



Noose Drill Progression
Offensive Coordinator
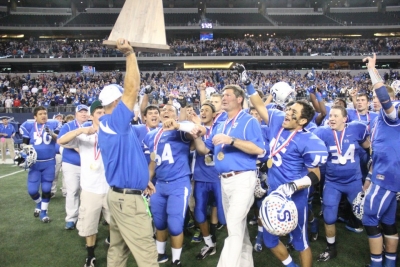
Stamford HS (TX) – 2012 1A Div 1 State Champions
Editor’s Note: Currently the offensive coordinator/receivers coach at Stamford (TX) HS. Have also had other assistant coaching stops at McGregor, Holliday, Knox City and City View (Wichita Falls) all in TX. Have worked under AD/HC Wayne Hutchinson for 11 of the past 12 years at Stamford and Knox City, being promoted to OC in 2009. In those 11 seasons have been 97-32, including 37-6 in the past 3, with a quarterfinal appearance in 2003, a trip to the state finals in 2011 and the 2012 1A Division 1 State Championship. Also coach OLBs and DEs on defense, 8th grade basketball and assistant coach of the Bulldog baseball team that has made 3 consecutive state tournament appearances. Father of 4 Boys and husband to wife Mindy.
Introduction
 Several years ago, we decided to scrap our flex bone offense and made the wholesale switch to a shotgun spread offense. In doing so, we knew we would need to incorporate many ideals that would help us become more consistent and successful at throwing and catching the football, but one drill that we run everyday is the Noose drill. I first encountered this drill in Lubbock at Texas Tech under the direction of Mike Leach. Most of you guys by now, probably know the story of Coach Leach and his tutelage under Hal Mumme. Then, when we went into spread offenses, we became clients of Tony Franklin and his “System”, another branch of the Air Raid offense family tree and came across the drill again and developed a better understanding and application of this drill.
The reason I like this drill so much and we use it everyday is for a couple of reasons. I have never seen a drill that encompasses so many of the little things that receivers and quarterbacks need to be conscious of in one drill that can be done in 5 minutes. Secondly, we are a small school (1A in Texas, our high school enrollment is 185) and we have guys that play both sides of the football and our entire coaching staff must coach both offense and defense. Coincidentally, we typically only have an hour for our offensive half of practice. Since we’re lacking some of the individual time that bigger schools may have, noose is great because we can coach so many details for our positions without having to spend a great amount of time on it during individual offense in practice.
Again, one of the best things about Noose is that it covers a myriad of things that we will harp on that we believe are critical to being a good receiver. In listening to many “Air Raid” spread offensive minds (Mumme, Leach, Franklin, Dana Holgerson, Sonny Dykes, Art Briles, etc.) speak, one common thing that most will mention is that the best way to get embarrassed in the spread offense is to not able to defeat press man coverage and not be able to get off the line of scrimmage and get into your routes. You may only see it once or twice a season, but when you do, you better be prepared for it. So for this reason, we work everyday on man press releases and the first few steps of the drill reflect this. It’s a worst-case scenario mentality…if you can get off man press, everything else should be easier.
We run noose drill everyday in pre-practice as a warm up. Another thing that we don’t waste time on anymore is an old-school, static, block-type stretch, where it takes 5 minutes everyday just to get the freshmen in a straight line in the back. Instead, we warm up with Noose.
Drill Set-Up
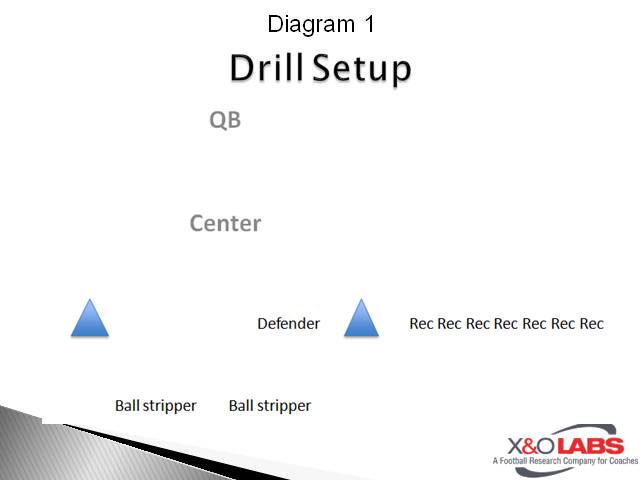
The drill is set up with two cones five yards apart (we use the boundary and yard lines). Some people will use stand up dummies or trashcans instead of cones or you could even use two guys that are in line. The cones are used to represent a defender, particularly a linebacker for the purposes of this drill. The receivers will line up behind one cone, facing the other cone. The next man in line will step around and be a defender. The QBs will be perpendicular to the cones, about 8 or 10 yards deep. Sometimes we will use our centers and if not, the receivers will come give the snap before that return to the back of the line. We typically have 5 or 6 different QBs, each with his own set of cones and will even out the receivers accordingly, trying to maximize our reps. It is a half speed drill, so all of these techniques should be very clean and noticeable. We want to try and exaggerate them during the drill.
Wide Receiver Mechanics
- STANCE – The first thing we coach our guys on is their stance. So for stance, we want our guys to have a wide base, a “fighter’s stance” with their feet about shoulder width apart. We don’t worry about one foot or the other being forward, because we don’t count steps in our routes. The next thing is we want our shoulders lower than the defender’s shoulders and our hands up and ready. It’s a street fight mentality and we want our stance to reflect that, all the while being comfortable and being able to run off the football. We also want their eyes on the snap, since our receivers are taught not to listen for the cadence, but to watch the snap. We will coach this in all phases of practice beginning here, the idea being to eliminate the temptation for us to jump offsides anticipating the snap.
- FOOT FIRE – Our next step is a foot fire technique. Here we are rapidly firing our feet and hands. We want to gain some ground and threaten the DB’s cushion and get into him, all without giving him a clue as to what our first move is going to be. We want to be violent with our hands and not let him engage.
- STICK OPPOSITE – Here we want to begin our single “stick” release by sticking our toe in the ground in the opposite direction that we’re going. We want them to do a good job of selling that they are going in the direction of the stick, so we want a good head and shoulder fake. We encourage them to “put some flavor in it” just like they’re being covered by their brother in the back yard. We have given our guys the freedom to work both left and right during this drill and trust that they will do so. A lot of young guys will only want to work their outside release or even worse they’ll only go right, because that’s the way we start them out in junior high!
- CLEAN THEIR HANDS – Here we need to be violent with our hands. After we’ve set the DB up that we are going the other direction, we want to “break his wrists” or “break his elbow” are good visuals that we will use here. We want to get the defenders hands off of us as we’re going into our dip.
-
Read More

How Pistol Coaches Teach Backside Slip Blocks
By Mike Kuchar
Senior Research Manager
X&O Labs
Editor’s Note: The following article is a small portion of the complete Pistol Special report that is available to our Insiders Members by clicking here.
Slip/Cruiser Concept
The slip or cruiser concept is the opposite of arc. In this situation, the read is going away from a Tight End (or three man surface) and another player is responsible for blocking the force defender for a QB keep. This player can be a player from a backfield alignment (Diagram 14) or one from the other side of the formation who will get to a position post or pre-snap to handle that responsibility. Nevada, under Ault, typically used borrowed a player from the backside of the formation to handle this responsibility (usually an H or Wing) which provided instant misdirection to the defense (Diagram 15) that looked a lot like the slice concept that was detailed in Case One. According to Norcross, Nevada varies whether or not it wanted its QB to carry the ball. “If we want to run lead option and leave the pitch man free we would tell him (slip player) to leave the force player. He’d leave the first man past the defensive end. If we want to run load option, we tell him to block him. He would slip and we would block the pitch key and it turns into sweep. It’s just a different variation.”
Norcross stressed the job of “covering up” when blocking the force player. Remember, this could be a receiver handling a Safety, so it’s important not to try and set up as a kill shot. “We would tell him to aim for outside shoulder of the defensive end (opposite of slice which is the inside shoulder). “When we got to the second level it doesn’t have to be a kill shot. Our QB will make your right. We just wanted to fit him up and basketball screen him initially. Once he chooses a direction now we can shuffle our feet and run him that way. The QB can press and cut off of us. The one thing we didn’t want to do is turn out on him and have him squeeze us down into the hole.”
Attaching Quick Game to the Zone Read
By Saj Thakkar – @saj1726
Running Backs Coach
Fitchburg State University
 Introduction:
The Inside Zone read has become a staple offensive play across the country from the pop warner levels all the way to the NFL with quarterbacks such as Robert Griffin III, Colin Kaepernick, Russell Wilson, etc.
One problem with the zone read concept is that it exposes your quarterback to more hits and over a course of a full season and those hits add up. A problem we had to solve was keeping our smaller, true freshmen quarterback healthy while also being productive on offense. After researching offense from UCLA and Villanova, we knew our answer would be the run/pass read game. This concept is being used throughout the country and we do not want to take credit for being innovators, however, after using it we now know why this concept is becoming more and more common.
Our run pass combo game lead to us having the most productive offense our university has had in over ten years while leading to our quarterback winning the ECAC Division-III Rookie of the Year with 25 touchdown passes. We also had an all conference running back and had a receiver break the school single season touchdown record.
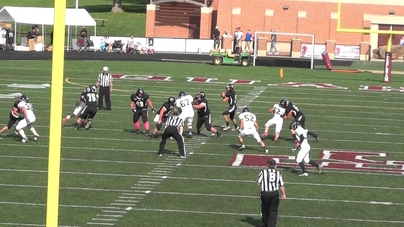
8 Variations of Pistol PA 4 Vert Concept
By Mike Kuchar
Senior Research Manager
X&O Labs
Editor’s Note: Perhaps we found the most success in play-action man protection concepts off the Veer and Midline option run-action. James Vint at Seminole High School (TX) wrote an entire piece below about his play-action pass concept off his Midline scheme from the Pistol formation. Below is his submission that is part of our complete Pistol Special Report. Click here to view the entire report.
“Our play action game is designed to attack areas the defense is vacating to play the run. With all of our play action concepts, we want the pass to look like the run. On midline, our offensive line will use an aggressive gap set protection. They will attack the near jersey number of the down defender. If you are covered, you will block the defender covering you. If you are uncovered, you will work inside to outside. We keep our protection very, very simple.
Our tackles will typically be blocking the 5 techniques. Versus an odd front, our guards will be uncovered, and they will work inside to out. We always want to block the most dangerous man first, and the inside linebacker is a more dangerous player than the outside linebacker. Versus an even front, our guard to the side of the 3 technique will have him man. Our guard to the shade will work be our dual read or inside to outside player. The center is going to base block the nose. If there is no nose, the center will work inside to outside.
I call it a gap-punch protection because we are going to step and protect our inside gap first. It’s based on B.O.B. concepts. The only difference between our gap protection and our Big on Big protection is the first step. In our gap protection, our first step is to protect inside because we’re not worried about and edge guy- our back and QB handle that. In B.O.B. our footwork is going to be predicated on the alignment of the defender. If the defender is head up to outside shoulder, we will power step inside and kick. If the defender is on our tip, now we are kicking. If the defender is a man removed, we are kick, kick and we read from there. This protection is a gap-punch, Big on Big combination.
The backfield action must look exactly like midline to the defense. Our pistol back will run down the brown spot on the center’s backside and sell the dive fake. He is responsible for “swallowing” the mesh point. He then is responsible for any A gap run through. We would essentially like for him to get tackled. The quarterback will push off the midpoint and flash the football. We teach the quarterback to bend his knees on the fake, and shuffle one step. As the back gets to the mesh point, the QB will pull the ball back in and bend his knees as he shuffles one step. The ball is not ever going to be in the belly of the dive back. We put a premium on ball security. We let the action sell the fake. After his shuffle step, the quarterback will then take a 3-step drop. He should end up at 6.5 to 7 yards on his drop.
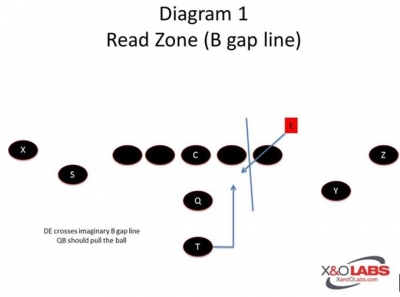
Pistol: QB Footwork and Mesh Game
By Mike Kuchar
Senior Research Manager
X&O Labs
@MikekKuchar
In this week’s research report on the Insiders’ membership website, we’re going to take an in-depth look at the QB’s footwork and the mesh game in the Pistol formation. Then, after we read this report, we’re going to move onto The Pistol Formation Study, which includes our research on all aspects of this formation. Plus, it includes 35 game films to illustrate our research findings. Let’s get started…
We all know the schemes look pretty, but when it comes down to option football, there is nothing more important than the mesh game. Don’t just take our word for it; listen to some of the more high-profile coaches we talked to for this report. Whomever we talked to, there was one common thread among teaching the mesh: Teach one thing, be consistent and don’t over coach it. That sentiment was echoed throughout our reporting on the mesh game from the Pistol. Consider Portland State’s offensive coordinator Bruce Barnum’s quip about how he learned to teach the mesh in his option game.
When Barnum first installed the Pistol in 2010 at Portland State, there was much ado about the QB/RB mesh in the option game. “I took all of Nevada’s video on Kaepernick,” said Barnum. They used to talk about jab stepping, stepping to six o’clock, clearing the back, etc. I turn on the film of Kaepernick and he catches the snap and hops in the air, stops and runs the read zone. I remember thinking this is crazy.”
Of course, Barnum was providing a little tongue and cheek humor, or perhaps just validating the super athlete that Kaepernick is. But, he was illustrating a fair point: be consistent.
“As long as the ball is getting deep and the read is long – that’s important,” according to Barnum. “The last thing you want is that QB sticking that ball straight out because there is no read for that DE and there is no smoke to the mirrors. It’s got to be consistent. I don’t care if you jab step and clear. I don’t care if you open to six o’clock and he screams by you. We had a freshman last year who would ride the back all the way to the Center. It doesn’t matter as long as it’s consistent.”
So, as a research company, we did our own validation on this topic and we went right to the source, Washington State running backs coach Jim Mastro, who was the running backs coach under Ault while at Nevada and quite frankly who Cameron Norcross calls the “best Pistol running back coach in the country.”
Since moving on from Nevada, Mastro has helped install the Pistol at UCLA under Coach Neuheisel and now is tinkering with it at WSU under Mike Leach. Mastro spoke about making sure things are uniformed in the mesh game, particularly in the zone read. “It’s not like the traditional run game which may be different because different QBs have different arm lengths,” said Mastro. “In the read zone game, the running back and QB must be attached at the hip or you will have balls on the ground all day long.”
Before we continue, I need to give you a quick ‘head’s up’… after you read this report on QB footwork and the mesh game, we’ll then go to The Pistol Formation Study, which includes all of our research and 35 game videos on the Pistol formation. In this study, we’ll take a look at all of the little-known coaching secrets and strategies that never came out of Nevada during head coach Chris Ault’s tenure. Our researchers were granted exclusive access to five of Coach Ault’s assistant coaches at Nevada. These coaches include Chris Klenakis, former OC; Jim Mastro, former Running Backs Coach; Cameron Norcross, former OL Coach; Kevin Maurice, a former GA; and, Dave Brown, another former GA on staff. In The Pistol Formation Study, these coaches break their silence on Nevada’s Pistol offense.
Next, let’s take a look at Coach Mastro’s 3-step drop and cock.
3-Step Drop and Cock:
In order to do this, Mastro teaches a three-step drop and cock fundamental which is extremely different than a typical ride and decide movement by the QB. “He will drop out and be a cocked angle at the defensive end (read key),” said Mastro. “We don’t want to be parallel to the sidelines. We want him at a cocked angle. He will drop and cock out. The back foot goes a yard and a half. The front foot goes a yard, which puts him at a cocked angle. That ball is an extension of his arm. The arms will be bent and the ball will be right in the face of that defensive end. The big thing is to have bent arms. The QB can’t have a stiff arm or the ball straight out.”
Mastro calls the QB technique a ‘Snatch Technique.’ “It’s not a ride and decide,” he told us. “The QB does not want to push the ball back to the running back. That ball is just held out there at that angle. By the time the running back gets to the QB (using the snatch technique), he knows if the QB is either pulling it or giving it. That’s why we had hardly had any fumbles. When it’s a ride and decide, he’s deciding pull it, keep it and there is hesitation. When it’s the snatch technique, by the time the running back gets there the QB knows either I’m pulling the ball or giving the ball. If he’s giving the ball he just loosens his thumbs, and if he’s keeping the ball he squeezes his thumbs. By the time the back got there, the QB already knew what he was doing. There is no grey area.
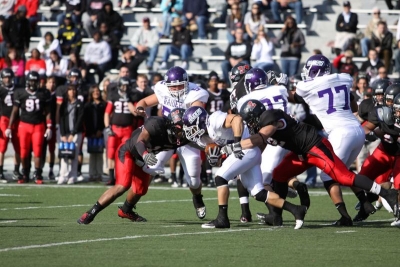
4 Read Drills for Safeties & Corners
By Mike Kuchar
Senior Research Manager
X&O Labs
Editor’s Note: This article is a portion of our Quarters Coverage Special Report. For more on this topic, click here to read the complete Special Report.
Since run/pass recognition is critical in teaching Safeties and Corners to effectively operate the Quarters system, we reached out to several coaches who use the scheme and asked them to detail the most productive drill they use to develop their Corners and Safeties.
Cover Four Run Read Drill
Jared Pospisil, defensive coordinator, Union High School (IA)
- For the most part, because our safeties are the run-first players in this call, much of the drill focuses on their reads and reactions.
- The corners, who assume the pass-first responsibility during a run call, basically go through their alignment, stance, and start when the ball is snapped, and finish each repetition with their late fill technique.
- Drill starts with 4 or 5 trash cans that represent 5 offensive linemen, 2 players representing end men on the line of scrimmage (EMLOS), 2 or 3 players representing offensive backs, 2 safeties, 2 corners, and 2 coaches (one acting as the QB and one giving blocking/running assignments) (Diagram 6)
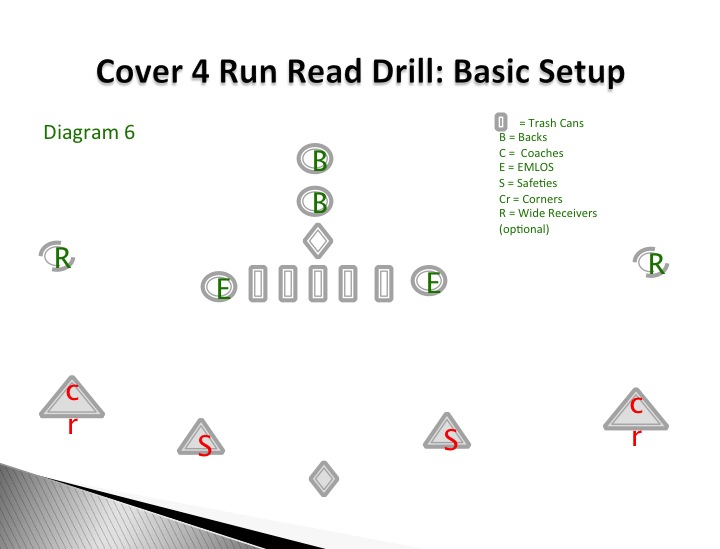
- In our Cover 4 scheme, when the safeties make a run call, they follow these basic rules: if the run is to you, fill aggressively; if the run is away from you, move forward to about linebacker depth and shuffle with square shoulders to the run direction, checking for cutback and reverse; if the play is a pass, jump any routes run by your key receiver over 7 yards deep but let short routes go.
- Safeties align at 8-10 yards deep, on the outside shade of the EMLOS; in most cases, this is a tight end or an offensive tackle, depending on the offensive set we see that week. For the stance, we ask our safeties to use a square stance, with knees and hips flexed, back slightly flat, hands loose in front of the body.
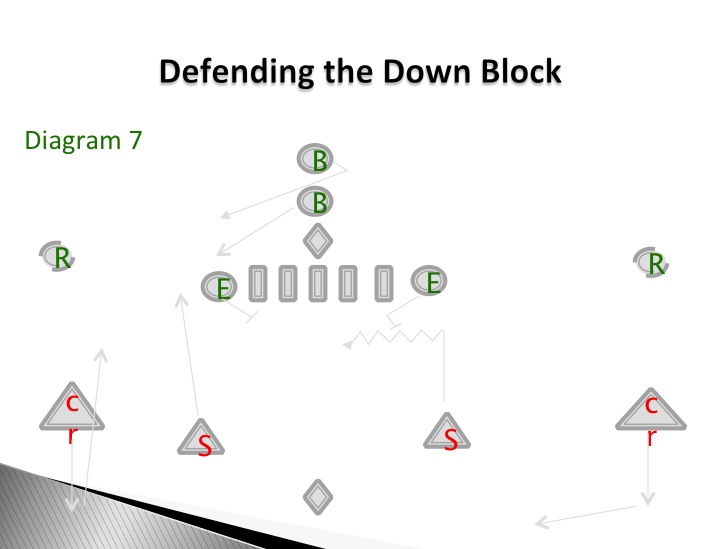
- Against a down block, the play side safety fills fast as the contain player (Diagram 7).
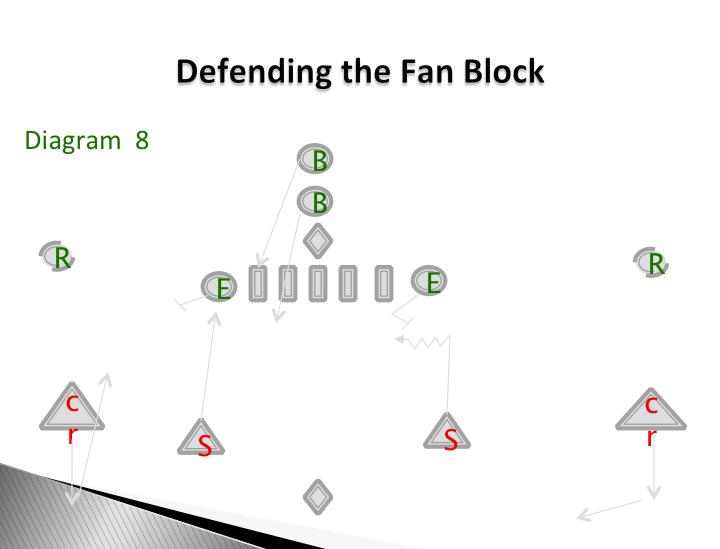
- Against a fan block (the EMOLS blocks out), we tell our safety to fill on the inside hip of the defensive end / outside linebacker being blocked out. In this case, contain is taken by the defender being blocked out, so the safety can help against the inside run (Diagram 8).
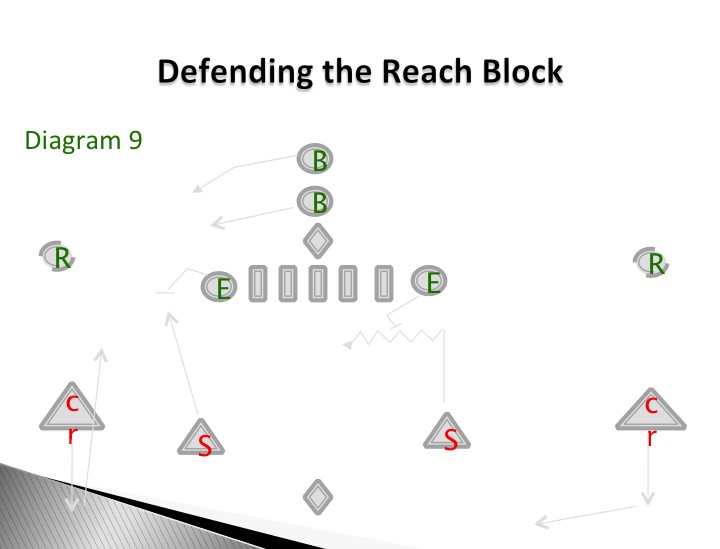
- Against a reach block, our safeties must attack the edge as the contain player (Diagram 9).
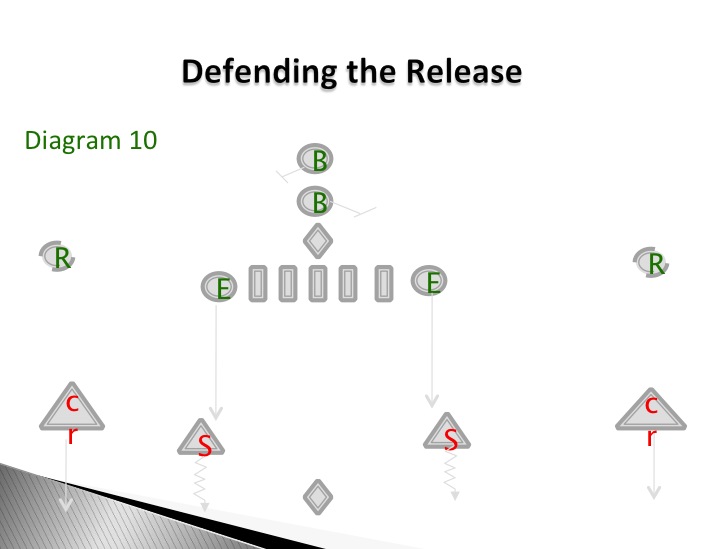
- Against a release by the EMLOS, the safety must honor the pass and begin to back pedal. If the receiver runs anything over 7 yards, the safety must lock on and run with the receiver, wherever he goes; if the receiver runs a route under 7 yards, we tell the safety to let the route go and look for work (Generally, ‘work’ is determined by the unique route combinations each of our offensive opponents run each week) (Diagram 10).
- When we play teams that crack heavily, however, we incorporate the crack-and-replace concept into the run read drill (Diagram 11)
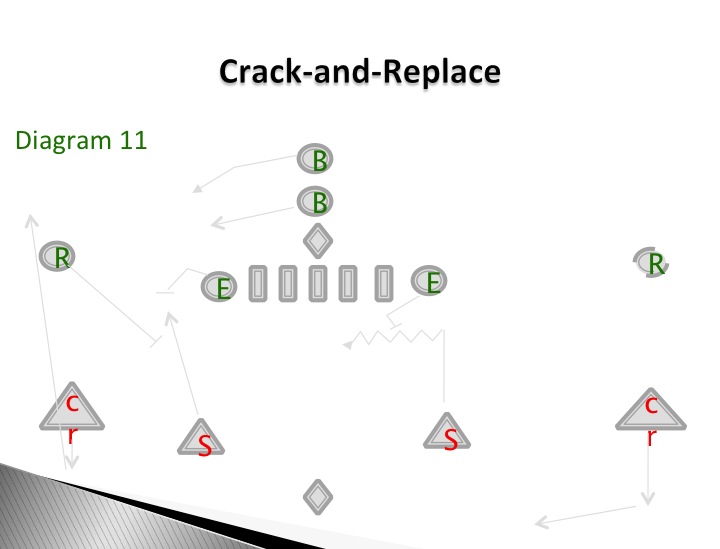
- One coaching point we emphasize for key reads involves reading the EMLOS’s shoulders. If our safeties see that the blocker’s shoulders have turned perpendicular to the LOS, either toward the ball or away from the ball, hiding their jersey numbers, the play is most likely a run, so fill. If our safeties see that the EMLOS’s shoulders—especially in the case of a TE—stay square to them and move up field, there is a good possibility that the play is a pass; honor it as such.
Cover Four Key Drill
Rick Wimmer, defensive coordinator, Fishers High School (IN)
Installing a Pro Style Spread Punt
By Christopher Smithley – @WJFootball
Secondary / Special Teams Coordinator
Washington and Jefferson College
 At W&J, we spend a lot of time on our punt team. We feel that this is the most important special team unit. The punt team can change the game positively AND negatively quickly with big implications. You can change the field position and put your opponent in a long field situation. However, with the slightest mistake, a punt block for a touchdown changes not only the score, but the momentum in a game more than any other play in football. The punt team must be able to play under a large amount of pressure every time they run onto the field. We want to be perfect every time that ball gets snapped.
The Pro-Style Spread Punt is a punt scheme that has lost a lot of its popularity in recent years in the college game. A lot of schools are now going to the shield punt mostly because it fits their personnel and helps to put their guys in better coverage lanes. This punt scheme is a scheme that uses depths and angles to take away a possible block that also allows you to maximize the number of athletes you have on the field for a consistently solid coverage. We use the Pro-Style Spread Punt scheme because personally, I am a true believer that it is not only the best protection and coverage scheme but also because you can be very multiple in your looks and your options to build fakes. It allows you to keep your rules simple and precise regardless of the wrinkles that you feel necessary to be successful. This allows the players to PLAY rather than having to think about their responsibilities because it becomes a natural act. I also feel that this punt scheme allows you to get more athletes on the field to play and tackle in space from a coverage standpoint.
Personnel
The first thing that we have to look at is our personnel. Which guys will play certain positions on this team and why? These players not only have to protect the punt but also have to cover and tackle with intent to force turnovers. This is our Pro-Style Spread Punt formation.
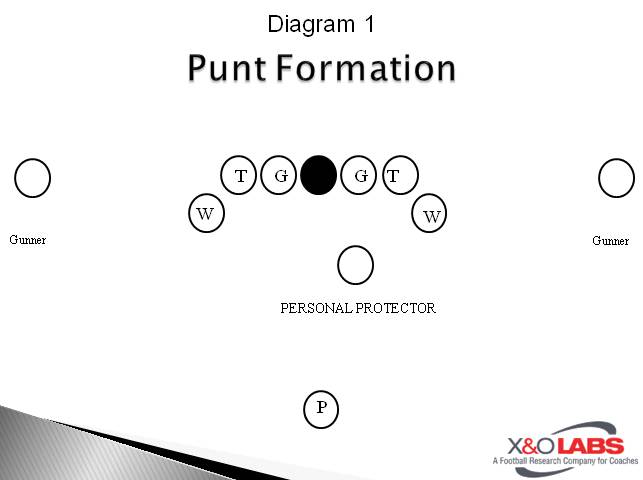
The gunners are players that need to be extremely athletic and have a good amount of speed to be able to win a one on one battle with the corner that is attempting to hold the gunner up. I want this player to be a disrupter. I want teams to look at our gunners and say, “We got to put a 2nd returner or corner over this guy so that we can get a step in the ground after we catch the punt”. These guys have to be able to react in a split second and change direction.
The wings also need to be a quick guy preferably with some length because their protection zone tends to be a little larger than all the other positions. The speed becomes a major advantage due to the fact that the wing gets into his coverage lane about 1-2 yards deeper than the rest of the punt team. These guys tend to be safeties or bigger receivers with ability to tackle.
The tackles are bigger safeties, linebackers, or tight ends with good athleticism and the ability to take on a rush through the C gap which is the 2nd largest protection zone in the scheme.
The guards are more stout players but still have a great deal of athleticism. A lot of punt block schemes want to attack the A and B gap against our punt scheme. These guys have to be able to accomplish their assignment with opponents attempting to bull rush them out of their gap as well as pulling them out of their gap. They have to be able to kick slide and stay strong and balanced in their stance throughout the snap.
The long snapper is a guy that is going to get that football to the punter in the smallest amount of time accurately and consistently. The long snapper will also have the responsibility of protecting an A gap based off of the personal protector’s call.
We want the personal protector to be the best athlete on the field but more importantly the smartest player on the field. He is our quarterback on this team. He sets the protection and makes adjustments if needed. Also the majority of the fake game revolves around this individual. We have used a number of different position players at this particular position in the past. We have used free safeties, linebackers, and running backs. You need to decipher what fits best for your individual punt team. Determining the personnel is extremely important for this team!
Alignment/ Stance
In our punt scheme our alignment is 6 inches between long snapper and guard, 6 inches between guard and tackle, and the wing is 1 yard outside and 1 yard deeper than the tackle. The guard, tackle and wing will align with their inside leg up with their feet staggered anywhere from 6 inches to a foot based off of comfort ability. They need to be in a good balanced stance with their butt down, flat back, and shoulders back with their eyes up. We always want to have our weight on the ball of our foot that is up, which is our inside leg. Our personal protector stands in a good linebacker stance heels at 5 yards from the ball in the A-gap. That A-gap will be decided off of whether our punter punts with his right foot or his left. Let me elaborate, if the punter punts with his right leg our personal protector will be in the right A-gap with his heels at 5 yards deep and in a solid linebacker stance. Our punter will be heels at 15 loose and relaxed and ready. Gunners will align at the top of the numbers in a receiver stance with the ball in the middle. If the ball is on the hash the gunner in the boundary will align at the bottom of the numbers and the gunner to the field will align on the far hash from where the ball is spotted.
Defending the Bunch Formation
By Mike Kuchar
Senior Research
Manager X&O Labs
Researchers’ Note: You can access the raw data – in the form of graphs – from our research in defending bunch run and pass games: Click here for the Statistical Analysis Report.
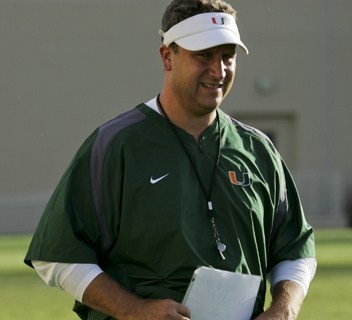
“If they run a bunch toss scheme, I want cloud and corner force.” Mark D’Onofrio, Defensive Coordiator, University of Miami (FL)
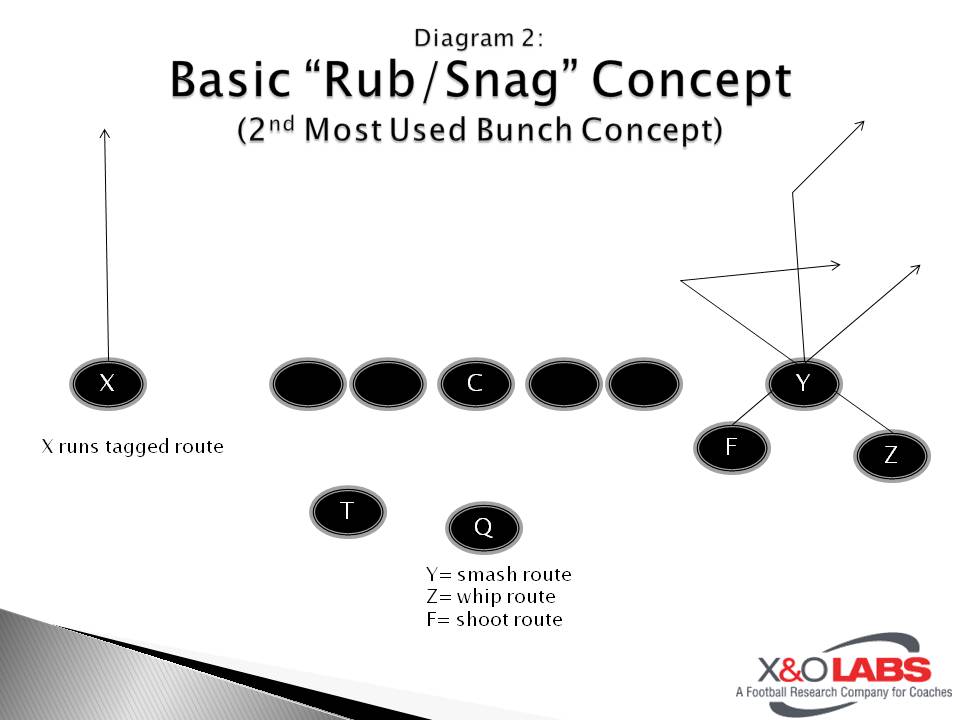
In our previous report, X&O Labs profiled the “Rub” concept, which is what we found to be the most used concept in Bunch formations. We presented numerous ways in which the bunch formation can place stress on a defense.
In order to conduct our defensive study we reached out to four major college coaches; two on the FBS level, to find out how they best handle bunch. Their responses may surprise you. All three consider defending bunch to be an entirely different package, mainly because offenses will use a separate set of plays in their bunch package to attack different coverages. When we conducted our initial survey, we found that 63 percent of coaches check their called coverage to a bunch check, and 61 percent of those coaches have only one base check to bunch. But according to the coaches we spoke with, there is no one best way to handle bunch. It’s all predicated on what offenses are doing when they run bunch. While we may not know of a “perfect” coverage to defend bunch, we do know that you must first analyze what offenses want to do. Productive offenses will attack both the strong side (three receiver side) and the weak side (X receiver side) when lining up in bunch. We found that offensive play calling is limited to the certain run/pass concepts when running the bunch formation:
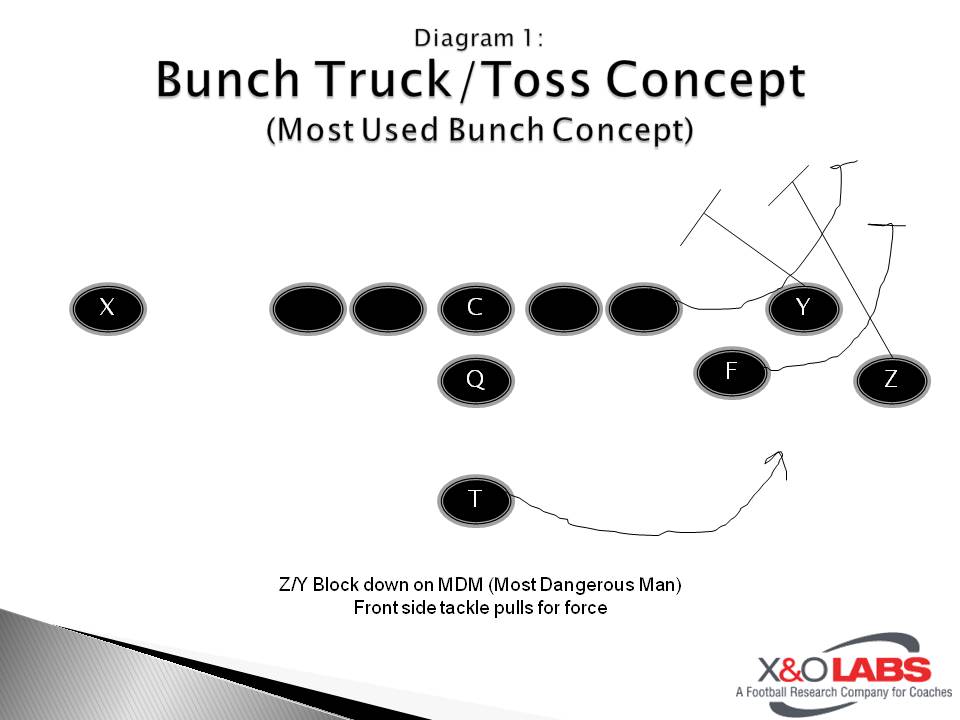
- To Bunch Side: Quick hitting fast flow run scheme like toss (truck scheme) or outside zone (diagram 1).
- To Bunch Side: Layered pass game concept with leveled routes such as the Rub/Snag concept (diagram 2).
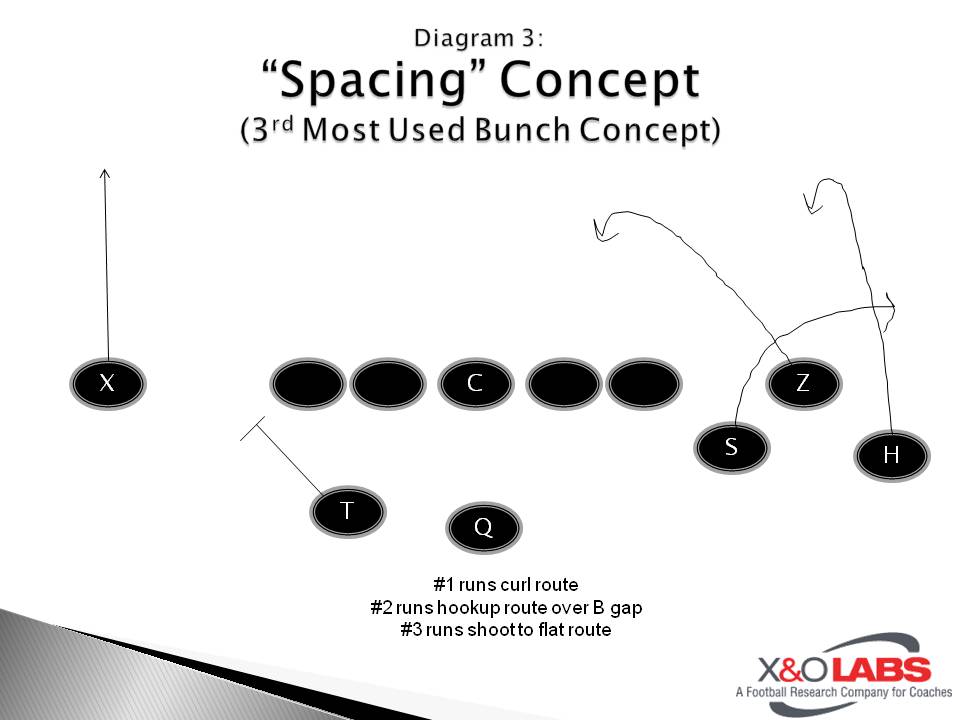
- To Bunch Side: Intermediate pass game concept that attacks underneath defenders such as the Spacing concept (diagram 3).
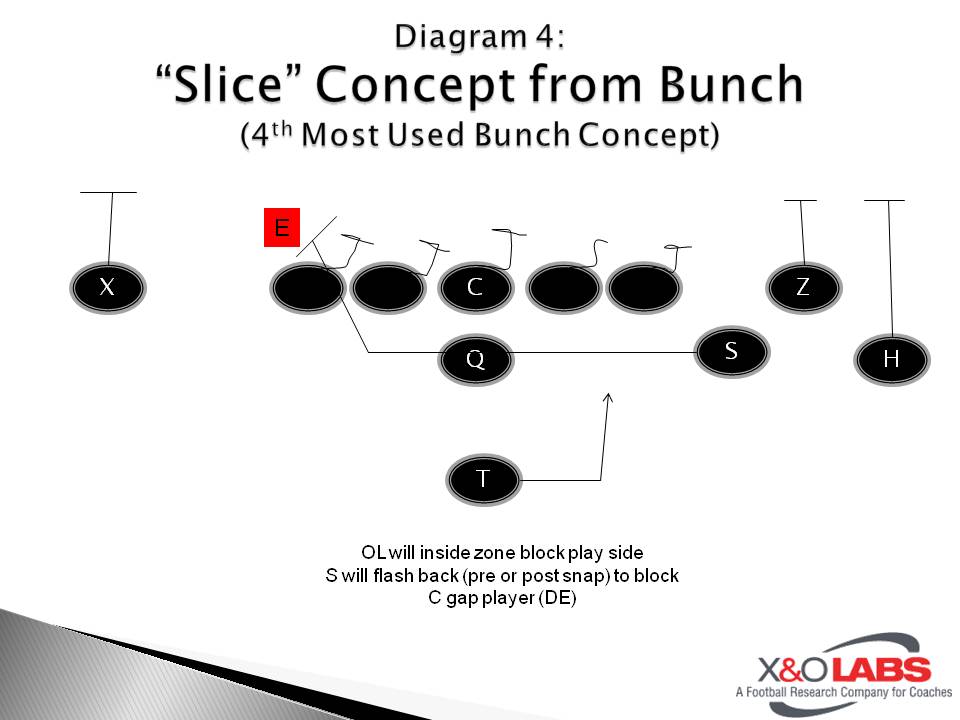
- Away From Bunch: Split Flow run game like the Slice concept back-side off inside zone (diagram 4) with a boot component off of it.
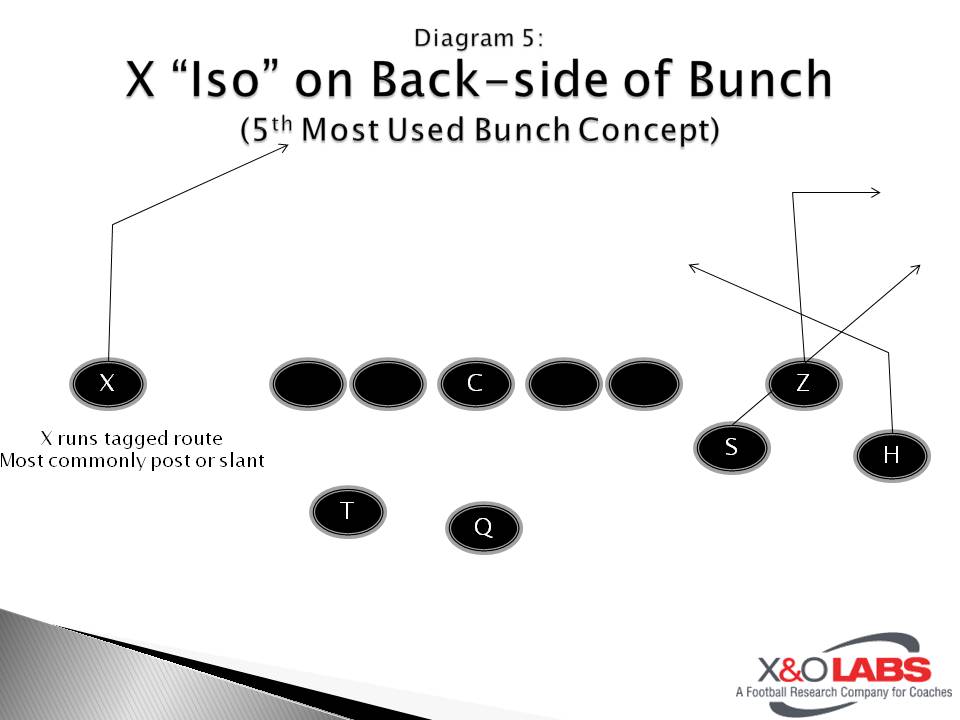
- Away From Bunch: Isolation on the X receiver with tagged routes (diagram 5).
We’ve found that most offenses will set you up in bunch and really run only one or two of those concepts. Remember that based on our Bunch offensive survey last month, the majority of coaches, 38.3 percent use the “Rub” concept to the play side of bunch as their main pass scheme while 51 percent of coaches use the toss or truck play as their main pass scheme. It’s what they favor that you, as a defensive coordinator, must defend. Of those coaches that use bunch, 42.2 percent use it in less than 25 percent of downs. As a defensive coordinator, this all has to factor in when defending it.
“If it’s a big part of their offense, then I’ll call defenses against it that I know will stick,” says Mark D’Onofrio, the defensive coordinator at the University of Miami. “If it’s 25 percent of someone’s offense out of 21 personnel, I may have five calls that I’ll play out of it. I just won’t have one bunch check. I want kids to play fast. If you’re getting a ton of it, you have to have certain calls. But if it shows up five times in a four game break down, I’ll only have one check based on what they are doing. If you’re getting a lot of open side run game than I want to send a pressure to the open side or play an eight man front. If they run a bunch toss scheme, I want cloud and corner force. If it’s an open side run team I want to have an eight man front or blitz the open side. If they want to run those intermediate pass concepts like the Spacing and Rub than you want some sort of man principle. It all depends on what they major in.”
In this report, we are going to focus on the three main coverages that defenses will use to defend bunch sets. We will detail the strengths and weaknesses of each coverage and describe how coaches use these coverages to defend the run and pass concepts.
Option Concepts from 4 Unbalanced Formations
By Mike Kuchar – @MikeKKuchar
Senior Research Manager
X&O Labs
 Introduction
Before we start addressing these specific unbalanced formations it’s important to note that most coaches will only use these formations if necessary. The entire concept behind utilizing unbalanced formations is to dictate defensive structure.
The premise is simple:
- If they adjust with a person for a person, run the option game the other way (away from the formation).
- If they don’t adjust body for body, run the option game to the formation strength.
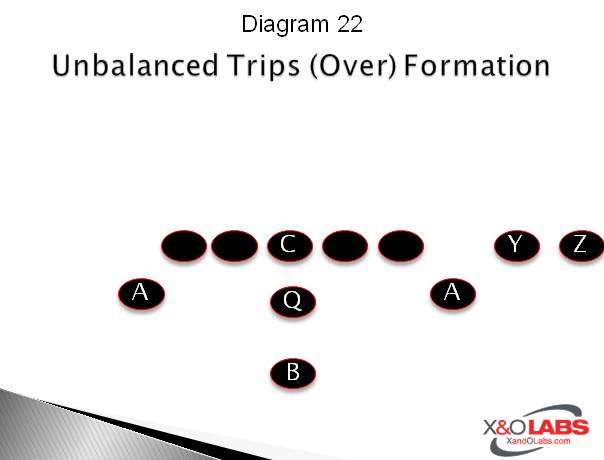
FORMATION: UNBALANCED TRIPS or “OVER” (Diagram 22)
Philosophy:
This formation has been a common formation among option disciples. When conducting our research, we’ve found the following maxim uttered on numerous occasions, “an unbalanced formation forces a defense to become unbalanced” and that’s how it can be manipulated. While we found this formation particularly effective against Even fronts, it can be just as productive against Odd fronts as well.
Benefits:
- Forces defenses to tip its hand by rotating their coverage- either to or away from the trips side.
- Provides for a possibility of any of the three split receivers to be the pitch back.
- Adds “girth” to the perimeter, which helps in perimeter blocking schemes.
- The use of motion can get second level linebackers to bump, thus declaring its intention.
Commentary:
“The University of Hawaii gave us an eight man front, so we went receivers over unbalanced into the boundary or the field and they match with a Corner. So now there is one less guy to deal with out to the play side. We went back to the weak side of the formation with our option game. Against 4-3 defensive teams we will go wide receiver over to the field and they will condense and play Cover Two to the field. They will walk the Sam out and split the difference. They didn’t add a person out there so now we have four blockers for three players. We get on the back side Safety in a heartbeat.”- Mike Judge, Naval Academy
“The slot could become the dive back in what we call a “Flip” alignment. The TB becomes the pitch player. If we are in trips formations against an eight-man front, it gets linebackers to bump with that motion. It’s the same read with the same blocking. If they don’t bump, we run triple the other way.”- Tony DeMeo, former head coach, University of Charleston.
“’Over’ calls for the WR on one side to align on the same side as the other WR. He is on the LOS and covered by the other WR making him ineligible but it does give us another perimeter blocker that some teams will not account for.”- Joe Bosley, Hereford HS (MD).
Shut Down Screens, Swings, & Sprints with These Blitz Checks
By Mike Kuchar – @MikeKKuchar
Senior Research Manager
X&O Labs
Four To A Side Pressure Checks To Defend Screens, Swings And Sprint Outs
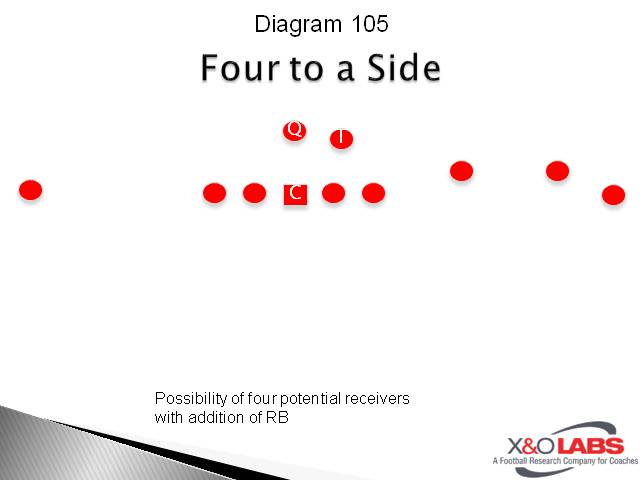
We wanted to combine sprint out protection beaters with a four to a side protection concept, which is usually utilized with the back set to the trips side. There is a possibility of getting four out, which would usually dictate a pressure adjustment by the defense. We’ve found that with the back set to the trips side there is an increasing possibility of some form of speed option or sprint out. These protections will usually have a full gate with a TE and back off the edge or two backs off the edge changing the launch point of an offense. The most common adjustment against sprint out concepts is to check the pressure to the receiver strength and get immediate edge pressure, forcing the quarterback to pull up prematurely and abort the run component of the run/pass option entailed in sprint out schemes. One of the checks that Kuchinski uses is what he calls “Steve” which is a zone blitz designed to attack Sprint out. “We can run Steve out of multiple fronts,” said Kuchinski. “We like running it out of the under frontso the gate including a potential TE stays away from our LB’s. Our DE to the pressure side has an Arrow tech on the Guard, our Nose has a Bull and Pull away from the pressure. Our DE away from the pressure has a Stab tech. Our OLB to the pressure has an Ice read on the TE/OT if he goes done on the Arrow DE the OLB will come tight down the LOS and inside of any backs (Diagram 106). If the TE/OT works out toward the OLB he will cross face into the inside gap (Diagram 107).The ILB toward the pressure side has a contain rush toward the up field shoulder of the QB and outside of any back to contain the rollout.”
D Line Study: Case 1 – Shade Nose
This report focuses on developing the shaded nose guard. Every four-down front plays with a shade nose, and he’s usually the anchor of the defensive line. One aspect of our research that we’ve found interesting is 39.5 percent of four-down front coaches play exclusively with a shade nose and a three-technique. They don’t cross train them. This tells us that these positions are specific, and they have to master different techniques. We also found that they are built in different ways physically. While we often visualize a shade nose guard as a massive defensive lineman always eating up two blockers, the reality is this may not be necessary: our latest survey showed that 39% of defensive line coaches prefer their NG to be 5’10 or shorter and one-third of the coaches would rather play with a quicker, smaller type (under 210 lbs.).
The fact is, of the six primary run blocks a shade nose guard must defeat only two are combo blocks. In reality, great nose guards come in all shapes and sizes, but two qualities all coaches agree a great nose guard must possess are not debatable: Being Physical and Mental Toughness.
For the purpose of this report, the six primary blocks and schemes a shaded nose must defeat are below. They will all be clarified later in this report.
- Reach Block by the Center
- O-Scheme
- Double Team
- Power Scoop
- Loose Scoop
- Joker Scheme
Case 1: Stance, Alignment and Key
Our nose guard survey responses included coaches on the college, junior college, high school, junior high school and youth league levels. The majority of coaches teach an inside hand down, inside foot staggered stance with a foot to crotch alignment (41.8%). The most frequent visual key being taught is the “V” of the neck, which 56 percent of coaches emphasize. The most effective way to coach each of these three areas is still to be highly debated and sometimes depends upon the individual player. Three outstanding and successful defensive line coaches, one high school, one FCS level college coach, and one professional defensive line coach gives us three different ways to coach stance, alignment and visual key.
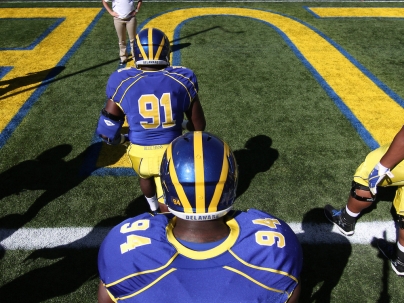
The University of Delaware defensive line coach Phil Petite teaches all of his front to align 15 inches off the ball with their inside hand down and inside foot back. “Because we play against so many offenses that use zone blocking schemes, our first step was up field. But we were always getting our shoulders turned and playing behind the block. Now aligning off the ball allows us to play downhill with force. The first step is still a 6-inch step and the second step depends on the blocking scheme.” Petite does give his kids a “jet” call in long yardage which tightens them up so they can get off the ball and get to the quarterback.
Even though only 6.5 percent of our coaches teach their players to use a tilted shade technique, it still is prevalent in some levels of football. Former New York Jets defensive line coach Kerry Locklin, who spent eight years at Fresno State, gives his nose guards the freedom of playing a true, shoulder-squared shade or a tilt-shade. “Playing a tilt is different and you have to work at it because his visual key is now the back-side guard,” says Locklin. “At Fresno State, we worked the nose guards vs. a center and two guards pre-practice for fifteen minutes a day. He has to rep it and develop a feel for each blocking scheme but still attack the center with each block. His tilt is about 45 degrees with his inside hand down and inside foot back. Horizontal alignment may be a little different for each guy, the best alignment for him.”
While only 14 percent of defensive line coaches surveyed teach a footwork visual key, Tom Beason, defensive coordinator at Wichita Northwest High School in Kansas, would coach it no other way. “We play exclusively outside shades and key the outside foot. We got this from the University of Kansas a few years ago, and I love it. The offensive lineman can give us one of only three things:
- If his outside foot is at me or outside me, I attack the block with outside leverage.
- If his outside foot stays still, I know now he is releasing inside, so I have to attack his outside half, close down hard and move with my gap.
- If his outside foot is back, I rush the passer.
“Giving them only three things makes it a lot easier to teach and the players understand it. Plus, keying the outside foot keeps them lower on the snap.”
Case 2: Defeating a Reach Block and O-Scheme
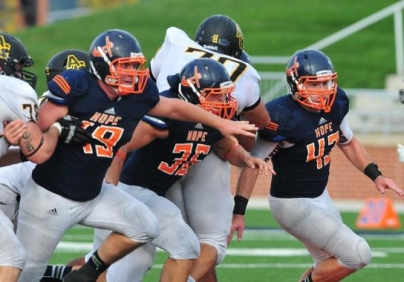
The reach block by the center and the O-pull are paired together because these are the two primary run blocks the shade will get from the center only. Block recognition between these two is critical and with repetition the shade will be able to react to either without hesitation. While only 16% of coaches teach the shade to attack and rip up field vs. a reach block, over 40% teach an “attack the center mentality” by controlling the front side A gap and crossing face vs. a cutback into the back-side A gap.
D Line Study: Case 2 – 3 Technique
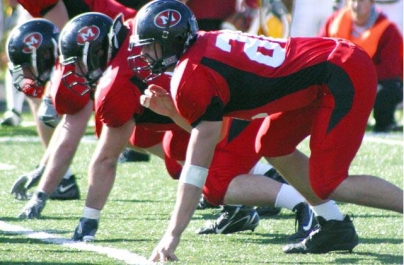
The 3-technique’s B gap alignment puts him in position to make more plays than any other defensive lineman. The absence of bootleg and reverse responsibilities allows him to play faster than a defensive end versus the run, and his outside alignment over the guard often puts him in one-on-one pass rush situations. One of the biggest challenges a 3-technique faces is the number of blocks and schemes he must learn to recognize and defeat. Ronnie Eaves, defensive coordinator at North Hall High School (Gainesville, GA) agrees. “Without a doubt, he has to be football smart,” said Eaves. “And a first year player cannot play the 3-teachnique. There are just too many things going on around him.”
Our intent with this report is to show you all the run-block possibilities a 3-technique will see during the course of the game, and more importantly how to defeat them.
If you’re wondering how vital a solid 3-technnique is to defending the run game, consider the following statistics we pulled from a recent survey: 64.7 percent of coaches surveyed put their strongest and most athletic defensive lineman at the 3-technique position.
In order to develop the pro-typical 3-technique, 74.8 percent feel the ideal size for the position is between 6 feet to 6’2 and weigh between 201-225 pounds. That kind of size is needed to defend the strong side blocking combinations in the run game such as double team blocks and drive blocks. These blocking scenarios are the ones we will discuss in the report.
For starters, a 3-technique’s B gap alignment puts him in position to make more plays than any other defensive lineman. When compiling the notes for this report, we assumed that a common discussion among coaches would be whether to align him in the B-gap and jet him up the field on the snap or to align him in a true outside shade with emphasis on keeping the offensive guard off the linebackers. Although, only 11% of coaches teach B gap penetration pre-snap, we found it does have merit when protecting against reach schemes, which was one of the more common concerns among those surveyed.
According to Omaha Nighthawks (UFL) coach Pete Kuharchek, the main factor in this decision is the ability of the individual player. “If I had a really athletic and talented 3-technique I would align his inside foot on the outside foot of the guard and just tell him to penetrate the B-gap,” said Kuharchek. “His athletic ability will keep him from getting reached by the guard or cut off by the offensive tackle, and he can be a disruptive force in the backfield and a playmaker. His wider alignment and gap charge give him a better chance to destroy the angles vs. a double team. The lesser the athlete, the heavier he has to play on the guard – a better alignment to protect linebackers.”
For the purpose of this report, we will address the following nine blocking schemes a 3-technique will encounter in the run game. Each will be explained in detail:
Primary Blocks and Schemes:
- Reach Block: Guard gets hat to outside shoulder (single block)
- Fan or Turnout: Guard attempting to widen 3-technique outside and down the L.O.S.
- Double-Team: Drive block by guard + down block by offensive tackle
- Power Scoop: Drive block by guard + cutoff block by offensive tackle
- Loose Scoop: 45 and up by guard + cutoff block by offensive tackle
- O-Scheme: Inside pull by guard + back block by center
- G-Scheme: Outside pull by guard + down block by offensive tackle
- T-Fold: Turnout by guard + inside pull by offensive tackle
- Veer Release: Tight inside release by guard + release by offensive tackle
According to our research, the chance of a player becoming overwhelmed by the sheer number of possibilities must be a factor in personnel decisions. A fundamental goal should be teaching him how to defeat all blocks and schemes while taking the thought process out of the equation. The only way to get this done is turning recognition into reflex through key drill repetition.
Eaves does this by continually drilling what he calls his “Read Progression Drills” so that a 3-technique doesn’t have to think, just react to what he sees. These drills should be done daily.
D Line Study: Case 3 – 5 Technique
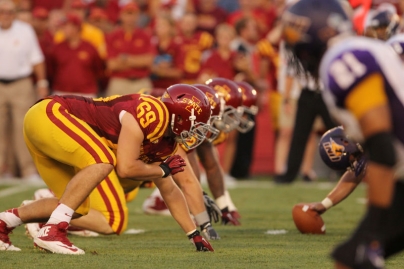
The myth that football coaches can put their best big athlete at the open side end and “just let him go” is far from the truth. Though the open end may have more space and freedom to make plays, zone read option offenses, as well as one and two back counter and power schemes designed to attack the open side, force him to play assignment and technique within the defensive scheme. Also, his alignment, assignment, and technique may change depending upon whether he is aligned outside an A gap nose guard (B gap bubble side) or a B gap defensive tackle (3-technique).
For the sake of clarity within this report, we will refer to the shade side defensive end as a 5-techniqueand a 3-technique side end as a Ghost 7. Illustrations of two defensive fronts, an open side 5-technique in a “4-4” (or “4-2-5”) and a ghost-7 technique in a “4-3 Under” front are included.
Initial reads from offensive tackle:
5-Technique (A gap D.T. side)
- Reach
- Fan (Turnout)
- Veer Release
- Scoop Away
- Inside Pull
Ghost 7 (3-Technique Side)
- Reach
- Fan (Turnout)
- Down (on 3-tech.)
- Scoop Away
- Inside Pull
Our survey responders placed a heavy interest in defending two open side runs: the Zone Read option and Counter O.T. While the Counter O.T. (also known as the 1980’s Redskins’ Counter Trey) has stood the test of time, defending the zone read has only recently become a priority in high school football. This report will place an emphasis on defending these two open side runs. Because a specific technique for a defensive end must fit within the total defensive scheme, we will include the other defender’s responsibilities within the diagrams used.
Case 1: (Part A) Open Side 5-Technique Stance and Alignment:
Our research found that the most frequently taught alignment (40% of coaches) is (1) foot to crotch or outside eye on the offensive tackle, 32% of coaches surveyed teach (2) an inside foot to outside foot (tip-5) alignment, and 25% prefer (3) a tilted stance, targeting the “V” of the offensive tackle’s neck.
“We align the open-side 5-technique a little wider and slightly tilted. He should never get reached because of alignment, and he is in position to shoot his hands and friction a veer release,” said Rex Norris, former college and NFL defensive line coach. A fourth option is widening the open end to at least one foot outside the offensive tackle. All four alignments have their advantages: a foot to crotch alignment better ensures keeping the offensive tackle off linebackers; a tip-5 alignment puts the defensive end in a better position to play a reach block and play a “chase” technique vs. flow away; a tilted stance gives the 5-technique a better angle to read the tackle/near back/far guard triangle and attack kick-out blocks; and finally, a wide 5-technique gives an athletic defender more freedom to be a play maker and mesh charge a quarterback vs. option. The question that must be answered, “How much of a collision do we need vs. an inside release by the offensive tackle?” is a major factor in this alignment decision.
(Part B) Open Side Ghost 7 Technique Stance and Alignment:
Because there is no B gap bubble to the 3-technique side, 38 % of defensive coaches teach an alignment of at least one foot outside the offensive tackle. However, a surprising statistic was revealed from our survey: We found that 34% of defensive coaches teach a tip 5-technique or tighter alignment to the open side, even with a 3-technique tackle aligned in his B gap.
A potential problem with a wide alignment, as explained by longtime Harnett Central High School (N.C.) defensive coordinator Bill Wyrick, is getting trapped. “The wider we align him, the better chance he has to run up the field and get kicked out.” Wyrick added, “Versus a down block by the offensive tackle, we teach him to read near back (for kick-out) to off-side guard. We will always play our open side end in a foot to crotch 5-technique, squeeze the tackle’s inside release and make sure we spill all kick-out blocks.”
Though a tight alignment may be a good starting point, an argument for playing a wider technique (one foot to one yard outside) may be supported by the following: first, a wider alignment gives him much better initial leverage for a contain rush vs. drop back pass, sprint-out or boot-leg. Secondly, the offensive tackle must block down on the 3-technique vs. any power or counter play run to the open end side, and a wider alignment puts him in a better position to read through the offensive tackle, near back, far guard triangle and still spill a kick-out block. It should also be noted that a tilted stance by a wider alignment (Ghost 7), which is taught by almost 25% of defensive coaches, will give the end a better angle to flatten, attack, and spill kick-out blocks.
D Line Study: Case 4 – 7 Technique
Ask any defensive coach and he’ll tell you that defending the C gap – the gap located between the play side tackle and tight end – is essential in stopping the run game. Conversely, the C gap is also where many offensive coordinators want to attack with their run game. Attacking the C gap is a sure-fire way for offensive coordinators to assess how strong your defense is up front. Its guts vs. glory. Can you handle the pressure that a tight end places on the defense by creating that extra C gap? Just for clarification purposes, this report focuses on a three-man surface, complete with a tight end. If you’re a pure spread guy, you may not have a legitimate tight end. If you’ve noticed, recent success from spread teams like Florida, Oregon and Boise State have all come because of the physicality that a tight end presents. So once he lines up next to the tackle, how can you protect it?
Our research found that almost 50% of defensive coaches play a variation of a 7-technique at least half the time within their defensive schemes. We’ve found that this number is significantly higher than it was over ten years ago. Many originators of the 4-3 front would employ a 9-technique defensive end who would play on the outside shoulder of the tight end. He would be responsible for the D gap, while a stacked outside linebacker would be responsible for the C gap. But some teams didn’t have the talent or the size to play the C gap with a second level player and started getting gashed by gap schemes like power and counter. It then became necessary to leverage that C gap with a down lineman on the line of scrimmage rather than a second level linebacker. It’s important that these defensive linemen convert recognition time into reaction time. This process requires a complete understanding of blocking schemes and a knowledge of how to physically defeat each block. It’s our intent in this report to provide information so defensive line coaches can either verify the stance, alignment and techniques they are currently teaching or discover a better way to coach a specific detail for a 7-technique. On a personal note, I learned a lot from working on this report and will make some adjustments to what I’m doing as Defensive Coordinator at Sequatchie County High School (TN).
For verbiage purposes, there are six blocks and schemes a 7-technique must learn to defeat. They are identified below and will be further explained in this report. It’s important to note the corresponding diagrams based on each blocking scheme. They will be referenced continuously during this report.
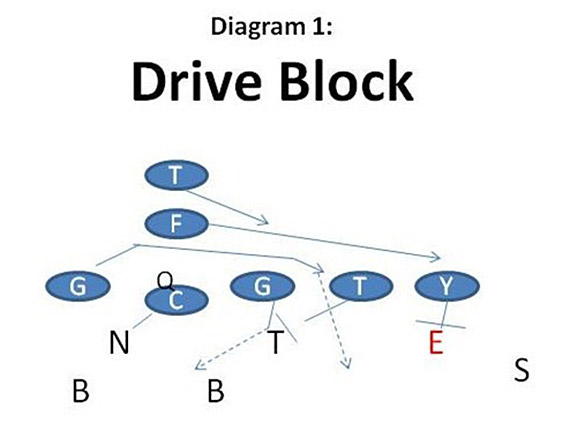
A drive or base block by the tight end (diagram 1).
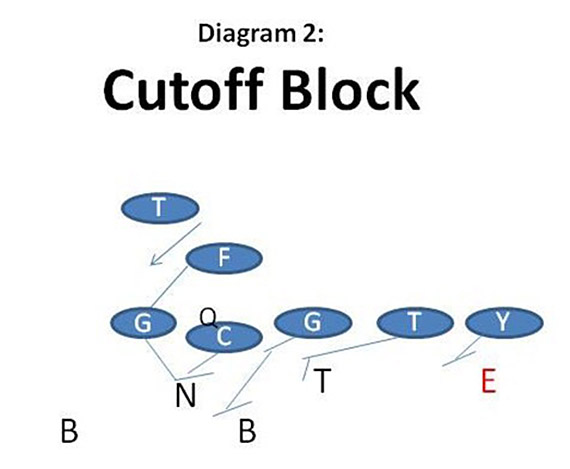
A cutoff block by the tight end, where he will try to gain leverage in the C gap (diagram 2).
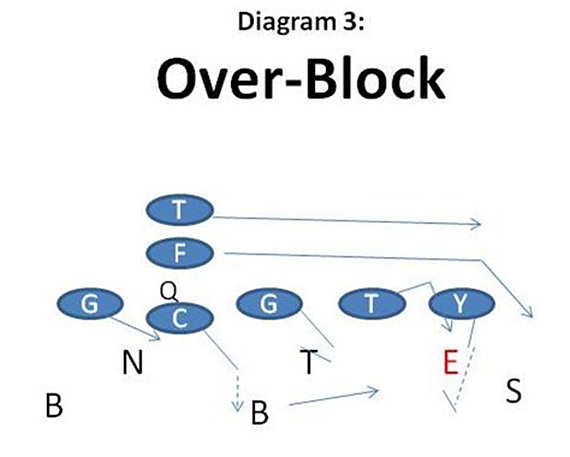
An over-block by the tight end and offensive tackle (diagram 3).
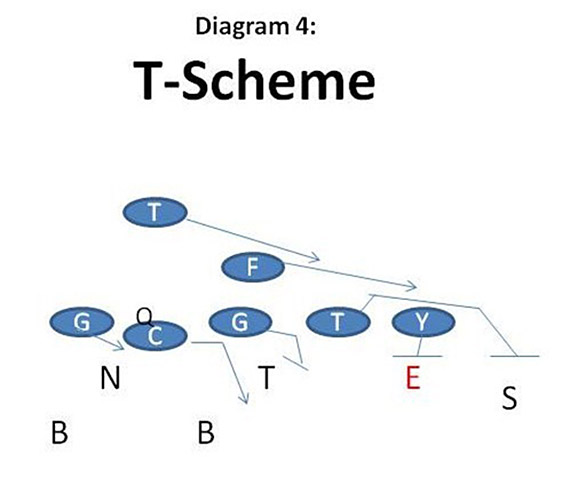
A “T-scheme” by the tight end and offensive tackle (diagram 4).
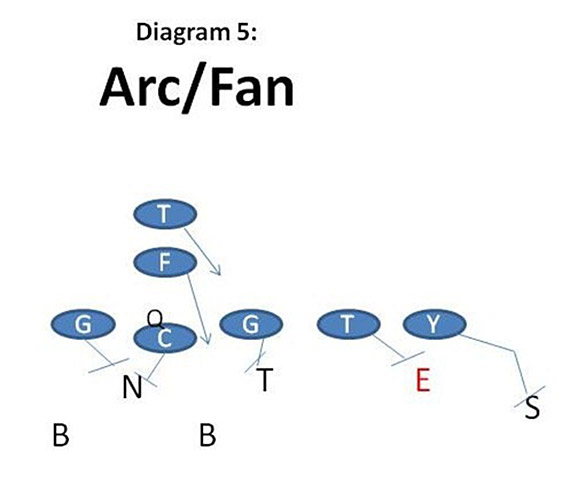
An arc release or fan by the tight end and offensive tackle (diagram 5).
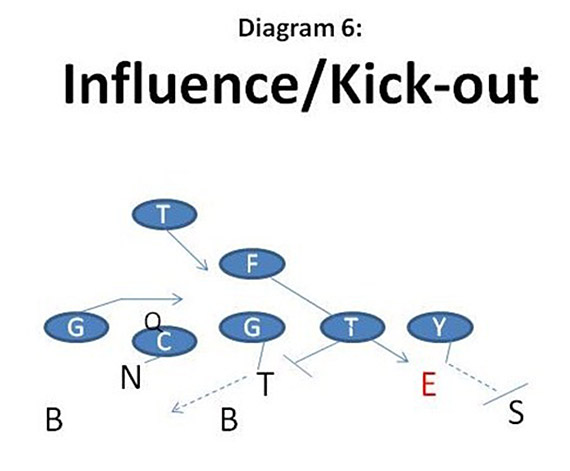
An influence/kick-out by the tight end and a back or pulling offensive lineman (diagram 6).
Case 1: Stance, Alignment and Visual Key