Simplifying a Count System & Rules in the IZ

By Adam Kirby

Offensive Line Coach

McMurry University (TX)

Twitter: @CoachKirby25

 

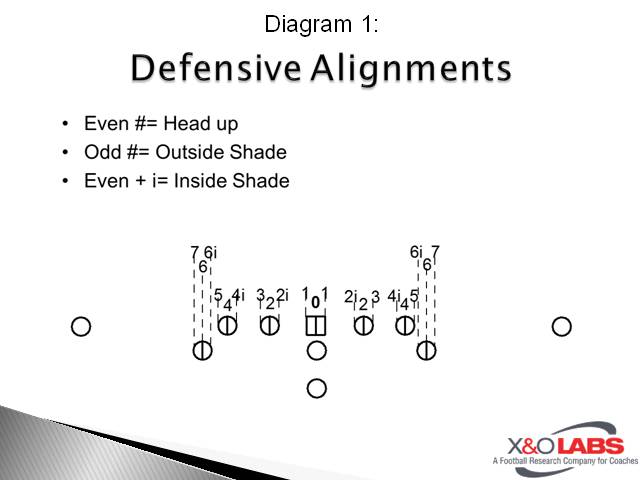
mmyOver the past few years, McMurry University has lived on its Inside Zone concept averaging 5.48 yards per carry and consistently moving the chains. A big part of that success comes from how we teach that concept. In this clinic report, I will break down our installation process, how we identify fronts, and how our count system allows us to seamlessly block various fronts. In addition, this report will outline what and how I teach zone to my offensive line and our RB reads and entry points. 

Here at McMurry University, we are a pro style, multiple formation offense. Within that scheme, our base play that we install on the first two days of camp is Inside Zone. Everything we do in the running game starts from an understanding of our IZ concept. Here is why we like to use this as our base. 

Advantages of the Inside Zone Concept:

  1. Stretches a team horizontally as well as vertically.
  2. Allows your RB to hit on different holes.
  3. Allows for the OL to “take the path of least resistance,” meaning they can get to the man they’re blocking quicker, which enables us to play faster.
  4. Enables us to crease fast flowing defenses.

Identifying Fronts & Count System:

When identifying fronts, our offensive line uses a simple “even/odd” call.

  • An “odd front” is any front where the guards are uncovered such as a 3-4 or 3-3.
  • Conversely, an “even front” is any front where there are four down linemen such as a 4-3, 4-2, 4-4.

Obviously, this is very general, but I have found this approach to be much easier for the offensive line than making “over/under/bear” front calls. We are able to account for the variances between the fronts through the following steps of our system.

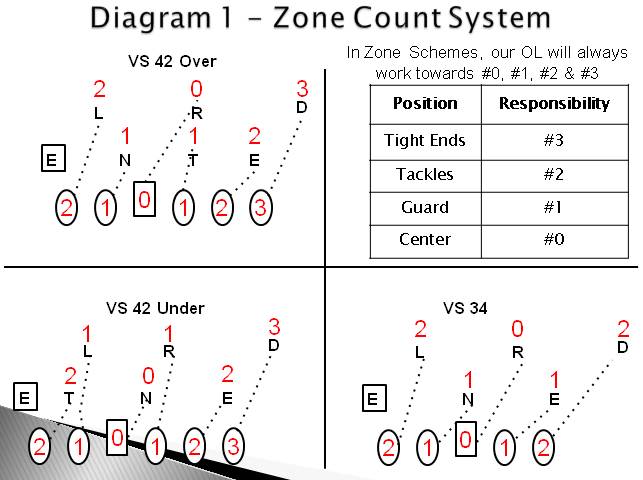
Once we get the front identified, we use a simple count system to help the linemen know who to block. I have found that this system enables us to know exactly whom we are blocking on play side and back side regardless of the front. Our basic rules for the count system are as follows:

  • The center is responsible for 0.
  • The guards are responsible for 1.
  • The tackles are responsible for 2.
  • The FB/TE is responsible for 3. In the event that there is no FB/TE, the QB then becomes responsible for 3.

The diagrams below show how we utilize the count system against an “odd” and “even” front with the TE.

Read More

Disguising and Matching Coverages

By Adam Harvey

Safeties Coach

Cibolo Steele High School (TX)

Twitter: @a_harvey


Introduction:

ciboloHow many times have you heard, “I’d hate to be a defensive coach with all the dynamic offenses out there”? To say it’s a challenge would be an accurate statement, but it would be wrong to say it is impossible. We have found that the teams who do the best job containing and stopping these offenses teams must be sound and simply get each player to buy in to his assignment. That is why our staff at Steele High School believes that the two most important components to defensive success are being aligned correctly and knowing and executing your assignment. If the players can execute those components, then the coaches can focus on the details of the scheme as a whole (ensuring that coverages match fronts, controlling gaps or wrinkling with blitzes and stunts). We ultimately play under the rule of controlling gaps and zones so we are not out-flanked trying to match man for man.

Disguising Coverage:

Great offenses are all about rhythm, especially the up-tempo schemes. Over the years, we have found that one of the best ways to get these offenses out of their rhythm is to make them second guess what they see pre-snap. That is why we believe wholeheartedly in the power of disguising our coverages. In order to make this happen, our team focuses on understanding the opponents snap indicators and presenting a consistent picture to the quarterback. 

We teach our players that the longer you are able to hold a look and lie to the QB’s eyes, the better off you will be. Once our players buy it to the concept, they begin to look for ways to hold their look.

The first step in disguising coverages is to identify the pre-snap indicators that our players can use to time the snap. That process begins in the film room as we analyze the snap count paying careful attention to the QB’s tendencies. We will assess his type of snap to determine whether it is a clap count, verbal cadence, check-with-me, or a traditional sequenced count. That information arms our players with the information they need to begin their movement. Our safeties are taught to wait until the indicator to roll into the coverage called. Our corners can also use a bail technique to keep everything in front of us once the indicator is given.

Quarterbacks that think they know what we are doing are the easiest to confuse. That is why we as a cover 2 team play in to his assumptions and give him a consistent two look. It is our desire to show two on the roof until the last possible second regardless if we are eventually playing man, three, or quarters. We have our corners pressed on the edges and usually do not change that concept as it is a big tone setter for us. This is done to allow our CBs to play as the force defender and the safety to use his intellect and react to the play whether he reads the lane of ball and plays the alley or drops into the appropriate coverage. When playing quarters, we will still show two on the roof to make it look like a cover two coverage as the pre-snap read. Upon seeing the indicator, our safeties will move from 10-12 yards up to 8-10 yards while reading keys. Another wrinkle that we use is varying which safety scrolls depending on what our front seven is doing. If we are blitzing, it is important for the safeties to know who is leaving and ultimately whether or not they are losing a linebacker (covered later).

Read More

Tagging Back Side Routes Off the Quick Game

By Paul Romolo

Offensive Coordinator/Quarterbacks Coach

Archbishop McNicholas High School (OH)

Twitter: @pnromolo


Introduction

XO PicLike any spread offense, we believe in making the defense defend the entire field. We use our quick passing game in particular to try to create width in a defense’s structure and complete high percentage throws. Ideally, we’ll throw eight to 12 quick passes and gain 50-100 yards per game, which forces the linebackers and safeties to cover up our slots. This, in turn, creates vertical running lanes in the box and creates an advantage in the ground game.
Problems with Mirrored Quick Game Routes

Our quick game differs from a lot of other teams because we do not mirror routes. In 2012, we mirrored routes and let our quarterback work the side or matchup he liked best. While this approach worked relatively well, we found that too many things could go wrong in that model. We found that we had issues if:

  • The quarterback picks the wrong side
  • A receiver falls down
  • The coverage rolls during the snap count
  • Something that looked good pre-snap might look awful post-snap

Since we want our quarterback to throw the ball on the last step of his drop, any of the above problems would completely derail our play. This would cause him to hitch up and deliver the ball late. As a result, we didn’t call a lot of quick game unless we were getting looks that we knew we could exploit (43 attempts in 11 games).

Additionally, mirroring routes goes against the spread philosophy. Letting the quarterback pick a side or matchup (or telling him which side or matchup to work) doesn’t actually stress the whole field. In fact, it cuts it in half or even in thirds should he choose to throw into the boundary. This is especially true if one particular receiver gets targeted repeatedly. Eventually, the defense will realize that the other areas of the field aren’t being threatened, and they’ll stop covering them.

Adding Back Side Tags

In 2013, we started tagging an intermediate and check down route on the back side of our quick game patterns. This provided a solution to each of the problems presented in the mirrored route model. If the front side doesn’t look good on our quarterback’s third step, he simply hitches up to his intermediate route. If that isn’t there, he hitches again and looks to his check down. That process lets us get the ball out in a hurry on the front side, but it also attacks the entire field and holds the defense accountable.    

As an added bonus, we found that letting the quarterback sort out which side to throw to takes time. Running a dummy count and checking with the sideline takes time. As a hurry up team, this was problematic. Tagging back side routes lets the quarterback snap the football faster because he can sort out where to throw the ball while the ball is in play. It doesn’t have to take up precious pre-snap seconds.

Front Side Combinations

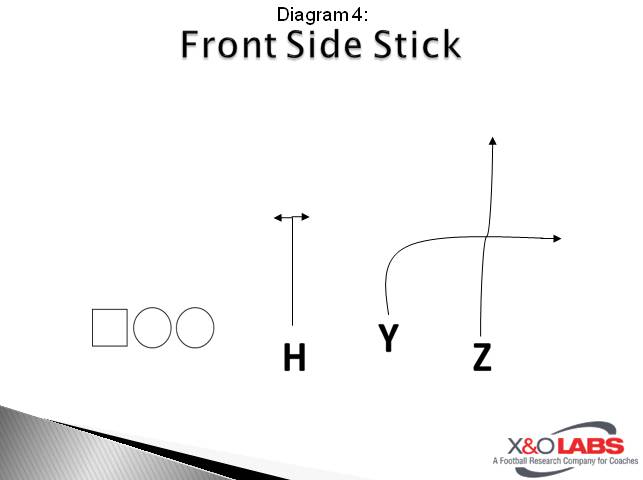
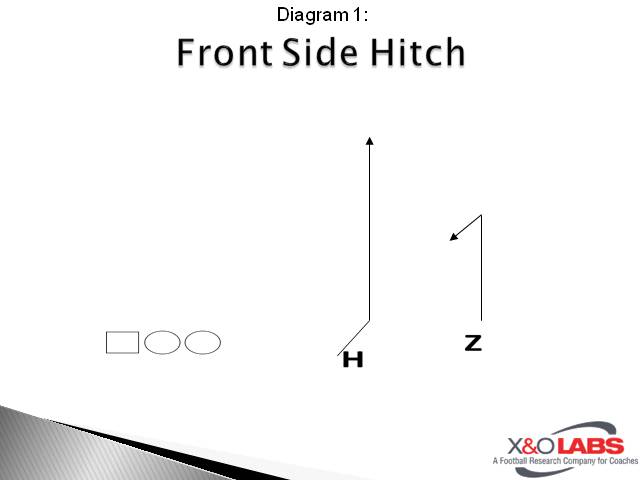
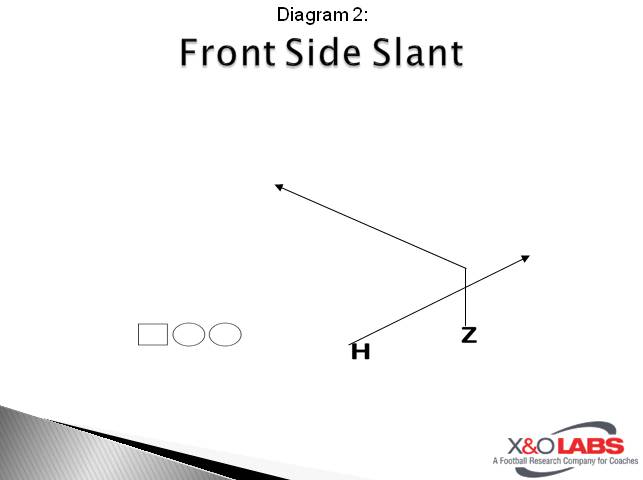
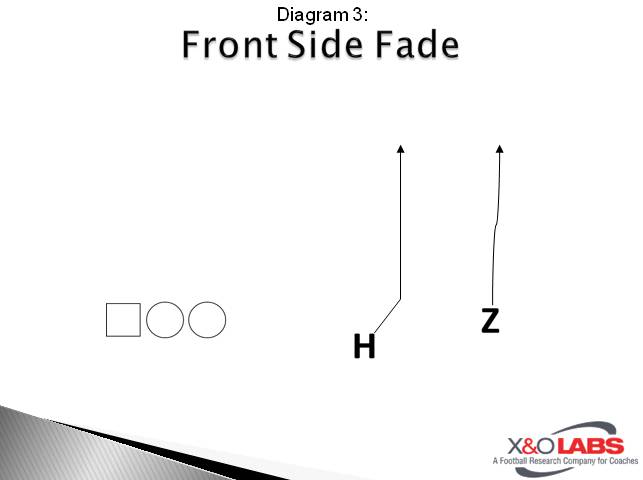
We work four front side combinations concepts as part of our quick game (Diagrams 1-4). These are pretty standard quick passing game patterns. We base them out of a 2×2 formation, but can run them out of a variety of formations including 3×1 and 3×2. Stick is always a 3 man pattern even if the third receiver comes from the backfield or across the formation in motion.

Slide1Slide2Slide3Slide4

We operate exclusively out of the shotgun, and our quarterback will take a standard 3-step drop. During his drop, he reads the flat defender on the front side. If he gets a clear read during his drop, he delivers the ball on his third step in rhythm without a hitch. In diagram 2, you can see the pre-snap picture for the quarterback working a hitch combination to the right. He identifies the outside linebacker as the flat defender with the defense probably playing Cover 3. In diagram 3, you can see his view on the third step of his drop. The outside linebacker has carried the hot route vertically to protect the seam and has left the flat exposed. The quarterback makes an easy throw to the hitch to gain at least five yards.

Read More

Defending One-Back Run/Pass from Cover Three Structures

By Matt Costa

Head Coach

John F. Kennedy High School (CA)


Introduction

costaAt Kennedy, our overall defensive philosophy is simple, “Less is More.” This is not a new philosophy and, for sure, it is not something dynamic. To put in more descriptive terms, we are a defense that is 4-2-5 in personnel, but a mix of College 4-3, Stack 4-4, and Split 4-4 in concepts. Below are a few basics in the set-up of our defense. 
We try to minimize thought process by minimizing moving parts. We do this by having only one  strength call. Our strength rules are as follows:

  • Number of most receivers
  • Versus a balanced formation we call strength to the field or the QB arm based on field position.

We also work to keep things simple for our players. This is done in a few different ways, with the most important being that we only have our players know one position. We also only run 4 coverages, 4 base fronts, and a combination of plug blitzes and some 6-7 man pressures.

Our Spread Defense Philosophy

We believe that cover 3 is the easiest and most effective coverage to teach and that means more experience and faster play. We work to stay in cover 3 against everything unless game plan and pressure scheme calls for it. While some will argue this is too predictable, we have found that the best way to counter that is with reps and players that are playing fast.

When playing spread teams, I like to start by making small adjustments to your base coverage. This will then allow you to focus on beating them up front, which research says is the most effective place to beat the spread. Most spread teams that we face either run Big-on-Big or Slide Protection. By dissecting the protection scheme and attacking it, it allows us to get the quarterback off his preferred launching spot. This, in turn, will lead to more incompletions and sacks. When attacking the spread at the line of scrimmage, we utilize plug blitzes and line stunts supplemented with the occasional Man Free and Cover 0 pressure scheme.

An added bonus of using the cover 3, plus its adjustments out of the 4-2-5, is when you do decide to send pressure you can disguise it by running a fire zone scheme or you can run a 6 man pressure and run cover 1 or cover 0 behind it comfortably because of the added bonus of already having five DBs on the field. We have found this philosophy to be very successful against the spread teams we face.

In this report I will discuss our cover 3, plus our “Falcon” and “Solo” adjustments. Then I will discuss our “Wanda” pressure and our “Plug” pressure, which in my opinion are our two best pressures we run against the spread.

Editor’s Note: X&O Labs’ Blitz Check Study illustrates the complete pressure check protocols coaches are using to put their players in the right pressures no matter down or distance. Read the study here.

Cover 3:

Our cover 3 is our base coverage and the individual rules are as follows:

Mike and Will – Hook to Curl.

Both Mike and Will start in a 20 alignment. He reads the guard to the back field triangle. If he gets a pass read, his eyes will go directly to his primary threat based on formation. He will work to the top of the Hook to Curl Zone.

Strong Safety – Seam to Flat.

He aligns 3×3 in a “Read” technique or on the LOS three yards outside the EMLOS in “Solid” technique. Read and Solid are “Hard” called from the sideline. He reads the end man on the line of scrimmage (EMLOS) to the #2 receiver. If the #2 runs to the flat, he buzzes to the flat now. If #2 goes vertical, he looks to reroute through the seam and works to the top of the flat.

Weak Safety – Seam to Flat.

The weak safety starts at five yards depth and four yards outside the EMLOS and adjusts to formation and personnel. He reads the EMLOS to the #2 receiver. If the #2 runs to the flat, he buzzes to the flat now. If #2 goes vertical, he looks to reroute through the seam and works to the top of the flat. His eyes will then go to the #1 receiver.

Free Safety – Deep Middle 1/3.

Read More

3 Fast Paced KO Coverage Drills

By James Vint

Offensive Coordinator

Seminole High School (TX)


3 Drill Kickoff Circuit

The following set of drills is set up with 3 quick stations that Vint calls the “Rodeo Circuit” and includes a tackling drill, gauntlet drill, and angle or pursuit drill.  These drills are used every day during 2 a days and then less frequently once the season begins.  Note that these are three of over 75 drills that are in our complete Special Teams Drill Special Report.  To view the rest, click here.

Drill #1:  Shimmy Tackle

This simple drill focuses on a full body open field tackling technique that can be applied in multiple special teams situations as well as defense. 

Concept / Coaching Points:  This is a simple 1 on 1 tackling drill using stationary ball carriers.  Stress shimmying into position, bending at the knees not the waist, punching arms upward through the ball carriers armpits, and running their legs through the tackle.

Read More

Mid/Outside Zone Case 1: Personnel & Coaching Ball Carriers

By Mike Kuchar – @MikeKKuchar

Senior Research Manager

X&O Labs


Please Note: We’ve included a lot of video in this case report, it may take a few minutes for all the video to load on your computer.  Thank you.


Introduction

In Case 1, of our special report, we will present our research on the varying personnel groupings and entry points most utilized in the outside zone and middle zone scheme.  In any zone concept, the aiming points of the ball carrier can be just as important as the actual blocking schemes themselves.  We’ve found that many offensive line coaches, such as Alex Gibbs, coached the running backs just as hard as they coached the offensive line.   When referencing the zone schemes, we’ve heard many coaches talk about “let the running back make you right” which essentially means the onus of the success of the play relies on the ball carrier making the right decision at the point of attack.  If that’s the case, then it’s essential to discuss the importance the ball carrier has on the scheme. 

When conducting our research on the wide zone scheme, we did find it not to be as popular as tight zone concepts.  In fact, according to our research, 50.5 percent of coaches only utilize the wide zone concept between 0-25 percent of the time.   Yet, 43.8 percent of those coaches said they averaged between 5-6 yards per carry on this scheme.  So we asked around to find out why coaches are not using the scheme as much. 

Before we start addressing the specifics of the wide zone concept, it’s important to note that there are various play concepts that can be devised from the wide zone blocking schemes.   Some of these concepts include, but are not limited to…

  • Jet or speed sweep
  • Speed Option
  • Toss Sweep
  • Stretch Scheme (one back)
  • Boss concept (two back)

Editor’s Note:  This special report is focused solely on wide zone and middle zone run concepts which require tighter aiming points than inside zone.   It will not include perimeter gap schemes like the pin and pull concept that may be common perimeter run concepts.  Insider members can find more information on the pin and pull concept by accessing the following reports:

Monmouth University Pin and Pull Scheme

Formationing the Shotgun Buck Sweep


The Case for Pin and Pull

There have been various situations where coaches would prefer to use a pin and pull or man blocking concept rather than a full zone.  One of the more common examples would be against an Over defense with a wide three-technique and a tight six-technique head up the defensive end.  Longtime NFL offensive coordinator Bill Muir used what he termed a “bingo” call against teams that would have a wide three-technique that couldn’t be blocked by the Guard.  The Tackle would just come down and the Guard would pull around.  “When we made that call, there was no cutback,” said Muir.  “It was an off-tackle stretch scheme.  I have the players the option and when you trust the judgment of the players, I allowed the onside Guard to determine if it was a three-technique against an Even front or the onside Tackle vs. a 5-technique in an Odd front if they were unreachable, they can make a call and we would go into the scheme.  This could change during the course of the game.  I gave them responsibility because it was their decision. “  Muir did tell us that against some fronts with a quicker Shade Nose he didn’t like the stretch scheme because the Center couldn’t reach the shade Nose.  “All of a sudden the back reads the 5-technique and cuts it back right to the shade Nose who is there to make the play.” said Muir.   


Reader Responses on when to use Pin/Pull Schemes

Some other coaches chimed about the certain circumstances they choose to use a pin and pull concept rather than a full zone principle.

“We will use Pin and Pull concept against a three-technique and a five-technique front side.  It’s a cross block technique.”- Mark Staten, Michigan State University 

We will use the pin / pull concept when we feel the c gap defender is too wide for the tackle to reach block. We also use this technique in our TE/wing and bunch sets where the TE’s man is too wide to zone block effectively.” – Terry Kent, Downers Grove South HS, [email protected]

“We use Pin and Pull with Tight End against a 5-technique or 7-technique.  We will also Pin and Pull vs. a 6-technique with a TE/Wing.  If we see a base 4-3 or 3-4 we use zone concepts with Stretch rules.” – Kenneth McClamrock, Concord HS, [email protected]

“Against odd fronts we will use our stretch technique to avoid opening large windows for LB’s to run through.” – Tony Neymeiyer, Baldwin Wallace University, [email protected]

“Against a defensive line that is better than us, it gives us angles to pin and pull so we use the man concept.” – Tim Halverson, Mount Horeb/Barneveld, [email protected]

Read More

Mid/Outside Zone Case 2: OL Pre Snap Reads & Rules

By Mike Kuchar – @MikeKKuchar

Senior Research Manager

X&O Labs


Please Note: We’ve included a lot of video in this case report, it may take a few minutes for all the video to load on your computer.  Thank you.


Introduction

In this case, we will present various pre-snap identification systems that coaches are using to teach their lineman who to block in the middle and wide zone run concepts.  Since defenses will stem, move and shift pre-snap, it’s essential that the offensive line knows exactly who they are responsible for by the time the ball is snapped.  While some coaches talk more about “running your track” on the wide zone concepts, others are more concerned about identifying defenders on the first and second level.  Below we present the base rules for the middle zone/wide zone run schemes and the adjustments coaches make to pre-snap movement. 


Defensive Identification Systems


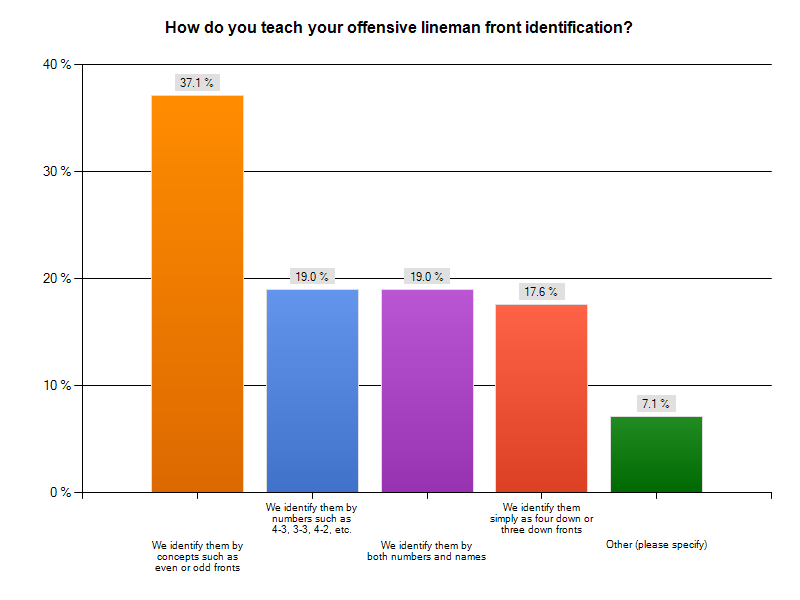
According to our research, 33.3 percent of coaches teach their players to identify defensive fronts by concepts, such as an “Odd” or “Even” distinguishment.  30 percent of coaches teach them to identify them by both numbers and names while 13.3 percent teach them to identify defensive structures by numbers.


chart8 

Identification by Numbers


At Western Connecticut State University, offensive coordinator and offensive line coach Drew Owens, relies on the count system to teach his lineman who to block based off three different fronts- 42 Over, 42 Under and 34.  Owens believes that most fronts will fall into one of those structures below. 


Slide1

Owens described his count system below:


Zone Scheme Counting

  • As an offensive line we use a count system pre-snap in our zone schemes
    • Our center will identify the point and the point or “zero” is where we build from
      • Center Blocks 0
        • Zero in our zone schemes is the first defender head up to playside the center
      • Guards Block 1
        • First man playside and backside of the zero
      • Tackles Block 2
        • Second man playside and backside of the zero
    • This is a pre-snap identifier for our OL
      • The type of zone called gives the OL their technique and departure angles from the LOS


Identification by Structures

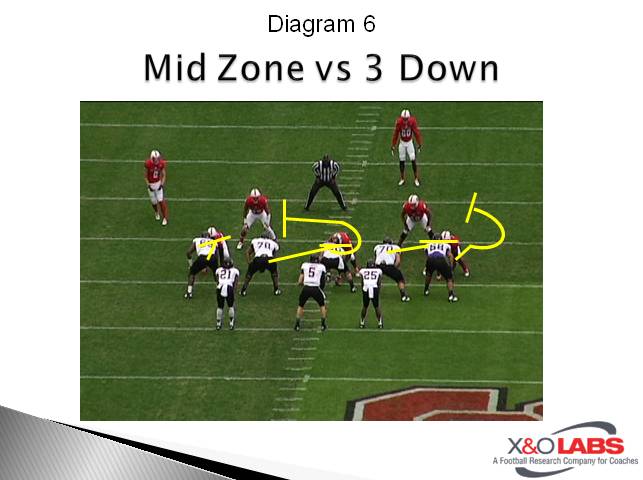
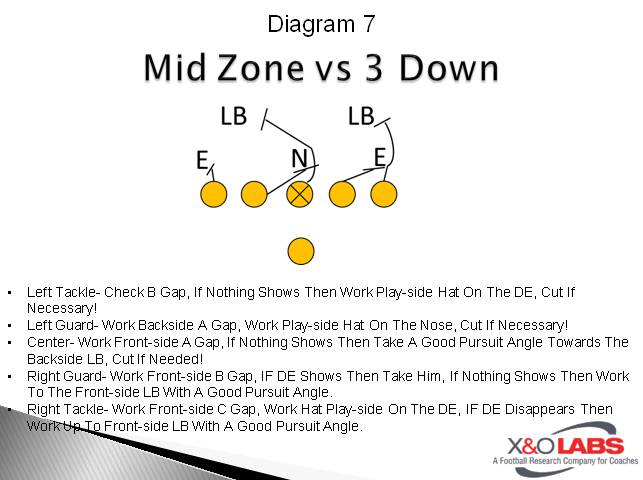
At Eastern Carolina University, offensive line coach Brandon Jones talks to his lineman about blocking the middle zone against only four different kinds of fronts- Nickel, Odd, Stack and Even.  Since the Pirates are mainly a 10 personnel team, the box is using clean enough where the lineman can make one of four calls.  Below is how he blocks the play based on the front.

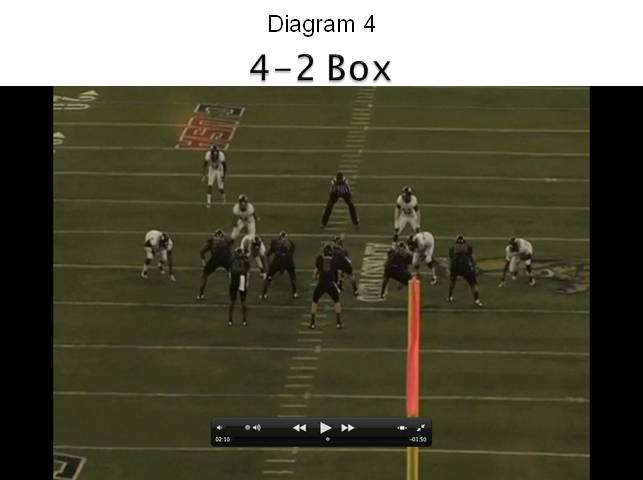
Nickel= 4-2 Box (four down linemen and two second level players)

Slide2Slide3Slide4

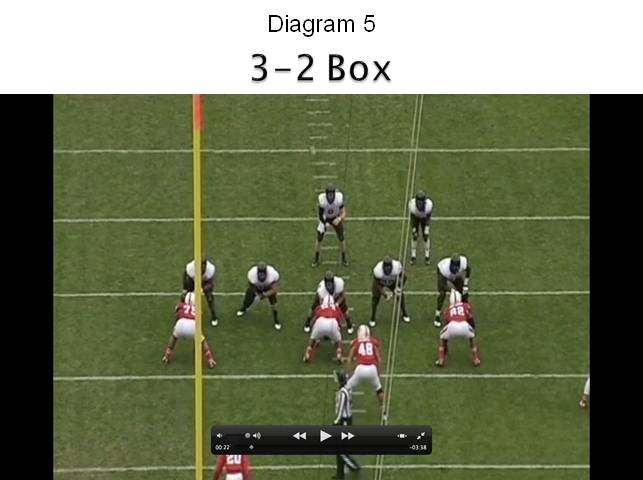
Odd= 3-2 Box (three down linemen and two second level players)

Slide5

Stack= 3-3 Box (three down lineman and three second level player)

Slide6Slide7

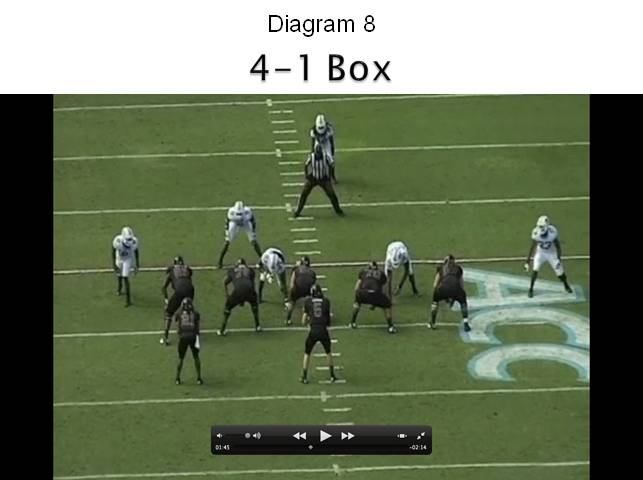
Even= 4-1 Box (four down lineman and one second level player)

d8

Read More

Mid/Outside Zone Case 3: Indi Lineman Covered Blocks

By Mike Kuchar – @MikeKKuchar

Senior Research Manager

X&O Labs


Please Note: We’ve included a lot of video in this case report, it may take a few minutes for all the video to load on your computer.  Thank you.


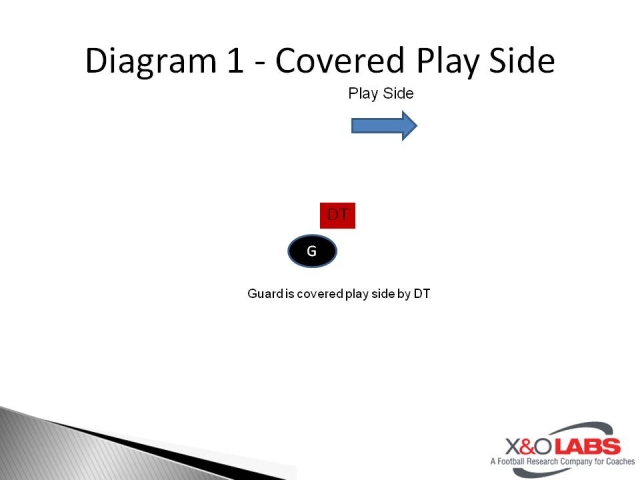
Editor’s Note:  A” covered” offensive lineman refers to any lineman to the play side of the middle or wide zone concept that is covered up by a first level defender (Diagram 1).

Slide1

Introduction

This case presents data on the different techniques that offensive line coaches are teaching to their covered offensive lineman in stretch concepts.   We’ve found that these techniques will differ based on the leverage of the down defender.  There are so many intricacies that go into these coaching points- head placement, hand placement, foot placement, angle of departure, etc. They are all covered in this case as it pertains to the wide and middle zone run concepts. 

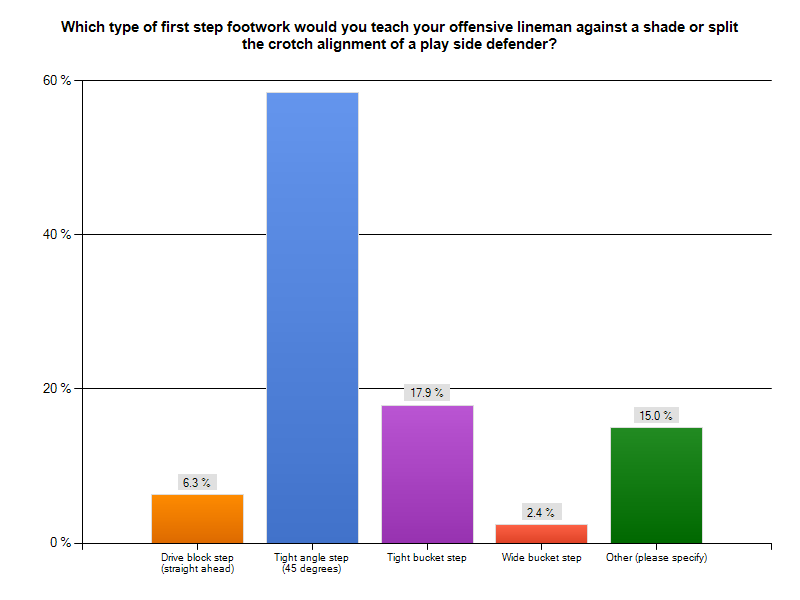
Our initial research shows that 59 percent teach the far armpit as the visual aiming point for the covered offensive lineman in both the wide and middle zone concepts.   We’ve found our research split on the footwork that coaches teach their covered offensive lineman in wide zone schemes- an even amount teach both the reach footwork and rip to run footwork while 13.3 percent teach the bucket step.  We’ve found that coaches are from two schools of thoughts on the covered lineman- they are either reach step advocates or bucket step advocates and we present both perspectives below. 

chart14


Rip to Run Footwork

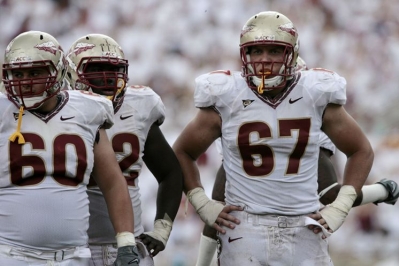
36.7 percent of coaches teach the rip to run technique in wide zone run concepts, regardless of position of the defense, so it’s important to present that side of our research.  Rick Trickett, the offensive line coach at Florida State University, is one of those coaches.  For Trickett, the crux of the scheme is the first step of the covered offensive lineman.  “He must bring his shoulders through on the first step on the stretch scheme,” Trickett told an audience of 400 coaches at the C.O.O.L. clinic in Cincinnati last month.  “We work to get our outside breast to his far armpit and our inside foot to crotch.  To do this we bring our shoulder over our knee on the first step.”

Eddy Morrissey, a former Graduate Assistant under Chip Kelly at Oregon teaches the tracks methodology and uses a run to reach footwork for everyone along the front.  “Technically I’m covered, but it’s really ripping and pressing and covering him up,” Morrissey told us.  “We don’t want the uncovered player to knock into me and there is all this penetration.  As I feel pressure, I need to lean back into him. I want my guys to face the sideline and now we are on a track.”   He teaches an elbow whip, pivot and run technique to his offensive linemen in his wide zone concept.  He provides a video tutorial on this technique below. 

Read More

Mid/Outside Zone Case 4: Uncovered Linemen Technique, Double Teams, & Backside Blocking

By Mike Kuchar – @MikeKKuchar

Senior Research Manager

X&O Labs


Introduction

In this section, we’ll be presenting our research on the techniques and fundamentals coaches are instructing their uncovered lineman to preform in middle and wide zone concepts. This may be the most important element of wide zone scheme because it is usually these players responsible for sealing the box and getting the ball on the perimeter.   We are also presenting our research on how coaches are finding ways to cut the defense off on the backside to allow for cutback possibilities.  We’ve found various aiming points on defenders to the backside to be cut, including some coaches who prefer not to cut defenders on the backside for reasons that are explained more in depth later in our report. 

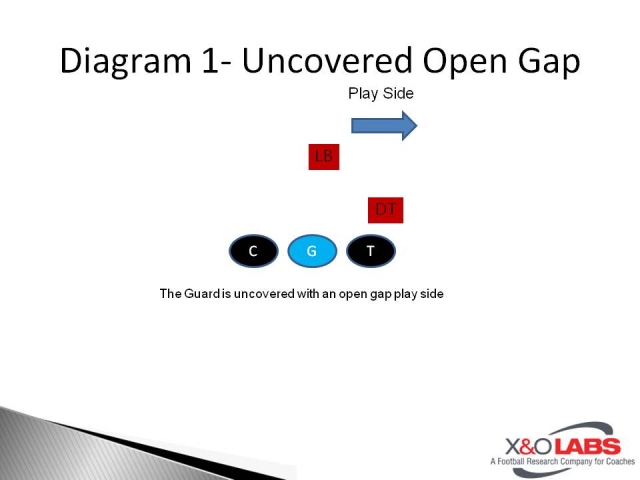
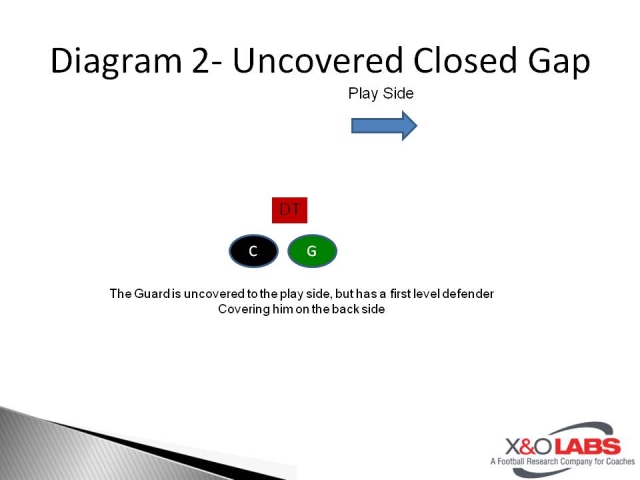
Editor’s Note:  Uncovered lineman refer to those lineman who do not have a defender covering them to the play side of the zone scheme (Diagram 1).  This is different than inside zone schemes, where coaches are instructing a backside shade (Diagram 2) differently. 

Slide1Slide2

Keeping consistent with the stretch or outside zone principle, the uncovered lineman is responsible for “overtaking” the defender lined up the adjacent, covered offensive lineman but the technique he uses to do so varies from coach to coach.  Regardless of the technique employed to do this, we’ve some common denominators that the uncovered player must accomplish:

  1. Attack the down defender on a 45-degree angle.
  2. Any color that hangs (becomes head up)- push back on to the covered player and move the defender.
  3. Any color that moves to you, over take it and get backside pad thru.
  4. Any color that moves away from you, track and block the second level.


Varying Eye Progression

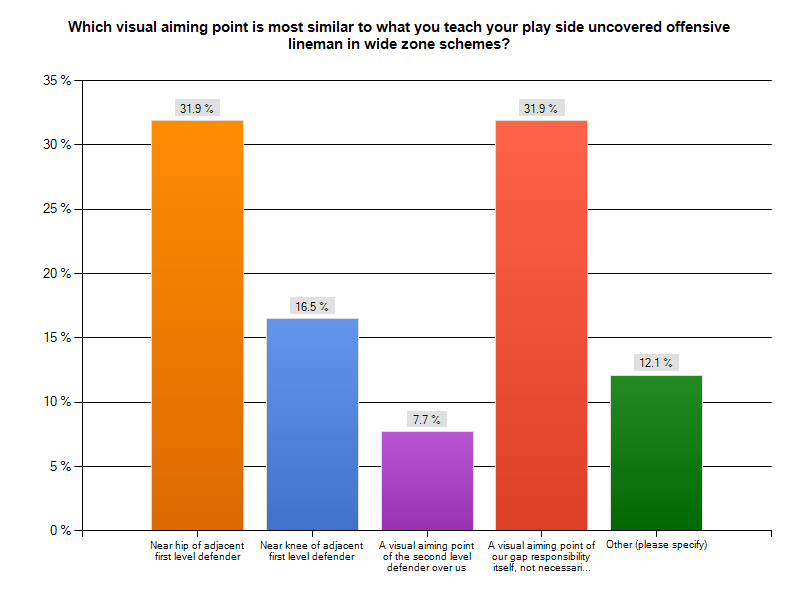
Most offensive line coaches will tell you the importance of training their player’s eyes pre-snap before even executing a block.  So, we wanted to find out what were the most productive aiming points given to these lineman before even attempting the block point.  Based on our research, we’ve found that 36.7 percent of coaches teach a visual aiming point of a gap itself, not necessarily a defender. We’ve found that this is mainly due to the possibility of post-snap movement, which we will address later in our report.  The next most popular response was the near hip of the adjacent defensive lineman.

chart16

Near Hip Progression

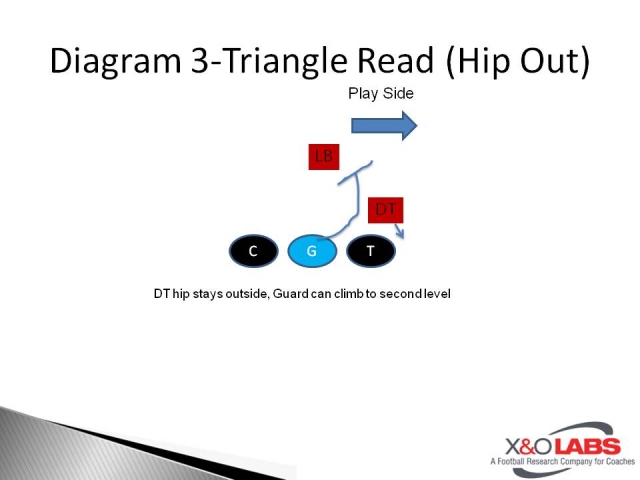
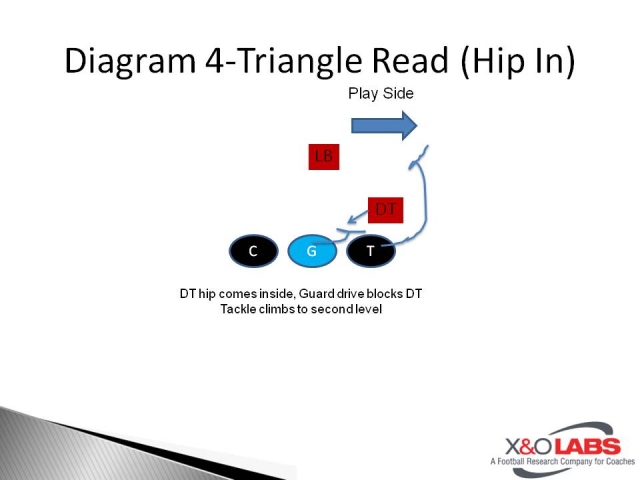
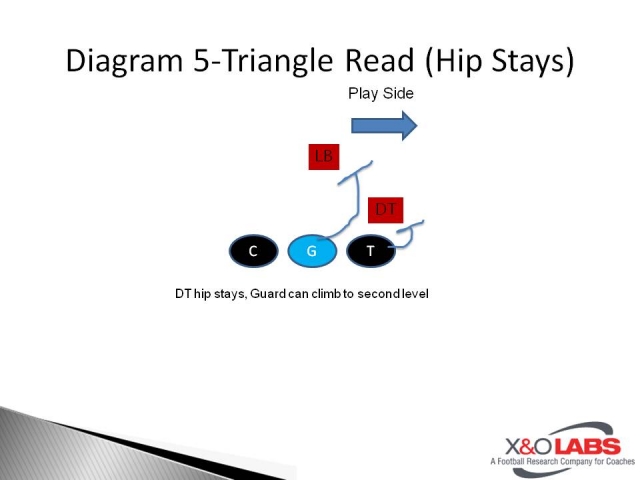
Travis Mikel, the offensive line coach at Southeastern Louisiana University teaches a hip Aiming Point and what he calls a “Triangle Read” to his offensive lineman.  The triangle read is to keep their eyes on the following (down lineman hip, play side linebacker, then back to their track).

According to Mikel, once the uncovered lineman diagnoses their read, he makes the following adjustments:

  • Hip Out- Climb to second level (Diagram 3)
  • Hip In (to him)- Drive block defender (Diagram 4)
  • Hip Stays- Drive to linebacker (Diagram 5)

 Slide3Slide4Slide5

Mikel stresses eye control at the hip, which insures the proper read and pad level for the uncovered offensive lineman.  “On my first step, my eyes need to be focused on the next down lineman’s near hip,” he told us.  “On the second step my eyes should have processed my read (what did the hip do?).  The third step shifts to my second level track if needed.  We must be able to see the triangle (DL hip, LB and back to our track).  

Tom Cable with the Seattle Seahawks believes more in seeing the hip of the next adjacent offensive lineman in order to make the correct block.   “I paint a picture for them in replacing their buddies hip,” said Cable.  “You have to know where you have to be to replace the covered player’s hip.  Let’s not read this hip or that knee.  I think that all sounds good, but I think it’s really all about reaching, running and adjusting.  I don’t want them reading anything because they lose intensity.  I want them to replace the inside hip of the covered player.


Near Knee Read Progression

We’ve found that 20 percent of coaches teach the near knee as an aiming point for uncovered offensive lineman in the zone scheme.  John Donatelli, the offensive line coach at Towson State University, teaches the near knee read in his middle zone run concept.    “He must key the knee of the play side hard defender or the D-Lineman covering the O-Lineman he is working with,” said Donatelli  “Looking at his knee and seeing the direction it is going will help the uncovered man in knowing what to do immediately post snap.”  Donatelli talks about three scenarios he will work with his uncovered lineman: 


  1. If the defenders Knee angles toward him the O-Lineman knows top take over the hard defender immediately. 
  2. If the defenders Kneed angles straight into the uncovered lineman’s covered partner he knows to then help (Define or Ride) the defender and work with his covered line mate.
  3. Lastly, if the defenders Knee angles away from the Uncovered lineman he then knows to climb to second level slowly and under control scanning play side to backside with his eyes looking for work.


Read More

Iso: Read and Fold Concepts

By Peter Bisson

Wide Receiver Coach

Pasadena City College

Twitter: @TheCoachsCorner


Introduction:

Like most coaches, I am always looking for ways to fit their base scheme to their personnel. When I first took over as the Offensive Coordinator at Heritage Christian High School, it was apparent that we would have the three running backs more suited for a down-hill power run years. After much research, we settled on a shotgun diamond formation and a tight bunch formation with minimal changes to the current set of rules in our power run series: Power Option, Fold Option, Fold Read and Iso Read. Today we are going to primarily focus on the Fold and Iso Read variants.

This formation/concept fit because we had a couple of quarterbacks that, while not necessarily burners, could effectively run the ball. It also allowed us to remain a shotgun, fast paced, no-huddle team, so I began looking a little more closely at the pistol game. We felt that this change helped us keep the scheme as simple as possible for the offensive line by combining our power game with our read and read option game. I also wanted to ensure we could run them all from a balanced set that did not require pre-snap motion. 

During the process, I spent a considerable amount of time analyzing pistol sets, especially the way the San Francisco ‘49ers ran its Iso Read. I have found that NFL Game rewind can be an effective tool to help diagnose and determine if something run at that level can be effectively incorporated into my current scheme. The coaches’ film angles are extremely helpful.

Editor’s Note: X&O Labs’ exclusive Pistol Formation Study is located here.

Installation Plan:

Before we even consider teaching the variations, our first goal is to ensure the offensive line is solid on the base plays. We also make sure both Varsity and Junior Varsity (and Freshmen) teams are using the exact same rules for our power blocking schemes. Base alignments for all players involved in the diamond set are as follows:

  • Guards/Tackles/TE(Y)
    • 2 ft. splits, ear hole even w/ hip of the center
  • Outside Receivers (X/Z)
    • Ball in middle of field: Top of Numbers
    • Ball on near hash: 1 yd. Outside Numbers
    • Ball on far hash: Split Distance between Number and hash
  • Running Backs(H/Y/A)
    • Split backs – Toes at 5yds behind inside leg of OT
    • Pistol – Toes at 8yds behind Center.
  • Quarterback
    • Heals at 5 yards directly behind Center.

When installing scheme, the first thing I teach my offensive line is the defensive lineman alignments (Diagram 1). 

Slide1

Fold Concept:

Here is a breakdown of the rules for our Fold concept, which also serves as the base play for the progression we are going to look at in this article.

Read More

Using Cover 3 to Defend the Quick Game

By Ryan Desrochers

Defensive Coordinator

Sunrise Mountain High School (AZ)

Twitter: @CoachRDes


Introduction

Like most 3-3 Stack defenses, we run mainly cover 3 and we bring a lot of pressure. That said, we are not the type of team that will just sit in the cover 3 shell and wait for offenses to pick on us. Instead, we have a few variations in our pocket to keep the offense guessing. Perhaps our favorite variation is our Jump Coverage concept that takes away the quick throws from the offense. We have found this particularly effective on 3rd and short when the offense is expecting pressure. Instead, our jump coverage sends four rushers and spot drops the coverage behind it one yard in front of the first down marker.

Before we get into the details of jump coverage, I think it is helpful to know what jump is meant to counter. In addition to our base cover 3 set, we will align in a 2 high safety shell and drop down a defender and roll to some variation of cover 3. We protect against the 4 vertical threat in cover 3 by having our curl to flat players carry the number 2 receiver vertical for 10-12 yards before zoning off. We also tell those defenders to push and widen the receivers off of the seams. Against a 3×1 set, our back side hook to curl player will wall and carry the number 3 receiver vertically while the curl to flat player play side carries #1 receiver and our hook to curl player carries the number 2 receiver. On the back side, we over/under with the corner and the curl to flat player creating a double team to the one receiver side. Like most teams, we do not chase any routes under five yards. Our basic philosophy is that we are going to pressure the QB, usually overloading a side and running either man free or 3 over 3 under fire zone coverage, and force the QB to make the wide throw to the sideline.

Our basic cover 3 defense has our corners and free safety dropping into their assigned thirds while our dog safeties will be our curl to flat players. We will pressure with one linebacker while the other two are our hook to curl defenders. Of course you can run the same concepts with the corner or free safety being the field curl to flat defenders or the dog safety to the weak side dropping down into the hook to curl zone. Once the base coverage is installed and understood, the players will be able to adapt to the jump concept.

Jump Coverage Basics

The basic premise of our Jump Coverage is that we spot drop to landmarks on the field and react to the QB from there. Our landmarks are for our curl flat players to get to the numbers and our hook curl players to get to the hashes in a 2×2 set. In a 3×1 set our curl flat defender goes to the numbers, our front side hook to curl player will split the numbers and hash, and our backside curl to flat player will buzz the hash. This is the only time when we will drop our coverage within 5 yards of the line of scrimmage depending on the distance needed for a first down. The premise to this coverage is to have the offense get rid of the ball quickly expecting pressure, but then take away the quick throws and force the QB to hold the ball, resulting in a bad decision or sack.


2×2 Set

Numbers                                Hash

Read More

13 Things You Missed: AFCA CONVENTION 2015


By Mike Kuchar with Sam Nichols

X&O Labs


Back in 2002 when I made my first convention trip to New Orleans (gosh, I miss that place) I made it a point to make sure I recapped, then re-filed my notes on the trip. I usually did this on the plane ride back; as to make sure everything was fresh in my mind. Many of us know, those two to three days can be a whirlwind, pulling us in every different direction from reconnecting with old friends to habiting the local watering holes. As a coach, I have an obligation to myself and my staff (many of them could never make the trip) to make sure I reported back on everything I’ve learned. Now as a football researcher, I feel the responsibility to report back to our readers on the same issues. So, now we bring the best of Louisville to you. These notes are in no particular order and in fact are a reflection of the sporadic, streams of consciousness style of note-taking I adhere to.

What Coaches Are Researching: 

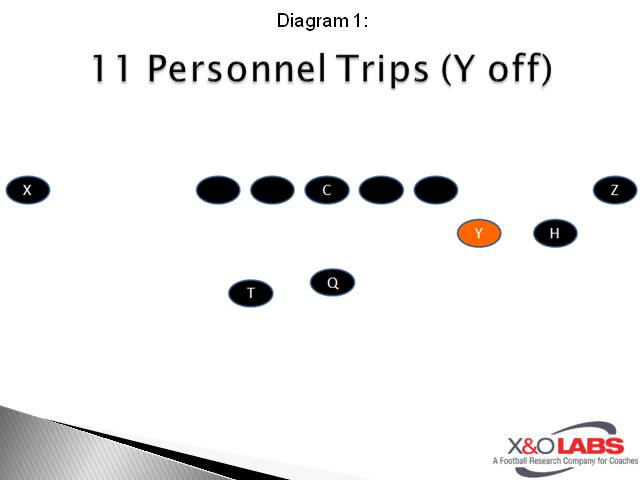
  • Defensive coaches are frantic trying to find ways to defend the 11-personnel 3×1 formations (with Y off the ball) that Ohio State has been exposing defenses with this post-season (Diagram 1).

slide1 

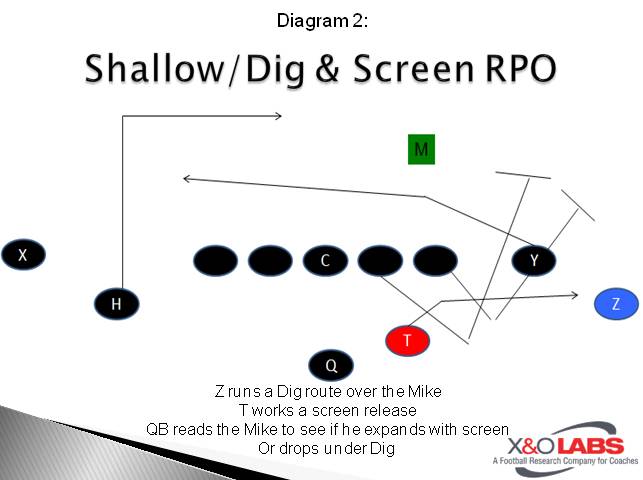
  • RPO concepts are running rampant in the minds of offensive coordinators.  Aside from the traditional stick/draw, inside zone/bubble or outside zone/slant combinations, there is another thread starting to take shape.  We’ve spoken to numerous coaches who are finding ways to vertical passing concepts like the shallow/dig with a TB screen concept (Diagram 2). In these plays, the play side inside linebacker being he movement key. If he works out to the screen (following the releases of the play side lineman) the dig is wide open. If he sits in the dig window, there is no feasible way he can work his way out to the perimeter to defend the screen. I can already hear those defensive coordinators offering their rebuttal on this one. 

slide2

Read More

Single Back Counter and Counter Read Concept

By Will Compton

Head Coach

Rudder High School (TX)

Twitter: @CoachWCompton


Editor’s Note:  Each year we ask our readers what they want to learn about in the coming year.  This year we had multiple coaches ask to hear from Will Compton, a current member of our Board of Advisors, on his powerful GT scheme. We want to thank Coach Compton for being willing to share the details to one of his most effective concepts.


comptonrudderIntroduction:

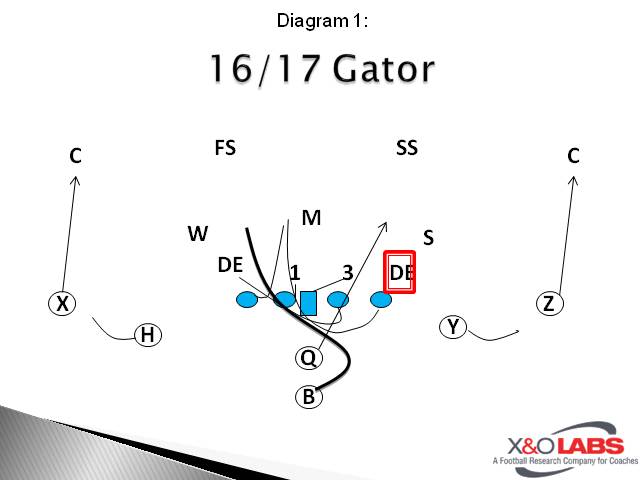
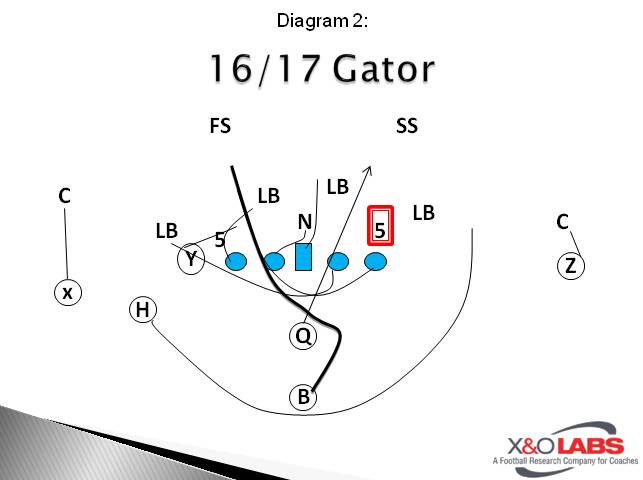
Growing up with a Wing-T background, Counter has always been one of the plays that have been a part of our “bread-and-butter” package. In the Wing-T, we always ran it towards the TE in order to get the double teams we desired to the back side linebackers. As we moved to the Spread, we were able to make some adjustments to the play that we had so much success with under center.

When I arrived at John Tyler High School in 2010 we changed the passing game so much that we left the name of all the run plays the same as what they had used before. They had always called “GT” Gator. So the name has stuck with me for the last five seasons. I have been blessed with some very talented quarterbacks that have been able to run this concept with precision including David Bush (TCU/McNeese St.), Greg Ward Jr. (University of Houston), and Braden Letney a 2016 QB at Conroe Oak Ridge. The common denominator between those three QBs is that they understood the details of the GT and GT Read allowing it to be immensely successful. This clinic report will provide the details that made them so successful.

Gator Concept:

Slide1Slide2

Offensive Line Play:

We want our offensive line to play fast and physical. For us, that means keeping it as simple as possible.  When it comes to the GT and GT Read, we keep it simple by ensuring that the blocking assignments for the offensive line are exactly the same. Instead, all changes will be made with the backs. We like this because it gives us the opportunity to get complex in the look of our plays, while allowing the offensive line to focus on the nuance of the defensive alignments.

Offensive Line Rules for Gator and Gator Read:

Play Side Tackle:

  • Against a 5-technique with no inside threat: False step (also known as a “dick block”) the defensive end and then work to back side LB. He must lock onto anything in his path.
  • Against a 5-technique with inside threat: We teach our linemen to double team to the back side LB, stay on play side shoulder. He must stay on the double team until the linebacker climbs over the top. 
  • Against a 4-technique: Dick block and wash the 4-technique down if he goes inside. If he goes out, work to outside linebacker. 
  • Against a 4i-technique: Step with inside foot and down block the defender.

Play Side Guard:

  • Against a 3-technique: Step with play side foot and punch play side arm, while double teaming to the back side LB. He is responsible for the back side LB if he runs underneath. 
  • Against a 2/2i-technique: Step with play side foot, stay on play side shoulder blocking the defensive tackle down. 
  • Against a 1-technique or nose guard: Step with the inside foot, staying on play side shoulder and double teaming to back side LB. He must stay on double team until back side LB climbs over the top.

Center:

  • Against a play side 1-technique: Pull flat and trap block the first man to show on the other side of the play side guard. We teach him to stay on the up field shoulder. If you can’t get him kicked out, log him. If nobody shows, he will pull and seal to the inside.  
  • Against a back side 1-technique or a 2-technique: Block back staying on play side shoulder or cut to the back side.
  • Against a nose: Step with play side foot and expect a double team from the play side guard to the back side LB.

Backside Guard:

Read More

Using Force and Vise Fundamentals to Fit the Run Game

By Kelly Ledwith

Defensive Coordinator and LB Coach

Western State Colorado University


wscu1954-38Introduction:

Our defensive production in 2011 forced us back to the drawing board. We had just allowed over 190 yards per game rushing on our way to a 10 loss season. When our opponents ran the ball our fits were never consistent. From week to week, we tweaked our fits to match each offense and it really slowed our players down and often led to missed assignments. After much reflection, we realized that we needed to do was simplify our system after a disastrous year to allow our players to focus on the essentials of defensive football; running, tackling, winning their one-on-one matchups and playing with a killer instinct. 

With that said, we didn’t want to restrict our calls because many offenses require us to give different looks and make in-game changes to coverages, fronts and blitzes. Instead, we created a structure with simple rules and terminology to allow our players to play fast and attack the offense. By keeping it simple enough that everyone knows all the rules, we found we rarely get players asking us “who was I supposed to have that play?” We also noticed that our players felt much more comfortable doing their own jobs and our missed assignments went down.

Fundamentals

To begin with, we are a base 3-4 structure, so we designed our system using the four linebackers as the key components to stopping the run with the idea that we can create an 8-man box by blitzing one and replacing him with a safety. The first guideline we teach our players is that if they are in the pressure (LB, DB or DL), they play the gap that they blitz through and splatter (spill) all second level blocks by playing the inside half of each second level block (Diagram 1). We term all pullers and RBs as second level blocks. This prevents our players from being trapped and allows us to change the fits, as an offense sees it, depending on who is in the pressure and who is not.

Slide1

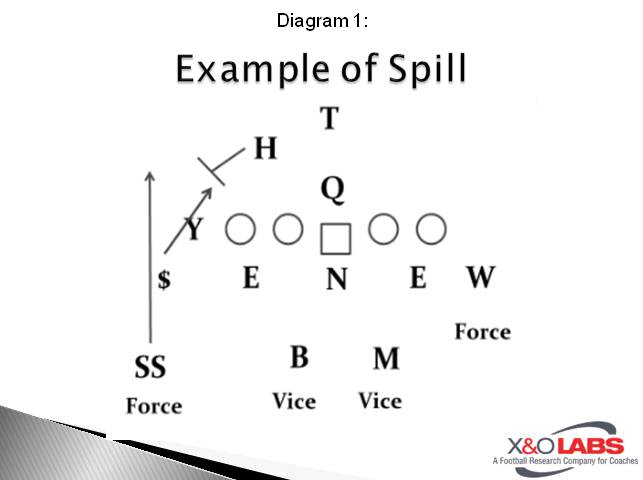
Defining Force and Vise:

Our defense will have two “Force” players and two “Vise” players. Our “Force” player’s guideline is to cage all blocks and send the ball back inside. Their goal is to fit the outside half of the “H” back or receiver whenever possible. We want them to take on the outside shoulder violently and crash the block back inside if it is a block in the backfield. If the block is on the perimeter, we want the “Force” player to fit vertically through the outside half of the back to make the ball carrier stop his feet. If the “Force” player comes inside the block, they must make the play. 

The “Vise” player’s guidelines are to try to fit the insert block on the inside and outside half like a vise.  We teach the front side “Vise” player to do one of two things based on own size. 

  1. If we have a more athletic and smaller body, we teach the “Vise” to rip and run on the front half of the block. 
  2. If we have a bigger stronger type of inside backer, we teach him to blast through the front half of the block using a “butt and pull” move. 

The back side “Vise” player is responsible for staying behind the ball and playing all cutback runs. Often times this means that when the ball goes wide, he becomes a free runner. We can also blitz an interior linebacker and replace the “Vise” with the safety dropping inside (Diagram 2). This concept is easiest to see in our 4 under 3 deep concepts, as we will have two “Force” and two “Vise” players at all times. In this concept we remind our “Force” players to cage everything and we ask our “Vise” players to bump to the “H” back/receiver to allow for downhill fits. They should always be looking to leverage the ball to the nearest “Force” or “Vise.”

Read More

Varying Backside Cut Points in the OZ

By Mike Kuchar

Lead Research Manager

X&O Labs


Editor’s Note:  The following research is part of XandOLabs.com special report on the Middle and Outside zone scheme, which can be found in it’s entirety by clicking here.


ummankatoBackside Blocking

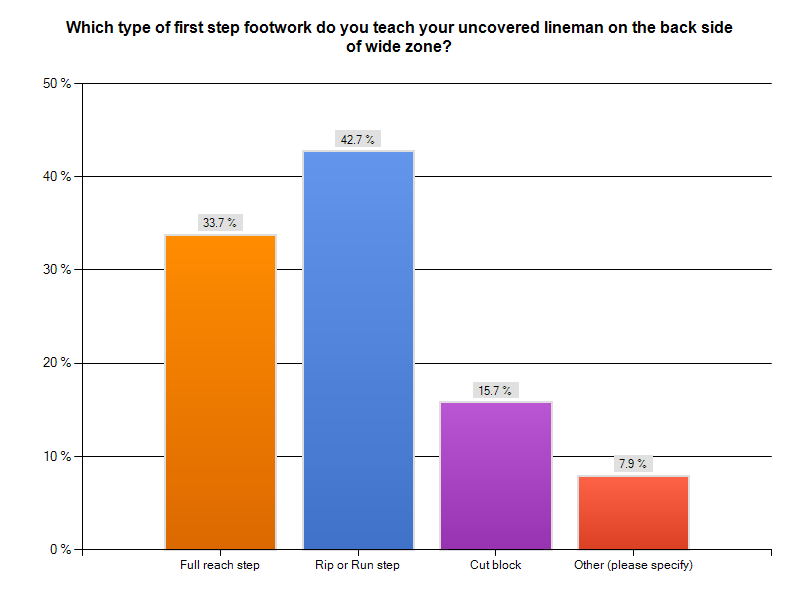
The backside of the stretch or middle zone concept is different than the inside zone concept, mainly because the scheme is not intended to cut behind the front side A gap like it is in inside zone.  Therefore, it may be possible to “cutoff” the backside by getting defenders on the ground.  When we asked coaches what they preferred to do on the backside of wide zone concepts, 42.7 percent said they teach a rip to run technique, where 33.7 percent teach a full reach or scoop scheme backside.  Only 15.7 percent choose to cut block on the backside.  

chart23

We felt this could be due mainly to a large population of high school coaches who simply don’t spend enough time on the cut block technique because it is illegal in some states to do so.   Regardless of the technique on the back side, the visual aiming point was constant- 40.9 percent use the far number of next adjacent first level defender play side as a visual target. 


Rip to Run Technique

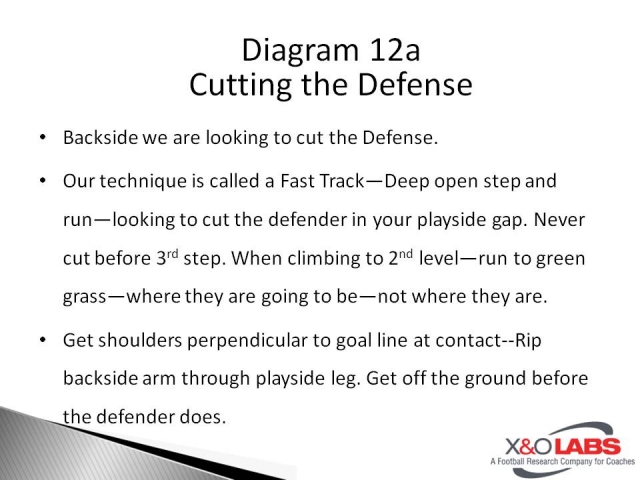
Jason Eck, the offensive line coach at the University of Minnesota State Mankato talks about a “fast track” technique on the backside of his wide zone concept.  “It’s deep open step and run and we’re looking to cut the defender in our play side gap,” said Eck.  “We never cut before 3rd step.  When climbing to the second level we run to green grass—where they are going to be—not where they are. The point is to get shoulders perpendicular to goal line at contact–Rip backside arm through play side leg. Get off the ground before the defender does.”

Slide12a


To see cutups of the backside Rip to Run technique backside, click on the link below:

Read More