Adjusting Your PAP’s to Attack Defenses

By Gerald Hazzard – @CoachHazzlec

Offensive Coordinator

Lake Erie University


Editor’s Note:  Assistant Head Coach Gerald Hazzard joined the Storm coaching staff as the offensive coordinator in January 2007. Hazzard was the first assistant hired by Mark McNellie. LEU finished 2013 as the second ranked offense in Division 2 averaging 551 yards per game. Hazzard coaches the quarterbacks and has produced 18 all GLIAC performers in 4 years. A 1999 graduate of North Olmsted High School, he was a three-year varsity fullback and linebacker. The Cleveland native and his wife, Emily, married in June 2007. The couple resides in Painesville with their children Gerald IV and Lucy.


Philosophy

lake-erie-collegeEvery Sunday when we start to breakdown our next opponent our top priority is to make sure that we are able to run our zone schemes against all of the fronts they show on film.  We will divide the film we are watching up by formation and make sure we look at each clip that our opponent has played during the season.  Once we have established that we can run our zone schemes against the looks that are on the film we will next determine what formations are the most advantageous to use.  This step may lead us to use the same formations we have been using all year or it may lead us insert new formations for the week.  This is a great way to broaden your attack and keep the defense on their heels.  Our next step in game planning is to make sure that we have at least one play action pass off of each of our zone looks.  It is our general philosophy to keep our run/pass ratio as close to 50/50 as we can.  Having a diverse play action package goes a long way to helping us accomplish that goal. 


Main Objectives in Game Planning PAP’s

When we designed our zone play action package we had three main objectives in mind.  The first objective is to take advantage of the reaction of the second level defenders and complete quick passes to skill guys in space.  We will run zone 35-40 times a game if we can.  Second level defenders have to respect our commitment to running zone and are often caught out of position against a quick throw.  Our tight end and our slot receivers are our main targets in our quick hitting play action plays because defenders get caught up in run flow so often they lose their responsibilities in the pass game.

Read More

Route Variants in the Boot and Naked Pass Game

bootlegBy Mike Kuchar

Senior Research Manager

X&O Labs


Perhaps there is no other topic more universal than the Naked or Boot pass game. Regardless of the offensive system you run, chances are you have some form of Naked, Boot or Waggle action off of your most productive run schemes. This could be the reason why we had so many coaches respond to our survey on this topic.  Below we present our findings on this concept- focusing mainly on different kinds of pass routes that can be employed with this scheme. But before we get into the specifics, there are a few items of research we’d like to share:

  •  48.7 percent of coaches use the boot or naked pass between 10-25 percent of their offensive schemes.
  •  43.9 percent prefer running the boot in early downs (1st and 10)

Editor’s Note: While we realize that many coaches classify Boot and Naked concepts into two different plays, we asked our readers to select their most productive scheme between the two and elaborate on it.


Because the Naked or Boot scheme can be used off of various run actions, we figured we wanted to present our results on which run actions were most favorable (based on our readers) to use the boot action off of it:

  • 28.1 percent of coaches prefer an inside zone run action and boot or naked away from it.
  • 22.7 percent of coaches prefer an outside zone run action and boot or naked away from it.
  • 21.5 percent of coaches prefer a gap scheme such as a counter or power run action and boot or naked away from it.
  • 8.2 percent of coaches prefer a fly or jet sweep run action and boot or naked away from it.

Case 1: Protection

* For the purpose of this report, “back side” refers to the offensive line AWAY from the run action- which is the side TO the boot action.


We all know that nothing works in the pass game without the proper protection, so we’d figured that would be a good place to start our report. It’s important to note that we decided to combine both the Naked and Boot concept for the purpose of this report because they can be so similar in nature in terms of the route progression. But, we did find that the protection in these two concepts could be totally different and in fact where split down the middle in our research. Here is what we found:

Research on Protection

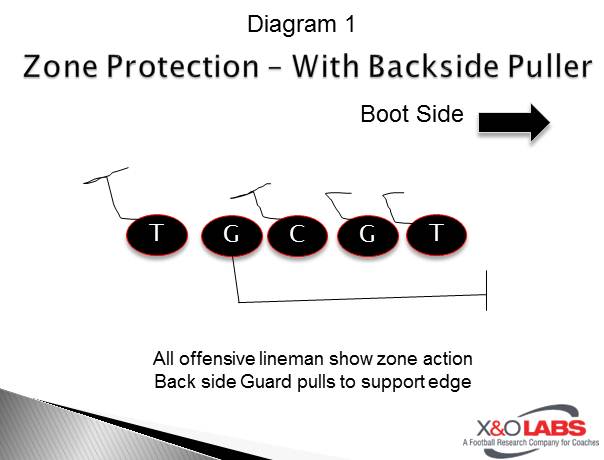
  • 37.4 percent of coaches prefer to use zone protection away from the run action with ONE backside puller (Diagram 1).
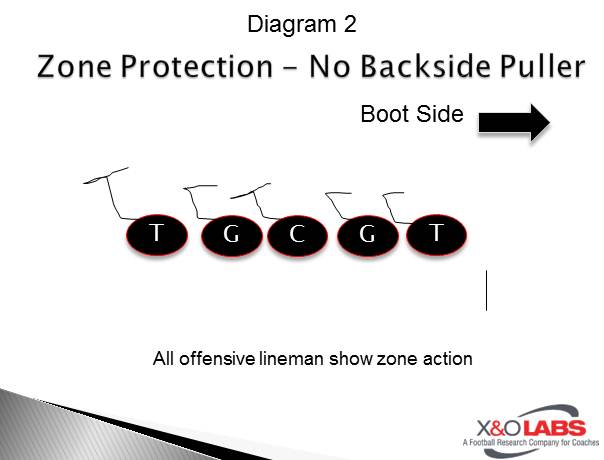
  • 35.8 percent of coaches prefer to use full zone protection away from the run action with NO backside puller (Diagram 2).
  • 21.1 percent of coaches prefer a mix of both man and zone protection.

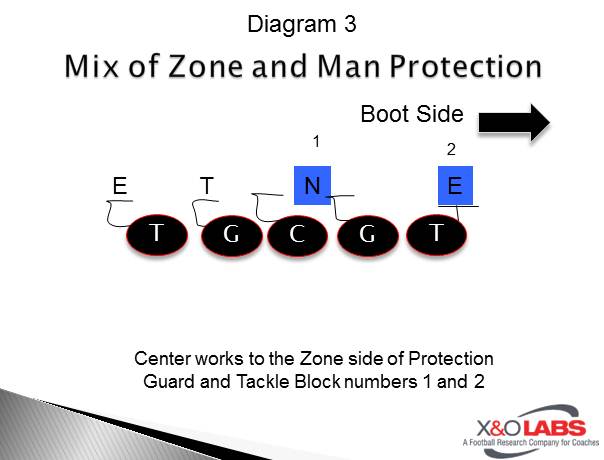
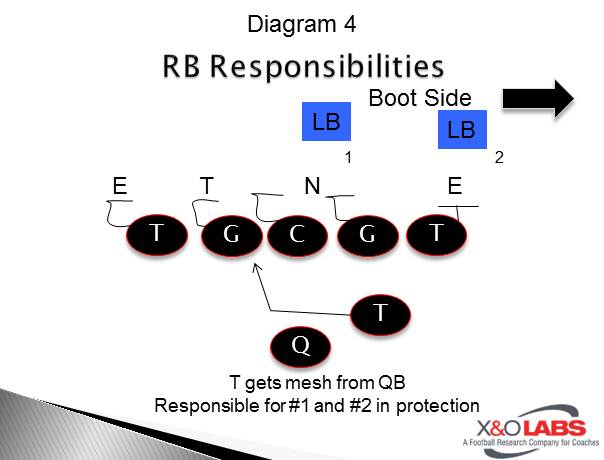
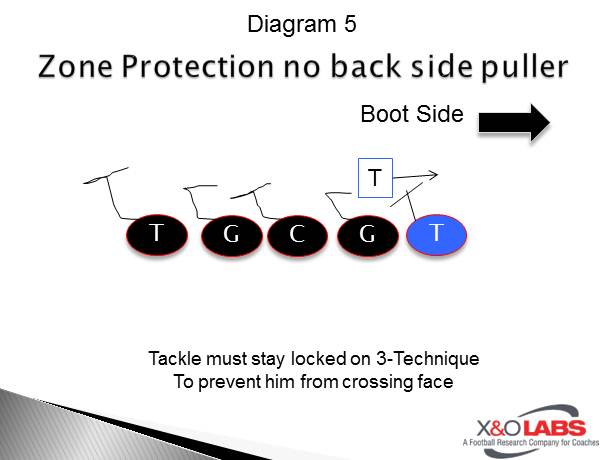
We were actually hoping for more of a discrepancy between these two concepts, but it seems coaches like it one way or the other- for various reasons which we will detail below.   Dave Schramm, the offensive coordinator at Fresno State University actually combines a zone and man protection scheme in his boot pass package.   Schramm will zone protect to the front side of the run, and man protect to the backside of the run (which is in turn the boot side).   In his protection, the Center will work towards the zone side, while the backside guard and tackle will block number one and number two respectively to the boot side (Diagram 3).  This prevents from any hard edge rusher up the field in the QB’s face, forcing and errant throw.  Schramm will also have the single back in his one-back schemes be responsible for both inside and outside linebacker (1-2 in count) after getting the mesh from the QB (Diagram 4).  One of Schramm’s major coaching points is to make sure the backside tackle MUST stay locked on a three technique or a 4i technique to prevent him from crossing his face (Diagram 5). 


Coaches that swear by the full zone protection do so because the hard zone action causes a freeze in second level defenders such as linebackers or safeties, allowing intermediate routes to clear behind them. Dale Sprague, the offensive coordinator at Allegany High School (VA) teaches his offensive lineman to take a bucket step to block one gap away from the boot side. Sprague calls it a “hard reach” step while pulling the backside guard. “Our backside puller pulls flat until he crosses the center, at which time he gains depth to find the first defender outside the play side tackle and/or Tight End. There are some boots where we will pull the Center if need be, especially if he is uncovered.”

Doug Taracuk, the offensive coordinator at Dublin Scioto High School (OH) felt that he just didn’t have the offensive lineman who can zone block, so he went more to a gap scheme protection up front- which he calls his “Gut” scheme. In his Power naked scheme, Taracuk will have the backside tackle block any B gap defender (to simulate Power) while the backside guard pulls. He tells his Tackle to stay on the double team and if there is no B gap first level defender, to sift hard, stay low and get to heels of defensive lineman- which he calls “Nebraska”- a term to remind his lineman not go up field. “We leave the End unblocked, and try to get the QB out and around,” said Taracuk. “It screwed opponents reads- because they read tackles and get run reads.”

Read More

Combining Power & Triple Option Schemes?

By Scott Girolmo – @CoachSGirolmo

Offensive Coordinator

Liberty High School (VA)


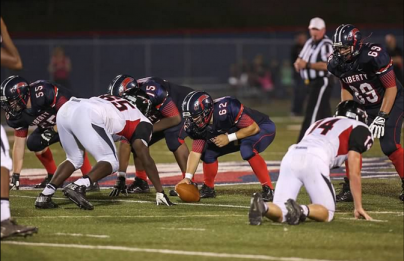
libertyEditor’s Note: Coach Girolmo grew up as a player for his father Steve Girolmo at Livonia High School in Western New York. A graduate of Cortland State (D-III – NY) he has coached at Castleton State College, and Western New England University as well as made stops in high school at his Alma-Mater Livonia and Liberty high School in Bealeton, VA.  In 2012 he took over the offense at Liberty and has installed an ever-evolving hurry up no-huddle philosophy that mixes schemes from across the spectrum. As the Offensive Coordinator in their 2013 campaign the Eagles offense averaged 34.2 points per game, and was the 10th ranked offense in VHSL 4A. Scott is a diehard clinic enthusiast and encourages interactive Q & A regarding any of his contributions to the site. 


We are a hurry-up no huddle offense, that runs multiple personnel groups, formations as well as a mixture of schemes from across the offensive spectrum. Our most effective run-schemes the past two seasons have been our power runs. Our identity has always been power oriented in my 3 years here at Liberty. Knowing this, I made a point in taking over the offense in 2012 to find ways to incorporate that into some of the new innovative backfield and perimeter schemes I wanted introduce. Thanks to the help of some bright coaching minds, I was able to hybridize my favorite backfield action – the shotgun inside mesh read and pitch phase, with the power o run scheme. The result, I believe is a very sound, and formidable run play that can yield phenomenal results for teams with sub-par talent, and a blue-chipper’s alike. Not only will this make a major impact at the high school levels, but I believe that it will explode in the college ranks, when coordinators with agile and athletic QB’s get their hands on it.

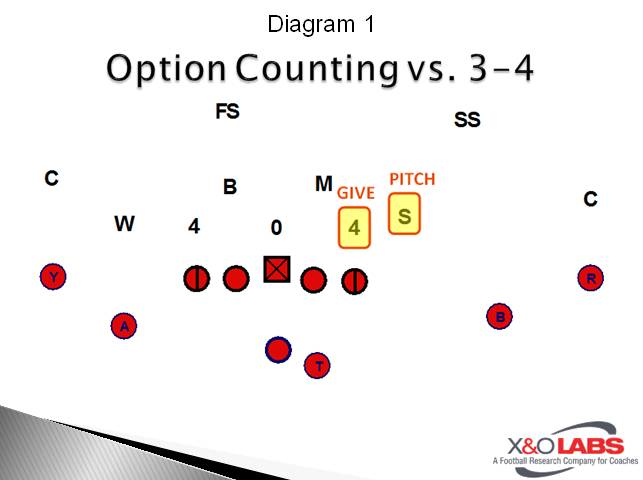
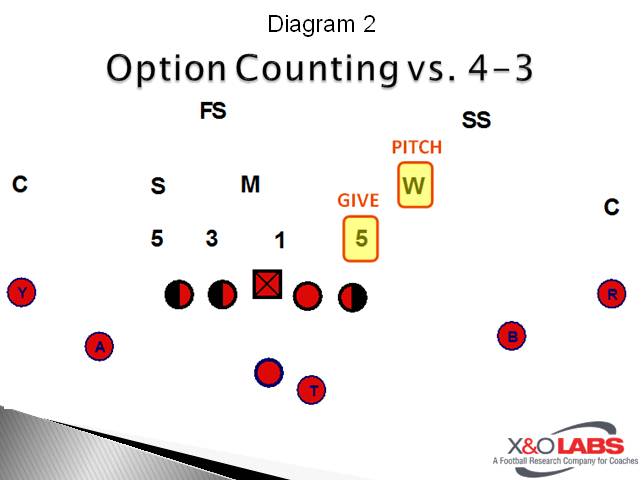
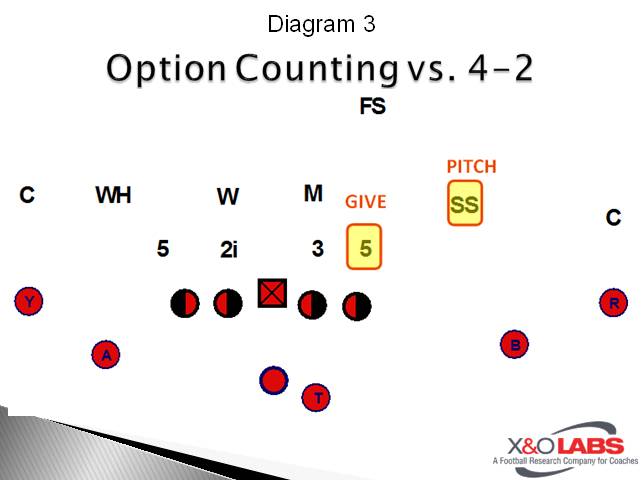
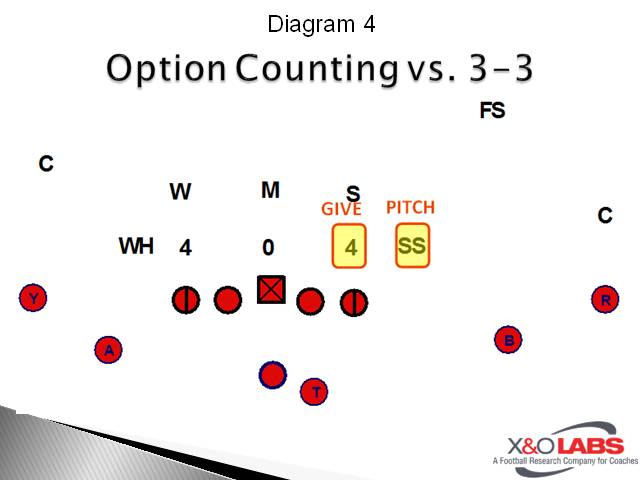
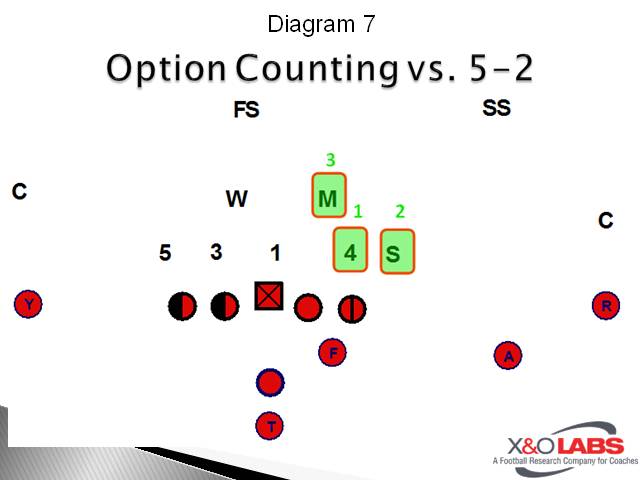
The surface run scheme for our 5 offensive linemen is the same in our power triple as it is in our power hand-off play. This allows us to practice, and play much faster as those guys up front don’t have much thinking to do. This will fall in line with many offenses looking to go hurry-up, and also those that are lacking talent/intelligence or practice time. Creating confidence in their roles on each play allows those offensive linemen to play to their maximum speed and effort. The magic happens with our “tags” for inside mesh read, and triple option. When we begin to change the moving pieces behind our surface, we not only create extra gaps with the pulling guard, but we free up extra blockers by reading 2 defenders play-side. Our option counting system can even be combined with our power counting system to give our QB the ability to check to a power triple against a number’s or alignment disadvantage. In our option counting system, we teach our kids that the first player from the play-side tackles NOSE – OUT is our GIVE key. The next most dangerous defender from the GIVE KEY- OUT is our PITCH KEY. Below is an example of our option counting system against a 2×2 formation (Diagrams 1-4).

Slide1Slide2Slide3Slide4

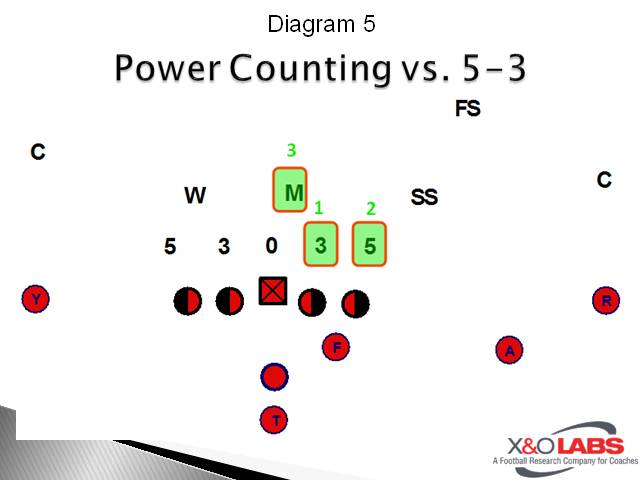
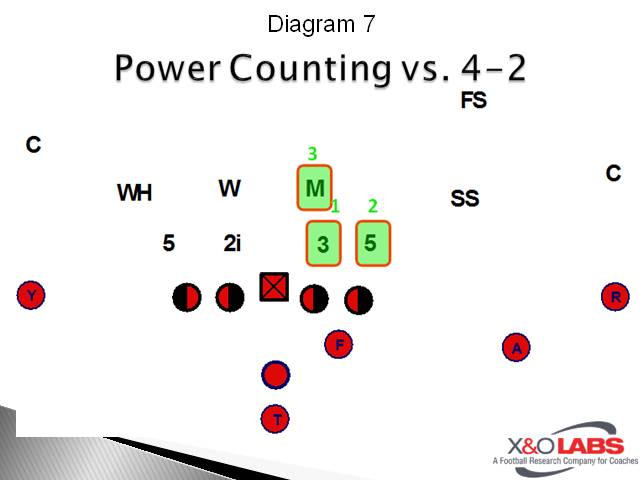
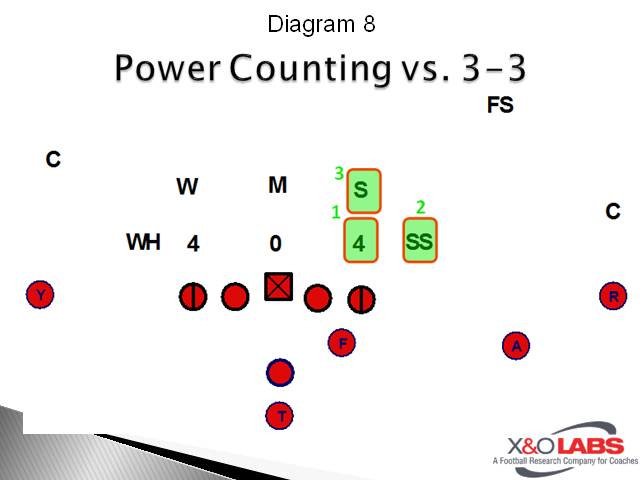
As you can see, some alignments are more advantageous than others. We use a very broad range of formations to help create advantages where none exists. This is also evident in our power counting system. We use the power counting system to both designate where the play-side combination block will occur, and to alert to where the puller and runner attack points are. Our play-side tackle dictates where that combo occurs by recognizing the technique, and anticipating the reaction of the 1st defender outside of the adjacent guard. He will down block, or call for a combo on that #1 player. If that player is a 4 tech (head up on him), the Tackle will base zone drive him himself with a B-GAP attack point as his target. The 2nd most dangerous defender is blocked by our fullback/h-back, and the #3 defender is the target of our pulling back-side guard. Below is an example of our 2-back power counting system (Diagram 5-8).

Slide5Slide6Slide7Slide8

Read More

Training the DE/OLB Gap Exchange

By Jason Davis – @jwdavis13

Defensive Coordinator

Farmersville High School (TX)


Editor’s Note:  Coach Davis will be entering his third year as Defensive Coordinator at Farmersville High School in Texas.   Coach Davis has coached for a total of 13 years, all of them in the Texas High School ranks. 


Introduction

CaptureReaction time and recognition are the keys to getting defenders in a position to make plays.  For us, that starts in the box with the way we read the opposing offensive tackles.  Our goal is to make sure that regardless of their technique, they will be wrong.  That is to say that if our guys execute our techniques we will be able to fill the appropriate gaps regardless of that tackles action.  We use his technique to quickly determine assignments within our “Gap Exchange” scheme resulting in better fits and more consistent pursuit.  Here are a few of the reasons we have found this to be effective for our team:

Reason #1 – Simplest Way to Define Responsibilities

It is the easiest way for our ends and backers to be responsible for both gaps quickly and efficiently.  We found that we played the counter, zone, and power a lot better because it eliminated a lot of doubt for our kids.  It also allows our kids to play fast and makes us difficult to block. 

Reason #2 – Cleaned Up LB Pull Read

The second reason is we used to try and get our backer a run through when he got a pull from the guard or tackle to his side.  We rarely got him through the line of scrimmage without getting picked up.  Then we tried letting our backer scrape flat with a pull from his side, but they always got picked up by a down block from the other side.  Our end would squat and be responsible for the quarterback on the read.  Regardless, we felt like we wasted two of our players, because we found that our DE is difficult to block chasing down the puller. 

Reason #3 – Not Wasting Players

This scheme allows us to play the backside of a counter or zone scheme without wasting our end and backer.  Their reads get them both into a proper gap and help them better understand what might be coming their direction.  Our guys know pretty much what to expect based on their tackles actions.

Reason #4 – Plays Into Strengths

The last reason we like our current scheme is that our ends are really good at playing a kick out block and working into “B” gap so we had to get a guy to “C” gap.  This strength / technique makes it really hard for a pulling tackle to wrap up on the linebacker putting us in a better position to make the tackle.

Base Defensive Alignments

We play an even front versus gun one back teams.  Our defensive tackles align in two techniques and are responsible for “A” gap. The defensive ends are in are in a three point stance, slightly toed out and attack/read the hip of the offensive tackle.  We want our defensive end to stay on the heal line unless his tackle pass sets. The inside backers are head up to the offensive tackles in a 40 technique about four and half yards deep. 

The defensive tackles will always line up in two techniques.  We never want the guard to have an indication of the gap the defensive tackle is responsible for pre-snap, but versus most zone and counter teams our DTs are responsible for “A” gap.  Our tackles attack the bottom of the number of their guard with both hands and work into their gap trying to get to the heel line while keeping their shoulders square to the line of scrimmage.  The DT’s know that their gap has the potential to move with a zone scheme and these guys will work to stay in their gap.  If the center blocks back on them they will work to cross the center’s face.  Our defensive tackles rep this every week in hopes that it becomes second nature to them.

The defensive ends align as tight as they think they can personally align to the offensive tackle without getting hooked.  On the snap, the ends will attack the hip of the tackle and read his facemask to determine our next move. 

Read More

Varying Supports in Zone Pressures


By Wagner College Defensive Staff


Editor’s Note:  After starting the season at 0-3, Wagner College rolled off nine consecutive wins en-route to a FCS playoff birth-the first time in school history- and they did it with defense.  Wagner was first in the Northeast Conference in scoring defense yielding only 17.4 points per game and total defense surrendering just over 320 yards per game.  X&O Labs Senior Research Manager Mike Kuchar spent some time this past Spring talking football with the Seahawks defensive staff.


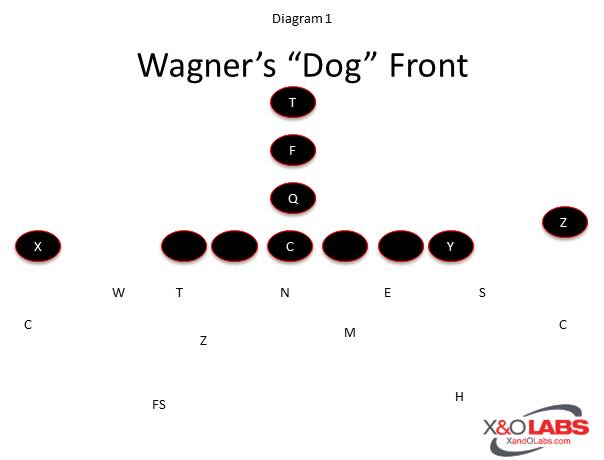
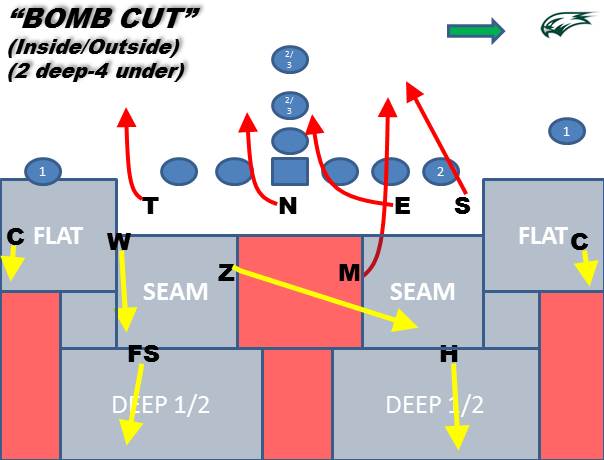
After having tremendous success defensively last season which included a run deep into the FCS national playoffs, the Seahawks are beginning to experiment with new forms of pressure this spring, including at two-deep four under concept from their “Dog” or Okie Front (Diagram 1).  After running mainly three-deep, three-under blitz rotations last season, defensive Coordinator Malik Hall and his staff decided to integrate some two-deep concepts to keep offensive off-balance.  “It takes away the three step game which we were tired of giving up,” said secondary coach Ryan Fullen.  “We are a quarters coverage team by nature, so we keep the two-deep shell plus we also don’t give up the flat so quickly as other some three-deep, three-under structures.”

In order to disguise its pressures, Wagner will use a “walk out” technique by its Corners post-snap, regardless of whether it is a two-deep or three-deep rotation.  “It confuses the QB because he sees a hard corner post-snap,” says Fullen.  “You can get him to clutch the ball on the snap or cause an interception because the QB doesn’t see the corner squatting.”  Assistant head coach Tom Mesalla agrees, “There comes a point in time you want to eliminate the quick game,” he told us.  “Those players are too good to see the speed out by the QB.  There are also times where the CB’s are really not that good.  Cover Two protects those Corners.  In Quarters coverage or in three deep they are on an island. “

Cut Coverage

Wagner understands the importance of teaching coverage first before any blitz pattern, it’s a lesson learned by Mesalla when he was the defensive coordinator at Louisiana Tech in the early 2000’s.  “We used Razor, Blade and Cut as words that denoted two deep zone pressures,” he said.  “It eliminated confusion in our kids.  They knew right away by the call what coverage we are in.”  Mesalla brought the same philosophy with him to Wagner and taught it to Fullen, who was an assistant with Mesalla when he was the head coach at Fordham.    Now in the Seahawks scheme, Cut coverage means there is NO rotation in coverage and the inside and outside linebacker to the same side will blitz.  One of the more prominent calls is called “Bomb” (Diagram 2).    While Mesalla admits it’s a good pressure to the field side, it can be used effectively against the strong side run game with a tight end.    In theory, the Corners are responsible for any flat threats, while the Safeties are the deep halves players, playing on top of number one. The linebackers that are not involved in the pressure are “seam” players, meaning they must carry the vertical of any number two receiver.


Cloud Support

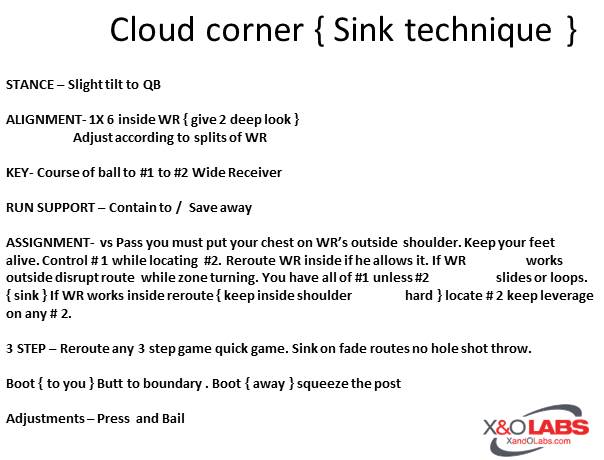
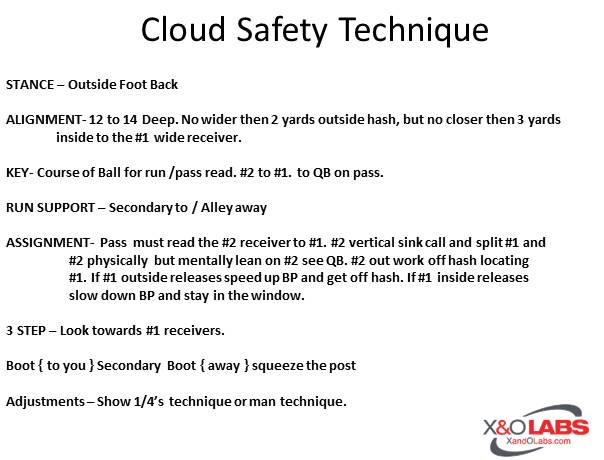
When first teaching the coverage, the Wagner staff teaches “Cloud Support” for its secondary.  The Day One installation rules that the Corners and Safeties get are below (Diagrams 3-4).


It all starts with Cloud, then we transition from there,” said Mesalla.  “Cut is a good complement to three-deep zone pressurs because there is no free access throw.  The QB has to read through his drop to see what the corner is doing.  But our first two steps as a Corner are the same- we take two steps back and either square up to play Cloud or open up to play Clamp (a support call which will be discussed later). Their first two steps should look exactly the same.  “We want to end up in a position on the outside shoulder so that we can reroute.  We teach an inside outside pin with our back to the ball.

Corner Technique

If we get an outside release, we are going to punch with our inside hand, then punch with my outside hand to pin and read number two.  If two is vertical, I carry number one (Diagram 5).  If number two slides, I will come off and play number two (Diagram 6).  There should be no hole shot in Cloud because the Safety will be there.  Once the corner controls number one with a reroute he must find two and see what he is doing.  If there is no number two, carry one until two shows.  If two is vertical, I must sink.  If two is inside shallow, I can level off (Diagram 7).  If two is off, I have to slide off and settle.  We must zone turn inside.  We can’t baseball turn (man turn) without seeing number two.   If both receivers are vertical, we tell our Corners that physically we are splitting both, but mentally they need to cheat inside because that is the shorter throw. The Corner is not responsible for number three in the flat. It’s the hardest coverage to teach.”

Read More

RB Keys to Identifying & Attacking Pressure

By Timothy Zetts – @zettstim

Runningback Coach

Fordham University

unnamed2Editor’s Note:  Fordham University just completed one of the best seasons in the program’s illustrious history and Coach Zetts, helped play a major role.  A former University of Akron quarterback, Zetts begins his third season on the Fordham coaching staff after serving as an assistant coach at Indiana University of Pennsylvania in 2011. He will again guide the Rams’ running backs in 2014. Last fall, senior Carlton Koonce, a preseason All-American and a Walter Payton Award nominee, became just the second Ram to rush for over 1,000 yards in consecutive season, finishing the year with 1,462 yards. He led the Patriot League and was 16th in the NCAA FCS in rushing average, earning first team All-Patriot League honors for the second straight year. 


Teaching pass protection to a running back is one of the more difficult things to do within the position for a variety of reasons: 1) Depending on your scheme, running backs are often undersized when compared to the linebacker they are facing, 2) Backs do not usually have an “aggressive” blocking mentality and 3) It is sometimes hard to diagnose where the pressure is coming from – making it hard to get the body in position to make the block. That being said, there is never an excuse for a running back not to execute at a high level in pass protection. It is vital that our running backs are able to win in pass protection – our offense depends on it. We cannot be ball carrying specialists.

Identifying Pressure:

unnamed1

We refer to any linebacker-only pressures as “Dogs” and any type of secondary pressure as a “Blitz.” A lot of times there are tendencies you notice when game planning that will help get the eyes to the correct vicinity of the field. As a unit, we devote about half our time watching pressure reels during a game week. While we are doing this, there are a couple of things we focus on:

  • Tendency a team brings pressure vs. down & distance
  • Specific field zones of pressure (field or boundary)
  • Whom they like to blitz most often
  • Any tips in their front/alignment/secondary rotation that we can take advantage of
  • What the individuals’ best pass rush moves are (bull rush, spin, push/pull).

My own personal belief with running back pass protection is the players are not going to understand how important it is unless you constantly emphasis it. Here at Fordham we focus a lot of our attention on pass protection because that is an area that does not come natural to everyone in our position group. Our room has ability to make a big play using their feet – but the thing that will get you on the field, and separate yourself from the others, is the ability to block.


Pass Pro Non-Negotiables:

I start by teaching the basic fundamentals of pass protecting (some of which were introduced to me a while back by Reno Ferri, Towson running back coach). There are four basics that we talk about:

  • Diagnose the pressure
  • Attack the pressure
  • Protect the pressure
  • Eliminate the pressure

It is vital we diagnose the pressure as soon as we possibly can to put ourselves in position to win. We never want to turn our attention away from a pressure to allow a free run at the quarterback. One of the most important things to do is identify the most dangerous person/people on the field that will make our job the toughest. Often times, especially on play-action protections, our body/eyes turn away from an ID backside so I always say, “eyes to the blind spot pre-snap”. If things look suspicious make sure you are in the clear before executing your fake (protection before fake).

Another reason we always want to diagnose the pressure as soon as possible is so we can attack and make the collision as far from the quarterback as possible. Attacking allows us to make contact with the linebacker before he is able to get a full head of steam. The less power he has, the better for us. The next thing we want to do is protect the imaginary line between the man we are blocking and the quarterback. We want to make sure we take away the defenders inside half when blocking. If we get a good piece of the defender, we then try to find his inside hip to try and wash him past the quarterback. If you are able to find his hip, you now gain control of his center of gravity. The fourth, and most important, is to eliminate the bull rush. A back’s biggest fear is being run over. To eliminate this, we have to make sure we make contact with a good, powerful base. I always emphasize that just because there is pressure, that does not mean we have to be the nail – we should always have the mentality of being the hammer.

To see a video tutorial on how Coach Zetts teaches his RB’s to abort the fake, click on the link below:

Read More

Hokies Short Yardage Coverage


By Mike Kuchar

Senior Research Manager

X&O Labs

Editor’s Note:  We all know the success that Virginia Tech has had on the defensive side of the ball.  Defensive coordinator Bud Foster and the rest of his staff have continually developed top tier defensive units.  X&O Labs Senior Research Manager Mike Kuchar spent time talking with Torrian Gray, the Hokies defensive back coach, talking about Cover 89, the Hokies short yardage coverage.

Philosophy

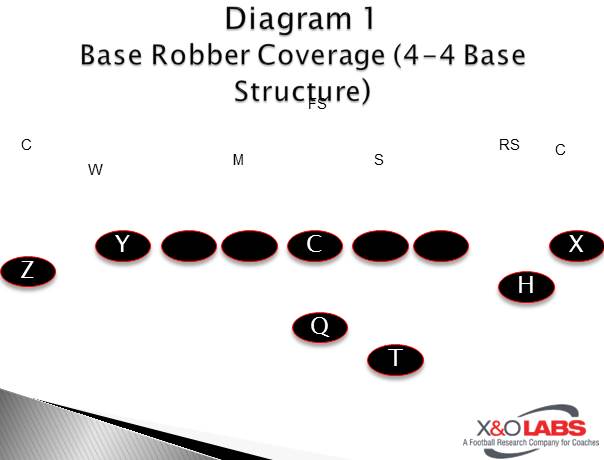
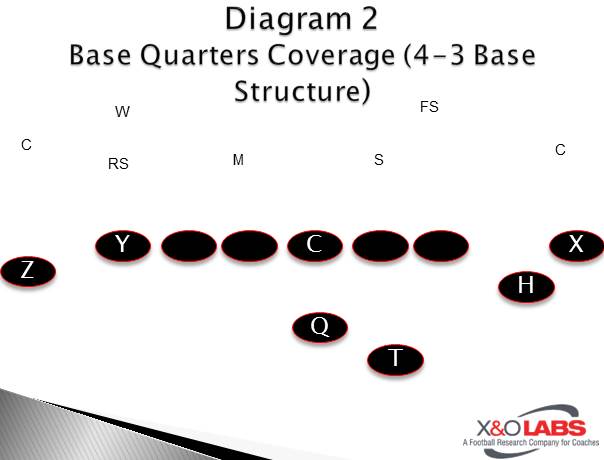
The Hokies traditional defensive structure is generically made off of two fronts- a 4-4 “G” package that Bud Foster helped develop and honed into a dynamic unit against pro-style offenses.  It consists of a four-down front with two interior linebackers (Mike and Backer) two exterior backers (Whip and Rover) and a Free Safety meant to “rob” any underneath routes (Diagram 1).  For the last few years, Virginia Tech has used more of a 4-3, Quarters type structure (Diagram 2) particularly against some open sets that the Hokies have encountered in the Atlantic Coast Conference.

In Virginia Tech’s terminology any even numbers (0,2,6,8) represent that “G” package while odd numbers (1,3,5,7) are indicative of the 4-3 front.  For example, Cover 8 is a base robber coverage from a 4-4,while Cover 9 is a pure quarters coverage.  When those ACC teams start to creep into the 16-yard line (or what Foster calls the red zone) the Hokies will combine both Cover 8 and Cover 9 into what they call “Cover 89” which is a man/zone matchup. Cover 8 pertains to the field side of the coverage (who is playing robber with on exception on the Free Safety which will be explained below) while the boundary side is playing Cover 9.   “Cover 8 is a pass thought progression.  It’s a pass coverage where we’re going to play in and out routes with the Corners and the Whips and Rovers. Cover 9 is a man principle backside.”

“Cover 9 is the red zone version of our Quarters coverage backside,” said Torrian Gray, the defensive backs coach.  ” The corner is locked backside and the Rover Safety is locked on two vertical on any outside release.  If the ball is in the middle of the field, we would play a Strong G instead of a Field G.”  Cover 89 consists of what is known as a “play it” or “lock it” call given by the Corners which is all based on down and distance.  The scheme will be explained in more detail below.

Cover 89 Coverage Fundamentals

We all know the scheme is always over rated, it’s the fundamentals that make plays, so we wanted to detail some of the more important coverage techniques that Torrian Gray teaches his Corners and Safeties in the passing game.

Corners Technique

Gray wants his Corners to have hard, square, inside alignment with no tilt.  “We try to deny the inside and easiest throw,” said Gray.  “We want to force the outside route and make him throw it through our body.  Against an extended number one receiver, we want to see the ball being snapped.   I don’t want to be just looking at a receiver because if he moves he’s gained leverage.  Once the ball is snapped our Corner’s eyes are going to the inside hip of that receiver.  We use a good two-handed collision to force him outside and make him throw it to our body.”


According to Gray, he doesn’t like to press his Corners inside the red zone because it invites the fade ball, which can be a particularly easy completion in the back of the end zone where space is limited.  “Some of those guys prefer pressing and sitting on the route so I let them play with it based on their individual strength,” said Gray.  “Right now I got a 220 pound guy who likes to get his hands on receivers so I will allow it, but I prefer for them not to do that.   You don’t want to give them an extra shot at the fade route because to me two/thirds of fade routes get completed.”

Free Safeties Technique

In Virginia Tech’s 4-2-5 structure, the Rover, Whip (or Nickel) and Free Safety are consist of the back end.  According to Gray, the heaviest responsibility in this coverage falls on the Free Safety who needs to match all underneath routes, something he is not accustomed to doing in the Hokies robber scheme.  This is done to free up both the Mike and Sam to make plays in the run game and take anything that flairs from the backfield.  The Free Safety’s responsibility is to handle any number two vertical route (like he would in Robber) but also match anything under routes.  “When we’re inside the 10 yard line specifically, we need to make sure we are able to jam the receiver before he can get to the option part of his route- either working inside or outside away from me,” said Gray.  “If he’s at the 10, I’d like our Safety to be at the five yard line as long as they are not in the way of the linebackers.  If the ball is inside the five, we will stay outside the end zone if possible.  If the receiver can clear our first level, we want to be able to get underneath his leverage or release.   We don’t pedal or back up.  It’s a flat foot technique or a buzz.”

Read More

Manipulating Offenses with the Monster

By David Joyce

Head Coach

Mountain Home High School (AR)


Editor’s Note:  Coach Joyce is transitioning into the head coach position at Mountain Home HS in Arkansas after serving as the head coach at Doherty High School in Colorado Springs this past season.  An Arkansas native, Coach Joyce has been a head coach in Colorado for the past 6 years, and has turned around 2 struggling programs in the state.  In 2013, Doherty won the 5A Pioneer League Championship, and won a playoff game for the first time in almost a decade.  Prior to Doherty, Coach Joyce was the head coach at Battle Mountain, and led them to the playoffs for the first time in 18 years.


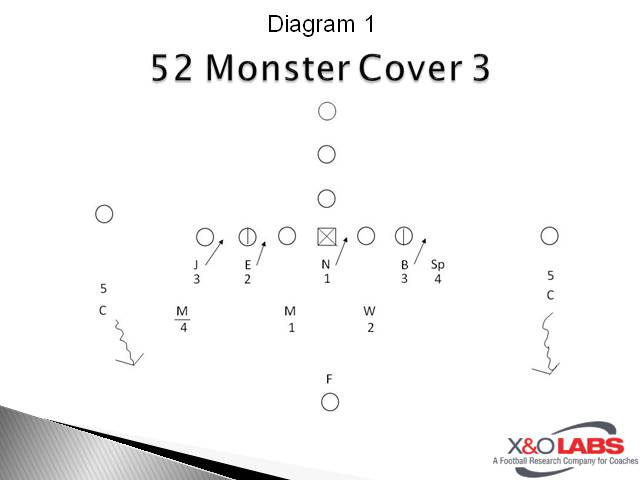
joyceDThe 52 monster defense was first used at Oklahoma and led to great success.  This defense is a trap defense at its finest.  I use the phrase trap because the defense is not symmetrical.  There is a strong side with 6 players and a weak side with 5 players.  The 6th player that creates the unbalance is known as the Monster, we refer to him as the Mobster, but I’ll get to that later.  The monster is a hybrid type player, more of your traditional strong safety/rover, capable of covering man to man, and capable of playing in the box as well.  To an offense, it appears that you should attack the weak side of the defense, as there is one less man, but this is the trap, because the defense will usually slant or stunt to the weak side creating a balanced defense, 5 on the front, 5 on the back, with the free safety head up on the center, see diagram 1.  We still use the traditional 52monster with Cover 3 behind it, but when you’re facing the spread, the 5-2 is at a distinct disadvantage.  This led to us creating the 3-2 Mobster defense.

Slide1Slide2

32 Mobster

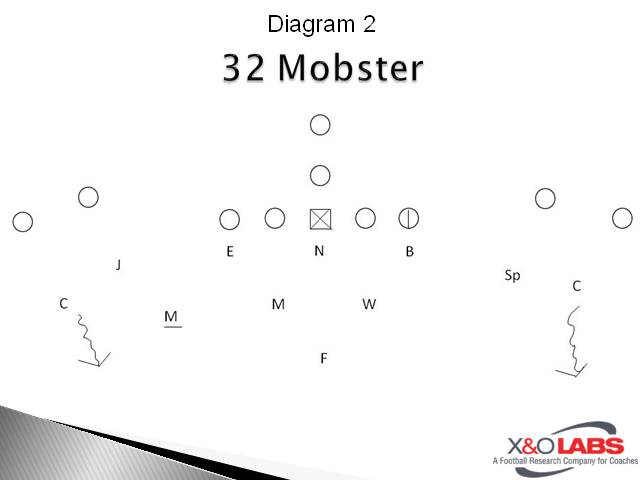
The 32 Mobster defense was developed as a spread version of the 52 Monster.  At its simplest, the defense is designed to do exactly what the 52 monster did, that is trap the offense into making a mistake and running into numbers instead of away from the numbers.  When you get further into the defense, the 32 Mobster is great at disguise, confusion, and my favorite, creating chaos.  Our base front is a 3-4 with the Mobster rolled down splitting the difference between the OLB/ILB but this is only a look.  The Mobster will always roll replace a LB.  We will usually play Robber coverage behind it.  And this is one of the many advantages of the system, as it allows you to get good at very few things, but window dress as much as you like.

Base-‘Whack’

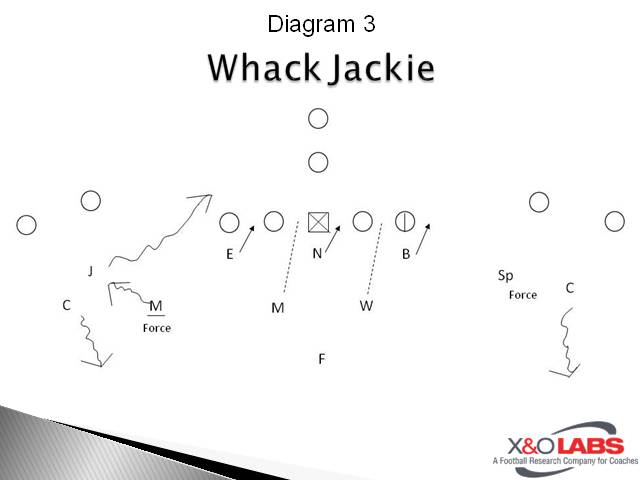
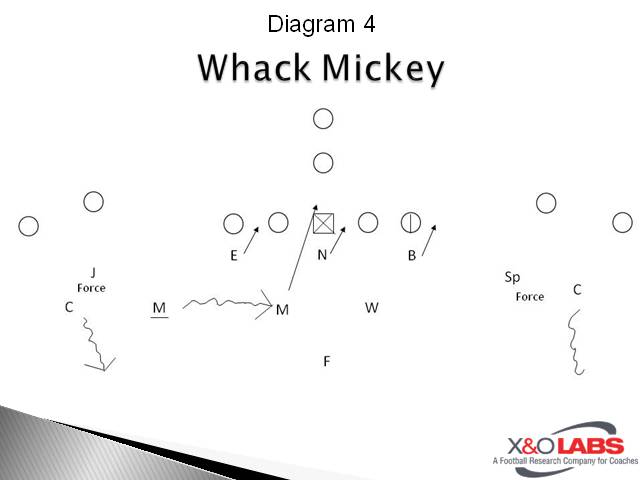
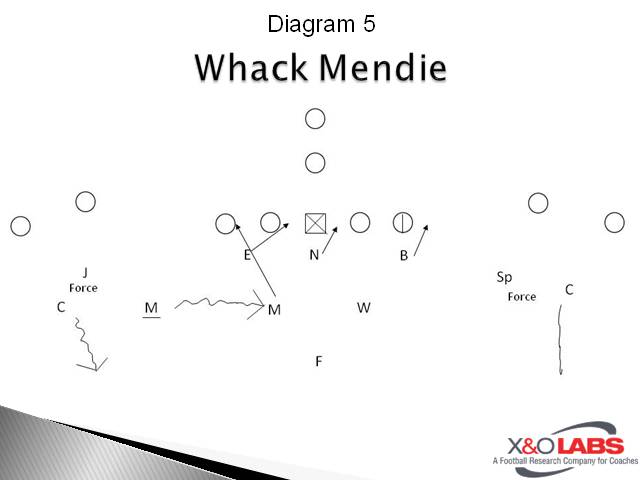
If we are facing a traditional 2 x 2 spread set, when we play our base.  Our base will look similar to a traditional 3-4 box, except our Mobster will be lined up in between the ILB and OLB to the declared side. see diagram 2.  We are setting the trap with the Mobster adding 6 defenders to one side, and 5 to the other side.  From this location, one of the 2 will be blitzing, either the ILB or OLB, with the E, N, B slanting to the weak side, we call the weak side slant ‘whack’ for weak attack.  The mobster will replace the blitzer and play his appropriate gap from that location.  For example, when we give a weak slant call “whack” and the blitzer ‘Jackie’, the mobster will roll down, then stem to the OLB’s position, and play the force defender. See Diagram 3, Whack Jackie.  This creates our symmetrical defense.

This base look has a few goals in mind for us, first, we want to create confusion with the offensive line and the QB.  If you look at Diagram 3 and Diagram 4, you will see that we create different run fits, and reads for the QB if he is running zone read.  A lot of coaches are hesitant about changing run fits, but when you are slanting and blitzing those gaps, then it’s easier for the players; and the Mobster only sees those run fits when he rolls into that position, it doesn’t change for him.  Second, we will get penetration, maybe not every time, but when the ILB or OLB blitz, the line must pick it up, and we have x stunts that we will execute and this always causes the line problems, and we can dictate where the running back will cut if we are facing the zone read.  See diagram 5 for both x stunts and zone read dictate. 

Slide3Slide4Slide5

Read More

DB Press Technique Report

By Mike Kuchar

Senior Research Manager

X&O Labs


Researchers’ Note: You can access the raw data – in the form of graphs – from our research into DB press techniques: Click here for the Statistical Analysis Report.


We all want that lock-down corner, the Derelle Revis shut down stud who has the potential to alter an opponent’s game plan and change the course of the game.  If the technique is played right, it can make an offensive one-dimensional or even cut the field in half.  But let’s be honest – chances are a Derelle Revis or Champ Bailey may not be walking onto your practice field any time soon. So you have to make the most of what you have – and that’s what this week’s Coaching Research Report is all about.

For the purpose of this report we’ll be addressing techniques used by the isolated corner.  We’ll assume he has no help, regardless of the coverage.  We’re talking about MFO (middle of the field open), no middle field defender, just a corner on the receiver.  It’s a coverage most coaches are scared to play, and perhaps rightfully so with the vertical elements the spread offense possesses.  We were actually surprised to hear that 70 percent of coaches will only press their corners if they feel he has the ability to do so.  So, we wanted to find out if it is your players’ lack of athletic ability or a reservation in your ability to teach the proper mechanics of press technique that prevents you from doing so.  Apparently it’s both.  Well, that’s why we’re in this business.   We’ve consulted with the masses that use a press technique on a regular basis and they have given you an all-access look on how you can develop your corners into dominant defenders.  Sure, that Revis-type may not be coming in the building any time soon, but after reading this report, you may not need him to.

Benefits of playing press man coverage:

  • Ability to stack the box with nine: Assuming you’ll get closed, tight end oriented sets, if your corners can play man coverage without the help of your safeties, it frees them to get down in the box and play run support.
  • Safeties can’t get cracked: Many defenses now are playing some form of quarters coverage to contend with the vertical pass game (Note:  X&O Labs will be finalizing a Coaching Research Report on quarters within the next couple of weeks).  Because offenses know that in quarters your safeties are tied into the run game, they will try to block them with receivers.  Playing tight press man takes away their ability to do so.
  • Develops your blitz package: You’d be hard pressed to show us a defensive coordinator who lacks aggression in the blitz game these days.  If you can teach man coverage, it gives you the ability to attack various man and zone pressure concepts.
  • Eliminate big plays: We’re sure some of you offensive guys are cringing at a bold statement like this.  We know that seeing some form of press man coverage outside can make you drool. But the truth is if you train the hands, feet and hips of your corner to handle all routes, particularly the dreaded fade and fade stop routes which we will discuss later, you limit the offenses’ chances of hitting that home run.

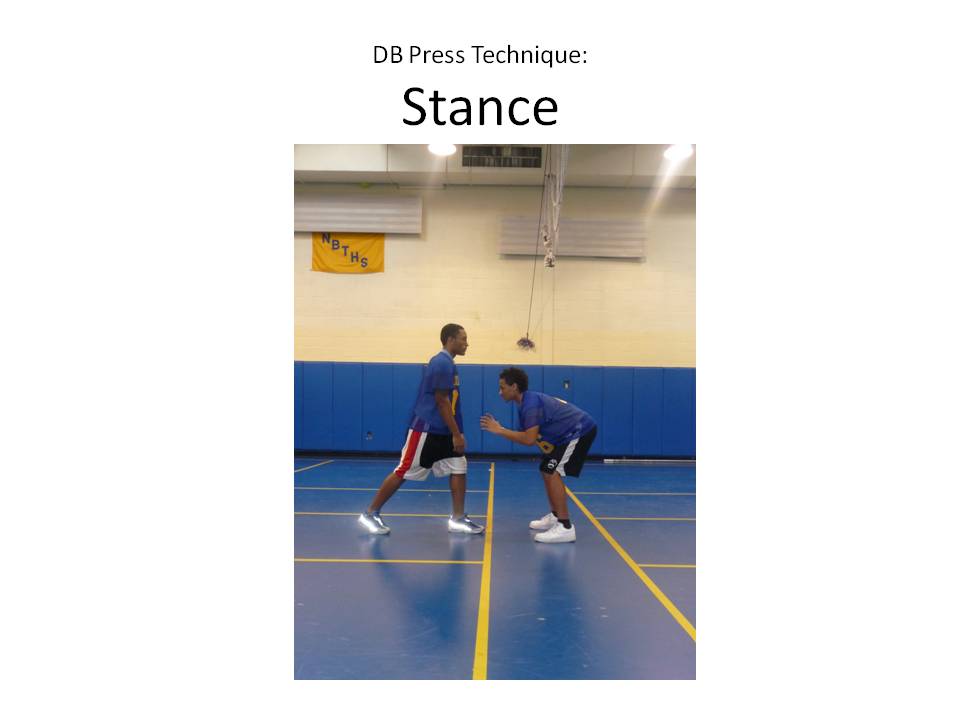
Case 1: Proper Stance/Vertical and Horizontal Alignment The responses were unanimous.  Nearly every coach we spoke with on this topic talked about how the feet will control the hands.  There is nothing more important in teaching press than teaching the play of the feet.   We couldn’t tell you how many times the mantra “feet first, then hands” was blurted over my cell phone line this past week.  But before you can play the feet accurately, you must be able to get into a good stance.  Many coaches, including the ones we have as our analysts, feel that teaching the stance of a press corner sometimes goes overlooked.  At the risk of boring some veteran coaches, we put together a majority consensus on what a stance should look like for a press corner:

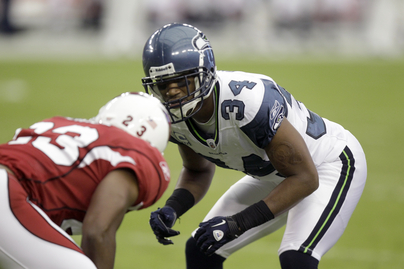
Press Corner Stance (Picture 1)

  • Feet directly under armpits: Slightly tighter than shoulder width.  This provides for better explosion off receiver movement and the prevention of getting over-extended and lunging on a WR, which many of our coaches feel was the biggest problem area when teaching press.
  • Bend at the waist: Much like a sprinter, the stress should be on their hamstrings, which need to be one of the stronger ligaments in a corner’s body.
  • Hands at the ready: Since the play of the hands are vital to success in press, the corner’s hands should be in the “up” position with elbows in and thumbs up.  This provides for an aggressive strike point on receivers.   We should mention that some coaches of the press technique, like Greg Brown, a well-reputed leader in the field, teaches his corners to hang their arms with fingers spread.  This provides for a relaxed posture.
  • Eyes Fixed: We found that this may vary as well.  Some coaches teach the focal point to be the bottom of the receiver’s numbers while some teach the belt buckle or waist.  Whatever the focal point, one common denominator was clear in our research.  Do not look at the QB in press technique.  Your eyes should solely be locked on the receiver you are covering.  We’ve found it interesting that some coaches won’t even press their corners if they have to read number two, like in some two high schemes.  The eyes are that important.


Press Corner Leverage When we refer to leverage, we’re speaking specifically about the horizontal and vertical cushion a corner should give to a receiver.  Our studies show that the majority of coaches, 34 percent, teach their corners to line up less than a yard off the line of scrimmage.  I remember hearing Mark Stoops speak at a clinic years ago when he was a defensive backs coach at Kansas State and him saying that deciding how much ground you’re going to give a receiver is strictly dependent on how good he is.   Coming from Stoops, this made a ton of sense, but I quickly found that I was not that good of a coach to assess my player’s abilities individually, so I had to give them a reference point.

Read More

12 Punt Returns = 12 Return Yards

By Terry Kent

Offensive Coordinator

Downers South HS (IL)


Editor’s Note:  Coach Kent is a 1974 graduate of Lawrence University in Appleton, WI. Upon graduation, he became the Head Football Coach at Fall River HS in Fall River, WI. Since then he has coached football at Westmont HS, Downers Grove North HS, North Central College, and Downers Grove South HS, winning the first 8A IHSA State Championship in football in 2001. He was inducted into the Illinois High School Football Coaches Hall of Fame in 2010. He is currently the Offensive Coordinator / Running Backs Coach at Downers Grove South and is responsible for the Punt Team. 


gameclipI have been intrigued by the Shield Punt ever since I first saw it being used in a bowl game several years ago. My first impression was dismay that anyone would want to let the inside rushers run free and blow up the 3 guys standing in the backfield. As more and more teams went to the shield, I started seeing its benefits. Before deciding to implement it, though, I had to be convinced that the advantages outweighed the disadvantages. What finally sold me on the Shield Punt was a Glazier Clinic presentation by Grand Valley State showing that in 2012 they only allowed 3 yards in punt returns. We all know that a punt is one of the greatest weapons a team has in changing field position. This past season we punted 31 times and allowed 12 punt returns for a total of 12 yards! This is the number 1 reason to use the Shield Punt – limiting your opponents return yardage. We also had one punt partially deflected due to poor execution by one of the shields.

The advantages of using the Shield Punt are as follows:

  1. Long Snapper has NO protection responsibilities.
  2. Get into coverage faster  à No returns!
  3. Can change block spot if needed.
  4. Rugby punt limits number of touches by returner.

The disadvantages that I had to work through are:

  1. Need to teach 3 different punts: Shield, Rugby, Tight
  2. Shield players aren’t reliable in coverage.
  3. Operation time must be a 2.0 or better.

The biggest stumbling block for me was teaching 3 different punts, especially a Tight Punt that we would use inside of the 20 yard line. Prior to this year, we had used the traditional double slot punt with zone blocking and we always had trouble teaching our defensive players the concept of zone blocking. One of the plusses of the Shield Punt is that your Punt Team really doesn’t block anyone, allowing us to put our best coverage players on the field. While we practiced the Tight Punt weekly, we never used it in a game.

Alignment

Our line lines up in a toe to heel relationship with the Center. We need to be careful that their heads break the plane of the Center’s waist, something that we didn’t always do. While we were never called for having too few men on the LOS, we certainly could have been. The Shield lines up with their heels at 7 yards. The Punter’s heels are at 14 yards. The Middle Shield, the Personal Protector, stacks behind one of the shields and steps between them. He is responsible for making the proper blocking calls and initiating the snap. Our line splits are as follows: C/G 2 yards, G/T 2 – 3 yards, T/E 3 – 5 yards. Early in the season we would split out both Ends to the same side when punting on the hash, but stopped doing this when we had protection issues.

Read More

Coaching Low Hands in Pass Protection

 By Justin Iske – @justiniske

Offensive Line Coach

Fort Hays State University


fthayesstEditor’s Notes: Justin Iske begins his fourth season on the coaching staff at Fort Hays State in 2014. Iske coaches the FHSU offensive line and serves as the team’s strength coach. In Iske’s first three seasons at FHSU, he has coached seven All-MIAA selections on the offensive line, led by two-time second team selection Hawk Rouse in 2011 and 2012 and second-team selection Mario Abundez in 2013. The Tiger offensive line helped produce an average of over 2,000 rushing and 2,000 passing yards per year in Iske’s three seasons. Iske came to FHSU after two seasons at Northwestern Oklahoma State University where he was the offensive coordinator, special teams coordinator and offensive line coach. His 2010 team won the conference championship and led the conference in rushing offense, sacks allowed and kickoff returns.


A debate that often comes up amongst o-line coaches is whether to set with high hands or low hands in pass protection. While there are several successful coaches that teach their offensive linemen to set with high hands to protect their chest, we are of the school that teaches low hands in pass sets. Much of what we teach has been stolen from Paul Alexander, the O-Line Coach of the Bengals and other coaches that have spoken at the COOL Clinic in Cincinnati over the years.

Note:  X&O Labs will be at the COOL Clinic this year.  Click here for more on this famed O Line gathering.


Why Low Hands?

In my playing days and early coaching career we were taught to pass set with our hands in front of our chest or eyes so that we could protect our chest and to execute a six-inch punch when the defender came within range. There is nothing wrong with this approach, but we now believe that we have found a better way of doing things. The preverbal light bulb went off when I worked a summer camp and was helping out with d-line pass rush drills. Every move that we worked on in that camp, the coach would set up the offensive player with his hands up so that the defender had a target to knock down. Common sense told us that if we set with low hands and don’t give the defense a target we can slow them down. And that is how we have taught it ever since.

Read More

Training the Anchor, Wall and Kick Players in Pin and Pull Concepts


By Bobby Rosenthal

Tight Ends Coach

Wilkes University


OLineEditor’s Note:  Coach Rosenthal is the Tight Ends and Assistant Offensive Line Coach at Wilkes University. After graduating Wesleyan University and playing as a graduate student in the fall of 2010, I started my coaching career volunteering at Yale University, working with the offensive line during their spring practices in 2011. That summer I accepted a GA position at Endicott College, where I worked with the running backs for one season. That season I coached a CoSIDA 2nd Team Academic  All-American. After one year, I went to Wilkes University where I have spent the last 2 seasons. Both seasons I placed a different player on the All-Conference list and have placed multiple student-athletes on the Academic Honor Roll every year.


At Wilkes University we are a multiple-I formation, run first offense. We are very diverse in our formations and will motion and shift on many plays to try to put our offensive skill players in an advantageous position to do their job on a given play. At the beginning, we focused on gap scheme runs and found ourselves to be very tight end and inside run oriented. We knew we would need to add some diversity to our run game and began to look for effective ways to push the ball outside. After some research we decided on a few “Pin and Pull” run schemes, two of which I will outline in this article.

As a gap scheme team, we knew some of the adjustments and issues we would face from defenses. In our research for our outside run game, we wanted to be able to find schemes which not only fit our style of play, but could attack the adjustments defenses would make to attack our power scheme. The three reasons we felt comfortable adding the “Pin and Pull” series were the following:

  1. It is a great way to attack a 7 technique defensive end (inside shade of tight end),
  2. It fit well within our teaching of power.
  3. It helped us build formations.

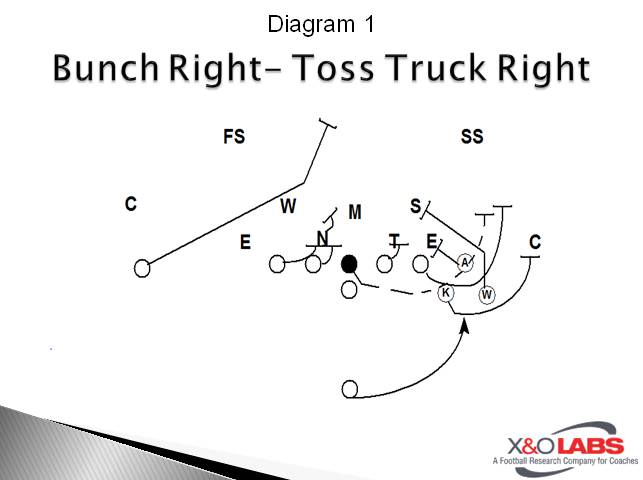
The two plays I will diagram in this article are the “Toss Truck” and “Toss Taxi”. These two run plays are very well suited to be taught together, as the plays are so similar that many of the rules are the same. By teaching these two schemes together, you are able to reinforce the key point of the plays and have a better chance of the players retaining the information.

Toss Truck

Slide1

Truck Rules:

Anchor: Block the first defender inside of you, on or off the ball

Wall: Block the next defender inside of you. Build a “wall” on the defense

Kick: Block the CB. Chase the defender’s outside number

PST: Alley puller. Clear the Anchor and Wall and get vertical. Look inside-out, top-down. Block the first bad color in the alley. If Anchor or Wall fall off block, clean up the mess

PSG: Covered- Reach block the man on. Facemask through the outside number. Uncovered- Mike responsibility. Jump through and block him now if possible. If not, pull for width and work off of PST’s block

C– Covered- Reach the PS A gap. Bring the backside of the OL with you. Uncovered- Mike responsibility. Jump through and block him now if possible. If not, pull for width and work off of PST’s block

BSG– Scoop the BS A Gap. Must get the Will LB blocked

BST– Scoop the BS B Gap. Must get the Will LB blocked

QB– Reverse out to 5:30/6:30 and pitch ball to RB. Carry out boot fake

RB– 1st step: open-lateral, 2nd step: Cross-over, 3rd step: controlled lateral run for width. Keep shoulders square and push vertical once outside the Anchor and Wall. Run up the Alley

BS WR- Sprint for BS Safety. Find work down field

Notes: Must get the play started, by blocking the first level first. OT does not have an assignment, block the first dangerous color. If there is a 2nd puller, work off the OT’s block. Any unblocked defender takes precedent over Mike responsibility. PSG and C must communicate who has the Mike responsibility. 2nd puller is always responsible for any front side run-through.

Adjustments: If the Center feels he cannot reach the nose, he can call the PSG down and become second puller. If the PSG feels he cannot reach the defensive tackle, he can call the PST down and become the “Alley” puller.

Defining the Anchor, Wall and Kick: The Kick is always furthest inside offensive skill player and may come from the backfield. The Anchor is the next outside and the wall is the furthest outside.

Read More

Teaching Inside Shade (6i) Reads


By Shaun Weaver – @sweaver22

Defensive Coordinator

Gettysburg College (PA)


CaptureEditor’s Note:  Coach Weaver enters his ninth season as a member of the Gettysburg coaching staff and his eighth as the defensive coordinator in 2014.  Weaver will also coach the linebackers for the seventh straight season this year. Prior to his arrival at Gettysburg, Weaver served as the defensive line coach at Bemidji State University in Minnesota from 2004-05. He also spent two seasons coaching the defensive line and serving as the junior varsity defensive coordinator at his alma mater, Wilmington College in Ohio, from 2002-03. Weaver guided his players to multiple postseason accolades at both Bemidji and Wilmington, including coaching one to All-America status at the latter.


Introduction

The C gap defender to your defensive line versus a TE is critical person in being effective at stopping a running game. With the C gap still being a focal point of attack for offenses the discussion on how you teach an inside shade player (6i) is extremely important. There are multiple options to stance, reads and reactions. This article will cover technique teaching options for your C gap players with block reactions for both options covered.

Stance

A defensive lineman’s stance is vital to having the opportunity to be successful every snap. A  poor stance will put a player at an immediate disadvantage. Having a good and simple stance progression to teach your players will give them a good base for having a comfortable and effective stance. The following is a partial stance progression that I currently use in teaching defensive lineman proper stance.

PRE-SNAP KEYS

Get every advantage your opponent gives you!

  • Before you get into your stance go through your C.A.A.R check.  (Note:  CAAR stands for C-Call   A- Alignment  A- Assignment  R- Read)
  • Down and Distance!
  • Check the Formation. Remember tendencies from the game plan
  • Read the Man across from you for hints to the play that’s coming. (White knuckles, the balance of his stance, size of splits, etc.)         


Right (Left) Handed Base Stance

  1. Feet shoulder width apart pointing straight ahead
  2. Right foot should be back and at a toe to instep relationship
  3. Put both hands on the ground 3 to 6 inches in front of your face mask
  4. Pick your left hand or “Flash Hand” up off the ground and put it to the side of your face mask with your thumb pointing up in a position to strike a blow
  5. Weight is slightly on the balls of your feet so you feel “air” under your heels
  6. Good Power angles in your hips, knees and ankles. Do not be stiff.
  7. Eyes up on man and Butt up slightly above head level, while maintaining flexed hips ready to explode off the ball


Read More

Practicing Screens with Tempo


By Brian White

Offensive Coordinator/Offensive Line Coach

Rose-Hulman Institute of Technology (IN)


Editor’s Note:  Coach White begins his third season on the Rose-Hulman Institute of Technology coaching staff and his second season as offensive coordinator in 2013.  White also serves as the team’s recruiting coordinator and the offensive line coach. White joined the Rose-Hulman coaching staff after serving assistant roles at the University of Cincinnati, the University of Notre Dame and the University of Maryland.  In his first season at Rose-Hulman in 2011, White’s offensive line provided blocks that allowed Kyle Kovach to earn the NCAA Division III all-purpose yardage championship.  The Fightin’ Engineers also established a school record for total offense with 625 yards in a 53-50 win at Anderson as part of a second place season in the HCAC.  
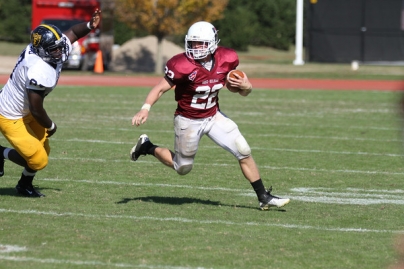


whitescreensFor the Rose-Hulman offense, as with many offenses at every level of football, playing fast is of critical importance to our success.  In 2013, we averaged 85.5 plays per game.  However, we strive to ensure that we do not sacrifice speed for precision.  Our goal every year is to identify the plays we feel are critical to our success as an offense and then find ways to drill these plays.  Our staff works to develop drills that teach the requisite skills to execute the play and simultaneously emphasizing how to play fast.

Each play we install follows a similar teaching progression.  We will start with the coordinator presenting an overview of the play.  During this portion of the install, the coordinator will inform the offense of the purpose of the play, when and why the play will be called and the method by which the play will be relayed to the unit on the field.  Each position coach will then meet with his unit to cover all of the particular rules and skills required by that position group to execute this play.  All of the major coaching of the play is done in these meetings.  On the field, we want to be able to practice as many reps as possible without stopping the drill to coach.

During our individual periods, each position coach will drill the skills necessary for each play.  These periods are the last opportunity for the position coach to work with his players at a teaching pace.  Once we come together as a full offense, we want to play as fast as possible.  We will employ many different drill formats to practice our players.  One of our favorite ways to drill a play is in a Half Line format.  In this setup, one half of the offense preforms a rep of a play, while the other half of the unit will prepare for their rep.  Coaches can choose to work the same play in each group or they can choose to work complimentary plays.  For example, we will run the frontside of a Zone Read scheme on one side then flip to the other group to work the backside.  We will also perform the same drill with both groups work the backside (or read side).

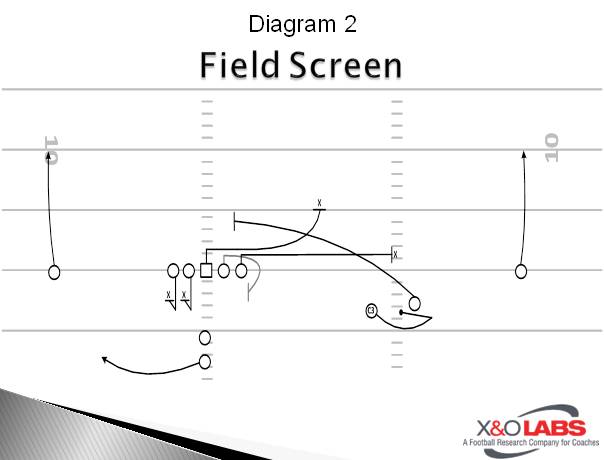
Before detailing how we practice our Quick Screens, the rules of the screen should be covered.  We will run our Quick Screen to both the Boundary (Diagram 1) and the Field (Diagram 2).
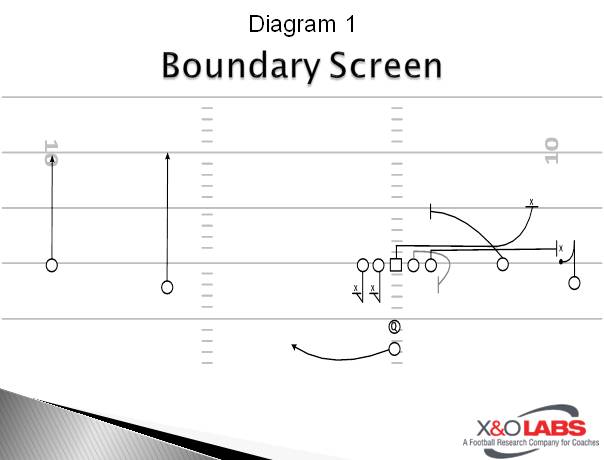
Slide1Slide2

Offensive Line

For all Screens, the Offensive Line must understand a few important items.  The first of these is the protection that the screen is related to.  Next, the Line must know how long to block that protection for. We will run “No Count,” “One Count,” and “Two Count” screens.  Finally, each member of the Offensive Line must know his role in the screen.  If the Offensive Linemen is expected to release in the screen, he must understand the spot on the field where the screen is attacking.  We call the spot the “Sidewalk.”

“The Sidewalk” will differ based on the location of the ball, in terms of if the ball is in the middle of the field or the hash, and if the screen is being run to the field or the boundary.

 Ball on the far hash (Screen run to field) = Sidewalk is the near hash

 Ball in the middle (Screen run either direction) = Sidewalk is the logo (halfway between hash and numbers)

 Ball on the near hash (Screen run to boundary) = Sidewalk is the inside edge of the numbers.

Now that we have outlined the different criteria the Offensive Line must understand, we can apply these factors to our Quick Screen.

            – Protection:  Empty, with slide to the screen (Odd = Area)

            – Count: No Count

– Release:  Screen side Tackle, Guard and Center (Odd = Screen side Tackle, Guard and Backside Guard)

As the above rules mention, the Offensive Line will block Empty protection.  Our Empty protection is a Half Slide.  In the case of a screen, we will send the slide side to the screen and the backside Guard and Tackle will block #1 and #2 on the Line of Scrimmage, respectively.  For the linemen releasing into the screen, they are taught to “Club” or “Shove” their defender based on his alignment.  A defender aligned to the side of the screen will receive a Club from the lineman.  A Club is executed by first giving the “illusion of movement” on the set.  We teach our Offensive Line to throw their head and shoulders back and exaggerate their set without losing very much ground.  The lineman will take two little kicks and entice the defensive lineman to work his shoulder.  As the defensive lineman attempts to grab the shoulder, the Offensive Lineman will pull the shoulder back and simultaneously club the defensive lineman in between the back of his numbers before releasing into the screen.

Read More

Utilizing a Comprehensive Check with Me System


By Jay Wilkinson

Offensive Coordinator

Broken Arrow High School (OK)


How many times have you reviewed film the day after the game and said that a play you called was dead before it started because of the defensive look you got?  The freeze and check with me methods are a way to eliminate dead play calls. We use the freeze and check with me methods to take a quick picture of how the defense is lining up and making the best play call we have versus that look.  Some of our biggest plays have come from these methods.

On its most basic level, the “Check with Me” concept allows an offense to make the play call or change the play at the line of scrimmage.  We have two different ways that we have this built into our offense.  Here is a more in-depth look at each concept:

Freeze Concept

When using the freeze concept, we will signal in the formation and no play.  The QB will go through the pre snap process and signal for the snap.  If we don’t draw the defense offsides, then we will call a play from the sidelines.  This allows us to look over the defense and call a play based on the look we are getting.

Check Concept

The check starts with us calling a formation and a play and tag check to it.  The QB will dummy signal for the snap and look to the sidelines.  If we like the play called, we will leave it on and the QB will call for the snap and run the play.  If we don’t like the play we have called, we will tell the QB to erase it.  He will then tell the team to look to the sidelines to get the new play and we will signal the new play and run it.

We prefer this method as opposed to the fast as you can model because it helps us from running a play into a look we can’t be successful against.  We do have some plays that we feel like we can run vs. any look.  We include this plays in our fastest tempo mode.

Benefits

We have found that checking at the line of scrimmage gives us many advantages.  It allows us to look at the defense and call a play based on the look we are getting.  For example, if it is 3rd and 7 and we don’t know if we are going to get base defense or coverage.  We can freeze it, see how the defense is going to play us, then call a play that give us a chance to be successful.  Similarly, if we want to run the zone at the 3 technique, we can call zone right and tag check.  If the 3 technique is on the left, we can just flip the play.

Read More