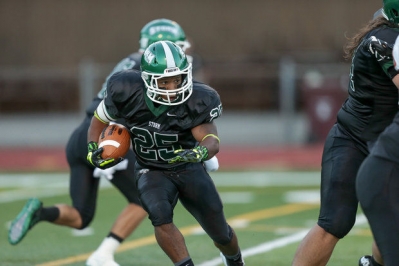
Storm Speed Sweep Concept: Attacking the Flank

By Gerald Hazzard,
Assistant Head Coach/Offensive Coordinator,
Lake Erie College
Twitter: @CoachHazzLEC

Introduction:

lefbThe Storm Speed Sweep is a concept that we have incorporated to attack the flank of the defense. When we designed it we wanted it to be different than the other Speed Sweeps that people see on a weekly basis. We feel our version gets the flank faster, is highly efficient, and forces the defense to adjust on the fly to defend it. The results were a play that was 64% efficient, which means it gained 4 yards, or converted the situation, and averaged 6.7 yards per carry. The Speed Sweep also produced 6 big plays (runs over 20) and 4 touchdowns in 2014.

This concept works wonderfully against the run blitzes that we see. As a heavy Read Zone team, defenses will often call their blitz game to the side of our tailback, or an interior blitz that can give a Zone play problems. Since we have the ability to run our Speed Sweep out of the same formations that we run our Zone, defenses are forced to guess which play we are running or abandon their blitz strategies in fear of getting out flanked.

Another advantage of this concept is that it is very basic from an assignment stand point. We feel that we do not have to practice it a ton to have it ready for game day. This allows us to spend extra time during the week correcting mistakes and gives us extra reps running our weekly game plan plays.

Blocking Scheme Offensive Line:

The success of our Speed play begins and ends with the front side tackle. His assignment is to “reach cut” the front side defensive end. He will take a 3 o’clock step or lateral step and cut the outside leg of the end. It is important for the tackle to gain enough ground on his first step to gain leverage and put himself in the best spot possible to execute his assignment.

If the end aligns wide or moves out on the snap of the ball our tackle has two options. First, he can use a technique we call “three steps to the cut” which means he will take his 3 o’clock step at the snap then take two more steps to make up the ground. After his third step he will throw his inside shoulder into the outside thigh of the end and cut him down.

The second option he has is to stay high on the defensive end. If the tackle stays high we want him to work to get his inside hand to the center of the end’s chest and his outside hand on the outside hip. His footwork remains identical to when he goes “three steps to the cut”. If the tackle can establish this position he should have the end reached. If the defensive end makes an inside move, the tackle will let him go and climb to the second level.

It is important to note that in our scheme we never block a first level defender that is in the B gap or tighter. We will also not block an interior blitz. The action of the play will handle inside moves and blitzes. Since we are not worried about anything past the B gap, our front side guard, center, and back side guard are going to take a 3 O’clock step to the play side and climb immediately. They will not block first level defenders. I want them to cut off the first second level defender that they can reach.

We teach our guys to never chase at the second and third level. We give our linemen a “license to miss” when blocking in space. I want them to run full speed at defenders in space. The thought is they will either get their block or the defender will get out of their way. We do not want our linemen trying to juke with defenders. The backside tackle is going to “run to cutoff”. Cutoff for us is seven yards deep on the opposite sideline. I want the tackle to take a sharp angle and block the first second or third level defender he can “cutoff”. A tight end on the back side will perform the same role.

Read More

Teaching Zone Eyes to Defensive Backs

By Zach Turner,
Defensive Backs Coach,
Kenton High School (OH)
Twitter: @Zach_Turner1

Introduction

screenshotOffenses are evolving year after year and are finding ways to put defenses in a bind. We are starting to see a lot of offenses use a variety of motions, zone fakes and misdirection to confuse and put the defense in a bad position. All of this “eye candy” can take your players out of position and create an edge for the offense. At Kenton High School (OH), we have incorporated a number of drills that help teach our defensive backs the eye discipline they need to more often be in position to make a play.

Keys

A lot of players especially at the high school level are aware of their initial (run/pass) key or secondary key when they enter our program. The first day of camp is when we teach our players how to determine and interpret their keys. This is a crucial part and must be done prior to any drills.

Determining Initial Keys

Defensive backs must have their eyes on their initial key at the snap of the ball. This is going to give them an initial read and identify if the play is a pass or run. We distinguish keys based on our defensive backs alignment. If a player’s alignment is outside, or on the hash, they will read the end man on the line of scrimmage. We tell our players that it could be a tight end or a tackle depending on the team and personnel grouping. If a player’s alignment or landmark is inside the hash they will be reading the guard to the tilt side.

Teaching Initial Keys

We teach our players two different ways to interpret their keys. We introduce both concepts in two-a-days so our players are familiar with them. Then during the season, based on the players’ technique and the scheme, we will go over how we want our players to interrupt their keys during the game. These two different concepts help our kids read the linemen who are high firing out or the lazy tackles who do not get off the ball well.

The first way we teach our players to interpret their keys is the common “high hat vs. low hat” read. If the player reads a high hat, he knows it is a pass. It may be the tight end releasing for a pass or a tackle pass setting. If the player reads a low hat, he knows it is a run. It may be a down block, drive block, reach block or even a pull by the tackle.

The second concept we use for teaching pre-snap reads is by determining “aggressive vs. non-aggressive.” If his key is aggressive and fires out with intent to block someone it is a run. If their key is non-aggressive and is either looking to release for a pass or is not firing out to drive the defender off the line of scrimmage it is a pass.

The only time these keys change is if you are reading the uncovered guard then you have to introduce guard pulls. To teach guard pulls, we tell our safeties if it is a tight pull it is a run; a wide pull is a pass.

Read More

Attacking Soft Coverages with the Bend/Hook

By Ryan Hain 
Offensive Coordinator
Franklin High School (MD)
Twitter: @coachhain


Introduction:


jac picWe are an uptempo offense.  Due the the speed and effectiveness that we have both running and throwing the ball, we tend to see a lot of 6 man boxes with very generic coverages. In order to attack these coverages, Coach Dave Brock, now at the Head Coach at Delaware, introduced me to the Z bend, X hook concept that he had been running for years at UNC, Kansas St, and Rutgers. I saw how successful guys like Hakeem Nicks, Jordy Nelson, and Brandon Banks were, just running this play alone and wanted to try it with our guys.

This past year the Bend / Hook concept or “Bend” as we call it on the field was a staple in our offense and a key to our run to a Maryland State Championship.  In 2013, we ran 56 times this season and completed 39 of them. So that is almost 70%, while we were 65% overall on the season. We gained 702 Yards on this concept at 18 yds per completion (12.5 yards per play). And we had 7 Td’s on this concept, 6 of them to the Z. In addition, we also earned 27 first downs on this concept.

Since we rarely saw an exotic blitz or rolled coverage against us, we found that this pass concept that made the defense defend sideline to sideline and deep as well as underneath. It also allowed us to line our top 2 receivers on opposite sides of the formation and make the defense choose which one to key on.  


Formations

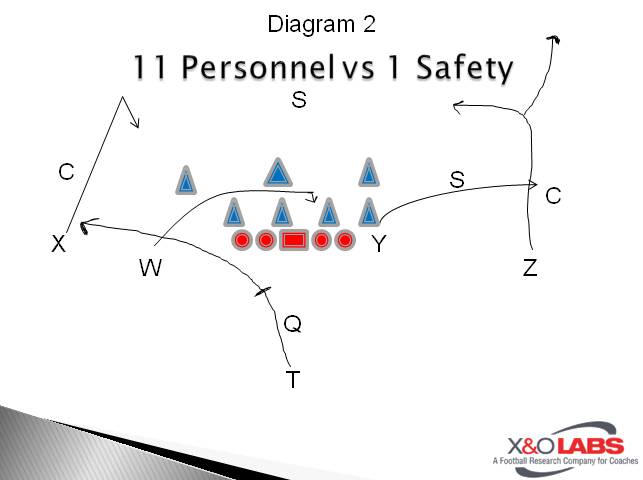
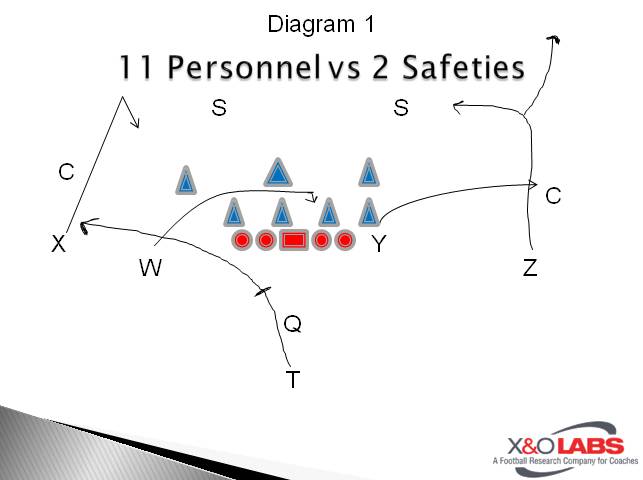
We have been able to run it out of a variety of formations and personnel groups, as well as with and without play action. 11 personnel has been the most used formation for this play (Diagram 1 and 2). Our system uses a “W” slot receiver instead of the more common “H” because our guy is typically more of a smaller scat type kid.

Slide1Slide2


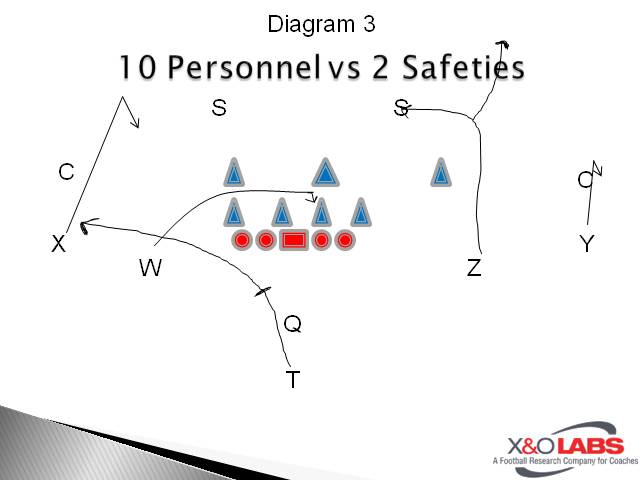
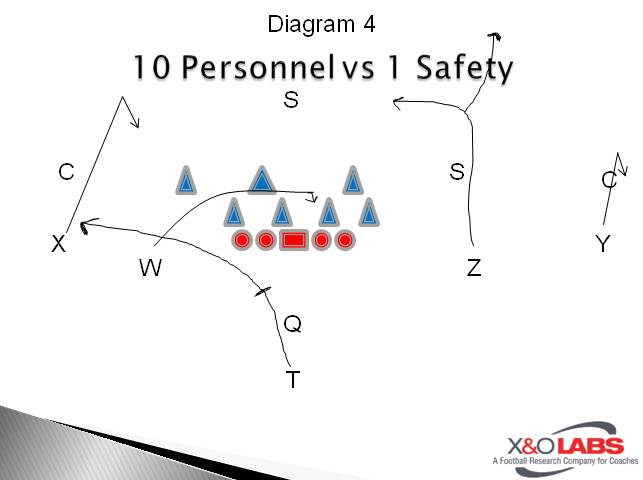
We also run it out of 10 Personnel (2×2) which is Y split for us, because our TE is also our outside receiver. (Diagram 3 and 4)

Slide3Slide4


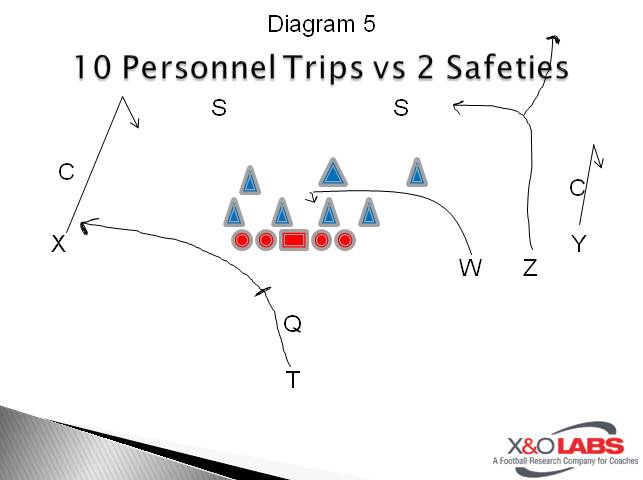
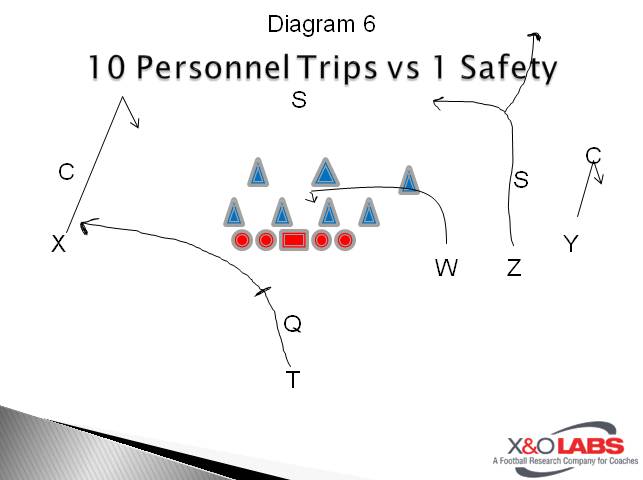
Trips has also been used for this play (Diagram 5 and 6).

Slide5Slide6

Read More

Throwing Uncovered in Your Run Game

By Will Compton 
Head Coach
Rudder High School (TX)
Twitter: @CoachWCompton

Introduction

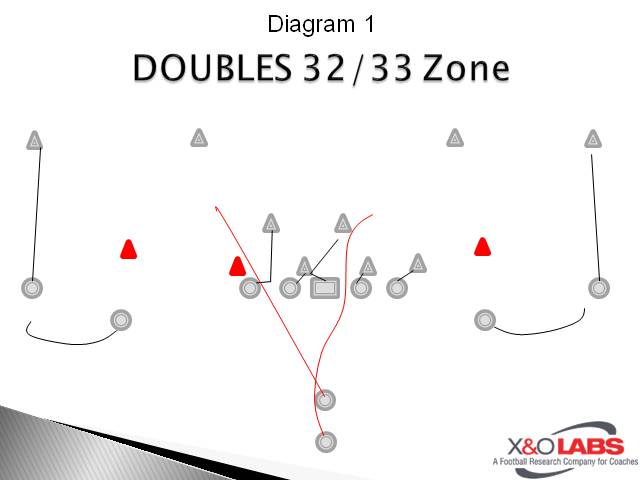
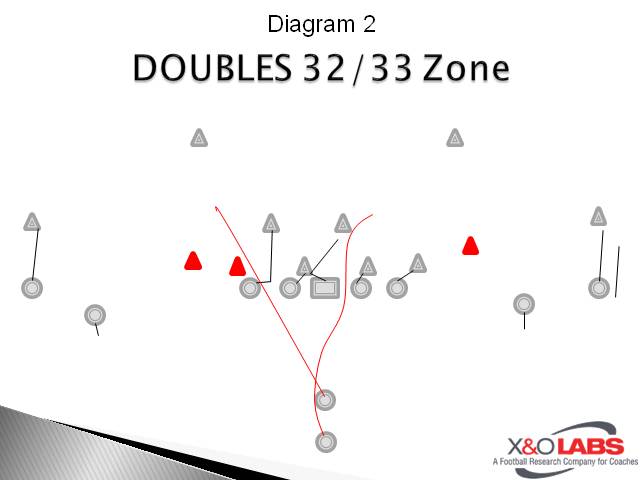
NortonYou look down at your call sheet and look for the perfect run play for 3rd and 3. You talk through the headphones and signal the play in to the QB. He walks to the line and the first thing he does is see if he can throw it. This is the basic process in all of our run game that doesn’t involve a jet motion. Using the philosophy of throwing uncovered in your game is a great way to add an option aspect to your offense. It is an easy way to help you call your run game because your QB will make your call a great play.
Throwing Uncovered

We use the idea of “uncovered” on all of our inside run plays. When the Defense begins to play heavy on the run and crowd the LBs close to the box it creates an uncovered skill player. When walking to the line we ask our QB on all run plays to look at the OSLBs. If they are playing tight to the box then he has the green light to throw uncovered. We teach our WR to identify which of them is uncovered based on the Defense. The WR will talk to each other and check on and off the ball based on who is covered or uncovered. This lets the QB know if he wants to throw the ball which WR will be running the fast screen. They do not have to understand coverages. They only need to understand grass. If the Defense is playing loose coverage across the board. The #2 WR will always run the fast. It is an easier and quicker throw for the QB.


Slide1Slide2

Why would you throw uncovered on run plays?

  1. Spread the ball around to all your athletes on the field.
  2. Make the Defense accountable for every Offensive skill position.
  3. It helps in making your play call the right one.

In today’s game players want to be involved in the game on every play. They want to feel that they are contributing to the Offensive success by doing more than just blocking. We use “uncovered” as a way to include them in our run game. Our WR do a great job of understanding grass. We spend time at the beginning of the season explaining to them that every called run play is still a possibility for them to catch the ball. This helps in keeping the WR committed to the run game. It also makes the Defense account for every skill player on the field. If they are going to play loose cover 4 and have 7 players tight to the box, you have to make them pay. If thrown several times a half the LBs will start to get out of the box a little more and more so that they can stop the fast screen. This gives you the numbers game that you want.

Read More

8 Ways to Cover Trips with Quarters

By Mike Kuchar

Senior Research Manager

X&O Labs


Editor’s Note:  The following report is an excerpt of the Quarters Coverage Research Report.  To view the entirety of that report, click here.  


Three-Wide Adjustments:

Defending unbalanced trips formations could be difficult regardless of the type of coverage, but there are some options with Quarters.  The main concern for any defense is to defend four vertical threats with the presence of four defensive backs gives a defense that option in Quarters Coverage.   Not surprisingly, we’ve found several answers to defend trips formations in Quarters coverage.  We’ll start with a typical 3×1 open set.  But before we do, below are some interesting figures we discovered in our research:

  • 49.3 percent of coaches will play Bronco (outside linebacker) force against the weak side of trips formations.
  • 38.4 percent of coaches will play their Safety to the trips side 1-2 yards inside of the number two receiver.
  • 50.6 percent of coaches will play inside leverage on the number one receiver to the side of trips formations assuming he has no help.

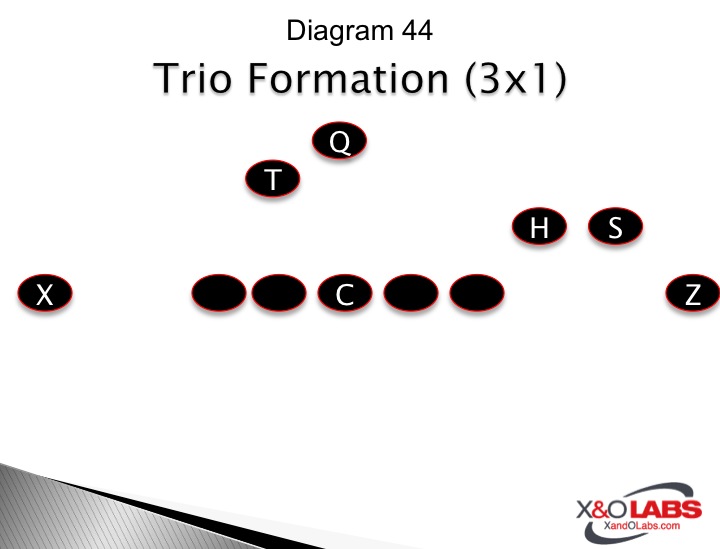
Formation:  3×1 Trips Open (Diagram 44)

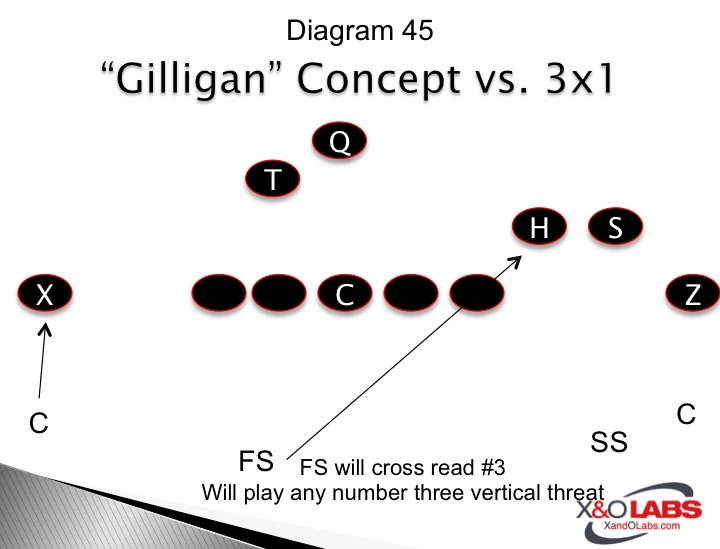
When we asked coaches how best do they defend 3×1 formations, 64.3 said they will man the back side corner on number one away from trips and tie in the back side safety to play #3 vertical (Diagram 45).  Boyd is one of those coaches, and he calls this coverage his “Gilligan” coverage, which is self-assuming, considering the backside Corner is on “an island all by himself.”

To the front side of the play, many coaches prefer to play what was referenced above as an “Alert” call against two wide receivers.  The Corner to the trips side will still handle any flat breaking routes by number-two, while the safety will leverage any vertical threat by number-two.

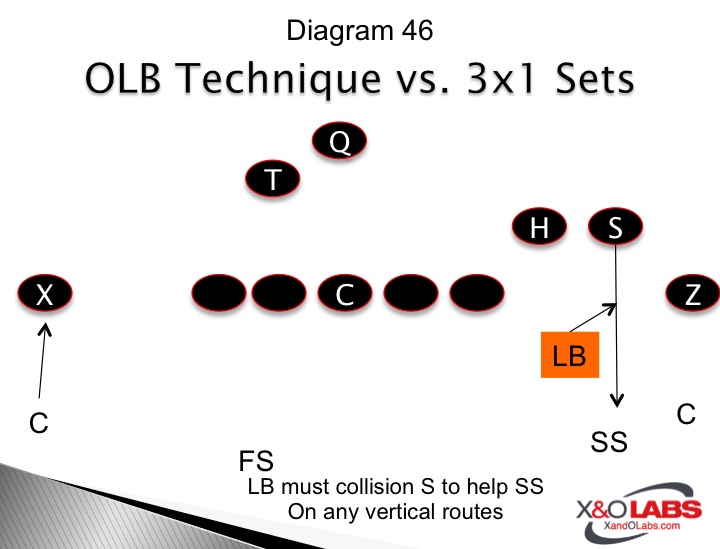
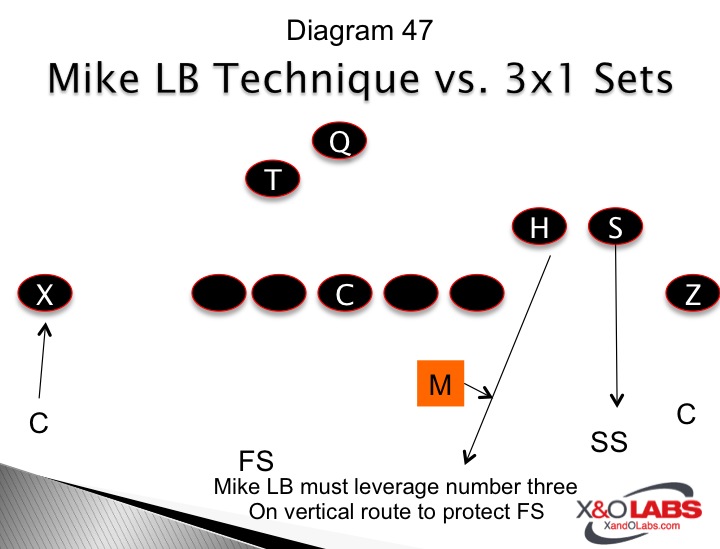
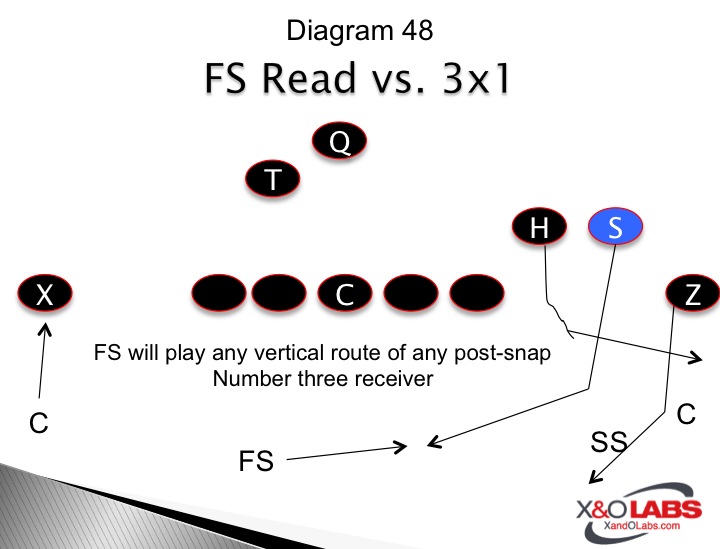
The key to this scheme, according to coaches, is the play of the apexed outside linebacker.  That outside linebacker must be able to hold inside leverage against number-two to protect the front side safety of any vertical routes (Diagram 46).  The Mike linebacker is a low hole player, who must work to #3 and not come across his face (Diagram 47).  The backside safety reads the front side number three receiver and picks up #3 vertical.  If number-three goes out, he looks for a new number-three, which can be coming from across the formation (Diagram 48).   Speaking from experience, one of the most challenging things to teach backside safeties (particularly young ones) in this Gilligan concept is to train their eye discipline in making them understand that number-three doesn’t always have to be number-three pre-snap it simply refers to the number-three receiver post-snap whomever that determines to be.   In the video clips at the end of this segment, you will see examples of back side safeties who did not play number three correctly.

Read More

Disrupting Protections Using First Level Twists

By Ben McKaig
Defensive Line Coach
Utica College
Twitter: @McKaig_Ben

Introduction:

As defensive coaches, we are constantly looking at ways to attack weaknesses in protections without losing coverage options in the back end of the defense. I believe that a properly executed twist can give both man and slide protections trouble, providing pressure on the quarterback without bringing an extra defender. We have worked our twists over the past several years to try to obtain maximum effectiveness against both types of protection.

Benefits of Using a Twist:

We look to twists to do several things for our defense. First, we can attack a protection with a properly executed twist and almost always generate additional pressure and stress on the quarterback and offensive line. We also incorporate our twist game to defend against screens and draws, as late moving defensive linemen are able to see the play happening in front of them and redirect. Finally, twists can cloud quarterback throwing lanes and help to defend against a quarterback looking to step up in the pocket or scramble. That said, the lion’s share of this article will focus on attacking offensive pass protections.

Maximizing the Effectiveness of Your Twists

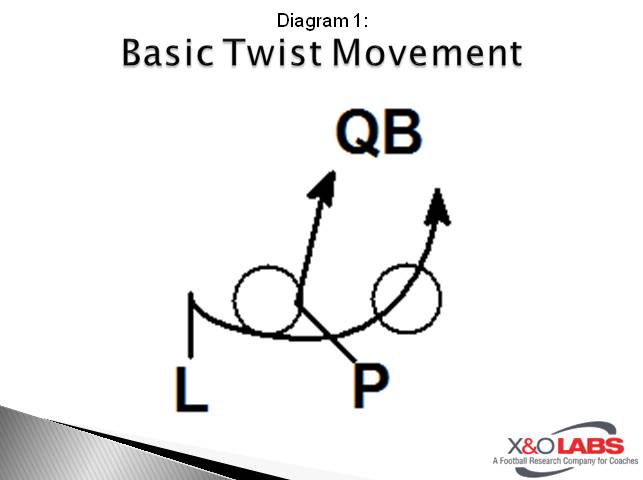
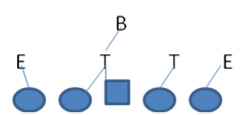
Our twisters are divided into two primary jobs: a penetrator and a looper. Our defensive linemen understand that depending on the type of protection we face, either member of the twist may come free to the quarterback. So there is a shared responsibility in executing our twists and all of our guys can benefit from a well-executed stunt. The basic twist movement is shown in Diagram 1. The penetrator is labeled P and the looper is labeled L.

Slide1

The Penetrator must execute the following:

  • Attack his aiming point which is either the ear hole or nose of the OL.
    • The penetrator is the catalyst in the twist. He must break the line of scrimmage and get the opponent offensive line off of the same plane or “off level.” This is the most important part of the penetrator’s job. Getting the offensive line off of the same plane ensures that they will not be able to pass off the twist without pressure on the QB. We also aim for either the ear hole or to “break the nose” of the OL so that we can penetrate the gap. These two aiming points allow us to work half of an offensive lineman even while we are executing the twist.
  • Strike the offensive lineman with their face and hands.
    • The OL should be looking to engage the “looper” in the twist. This is a free shot for our penetrating defensive lineman to strike an OL and to knock him “off level.” This will also help to deny OL the ability to pass off the twist.
  • Shed and Ricochet. Get vertical to the QB.
    • The penetrator must not become engaged when he strikes the OL. It is important to ricochet off of the strike and get vertical into the QB’s face. We call it a pinball technique. Bounce off of the OL and get moving to the QB.

The Looper must execute the following:

  • 2 vertical steps to make the OL believe he is about to engage the looper.
    • Best case scenario, we can get the OL to focus his eyes and even open his hips toward the looper. When his hips are pointed to the looper, it ensures that our penetrator will get a great strike and will be free to ricochet to the QB. The OL will not be able to flip his hips faster than we can move. Occupying his eyes will ensure a free shot for our penetrator to take him out, eliminating him from the protection.
  • Stick and go. The looper will stick his foot in the ground and nod, similar to a WR break.
    • Sell the movement and continue to occupy the eyes of the OL. Loop to find open space. Work a move off of any additional blockers. In a man blocking situation, one of the two will come free.

Types of Twists

Read More

Blocking Problematic Fronts in the Spread Power Scheme

By Justin Iske
Offensive Line Coach
Southwestern Oklahoma State University
Twitter: @justiniske

Introduction:

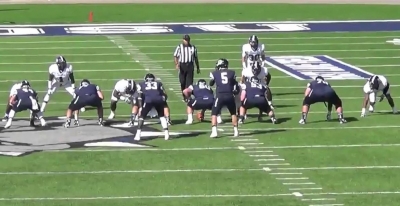
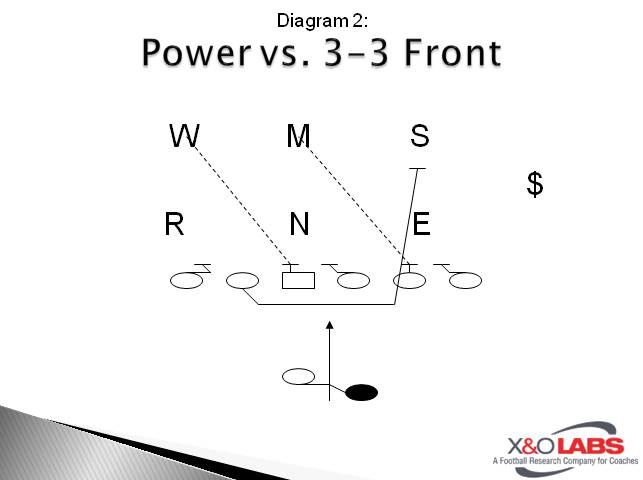
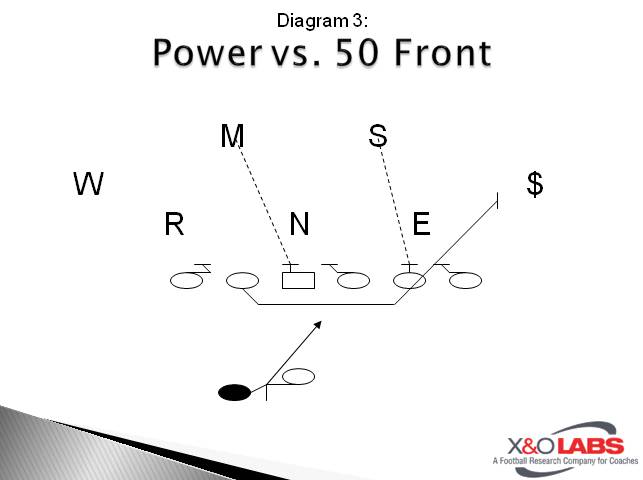
swosuThe One-Back Power play is a simple scheme that is easy to teach assignment wise and can be adjusted to account for any defensive alignment or post-snap movement. This play and our Counter play are taught in tandem as they are both gap schemes that are very similar, especially on the front side. The game film attached to this clinic report shows all of the techniques discussed below done improperly and properly.
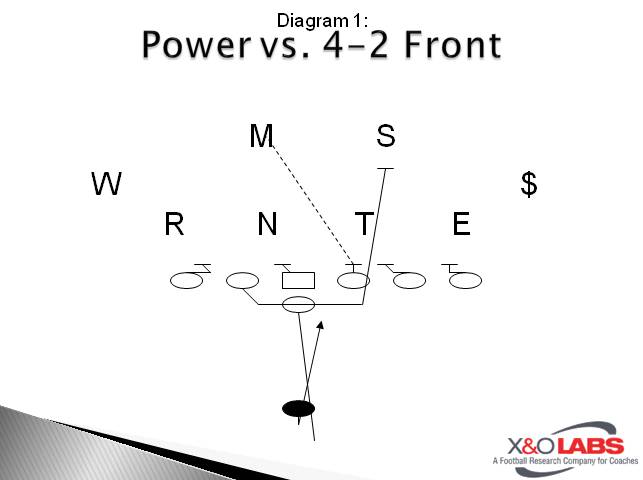
Base Assignment Rules for Power:

Tight End: C Gap – Man if covered by a down lineman. C gap to second level if uncovered. Must account for any C gap run through.

Play Side Tackle: B Gap – Create a double team if possible with either the tight end or play side guard. Account for any B gap run through.

Play Side Guard: A Gap – Create a double team if possible with either the play side tackle or center. Must account for any A gap run through.

Center: Back side A Gap to second level. Must account for any back side A gap run through.

Back Side Guard: Skip/Square Pull to play side linebacker. Read the play side double team and/or tight end’s block for entry point. Work for a kick out on your linebacker but don’t pass by opposite color.

Back Side Tackle: Back side B Gap to hinge. Must account for any B gap threat first and then hinge to the back side C gap if no B gap threat.

Slide1Slide2Slide3

Tight End Coaching Points

Man vs. Nine Technique: First step is a six-inch power step (forward) with the play side foot. The second step mirrors the first step with the inside foot. Two-hand punch to the inside number of the defender. He must stay square to the line of scrimmage and keep his butt out of the hole. At no time can the tight end let the defender cross his face.
Man vs. Seven or Six Technique: First step is a six-inch step for width with inside foot. The second step mirrors the first step with the outside foot. Two-hand punch to the inside number of the defender. Stay square to the line of scrimmage. If defender fights inside, he must cover him up and wash him down the line of scrimmage.

Having a tight end that can base block a defensive end is the number one factor for having a consistent Power play. If you aren’t blessed with that type of player at the tight end position, you have some options besides deciding to scrap the play altogether. Those options are as follows:

  1. Run Power from a two-back set and assign the fullback to kick out the front side defensive end.
  2. Put the Y off the ball either aligned in the B gap or in motion to the B gap in order to give him an angle to get a kick out on the front side defensive end. This also has the advantage of being able to flip the play based on alignment and/or matchup.
  3. Flip the Y and back side tackle’s alignment to get a better blocker at the point of attack. This will result in an overload formation and will also force changes in the secondary.

Double Team Coaching Points

Read More

Inside Zone: Varying Roles for the Slot Y

By Ben Malbasa
Head Coach 
University School (OH)
Twitter: @BMalbasa

Introduction:

IMG 0481Those of us who run variations of the Spread offense are well aware of the potential drawbacks of this offensive approach. They include a lack of physicality at the point of attack, the difficulty for defensive units when they face power-oriented teams, and the inability to run the ball with a lead in the fourth quarter among others. While my experiences have taught me that these criticisms are not without merit, I believe that the benefits of an up-tempo, wide-open approach have always outweighed these occasional frustrations.

During the past two seasons, we have utilized a slot-style tight end (some would refer to him as an “H-Back”, and we call him the “Y”) in order to have the flexibility to create additional gaps for the defense to defend, and to make our running game more multiple. This has addressed some of the issues listed above and provided more options for us in all facets of our offensive game.

Personnel

Choosing this player is an important part of allocating offensive personnel. The ideal Y in our system is strong enough to successfully kick out opposing ends, fast enough to threaten the deep middle of the field, and skilled enough to be an effective pass catcher. In other words, our Y is a hybrid of a fullback, tight end, and inside receiver. If we have a player who fits this mold, we consider ourselves especially fortunate because it means we do not have to change personnel to alter our formations. If such a hybrid is not in your program, our objectives in the run game would dictate playing the linebacker or fullback type in the role.

Base Inside Zone Scheme

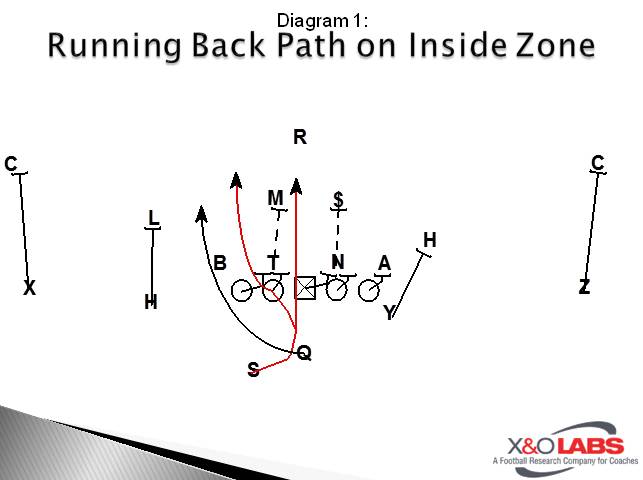
Like many Spread teams, our base run play is the Inside Zone and the Zone Read has been part of our first practice installation plan every season. In our version of Inside Zone, we teach our back to aim for the near hip of the center and read the back side A gap. If it is open, he explodes through the hole; if it is closed, he bends back to escape through the back side B gap (Diagram 1). Our running backs and quarterbacks practice the mesh and read almost every day, and we position a defender for the running back to read while attacking his aiming and escape points.

Slide1

Read More

How Champions Disrupt Routes

By Mark Bruns 
Defensive Coordinator
Coldwater High School (OH)
Twitter: @coachBruns


Introduction:

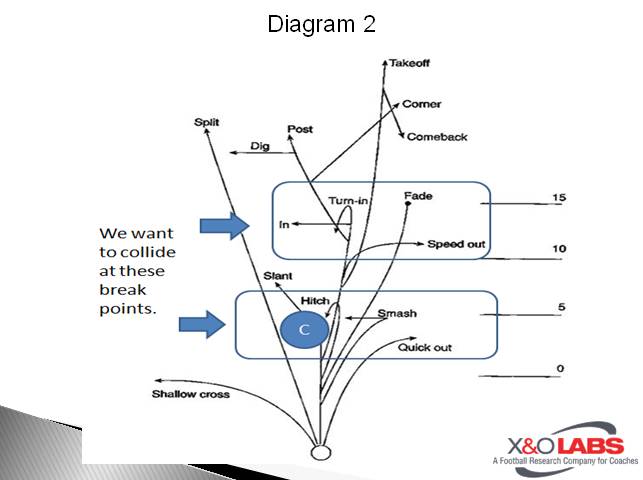
From a defensive perspective our goal is to disrupt the offense as best we can, allowing time for the rush to connect, and making the quarterback throw something they are not comfortable with.  Our philosophy at Coldwater High School is to collision receivers at different points in their routes, thus making the timing of the offense disrupted.  By getting our hands on receivers we are hoping to also create a smaller completion window for the quarterback to try and fit his pass into.  If we can disrupt the read, and get some time for the rush to get the quarterback to move his feet and reload then he is also not going to be as accurate. 

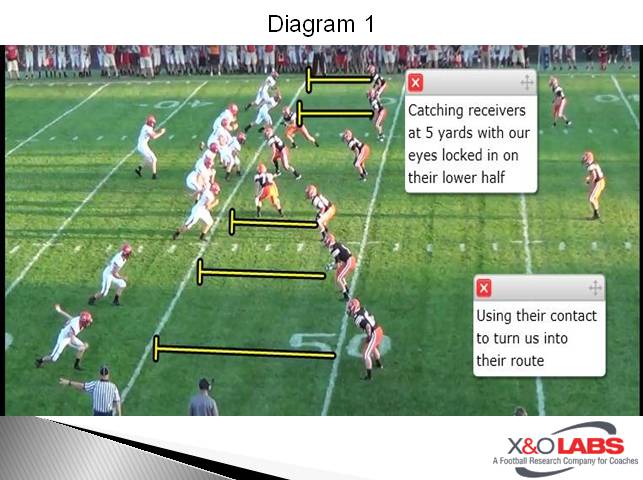
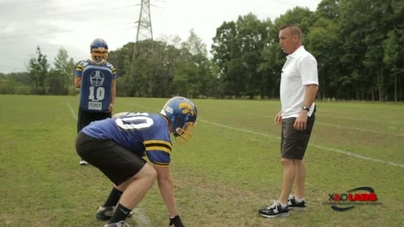
We try to accomplish our goal in several ways and techniques.  We have a press technique that many teams use, especially when they have superior athletes to their opponents.  We have the typical off technique where the secondary players give cushion and react to what is happening in front of them.  However, our favorite technique is the “catch” technique, where we wait for the receiver at 5 yards and then let them turn us into the route.  This has been most effective at stopping offense from using any kind of short game, and also intermediate routes timing is off as well. 

Slide1Slide2

Alignment

Disrupting reads is a big part of our defense, but we don’t let it be a detriment to our scheme.  We do not walk all the way out on a receiver that is lined up 5 yards or closer to the sidelines, that receiver can only do 2 things.  Most likely come and block you, which is why he lined up that far out in the first place.  Or because he is trying to create some space for his route that he is going to run inside somewhere in the first place.  We have seen too many teams concerned with getting their hands on receivers that they will take themselves out of plays simply by alignment.  Or they will chase a receiver and take themselves out of position to make a play in their area they are designated.  If a receiver wants to run out of his way to avoid us, or the offense wants to put multiple people in a zone then we will cover those guys with one defensive back.

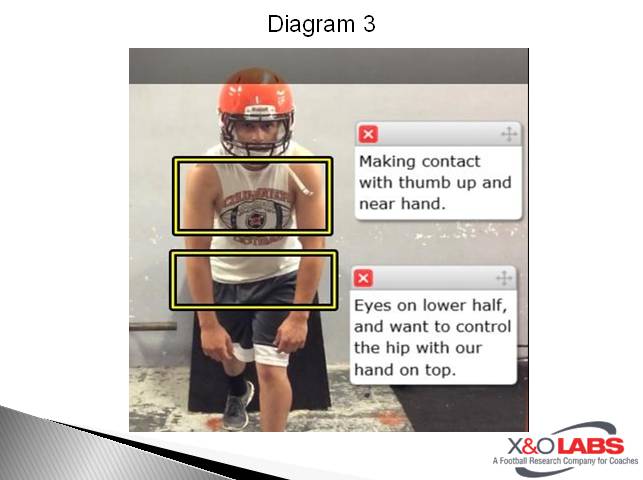
We want to play the receiver from the “top down” by disrupting the easy pass first, and working our way into deeper routes.  Once we are past 5 yards we don’t have to worry about quick game, at ten yards we are looking for outs, flags, an in, or a post.  Then if the receiver hasn’t committed to breaking their route after fifteen yards it is likely a fade or vertical route.  Having inside leverage we want to take away the easy pass inside first.  But also by having inside leverage we want the quarterback to have to throw to the outside, hopefully putting the sideline (our 12th defender) into play, and it also makes the throw longer, thus reducing accuracy.  I think all defensive backs coaches have to worry about giving up the deep ball first, and work everything else off of that.  By taking on just half of the receiver, because he turns us, we are “catching” him at 5 yards, it has to slow down the receiver.  The aiming point for contact is the near pectoral with our close hand.  Never want to come across and gamble on a big hit, because our momentum has to be backwards and ready to run in the hip pocket of the receiver.

Slide3

Read More

Concept Blocking: Case 1 – Simplifying Schemes

alercio2By Rich Alercio
Offensive Line Researcher
X&O Labs

In a 25-year career as an offensive line coach and clinician for youth, high school and college coaching staffs, I have come to one conclusion: Teams have way too many running plays with varying blocking schemes in their offenses. They block one play this way and another play that way. For example, they think if the 3-technique shifts to a 1-tech a different play must be called. I have always subscribed to the K.I.S.S. (Keep It Simple Stupid) methodology, especially for the big guys up front. The offensive linemen do not care about all the creative ways you can get the ball to your best player and all the window dressing used to do so. They just want to have great confidence in knowing what step to take and where to take it.

Regardless of the offense, most running plays can be categorized into one of three offensive line schemes: Zone, Gap or Man. Instead of having a dozen running plays with a dozen different blocking assignments, consider grouping all of your running plays into one, two or all three of those schemes. Once the offensive lineman understands the scheme, he can easily adapt his technique to the play. For example, if Iso and Lead Draw are both Man schemes, the playside tackle just needs to know he has #2 on the LOS (which is mainly the defensive end). The assignment is the same, but the footwork may change. For example, if it is an Isolation play, he takes a run step with his inside foot. If it is Lead Draw play, he will pass set with his inside foot first. Its two different plays blocked the same way with the same leverage with just a change in technique. Basically, it’s two plays for the offense that the defense has to defend but only one scheme for the O-Line to learn.

Before I begin grouping running plays into the three “run families,” I’ll define the 5 run steps that the offensive linemen will use on the plays. Although this may sound elementary, it’s essential that coaches teach all footwork techniques first so that players can identify their technique based on the play concept. The first is a “Base” step. A base step is a vertical step straight ahead where the heel of the foot you are stepping with will replace the original alignment of the toes of that foot (“heel replaces toe”).

The next step is “Reach” step. A reach step is a vertical step as well but with lateral displacement. With a reach step, the offensive lineman gains ground vertically and laterally. The vertical distance of the step is the same as the Base step: heel replace toe. The lateral distance will depend on the alignment of the defender Base and Reach steps are both vertical steps. The shoulders of the offensive lineman will stay square to the line of scrimmage.

The third step is an “Angle” step. Angle is a 45° angle step forward. Again, the heel of the foot taking the Angle step does not go further than the original alignment of its toes.

The next step is a “Bucket” step. A bucket step is a backward 45° angle step. After the step, the toes of the foot taking the Bucket step will be at the depth of the original alignment of the heel of that foot. Both the Angle and Bucket steps get the shoulders of the offensive lineman turned at a 45° angle.

The last of the run steps is the “Pull” step. The Pull step is a 90° step towards the sideline. The alignment of the heel after the step should be directly behind its original alignment.

Concept Blocking the Man Scheme

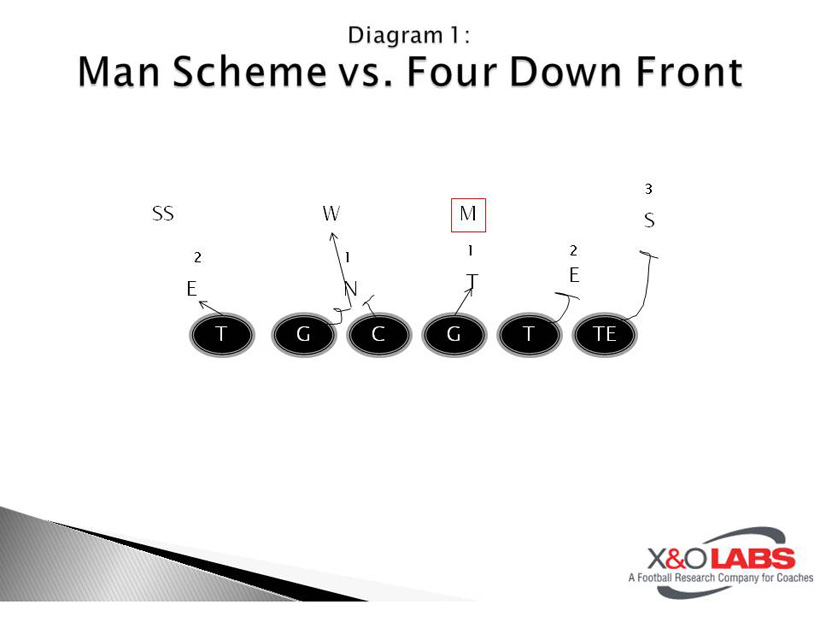
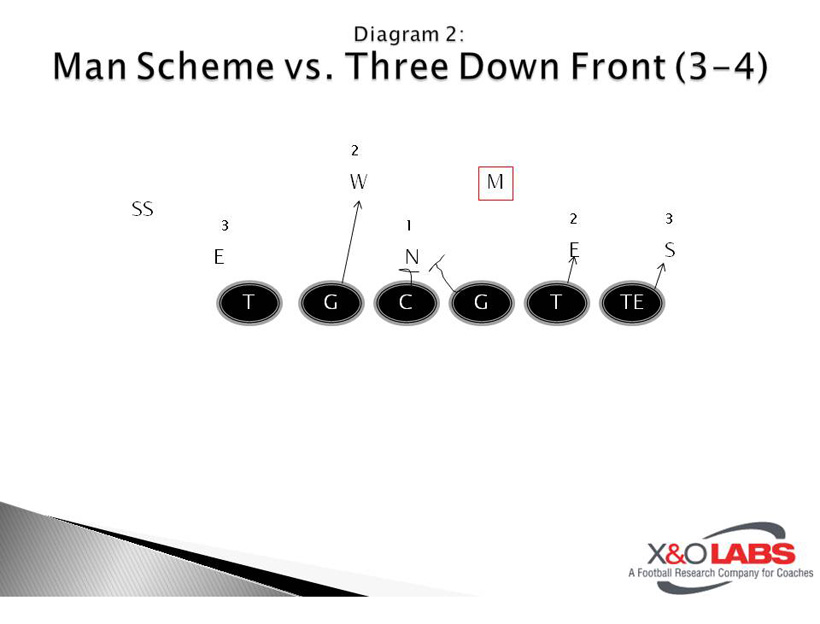
Following the example used in the opening paragraph, we will begin with a Man scheme. Each offensive lineman is assigned a defensive player which allows for the most accountability. There can be no excuse of “your man” slanting to someone else’s gap. It also allows the coach to tell the RB with great certainty where the hole is going to be. In a Man scheme, the Guards will block #1 on the line of scrimmage (DT) and the Tackles will Base step with their inside foot to block #2 (DE). The Center has the Middle Linebacker aligned over him (4-3, 3-3) or the back-side ILB vs. a two Inside Linebacker front (4-4, 3-4).

Man Concept vs. Even Front

Man concept vs. Even Front

If the Center is shaded by a #1 (DT/NT), he must combo with that Guard to his LB.

Man concept vs. Even Front

Read More

Concept Blocking: Case 2 – Man Schemes


By Rich Alercio
Offensive Line Researcher
X&amO Labs

Man blocking schemes are the easiest for coaches to teach and for linemen, and backs to learn. All they need to do is be able to count. Man schemes also allow for the most accountability, if there is a breakdown a coach and the player should know where it occurred. There are some combination blocks associated with a man scheme; but for the most part, one offensive player is responsible for blocking one defender. The man scheme also allows the coach to tell the running back, with a high level of certainty, where the hole is going to be.

As discussed in Part 1: Grouping Plays into Concepts and Matching Corresponding Footwork, we will utilize 5 Run Steps:

  1. Base
  2. Reach
  3. Angle
  4. Bucket
  5. Pull

In the Man scheme, Guards are responsible for #1 on the line of scrimmage (LOS), the Defensive Tackles(Diagram 1).

Concept Blocking Man Schemes - Diagram 1

A head up Nose Guard with both Guards uncovered is #1 on the playside. The back-side Guard is a free player. He can be part of a 3-man combo on the Nose Guard with the Center and playside Guard to the back-side ILB vs. a 3-4 (Diagram 2).

Concept Blocking Man Schemes - Diagram 2

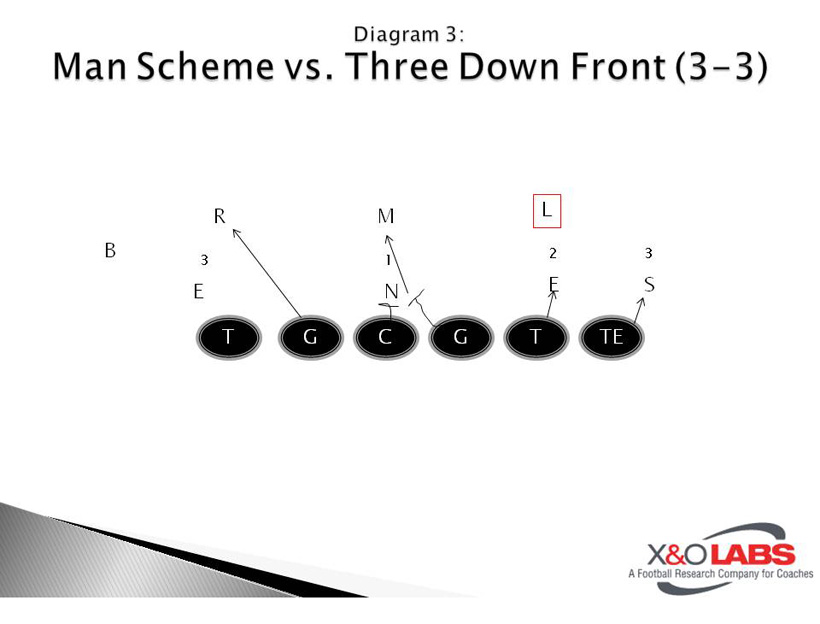
Versus a 3-3, the playside Guard and Center combo the Nose Guard to the Middle LB. The back-side Guard can combo the Nose Guard but will be responsible for the back-side OLB stacked on the DE at the edge of the box (Diagram 3). Tackles are responsible for #2 on the LOS, the Defensive Ends. The Center is responsible for the Middle Linebacker (in a 4-3 or 3-3) or the back-side Inside Linebacker (4-4, 3-4) vs. a two Inside Linebacker front and must call the combo with the appropriate Guard when he is covered. If the offense utilizes a Tight End, he blocks #3 on the LOS or a walk-up Linebacker. If there is no #3 on the LOS, he arc releases to block the alley defender. The alley defender could be an outside linebacker, a safety or a rolled Corner to a nub tight end. The first Linebacker to the playside is blocked by a lead back.

Concept Blocking Man Schemes - Diagram 3

This report will address three common running plays that are associated with the Man Scheme. They are:

  1. Iso
  2. Lead Draw
  3. Counter

Counter is sometimes referred to as Tackle Trap. These three running plays can be utilized by almost every style of offense.

Iso

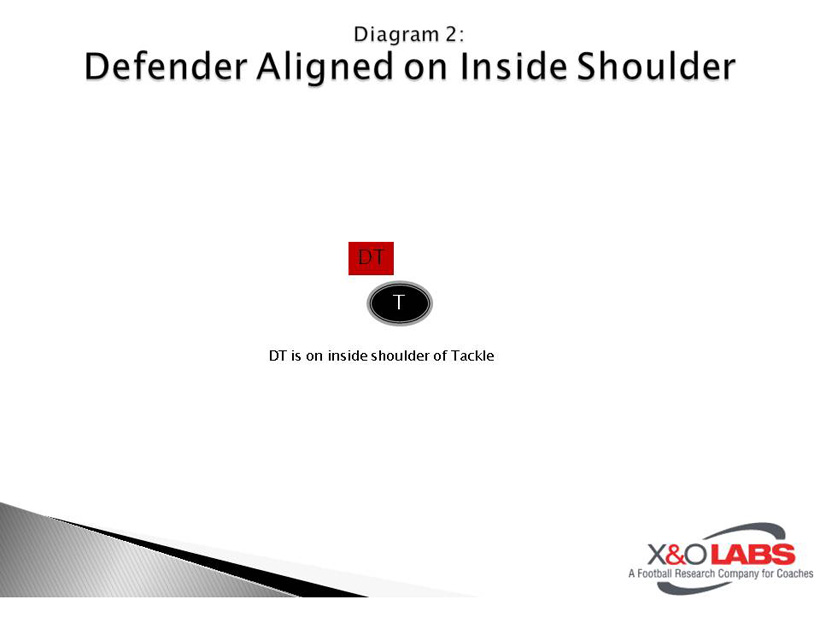
Let’s begin with the Iso play. To avoid the big collision of lead back on Linebacker, it is best to run the play through the B-gap (between the Guard and Tackle). A good Linebacker may get a split read from the Guard and Tackle and fill the gap, but he will not have a direct path to collision the lead back as he would if the play were run to the A-gap (between the Center and Guard). Now let’s address the big guys up front and start with the playside Guard’s block on #1. If the DT is aligned in a 1-tech (inside shoulder of Guard), the playside Guard will take a Base step with his outside foot (Diagram 4). This step insures that the defender does not beat him on a slant to the B-gap. He should NEVER step with the near foot to the defender when he already has positional leverage to the hole. The visual aiming point for the Guard is the outside bottom of the defenders facemask. That aiming point allows the Guard to maintain horizontal leverage to the hole and vertical leverage on the defender (under his pad level).

Read More

Concept Blocking: Case 3 – Gap Schemes


By Rich Alercio
Offensive Line Researcher

X&O Labs


Among all run schemes, a Gap scheme is the most complex, time consuming yet rewarding run schemes. It combines playside linemen blocking to their back-side gap with situational double team blocks with one or more back-side lineman pulling to the playside. The two most common gap scheme running plays, and the two I will cover are the Power and Counter Trey schemes.

We will utilize the 5 Run Steps discussed in Part 1: Grouping Plays into Concepts and Matching Corresponding Footwork:

  1. Base
  2. Reach
  3. Angle
  4. Bucket
  5. Pull

In the Gap scheme runs, every lineman (Tight Ends included) is responsible for a Gap unless he is a “puller.”

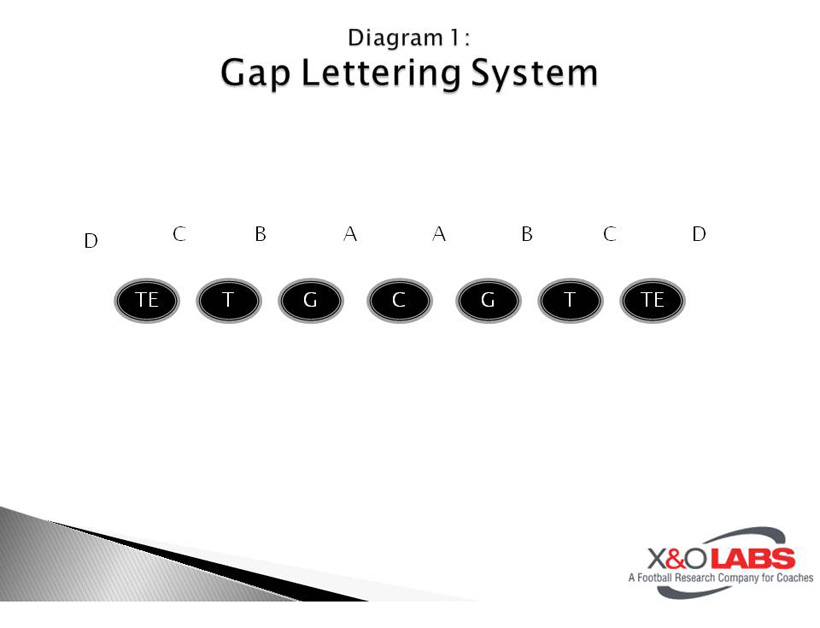
Let’s begin by identifying the gaps. The area between the Center and Guards are the A gaps. Between the Guard and Tackles are the B gaps, the C gap is between the Tackles and Tight Ends and the D gap is the area outside the Tight End (Diagram 1). Below is the basic list of player responsibilities in the gap scheme. PS stands for “playside” and BS stands for “backside.”

Concept Blocking Gap Schemes - Diagram 1

Gap Scheme responsibilities:

  • PS Tight End: C Gap
  • PS Tackle: B Gap
  • PS Guard: A Gap
  • C enter: A-B Gap
  • BS Guard: Puller
  • BS Tackle: C Gap or Puller
  • BS Tight End: D Gap

The Power and Counter Trey plays are blocked exactly the same for the Center and playside Linemen. They will all take their first step with their back-side foot (the foot in their gap). On a gap scheme run to the right, they all will take a first step with their left foot.

The responsibilities of the all the playside linemen, including the Tight End, are the same. With a defensive lineman aligned on our inside shoulder, (man on in their gap) (Diagram 2) such would be the case with a guard against a shade technique, a tackle against a 4i technique and a tight end against a 4-technique, we will take a Reach step with our inside (gap) foot with a visual aiming point of the center bottom of the defenders facemask. If the defender works to maintain his inside leverage, we will drive him down through the gap. If he slants cross our face to the next gap, we will get help from our play side lineman.

Concept Blocking Gap Schemes - Diagram 2

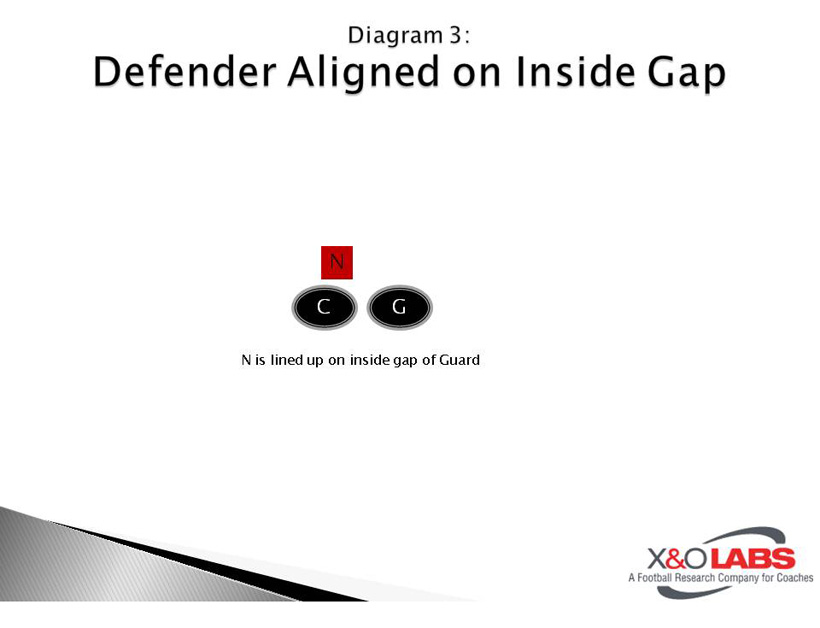
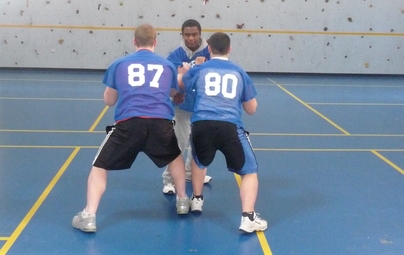
Versus a defensive lineman aligned in your gap but on the man to your inside (Diagram 3), we will take an Angle step with a visual aiming point of the center of the defender’s body to cover him up.

Concept Blocking Gap Schemes - Diagram 3

If there is no defender aligned in our gap and no one aligned on you (Diagram 4), we will angle step to our gap with a path through our gap to the Middle or back-side Inside Linebacker.

Read More

Concept Blocking: Case 4 – Universal Pass Pro


By Rich Alercio
Offensive Line Researcher
X&O Labs

It’s my thought that one pass protection scheme can be used for both 3 and 5 step drop back and play action schemes. In fact, it can also be implemented into a 6, 7, 8 or 9-man protection scheme.

Sound too good to be true?

It’s not. It is called Slide Protection but not a full slide. We want Linemen blocking Linemen.

Slide protection will combine the two schemes discussed in previous run blocking articles:

  • Man
  • Gap

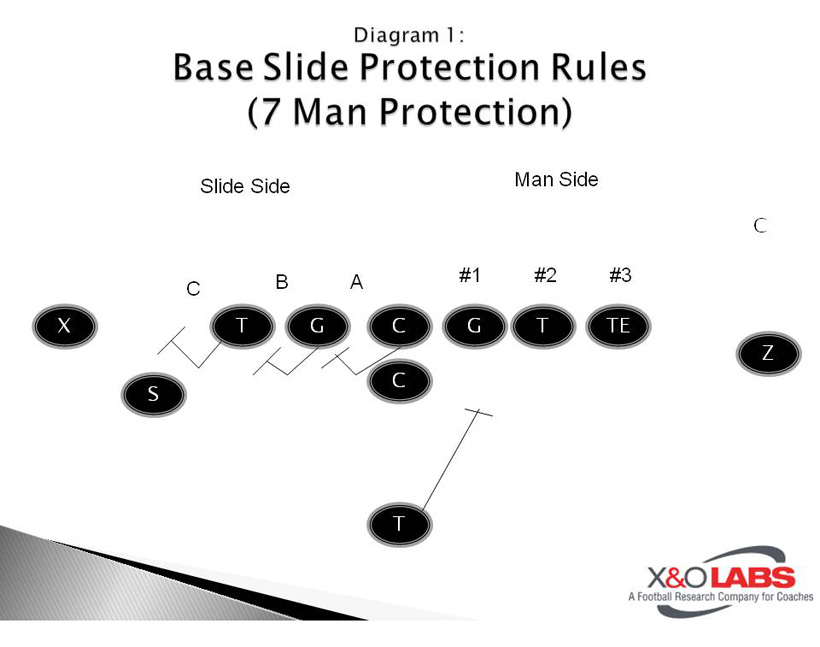
One side of the Line of Scrimmage will block Man protection. The Guard will block #1 on the LOS (Defensive Tackle/Noseguard). The Tackle will block #2 on the LOS (Defensive End). The Center, other Guard and other Tackle will block a Gap protection scheme (Diagram 1). The Center has the A gap on the Gap side while the Guard has the B gap, and the Tackle has the C gap.

Universal Pass Protection Schemes - Diagram 1

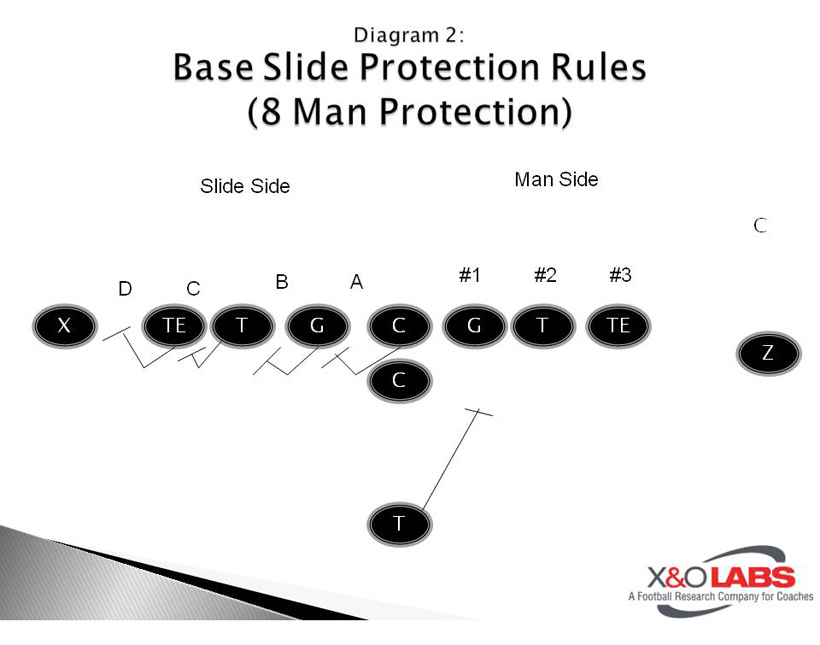
The Running Back(s) block any Blitzing Linebackers on the Man side. This allows the protection to account for 6-man (1-back) or 7-man (2-back) pressure. A Tight End on the Man side can either go out into a pass route or block #3 on LOS (Linebacker) just like he did in man blocking schemes. A Tight End on the Gap side can stay in and account for D gap or run a pass route. Having a tight end in the protection allows for an 8 or 9-man protection scheme (Diagram 2).

Universal Pass Protection Schemes - Diagram 2

Pass Pro Fundamentals

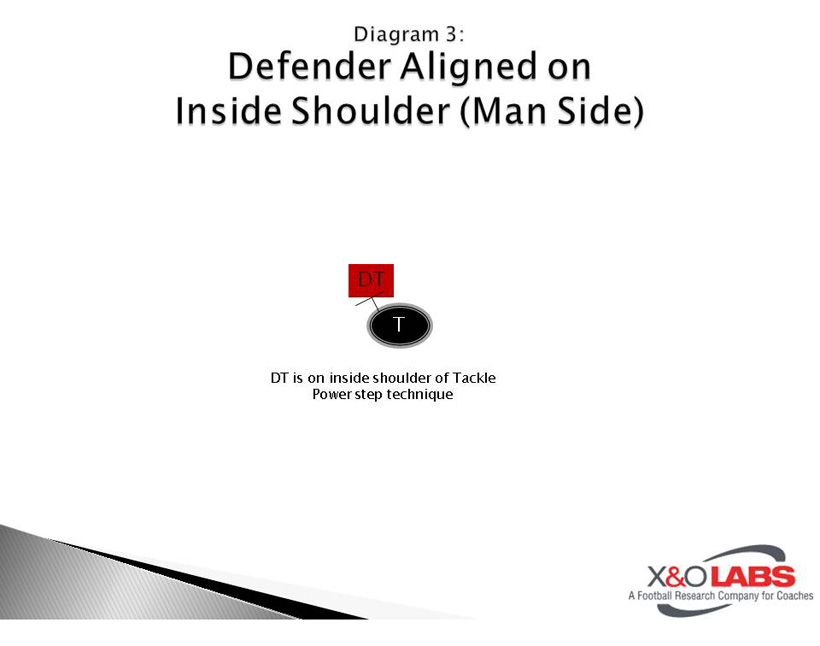
Before going any further with the protection scheme, let’s discuss the steps and demeanor the linemen will utilize in pass protection. Any offensive lineman blocking or setting to a defensive lineman to his inside will use a Power step (Diagram 3). The Power step is a lateral step with the inside foot. The step works inside parallel to the LOS. No ground is gained or given on the step. The width of the step is determined by the alignment of defender.

Universal Pass Protection Schemes - Diagram 3

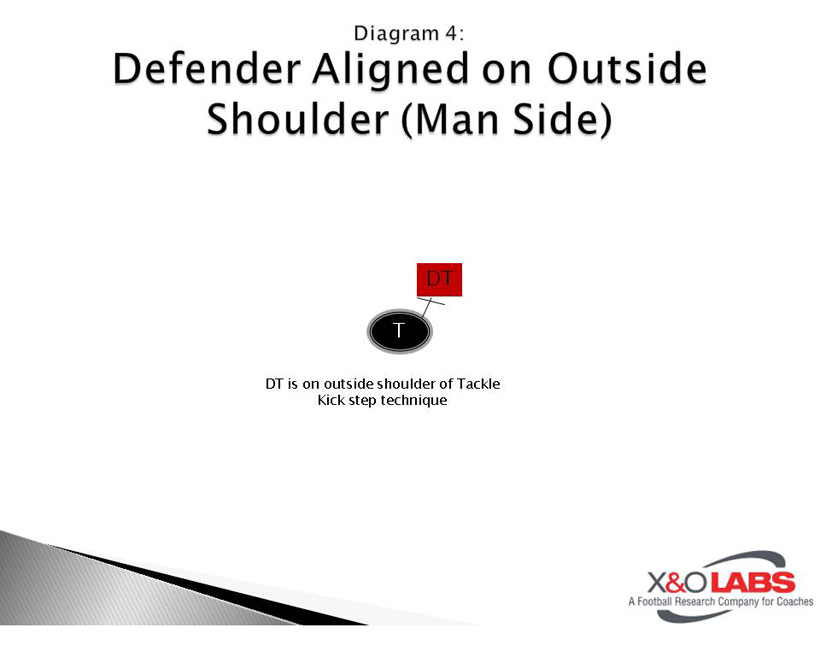
If the offensive lineman is setting to or blocking a defender to the outside (Diagram 4), he will take aKick step. The Kick step is executed with the outside foot out backwards at a 45 degree angle.

Universal Pass Protection Schemes - Diagram 4

Now let’s discuss the body demeanor of the offensive linemen upon taking their first step. All offensive linemen will get feet outside knees and knees outside hips. Their outside foot will be staggered back with a big butt and big chest square to the LOS with weight on the inside foot, regardless of the first step. Their hands should be at chin height creating a triangle with the forearms. The offensive lineman should see the target through his hands.

The Pass Set is the combination of the first Pass Step (Power or Kick), the demeanor and the subsequent steps that lead up to the Punch.

The second step is a Slide step with the opposite foot of the first step. The slide step does not gain nor give ground. It just slides in the same direction as the first step. The third step is a repeat of the first step and is called the Brace step. The Offensive Lineman braces on the third step to deliver his pass punch to his target.

Read More

Concept Blocking: Case 5 – Zone Schemes

By Rich Alercio
As told to Mike Kuchar

Editors Note: The following material was presented by X&O Labs’ offensive line researcher, Rich Alercio, on how he blocks his zone schemes.

Many coaches teach the inside zone (an interior play that will hit within the tackle box) and the outside zone (a perimeter run scheme) in two separate ways, but I try to combine the same blocking schemes in both runs. In theory, both zone plays rely on a vertical stretch by the defense in which it is the running back’s assignment to find an opening in a gap and explode through it. I teach both plays the same exact way to the front side, the only difference is the back-side of a stretch play when lineman need to work across the body of the defender to their gap. The play looks and feels the same to a defense, which is what makes using the two in combination so effective. The only difference is the path of the running back. On the inside zone, the running back pushes to the heels of the offensive lineman reading the first down defensive lineman to the playside. In the stretch scheme, the back’s aiming point is the defender on the outside of the tight end. Although this report will focus on offensive line play, the back is just as important, as he must take the same steps and move in the same manner.

Displacing Defenders on the Inside Zone

The inside zone is a play that works off the displacement of defensive players, with the intent of getting them moving laterally down the line of scrimmage and cutting up into a gap where they have vacated. The common misconception about the inside zone is that it’s a straight ahead play and that’s entirely false. You rely off the displacement of the defensive lineman or linebackers to find the spots that are vacated. It’s anything but a downhill play. It’s a slow-to-fast play where we’re taking a look and seeing how defensive linemen have displaced themselves laterally. The whole idea of the play is to get the LB to run in the direction that we are running, hold lineman with combination blocks and find the spots in-between.

But it’s the lineman’s job, not the back’s, to displace the defense. Whether the called play is zone or stretch, all offensive linemen must take the same exact steps. The critical thing is everyone is stepping with the playside foot, right or left. We actually make a “Ricky” or “Lucy” call denoting the right or left foot. What makes it simple is playside linemen will either take a reach or a base step (the same steps addressed in Alercio’s man blocking report) depending on if a lineman is covered or uncovered. Regardless of the type of step each lineman is taking there are two components of executing the play effectively:

  1. Never let the heel of that second step cross the toe of the first
  2. Keep your shoulders square to the running back

Everything nowadays is about covering guys up, that’s all you need to do. The days of putting your head on this or that side and steering him in a specific direction are over. There is no more drive him back for five yards and put him on his butt. When that happens, it’s a special thing. It’s just cover him up and let him run; eventually he’ll work himself out of the play. You can’t turn your butt to the hole. Stay with him and stay square, your heel cannot pass your toes.

Four Blocking Scenarios on the Playside of Zone Runs

To me, there are four main scenarios that a player has to ask himself when determining what block to execute in a zone scheme:

  1. Covered playside
  2. Covered back-side
  3. Uncovered open gap
  4. Uncovered closed gap

For clarification purposes, we talk about “covered” as when a first level defender (walk up linebacker or defensive lineman) is aligned over any part of the offensive lineman. Playside and back-side in individual zone principals do not refer to the playside of back-side of the LOS but rather the playside or back-side of the individual offensive lineman.

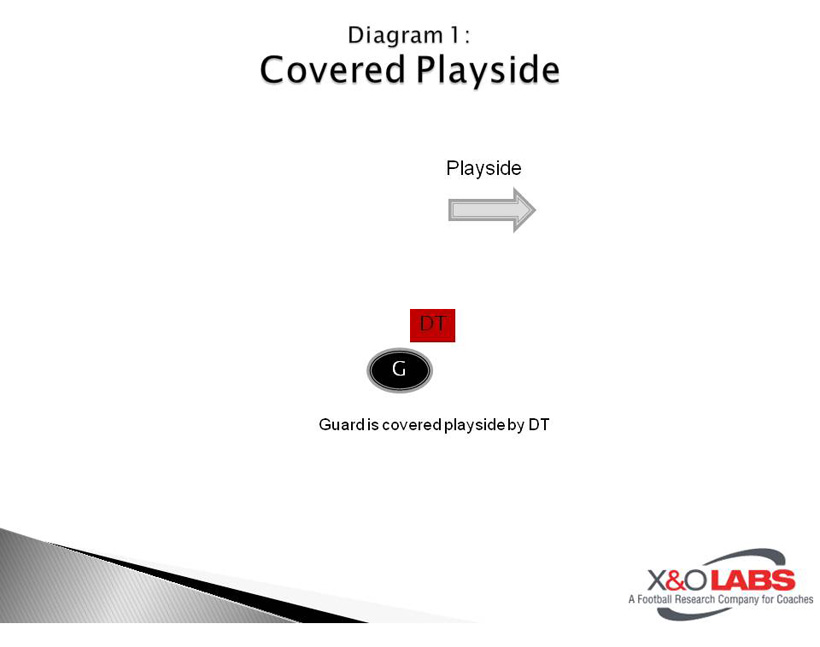
Covered Playside (Diagram 1)

Concept Blocking Zone Schemes - Diagram 1

Definition: Covered playside indicates that the offensive lineman has a defensive lineman aligned on him and on his playside shoulder.

Read More

Concept Blocking: Case 6 – Instructional Videos

X&O Labs’ Rich Alercio takes you on-field to present the Concept Blocking System.

On this page you’ll find two videos:

  1. Run Blocking Techniques for the Concept Blocking System
  2. Pass Blocking Techniques for the Concept Blocking System

Due to length, we’ve separated each video into two segments – Part 1 and Part 2. All four of these videos are available below – on this page.

These videos are enabled to play on any computer and most mobile devices such as smart phones and tablets. To watch these videos with your coaching staff or players, we recommend you connect your computer to a projector.

To maximize your viewing experience, we recommend you close all programs and windows you are not using prior to watching these videos. If you experience any buffering issues, just “pause” the video for a moment and then press “play.”

Read More