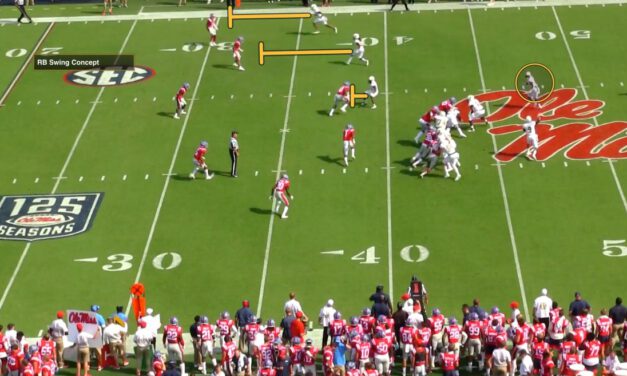
“RB First” Isolation Progressions in Pass Game

By Mike Kuchar with Greg Stevens
Offensive Coordinator
Southeastern Louisiana University
Twitter: @GregStevensSLU


It starts during the recruiting process with Greg Stevens. He wants backs that can not only run but be good receivers too. Makes sense, but at the high school level where many backs are groomed to be downhill runners in tight zone and gap schemes, this becomes easier said than done. So, there is an evaluation and training process that he will orchestrate to develop the backs in his system to be pass catchers. “Once they get here, we figure out what they can do,” he said. “Then we have a system to adjust to their skill set.” This system is built around having the back be the primary target in the pass game. The benefits are simple: it forces defense to cover the entire field and makes defensive coordinators think twice about front loading pressure. “We got pressure early in year, but if your back is an option you wind up getting advantages,” he said. “It forced teams to have to cover our back with peel techniques. Eventually they get away from it, particularly if you’re efficient throwing the ball. We saw less and less as the season went along.”


Installation/Game Planning:

According to Coach Stevens one of the first biases you have to overcome is teaching the QB that the back is a viable option in the pass game. “It’s all about completions in our drop back pass game because obviously that is what moves the sticks,” he told me. “But you find that backs are usually wide open and QB’s are forcing the ball downfield into double coverage. So, we stress throwing the ball to the back with space.” This mindset is universal. That means even in long yardage situations when receivers are taught to get to the sticks, the back has to be a viable option underneath. “If the coverage dictates the throw then throw it to him,” he said. “We have a better chance of throwing a two yard route to him and having him break a tackle for a first down then trying to push the ball downfield. Most of our third and long conversions have been completed before the chains and getting the first down.”

But with new running backs having to divide teach time with learning run concepts as well, I was curious to hear how many indi routes he will build into their toolbox without overloading their learning curve. For Coach Stevens, it starts by studying the coverages of his opponents. “We run a lot of the same concepts with different personnel and formations,” he told me. “For example, we ran 18 variations of the flood alone last year. So, when use 12 personnel you’ll often get Cover 3 pictures that dictates routes like Floods and boots. If you know that by formation and personnel you are going to get them in different coverages, you need to decide what you want to run against that.”

During the installation process, Coach Stevens will build in the route first and then the back is taught his route based on if he’s to the two-receiver side or three-receivers side. This correlates with what his route is, which is explained by the concept below. When he puts the game plan together, Coach Stevens will highlight the back in each of these concepts and track his touches.
“While touches vary depending on how explosive he is, we wanted to get him at least 15 touches out of 90 plays a game,” he said. This clinic report emphasizes how he’s able to get the back on mismatches in coverage or personnel based on the following core pass concepts:

  • Flare (Swing) Concepts
  • Flood Concepts
  • Spacing Concepts
  • Mesh Concepts
  • Isolations
 

Read More

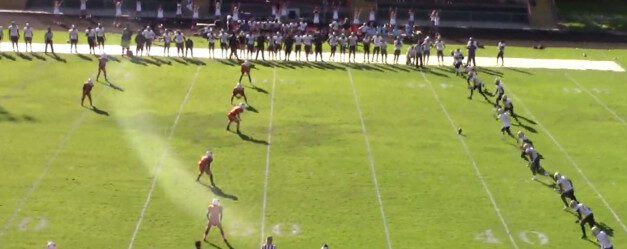
Teaching Play Side Tackle to ID for Tackle Wrap/Tackle Trap

By Justin Trahan
Offensive Line/Run Game Coordinator
West Orange-Stark High School (TX)
Twitter: @coach_trahan


The Dart is a great scheme to use when you can variate at the line of scrimmage based on the defensive alignment. Our play-side (PS) tackle will make this pre-snap read for us and echo his call down the line of scrimmage (deciding whether we will wrap or trap). It is a physical run play in which we coach the Tackle Wrap variation as we would one back power, and our Tackle Trap variation we coach just as we would a physical trap play at the point of attack. This play has been a huge part of our success in recent years. We mirror the Dart with our sprint out game as well as our jet sweep game, which allows us to slow down the second level or get flow at the 2nd-level away from the play using misdirection in the backfield. The backfield action we are showing is a sprint draw look. We use this as misdirection because we sprint out so often it’s just a natural fit to use something that we do well to create smoke and mirrors to make the Dart a better play. We coach a 3-step sprint out fake for the QB and RB, hoping to create that 2nd level flow.


Tackle Wrap

In the Wrap variation of our Dart game, we are showing the Sprint Draw in the backfield, this is something we don’t change regardless of how we variate upfront. We coach a 3-step sprint out fake for the QB and RB, hoping to create some 2nd level flow. This could be the biggest reason for our success with this play because we get that 2nd level flow which makes LB’s easier to handle. When facing a 3-man front or a 3-4 defense we can climb to the BS LB using a combo with the center and PS guard. However, against a 4-man front, we are unable to climb to that BS LB which is why the misdirection in the backfield is so key to help us remove that BS LB threat with the flow. We coach a 3-step sprint out fake for the QB and RB, hoping to create that 2nd level flow.


Vs. 3-4 or Odd Stack

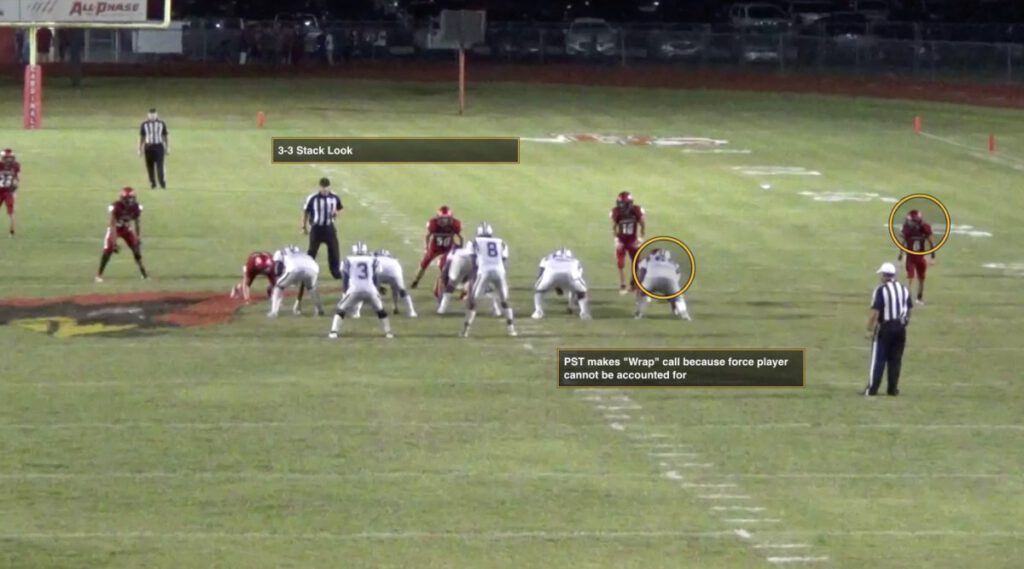
Coaching points when facing a 3-4 or a 3-3 stack when running the wrap variation of our Dart game. We treat these two fronts differently if a force player is present. If we are facing a 3-3 stack with a force player, we will use the wrap variation and try and hit it under the force player. Whereas against a 3-4 we would only use the wrap variation if there is no force player.

  • PS Tackle is either going to block a 5- technique inside out or down block on a 4-technique.
  • Center and PS Guard will always combo the nose guard to the BS LB, or if it’s a 3-3 stack their combo will be to the Mike LB.
  • The BS guard never changes regardless of the front he always replaces the pulling tackle by blocking back.
  • BS tackle which is the pulling tackle in the wrap variation will use a skip pull technique to create space from the line of scrimmage as well as maintain square shoulders throughout his pull, so when he gets to the whole he can attack LB with square shoulders. Versus a 3-4 defense, he is attacking PS LB which is normally a “20” backer by alignment, or versus a 3-3 stack, he would be pulling for the stacked backer on the PS tackle.


Read More

Auxiliary Gap Run Schemes in the Flex Bone Offense

By Derick Heflin
Head Coach
Washington High School (MO)
Twitter: @bluejayfootball or @hef_58


We are a Flexbone team that majors in Inside Veer, Outside Veer, and Midline. In 2019, we made the switch to the Flexbone from the Pistol Spread (we were 9-22 in three seasons in the spread, 9-2 this past season in the flexbone). We are a little different in our Flexbone system. We use a TE almost every play, use lots of different formations/backfield sets, and utilize some gap schemes to get our slots involved in the run game. Our top concept in 2019 was Outside Veer, but in our transition process, we were able to incorporate several gap schemes to complement our option scheme. This made the transition easier for our players. We found that less is more with our gap scheme plays. We want to keep things simple and similar. We want to carry over in all our schemes, so it’s easier for us to teach and our players to execute. Our top three gap scheme plays were a combination power/iso play we call Blast, Blast Counter play off of rocket motion using the same blocking as our Blast play, and Trap.


Blast

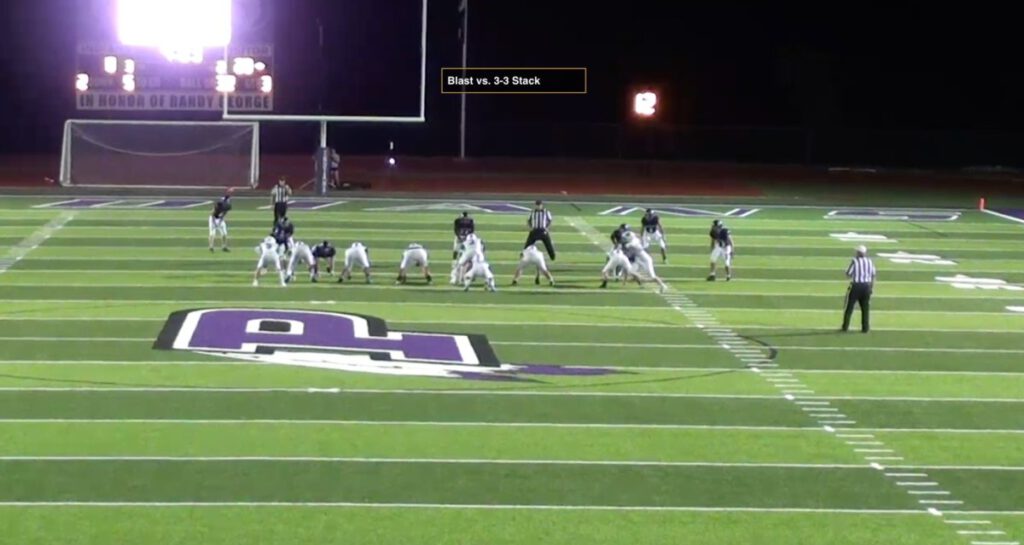
Blast has been our top play for the last 4 years. We kept the play in our scheme as we moved to the flexbone. While Inside/Outside Veer is our bread and butter play(s), Blast is our attitude play. It gives us a play where we can come off the ball and play smash-mouth football. This play is a combination of iso and power. We don’t have huge B Backs (fullbacks) that can kick out big defensive lineman consistently. By blocking the play the way, we do, we can get a favorable matchup of our fullback on a linebacker. Our offensive linemen are also not huge kids. We average about 220 upfront and usually are smaller than the teams we play. This scheme gives us the ability to use the defender’s alignment against him.

We categorize our run game blocking rules. For our gap scheme, our playside linemen rule is to work Gap- On – Down. We will fan or turn out on an outside shade. This gives our undersized lineman an advantage because they can use the defensive lineman alignment against them. We just want them to get off the ball and take the defensive lineman where they want to go. We have our lineman step with their inside foot first, to prevent defensive linemen slanting across our face. Our center will block the first defensive lineman On – Back. He will replace the pulling guard. Backside our guard will pull around working for the first open hole. He blocks the first linebacker head up to his inside. Our backside tackle and tight end will scoop their inside gap. Our offensive linemen make line calls every play and communicates defensive alignment. We always give our backside guard and center the freedom to make an Ice call. This call tells the backside guard not to pull. We do this when we don’t feel comfortable with the look we are getting. In this case, the play becomes Iso.  We also can make a call where all the linemen block down, making the play basically Power. By using the blocking scheme and using tags we can get more bang for the buck. This is what we want out of our complimentary plays.

Our fullback will run his inside veer path and block the first linebacker head up to the outside. The playside slot’s rule is fan or fold. We give him the option to choose the best path for him to get the outside linebacker or force player blocked. Both of these players in our offense are usually 160 to 175 pounds. They rely on angles and quickness to make these blocks more than sure power.

For our mesh on Blast, our backside slot takes 3 motion steps, drives off his outside foot and dives at the crack of the playside guard. We tell him to run to green grass. We don’t want to over coach this point. Our quarterback will reverse out, take two steps at 6 o’clock, and put the ball in the belly of the slot. He is supposed to boot after the handoff. Our WR rule is to block the near deep defender or TD Alley.

This past season we averaged 4.2 yards a carry on this play. It was a great compliment to our Veer scheme and gave us an easy way to get the slots the ball. Also, it gives our quarterback a play off from having to make reads or decisions.


Read More

Outside Cage vs. Interior Pressure Angles in 3-Deep, 2-Under Fire Zones

By Garrett McLaughlin
Special Teams Coordinator/Defensive Line Coach
Bates College, Lewiston Maine
Twitter: @_CoachG_


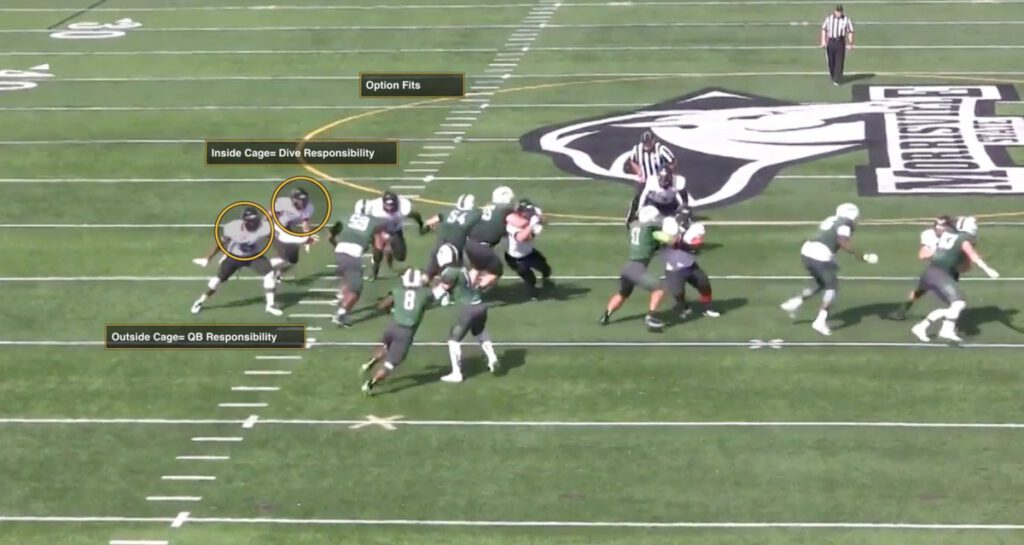
On every defensive staff, I’ve been a part of, there has always been a conversation about blitz game. The best way to bring extra heat against the run and pass while also mitigating risk and keeping things as simple as possible for the players. One of the best answers we’ve found to that is ‘Hot Pressures’ – 3 Deep, 2 Under-fire zone coverage while rushing six. There are some very distinct advantages to this pressure structure:

  • It’s simple. You can easily mirror it, make one-word calls to help your defense line up, and it requires very few checks
  • It’s vision-based. For any of the non-blitzers, it is a pure spot drop, eyes on the ball operation
  • It’s easy to disguise
  • Great vs the run
  • If you run Cover 4 as a base, the strengths and weaknesses of the coverage are quite different


Most importantly, it has a demonstrated track record of success. Running these types of pressures in 2015 at SUNY Buffalo State over 200 times, we allowed 1.4 yards per carry, along with 4 INTs, 10 sacks, and numerous TFLs. We were a four-down, press quarters operation, but I’m convinced (and have seen it done on film) that this scheme can be successful within any structure. As a staff we didn’t have any situation we would call these pressures in – Whenever we felt it was right, we would let it rip.


BASIC CONCEPT / RULES

Before going into specific teaching, there are some important general points to review. The first is how critical disguise is to this pressure structure working. Part of the benefit of running your pressures in this manner is that it is easy to be deceptive within how you do it. So with whatever your base defense is, make sure you’re giving the same look pre-snap when you have a hot pressure called.

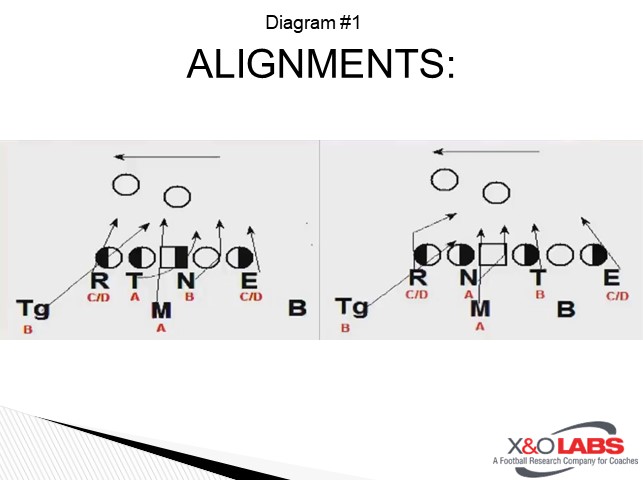
Within that, from a front standpoint, at Buffalo State, we always played it from our base rules. It was most important for the defensive line to understand where they had to get to within each pressure concept. For example, if ‘Fire’ was called (See Diagram below), the left defensive tackle knew that he had to get into the opposite A Gap, regardless if he were lined up in a 3 tech, a 2i, or a 1.


Additionally, built into all our pressures vs a TE surface the C Gap would always be the one that would be open. That way, our second and third level fitters can always anticipate where the open game will be.

Read More

Alcorn State’s Receiver-Based Route RPO Route Progressions

By Elliott Wratten and Jason Phillips
Offensive Coordinator, Wide Receiver Coach
Alcorn State University (MS)
Twitter: @CoachWratten @ALCORN_COACHJP


RPOs have become a staple of college football, and our offense at Alcorn State. The routes that we run are not unique to us, but our packaging for our RPOs is. We use this RPO package with inside zone, inside zone variations, power, and counter.

The uniqueness of our system is that we let our players call the route based on some parameters and base rules. Our system of letting the players call the pass concept is one that was built out of necessity. Our issue became that defenses would give us a throw read, but the coverage behind it was making it a bad look to throw the ball into. This was causing us to throw contested balls and putting WRs into harm’s way.

We base out of 11 personnel along with the ability to flex into some 12 personnel. Our base philosophy of this concept is that the QB is responsible for the 7th defender on both sides. If the QB feels that #7 can tackle the ball for 6 or less, the ball needs to be thrown. This allows us to have some different answers based on how the defense is playing us, and the different things we faced when teams try to dictate throws vs. runs.


Why?

Our No. 1 reason for using our RPO system is to get even numbers in the run game. We believe if we have 6 on 6, our guys are good enough to hand the ball off and get at least 6 yards. That’s a win for us; that means we are in a position to dictate to the defense what we want. We use our RPOs to keep the box honest and take advantage of field space when defenses cheat seven and eight guys into the box.

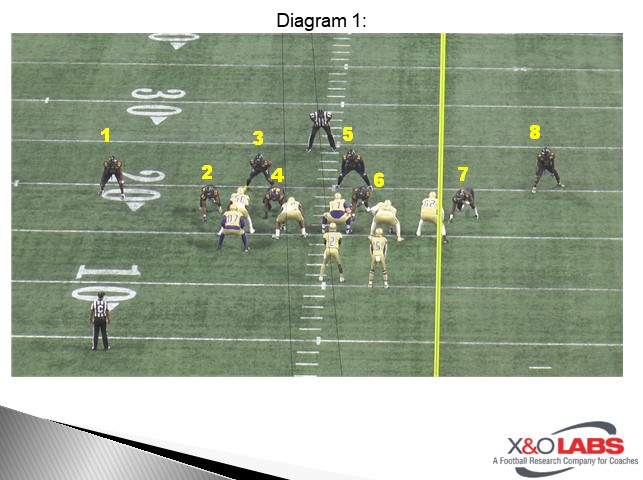
Diagram 1


We have a few reasons that we went to a system that allowed the kids to call the route based on the look. The first was most defenses have adjusted to check-with-me offenses, and this allows the players to call the look based on what the defense has presented to them. This allows us to maintain our tempo and not be a play behind and turn play-calling into a guessing game. The second is we have dramatically improved the looks that we throw into and have eliminated high-risk throws such as bubbles into cloud corners or glances into bad leverage. This has allowed us to still control the #7 defender to each side and throw the best look available.

We also have been able to marry our runs with our throws in the available field space.

Lastly, this system has allowed us to be more explosive. Our system has now allowed us to capitalize on the defense taking away our 6-yard run. Our intention is not to replace that 6 yards with a 5-yard completion but instead to catch the ball on the move for a first down and the chance of an explosive play.


Run Game Complements:

We are primarily an 11 personnel offense with the TE playing as a sniffer most of the time, but we will attach him as well.

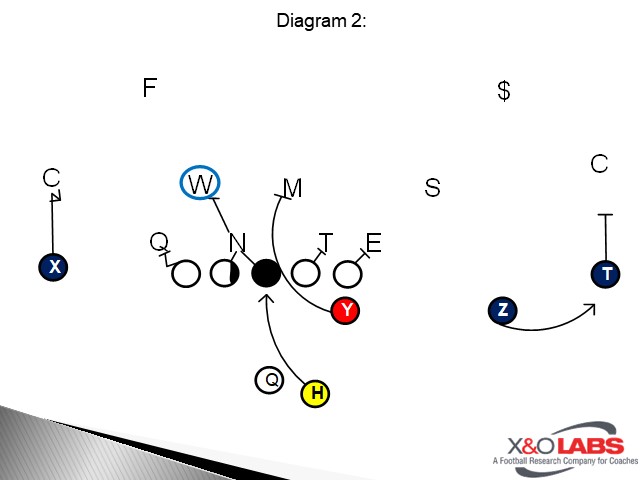
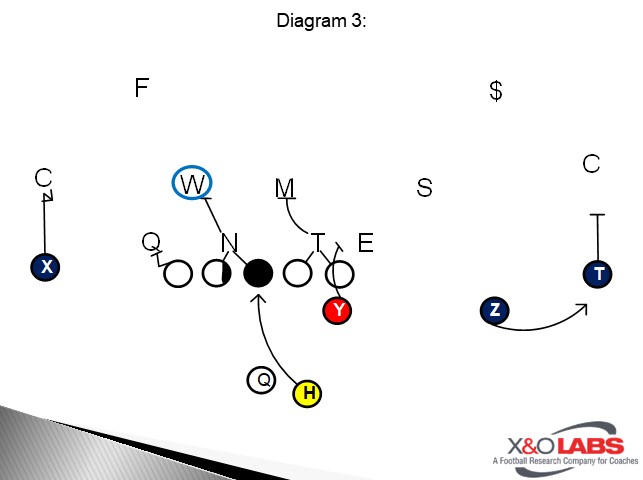
Our base runs we use with these RPOs, are inside zone, split zone, zone iso, power, and counter. This allows us to pair up our best runs and the throws will be added on as an extra layer. Zone iso has proven to be the most effective and stressful for defenses, but it also is the one defenses work to take away first.

Our criteria for the inside zone is going to start with the zone iso. Once a defense works to take that away, our next progression is the split zone or same-side zone. The zone iso allows us to create extra gaps inside the box and put stress on the #7 defender to fit an internal gap quicker. Once defenses start moving the Defensive Tackles, we will use more split zone and inside zone to allow for better angles and more efficient blocking.

Diagram 2

Diagram 3

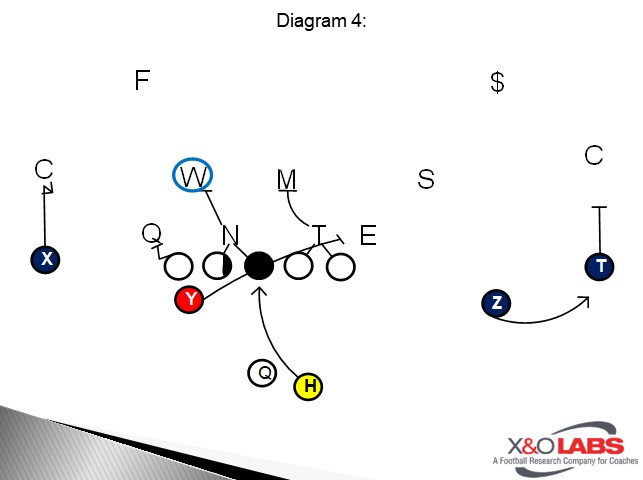
Diagram 4


Power and Counter are look-specific plays for us. The advantage for power and counter is like zone iso in the regard that we are creating extra gaps and forcing the #7 defender to fit quicker. The biggest issue with power is the backside hinge by the tackle; we must be comfortable with how the defense is playing it that week. If the three-technique is a bad matchup and a vertical player, it likely will not be in the game-plan that week. If we are getting a shade to the backside, or an open B-Gap, it can be in the game plan for that week. Counter, if we are playing a tight squeeze and spill team, we again can RPO. If the DE to the side we are running the ball is a mesh charge or vertical player, it will not be in the game plan.

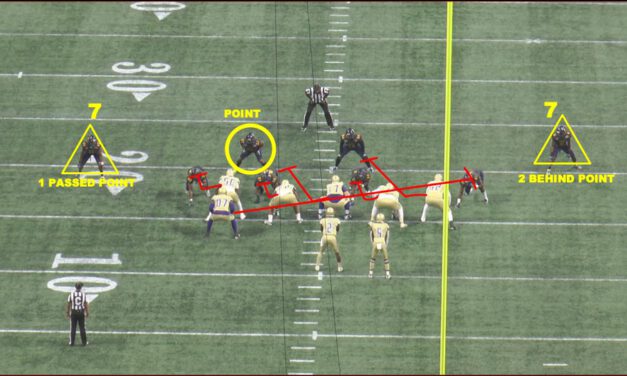
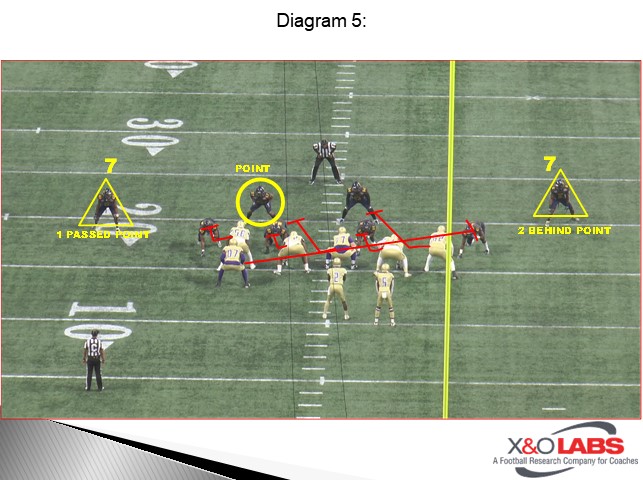
We ask the center to point a LB in everything we do. On every run, pass, or no play we are identifying a “Point” LB. The point for our inside zone and pass protection marries up to allow us to know who we are responsible for as an OL and lets the QB know who he is responsible for in pass pro or RPO. There has been carryover for the QB knowing whether he is throwing hot off the defender or if he is a defender forcing an RPO to be thrown.


Identifying and Manipulating Seventh Defender:

QB’s first responsibility in our offense is to set the defense. Being that we are exclusively a shotgun football team, this always requires having our hands up prepared to catch the snap. We will also bluff, raising, and lowering our hands to get the defense to their final alignment. From there we will identify our #7 to each side — both who they are and where they are based off the center’s point. We identify frontside #7 as first past the point play side and backside #7 as 2nd behind the point. Multiple positions could qualify as #7, we define him as the defender most likely to tackle the ball if handed for six yards or less. We will work play side to backside in identifying the most dangerous #7. When either #7 is on the LOS we will abort the run and send the RB to the issue. If the play side #7 is an issue we will never make it to the backside and must handle him. Once we have cleared the #7 play side, we can work to #7 backside. At this point, we will receive the signaled routes from the tagged WRs.

Diagram 5

Read More

The A-Gap Slip Field Goal Block Scheme

By Ryan Montalvo
Special Teams Coordinator / Secondary Coach
Dulles High School (TX)
Twitter: @Coach_Montalvo


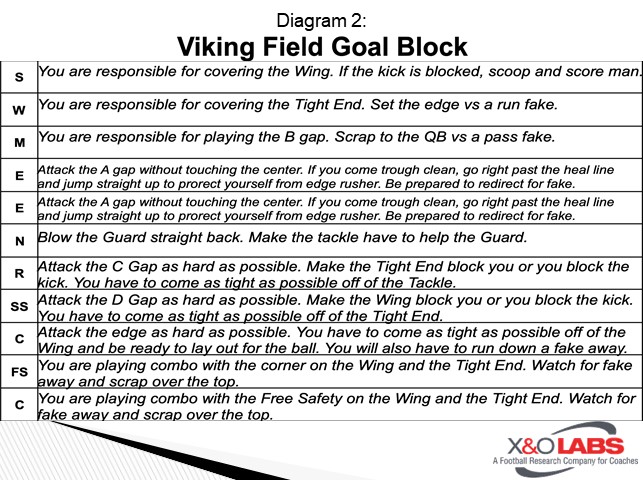
Field goal block can be an overlooked aspect of the kicking due to it usually occurring right after your defense just gave up a score. Getting scored on by your opponent can shift the momentum of the game away from your team but blocking the PAT can swing it right back to you. We developed a simple scheme at Dulles High School that allows us to block field goals from the right or left without confusing our athletes and allowing them to play fast.

Montalvo 111020


Assessing Personnel:

The first thing we do when we start to personnel our field goal block team is, we try to find kids who have a great takeoff and are willing to layout to block a kick. We start this process early in fall camp while we are evaluating kickers, punters, holders, and returners as well. We want to sub as little as possible, so trying to find a defensive player to be the edge rusher is a huge point of emphasis when looking for the guy who is going to come off the edge.

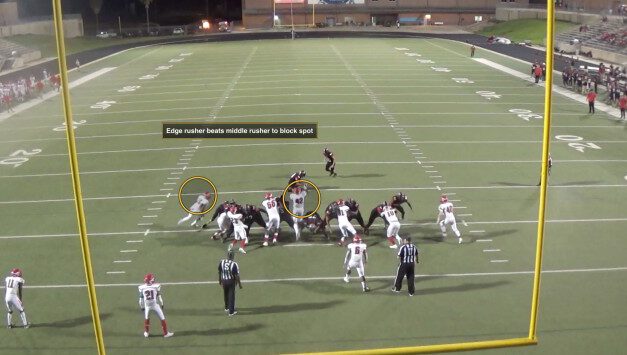
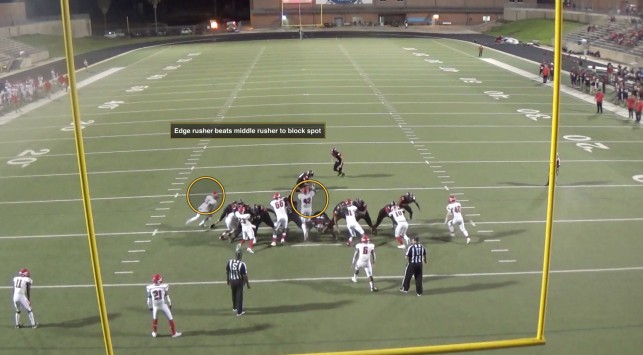
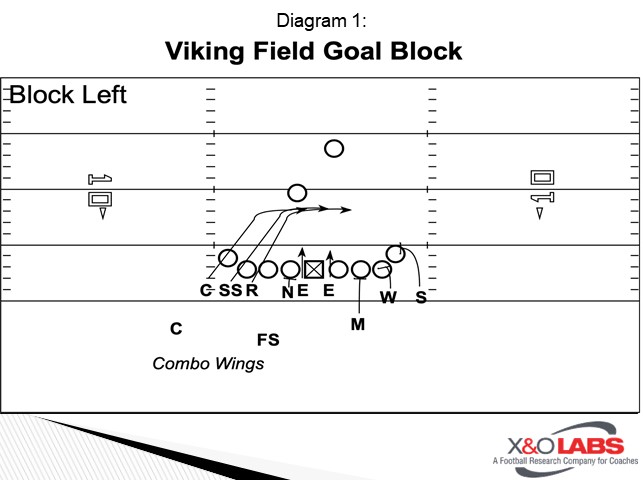
Our scheme is simple but can give you multiple block points. We want to be as sound as possible to deter teams from running successful fakes. Our block is a combination of an edge rush with an A gap slip that makes teams tighten their splits to give us a shorter edge or block out on the edge rusher and widen the interior gaps. Our scheme is the same no matter which direction we want to block the kick from. If we’re going to change which side we block from, our whole unit flips to simplify the scheme. This allows us to teach the entire defense the scheme so no matter which players are on the field, they can execute the block we call. We were fortunate enough to sub-two players at most depending on if they were on the field during that defensive series. Best case scenario they were both in the game, so we didn’t have to sub at all.

Diagram 1

Diagram 2


Read More

Teaching Blitz-Peel Technique to Edge Rushers

By Eric Firestone
Defensive Coordinator
Gardendale High School (AL)
Twitter: @Coach_Firestone


At Gardendale High School we are a Multiple Front Defense.  In today’s era of wide-open spread offenses, it is imperative that as a defense we present a variety of looks with our fronts, coverage and with different blitzes.  One aspect of defending the pass is incorporating different numbers in the pass rush and the pass responsibilities.  Depending on the down we can bring as few as 2 and as many as 7 on the pass rush.  The more defenders we bring the fewer eyes we have on the QB and pass defenders and more careful we must be with our coverage.

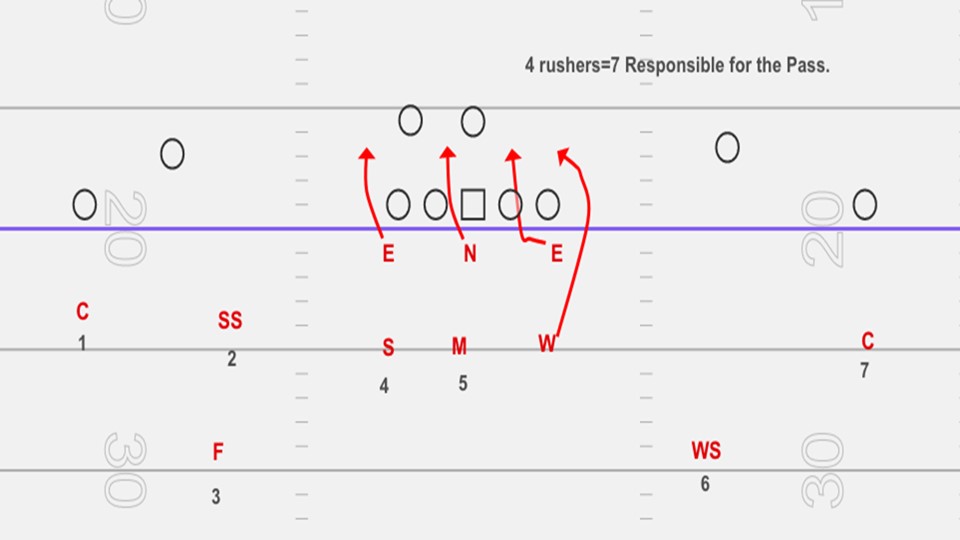
A standard pass rush for most defenses is 4 defenders.  It is no different for us.  Not to oversimplify things but one must always account for the 5 eligible pass receivers and keep that in mind when bringing pressure.  When creating pressure, one must use common sense and math to know your strengths and weaknesses.  The most common pass can be broken down into:

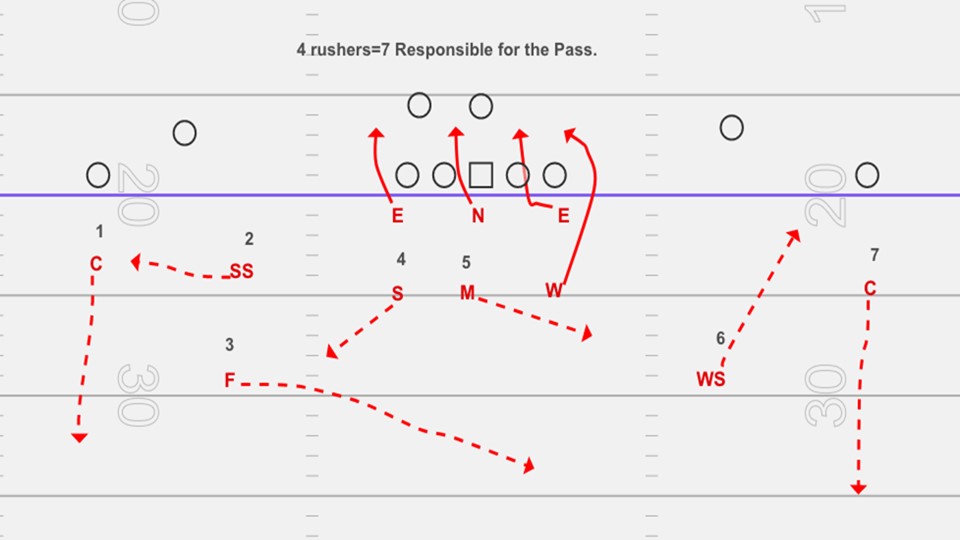
4-man rush =7 defenders for the pass

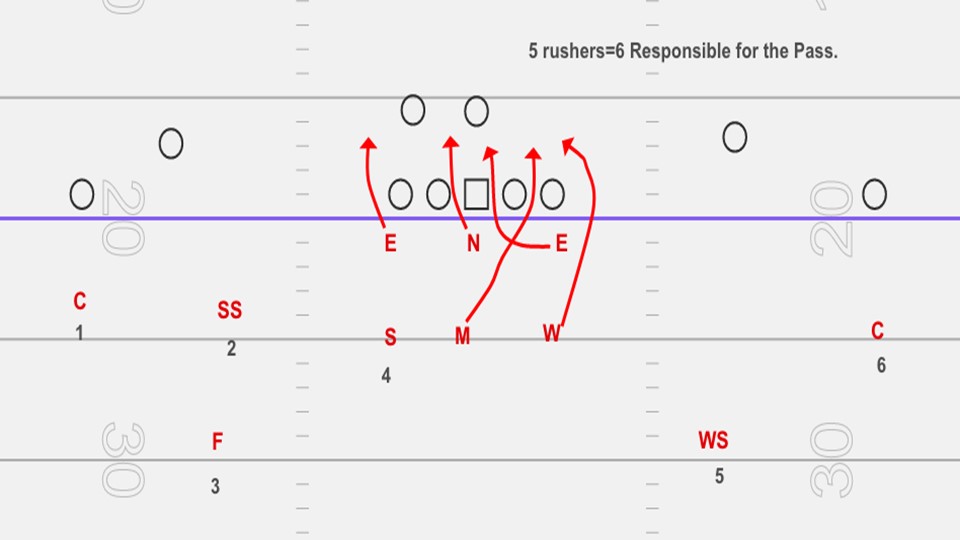
5-man rush=6 defenders for the pass

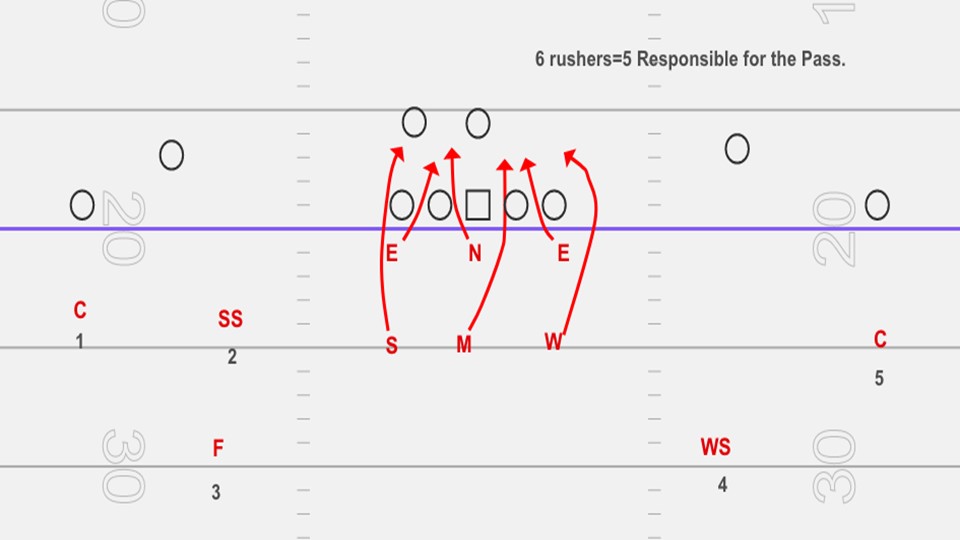
6-man rush=5 defenders for the pass

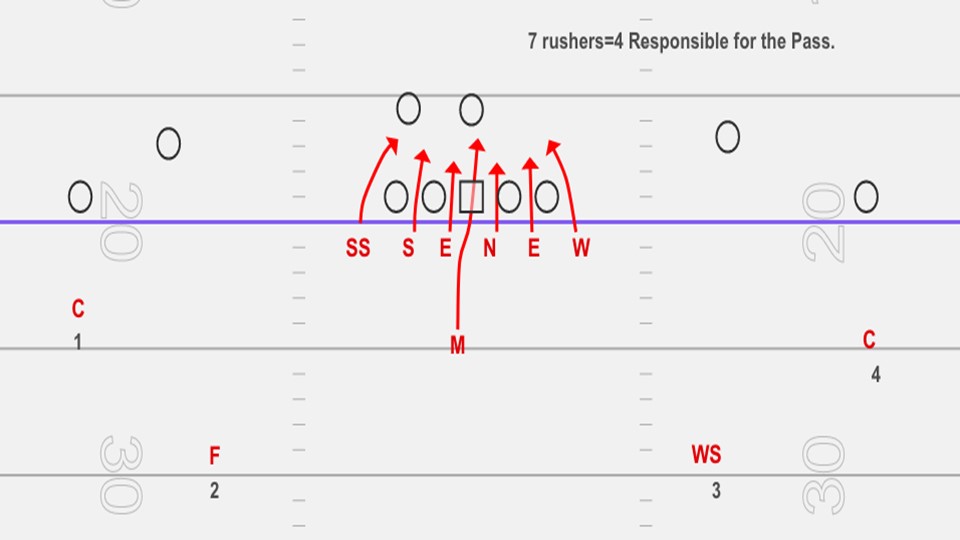
7-man rush=4 defenders for the pass

Firestone 111020


Here are some examples out of a 3-man front:

Diagram 1

Diagram 2

Diagram 3

Diagram 4


As you can see the more, we send on the pressure the greater the risk for an explosive play to happen for either team. The less sent is more conservative and less likely to give up an explosive play. When we send 4 or fewer rushers, we let them go and without pass responsibility because we have 7 people to defend 5 and that gives us a +2 advantage if we want to play coverage. 

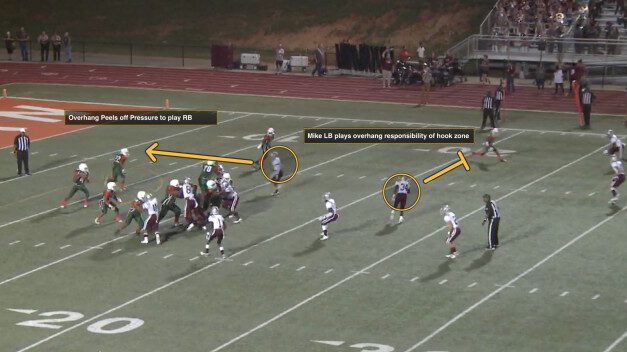
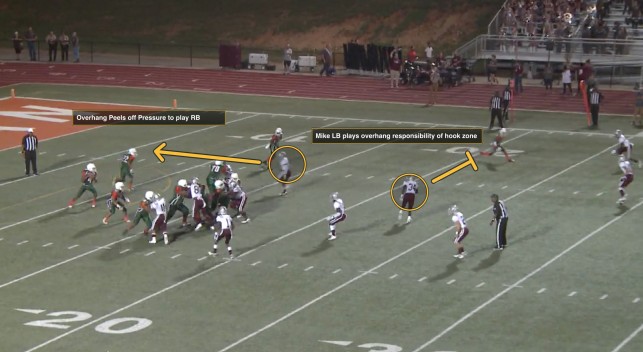
Here is an example of a line movement with a Linebacker off the edge.  A simple Cover 3 concept with 3 deep and 4 underneath.  In only sending 4 rushers we are playing more coverage and must sacrifice not getting to the QB especially if the Running Back stays in to pass protect.  This is something we rarely do unless we feel we are better upfront than the opponent or in a situation when we need to play it safe and play coverage.   If the Running Back comes out, we have 2 linebackers that are dropping to pick him up. 

Diagram 5


Read More

“Motor” and “Driver” Techniques for Zone Combinations
By Joseph Gaddy
Offensive Line Coach
Madison County High School (FL)
Twitter: @iamJGaddy


There is a common misconception that Zone Concepts, in general, are not physical schemes; that if you want to dominate the defense, gap schemes are the answer. At Madison County, who has a deep tradition rooted in the Wing-T, we can tell you that it is a false narrative. While we still heavily rely on our Wing-T principles, some form of Inside Zone accounted for 32% of our run game this past season which was roughly 182 times. While it may be presented differently in the way of Full Zone, Split Zone, Zone Read, or some sort of Zone Iso our offensive line is working zone principles. The major reasons for our utilization and success of this scheme is our ability to:

  1. Get as many Double Teams as possible at the point of attack
  2. Physically Dominate the line of scrimmage.
  3. Properly fit on the 2nd (and sometimes 3rd) level.


In this report, we will discuss how we break down these Double Teams or Combo blocks into specific parts that can allow us to fine-tune the varying phases of these blocks, and how we rep them so that we can dominate on Friday nights.


Who Do We Combo? -Our Inside Zone Scheme

In our inside Zone Scheme, our goal is to get as many combos as possible. If we need to attach a TE to get our second combo, we will most definitely do so.


Foundations of Combos
Our Combos in our Inside Zone Scheme are “Vertical” Combos. We are trying to get movement vertically to the 2nd level defender. It is important to rep this mentally, as it differs from your gap combos which typically have your playside combo working to a backside defender.

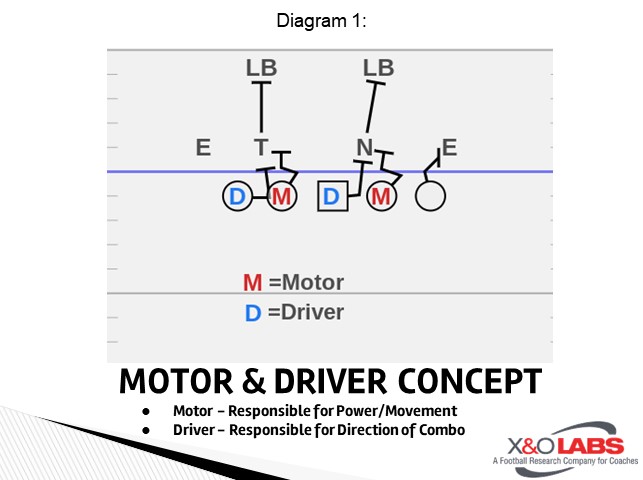
We split our Combo up one of two distinct roles or jobs: “The Motor” and “The Driver.”

Motor – Inside Man of the double team that is responsible for movement, power. Just like the motor in a vehicle.

Driver – Outside Man of the double team who is responsible for steering, or direction. Just like the steering wheel or driver in a vehicle.

Diagram 1


Hand Placement: We teach a “2-on-2-off” technique in terms of hand placement. The OL should each have their hand nearest the defender on while keeping their opposite hand free for contact on the 2nd level. We teach the chest plate as the strike zone. The Motor and Driver have slightly different contacts which we will discuss later in the report.

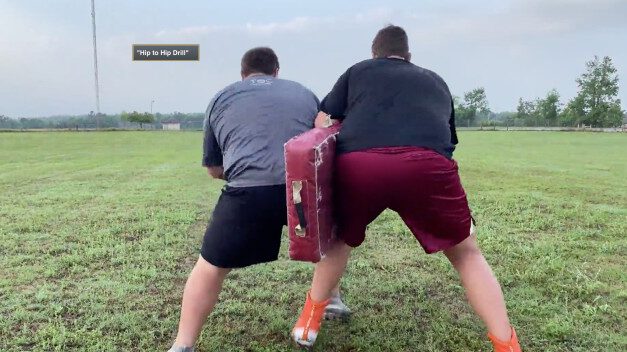
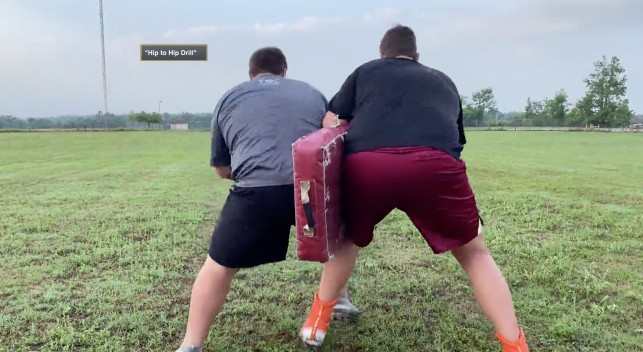
Hip-To-Hip: The quicker we become one being, the quicker we decrease a chance of the DL splitting the double. Most issues that arise in combos are the two offensive players not working tight, together, and in unison. When there is more than one vision, there is division.

2nd Level Defender: We do not specifically tell an offensive lineman who will come off. We teach if he fits here…he becomes yours, and the same for the other lineman. This helps us focus initially on the down defender, then as we work vertically wherever that defender shows, we will then disengage the down defender and let our teammate know “I’m’ Gone” and allow him to take over. Our goal is to come off late on the second level. In doing this we again ensure movement on the down defender and decreases the amount of separation between ourselves and the defender.


Two Jobs – One Goal

We work the separate, specific parts of the combo during individual just as much as we do the double team in its entirety. The OL gets a lot of reps together during team and group settings, so we feel it is important to help each player master his “Job” so we can be successful together. Also, be sure that you define for them who is what, and rep it as such. For example, our TE will ALWAYS be a driver, never a motor, so he does not need to rep as such.


The “Motor”

“JOB”: Again this is the inside man on the combo and is responsible for the initial movement and power of the combo. We work a quick rocker or power step with the playside foot (foot away from the defender) first. This step is no more than 6 inches, lateral. This is for 2 reasons:

  • It anticipates and protects against an inside spike from the defender. (We use this same concept when we have to man block a defender, we refer to it as a “White Block” or “White Step”). Your Power truly comes on your 2nd step, so we will now have max power when we contact the defender. Which is our “Job” in the combo.
  • Our 2nd step is vertical into the crotch of the defender with our near foot. This aiming point helps assure we account for half of the defender.


Hand Placement: Our Strike Zone is the Chest Plate of the defender. We are going to strike half of the defender or the half closest to us. As the “Motor” we are going to strike with an aggressive flipper technique. An aggressive flipper is an open palm punch, twist, and lift with the forearm. We feel this gives the best-case scenario for surface area contact and force. We will not make contact until our 2nd step is in the ground to ensure the most pop. Our goal is to get a drive and lift.  We will keep outside hand free, for the second-level defender. While we grind that elbow and forearm to our side to generate power and decrease the likelihood of grabbing the 2nd level.  

Read More

Special Teams Game Planning and Practice Preparation

By Bobby Ramsay
Head Football Coach
Mandarin High School (FL)
Twitter: @Mandarin_hs_fb


Planning, installation, teaching, efficiency. All of these are things that as coaches we must take into consideration on a daily, weekly, and monthly basis. It is especially important that when organizing your game planning template for the season, that you include special teams. We believe very much at Mandarin that to be as prepared as possible to win on game day, your special team’s planning must be done in a way detailed way, much like your offense of defense. We also believe that applying that plan in an efficient way that prepares your players, focuses on what wins’ games, and keeps your coaches and players fresh is the best approach to getting optimal results in practice and ultimately in the game as well. As a head coach who does not call the offense or defense, I believe that allows me to take ownership of the special teams’ game planning, easing some of the burdens on the rest of my staff. It is critical though that you are detailed, that you not only scout and critique the opponent but yourself as well, and ultimately apply this in practice in a way that allows you to maximize your reps, simplify it for your players, and communicate the plan clearly

Key rules/situations you must cover with your players:
  1. Onside Kick
  2. Onside Recover
  3. FG no timeouts left
  4. Taking a safety
  5. Punting backed up
  6. Pinning the opponent on punt
  7. Pooch Return
  8. Squib Return
  9. Pooch Kick
  10. Squib Kick
  11. Fair Catch
  12. Peter Calls – everyone gets away from the ball
  13. What is a live ball?
  14. What is a dead ball?
  15. PAT/FG Fake
  16. Defending PAT/FG Fake
  17. Fire Call
  18. Defense Safe
  19. Punt Fake
  20. Not fielding a punt inside your 10-yard line
  21. Not letting the ball hit the ground on a kickoff return
  22. Swinging Gate Defense


Now, not all these situations require special drills or special portions of practice. For example, reviewing what is a live ball and what is a dead ball is done simply by asking your special team that you are working on to tell you what is a live ball or what is a dead ball. This way if a ball is blocked or muffed they know if the ball can be advanced by the offensive team, or if they should get away from the ball as a possession has changed and the ball cannot be advanced unless someone on the defensive team touches it. This clip is a good example of players knowing this.
In this clip, we have our FG attempt blocked. However, as you see, the ball is picked up by our holder, who knows that the ball is live and immediately begins to advance the ball, which he runs in for a touchdown. Also, some of the situations do not come up every week, you may only see Swinging Gate once or twice if at all. So, don’t think that this is overwhelming, and as the season goes on simple reminders for a lot of these are all your needs. But it can be the difference between a win and a loss

Read More

4×1 Quads Bubble/Bubble Switch Concept

By Toriano J. Morgan
Assistant Head Coach/Offensive Coordinator/QB Coach
Virginia State University
Twitter: @Toriano81


Every offense should have a staple play that they can hang their hat on. The Virginia State offense has used the bubble screen as a key component of its offense, and we have been very successful utilizing it. We teach our quarterbacks that as they go through their pre-snap read and we have an advantage in numbers, they can automatically check to the bubble. We feel confident in allowing them to do this for two main reasons. The first reason is if we had a run play called, we feel checking to the bubble is no different from checking to a perimeter run which might be a better play in that situation creating a positive gain on the play. Secondly, if we have a pass play on and we get numbers checking to the bubble gets us into a higher percentage completed pass play. So, we get the best of both worlds. Our goal is to always make the defense defend the bubble, this helps to give us leverage in our run game and marries perfectly with our RPO concepts.

We are a formation offense that likes to create match-up opportunities to create explosive plays. Our goal is to get our best athletes on the field and get them the ball in space. We discovered that our quads package did exactly everything we wanted. It also added a dynamic dimension to our bubble screen. It put our best athletes on the field, in space, and gives us a favorable match-up and numbers at the point of attack. It also provided favorable blocking angles on the perimeter that put us directly on the third level if executed correctly. We also saw an increase in YPC out of our quads package.


Setting the Perimeter

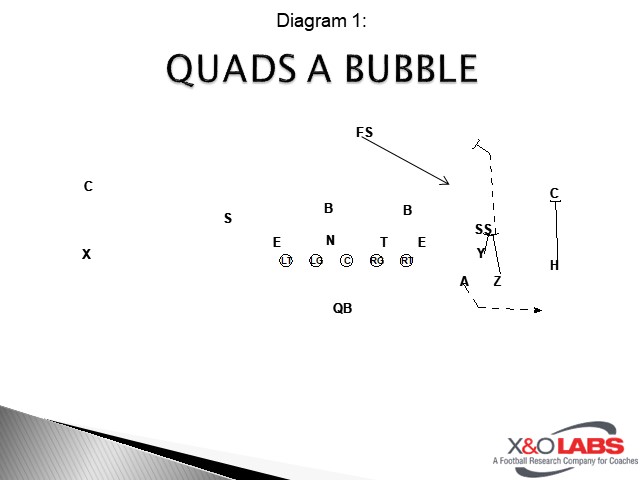
Diagram 1


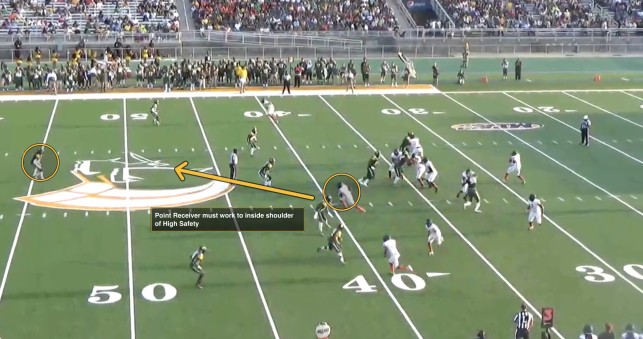
It is no secret that to be successful running the bubble screen you must set the perimeter. We find the simplest way to accomplish this is by alignment. We prefer to use a bunch look in our quads package because it allows every element of our blocking scheme to be sound. We teach the player running the bubble that the first guy inside of you is your guy, your technique running the bubble must beat him. We do teach our player running the bubble to drop step and lose ground as it creates a longer run for that defender and gives our ball carrier an advantage. Our goal for our ball carrier is to beat everyone to the edge because we have created the leverage to do so.

It also creates immediate movement by the defenders and allows for better angles and the immediate closure of space with our guys stalk blocking in space. We want our blockers to “go to where the defender is going” not where he is currently. We must anticipate movement.

It is a must that we win the point of attack, so we will always double at the point of attack to secure leverage and then the #2 receiver will come off to secure the alley (much like zone blocking). The #1 receiver will use a stalk blocking technique. We insist that they make the defender go through them to get to the ball carrier.


Perimeter Double Teams Drill:

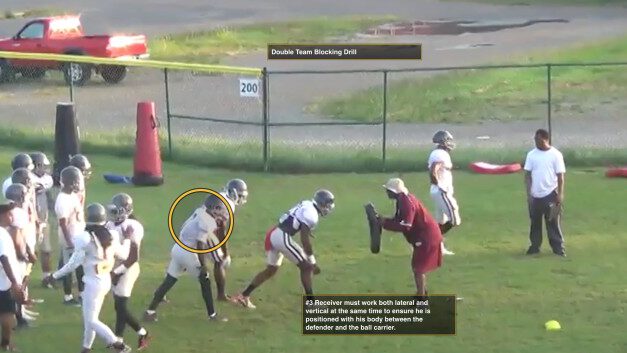
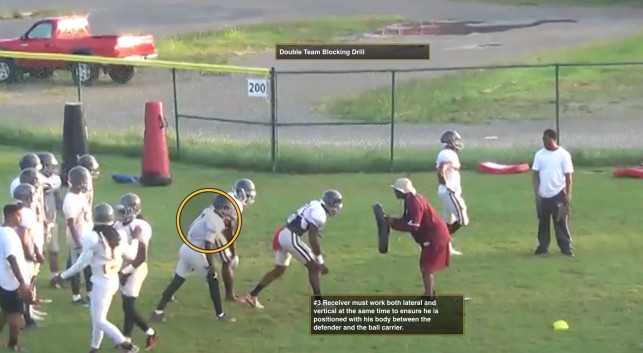
Before addressing the concept, it’s important for coaches to develop the mentality for receivers to block in space. The first drill that we find to be the most important is the double team at the point of attack. We will have a coach holding a simple handheld bag, and at the snap of the ball, we simulate the double team. We will work the double team from various looks. We will incorporate motions because they change blocking angles on the double team, so we want to remain consistent in our technique


Coaching Point

The #2 Receiver is concentrating on anticipating the defender working that will be working through him. His primary goal is to not to let the defender split the double team. We also coach him to progress his eyes upfield through the alley because he will need to be able to come off this block and climb to secure the ally defender using his stalk blocking technique.

The #3 Receiver is coached to anticipate immediate lateral movement from the pressed defender. In this event we teach our receiver as he engages in this block, he must work both lateral and vertical at the same time to ensure he is positioned with his body between the defender and the ball carrier when the #2 receiver comes off. He is also taught that he cannot cross his feet over as that will cause him to lose control of the block should the ball carrier cutback because of pursuit.

We teach our receiver that he must treat his technique as if this is a one on one block. The ability to double is a bonus. We must be prepared if the alley player reads this quickly and runs the alley hard right now.

Read More

Non-Contact Drill Work to Teach Tackling, Block Destruction and Ball Security

By Gabe Fertitta
Head Coach
Catholic High School (LA)
Twitter: @fertitta_gabe


One of the most difficult things to teach football players at all levels, and probably receives the least instruction, is the fundamental of running with the football after the catch (or in open field on runs). Additionally, defenses are constantly looking for new ways to drill open field tackling without adding more contact to the game. Most states now have limits on the amount of contact time in practice, and coaches across the country are concerned about their ability to teach tackling without drills that use full contact techniques. In studying drills and film from places like the New England Patriots, Troy University, and West Virginia, we have come up with a few “Tackle/RAC” (run after catch) drills that we have incorporated into all seasons of our program development. These drills can be done any time, without pads, and without any contact. Additionally, if you were to review your own film, you would find these situations arise multiple times in a game and most practices do not have the time or structure in place to drill these situations.


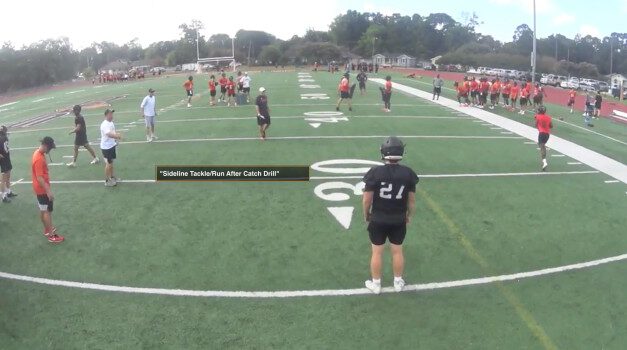
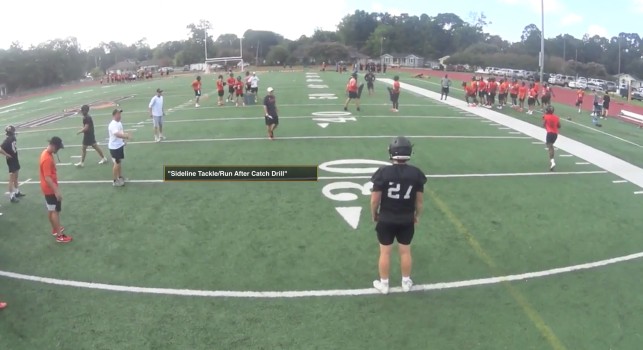
Sideline Tackle/Run After Catch Drill:


Drill Setup:

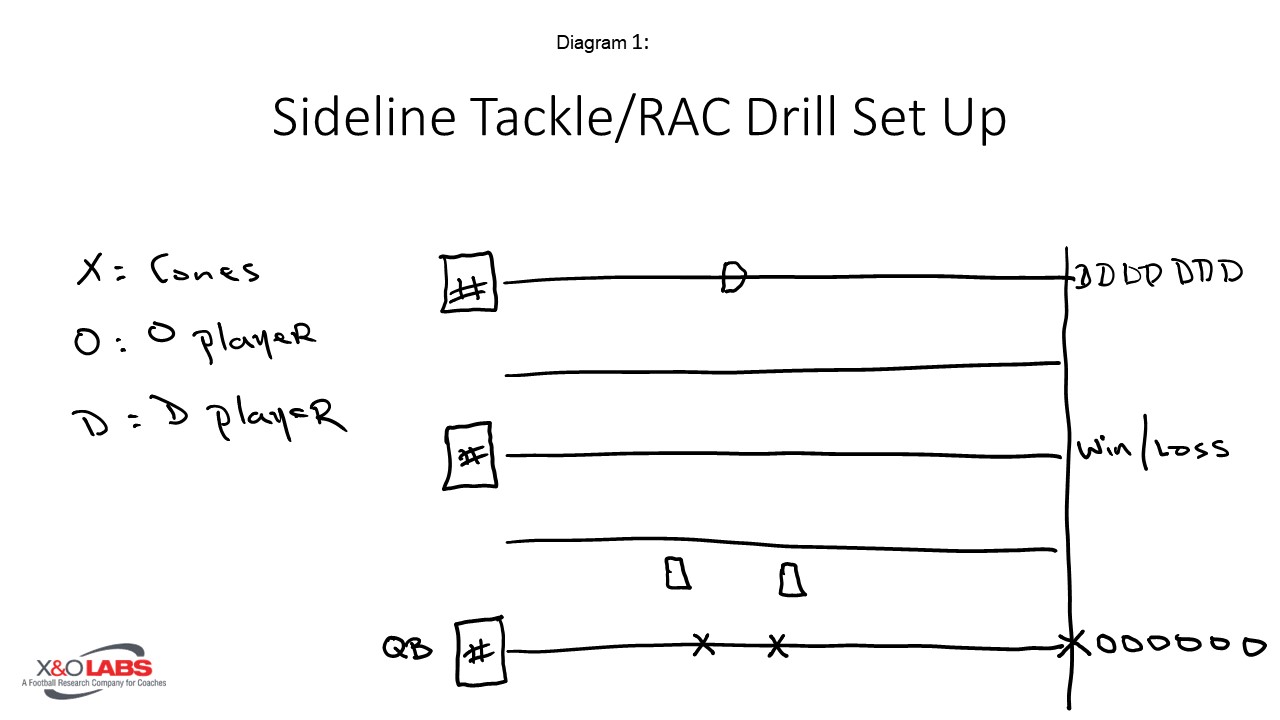
The first drill we use in our Tackle/RAC circuit is set up with two shield holders, an offensive player, quarterback, and a defensive player. The beauty of these circuits is that in a short amount of time, you can work a ton of players through the drill and get vast amounts of reps. Additionally, if you have two-way players, this is an easy way to drill simple things like catching the ball with hands, getting vertical after the catch, approach to tackle, shimmy, and striking with the correct shoulder on defense.

This drill could be done with full contact; however, we always use this drill with a tag off on the hip of the ball carrier. We can track wins and losses through the drill by determining if the defender was in a position to make the tackle before the 10-yard mark.

Diagram 1


Offensive Coaching Points for Sideline Tackle/RAC:

  • Quarterbacks will PAT the ball to signal the start of the drill.
  • Ball carriers will start on the sidelines and run to between the cones and receive the ball between the two shield holders.
  • As soon as the ball is caught, the ball carrier must get vertical to split the shield holders, simulating getting vertical after a catch in space like a dig or slant.
  • Only ONE cut or move is allowed from the ball carrier although if the defense has practiced this situation enough, the ball carrier will soon learn that he probably can’t win if he makes more than one move.
  • The offense can “WIN” the dill by making it to the 10-yard mark from the catch. Boundaries for the ball carrier in this drill are the top of the numbers and sidelines. 


Defensive Coaching Points for Sideline Tackle/RAC:

  • The instant the defensive player in front of you does his “up/down,” get aligned and still on your cone at the top of the numbers. We like to use this pursuit angle to train the defense for inside out pursuit and using the sideline as an extra tackler.
  • When the quarterback pats the ball to signal the start of the rep, the defensive player must execute an “up/down” and pop to his feet and begin to pursue the offensive player.
  • The most critical coaching point for the defense is to tackle with the correct shoulder based on leverage and CLOSE THE SPACE between him and the ball carrier as fast as possible.
  • Once the tackler has closed the space, he should then get into Mobile Athletic Position (MAC) and shimmy to lower his hips, get his cleats in the ground, and set up for a “near leg/near shoulder” strike.


Read More

Drill Progression for Wall Defenders in Punt Return Units

By Galen Holmes
Defensive Line/Special Teams Coordinator
Worcester Polytechnic Institute, (MA)
Twitter: @coachholmes3


At WPI, we place a large amount of emphasis on special teams each week. I am extremely fortunate to work for a Head Coach, Chris Robertson, who shares the same vision and philosophy with the importance of each phase of special teams. As our Defensive Line coach, being able to coordinate our special teams gives me a tremendous opportunity to not only work with our defensive players, but also work with our offensive players and build relationships with those players as well.  Each week we spend a great deal of time breaking down our opponent’s punt team and look for ways to attack it. Our objectives and scheme we employ have changed each year based on our personnel as well as the strengths and weakness of our opponents.  We focused on the return game largely due to the personnel we had.  Our offense had the best scoring offense in school history and our defense was nationally ranked in several categories and us being able to use our punt return to flip field position was a huge part of our success on both sides of the ball. 


Personnel

We believe it is important to not try to force a square peg into a round hole and be flexible as a coach to adjust to put your players in position be successful. Each year the strengths and weakness of our team vary which means we will adjust our scheme that best suits the strengths of the players we have on our punt return team.   In past years, we have been more of a pressure oriented team looking to block punts every weak. This past season we shifted to more of a return oriented team as we had less twitchy type athletes and athletes more suited toward blocking in space.   We always will have a block concept and a return concept for each game just in case. 


Opponent Breakdown

In college football you can see a wide variety of punt formations as you move through the season.  It can be a challenge each week to have to recreate a look against a new formation. It also calls for personnel adjustments as well.  If we have to play against a team who punts out of a 3 x 1 formation our personnel for that week will have more DB’s to get the right personnel on the field.

When we break down an opponent’s punt team we focus on these five questions:

  1. What is the formation?
    • Are they multiple in formations? We played against a team one year that had shown 8 different punt formations prior to our game. Do they use different formations when punting in a backed up situation?
  2. What is the operation time like?
    • Is the snapper consistent? If they can get it off in 2.1 seconds or less it is hard to get the block. This helps us determine if we want to focus on blocking the punt or focus on the return game. We also look for a “tell” in the snappers rhythm i.e. a head nod just before the snap or something similar to help maximize our take off.
  3. What is their personnel?
    • Are they bigger stronger players or smaller more athletic guys? Who are their best cover guys? This helps us get the right personnel and match ups.
  4. What is the punter like?
    • Right foot or left foot? Where is the block point? What is his hang time, average distance etc.? Is he a good directional kicker?  Where does he kick the ball relative to punt location (right hash, left post etc.)? This helps us coach our returner on what to expect and where to align himself.
  5. What is the protection like?
    • Is it man or zone? Where is the weak link? This will help us decide where to attack when planning our punt block.
  6. Who are the eligible players? You have to be sound against a fake and be sure you get your offense on the field on the next down.


Scheme

Our number one job for our punt return unit is to get the ball back for the offense. We tell the returner there is no shame in a fair catch as long as our offense snaps the ball on the next down. If we field the ball without a fair catch our next objective is 10 yards.  We simply want to get the equivalent of a first down. For example, taking our offense from the minus 25 to the minus 35 has a huge impact on scoring percentage. This year the return game was what we focused each weak. We did not have the right guys available to get to the block point and most teams we faced had solid operation times.    

Our primary punt return scheme is a wall return. What we like about the wall return is the ability to bring pressure from one side to force the kick but also have a chance to block a punt and also have a return on the other side. We will run the wall to the field or the boundary based on the punters tendency or if we feel our opponent is overplaying one side. It is critical for players on the unit to understand what leverage they need to take this scheme work.  To us it is man to man basketball defense, deny your man getting to the basket, which in a punt return scenario, would be the returner.

Generally speaking, we will have a pressure side and a pin side on our wall returns.  The pressure side players are attacking the block point and working to the wall and the pin side players are blocking their assigned men with return side leverage.  At times we will bring pressure and use some players to pin on that side as well.  We will do whatever we need to get an advantage for our returner to have a chance to get at least 10 yards.


Read More

SLICE Technique for Wall Players in Multiple Coverages

By Ashley Henley
Linebacker Coach
Shiloh Christian School (AR)
Twitter: @coach_Ahenley


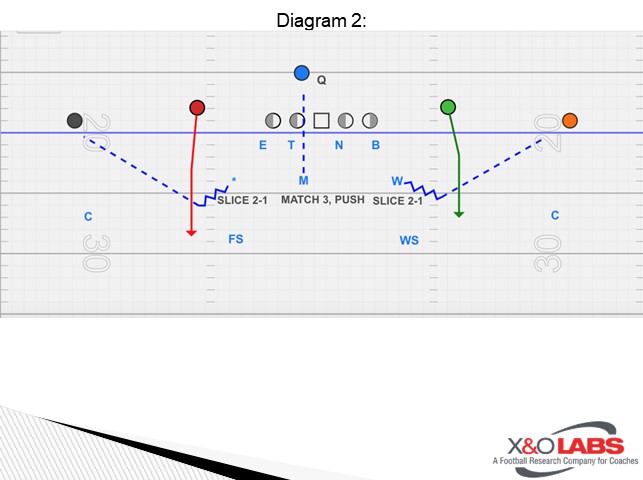
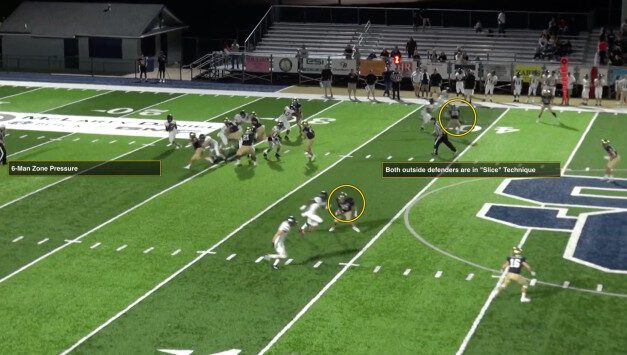
At Shiloh Christian, we base out of a 4-2-5 but are multiple in our fronts and coverages. As a result, we want to teach techniques with as much schematic carry over as possible for the sake of simplicity. One of these is our “slice” technique that has to carry over to all coverages. It is not a technique we invented but because of our multiplicity and belief in pattern matching it has been an effective tool in our toolbox when installing and game planning coverages.  Once a player understands the meaning of “slice” it allows us to coach fast and efficiently.

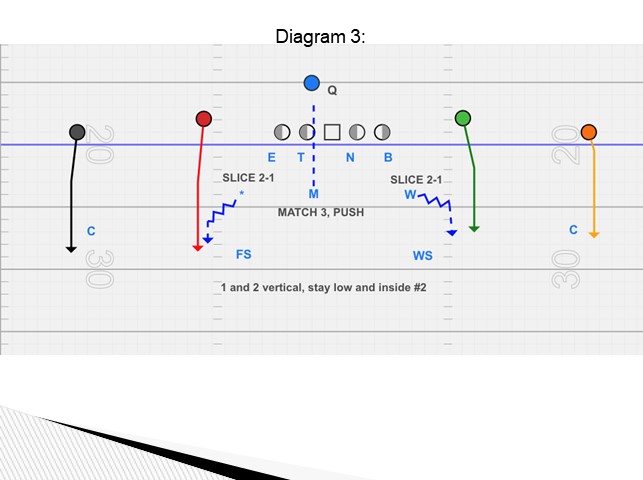
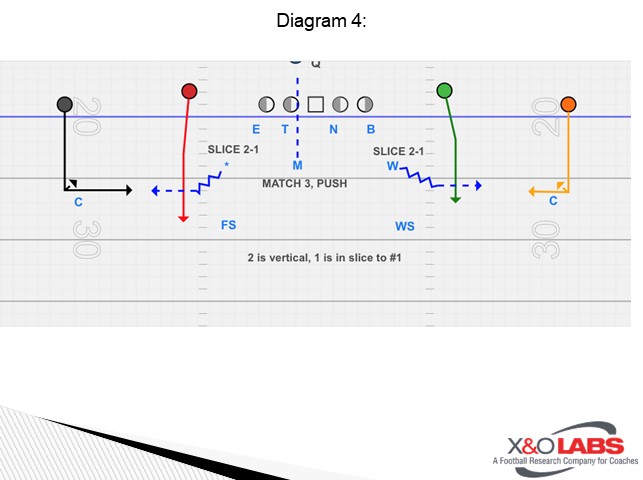
The term “slice” is a universal term we teach meaning Stay Low and Inside. It is used in any scenario where a player is a curl-flat dropper, hook-curl dropper, or even a cover 2 corner could use the technique with OUTSIDE leverage on a 1 receiver. We will teach this technique to all LB’s, safeties, and corners. It’s an easy concept to teach and has great carry over to all coverages with zone match and man match concepts. As a result, it can be drilled by any DB/LB coach as part of a circuit or other group work involving multiple positions.

Once we have mastered the technique, we have now taught a fundamental technique we use in cover 4, cover 3, 5-man pressure zone coverage, cover 2, and man match coverage for underneath defenders.

Coaching points include positioning yourself with aligned leverage between your 1st threat and the next closest receiver. Our positioning should be “low” as to not allow the receiver to beat us underneath. We want to “body or wall” our threat and “see” the next.


“Slice Technique” Drill Work:

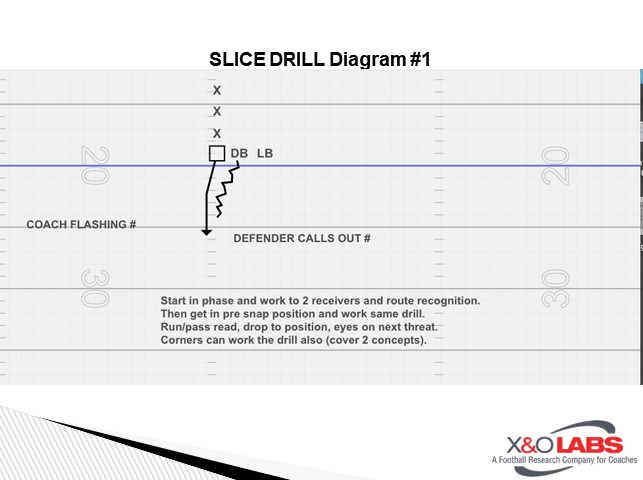
We will begin the teaching progression in phase with a receiver. This position is half a man with his head behind the receiver. We want hands-on so we can feel/wall/collision while seeing the next threat. The idea is to carry the receiver with my leverage until I have a new threat.

A coach will stand opposite the defender- as the receiver works vertically, the eyes of the defender should be on the coach, keeping proper position with his body. The coach can flash hand ‘s to train eyes and work feeling and seeing simultaneously.

Diagram 1


From here, we progress to actual routes while still in phase. The defender resumes position, but now he will get actual routes (signaled by a coach) and react accordingly. If he is a safety/LB he is working curl-flat drops, hook-curl drops, etc. A corner would be working Cover 2 slice with outside leverage, funneling 1 and seeing 2 inside.

Our next progression is to work from pre-snap alignment. Working from the snap, read, get in position and react to routes. If this technique is a run-first player (for me it usually is), coach it that way. Play run first, react to pass and work to get in phase on the 1st threat while seeing the next threat.

Below are diagrams of underneath defenders based out of 1/4’s concepts aligned to 2 by 2 formations. The STAR and WLB are using slice technique in this scenario.

Diagram 2

Diagram 3

Diagram 4


Read More

Sheet Templates to Create Offensive Scout Team Efficiency

By Joe Pearson
Defensive Coordinator/O-Line
Oxford Area High School (PA)
Twitter: @swarm_defense


We, at Oxford, value reps and decision making while in practice. To do so, we needed to look at other ways to increase scout team effectiveness and efficiency. The traditional days of one coach holding the clipboard or drawing and trying to install the Wing-T in three minutes were wasting time and costing our guys valuable reps both physically and mentally. We needed to increase reps and reduce the number of guys standing around. This led to our Scout Offense sheets.


Scout Sheet:

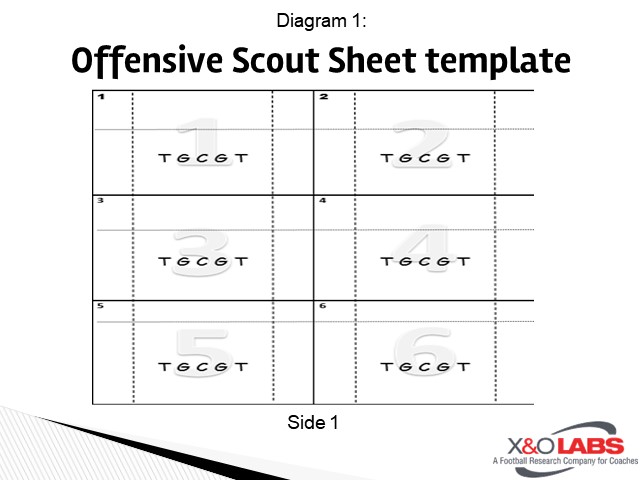
Diagram 1

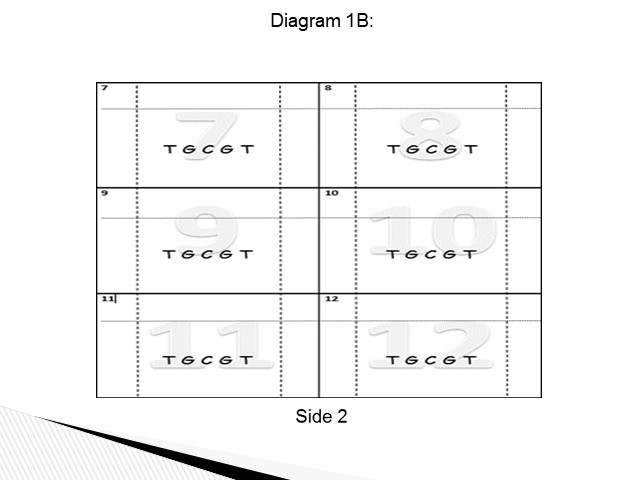
Diagram 1B


We developed and adapted a scout offense sheet that consists of 12 numbered plays, 6 on each side. We would have scout sheets draw for the different sessions of practice (Combo periods: pressure, pass concepts, inside run, 7 on 7 and Team Periods). As last season progressed, we made sure we included a few essential points to allow the sessions to run effectively.

  • Must include the defenders
    1. This allowed the scout to see where the defenders will be. This helps reduce the possible talent gap and any surprise of pressure.
  • Defensive call (highlighted for the scout team to see quickly)
    1. It allows the scout team to see our defensive call system and allows them to have an advantage in seeing movements and pressure.
  • The offensive plays are drawn.
    1. Used for blocking responsibilities and/or pass routes.
    2. It allows you to indicate any specific blocking responsibilities.
  • Use terms that describe your blocking and play-schemes (highlighted for the scout to see quickly)
    1. We will never be able to replicate schemes we do not run with the effectiveness to teach the details. We want our scout to play fast and develop in our offensive scheme, so we run our closest scheme (i.e.: Opponent A runs buck sweep; I will write our terms used for pin and pull on the sheet and highlight. Opponent B runs inside zone, I will write the term used for Duo on the sheet and highlight).
  • Put the letter for the hash mark in the location of the ball (M in the middle of the play box, etc.).
    1. Allows for our center to see the location and move there as quickly as possible.
  • Finally, the offensive skilled position must use your terminology and/or position letter indicators.
    1. Reduce all teaching and translation (i.e.: we call our TE the Y, use Y not TE on the scout sheet. i.e. FB is H).
    2. This allows for scout players to fill in their position quickly, feel more confident and play faster.


Read More

4 QB Drills to Teach QB’s to Extend Plays

By Mike Dovenberg
Offensive Coordinator/Quarterbacks Coach
College of San Mateo (CA)
Twitter: @CoachDovey


While every coach hopes to have a perfect, clean pocket for every play, the reality is that oftentimes quarterbacks are forced to adjust and throw from an imperfect base or on the run. There is certainly value in recruiting a great athlete for whom these things come somewhat naturally, but I believe as coaches, we can drill and improve these skills. These drills are designed to enhance a QB’s “toolkit” for making plays in real game situations.


Organization of a Drill Bank
At the College of San Mateo (CSM) and as a private QB coach, I organize my drills into five categories:

  1. General Footwork
  2. Throwing Mechanics and Body Control
  3. Perfect Drops
  4. Pocket Movement and Escapes
  5. Run, RPO, and Ball Security


For this report, we will primarily focus on the pocket movement and escapes portion. We drill at least one of these skills every day both and out of season. Let’s dive right into it.


Drill 1: Jog-Flip-Toss

Drill Mechanics

  • QBs pair up 10 yards apart with one ball per pair.
  • QB jogs slowly away from the target.
  • On command, flip hips & deliver the ball to the target. Switch turn direction & repeat.


Coaching Points

  • Emphasis is a fast turn with body control and smooth delivery of football.
  • Ball in secure carriage position (armpit to armpit).
  • Weight transfer from plant foot through the ball.


Clean follow through and throwing mechanics:

  1. Full arm extension.
  2. Elbow above the shoulder.
  3. Finish with a thumb to the opposite hip.


Read More