306")


Offensive Line Coach
Madison County High School (FL)
Twitter: @iamJGaddy
There is a common misconception that Zone Concepts, in general, are not physical schemes; that if you want to dominate the defense, gap schemes are the answer. At Madison County, who has a deep tradition rooted in the Wing-T, we can tell you that it is a false narrative. While we still heavily rely on our Wing-T principles, some form of Inside Zone accounted for 32% of our run game this past season which was roughly 182 times. While it may be presented differently in the way of Full Zone, Split Zone, Zone Read, or some sort of Zone Iso our offensive line is working zone principles. The major reasons for our utilization and success of this scheme is our ability to:
- Get as many Double Teams as possible at the point of attack
- Physically Dominate the line of scrimmage.
- Properly fit on the 2nd (and sometimes 3rd) level.
In this report, we will discuss how we break down these Double Teams or Combo blocks into specific parts that can allow us to fine-tune the varying phases of these blocks, and how we rep them so that we can dominate on Friday nights.
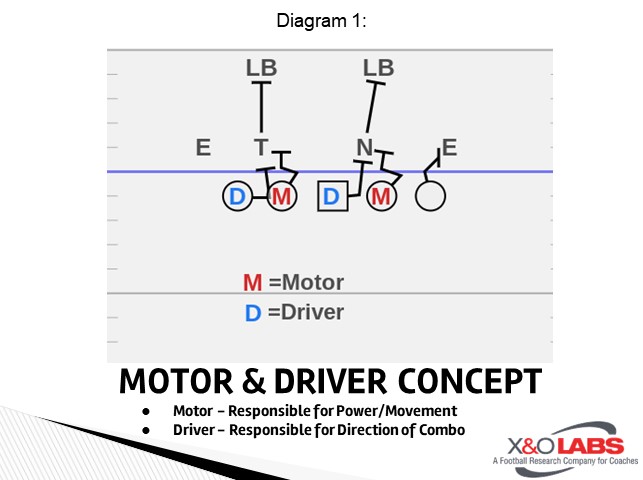
Who Do We Combo? -Our Inside Zone Scheme
In our inside Zone Scheme, our goal is to get as many combos as possible. If we need to attach a TE to get our second combo, we will most definitely do so.
Foundations of Combos
Our Combos in our Inside Zone Scheme are “Vertical” Combos. We are trying to get movement vertically to the 2nd level defender. It is important to rep this mentally, as it differs from your gap combos which typically have your playside combo working to a backside defender.
We split our Combo up one of two distinct roles or jobs: “The Motor” and “The Driver.”
Motor - Inside Man of the double team that is responsible for movement, power. Just like the motor in a vehicle.
Driver - Outside Man of the double team who is responsible for steering, or direction. Just like the steering wheel or driver in a vehicle.
Hand Placement: We teach a "2-on-2-off" technique in terms of hand placement. The OL should each have their hand nearest the defender on while keeping their opposite hand free for contact on the 2nd level. We teach the chest plate as the strike zone. The Motor and Driver have slightly different contacts which we will discuss later in the report.
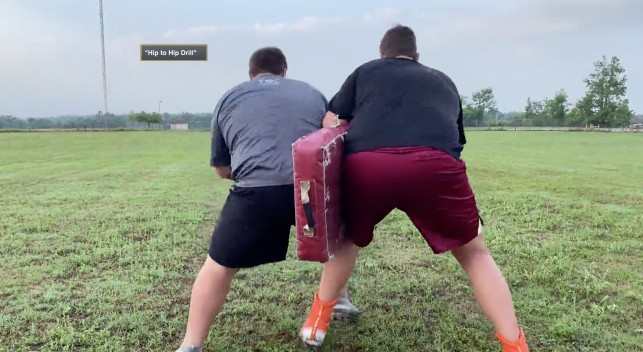
Hip-To-Hip: The quicker we become one being, the quicker we decrease a chance of the DL splitting the double. Most issues that arise in combos are the two offensive players not working tight, together, and in unison. When there is more than one vision, there is division.
2nd Level Defender: We do not specifically tell an offensive lineman who will come off. We teach if he fits here...he becomes yours, and the same for the other lineman. This helps us focus initially on the down defender, then as we work vertically wherever that defender shows, we will then disengage the down defender and let our teammate know “I’m’ Gone” and allow him to take over. Our goal is to come off late on the second level. In doing this we again ensure movement on the down defender and decreases the amount of separation between ourselves and the defender.
Two Jobs - One Goal
We work the separate, specific parts of the combo during individual just as much as we do the double team in its entirety. The OL gets a lot of reps together during team and group settings, so we feel it is important to help each player master his "Job" so we can be successful together. Also, be sure that you define for them who is what, and rep it as such. For example, our TE will ALWAYS be a driver, never a motor, so he does not need to rep as such.
The “Motor”
"JOB": Again this is the inside man on the combo and is responsible for the initial movement and power of the combo. We work a quick rocker or power step with the playside foot (foot away from the defender) first. This step is no more than 6 inches, lateral. This is for 2 reasons:
- It anticipates and protects against an inside spike from the defender. (We use this same concept when we have to man block a defender, we refer to it as a “White Block” or “White Step”). Your Power truly comes on your 2nd step, so we will now have max power when we contact the defender. Which is our “Job” in the combo.
- Our 2nd step is vertical into the crotch of the defender with our near foot. This aiming point helps assure we account for half of the defender.
Hand Placement: Our Strike Zone is the Chest Plate of the defender. We are going to strike half of the defender or the half closest to us. As the "Motor" we are going to strike with an aggressive flipper technique. An aggressive flipper is an open palm punch, twist, and lift with the forearm. We feel this gives the best-case scenario for surface area contact and force. We will not make contact until our 2nd step is in the ground to ensure the most pop. Our goal is to get a drive and lift. We will keep outside hand free, for the second-level defender. While we grind that elbow and forearm to our side to generate power and decrease the likelihood of grabbing the 2nd level.