Formation Based Defensive Game Planning

By Vince Luvara
Defensive Coordinator/Secondary Coach
Washington & Jefferson College (PA)
Twitter: @Coach_Luvara


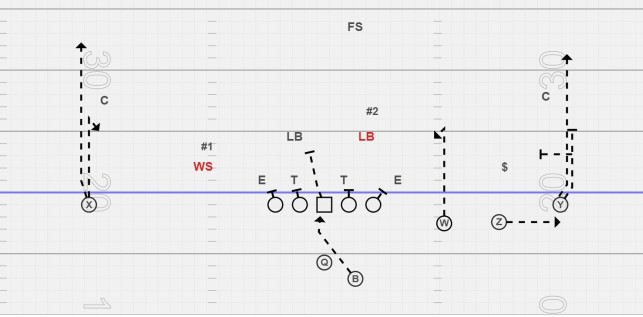
At Washington & Jefferson we are a 3-4 multiple front quarters team.  We are not a heavy pressure team; in 2019 we blitzed at 25% clip for the entire year.  We believe in having as many tools in our toolbox so we can adapt to whatever type of offense we are seeing week to week.  We have 20 different fronts we can use: both 4 and 3-man fronts.  We use 4 different versions of Quarters, five different versions of Cover 2, four different versions of Cover 3, two different versions of Cover 1, two different versions of 2-Man and 17 different 3×1 adjustment.  While we might not install everything in camp, we feel it is necessary to have these options when the situation presents itself.


Essential Questions

There are many things to think about when game-planning against an opponent.  Here are the questions we ask when making our defensive game plan.

  1. Who are their key players and what do we need to emphasize to be successful?
  2. What do we need to do vs trips and empty?
  3. Do they run unbalanced, is it end over unbalanced or true unbalanced?
  4. How are we getting off the field on 3rd down?
  5. What does the offense like in the Red Zone?
  6. How are we handling Wildcat?


Key Players / Emphasis

The first thing we look at is what did we do well last week and what didn’t we do well.  Most offensive coordinators will try to attack your weakness, so the first thing we do is come up with a way to improve what we did poorly the week before.  For example, if we felt our tackling was poor the previous week, we might hit our tackle circuit double.  Or if we felt we didn’t handle a route combination well we will go over it in an extra half-field coverage period

Then we look at who is their go-to skill guy and what do they do well and what don’t they do well.  For example, does a QB escape to one side better than the other, if so, we will try to flush him to that side.  Do they have a higher percentage of times they are throwing to a certain guy in critical situations?  What is their go-to run play?

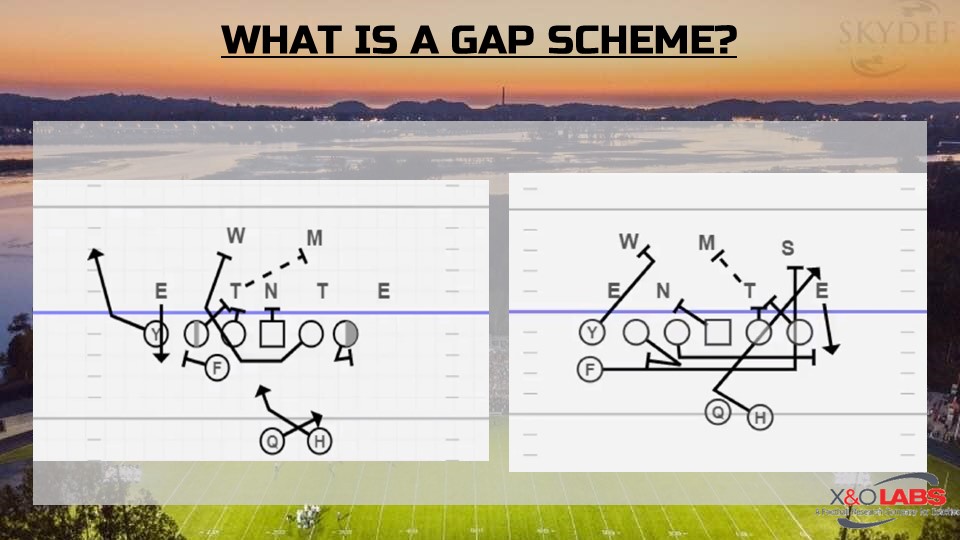
To do this we might decide we are going to double team a certain guy or on passing, situations run a twist or pressure from one side of an opponent’s formation or only on a certain hash.  It might be we are running gap scheme movements this week as opposed to our zone scheme movements.


3×1 Thought Process

Back Strong / Pistol: What RPO’s are they running? Are they Sprinting out? Then try to match our 3×1 coverages to what they are trying to do out of 3×1 Back Strong / Pistol.

Back Weak: Are they releasing the back or is he staying in the protection? If their best WR on the backside of 3×1?

For the 3×1 Back Strong/Pistol we are going to play more drop-down coverages from the field safety so we have 3 over 3 pre-snap so the read is telling the QB to hand the ball.

With 3×1 Back Weak we are going to look at stuff that is going to give us 3 over 2 into the boundary to hand and route combinations from the single receiver and the running back to take the linebacker out of conflict.


3rd Down Thought Process

3rd down is its own entity and a ton of film preparation goes into how we will play it. Here are the questions we will ask ourselves as we prepare for 3rd down. 

  1. Who is the go-to guy? If there is a designated go-to guy, we can double that guy, roll coverage to him or put our best defender on him.
  2. Is the QB a Runner?
  3. What is the Protection? Slide or Man? 5- or 6-Man Protections? We will design our pressure based on the protection.
  4. Run / Pass vs. Down and Distance. There is usually a cut-off point for each play-caller when they will run the ball vs when they will pass the ball.
  5. Pass Type (3 Step, 5 Step, Sprint Out, Boot, Screen) & Concept vs. Down and Distance.


Read More

4 C’s of Continuous Movement in Press Technique

By Dan McKeown
Defensive Coordinator & Defensive Backs
Saginaw Valley State University (MI)
Twitter: @DB_McKeown


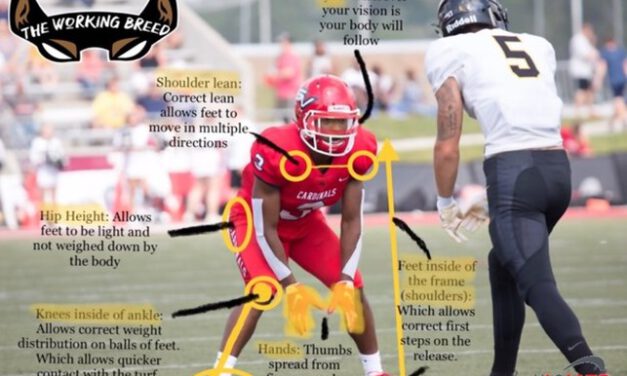
Press coverage with cornerbacks is an advantage! Pressing with the CB’s gives us route elimination based on releases, instant re-routes, interruption of timing, the ability to put more defenders around the ball, and the fulfillment of a competitive DB’s nature. I’d like to identify that press isn’t a form of a physical bump and run method but rather the concept of disrupting WR’s while staying on top of their route for as long as possible. QBs and WRs will run their routes on air every day and develop timing together. Now let’s say they do it again, but I place a barrel in front of the WR. Their timing will already be different. Now imagine if this barrel moved to stay on top of the WR and cut his angles off! The timing they worked on is now off schedule, and that’s why press is an advantage. Different coverages dictate different elements of press but in this case, we will focus on press coverage used in our quarters and cover 1 concept. I’ll spend more time talking about the release part of the press because it’s where common technique issues can be cleaned up.


A key component to press coverage: Continuous Movement

A couple of years ago I watched all the top CBs in the NFL and wanted to see what made them the best at their game. There were different styles of play but the one thing that showed up with all of them is they moved with efficiency. Moving with efficiency is to get from point A to point B as quickly as possible with the least amount of energy. A lot of words like fluid or smooth would describe what we call being efficient. All these top NFL CBs moved efficiently that allows them to obtain continuous movement. They took steps that continuously directed them to their intended direction without losing any speed. These elite DBs didn’t take “gather” steps which I would define as an unnecessary extra step in between transitions. This was the difference from the elite to the rest. It showed up, especially in press coverage. From this, we developed how to obtain continuous movement in our DB’s. If we can move with efficient steps in press coverage, we feel we have the advantage.

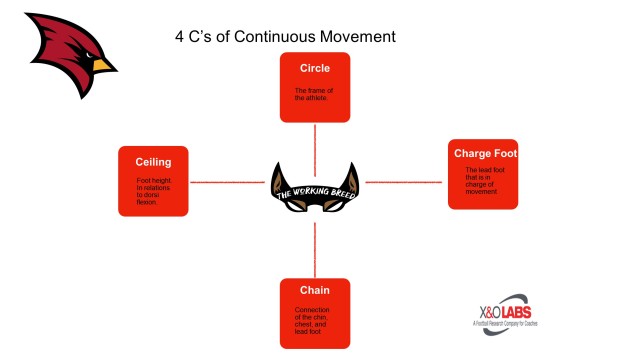
Continuous Movement: Four factors based on biomechanics that work together to create an efficient movement. We call them the 4 C’s of Continuous Movement

Diagram 1


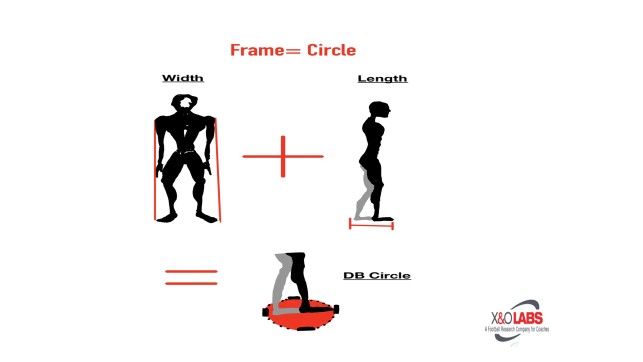
Circle: Staying within our frame. Our frame must be defined in a 360-degree manner. The width of our frame is our shoulders down to the floor. The front to back part of our frame is the length. To find the length you can stand on one leg and put your other foot behind the standing foot while keeping it flat (dorsi) on the ground. Take the width (side to side) and the length (front to back and drawing a circle around them. That is your frame. Our objective is to stay in our frame all the time.

Diagram 2


Ceiling: It’s our foot height We want to keep our feet dorsiflexed while pedaling, scooting, and shuffling. This allows us to keep our feet under us and in our circle. Our foot height should be like a heart monitor in transitions. For example, when backpedaling and then opening the height on the monitor should all be the same. What I mean is the rhythms should all look the same until you get into a run. We will gather step when our rhythms are inconsistent. An example would be sliding our feet on grass then picking them up to transition.

Read More

Using Target Grades for Defensive Evaluations

By Nick Davis
Defensive Coordinator/Defensive Backs
Rose-Hulman Institute of Technology (IN)
Twitter: @CoachNickDavis @SpreadDefense


Grading the defensive player targeted on each play started as a way for me to grade our defensive backs in Skelly and 1 on 1 periods during our Spring practice.  I would simply put the player’s number in a Hudl column to keep track if he were playing well or not.  I was able to go back and make a playlist for every player.  At the end of the Spring, I met with each player and had real information on what they did well and what they needed to improve on. The player then also could go back and easily watch every clip.  We took the idea into the season because I was tired of the traditional grade scale where a DB might grade out at a 90%, but the three times he got targeted, resulted in touchdowns. 

What I quickly found was that it provided me other great ideas I could use along with this concept. We started to grade every targeted player on both run and pass plays.  We ran reports to see who was the most efficient. We created an in and out of position aspect to the system.  We will use this data as a performance grade. We want you to be correctly aligned every snap. If you are in the right spots, but not making plays, the coach needs to change what he is asking that player to do or find a new player to get the job done.   


“Targeting” Criteria

Grading every targeted player is an easy process. I will start with how I grade pass plays.  If you are playing a man concept it is the man defender who was targeted.  If you are playing a zone concept, it is whatever players’ job it was to be in that zone.  Any sack we will give credit to that defensive player that got the sack.  If the ball is thrown out of bounds because someone was chasing the quarterback, we give credit to that defensive lineman. If it is a bad call as a coach, I take the blame for the call.  If I am listed on the target sheet too many times, then I need to look at the calls I am making. On run plays, it is the defender whose job it was to make the play based on your defensive scheme. If a guy misses an assignment that creates a big hole in the run game, we will give blame to the player who blew the assignment. If a player gets a tackle for a loss, we give that player credit. 

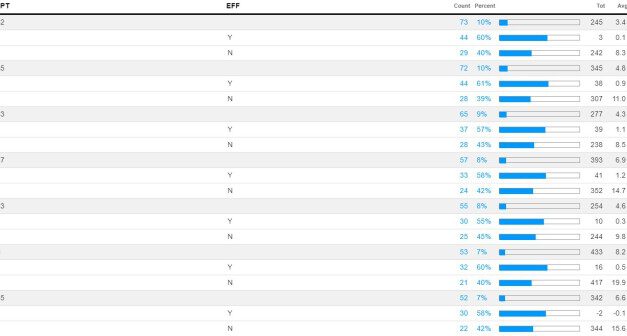
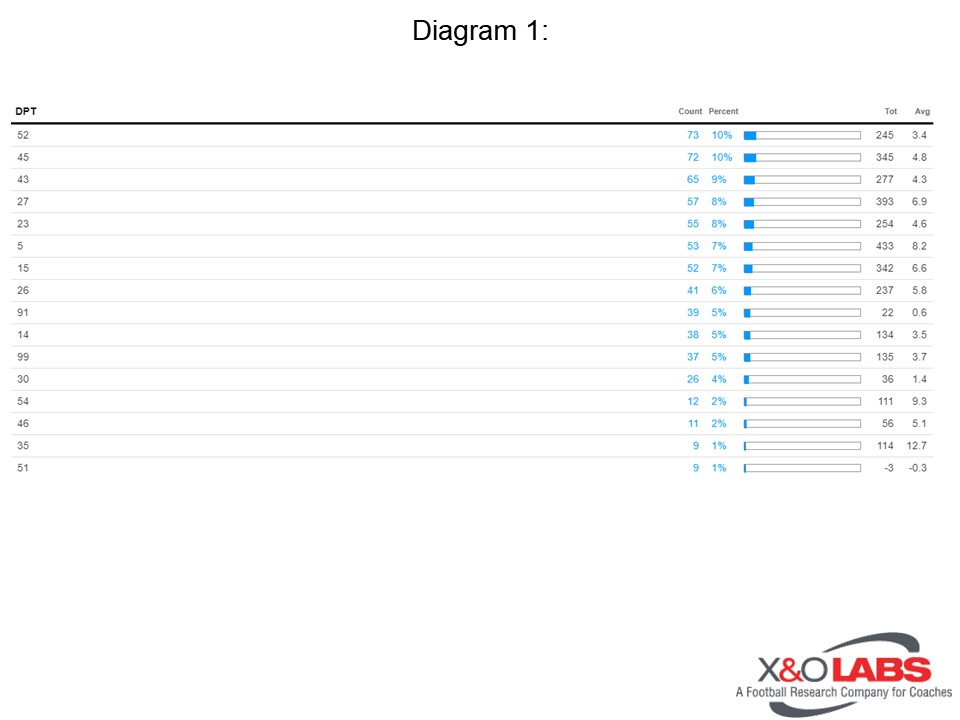
I would suggest a coach that knows the whole scheme to input this data.  I found in a ten-game season our top guys targeted only have a chance to make a play five to eight times a game. Our top targeted player in the last two years has been under eighty snaps. The good thing for us that player was a 1st team all-conference player and teams averaged under 4 yards a play when he was targeted. Once we have all the players down for a game or season, we run a report and see who got targeted the most and what the yardage was. In the diagram, you see #52 was targeted 73 times all season and gave up 3.4 yards per play.  What I have learned is you want your linebackers under 4 yards per play. You want your defensive lineman under 2 yards per play. You want your defensive backs under 5 yards a play.  

Diagram 1


Read More

Defending 3×1 Formations with Split Field Midpoints

By Kurt Twichell
Defensive Coordinator/Linebackers Coach
Portage Central High School (MI)
Twitter: @coachtwich


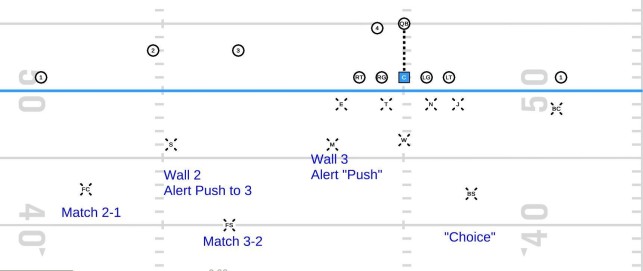
Trips sets are football’s simplest unbalanced concepts and require some sort of compensation from the defense to match the numbers advantage created by the offense to the trips side. While there are many types of 3×1 sets and therefore many different ways to play them, I am going to highlight today our base “Midpoints” check that we use to defend formations that involve a detached #3 receiver in a traditional 10 personnel spread set.

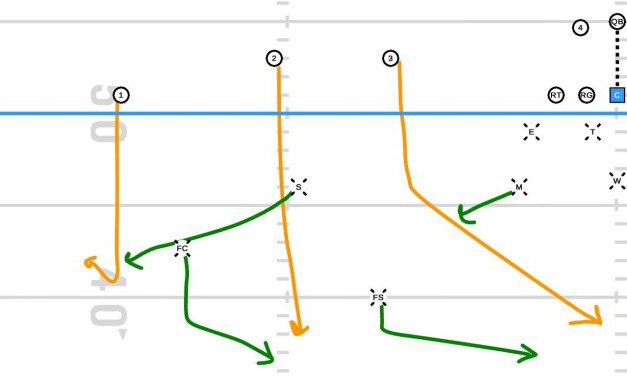
Midpoints is something we learned from Pat Narduzzi’s staff in his time at Michigan State, and it plays off of the mathematical trend that the least targeted receiver in 3×1 is the farthest #1 to the trips side (7% of all 3×1 targets against us in 2019). As the name implies, Midpoints is going to align our corner to the trips side 7 yards deep and halfway between the #1 and the #2 receiver, or on their “mid-point.” Midpoints dares the average high school QB to make the farthest throw, while leveraging our defenders to the much more accessible interior receivers, who are also matched by an underneath player.

It is also worth noting for us that in 2019, nearly 80% of our defensive snaps took place from a hash, further increasing the distance from the QB to the #1, and thus decreasing the chance that he will be targeted. When we look at the math, we can see why. On a high school hash with a straight QB drop of 7 yards, the distance of a throw to the opposite sideline of 10, 15, and 20 yards downfield is roughly 39, 41, and 45 yards, respectively, that the ball must travel through the air.

We feel that the biggest strengths of this check at our level of high school ball, compared to other ways to play against 3×1, are two-fold. The first is the ability to protect the deep shots, limiting the big play capability of an offense by leveraging the spacing of our 4 defensive backs with their 4 primary receivers, while also gaining re-routes on the interior receivers. Secondly, Midpoints keeps us truly split-field and allows us to keep our boundary safety to the short-side to assist our corner with the receiver – who oftentimes is the offense’s most explosive player. We have multiple ways of involving our boundary safety to combat the offense’s tendencies, which I will briefly touch on later, but using Midpoints to stay split field gives us maximum flexibility.


Alignments

The early version of how we taught this had the safety follow a similar horizontal alignment rule mid-pointing the #2 and #3, but we have since moved him on top of #3 after we had some difficulty with the #3 on bender routes in the middle of the field.

Our overhang/Nickel, who is fully out of any primary run fit versus a detached #3, will align on the inside eye of #2 at 5 yards and follow his standard C4 rule of walling #2 from entering the middle of the field. The Mike is the #3 wall player and will align in a 50 on the outside hip of the OT.

I should also note that we prefer to set the strength away from a detached #3 to reduce the conflict of the Mike (RPO) by giving him the B gap, and also protecting the boundary Will with the presence of a 3-technique weak. You can see our alignments below.


Assignments

CB

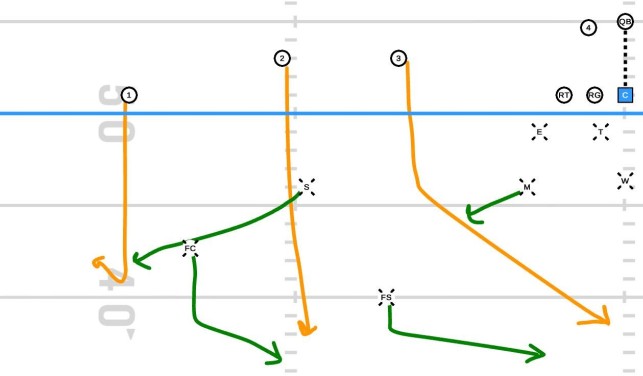
In his deep ¼ of the field, the corner’s responsibility is to lean on the vertical of #2 and be ready to fade back on #1 in the event of #2 pushing off his vertical stem. We had initially kept him on a square pedal technique, but have since resorted to more of a side-shuffle/kick technique to allow him to push off of his back foot and drive on any underneath throw, see the seam route and cap the vertical of #2, or fade back into the sideline on #1 without having to flip his hips. He is also allowed to show press on #1 initially but must bail pre-snap in order to ensure he can overlap #2.

If this sounds familiar to Cover 3 technique, it certainly is. One of the things we love about coaching Midpoints is the easy transition of teaching our corners their Cover 3 technique in some of our zone pressures. We do not coach him any differently, which allows us to use the much-coveted “same as” style of teaching that we strive to use as much as possible.

Here we see how the corner would overlap and top a vertical release from #2 after getting a re-route from our Nickel.


FS

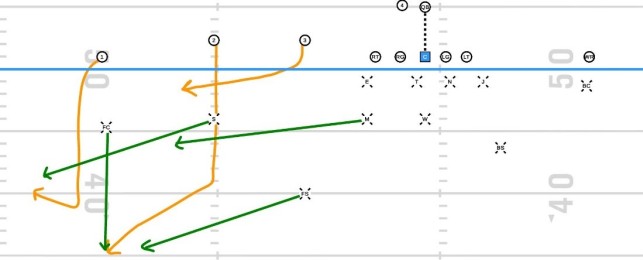
The field safety’s primary responsibility in Midpoints is to play the vertical of #3. At 10 yards off the ball, we still want him to pedal out of the snap with eyes on #3. If #3 deviates off his vertical path before underneath the Mike, he will shift his eyes to #2 and get over the top (compress with the corner).

Here we see the distribution vs. a common sprint-out, flood concept.


The technique of the FS is the “same as” he would play 2-Read, one of our other common ways to play 2×2, except now it is to #3 and #2 (important to note that we are NOT playing 2-Read, the Nickel is doing something different, but the teaching of the safety is exactly the same). The FS must be the topper of the coverage and will add on late to any screen game (more below), needing to sit on top of the pump-n-go.


Nickel/Sam

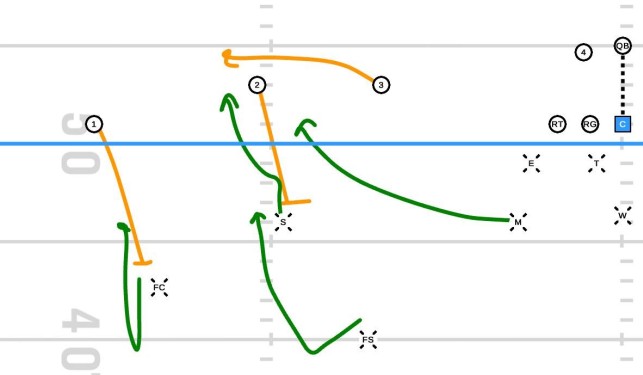
Our Nickel has perhaps the most important role in Midpoints, as his eye control and technique are going to have a direct impact on almost anything the offense tries to attack us with. The initial key of our Nickel is the #3 receiver, as he will be responsible to push out with him on any out-breaking route or bubble.

Defending screen game is one of the main concepts that must be worked against in Midpoints and is a way that offenses will often look to attack with the deeper safety off the ball. We are looking for the Nickel in this case to “crack the crack” and work over the top to compress the ball back to the Mike and FS. The tighter the Nickel plays to the LOS, the more difficult this technique is, so we need to ensure that his heels are 5 yards off the slot to give him the vision and pursuit angles he needs to be successful.


Read More

Game Week Efficiency and Organization of the Punt Block Unit

By Andy Merfield
Cornerbacks Coach & Special Teams Coordinator
Benedictine College (KS)
Twitter: @RavenFootballBC


With limited time to practice special teams during a game week, it is very important to be as efficient and organized as possible. This is especially important when it comes to the punt block unit. In my experience, among the main four special teams’ units (kickoff, kickoff return, punt, and punt return), this one is typically given the least amount of practice time and often does not get the first choice in special team’s personnel. To be successful on the punt block unit, it is important to be efficient and organized with your scouting, game-planning, meetings, and practice time.

I think it is important, on the punt block unit and in other areas of football, that one does not try to be too good at everything, every week. We have three main points of emphasis when game-planning on the punt block unit: pressuring the punt, returning the punt, and defending fake. Most weeks, we will choose to focus on only two of those three areas. With limited time to plan, meet with players and practice, I have found that focusing on only two areas can help provide clarity as we strategize for the game and structure our practice time. I will come back to this topic in more detail when I discuss game-planning.

In this report, I will first discuss the work that goes into setting up your scheme in the off-season. Then I will cover practice work and player selection on the punt block unit. Finally, I will review game-planning and what we do to prepare our punt block unit during game week, as well as some thoughts on how to handle game-day decisions. I will specifically focus on organization and efficiency on this unit, but I think that many of the procedures we use can also be applied to other special teams, as well as offense and defense. 


Offseason Work and Setting Up Scheme

During the offseason, I will conduct a review of the previous year’s unit. This review will include statistics on which of our calls and concepts were most successful, ideas on our scheme and better ways to coach and drill our techniques, notes on our opponents’ schemes and better ways to attack their protections and coverages, and thoughts on our personnel (especially underclassmen who will be with us again in the coming fall).

In the summer I will build a menu of pressure and return calls that we like against different punt team structures. We primarily see shield-style protections, along with a few teams that use pro-style protections. If an opponent is radically different from one of those types of structures, usually I will have to put together something a bit different for us as well.

On the pressure menu, we will usually have four or five different pressures that we use against shield teams, three that we use against pro-style teams, and one main concept against rugby teams. It is important to note that we will only carry one or two different pressure calls into a given game (more on this when we get to the game-planning section).

Building our pressure menu helps reduce the time one has to spend creating new concepts during a game week. It’s akin to offensive coaches who have a true ‘system’ (i.e. wing-T or flexbone option) with all their answers built into the scheme. They do not have to game plan all day Sunday, because they already know what they like against different coverages and structures. We try to be the same way with our punt pressures; we just categorize what we are going to be seeing and choose from the menu based on the specifics of what the opponent does.

For our returns, our basic structure rarely changes. We will always carry a man return (every man wins his one-on-one matchup) and sometimes a directional return as well. We will game plan our directional return based on the opponent’s kick placement and coverage tendencies. To increase efficiency and learning transfer, almost all players will have the same responsibility on our man return and our directional return. On the directional return, we are just telling them where the ball is going and what leverage we want them to have on their man.


Practice Work

As we get into practices during spring ball and fall camp, our attention turns back to our players and the techniques that we use on the punt block unit. During spring practice and fall camp, we only do drill work in a circuit format, small groups, or one-on-one competitive work. We rarely will do any full-team reps before the first game week. I think this ties in with the emphasis on efficiency and technique. We teach our players the proper techniques, then (once we are in-game week) let them apply their techniques to different pressure and return calls.

In our game week practices, we will sometimes use some of the punt block practice time to break up into smaller groups. This allows us to best utilize our time so that all members of the team are working on the skills and calls that are most relevant for them. We will also try to use the same scout-team players throughout the season to simulate the opponent’s punt team. That way the same players are always working similar techniques from week to week, which gives us a better look. If there is anything special that the punt team does (speed huddles or drastic shifts, etc.), we can try to build in some time during practice where the coach who works with the scout team can get them organized while the players on the punt block unit do drill work.


Player Selection

As we come out of fall camp, we work to put together our depth chart. I think it is very important to categorize players based on their abilities and stack up against players on the depth chart with similar skill sets (often players who play the same defensive or offensive position). In the same way that an offensive coach should be able to describe the characteristics of their ideal tight end, a coach running the punt block unit should know what he is looking for in different positions and roles. This helps with the efficiency of running the unit in that when you need to make changes to the depth chart, you already know what you are looking for in that position. Using circuit training on this unit allows our coaches to instruct all players in the same basic skills and evaluate a wide variety of players and put them in positions where they can be successful. Here are the general roles that we use on the punt block unit:

Corners: our players at the corner position are almost always cornerbacks by trade as defensive players. We need guys we can trust playing man coverage in space.

Secure: we will have two players whose primary job is to secure off the edge and make sure the ball comes inside on any potential fake. These players are rarely the most athletic ones on the field, but they are guys we can trust to get the ball turned inside and make a tackle if necessary (usually backup linebackers or safeties). These players are often ones you would not want in a one-on-one hold-up situation, but once the ball is kicked, they can hustle back and get in someone’s way to have a chance to spring a big return. 

Block emphasis: the best punt block specialists I have been around all having great athleticism and desire to get to the block point. They must also have the intelligence and toughness to navigate protections and survive collisions with the shield, and the courage to go after the block when they can do so. We also coach our guys on their decision-making around the block point. This is a clinic talk for another time, but we give specific coaching points on where and how to finish, when to leave their feet, etc.  In three seasons I have run the punt block unit, we have blocked 16 punts and only had three roughing/running into the kicker penalties.

Return emphasis: other players on the unit focus more on returns and are rarely in on the rush. These players need to do a great job being tenacious and persistent to win their one-on-one matchups.

At the college level, we also always have a player on the field (usually an experienced and trustworthy linebacker or safety) that can make checks within the game plan or if the opponent presents an unfamiliar formation.

Returner: the returner needs to be trustworthy and sure-handed above all else. No matter how athletic he is, if he has issues with ball security, he will not be on the field for us in that role. Usually, with punt returners, agility and quickness in a small space are more important than blazing speed.

 

Read More

Using The “Dent” Technique to Eliminate Vertical Seams in Gap Runs

By Alex Smith
Defensive Coordinator
Spring Lake High School (MI)
Twitter: @ASmith032


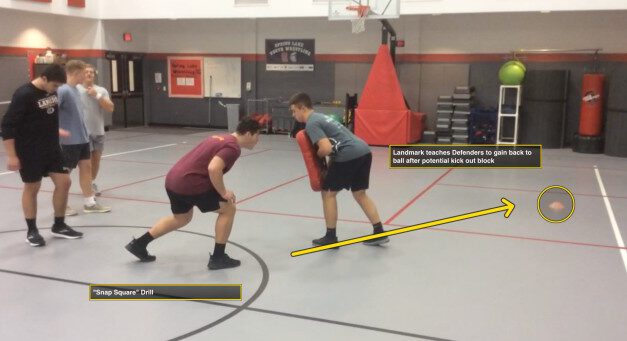
It is my firm belief that you will always get what you emphasize. At Spring Lake HS, our goal on defense is to keep things simple for our kids, present multiple looks to the offense, eliminate vertical seams in our defense, and force running plays to bounce to our perimeter players. For us to effectively execute this style of defense, we spend a lot of time working on what we call the “Dent” technique.

Before we begin talking about what a dent is and how we teach it, I’d like to define what a “Vertical Seam” is, and why they must be eliminated.

Diagram 1


VERTICAL SEAM = A gap that is created when an edge player runs upfield and is kicked out by a puller/lead blocker.

The clip below is an example of what we define as a “vertical seam”. As you can see, the right defensive end runs upfield and is kicked out by the pulling guard. This is where the vertical seam in our defense is created. It is also important to note our play side ILB and rolled-up safety in this clip. Notice how they are working towards the sideline on their pursuit path, expecting the ball to be sent to the perimeter by the edge player. If the edge player would’ve executed a dent technique, there would be no vertical seam and a minimal gain.

Read More

Teaching OL Physicality in an Up-Tempo Offense

By Adam Kirby
Offensive Coordinator/Offensive Line Coach
Sulphur High School (LA)
Twitter: @CoachKirby25


The up-tempo, RPO offense has taken the football world by storm in the last decade. Around the time Chip Kelly popularized this style of play as the Head Coach at Oregon, everyone in football from high school to the NFL has been looking to go faster and, in this thinking, offensive line fundamentals get lost. My goal for this article is to help bring some clarity to the following questions:

  • Explain the advantages of playing fast
  • Help you understand the OL’s role in an up-tempo offense and the challenges facing offensive linemen
  • Demonstrate and explain drills used to maintain physicality and technique in the up-tempo system
  • Give you some ideas and how to implement them into your up-tempo package


My first offensive coordinator job came in 2016 at Southwestern College. When I became an OC, I knew that I wanted to jump on board with the up-tempo, RPO offense that everyone around the country was operating, but I had no idea how to implement the system itself into my offensive line. I was worried that going fast meant too many 3 and outs, that the offensive line would become tired and play lazy and that we’d hurt our team in the long run by forcing the defense to play 2/3 of the game. And although these concerns were legitimate for our offensive staff, gravitating to the up-tempo offense paid dividends for our program both at Sulphur and at Southwestern College. Some advantages that we’ve found from going fast on offense are:

  1. Keeps it simple for the players/coaches
  2. You don’t have the time to dwell on mistakes or missed calls
  3. Makes the defense play left-handed
  4. Forces defense to stay in their base defense which makes calls easier
  5. More speed on Offense leads to less movement by the Defense
  6. Simplifies reads and adjustments for your QB and OL
  7. It allows your players to have fun and GO!


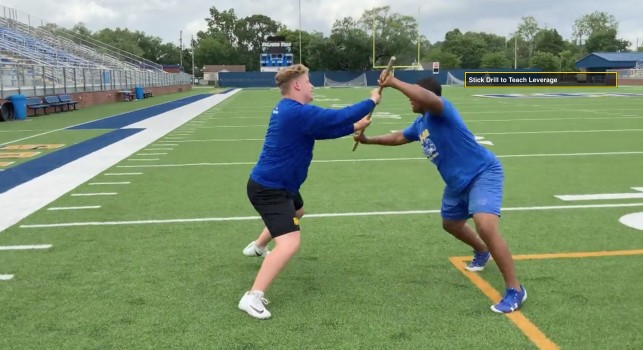
In operating out of an up-tempo system, the toughest aspect that I’ve found to monitor daily is being fundamentally and technically sound. I think the common knock on up-tempo teams is that their offensive line isn’t physical – it’s more, “get in someone’s way and let the running back get 4 yards.”

The one thing that we demand from our offensive line is physicality and I believe that as a unit, you can overcome a lot and cover up some mistakes if your offensive line is physical and plays nasty at the point of attack. From my experience, physicality is a learned trait that needs to be pushed every day in practice. Kids are kids and regardless of the level (1A-5A, NAIA, D3, D2, etc.), they will take the easy way if allowed. In practice, this is our blueprint for success:

  1. An individual period should be the most difficult part of practice for your guys!
  2. As a coach, you want to work your offensive line the hardest the first 20-25 mins of practice.
  3. Set the expectation in pre-practice so you don’t have to ‘turn it on’ during team periods.
  4. If they are going out there and “walking through” the drills, then you need to change a) drills or b) your expectation


Read More

Pre-Snap and Post-Snap RPO Drill Work For QB’s

By Josh Lindke
Passing Game Coordinator/Quarterback’s Coach
Toledo Central Catholic High School (OH)
Twitter: @Coach_JLindke


When you are looking to improve your RPO game, the first area that you may want to look at above the scheme, defenders you want to conflict and tags you want to add, is the individual technique and fundamentals of your QB in the RPO aspect. I believe that it is easy for many coaches to make the mistake of incorporating RPO’s but forgetting to give their QB the tools to succeed in the RPO world. We usually don’t just tell a QB to take a drop when we want to throw the ball down the field. We as quarterback coaches almost always give him the tools to succeed within a series of different drops, whether it be a 3-step, 5-step, 7-step, or any type of quick game.

Well, the same can be said for the tools and techniques the quarterback needs to be successful in the RPO world. There are specific drills that can be utilized every day to not only improve your quarterback’s skills in the RPO world but take the RPO aspect of your offense to next level.  I am a big believer that making sure our QB’s feet are always in a good spot to throw. We use the phrase, “good feet-good throw,” because I think if your QB doesn’t have the biggest arm, then making sure he has good feet gives him a chance to be successful in the RPO/throw game. Another thing that we always want to keep in mind is that every throw is a big-time throw. Letting your QB know that, gives him the mindset that no matter what drill he is doing, it’s important to make every throw their best.


Where to start

There are 5 different drills that we utilize to improve our quarterback’s fundamentals and decision making within the RPO game. At Central Catholic, we utilize these drills every day because I am a big believer in drilling the RPO aspects of the game is not only a team setting but in individual drills, group settings, and then in the film room and on the whiteboard. I think that sometimes we as coaches just think it’s easy to tell a quarterback to ‘read and ride” and throw the RPO if the conflict player commits to the run or hand it off if that player plays the pass. It’s not as simple as that and these RPO throws aren’t as easy as we think.


What we believe

When we run RPO’s, we want to establish the downhill run. We don’t call RPO’s to throw the ball more, we utilize them to manipulate numbers in the box to ultimately give ourselves “light-boxes” to run the football. We drill this mentality into our QB from day 1 install. However, when he goes to throw that pre-snap or post-snap RPO, he has the tools and techniques to be successful and fluid.

We believe in a few different RPO QB drills. We utilize these drills in the off-season and in-season, but they never change. Sure, they can be manipulated to give certain looks week to week, but the core of the drills and the language utilized in the coaching points made to the QB never change. Many of these drills that we are going to go through are quick-release drills. We drill this because often, during an RPO, whether it be pre- or post-snap, the ball is coming out quickly. So, these drills can help your quarterback not only improve his RPO footwork but his release as well. 


Base Individual Drills


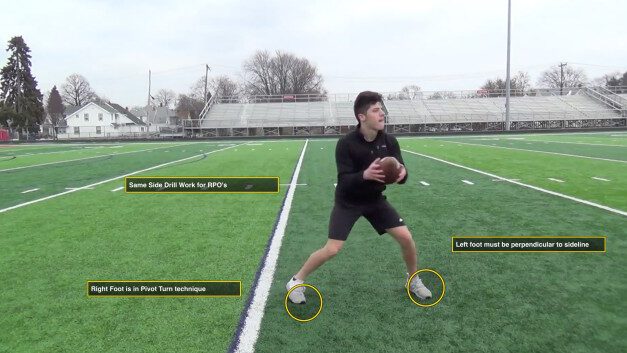
Easy/Way Hard Way Warm Up: (Feet Parallel- Easy Way- Hard Way)

Back Away (Easy Way-Hard Way)

Walk Away (Easy Way-Hard Way)


Pre Snap RPO

Turn 2/Clear 2 (Easy Way-Hard Way)

Quick Rip (No Laces)


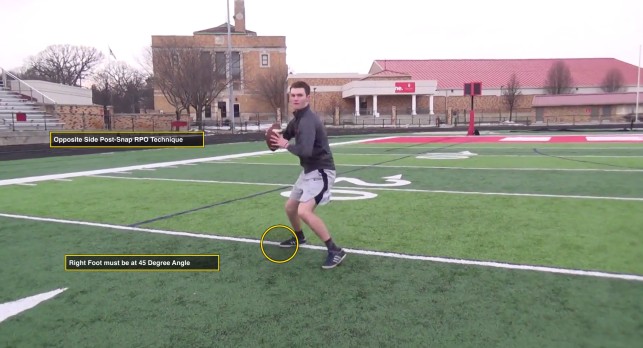
Post-Snap RPO

Read Ride Pop

Same Side Mesh Ride= 90-degree footwork (Easy Way)

Opposite Side Mesh Ride= 45-degree footwork (Hard Way)


This is how we breakdown our Individual/Group RPO drill work. We have always found ways to steal time during practice to get this done. Whether it’s during Indy work, defensive time, special teams, pre- or post-practice, we carve out time to get these drills to our quarterback every day. Again, if you want to be good at RPO’s, it starts with the skill set, technique, and mindset of your quarterback in the RPO world.


Coaching Points:

Warm Up: (Feet Parallel- Easy Way- Hard Way)

Read More

The “Gung Ho” Kickoff Scheme

By William Lund
Special Teams Coordinator and Defensive Line Coach
Roosevelt University (IL)
Twitter: @lundsanity51


Gung Ho is a Chinese phrase that translates to “working together or working in harmony”. Kickoff operates in the same way with 11 players working together to create great starting field position for the defense. It also applies to develop harmony in practicing the variety of skills over the course of a practice week. I value developing skills at speed over practicing full schemes of return we are facing. There are several techniques needed to be successful in Kickoff Coverage. Finding harmony in developing an efficient way of balancing skills and techniques in execution with our opponent’s scheme in a tight time frame was my focus.


Philosophy

Our Kickoff scheme is set up like defensive fits in the run game would be designed. We attack our fits, our fits take us to the return. No lanes, run to your fit. Based on your keys we can play fast and precise.  We have two-fold players that act like Robber safeties running the alley. The scheme also incorporates a spill and over the top player, as linebackers would execute in the run game. It allows us to play fast and effectively.


Positions

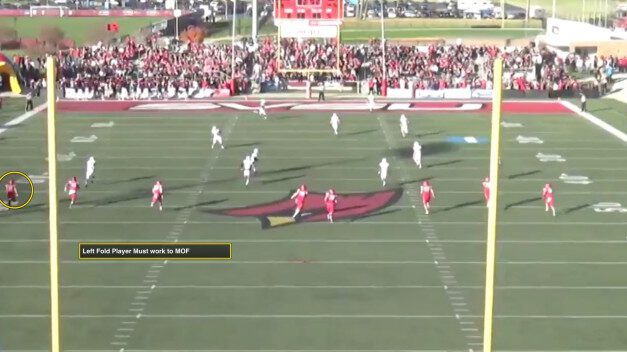
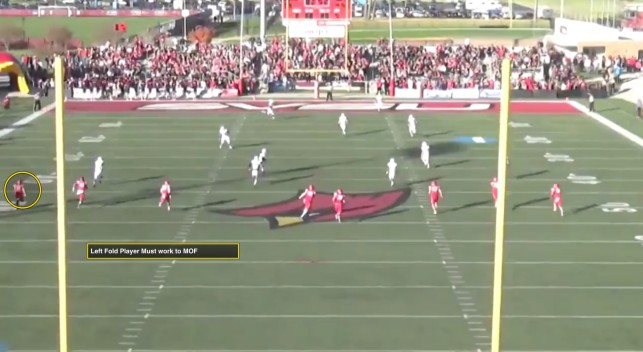
The positions are mirrored left and right. The 5’s are the Spill and Over the Top Players(OTT). The OTT player acts as a bonus ball guy. Linebacker types or bigger body safeties that have some speed work well here.  Our 4’s are TE/DE/MLB types who are punch and press guys, physical and disciplined. The 3’s also act as punch and press players and often need to set an edge or “Chase the Puller”. OLB/Safeties/Bigger RB’s fit well in these spots. The 2’s are contain players. Speed is crucial, but discipline is paramount. WR’s/RB’s/CB’s work well in this position. Contain players stay outside of everything on a return to them or they are players who “trim the fat” at ball depth as they squeeze any return away. The key players for this unit are the 1’s or Fold players. They are essentially ball guys. If the ball comes to them, they fill, any return away they fold and find an alley. The fold players need to have instincts and speed. Great instincts will help some players play faster in this position if they don’t have great “timed” speed.
 

Zones of Attack 

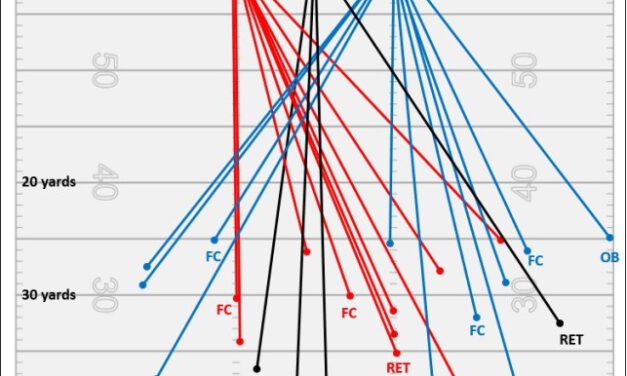
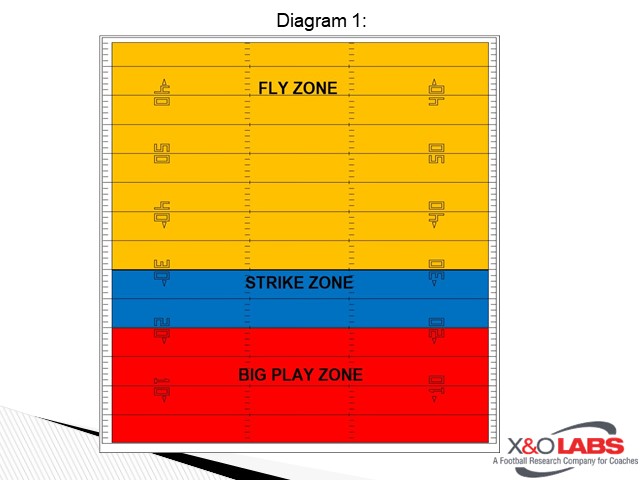
We have three zones of attack. The Fly Zone is from the -35 yard line to the +35 Yard line (Picture shows 20, Changed with new KO rules). We want to FLY in the Fly Zone. We want to beat blocks with speed or working backdoor. We do not want contact with any front-line blockers unless they retreat into the Strike Zone.

Strike Zone is from the +35 to the +25. This is where the majority of contact takes place. We must play physical and smart working to our fits as we attack blocks. Because we are fit oriented we need to defeat blocks to the side of our fit. We want to be heavy-handed, punching, and escaping blocks quickly.

The Big Play Zone is inside the +25 yard-line. This is where we must be great finishers. We want to secure tackles and have as many bodies attacking the returner to create momentum and field position for the defense. We want to swarm and create opportunities to get on top of any loose balls created by our physical play.

We will use a variety of kicks to help our unit be unpredictable and use it as a weapon for our team to potentially gain a possession. Deep Kicks, Sky Kicks, Pop Over, and Surprise Onside Kicks will be ways we will take advantage of spaces in the return unit. It also gives us ways to adapt to weather as the seasons change. Philosophically, I am a middle of the field kicker with some adjustment between goalposts. I know a few teams like to kick on a hash and to condense the field and have the cover units only cover 2/3rds of the field. As a return unit, I have taken advantage of this scheme several times with returns to the field. The condensed area, in my opinion, makes blocking like shooting fish in a barrel and we run to daylight.
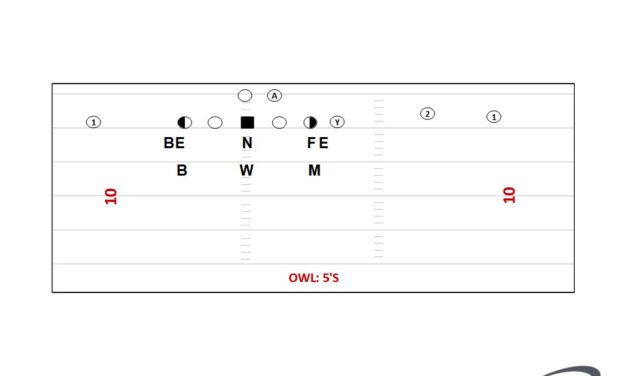
Diagram 1


Kickoff Keys and Fits

We look at the offensive return team as trying to execute a play versus the defensive kickoff team. We will all have a FIT responsibility within the scheme. We have a force/contain player along with alley players that are expected to make the tackle. Executing a proper kickoff is more than running down to knock someone down   Kickoff is quite simple, it is a defensive play, and execution must be precise. Get to your fit, find the ball, tackle it, and get it back to the offense.

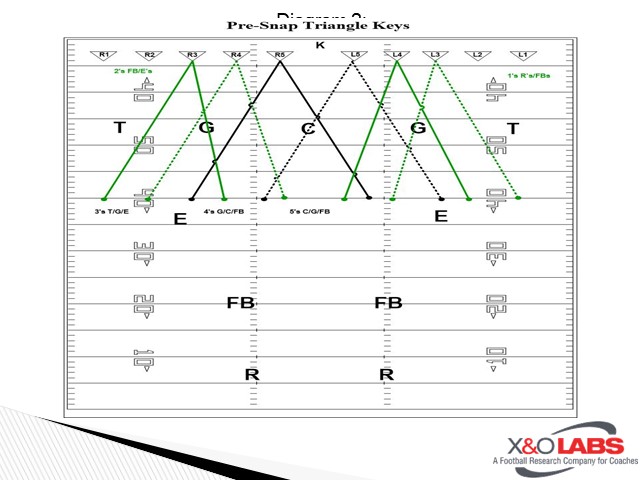
5s – Spill (Player to the side of the Kick Direction) player fits inside the number of the FB. The OTT player (Opposite of the kick) Scrapes tight off Spill Player and takes the best path to the ball. The pre-kick key is the Center/ Guard + FB triangle.

4s – Fit outside of FB – Punch, and Press, escape to your fit side. Pre-Kick Keys Center/Guard + triangle is your key.

3s – Fit outside the TE, Punch, and Press escape to your fit side. If TE works across the formation, chase the puller. Pre-Kick Key T/G/TE triangle.

2s – Contain – Set the edge of the defense, outside of everything. Everything stays inside. Return away, trim the fat at ball depth, looking for reverse or cutback against the grain.

1s – Fold or Fill to the ball. If the backside of the kick, fold.  If the kick is to, then fill inside the 2 or 3 based on block scheme. Take the best path, make the play. The key is the kick direction and returner.


Pre-Kick Keys

Diagram 2


Read More

4 Essentials For Proper Strike Points in Block Destruction

By Dan Owen
Former Defensive Coordinator/Special Teams Coordinator
Keiser University (FL)
Twitter: @Coachowen561


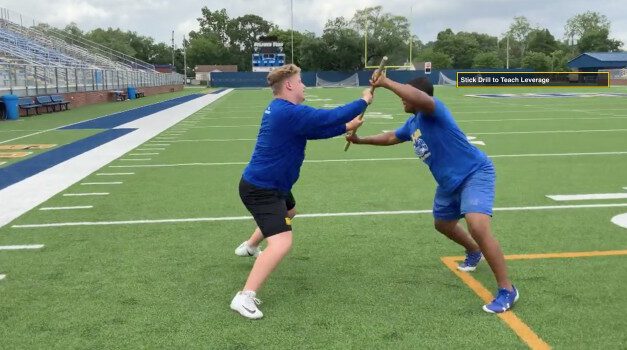
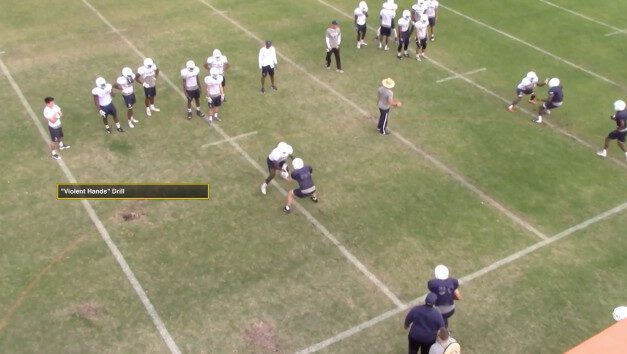
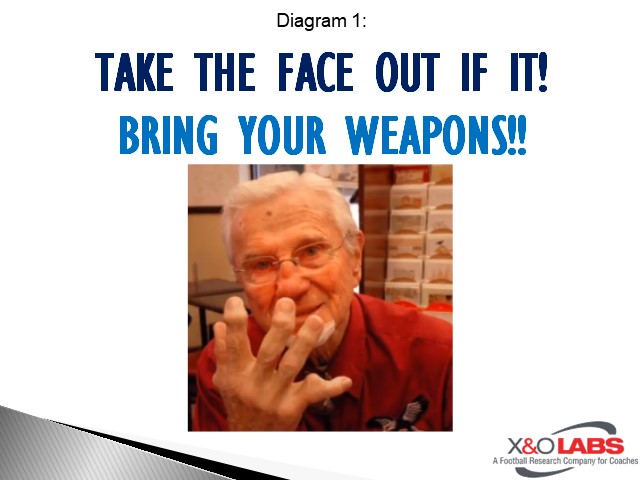
Your hands are your weapons in football, and you must be willing to use them. When we talk about using your hands here at Keiser, we call it “Striking” and everyone in our program must know how to strike.  Player safety is the number one goal for all of us and that is why we have adopted this block destruction technique. “Head to Head” or “Face to Face” collisions can have as much as an impact on your head as a tackle.  These old habits of banging facemask to facemask are engraved in young player’s minds just like tackling with the head is. We do understand that is not always possible to keep your head out of certain tackles or blocks, but here at Keiser we put maximum effort into breaking old habits.

Diagram 1


Just a humorous way of communicating to use your hands. We say would you rather have an ugly face and not remember anything or just some ugly fingers.


Read More

Underneath Coverage Techniques to Train LB’s vs. Crossers

By Keith J. McMaster
Defensive Coordinator
Crete-Monee High School (IL)
Twitter: @keithmcmaster


Today’s version of football has become very restrictive when it comes to what a defense can or cannot do. The rules have trended towards more scoring and higher offensive output making the life of a defensive coordinator more and more complex. The physicality and violent plays are becoming obsolete. Therefore, the defense must use every available method to disrupt, intimidate and attack the opposing team. One of the physical aspects that our team constantly teaches is the physical re-route of receivers, especially from the linebacker position.

This oft-forgotten technique has huge benefits for our defense. A direct result of our physical play has been the decrease of passing yards per game and completion percentage while the sacks, interceptions, and pick-sixes have risen. This puts extreme pressure on an opposing offense when the receivers constantly need to alter routes and make the quarterback work harder and take longer for a single completion. Whether in press man or zone coverage, the main focus of our linebackers is physical re-routes to take away the middle of the field.

Re-Route: Footwork

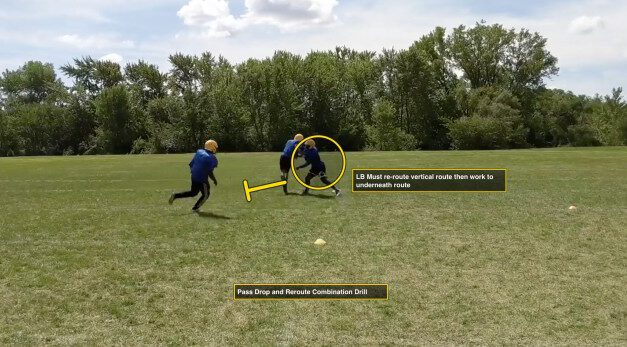
Before a linebacker can even think about re-routing a receiver, coaches must ensure his footwork is correct. Most teams work linebacker drops; however, this drill focuses on what happens when the linebacker meets the receiver in his zone after his drop. The linebacker’s footwork must be in the proper position to strike and disrupt a defender.

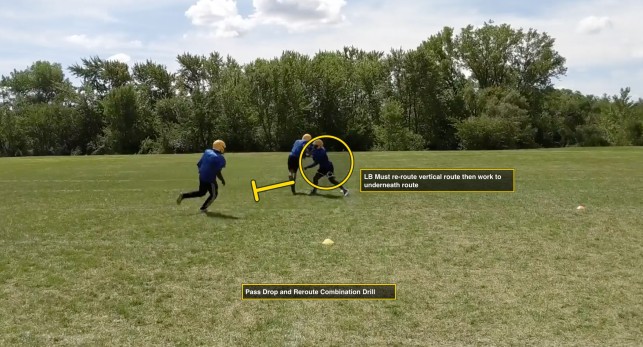
To start the drill, begin with a linebacker and a receiver in close vicinity, if the linebacker has already read his keys, read the pass, and has dropped into his coverage. For setup, start with a receiver that is in a position to work through the linebacker zone. The linebacker begins on a 45-degree angle as if he’s working a hook to curl drop. However, to guarantee the defender is using his feet correctly, have him place both hands behind his back in an athletic position. This forces him to work on body positioning to control the direction of the receiver.

You can work two different routes with the receiver: a vertical route and an underneath route. On go, the receiver will attempt one of the two routes. For the vertical route, the linebacker works on maneuvering his outside hip to the receiver’s inside hip. The inside foot then walls off the inside, forcing the receiver outside. For an underneath route, the inside hip matches the outside hip of the receiver. It is followed by the linebackers outside foot stepping forward. Many times, this technique alone will cause contact and disruption with the receiver. Once the footwork has been accomplished, the strike and punch will follow.

Read More

3×1 Stick RPO

By Ty Stoldt
Offensive Coordinator/QB Coach
Palmetto High School (FL)
Twitter: @CoachTyStoldt


As we all know, RPO’s have revolutionized the way offenses operate at all levels of football. As an OC, a main goal of mine is to make the defense cover all 53 1/3rd.  Using this simple 3×1 RPO, we have had success against multiple fronts and coverages. Not only does this RPO provide possibility of distribution for every skill player on the field but it also empowers our QB to make cerebral decisions based off our pre and post snap reads.

Pre-Snap

As we approach the line of scrimmage, the first thing we do is identify our safeties to look for our indicators. Pressed man gives us our answers early, soft zone initiates our reads.  The first thing we look for is our “Freebie” with the backside receiver. In this 3×1 set, our backside receiver has a hi and a low option each week.  Pressed coverage converts to our hi route, soft corner (8+ yards) converts to our low route. If we are getting one and one coverage, we MUST utilize that matchup.  Once the defense begins to play 2 over 1 backside, we begin to work our post snap read.

Post-Snap

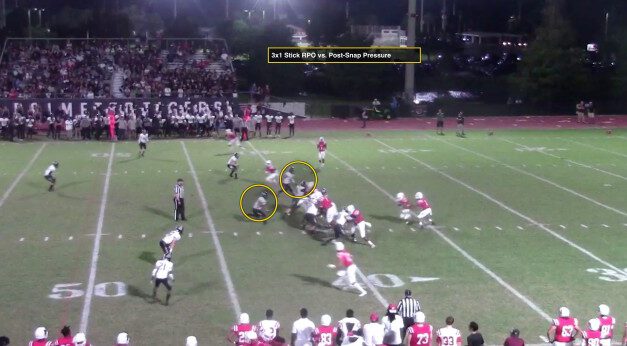
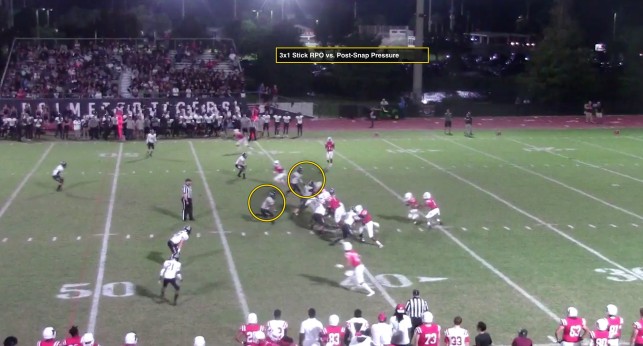
With backside dead, the QB begins to identify is post-snap read.  In this RPO, we key the #2 backer in the box. As the QB receives the snap, his eyes are on that backer during the mesh.  If the back fits, we pull and pop. If the backer drops, we give.  Once we decide to pull, the QB knows to read the concept inside/out. Our first option will be the #3 receiver on the spot route.  Teams often fit the down safety over the #2 receiver giving the #3 receiver a free release. If teams screw down over #3, our QB knows to work to our #2 receiver who is running the bubble. Our #1 receiver play side has two options.  If man coverage, they know to outside release and go win. If soft coverage, they become blockers for the bubble and identifies the most dangerous man. If we get 2 over 1 backside and 3 over 3 frontside with a 1 hi safety, this leaves us with a 5-man box, which is what we want for our inside zone scheme.  Due to the fact this is a second level RPO and we are reading this backside LB- this tells our backside tackle to base block the DE rather than sift to the second level as in a traditional IZR play.  Essentially this blocking scheme follows the principles of a “Big on Big” protection. Below you will find diagrams of how our rules shape up against multiple fronts.

Coaching Points:

Backside Receiver- Top or bottom of the numbers based on route concept. Very important that they push vertical every snap and threaten that CB to open their hips. Lazy routes play in favor of the CB and reduce the big play capability. 

#1 Play-side: Bottom of the numbers. Identify Corner (Pressed=Fade Soft=Stalk MDM)

#2 Play-side: Wide split, show chest to QB and Backpedal to the #’s, stay flat, catch and get vertical

#3 Play-side: Identify Key, Push to green, Snap head around

RB: Identify Key, IZ Track, if pull, find work (engage fitting LB)

QB: Be definitive, Eyes on read, take what the defense gives you

Variations

Backside:

Each week we will identify what our hi/low routes are for our ISO receiver based off the defensive coverage/leverage/technique.

Hi Routes-Fade, Glance, Corner

Low Routes-Hitch, Slant, Quick

Play side:

One variation that we apply is flopping the rules for the #2 and #3 receiver. When done, #3 would then run the bubble and #2 would run the spot. This is a great way of taking advantage of an aggressive flat defender who does a good job of blowing up the bubble routes.

Read More

Four-Day Install Plan for a Multiple Front Defense

By Nick Davis
Defensive Coordinator/LB Coach
Rose-Hulman Institute of Technology (IN)
Twitter: @Spread_Defense


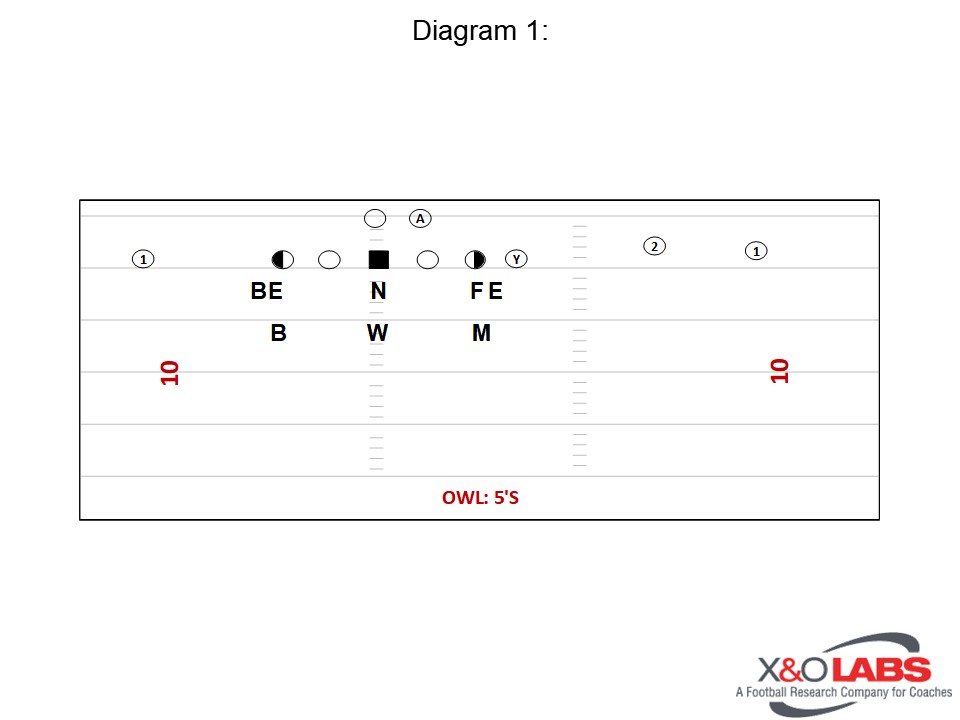
This past season we installed three, four, five, and six down fronts in four days.  We spent a day on each of the four different types of front structures.  We use a category system for our fronts, in which the first letter of the word and the type of word will tell you how to align. The three down fronts are all different types of birds.  Our four down fronts are all different types of fishes. Five down fronts are all different types of mammals. Our six down fronts are different types of fruits. 

Before I dive into all the fronts, we are a 3-3-5 personnel, one gap defense that plays mostly one high man coverage.  We are a field/boundary defense, therefore our front strength does not have to match our coverage strength.  For each of our fronts, our defensive linemen and linebackers base rules are the same.  Each player in the box owns a different gap and has rules for what that gap or player in that gap does.  To eliminate a signal, we yell in our defensive fronts, then signal the movement and coverage each play.  Each week we have a default front so if there is no call they know what to line up with.  Once we make our game plan, we will look and see what the most popular alignment is for that week and that is what generally becomes the default front for that week.


Day 1 Install:

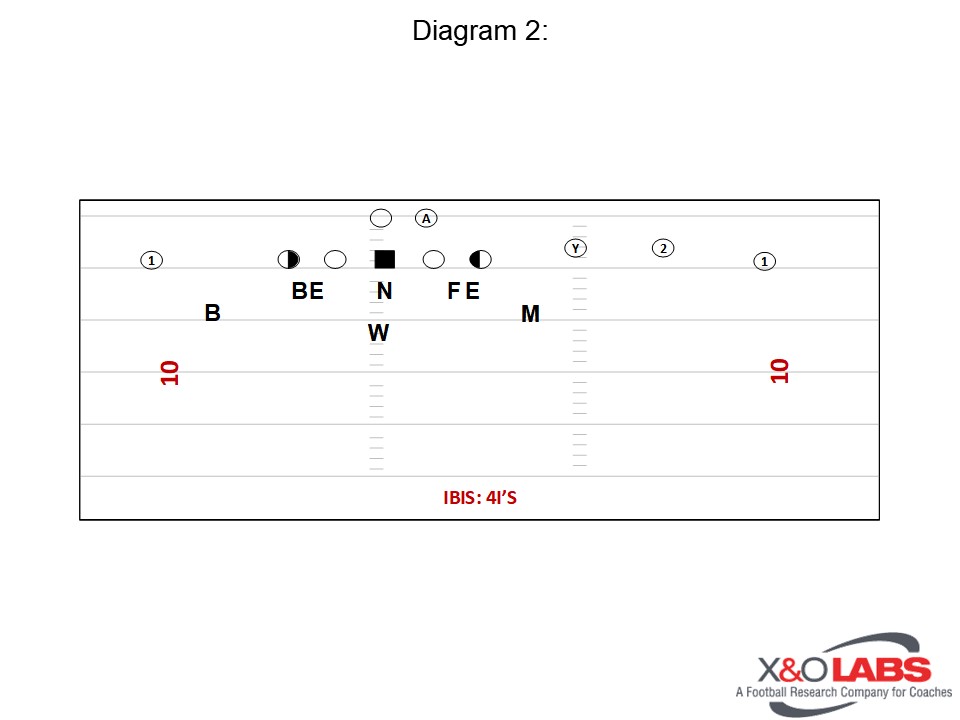
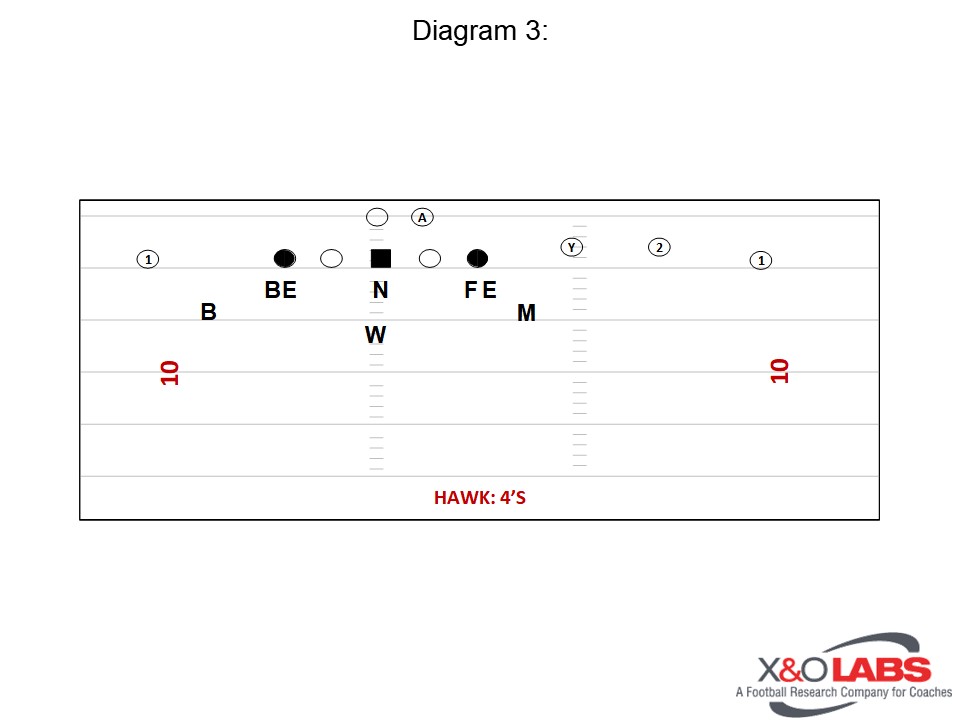
Day One we installed every 3 down front we planned on using for the whole season.  Owl is our base three down front. The “O” tells the Defensive Ends where to line up in regards to the tackles.  So in Owl we line up outside the tackles in a five technique.  Our Nose is a base 0 technique and our linebackers stack the tackles and center at five yards.  Ibis is our 4I front.  The ‘I” tells our DE’s to line up inside the tackles in 4I techniques and the outside stack linebackers line up at 3 yards and apex the tackle and the next extended player in the formation.  Our Falcon and Buzzard Fronts tell either the field or boundary Stack to make the 4I adjustment.  We can also align our fronts based on where the TE or TB are in the formation.  Eagle tells us to make the 4I adjustment away from the TB or what we call the “A”. We tell our DE’s we want the “End” to the A. The opposite of Eagle is Albatross. We put the 4I adjustment to the “A”. Hawk tells our DE’s to line up head up the tackle because of the “H”.  We can also set our front to the TE. The “T” in Tweety tells our Backers to make the 4I adjustment to the TE.  As the year goes on you can always add new fonts we just have to find a type of bird that makes sense.  With our 3 down fronts we also have adjustments we can make. We can shade our nose to the field, boundary, or to or away from the TB. We have tags to change linebackers depth or what direction to set the strength. So one example of a tag would be Ibis Flip. We will send our field players to the boundary and flip our strength.


Diagram 1

Diagram 2

Diagram 3

Read More

A Comprehensive Red Zone Plan for Practice and Game Day

By Jacob Knight
Offensive Line Coach/Co-Offensive Coordinator
Waverly High School (OH)
Twitter: @CoachKnight55


As an offense, we put great emphasis and stress on how we attack in the red zone. What we try to do each week is establish efficient, and effective concepts that we know we can attack with once entering the red zone. In our 4 years at Waverly, we have learned a lot about ourselves as a red zone team. We have shown considerable growth in this area over our 4 years at Waverly High School. in 2015 we were a 60% score and 53% touch down. In 2016 this number went to 79% TD, and score, and in 2017 we were 82% score and 79% TD. Our most efficient season came in 2018 we were 95% score and 87% TD.  I am firm believer our game planning, and practice process has lead to this. We changed this process prior to 2016, and it leads to a huge increase, and we have seen it slowly get better every season since.


General Philosophy

Once we enter the red zone the first thing that enters my mind is that we want to take a shot and try to score from the RZ/Fringe area. Once we enter the fringe area I am a huge fan of taking a shot. We are either going to throw some form of play action, or vertical shot so that we can score, prior to entering the 5 to GL area. This area for a spread team is extremely difficult, and the field becomes so compressed (we learned this the hard way in 2015). We also really like to establish our best runs once getting into the red zone, this has created running opportunities for us. We are a pretty run heavy Red Zone team (56% run) So when we game plan our runs we decide what is going to be our best weekly run, and this a run we try to run once getting in the red zone, this has worked very well for us the last two seasons, and has allowed us to dress these runs up with motion, or with unbalanced formations once entering the red zone.


Game Planning Process

Diagram 1


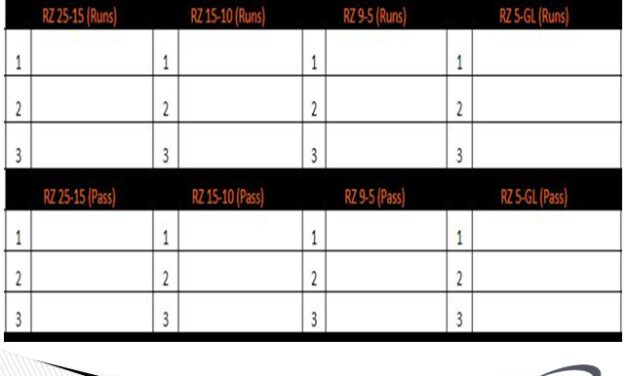
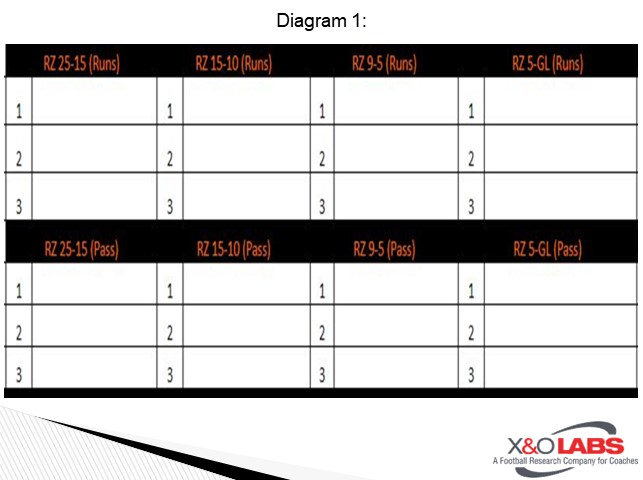
Above is the part of our game planning board that we use to game plan, and script our Red Zone Plays. This board has become extremely helpful to us over the last three seasons, it is a great way for us to collect our thoughts, and decide how we want to attack our opponent.


Creating Opportunities for the Split End

Within our game planning process, the number one thing we try to decide during our game plan meeting is whom can we attack once we enter the Red Zone. We also try to decide what runs we want to use, and how we want to attach RPOs to our run game to create mismatches. The first thing we always try to do in the game planning process is we try to create matchups for our receivers, and we do that a couple different ways, the first is we want to move our outside receivers around (X/Z). Typically, in our offense, the X plays to the left, and the Z to the right, so what we like to do is run formations that move our X, or our Z. Typically our Z is the “Dude” in our offense, so we want to game plan 2 to 3 ways to get this player open, as well as 2 to 3 ways to draw the defense to him to open other players up. This could be we move him to run a slot fade concept, or we may motion him to either open up a run concept or to open one of our other receivers up in the passing game. We also will use stacks in order to create rubs in short-yardage and goal-line situations. 

Read More

The Duo Concept: Power Without a Puller

By Michael Janak
Offensive Coordinator/Offensive Line Coach
Cy-Fair High School (TX)


At first glance, many people mistake Duo for Inside Zone. There are no pullers, it is a downhill run, and the running back seems to simply take his time waiting for a cut to open up. However, upon further study, you realize that it is something different altogether. Duo has much more of an emphasis on the vertical push at the line of scrimmage. The scheme of the play allows you to accomplish this because it provides two double teams at the point of attack. The offensive line can focus on establishing push because they are not chasing linebackers, the running back is reading the linebacker (Mike backer) and determining his cut off that read. I feel that the title of the article really sums up what this play is: Power without a puller. It is a physical, downhill run with little chance of a result of a negative play. At times, it can be much more of a dynamic play than power simply because it gives the ball carrier more options in terms of which gap the play can hit in. We started running this play at the end of the 2015 season and we have seen it for big plays all across the line of scrimmage.

We like this play against the basic fronts that are listed in the article. 4-2-5, 4-3, and 3-4. When opponents start bringing in extra defensive linemen, lining up in a Bear front, or doing some unconventional things in the box I don’t really like the play as much because you can lose your double teams. I’d much rather run power or outside zone at that point.

In terms of where exactly it fits in our offense, it is our third most called run play. Number one is Power, number two is Outside Zone, and number three is Duo.

We really don’t see teams game plan to stop Duo against us as much as they do Power simply because it is our third most common run. However, one thing I have seen teams try to send the weakside LB through the backside A gap or B gap on a delay. If it is an odd front the backer will go through the weakside A gap, hoping the center gets buried off in the double team on the Nose. If it is a four-down front, teams will send the weakside backer through the weakside B gap on a delay, hoping the guard is buried off in the double team. We try to make our linemen aware of this and make sure that they are keeping their eyes where they need to be.

Coaching Points:

QB: It is especially important that the QB comes straight back without pushing the RB off his landmark. If the QB forces the RB off his track, it is exceedingly difficult for the back to be able to make some of the backside cuts that may be available. The RB has to attack in the inside leg of the play side guard.

RB: Now, when I say that the running back is reading the Mike backer, that is exactly what I mean. If the Mike scrapes over the top of the double by the tackle and tight end, then the running back knows that the play now needs to hit B gap strong to B gap weak. If the Mike backer plugs or fills the B gap, the RB knows that he needs to bounce strong or cutback weak, avoiding the B Gap.

The RB will take a slide step with his play side foot, get downhill on the second step while taking the handoff, and attack the inside leg of the play side guard. One of the biggest coaching points for the RB is patience. We line up the RB at 8-8 ½ yards deep in the backfield when we run Duo. The reason for this is twofold. One, it allows the RB longer to read the Mike backer since he is getting the ball deeper. Two, it allows the offensive line to stay on their double team blocks longer and vertically push the line of scrimmage. The RB must be patient, trust his read, and get downhill with square shoulders.

OL: An important coaching point on the double teams is the use of the “Gallop” or “High Leg” technique. We started using this technique in 2016 and it has undoubtedly improved our double teams. The outside man on the double team (versus an odd front the play side guard and the play side TE) will “Gallop” into the double team. During the use of this technique, the inside foot will move inside and up the field, gaining as much ground as possible while still maintaining a good, athletic base. Next, the outside foot will move in the same direction to reestablish the base and basically put the lineman in what I call a “coil” position, ready to explode into the defender. When the base is reestablished, the lineman will explode into the defender using the “flipper” technique with their inside arm, attempting to launch the defender, while staying hip-to-hip with their inside teammate. From there, the inside foot must stay in front of the outside foot so the lineman can stay square. Once the lineman feels his teammate leaves the double team, he will transition into a “drive” block or “fit and finish.” The easiest thing I can compare this too is fencing. If you have ever watched fencing, very often they attack with one foot constantly remaining in front of the other. This allows the lineman to stay square on the double team and climb to the second level with square shoulders as well.

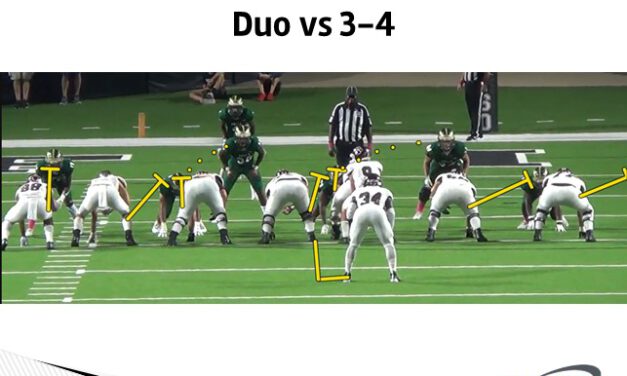
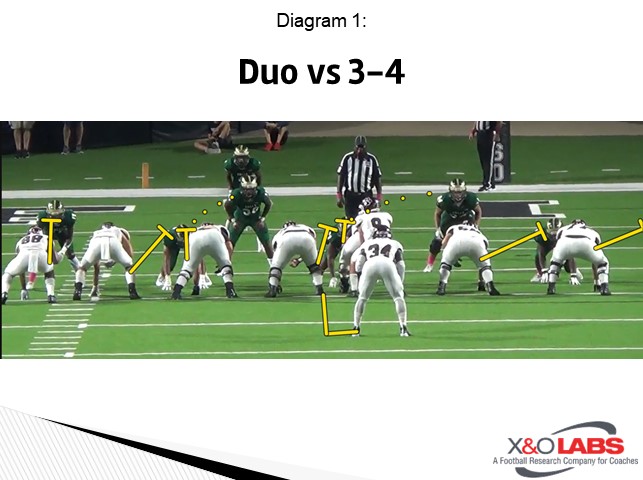
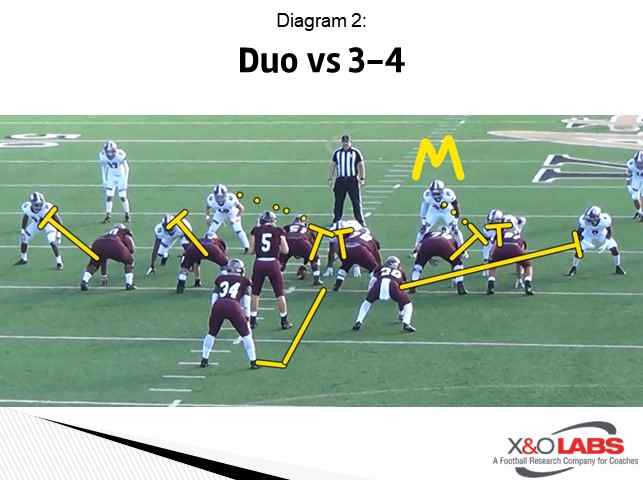
Duo Concept vs 3-4 Spacing:

Diagram 1

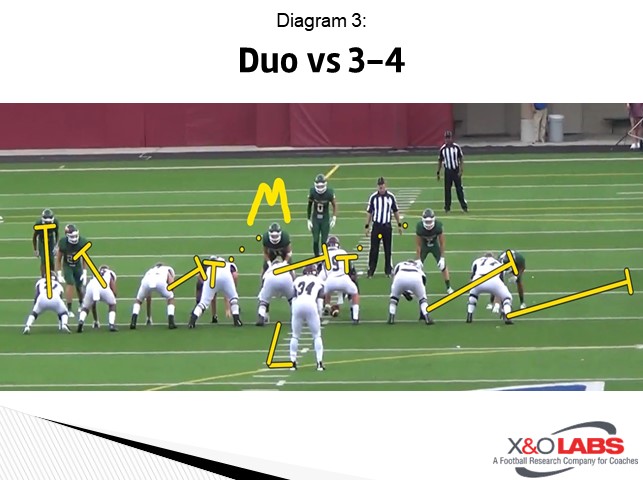
Versus the Odd, the two double teams occur with the tight end and right tackle doubling the defensive tackle to the Mike backer, who is the read against the odd front. The playside tackle is looking for a fill or scrape from the Mike. Should the Mike scrape over the top of the double team, the tackle will press into the defensive linemen with his outside arm and stay on the double team. Should the Mike backer fill into the B gap, the tackle will slip off with square shoulders and pick up the Mike. If the defensive tackle slants inside to the B gap, the offensive tackle will pick him up and the TE will climb to the Mike backer.  The second double team occurs with playside guard and center doubling the Nose to the weakside linebacker or will. If the Nose slants weak, the center will pick him up and the guard will climb to the will backer. If the Nose works strong or is shaded strong, the guard will stay on the Nose and the center will climb to the backer. The backside guard and tackle will handle the defensive tackle and outside linebacker by fanning out. The two backside offensive linemen should be able to handle any games or movement by those two backside defenders. Now, there must be someone to account for the playside outside linebacker, and this can be handled in a variety of different ways. It can be done with a fullback from the eye or offset.

Diagram 2

It can be done with an H-Back or second tight end in motion. It can also be accomplished by using a wing or hip player that is lined up 1 yard away and 1 yard back from the inline tight end. There are a variety of ways to get a blocker to that defender.

Diagram 3

To study game film of this concept, click on the video below:

Read More