306")


By Ty Stoldt
Offensive Coordinator/QB Coach
Palmetto High School (FL)
Twitter: @CoachTyStoldt
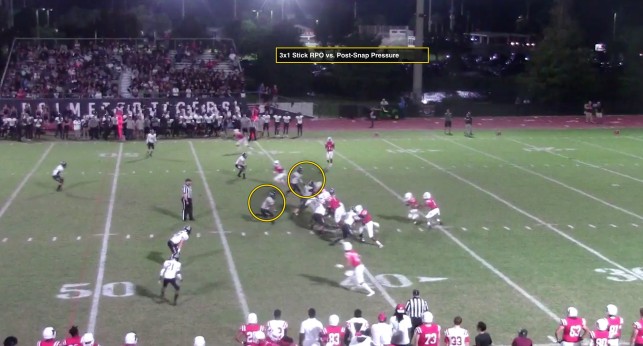
As we all know, RPO’s have revolutionized the way offenses operate at all levels of football. As an OC, a main goal of mine is to make the defense cover all 53 1/3rd. Using this simple 3x1 RPO, we have had success against multiple fronts and coverages. Not only does this RPO provide possibility of distribution for every skill player on the field but it also empowers our QB to make cerebral decisions based off our pre and post snap reads.
Pre-Snap
As we approach the line of scrimmage, the first thing we do is identify our safeties to look for our indicators. Pressed man gives us our answers early, soft zone initiates our reads. The first thing we look for is our “Freebie” with the backside receiver. In this 3x1 set, our backside receiver has a hi and a low option each week. Pressed coverage converts to our hi route, soft corner (8+ yards) converts to our low route. If we are getting one and one coverage, we MUST utilize that matchup. Once the defense begins to play 2 over 1 backside, we begin to work our post snap read.
Post-Snap
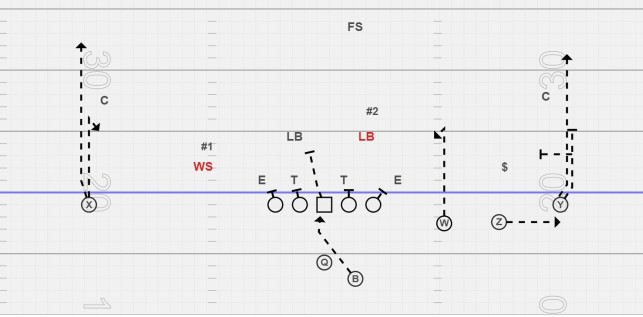
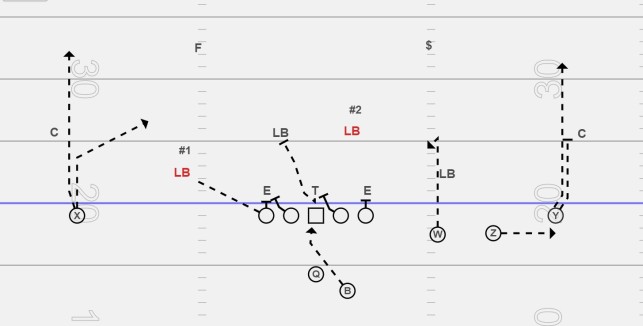
With backside dead, the QB begins to identify is post-snap read. In this RPO, we key the #2 backer in the box. As the QB receives the snap, his eyes are on that backer during the mesh. If the back fits, we pull and pop. If the backer drops, we give. Once we decide to pull, the QB knows to read the concept inside/out. Our first option will be the #3 receiver on the spot route. Teams often fit the down safety over the #2 receiver giving the #3 receiver a free release. If teams screw down over #3, our QB knows to work to our #2 receiver who is running the bubble. Our #1 receiver play side has two options. If man coverage, they know to outside release and go win. If soft coverage, they become blockers for the bubble and identifies the most dangerous man. If we get 2 over 1 backside and 3 over 3 frontside with a 1 hi safety, this leaves us with a 5-man box, which is what we want for our inside zone scheme. Due to the fact this is a second level RPO and we are reading this backside LB- this tells our backside tackle to base block the DE rather than sift to the second level as in a traditional IZR play. Essentially this blocking scheme follows the principles of a “Big on Big” protection. Below you will find diagrams of how our rules shape up against multiple fronts.
Coaching Points:
Backside Receiver- Top or bottom of the numbers based on route concept. Very important that they push vertical every snap and threaten that CB to open their hips. Lazy routes play in favor of the CB and reduce the big play capability.
#1 Play-side: Bottom of the numbers. Identify Corner (Pressed=Fade Soft=Stalk MDM)
#2 Play-side: Wide split, show chest to QB and Backpedal to the #’s, stay flat, catch and get vertical
#3 Play-side: Identify Key, Push to green, Snap head around
RB: Identify Key, IZ Track, if pull, find work (engage fitting LB)
QB: Be definitive, Eyes on read, take what the defense gives you
Variations
Backside:
Each week we will identify what our hi/low routes are for our ISO receiver based off the defensive coverage/leverage/technique.
Hi Routes-Fade, Glance, Corner
Low Routes-Hitch, Slant, Quick
Play side:
One variation that we apply is flopping the rules for the #2 and #3 receiver. When done, #3 would then run the bubble and #2 would run the spot. This is a great way of taking advantage of an aggressive flat defender who does a good job of blowing up the bubble routes.
Offensive Coordinator/QB Coach
Palmetto High School (FL)
Twitter: @CoachTyStoldt
As we all know, RPO’s have revolutionized the way offenses operate at all levels of football. As an OC, a main goal of mine is to make the defense cover all 53 1/3rd. Using this simple 3x1 RPO, we have had success against multiple fronts and coverages. Not only does this RPO provide possibility of distribution for every skill player on the field but it also empowers our QB to make cerebral decisions based off our pre and post snap reads.
Pre-Snap
As we approach the line of scrimmage, the first thing we do is identify our safeties to look for our indicators. Pressed man gives us our answers early, soft zone initiates our reads. The first thing we look for is our “Freebie” with the backside receiver. In this 3x1 set, our backside receiver has a hi and a low option each week. Pressed coverage converts to our hi route, soft corner (8+ yards) converts to our low route. If we are getting one and one coverage, we MUST utilize that matchup. Once the defense begins to play 2 over 1 backside, we begin to work our post snap read.
Post-Snap
With backside dead, the QB begins to identify is post-snap read. In this RPO, we key the #2 backer in the box. As the QB receives the snap, his eyes are on that backer during the mesh. If the back fits, we pull and pop. If the backer drops, we give. Once we decide to pull, the QB knows to read the concept inside/out. Our first option will be the #3 receiver on the spot route. Teams often fit the down safety over the #2 receiver giving the #3 receiver a free release. If teams screw down over #3, our QB knows to work to our #2 receiver who is running the bubble. Our #1 receiver play side has two options. If man coverage, they know to outside release and go win. If soft coverage, they become blockers for the bubble and identifies the most dangerous man. If we get 2 over 1 backside and 3 over 3 frontside with a 1 hi safety, this leaves us with a 5-man box, which is what we want for our inside zone scheme. Due to the fact this is a second level RPO and we are reading this backside LB- this tells our backside tackle to base block the DE rather than sift to the second level as in a traditional IZR play. Essentially this blocking scheme follows the principles of a “Big on Big” protection. Below you will find diagrams of how our rules shape up against multiple fronts.
Coaching Points:
Backside Receiver- Top or bottom of the numbers based on route concept. Very important that they push vertical every snap and threaten that CB to open their hips. Lazy routes play in favor of the CB and reduce the big play capability.
#1 Play-side: Bottom of the numbers. Identify Corner (Pressed=Fade Soft=Stalk MDM)
#2 Play-side: Wide split, show chest to QB and Backpedal to the #’s, stay flat, catch and get vertical
#3 Play-side: Identify Key, Push to green, Snap head around
RB: Identify Key, IZ Track, if pull, find work (engage fitting LB)
QB: Be definitive, Eyes on read, take what the defense gives you
Variations
Backside:
Each week we will identify what our hi/low routes are for our ISO receiver based off the defensive coverage/leverage/technique.
Hi Routes-Fade, Glance, Corner
Low Routes-Hitch, Slant, Quick
Play side:
One variation that we apply is flopping the rules for the #2 and #3 receiver. When done, #3 would then run the bubble and #2 would run the spot. This is a great way of taking advantage of an aggressive flat defender who does a good job of blowing up the bubble routes.