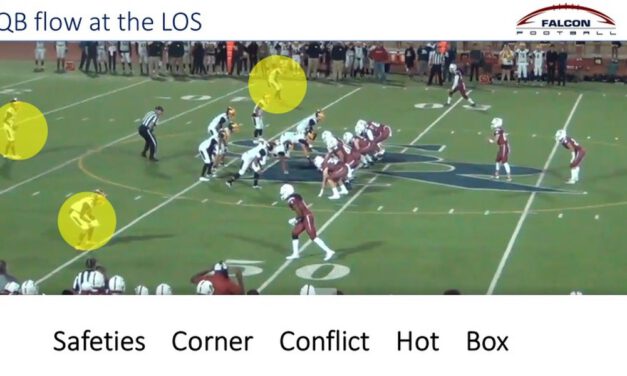
The 40-Second Pre-Snap Thought Cycle for QBs

By Gary Harrison
Offensive Coordinator
Scripps Ranch High School (CA)


How does your QB manage the 40 seconds between each play?

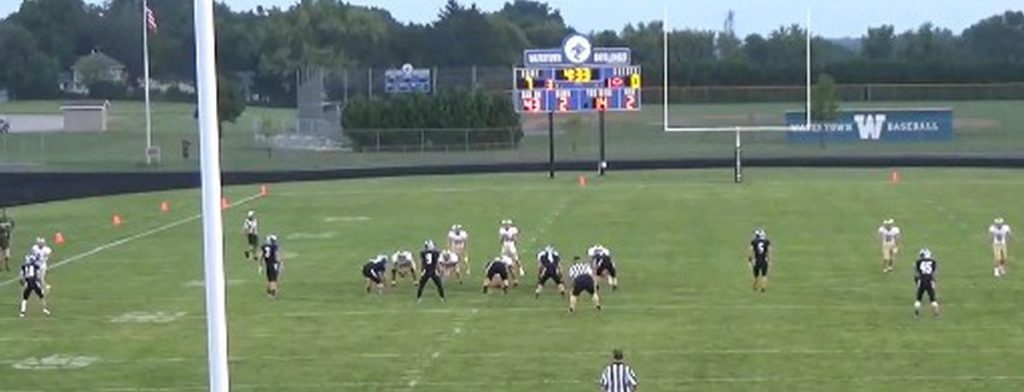
As coaches, we spend countless hours ensuring our schemes and execution will be effective.  But how much time do you spend working with your QB on managing the 40-second play cycle?   In my observations and coaches’ discussions, I have surmised that this is an area that does not get a lot of coaching time. I think there is an opportunity to improve your QB play by spending some time training this aspect of the game.

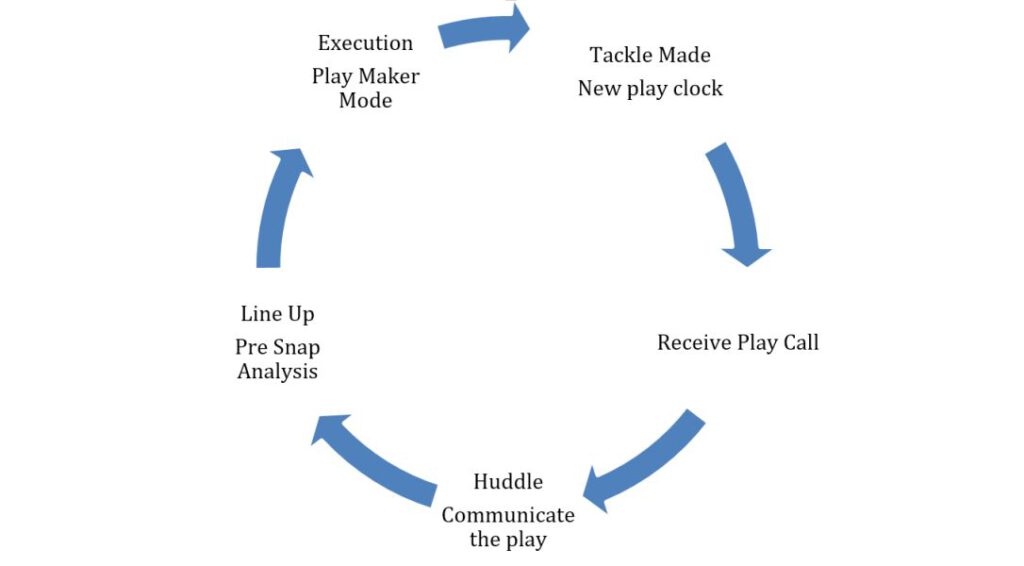
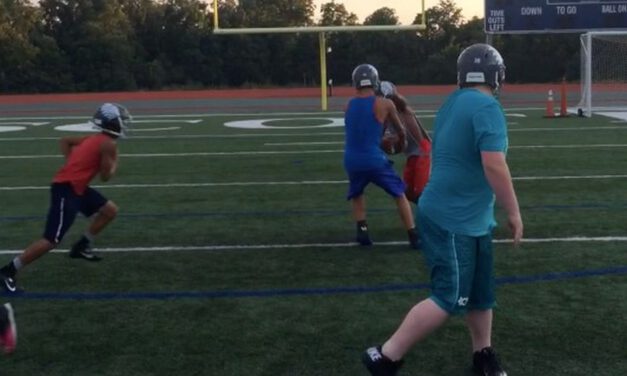
We look at the time between plays in 5 distinct compartments: Tackle made (0:40 sec start) à Receive Play call à Communicate Play à Pre-Snap Analysis à Execution.


Defining the Problem

We have all seen game scenarios when the QB is struggling, and the game gets too fast for him to the layer is struggling to get full control of his mental faculties. This report will examine the cause of these QB distresses and how to mitigate their negative impact on his performance.

The amount of information anyone can simultaneously process has its limits.  Sports psychologists have studied the mental processes) of athletes when they try to perform more than one task at a time and have concluded that there is a steep drop off in physical performance when the brain is overwhelmed.   Other professions study this phenomenon too.   Aviation physiologists studied military pilot’s cockpit multi-tasking methodology after a string of avoidable mishaps and subsequently recommended compartmentalization training to reduce cognitive processing errors and improve performance.

Compartmentalization is the mental checklist used by military pilots to:

  1. Manage the barrage of incoming information, and to
  2. Filter through to the critical information needed
  3. To take immediate actions in the cockpit


When a pilot or QB becomes overwhelmed with too much information, he can suffer from short-circuiting (in the Military, we lightheartedly refer to this as a helmet fire. These cognitive processing errors will result in poor reads and physical mistakes from your QB.  So how can these methods be applied to a young QB?  What are the similarities in a pilot’s load management strategy to that of a young QB trying to manage a game?  The below article explains how we coach our QB’s on managing the 40-second play cycle.


The 40-second Play Cycle

We instruct our QB’s to manage this time cycle into five distinct compartments.


This seems to be complicating the play flow, but I have found that QB’s in high-pressure situations may jumble these distinct tasks resulting in miscommunication and assignment errors.  When the QB is struggling, the game speeds up and these separate mental activities start to snowball into one big helmet fire. The compartmentalization is a way for QB to maintain or recover his bearing and devote his full mental focus on the most important activities between plays.


Coaching Points for each phase of the 40-second play cycle

Read More

Streamlining Teaching of Fire Zone Coverage Responsibility

By JJ Ortiz
Defensive Coordinator and Safeties Coach
Middletown Area High School (PA)


Outside a defense’s base, fronts and coverages often lie its’ blitz packages. At Middletown, we love to call blitzes and let our players be aggressive. We have always liked how the 4-2-5 gives us options on whom to blitz. However, throughout the years, we’ve found that to consistently execute blitzes correctly, we need to condense the amount our kids have to know. In the past, this has kept the blitzes to just a handful. There were times we knew we needed certain blitzes. Unfortunately, we could not install them because it would become a mental overload for our players who were already having to learn our team’s offensive plays. Our blitz system was one of rote memorization for all eleven players on the field. Although we were having some success, we knew we could make this part of our defense better if we found a better way to coach and teach. As a defensive staff, it became our mission to find a way to expand our blitz package while keeping it simple enough for our players to continue to play as fast as they do in our base package.
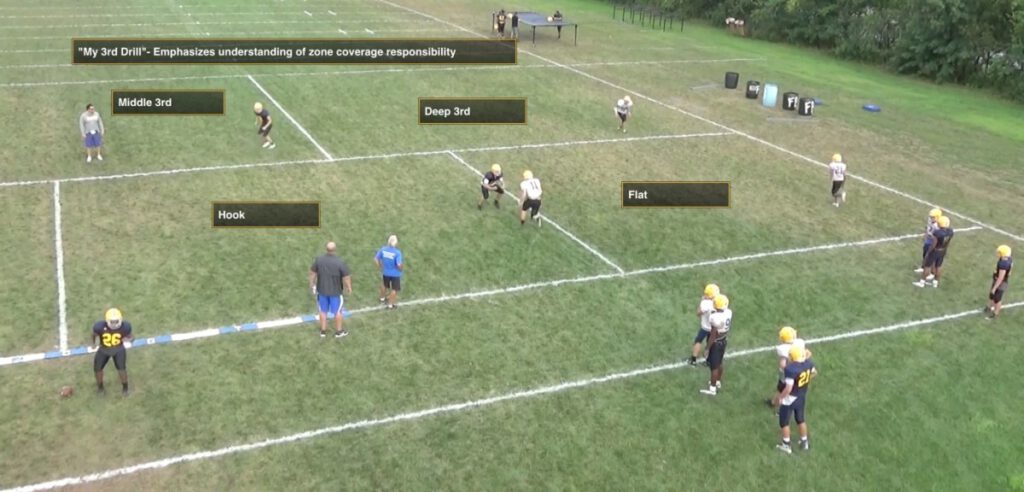
 

Through talking to various defensive coaches and learning about their methodologies for simplifying and teaching good defense, we believe we developed a blitz system that finally allows all eleven players to play fast. They can play fast because they do not have to think much about their alignment, assignments, and responsibilities. By creating a sound conceptual blitzing system, teaching the players the “why”, eliminating what if’s, and tweaking how we practice, we have been able to create a lot of headaches for opposing offenses.


The System’s 5 Main Components

To establish a fast timeline for teaching, learning, and building repetition; there are four main components to our zone-blitz system. Implementing these components eliminates a lot of pre-snap and post-snap thinking for our players while also providing them an easy gap sound structure within which to play.


1st Component: A married front and secondary strength call

Many defenses can blitz without matching their front and secondary calls. Their players can digest how a base blitz call might change depending on offensive personnel, formation, etc. In our experience, it has been an “expensive” proposition for us to teach our players the various what if’s offenses can create for blitzes. We, or more so, I have not been able to find a simple way to teach these types of variables effectively with the number of players we have playing both offense and defense while also staying multiple on defense. We’ve also found that if players are thinking too much pre-snap, this inevitably slows them down post-snap. To combat these issues, we’ve married our front and secondary strength calls in our zone blitz package so that the players know which positions are on their side of the ball.
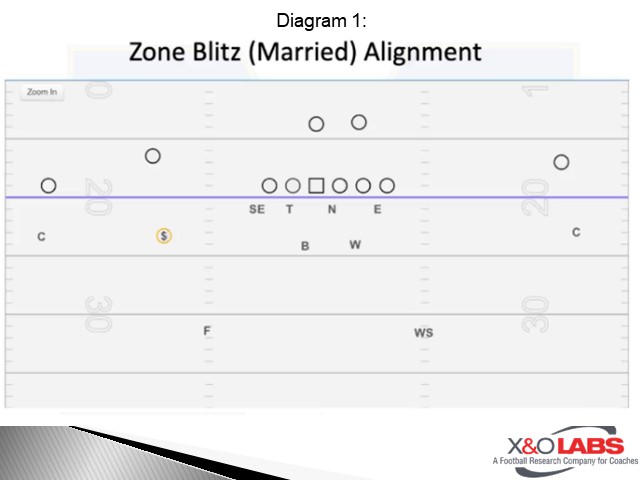
 

In a married defense, our 3-tech tackle, Strong End, Mike, The overhang Backer, and Free Safety are all on the same side of the football. To the weak side are our shade nose, weak end, weak inside linebacker, and weak safety. By having a familiarity with who is on your side of the football, our players have very little to think about pre-snap once the blitz call is in. They’ll know their assignment, whose blitzing, where they are blitzing, where they are rotating, in large part to the defense having a definitive strong and weak side.


2nd Component: Simple coverage rules using a 3 deep 3 under

The coverage behind a zone blitz can also be an “expensive” proposition. Whether it be a check system between 3 deep 3 under or 2 deep 4 under based on formation, or Dick LeBeau’s match carry deliver coverage concepts, it is easy to make the coverage aspect of the zone blitz system time and rep consuming for high school players. Although these mentioned concepts have a ton of value and have shown to be highly effective, we have decided to stick with simple alignment and assignment rules that allow our kids to gain confidence and play fast within our blitzes almost immediately.
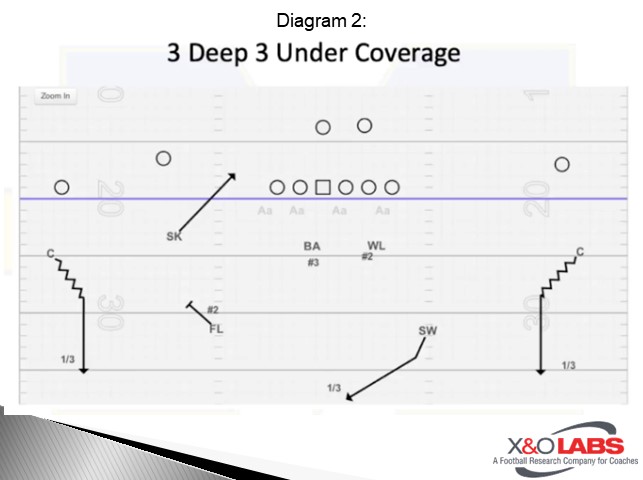
 

We will start in a cover 2 shell. Assignments may vary for the safeties depending on where they are rotating, however, for our overhang and two inside backers, the assignments are very simple.  For Safeties: If the defensive player you’re married to blitzes, you replace them in the underneath part of the coverage. If they don’t blitz, you’re rotating to the deep middle 1/3rd. For the overhang and weakside inside linebacker: If you don’t blitz, you are a #2 drop. For the Mike: If you don’t blitz, you are the #3 drop.


Coverage Responsibilities:

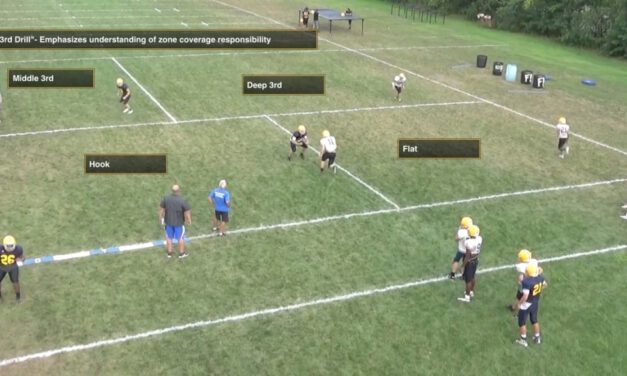
Outside 1/3rd: (Mostly Corners in Single LB Zone Blitzes) Show Cover 2; Apex 2 threats; Play overtop the deepest threat to your 1/3rd

Middle 1/3rd: (Either Free or Weak Safety) Show Cover 2: Work to Middle of Formation getting run/pass read from the cluing ball up/down from QB

#2 Drops: vs Pass – Seam, Curl, Flat, Wheel.    Vs. Run – Force (Pitch), Fold; #2 Drops must disrupt the inside hip of the terminal #2.  We want #2 drops to be extremely physical on any vertical route

#3 Drop: vs Pass – Disrupt inside pad of #3; Match the vertical of 3 and make them throw over your head vs Run – Inside out on the football


3rd Component: Name your single blitzers and conceptualize two blitzer names

To reduce thinking for our players, we will call the position name of the player we want to blitz. The names are:

Strong Safety (Overhang): Sky
Mike: Buck
Weakside ILB: Whack
Free Safety: Fox
Weak Safety: Swarm

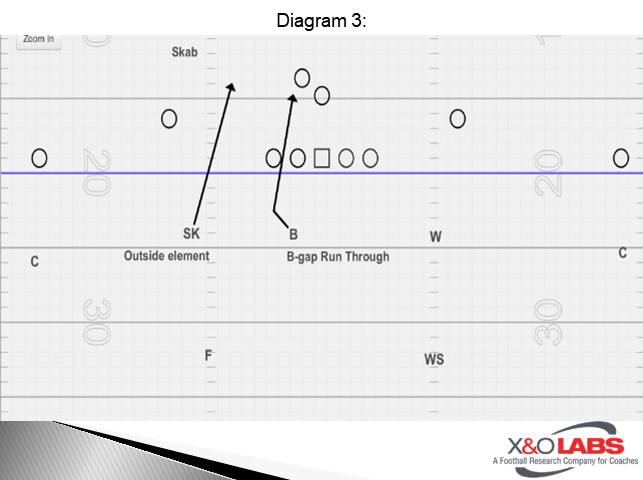
When we want to blitz two players, we will use words like “Skab” to define both whom we want as blitzers and how they should fit the blitz.  The first letters “SK” would indicate our Sky player, or Strong Safety would be the outside box fit of the blitz. The “B” would indicate our Buck would be the inside fit, or what we call the “B gap run through” of the blitz.
 

4th Component: Name your gaps

Again, to reduce the thinking for our players in our single blitzer package, we will name the offensive gaps at the line of scrimmage. We do this to tell our blitzer which gap they are to blitz through. It is a very elementary concept but it has quickened the learning curve for our kids and allowed us to be able to teach how to blitz, how to cover and install other defenses at a much more efficient and deeper level.

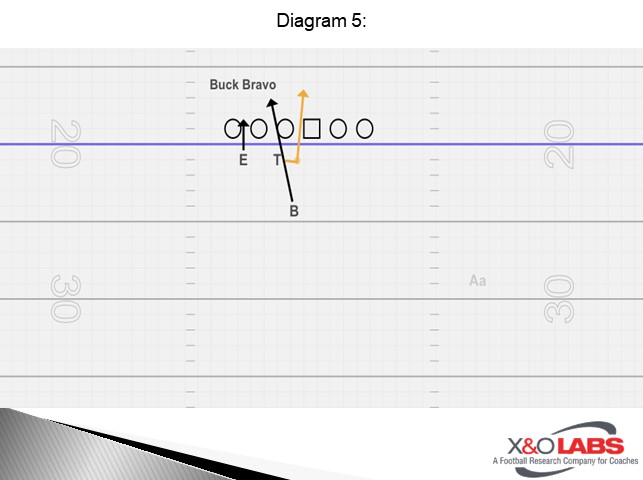
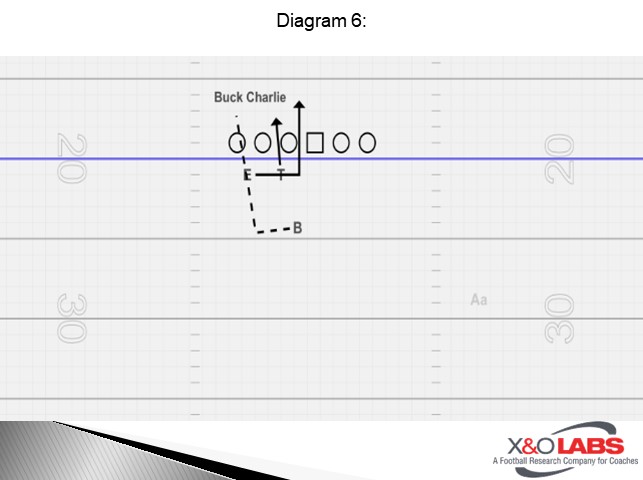
In the following diagram, you can see how we have named the offense’s gaps. To the offensive strength, we use military call signs. The A gap is “Alpha”, B gap is “Bravo”, C gap is “Charlie”, D gap is “Delta”. To the weak side of the offense, we name the gaps using Spanish numbers. A gap is “Uno”, B gap is “Dos”, C gap is “Tres”, D gap is “Quatro”. These serve as the landmarks for where our blitzer will blitz through the offensive line.
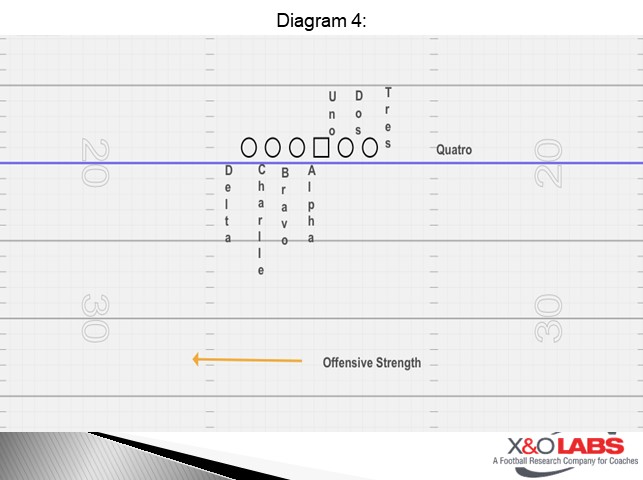
 

A major coaching point for the Defensive Line in this concept is that the D-linemen must know the gap they are aligned with. If their gap is called in the blitz, for example, we call a “Bravo” blitz, our B gap lineman must then move inside to the next available gap. If we were to call a “Charlie” blitz, our C gap lineman would move to the next available gap inside his initial alignment. This means if there is a player lined up in the B gap, then the C Gap lineman would move into the A gap, which would be the next available gap inside.
 

5th Component: Use simple movement patterns for D-Line in overload blitzes

In our overload system, we’re sending more than one blitzer with a lot of post-snap movement by the defensive line. This post-snap movement can involve moving more than one gap (long stick technique) while a defensive lineman drops into underneath coverage.

Read More

Game Planning RPO/PAP Tags From Compressed Formations

By Kurt Forrest
Head Coach/Offensive Coordinator
Mechanicsburg High School (OH)


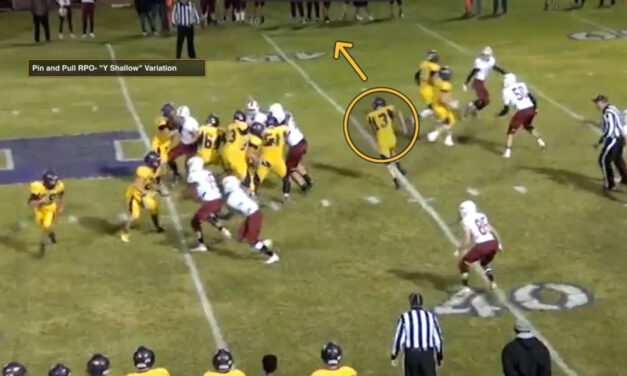
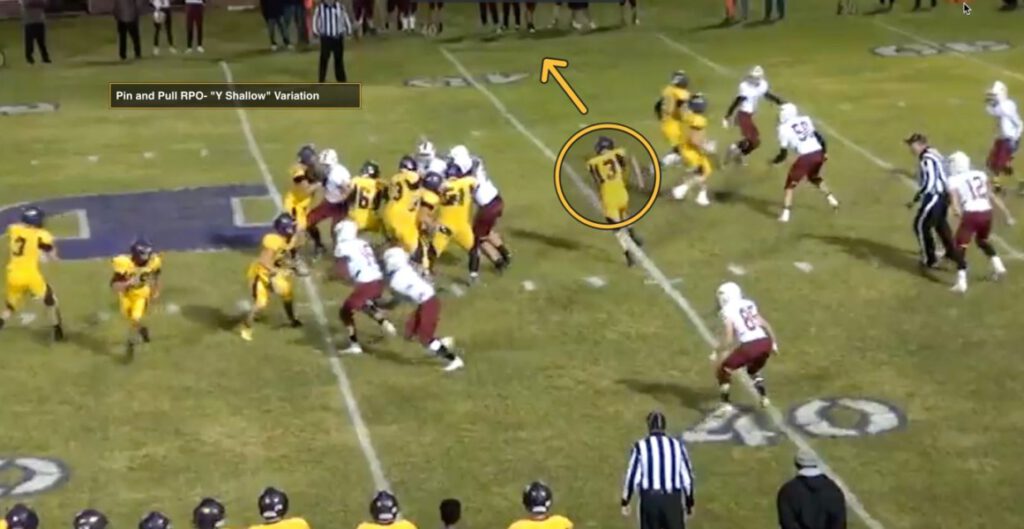
Here at Mechanicsburg the Buck Sweep and Pin Pull Concept has become a big part of our offensive identity. To protect these concepts and to create more chunk plays the play-action game we have developed to put specific defenders in run/pass conflict has been remarkably successful for us as well, now most of our offense is based on it. Each week we want to find formations to create a soft edge or give us a numbers advantage to get the ball on the edge.


Formations

We have 4 to 5 base formations we use but we will never limit ourselves in this department. We will use Empty sets, 1 Back, 2 back, TE/Wing sets, and we will condense our receivers on a majority of these to create extra gaps. We also use a Strongside and Quick side on our OL, the strong side is where we run our Buck series and the quick side is true pin/pull. This allows us to steal reps in practice since all our guys play both ways and a lot have to play special teams as well.

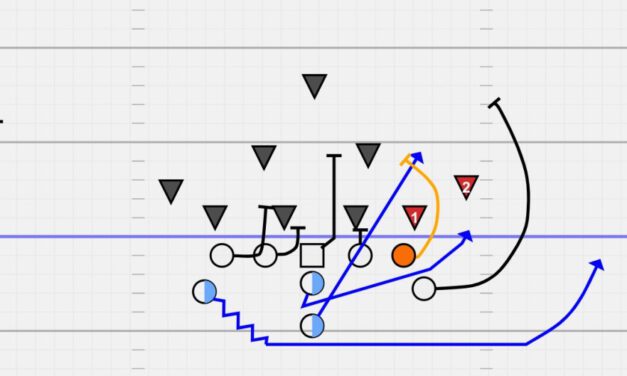
Here are our favorite formations that we will almost always carry into a game.  The first one is a TE/WING set to the strong side and two WRs “squeezed down” to the quick side, this creates 10 gaps the Defense must account for. We will run Buck to the strong side and QB pin/pull with the running back leading to the quick side. We love using tight ends because it makes most 3-4 defenses into 5-2 teams and it makes even front defenses pick where they want to play their defensive ends (if they get too wide, we will run a power scheme inside of them to keep them honest). The diagram below shows one of our favorite formations with our favorite play out of it drawn up. It’s a simple RPO with buck sweep being run as the base run and the two backside wide receivers running a simple curl flat (bubble) combination. The quarterback reads the BSILB vs a 4-2 box and he will read the backside stack LB vs a 3-3 box. Once the quarterback decides he has a throw read he simply goes curl to bubble.

Route Details: The outside WR who is on the ball should angle outside of the flat defender if the defender is in his framework or a yard or two outside of his frame then work to 8 yards vertical while using his eyes to push the corner deep then snap it off and come straight back downhill into the window between the 2 linebackers. If the defender is 3 yards or more outside of his frame then he will work inside of him to 8 yards vertical and sit down in the window showing his numbers to the QB. Once he catches the ball, he needs to get vertical immediately to try and get 5 more yards. The inside WR needs to drop his outside foot and get as much width on his bubble route as possible to stretch the flat defender. Once the ball is caught, he needs to be ready to win a one on one opportunity.

QB Read Progression: One of the reasons we love this play is we feel it is amazingly simple for the quarterback. Once he identifies the backside inside LB he reads him post snap. Once the ball is snapped his eyes go straight to the read key if the back flows hard, he will pull and go curl to bubble. Most of the time the curl will be the throw that’s open, if the read key flows hard and the curl is taken away then go quick to the bubble. This should be a great third option or check down option with a good athlete one on one out in space.

QB Footwork: At the snap the QB will step back with the foot closest to the RB and then ride the RB through his opposite hip which is when the decision has to be made to give or pull. As he rides the RB the QB should shift his weight to his foot that started opposite the RB. This allows the QB to either be ready to throw immediately or to flip his hips and turn two just like a second baseman to make the throw the opposite direction.

Drill Work: Since the Buck sweep has become our bread and butter, we allow for a 10-12 play period of practice to be nothing but Buck Sweep with RPOs in a team setting. We tell our scout team guys to read their keys and go somewhere fast so even the coaches don’t truly know what read the QB will get. We will run these plays fast and up-tempo so we can get 10-12 team reps in about 4-5 minutes. This makes it 2nd nature for our players.

Read More

Kick Leg Mechanics for Pooches, Onsides and Rugby Style Approaches

By Kristian Stern
Wide Receiver/Kicking Coach
Westwood High School (TX)
Twitter: @CoachKStern


Kicking is one of the most important and overlooked aspects of football. A kicker / punter can make or break a game just on one kick. When coaching a kicker, it’s important that you only give them one thing at a time to work on. Too many coaching points at once could make your special teams practice go bad in a hurry. For instance, if they have a hard time getting their toe pointed, all they should work on that day is pointing their toe. I will go over what to look for at practice to help your kicker improve as well as your overall special teams. Here are the fundamentals of kicking and punting as well as things you should be looking for in practice.


Field Goal Technique


  1. The set up (all steps listed are for a right footed kicker; left footed kicker would be opposite):
  2. Place plant foot (left foot) one-foot length away from the ball (use right foot to measure)


Plant foot depth:

  1. 2-inch tee: toe even with nose of the ball
  2. 1-inch tee: middle of foot even with nose of the ball
  3. Off the ground: ankle even with nose of the ball


Alignment:

  1. After plant foot is aligned, take 3 casual steps back no more than 3 yards
  2. After 3 steps back, align kicking foot through the tee through your target
  3. Take 2 steps to the left (steps are shoulder width or slightly inside)
  4. Steps over are at a perfect 90-degree angle
  5. After 2 steps over, left foot is aligned with where you originally measured your plant foot
  6. Right foot toe is aligned with heel of left foot
  7. Pick small target to hit in-between the middle of the uprights
  8. Small lean forward with a big chest


The approach:

  1. Eyes on the ball
  2. First step is a jab step with left foot (small step an inch forward)
  3. After second step, land plant foot next to ball just like you first aligned it
  4. Head should stay on a straight line and not bob up and down as you approach the ball


The Finish:

  1. Toe pointed
  2. Plant foot pointing at your target
  3. Leg locked before contact
  4. Make contact with the ball an inch below the middle of it
  5. Toe and leg locked through contact
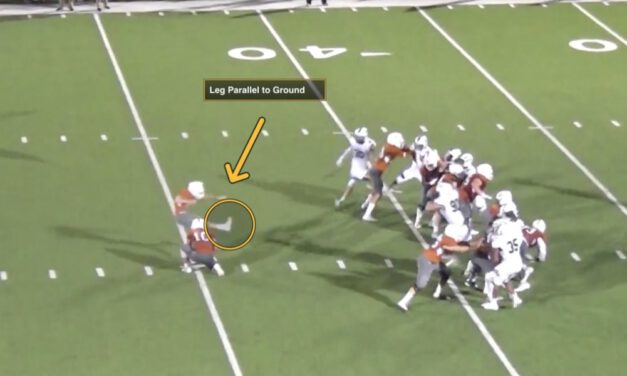
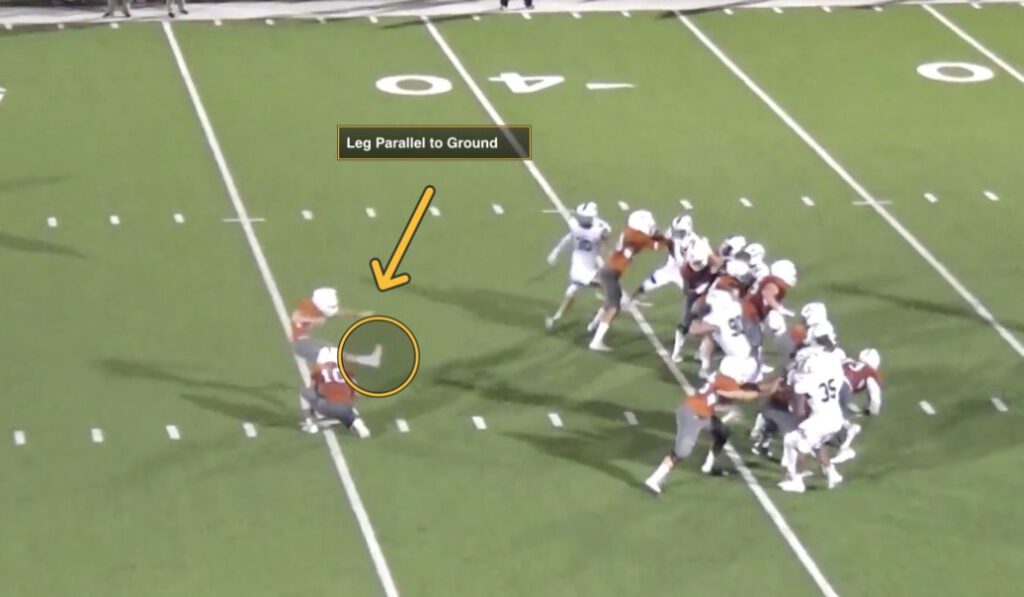
  6. Leg parallel to ground after contact
  7. Crunch with left arm to counter your leg swing
  8. Everything finishes towards your target
  9. Eyes up after you finish the full kick


Read More

QB Run/Pass Packages From Wildcat Formations

By Tim Hammack
Offensive Coordinator
Christ Prep Academy (KS)
Twitter: @coachtdhammack


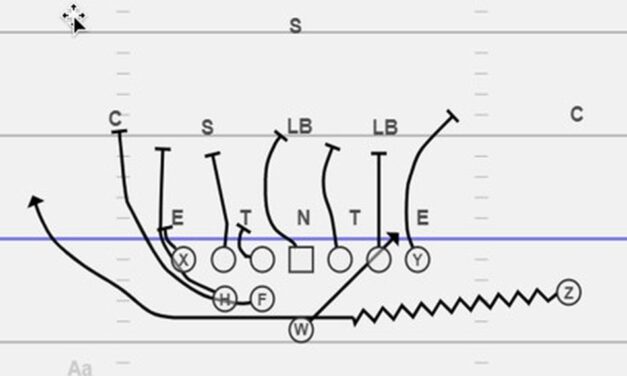
Thanks to X&O Labs for the opportunity to share the basics of our Wildcat package with you. Like many other teams, we often utilize the Wildcat formation in short-yardage and red-zone situations. But we also use Wildcat as a changeup and begin drives in the middle of the field by running multiple plays in succession from our Wildcat formation. We also use it as a major component of our “four-minute offense” when we have a lead and want to chew up the clock at the end of the game.  This has forced us to think creatively about expanding our Wildcat to make the package more varied and less predictable, making it more difficult for opposing teams to prepare for and defend it. This report details our specific Wildcat formation and the fundamental design of our four base plays from Wildcat. The plays and assignments are shown against a five-man front since that is what we often see from our opponents against our Wildcat.


Formation

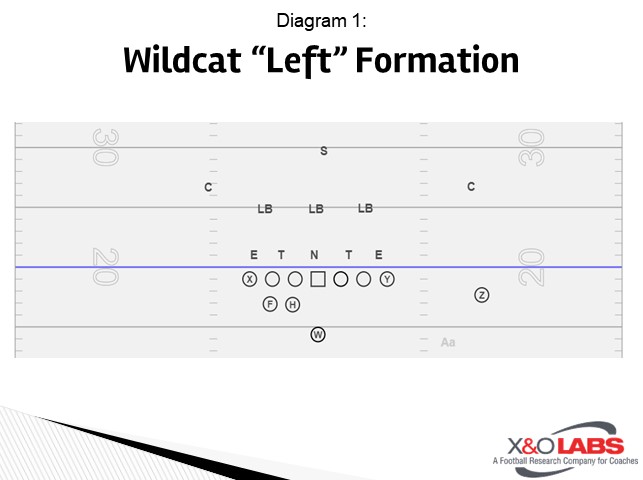
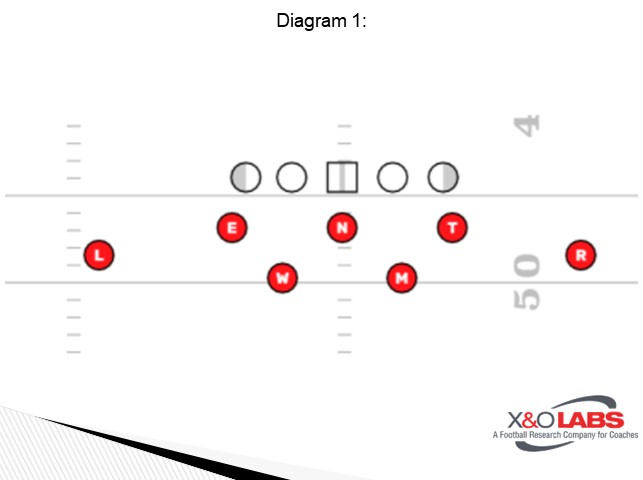
Wildcat for us is what would typically be referred to as a heavy tight set. We utilize one tight end on each side of the formation, two fullbacks/H backs, one slot player and the Wildcat back. The H backs align next to each other on the same side in a three-point stance directly behind the guard and tackle respectively with hand on the ground at 2-2 ½ yards. The slot player aligns to the side opposite of the H backs. The Wildcat’s toes are at a depth of five yards directly behind the center. We can align with perceived strength to the left or right based upon the location of the H backs and slot. Our linemen splits in Wildcat do not change from our normal splits. Diagram 1 below depicts our Wildcat formation with left strength.


Philosophy

We think of the Wildcat as an extension of our every down offense and one of several personnel packages we use. As such, the terminology we use to call plays while in Wildcat is not special or unique and does not differ from play calls in the spread, I, or any other formation. For example, a basic jet sweep play call would be “blue” or “red” (blue=left, red=right) regardless of formation. This means the basic blocking techniques, rules and assignments for plays also do not alter significantly with Wildcat. We simply now have additional blockers (H backs) with which to work the point of attack.

Basic offensive philosophy includes the ability to threaten the defense vertically and horizontally and make them defend the whole field. Our Wildcat package includes plays to achieve this as well. If the defense stacks the box to stop the Wildcat power inside runs, they then make themselves vulnerable to these horizontal and vertical stretch plays. To help accomplish stretching of the defense we utilize jet motion on almost all our Wildcat plays, forcing the defense to defend the edge. And our pass plays from Wildcat accomplish the purpose of stretching the defense vertically.


Base Plays

Our four base plays from Wildcat are jet sweep, full flow lead, back-flow power, and the pop pass.  While we have additional plays, these are the staple of our Wildcat package and our other Wildcat plays build off these base plays.


  1. Jet Sweep

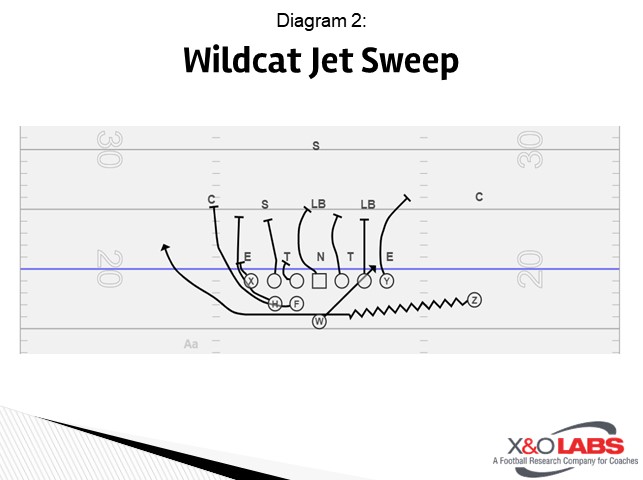
As I mentioned we run jet motion on almost every Wildcat play, but not just as a decoy. We typically run the jet sweep at least once every Wildcat offensive series. Diagram 2 below illustrates our basic jet sweep play from Wildcat.

Read More

C-Gap Defender Block Identification and Destruction from Even Front Spacing

By Cody Crawford
Defensive Line Coach/Recruiting Coordinator
Allegheny College (PA)
Twitter: @CodyCrawAC


Being simple to the kids you’re teaching yet appearing complex to the offense can feel like a Catch 22.  I believe it can be done if you truly believe in what you’re teaching and know the Why and How.

Anyone who has coached college football at the lower levels knows you really have to budget your time and analyze what you’ll have time to teach and even more important, what your kids will be able to retain with the time you have with them.  All this being said, we implement a system of techniques and progressions that give our players the best chance of understanding the big picture.  You don’t need every one of your players to be able to dissect the defense but, if the players up front understand Why you need them to do what you’re telling them to do, you’ll get much better results.  We base out of a 4-2-5 Under scheme with the ability to set the front in multiple ways.  By having more of a hybrid DE/LB at one End and a bigger End who can hold up double teams we allow our front to be very fluid with different alignments and movements.  As far as our fits are concerned, even though we are a 4 down front we essentially fit the run with odd space.  What I mean by that is we will close both B gaps since we are playing with a 3 tech and a Heavy 5 tech who are B gap players.  The Nose will be responsible for the A gap and we will be softer in the C gaps with our Wide 5 technique and the backer who is opposite.


ALIGNMENT


Heavy 5 Technique:

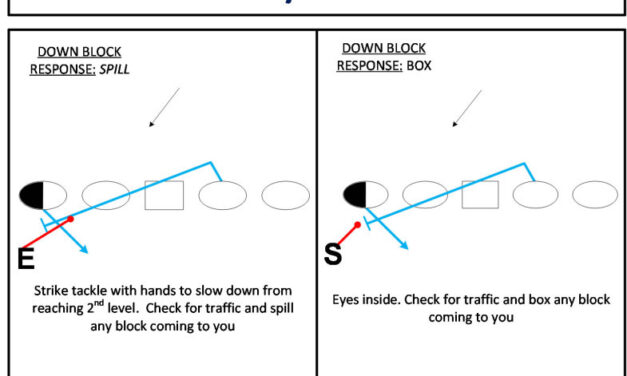
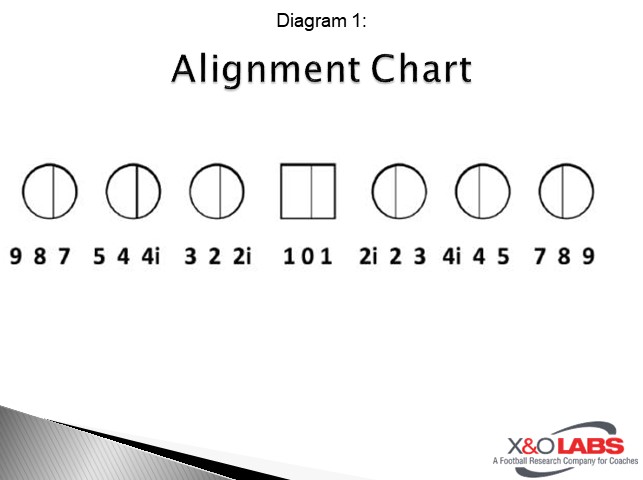
Our End will be the bigger of the two because his base technique will essentially be a two gapper.  He aligns in a heavy 5 technique and most of the time to the field.  In terms of alignment when we use the word “heavy” before any technique that means we want our inside hand splitting the midline of the Offensive Lineman’s body.  This alignment is used for a couple reasons.  First, it works against the OL’s fundamentals and reduces the angles.  Secondly, it makes the guard honor the End since he is playing a two gap technique with any block at him.  We place a big emphasis on backfield alignment with our D Lineman.  This doesn’t usually apply to how we align our End.  Whether the back is away or to you, we want the End to stay in the ballpark of his base alignment.  We align heavy because we are making our End responsible for the B gap.  If he gets a base or reach block he plays what we call “Indian” (Escape Inside).  He is going to trigger off the near ‘V’ of the neck of the OL.  We’ll commonly refer to this as “key the logo”.  As soon as he triggers the End should shoot his hands to his target.  Since the End is really a two gap player he should strike right underneath both arm pits with a base block compared to a shoulder cuff and near pec hand placement you see with looser alignments.


Wide 5 Technique:

Our Stud position is the guy who is more of that DE/OLB hybrid.  We count on this guy to be able to rush the passer effectively and even drop into coverage sometimes.   We want the Stud be versatile so we can be multiple in the looks we give the offense and not have to change personnel.  When we tell our Stud to align in a wide alignment that means a foot outside the outside foot of the tackle.  More specifically we tell them the outside part of the foot.  We always begin with giving our guys landmarks with their alignments.   We don’t stress as much about being exact as long as you’re in the position to execute your assignment.  Since we align this end much looser that means he’s going to be a 1 gap player.  The Stud’s alignment we adjust more with backfield alignment.  If the back is away we want him to loosen up from his base alignment.  If the back is to him we want him to tighten down to hand to foot alignment.  So his down hand on the outside part of the foot.  The Stud is going to be the edge of the defense so it is crucial he does not get reached.


Alignment Variations

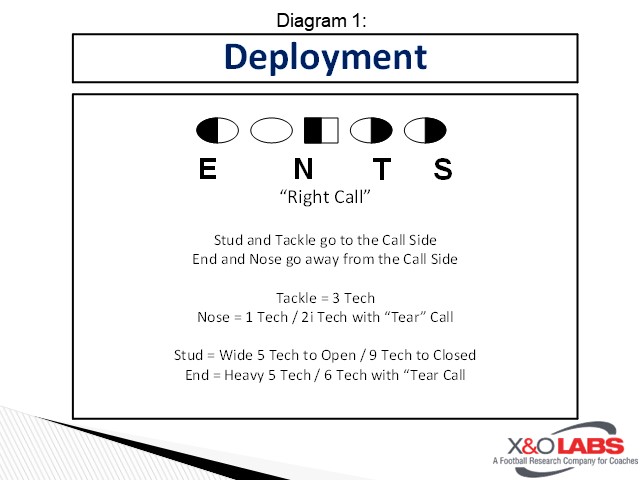
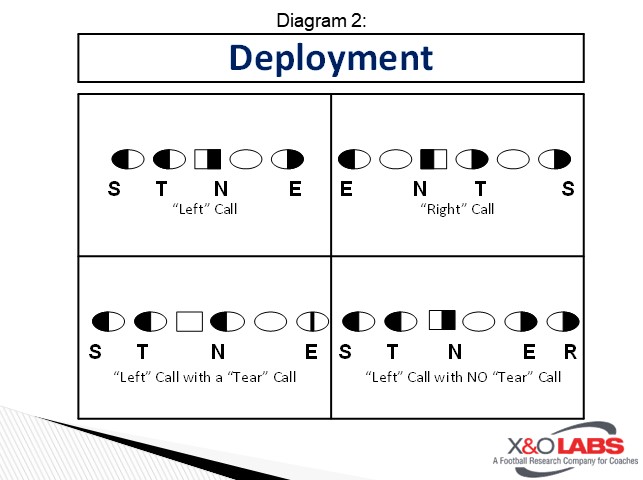
When we’re talking about our base over/under fronts the alignment with a TE will depend on whether you are the Stud or the End.  The Stud will move out to a 9 technique against a TE.  We always tell them they are the edge and that is why they will always have an outside alignment and box any pulls which we will get into later.  The End on the other hand will stay in a heavy 5 technique vs a TE unless they hear a “tear call”.  A tear call will be made only when the 1 tech and 5 tech are to the field.  This call is made vs any set that has a TE and two receivers to a side.  If it’s a pro set (TE/Flanker) then the Rover (Nickel/Sam) will be in a 9 technique.  With #2 removed from the core we have a soft edge so we bump the End to a 6 tech and the Nose to a 2i to reduce the bubble.  The End is still playing “Indian” so he is a two gap player.

Read More

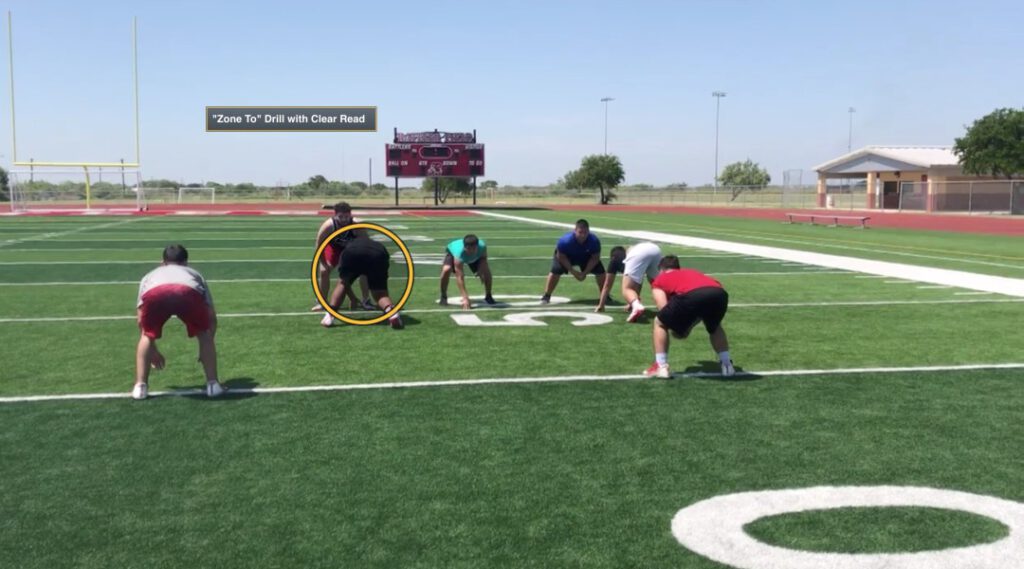
Group Drills to Teach Cloudy vs. Clear Reads in Even Front

By Luis Lauriano
Defensive Coordinator
Rio Grande City High School (TX)
Twitter: @lllauriano


The defensive line position has had to evolve into a more athletic, more versatile unit to defend the tempo of multiple offenses that switch between 10-personnel and 20-personnel to establish their run and passing game. The defensive end position for us has been the most critical position to develop a defensive advantage in terms of speed and versatility. The defensive end position in our 4-3 scheme primarily consists of one of our most athletic linebackers that can force on run support and pressure in the passing game. This hybrid DE for us is used to be a fast “chase” player in run support instead of traditional feather technique DE. We tag our DE with Calls that allow him to be the quarterback player at times as well which enables our DE to be versatile as needed.


Our Base

Our defense bases out of a 4-3 Over front set to the 3-man surface or the passing strength when everything in the formation is balanced. Our defensive end will be a tight 5-technique with no Tight End and a 6-technique (head up to the tight end) when there is a TE is “on” the offensive line set. The inside hand of the DE is down with inside foot back and staggered. The stance is squared, staggered because we do not want to tip off our line movement. Our defensive end can play a loose 5-technique when the game plan faces with outside leverage teams.


Block Reaction versus Base/Reach Blocks

Our defensive ends will learn to defeat the base and the reach block before they learn anything else. Our defensive ends will partner up in Individual “Indy” time. Our defensive ends will treat base and reach blocks the same with an emphasis on angles and run fits. The defensive end will react to this type of “On” block by stepping to the crotch of the OL partner and maintain outside leverage. The OL partner will step to, grab “On” to DE, run, and hook DE. Our progression in block defeat versus base and reach blocks is as follows:

  • Step and Punch
  • Step, Punch, and Press
  • Step, Punch, Press and Push/Pull for block defeat
  • Step, Punch, Press and Push/Pull, find the ball carrier


The coaching emphasis is inside hand and outside hand maintain outside leverage. The defensive end must fight outside and win at all costs. If the DE is ever blocked, hooked, or reached, he will begin to chase the ball inside/out and be a football player (see the ball, find the ball, get the ball; pursuit).  The defensive end must maintain outside leverage and keep outside the gap responsibility to create a clear read for the linebacker.

Read More

Using the Twirl Series to Supplement the Single Wing Offense

By Dan Woolley
Offensive Coordinator
Scott High School (KY)
Twitter: @thecoachwoolley


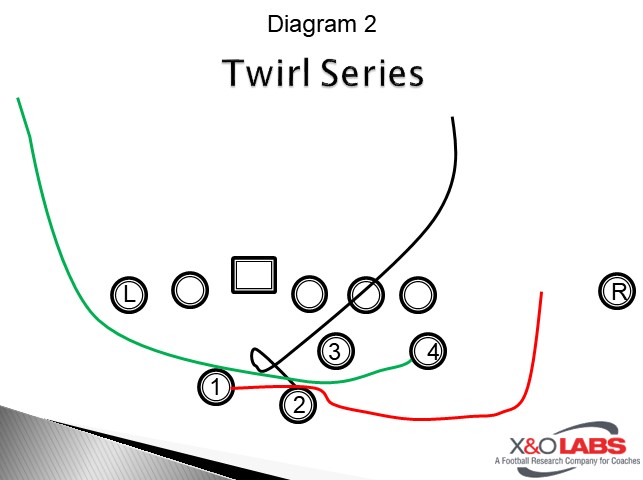
I have previously detailed the basics of our overbalanced offense in the report “Adapting Single Wing Principles to Ignite Your Run Game.” One of the series not detailed in the report that we have used with great success is our Twirl Series. The Twirl Series is where our HB takes the snap and completes a full 360° spin while meshing with the QB and WB away from the line of scrimmage.


Note: Our 1 Back= QB, 2 Back= HB, 3 back = FB, 4 Back= WB, L= TE, and L=WR

We feel like using the Twirl Series is like a pitcher changing speeds. While we are executing the same running plays as our base single wing set: Power, Sweep Strong, Sweep Weak, Wedge, the timing of the plays is different and usually causes the defense to hesitate. We feel this hesitation will slow the defense down so we can continue to run our base series. We have preferred to run this series to spark our offense when our base series is not as effective as we would like.


If we feel the defense is hesitant when we run the Twirl Series, we will run Power or Sweep Strong. When the defense reacts to stop these plays, we will counter with Sweep Weak and Wedge. We also have a Twirl Pass that we can run to exploit teams who creep up to stop the run and Twirl Screen to run vs. teams that try to get upfield and create havoc.

We run this series with our base personnel, but I feel that if a team had a plethora of RBs that this could be a great “wildcat” series since you have RBs attacking the middle and both flanks of the defense simultaneously. This deception and the defense’s unfamiliarity with the series since we feel that there is no way the opponent can simulate it in practice, allows us to overcome the loss of a strongside blocker, who is now engaged in the mesh.

One of the other advantages of this series is that all our plays look very, very similar. With the HB, QB, and WB running the same path every time, the defense does not know what the play is until they can find the football. This is much harder than it sounds. With the HB spinning and the QB and WB meshing with him, a lot of movement is going on in the backfield and it makes it hard for eyes to focus and find the football. We have found that even the most disciplined teams in terms of reading keys get caught staring in the backfield trying to find the ball instead of reading their keys. It is not uncommon for players at the first, second, and even third levels to slow down and try to find the ball, take themselves out of the play by chasing someone who doesn’t have the football or attempt to tackle someone who doesn’t have the ball. Besides making it much easier on us when the defender takes himself out of the play, it puts doubt in the minds of the defenders, and we feel it slows him down for the rest of the game.


Install

Though the Twirl Series seems very complex we have found that the basic mesh point can be installed in a small amount of time. The clip below is from our Freshman team in June 2014, when we first started installing the Twirl Series. We initially installed it with them before we did with the varsity. This allowed us to work some kinks out. They have had approximately 15 minutes of install time. Before this clip, there were a few cases of players bumping into each other, but as you can see after a short amount of time, they have the basics down. The mesh is a little slow and mechanical, but overall it gets the job done.


Editor’s Note: Coach Woolley has provided narration for each clip below:


Clip #1– HB is going to keep the ball. Even with no offensive line, it is tough to see who has the ball as all 3 RBs carry out fakes. Notice how HB double skins it as he is coming into the line of scrimmage. This creates a lot of deception.

This clip is important for another reason: it allows you to get a feel of the defensive perspective. It is hard to figure out who has the ball when you only watch it once. It is important to note that in this clip there is not an offensive line in the way to further obscure the vision of the defense. Adding the offensive line combined with the ball carriers hiding the ball from the defense through “double skinning” or placement on hip make it extremely hard for a defense to find out who has the ball.

Read More

Combatting Common Defensive Adjustments to the Flexbone Offense (Part 1)

By Matt Morrison
Head Coach
Francis Parker High School (CA)
Twitter: @CoachMMorrison


In the 2017-2018 offseason, we decided as a coaching staff that we needed to go in a different direction offensively. I had just finished my first season as the head coach at Francis Parker and to say that we struggled to move the ball would be putting it politely. We couldn’t drive the ball, we hardly made any explosive plays, and our team only scored over the 20 points twice in 10 games. While some of that could have been attributed to a young team, the reality was that we had done a poor job of putting our players in the best position for them to have success.

At Francis Parker, we are a small team, both literally and figuratively. As a small school (250 boys) that offers a full variety of sports, our program numbers are typically in the mid-30s for grades 9-12. Additionally, while our kids do a great job of training to build strength and speed, we will go into nearly every game on our schedule as the undersized team. In 2019, our roster had only 3 players who weighed in at over 200 pounds.

It was the combination of all those factors that led us to the flexbone offense. While there are numerous advantages to running the flexbone, the ones that have made the biggest difference for us are:

  • It allows us to play to the strengths of our offensive lineman (smarts, angles, quickness, leverage), while hiding weaknesses (size)
  • It allows us to attack the entire width of the field and the entire structure of the defense
  • It creates more balance within our offense, allowing us easier ways to get the ball to all of our different skill players
  • It allows us to control the tempo and pace of the game. In addition to being able to keep a talented offense off the field for extended periods of time, it also can shorten the number of total snaps in a game.  This has been critical at times for us competing against teams with bigger rosters, as all of our players play offense, defense, and multiple special teams.


In the spring of 2018, we did a deep dive and began studying several teams at both the high school and college levels who have had success running the offense. We then spent the remainder of the offseason working as a staff on the best way to build, package, and install the offense so that it would transform from just a series of plays into a system that our players could execute with speed and precision on a weekly basis. This is where I believe we have seen our biggest advantage of the offense.

The flexbone is unique.  While several teams will run certain plays that you may see from a traditional flexbone offense (Veer, Midline, Trap, Belly, etc.), there are only a few in our section who run the entire gamut of the offense. This has provided us two advantages that I believe have made us a very tough team to defend:

  1. The flexbone is exceedingly difficult to simulate in practice. While it might be possible to train your scout team to run one or two of the flexbone core plays efficiently over the course of a game week, it is highly unlikely to do so for the entire offense.  As you will see throughout the rest of the article, our core plays are Inside Veer, Rocket Toss, Midline Follow, and Midline Triple, but we also will run Belly, Trap, Trap Option, Counter, and Counter Iso, not to mention our quick pass and play-action game.  While we have been blessed to have skill players with good speed, I have no doubt that a large part of our success is our ability to get the defense to play slower because they have rarely played anyone like us offensively.
  2. It has simplified the adjustments that we make both during and between games. Because we have truly built an offensive system, both our players and coaches have a solid understanding of how our plays fit together, and in turn, how we will need to adjust vs a variety of different defensive schemes that we might see over the course of a season.  As I mentioned before, all of our players will play on both sides of the ball and in the kicking game.  This means that we do not have extended time during games to consult with our position groups during the game.  Even during halftime, our time is limited, as we must cover all 3 phases. Because of those circumstances, it is even more important that our communication is simple, organized, and efficient.  I am excited to share some of the go-to adjustments that we will use against common defensive tactics vs our flexbone offense.


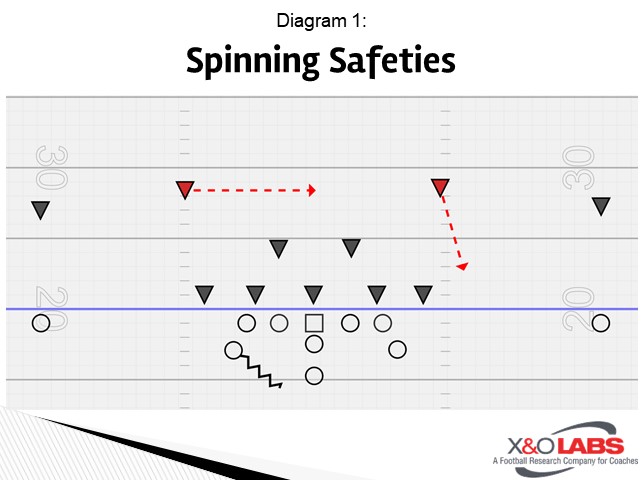
DEFENSIVE ADJUSTMENT 1: SPINNING OR RUNNING SAFETIES TO SLOT MOTION

One of the most common strategies that we will see from our opponents is for teams to spin their safeties once we motion one of our slots.  They are usually doing this for 1 of 2 reasons.  Either they are looking to be able to force the ball faster and set a harder edge on the perimeter, and/or they want to put their pitch player into a better position to play his option responsibility.  This is especially common for teams that base out of a two-high coverage structure.

Read More

Combatting Common Defensive Adjustments to the Flexbone Offense (Part 2)

By Matt Morrison
Head Coach
Francis Parker High School (CA)
Twitter: @CoachMMorrison


In the 2017-2018 offseason, we decided as a coaching staff that we needed to go in a different direction offensively. I had just finished my first season as the head coach at Francis Parker and to say that we struggled to move the ball would be putting it politely. We couldn’t drive the ball, we hardly made any explosive plays, and our team only scored over the 20 points twice in 10 games. While some of that could have been attributed to a young team, the reality was that we had done a poor job of putting our players in the best position for them to have success.  This report is the 2nd of two and starts with the 3rd and 4th defensive adjustments to stop the offense.


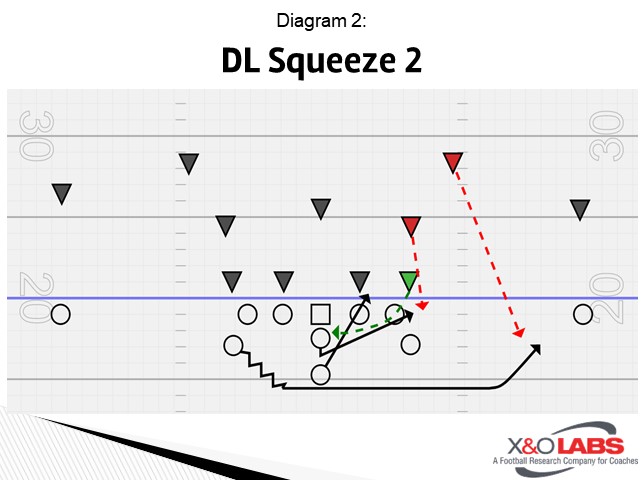
DEFENSIVE ADJUSTMENT 3: DL SCHEMING TO TAKE AWAY THE FULLBACK

Since the Inside Veer play is one of the staples of the offense, another one of the more common defensive adjustments that we will see is teams aggressively pinching and slanting their defensive line with the goal of eliminating the fullback as a ball-carrying threat.  There are several different thoughts as to why this is an effective strategy against the flexbone.  Among others, this tactic will put the ball in the hands of the quarterback much more often, giving the defense more opportunities to hit him when he disconnects and declares himself as a runner.  This also enables 2nd and/or 3rd level defenders to pursue faster, as they know that the DL is eliminating the dive phase of the triple option.  When the defensive ends are squeezing, you will also see the linebackers and free safety running the alley much more aggressively.  This is similar to the gap/scrape exchange technique that has become a popular way for defenses to defend the shotgun zone read.


Offensive Answer 1: Displace or Block the Quarterback Player

As a flexbone offense, we are resigned to the fact that our quarterback is going to take some hits.  More than speed, quickness, arm strength, or even decision making, I am of the belief that the most important quality that a flexbone quarterback must possess is toughness.  If your quarterback is not a legitimate threat to carry the ball, it will be difficult to sustain any success in this offense.  We never want to give the defense the opportunity to repeatedly tee off on him. The easiest way for us to accomplish this when the defense is scheming to cancel the dive is to either displace or block the defender responsible for playing the quarterback phase of the triple option.


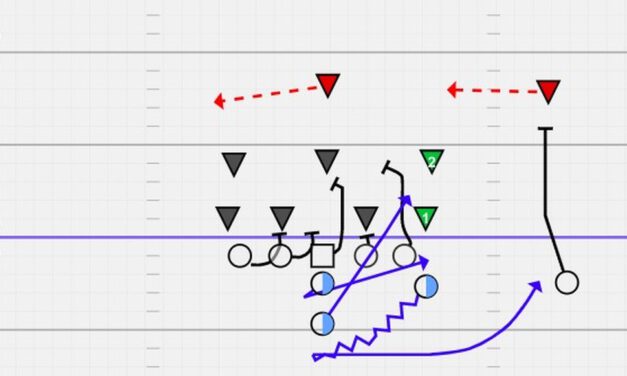
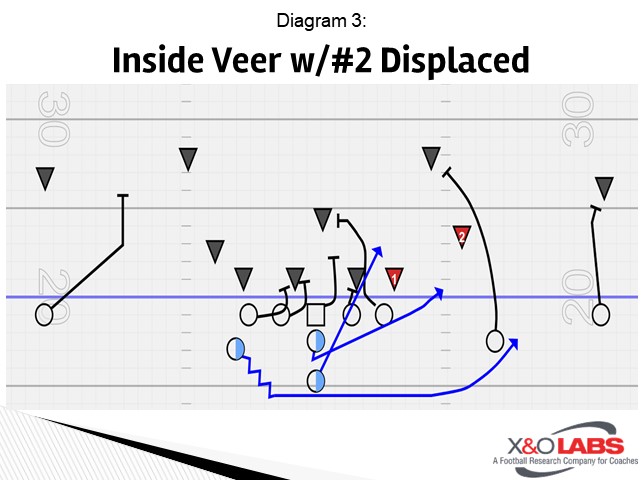
Here we have moved our playside slot from his traditional wing alignment to that of a true slot receiver (you can also do this through personnel substitutions as well depending on the skills of your players).  This forces the #2 defender to widen his alignment, giving the QB more time and space to make his decision to keep or pitch once the DE tackles the dive.


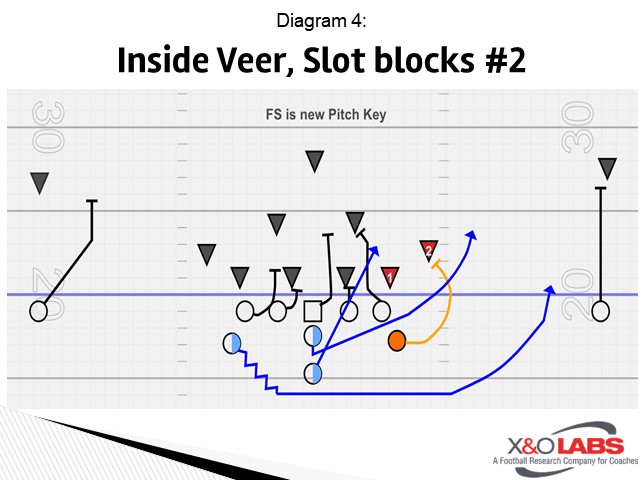
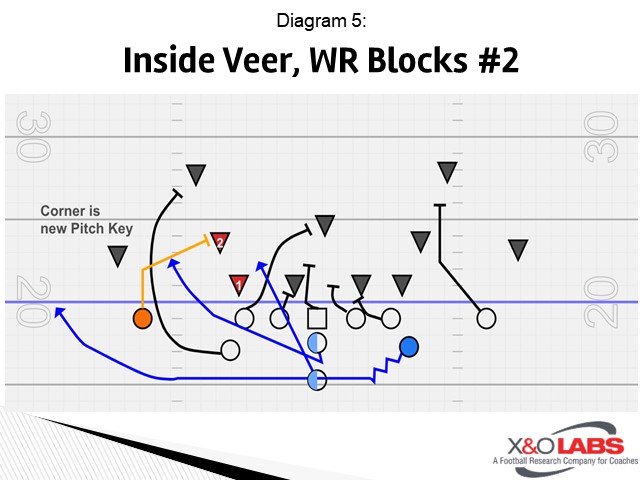
The other tactic that we will use is to block the quarterback player and ID another defender to read as our pitch key.  We can do that with either our slot (Diagram 20) or our wide receiver

Read More

Variations of the Sail Concept

By Jim Glover
Offensive Coordinator
Centennial High School (TN)
Twitter: @jimballcoach


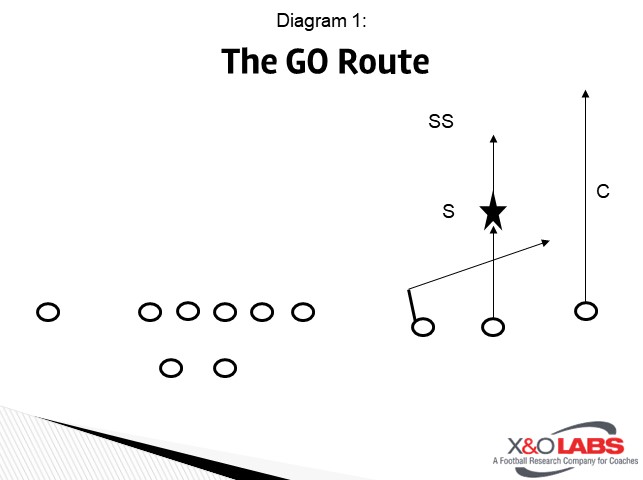
The Run and Shoot “GO” Route is a staple of the offense. Since the day Mouse Davis put it in, it has been a winner because of its morphing qualities. Correctly taught, it can be one of your more consistent plays that carries a big-play potential.


WHAT IS THE GO ROUTE?

At the onset, the “GO” route looks like there is nothing special about it. And it is a basic flat route that gets the offense a consistent 5 yards for each completion. As a play-caller, I like a consistent 5 yards. So, calling this play repetitively is something I am happy with. But what makes the “GO” route worthy of a whole article? Well, it is the “magic” that happens once defenses try to take away the basic flat route.

We have been running this play as part of our offense since 1992. It has evolved from an under-center quick game route to a shotgun intermediate yardage play. The reads have adapted from a simple flat defender read to being able to handle the multiple zones and combo man coverages we see today. This article will give you the drills and answers to the common defensive adjustments we see.


SEAM READ – Everyone Does It

As you can see the basic route package consists of a Mandatory Outside Release (MOR) by the #1 receiver, a Seam Read by the #2 receiver, and a Shoot route by the #3 receiver. These are basic routes except for the Seam Read. This is the route we spend most of our time teaching and drilling. All three receivers will be drilled on this route due to our variations of the play.


PRACTICE DRILLS

Where is SAM?

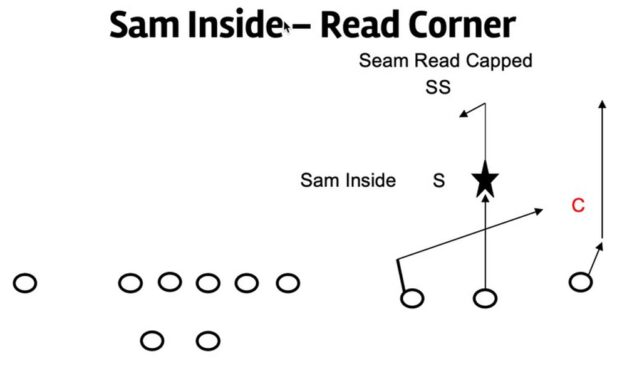
The #2 receiver will run his Seam Read after answering two questions. 1) Where is the Sam Linebacker and 2) “Is my route capped?” We want the Seam Read to attack the outside shoulder of the Sam Linebacker. Once he is even with the Sam, we want him to “gear down” and “rub”, making it difficult for the Sam to get to the Shoot route. In drills, we will place the Sam inside the #2 and then outside the #2. If the Sam is inside the #2 then the “rub” is easy. If the Sam is outside the #2, then the “rub” may not happen. We still want the #2 to attack the outside shoulder of the Sam. If the Sam plays over the top and slides to the outside, the #2 will look for the ball on his back shoulder if the route is capped by the safety. If he is not capped, his route should continue up the field. All three receivers will run the Seam Read drill. This is first taught without a ball being thrown. Once all receivers get a feel for the Seam Read, we will bring the QB in and throw the route with three defenders. The Sam, Strong Safety, and the Cornerback.


QB Reads

The QB’s reads start with the same questions asked by the Seam Read route, “Where is the Sam?” and “Is the route capped?” For the QB, if the Sam is inside the #2 receiver, we want to read the CB. He will high/low the CB with the Shoot and MOR. If the Sam is outside the #2 then we will read the Sam and high/low him with the Seam Read and Shoot routes. The “capped” Seam Read should get a back-shoulder throw to protect him from the safety. If the seam read is uncapped, then we can throw the ball out in front of him.

We want the ball out of the QB’s hand quickly. Once the QB catches the snap he will take 3 quick drop steps on an angle toward the GO route. On his third step, the ball should be delivered. If not, he should pump fake and then hit the open receiver in his secondary route.

Read More

Read Pressures Out of Multiple 3-4 Spacing

By Chris DiLella
Associate Head Coach and Defensive Coordinator
Rhodes College (TN)
Twitter: @Coach_DiLella


First, I want to mention how grateful I am to X&O Labs for allowing me to talk about something that I believe we have had a good amount of success running these last few years. Our read pressure system has allowed us to always make sure we have at least a 4th rusher in the passing game, while also allowing us to be gap sound vs. any run we may see. When speaking about this I am specifically talking about our 4 linebackers, our call/boundary side OLB- Rush, our call/boundary side ILB- Mike, our away/field OLB- Lynx, and our away/field ILB- Will.


What I mean when I call these a “read pressure” is that each defensive player has a specific offensive player that he reads when blitzing and that tells him how he should react. The variation of who is coming when causes confusion for both the QB and OL. It allows our players to play fast against any offense we see because of the minimal rules and techniques that we teach them. Our alignment rules are simple and by day 2 of installs, we can run any pressure out of any coverage that we have. Below, I will be going into detail on what we teach our players when we run Razor (rush), Laser (lynx), Max (mike), Wax (will), Rome (rush or mike), Waco (lynx or will).


OLB Pressures (Rush and Lynx)

When calling our defense, we are generally going to be sending the rush about 60% of the time.  Because of this, we like him to be a very good pass rusher and our best run defender.  On the other side, our lynx is going to be better in space and better in coverage.
 

Alignment:

When it comes to teaching our OLB alignment, we like to speak in general terms and have them follow a few simple rules.

  1. Align for Success! Be able to execute your assignment from where you are
  2. Apex Split #1 or split #2 at 3-5 yds.
  3. Attached TE w/ no split #1 align in a loose 7 at 1-3 yds
  4. Attached TE or H w/ split WR apex to wide 9 depending on splits
  5. You have the freedom to “prowl” into position pre-snap


Pressure Rules

In normal, non-blitz, situations we teach our OLB’s to read their “triangle” which is EMOL through to mesh point.  This transitions seamlessly to our razor and laser technique because we will always be C gap players reacting to the tackle’s block.

  • Read “V” of the neck of the tackle
  • Attached TE shock and rip into C
    • If you can’t rip into the C gap then put his body in it


When teaching this I have found the hardest thing for younger players to pick up on is that they are not just blitzing off the edge (or running up the field). They need to understand that they are responsible for a specific gap and what they do needs to be dictated by what we are seeing from the offense.

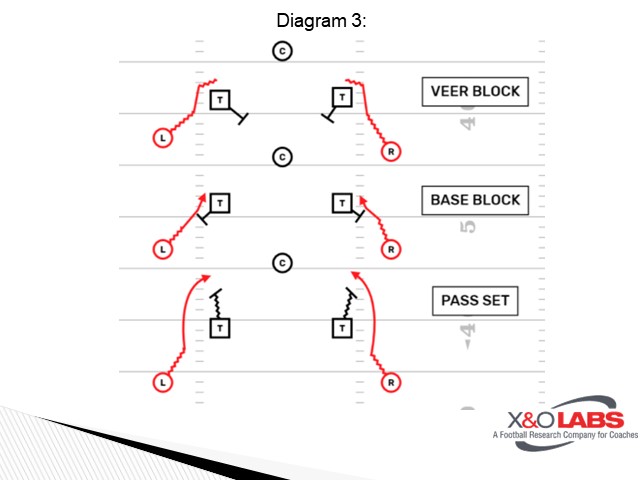
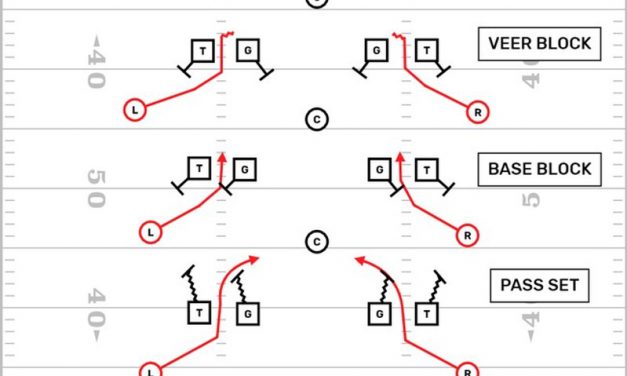
We teach 3 basic block recognitions to them.

  • Veer (tackle away). Shuffle and squeeze responsible for QB on mesh/boot. Spill anything across.
  • Base (tackle to). Shock/Release in C gap. Do not widen or come inside
  • Pass Set. Transition to pass rush technique. RB to you beat outside for contain. You are an outside pass rusher. Aim for the back shoulder of WB


The drill below is done twice a week. Once they are comfortable with each one, it is at the coaches’ discretion as to what they are seeing.  We will add a TE into the drill depending on what we need to prepare for.


Read More

Offensive Game Planning and Thought Progression by Formation

By Dylan Ziegler
Offensive Coordinator
Beaver Dam High School (WI)


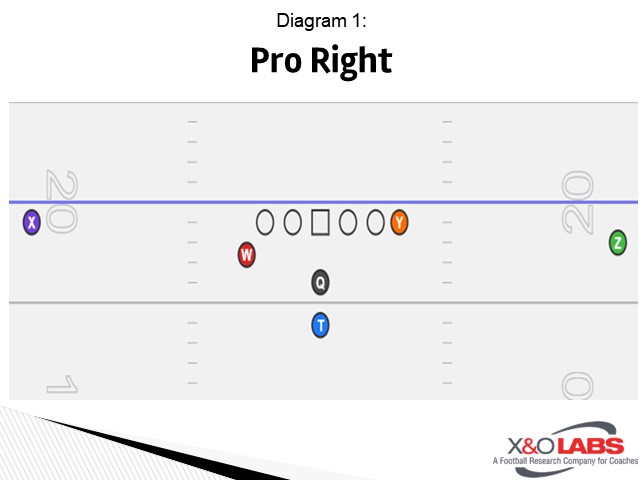
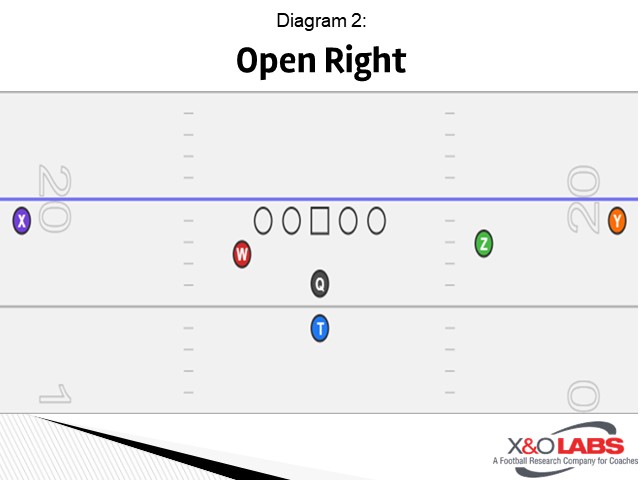
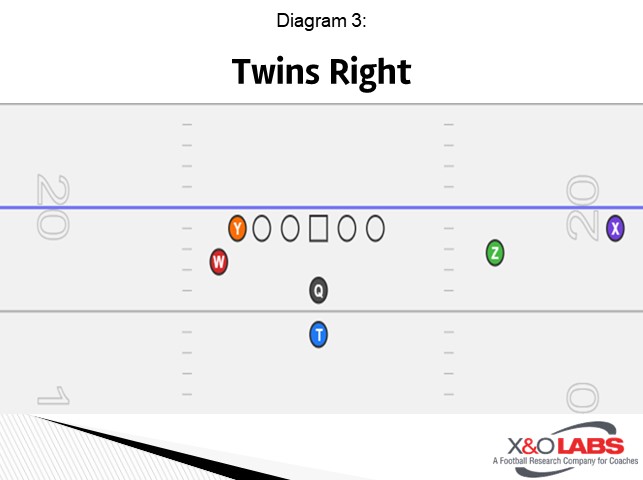
Many offenses are condensing the number of formations in their playbook to make things simpler for their players. Only running plays out of 2-4 formations avoids errors in your offensive alignment. However, I believe this allows the defense to have very few checks, to diagnose certain plays, and take certain things away from the offense. We have not had the benefit of having the talent to overpower our opponents, so we had to find a different way to get easy yards. The coaching staff at Beaver Dam High School has developed a system of tagging formations. Each tag affects the alignment of very few people on offense. I believe this gives us an advantage because we make very few alignment errors while forcing the defense to be ready for a multitude of formations. The tags are the same no matter what formation they are attached to which makes it easier for the players to align properly while also keeping the offense truly diverse.


Base Formations

We have three base formations:

Pro:


Open:


Twins:


We can attach tags to any of the base formations (and at times, two tags to a formation) to create an arsenal of alignments.


Formation Tags

We have 19 tags in total, but we certainly do not use all the tags every year. Some tags are designed for a QB that is more of a throwing threat than as a running threat and vice versa. We also have tags that are designed to take advantage of the different skill sets of personnel at the wing, tailback, and Y position. We focus on how we can put our players in the best position for that year and stick to those tags. For this report, I will focus on our most commonly used tags. Below is a chart matching the tag and formation adjustment:

Tag Formation Adjustment
King Wing moves to strength (keeps wing alignment)
Empty T moves to WR split on the weak side
Split Wing aligns in the backfield, offset the QB to the strong side of the formation
Bunch Wing moves to king position, the two WR’s move to “snug” position to condense the formation. Create an off the LOS, on LOS, off LOS “bunch”.
Tight WR’s to weak side tighten splits to condense the formation (does not apply to Twins formation)
Devil X or Y (depending on base formation) and wing “stack” in the slot and Z split to Y’s normal alignment. (Does not apply to Pro formation)
Out Wing takes WR split
Trips  Wing moves to strength with a WR split
Stack WR’s to the same side of formation will align one WR in front of the other. Their split will be the midpoint between their normal alignment (their split can change slightly based on the concept) (Does not apply to Pro formation)
Jack Wing goes to “king” alignment. T moves “king” alignment just inside the wing
Jill T moves to a “queen” (wings natural alignment) alignment inside of the wing


Read More

Methods in Freeing the Mike LB in a Stack Front

By Adam Siwicki
Associate Head Coach/Defensive Coordinator/Linebackers Coach
Culver-Stockton College (MO)
Twitter: @AdamSiwicki


The challenge for a defensive coordinator is to find the fine line of keeping your system simple enough for your athletes to play confident and fast but complex enough to keep the opposing coordinator guessing. We use a wristband to communicate the plays we run. I prefer the wristband over signals because it is position-specific and I can put tips and reminders on certain player’s wristbands to make the information more quickly accessible to the player. It also allows for flexibility when changing run fits but yet keeping it simple for our players. We constantly change up the way we fit runs here at Culver-Stockton College and yet we have had very few misfitted run plays due to the simplicity of our defense. We play a 3-3-5 odd front, two-high defense. In our conference, we see multiple styles of offenses ranging from Air Raid to Wing T. I wanted a system that is flexible and adaptive to the various styles we see without drastically changing each week.

When game-planning for an opponent, I am always trying to figure out how to add an extra number to the play side. I have coached in many systems and generally, that number comes from the secondary. Our system does allow for us to fit runs that way, but I also like to try and add an extra number in the box, opposed to having it always come from the secondary. We are a gap sound defense and want our linebackers who are responsible for a gap to play fast and downhill. We will free up a linebacker in the box for him to scrape over and fix any misfit defensive lineman or linebackers. Which linebacker we make free varies based on formation, play direction tendencies, or back sets the offense presents us with. For this report, I will talk about how we free up our middle linebacker. To free up an inside linebacker we will slant our defensive line. Which way we slant is based upon game plan and can change by series or quarter.


In Diagram #1 you can see we slant the line to the field and free up our Mike linebacker in a Tampa 2 coverage.
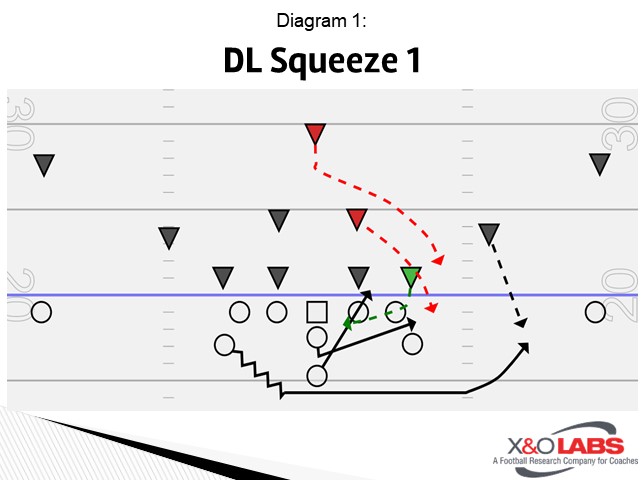
DB RUN FITS: Our boundary corner is the force player while our strong safety has all of #1. They have the flexibility to swap responsibilities making the safety fit the C gap and the corner play all of #1. We feel having a corner trap to the field is not putting that player in a successful position, so we allow them to communicate the switch.

FREEING UP LB’s: I made our Mike linebacker the free player in this formation. As mentioned previously, he will scrape over and fix any misfit defensive lineman or linebackers while maintaining the responsibility of being the spill player. No matter where the extra RB inserts himself in Diagram #1, we will have our middle linebacker there to fill the created gap or be the extra fitter in the box. Our overhang (Nickel) is a force player responsible for the C gap along with the DE to his side. Depending on what plays you get you may choose to keep him out of the gap and place him outside the #2 WR. Again, having a system that allows you the flexibility is something I thoroughly like about this scheme.
Read More

Practice Planning One Word Tempo Packages

By Patrick Cotter
Head Coach/Offensive Coordinator
Fairbanks High School (OH)
Twitter: @CoachPCotter


During my career as an assistant coach, coordinator, and now a Head Football Coach, I have attempted to mold what we do to the athletes we have. When I came to Fairbanks High School in 2015, we were talented but needed to dedicate time to our fundamentals. So, to do that we installed a simple inside zone scheme with some wrinkles and increased our no-huddle tempo to a speed I had never attempted before. This took time, but paid off, I inherited a 1-9 football team and in 4 season our boys were conference champions and earned the school’s first trip to the playoffs in 11 years. The one-word concepts allowed our players to play fast and think slow while doing our most fundamental plays and formations. What I love about installing these concepts is that you can mold it to anything you run, Wing-T, Spread, Veer, it doesn’t matter. If you are no-huddle or huddle you can use these concepts to change tempo and gain an edge at different times in the game.


Choosing Plays/Formations to Use

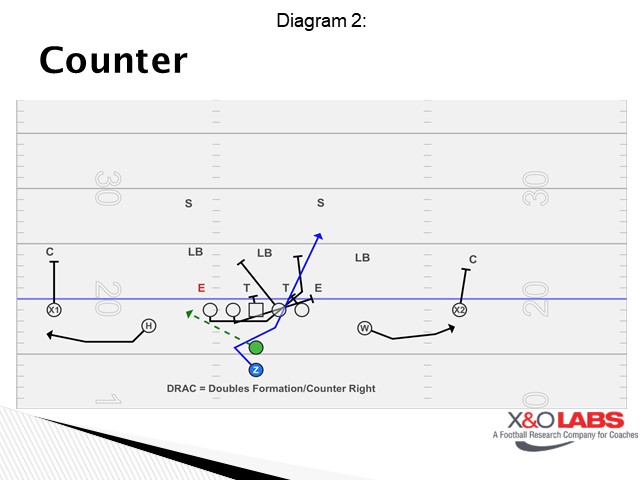
When I installed these, I didn’t want to overload my players, I adapted this from Chip Kelly when he was at Oregon and refined them with the help of Mike Yurcich when he was at Oklahoma State. But, in college they have way more time with their players than we do in the preseason, trying to package everything we do, just is not possible. So, our staff decided to use two blocking schemes and two formations to incorporate our one-word packages. We chose our inside zone scheme and our counter scheme; these were the first two blocking schemes we installed those years, and our kids knew them the best and did not have to think when running them. With both of these concepts, we attach bail-out passing options for your quarterback. This allows us to be multiple with only one call. I would suggest using plays that you feel most comfortable with, if you are a Wing-T team and a trap is your best play, use it. Don’t overthink it and don’t try to get cute, do what you do best.


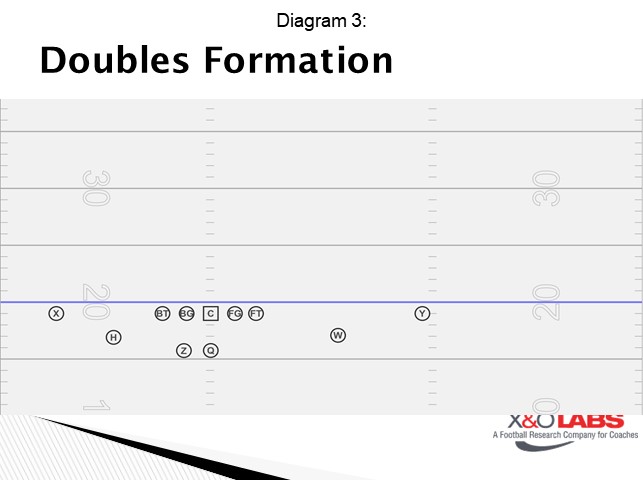
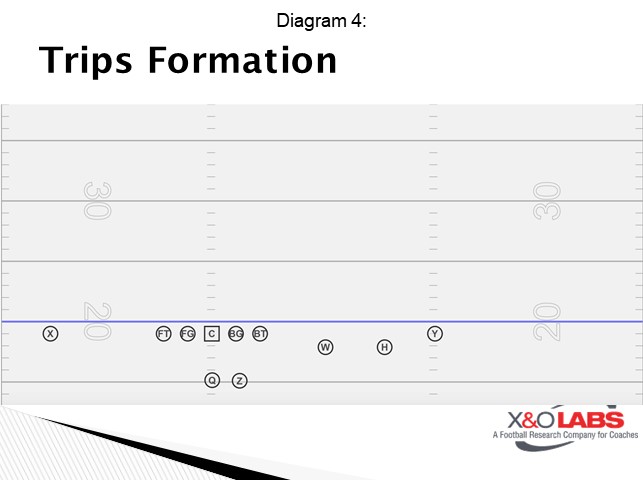
Next, we chose our two formations to marry to these schemes. We used our base doubles and trips formations because these are the formations, we used the most at the time. I have used under center formation for this in the past. Use the formation you use the most because defenses know you use them the most and you can do the most out of them and it forces them to become quite simple with their defensive calls.


Another version of our one-word packages is to marry a run scheme with a pass concept. We run these combination packages with only one run scheme and one formation while attaching a small group of passing schemes. For our one-word run/pass packages we used our empty formation to get more spacing and stretch the defense so we can play in space. For instance, we will use our inside zone scheme to the boundary with our quarterback and run a quick pass scheme to the field and boundary, such as bubble, hitch, or stick. These allow your quarterback to make the defense wrong all the time. We will teach our quarterback to count numbers, 5 or less in the box = run it, 6 or more in the box = throw it. We tried to make it quite simple and allow our quarterback to quickly identify what he needs to do.

Read More