Developing A Comprehensive Screen System

The first part of my screen series will be describing what each of the screens is. We all have different terminology so I will briefly explain what we use at my school. I didn’t invent this, it is TFS terminology, we might have some slight tweaks but this is how we call our screen game.

We call our screens both by number and by name. In terms of numbers, screens at 40s/50s.

  • 40 to the Right
  • 50 to the left

The second digit describes which skill player is getting the ball.

  • 41/51 = #1 WR
  • 42/52 = #2 WR
  • 43/53 = #3 WR
  • 44/54 = #4 WR

The number by itself indicates who is getting the ball, what direction, and if no tag is used it is the first screen in our screen series which we call QUICK SCREEN.

Quick Screen and Bubbles

A Quick screen is also known as fast screen or hitch screen. #1 WR foot fires 2 steps up field, comes back catching ball behind LOS and reads his blocks.

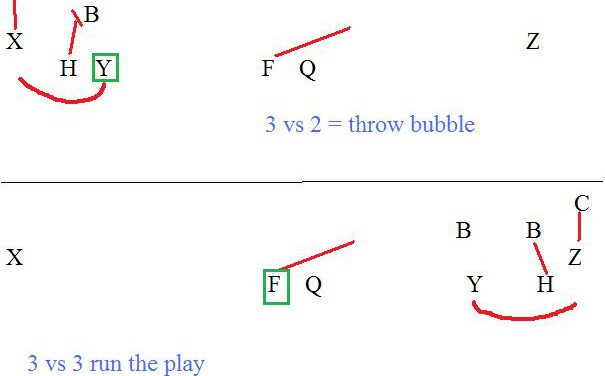
Now we have adapted from traditional TFS for the other WRs on quick screens. I didn’t like #2 and #3 WRs on the quick screens, so we modified it to make them automatic bubbles. So a 42,52,43,53,44,54 are all bubble screens. The called WR runs the bubble, the other WRs stalk their man. We only run bubble when we have a numbers advantage (some teams only have 2 players out there to cover trips) or if we see OLBs who are cheating to stop run and they aren’t honoring our inside WRs.

Solid Screen

Solid is almost the same thing as quick, except with a run fake opposite the direction of the screen first. We can call this play as Solid Rt/Lt. Or by saying 41/51 Solid. Number explains the player and the direction, the “Solid” tag explains that its our solid version of the screen.

Jailbreak

You can probably guess, Jail Rt/Jail Lt. or we can say 41/51 Jail.

Jailbreak is a screen to the outside WR, he will push it up the field further than quick, OL pass sets and releases, QB will pump one way retreat and throw the jail. I have seen some guys refer to this as a tunnel screen. This is my favorite of our screen plays because most teams buy the pass look we show from all 11 guys, blitzers are rushing hard, coverage guys are dropping off getting deep, and then we hit this and get our whole Ol in front leading the way. It was a great play for us this year, our varsity team’s best play this season.

Slow Screen

Slow screen is your typical RB screen, he sets up to block, kinda rolls off and catches the screen. We didn’t run this screen a ton, but more on that later.

So now that I have introduced the basic terminology we use and what each screen is, I will go more in depth into the individual techniques of each screen.

break

Here is how we use the skills talked about in part 1.

Quick Screen:

The #1 WR (widest WR) to the called side foot fires, a lot of exaggeration from arms and feet, really want the CB thinking he has to get deep. He should go about a yard up field, then come back to catch the ball where just behind the LOS. My biggest piece of advice here, is repping the screens live in practice, so he gets used to cutting off his blocks and finding lanes. We allow them to come inside a few steps to let their blockers get in front of them, but it hits best when they get back outside after this. On these WR screens are best long gainers, were when the WR dipped in (behind an OL or WRs block, then got up field or back outside)

Slot WR(s) : The #2 WR has the rule of #1MDM, or most dangerous man to making the play. If he sees a very tight corner then that corner is the most dangerous man and our #2 WR must block him. If the corner is soft and the OLB over him is playing tight then that is the most dangerous man. If both guys are playing soft he will slow play it, going half speed off the LOS looking for who is coming downhill to attack the screen first.

If we are in trips and have a #3 WR he then blocks the second most dangerous defender. We work everyday drills in practice with the WRs recognizing who is picking up who based on their depth.

RB: Original TFS stuff has the RB also getting out on the second defender play side, but ours never really did anything, my Ol were better blockers so I eventually stopped releasing them to block from the backfield. I would either move them out to empty so their path is shorter, or if they are in the backfield they just step up in case somehow someone comes through completely untouched and can possibly fluster the QB.

QB: Grip it and rip it… that’s really it. It is called quick for a reason, he throws it as soon as he gets it. With a kid who has bigger hands I think he can get away with not even getting the laces and just getting it out. I tell my QB to throw the ball to where the WR starts out pre snap. If they throw the ball right there, the WR (after going up and back) should be in the perfect spot to catch the ball.

Bubbles:

Bubbles are fairly simple for the skill guys. We run these to our #2 and #3 WRs, as well as to the Rb out of the backfield.

Called WR runs the bubble route which I teach as follows:

  • Align a little deeper than normal for easier window for QB
  • Cross over step toward sideline on the snap
  • Lose 1 yard on first step
  • Run flat down the line after that
  • Shoulder North/South
  • Head Turned back to Qb

I dont like big looping bubbles, QB has to be extremely accurate and lead the WR just right. We align deeper and lose 1 yard off the snap so we have more depth, makes QBs throw easier. Then we run (kind of a cross over type run) toward sideline, since ou shoulder are square Qb can just throw the ball aiming to throw it in front of the front shoulder, once ball is in the air it is easy for the WR to adjust. Very effective and I don’t recall my team having a single incompletion on bubble all year.

QB: Similar Grip it and rip it idea, key is aiming for bubble man’s front shoulder.

Other WRs: Stalk your man

Read More

Simplifying Film Study for the Post Season

By Jeff Minter

Columnist

X&O Labs

Editors Note:  Since 1998 Coach Minter has served as a head coach, coordinated all three phases of the game, and worked with the defensive line, offensive line, linebackers, quarterbacks, and wide receivers. In the past few years, Coach Minter has become one of the most popular and respected coaching bloggers on the web and is excited to be a regular contributor for X&O Labs.

Playoff season has arrived and with it comes more pressure, more responsibilities and in many cases unfamiliar opponents.  Each of these factors makes it crucial for coaching staffs fortunate enough to be in the playoffs to have a detailed plan on how they plan on studying their opponent with the added time constraints and pressures.

The key to successfully navigating your post-season film study is simple…WORK SMARTER NOT HARDER!

In reference to coaching and film study this does not mean you can be lazy. You still need to put in the time. However, by prioritizing and organizing how you study film you can reduce the hours you put in allowing you to deal with all of the additional variables that come with post season play.


Delegate to Dominate


The best you can, delegate the film study by position group. Doing this not only empowers more coaches and helps them understand the opponent, but it also allows for more depth of study at each of the given positions.

Read More

Winning the Passing Game With Press Technique

By Zach Cunningham

Secondary Coach

Harrisonville (MO) High School

Editor’s Note: Coach Cunningham currently serves as the Secondary Coach at Harrisonville High School in Missouri. This is his 4th season at Harrisonville, and prior to that he served in the same capacity at William Chrisman High School in Independece, Missouri. Coach Cunningham played his college ball at William Jewell College in Liberty, MO. 
I want to first start by thanking X&O Labs for the opportunity to write about Press Technique. I also want to take a quick moment to thank the coaches I have worked with in the past and especially those in the Kansas City area for their experience and support. Lastly I want to thank all of the players that have played for me for their talent and effort throughout the years.

I have spent the past three seasons as the Secondary Coach at Harrisonville High School, which is located outside of Kansas City, MO. On defense we play an attacking 3-4. We blitz 90% of the time, so we are in man-to-man coverage 90% of the time, mostly with no safety help.  Our opponent completion percentage last season (2011) was 28.7% and in 2010 was 32.4%. When we blitz we feel playing man, instead of zone, allows us to dictate what the offense can and cannot do.

There are many benefits of press-man coverage. It disrupts the timing on the routes, and with us blitzing 90% of the time the ball will be out of the quarterback’s hands quickly. We like press-man coverage for three man reasons:

  1. It allows the defense to put more guys in the box.
  2. It closes the space between the receiver and defender, which tightens the window for the quarterback to throw into.
  3.  Wide receivers just don’t like being pressed off the line.

Alignment/Stance

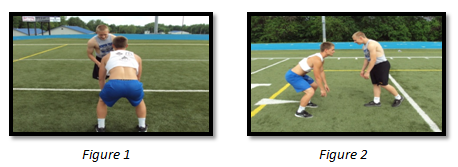
Alignment and stance must be addressed first. Everything in the following report will be discussed out of a Cover-0 look. When we are pressing, we will align with an inside shade (defender’s nose to receiver’s inside ear) (Figure 1). I like to use the nose-to-ear as a starting point because it allows my defenders to have a comfortable base with their feet. Some players are naturally wider and longer than others, and some guys are quicker and more explosive with a wider stance. We want to squeeze the line of scrimmage as much as possible, or get as close to being off-sides as we can if the wide receiver is ‘on’ the line. If he is ‘off’, we will align further away from the line of scrimmage and move inside more than usual. I want our defensive backs in a comfortable stance: knees slightly bent, butt behind, eyes up, arms loose (Figure 2). Putting the butt behind the defender allows more room to keep the receiver in front of the defender. It is going to take more steps and work for the wide out to get behind the defender.


Technique:

This is where we will win or lose on the route. I like to teach playing press in two phases:

  • 1st phase is the initial contact and the first 3-5 yards of the route.
  • 2nd phase is route progression and playing the ball.

1st Phase:

1st phase is usually won or lost on the line of scrimmage. Many coaches teach the slide step and off-hand jam. I prefer more of an attacking method with a punch/counter-punch (p/cp) into the off-hand jam technique. We are already aligned inside the receiver. I teach this to take the inside away and put the defender between the QB and receiver. When we punch/counter-punch (p/cp) our first step is forward with our inside foot. (See figure 3) . This step is not a big one, it’s more like a 6 inch step with the inside foot forward. Simultaneously we will “punch” our inside hand to the inside chest-plate of the receiver. This takes away the inside and forces the wide out to go one direction. The key to this is to not lunge; but stay balanced with a solid base or risk being out of phase within the first step. The second step will match the release of the receiver (outside or inside). The defender’s other hand will “counter-punch” to either the outside chest-plate (outside release) or shoulder (inside release) (Figures 4-5).

Read More

3 Tips to Create Special Teams Buy-In

by Abe Mikell

Assistant Football Coach

Stuarts Draft High School (VA)

A while back, I was talking with a fellow special teams coach about his team and he mentioned that he was having trouble getting buy in from his kids and his fellow coaches.  The more I thought about it and the more gamefilm I watched, I realized that this problem is probably much more common than many of us “special teams nuts” might want to admit.  With that in mind, I compiled a few tips to help you super charge your special teams by increasing “buy in.”

Tip #1:  Involve All Coaches

First and foremost, your head coach needs to take an active role in coaching special teams. He sets the tone for the team so his involvement and energy are a must and show his support for what you are teaching.  Our head coach runs most of the scout teams, except for scout kick off, because he has a position to coach on kick off return. Our scout teams work well. It may be that he can motivate them to try hard simply because he is the head coach.

With the head coach on board, you can now delegate position coaching responsibilities to each additional coach.  During the preseason, they are responsible for teaching the technique that their position will use to execute their assignment. During preseason camp we work 1-2 phases a day and the coach will get 5-7 minutes with their positions. We will also do circuits to work on specific phases and skills, and the coaches are responsible for stations in the circuit. We have 6 coaches on staff, and 4 are used on each special teams except for kickoff, and then everyone is used except to head coach. He has scout kick off return.

I am the coordinator, which means that I design and teach the schemes to the players and coaches. I am also responsible for creating the scouting report during the season and planning how to use the time for special teams during the practice day. I also adjust the depth charts during the games and for the upcoming week based on input from the “position” coaches.

Tip #2:  Manage Your Player/Personnel

Many teams treat special teams far differently than their offense and defense.  They post depth for O and D and give detailed scouting reports but then give the bare minimum when it comes to special teams.  By using this method, you are creating the perception that special teams are not that important and that they don’t deserve that much time and focus.

We counter this perception intentionally through the way we communicate and manage our players/ST personnel.  We usually have a relatively small squad, but one of the most beneficial things that we have done is to create a special teams practice squad. We use this much more in the early part of the year and in preseason. For each team, I have a 2 deep depth chart and a scout team. Ideally, it would work like this: The starters on punt would be your scout team punt, unless they are on the 2 deep for punt return. Your starters on punt return and your scout punt return unless they are on the 2 deep.

The guys that are left over go with the coaches who don’t have a position responsibility. They can work on whatever they want, football skills, whatever. Most of the time these guys will be your offensive line. The only special teams most of them will be on is PAT/FG.  By working them during special teams time, we are making sure that players don’t see special teams reps as an opportunity for a long break on the sidelines.  This encourages participation across the board.

If your personnel are not getting it done, fire them. I feel like I prep our kids well. This year, I post the weekly scouting report and depth charts for the team to read on a board in the locker room. It is their responsibility to see and read it, especially the depth/personnel. I still go over and communicate any changes, but this way they get it more than once.

By the way most of our subs this late in the season have played on that special teams at some point in the year, they made a shift up or down the depth for one reason or another, usually injury.

Tip #3:  Practice Plan for Success

I think you need 15-20 min a day, period. Early in the year, our head coach was forgetting to give any time on Mondays to special teams. It showed in our production. We sucked the 1st couple of games, and he knew it. He gave the time back. Be organized in your time. Try to get as much done in your time as you can, but still be clear in your communication, don’t rush too much. During the season, here is our schedule.

Monday: 10 min punt/10 min punt return. On each, I go over the game plan and adjustments for 3-5 min then 5 min or so of team reps. Half are live and ½ are 15 yd cover or punt blocks. I try to get subs in, but it doesn’t happen much. Punt Block time is diminishing due to a small, but helpful adjustment I made. The defense is our punt return, but we will sub in 3 defensive line to get speed/fresh legs on the field.

Here is how we manage our time to ensure we are prepared for gameday:

Tuesday: 4 reps punt, 8-10 min KO, 7-8 min KO Return. Punt reps and fast and rapid. This week we had to work on getting on the field and executing a punt in under 17 secs including shifts and motion. KO: 3-4 min review and scout then ½ the reps are to15 yard coverage, then ½ are full speed. KO Return: 3-4 min review and scout then ½ the reps are to contact, then ½ are full speed.

Read More

Equating Numbers with Empty Pass Protection

By Rich Alercio

X&O Labs Offensive Line Columnist

Editor’s Note: As an Insiders member, you get access to Rich Alercio’s Concept Blocking System which includes 5 reports and 2 full-length videos (shot in HD video). Click here to access the Concept Blocking System.

“Who do they think they are the New York Jets?”  You may recall that line from the Disney classic “Remember the Titans” when Ed Henry’s offense showcased an Empty formation (then a rarity) in a high school state championship game.  Five receivers gave the Titans fits in that game and it is still causing problems for defenses today.

Offensive coordinators can be on the board all day devising route combinations for five receivers but what they must first learn how to do is protect the passer.   Sure, you can only block five but you can account for many more.

While it is not the intent of this article to discuss receiver play, it is important to note that they must become involved in site adjusting or running hot routes off of second and third level blitzers.  Blitzes vs Empty formations can leave huge voids in the defense.  We will address blitz protection a bit later.  For now, let’s start with the base rules.

We will utilize a Man protection scheme with combinations to potential blitz threats.  We are Big-on-Big (BOB) in our blocking scheme.  The O-Line is responsible for all down linemen and Inside Linebackers.  In other words, they have the box.  If an offensive lineman is covered by a defensive lineman, he is responsible to block him. Any Uncovered lineman will check to block  Linebackers.  It’s as simple as that- at least to start.

Empty Pro vs 4-3

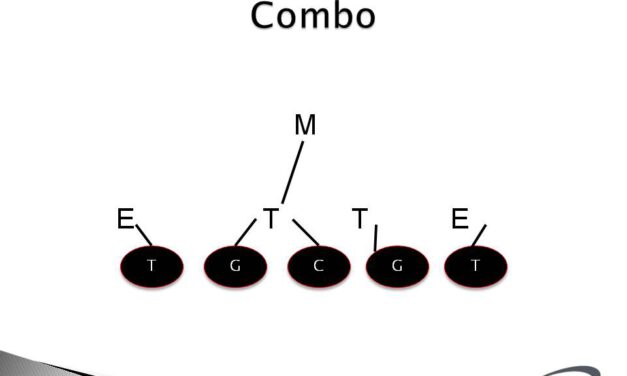
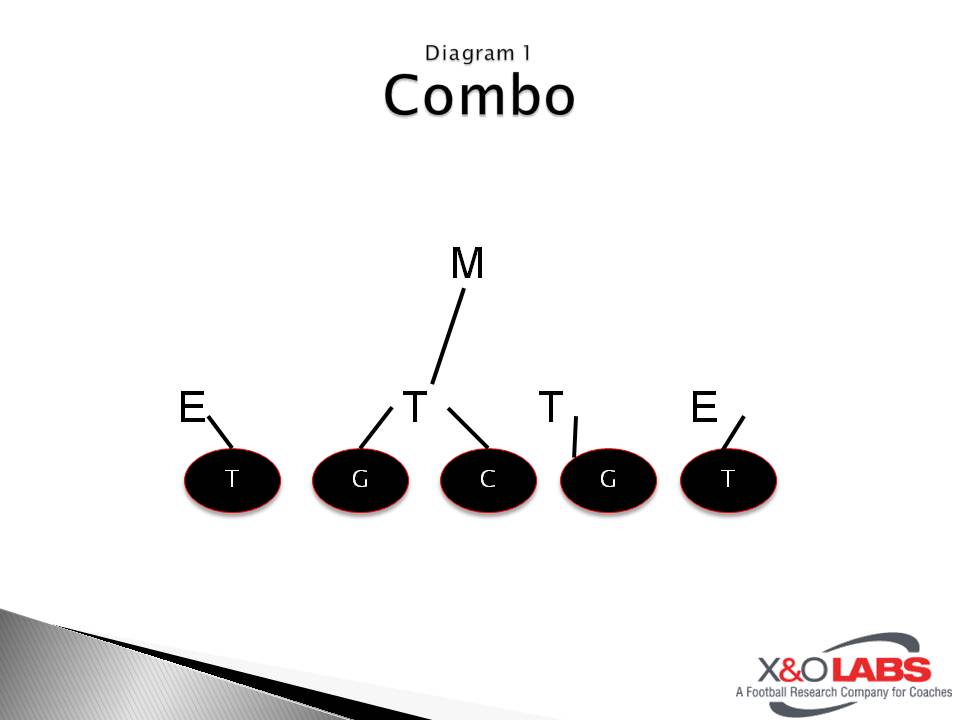
The 4-3 front is the cleanest and easiest to protect in empty.  The four covered OLs have the four defensive lineman. The one uncovered OL is responsible for the MLB (Mike LB).  He can either call a combination with the near interior lineman (Diagram 1) or set back to the “hole” to block him solo (Diagram 2).


If the Center is the uncovered OL, he has the Mike and can either set back to the hole or combo with the Guard who has the 2i.

Read More

Mid-Season WR Drill Series

By Sam Nichols

Managing Editor

X&O Labs

By the mid point of a season, most coaches know what they have to work with.  They know the strengths and weaknesses of their players and they have been able to see those qualities on the field in different situations.  The difference between most coaches and great coaches is what they do with this information.  In other words, how do they address the weaknesses of their players mid-season to help them continue to develop and grow as players.

I have found that one of the best ways to respond to the mid-season assessment is to go back to drills that specifically work on areas of weakness.  I build in drills that incorporate multiple points of emphasis and concentrate the players on the fine points of the skills.  If done well, I will see the players get over the mid-season plateau and continue to progress into the post-season when the details matter even more.

With that said, here are a few drills that I like to use on a weekly basis during the second half of the season to meet the goals stated above.  These are not earth shattering concepts, but they are crucial to success within our offense.

Drill #1:  Hitch Cut Drill

Purpose:  To rep come back routes (hitches, curls, and comebacks) through practicing cuts and catches out of the break.


Procedure: 

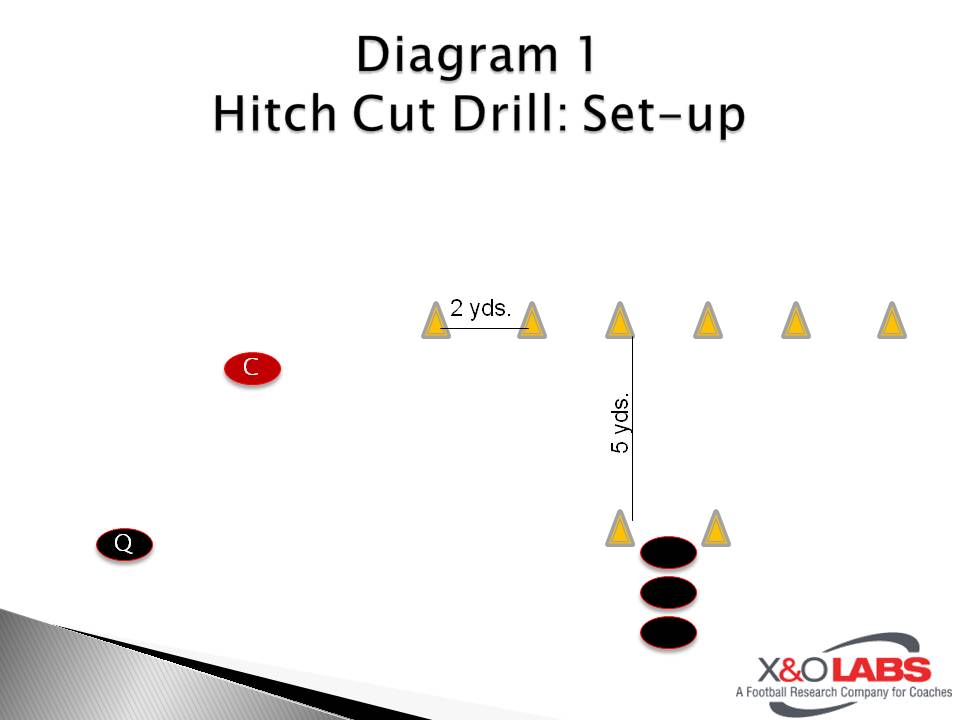
  1. The drill requires 6 cones set up 2 yards apart five yards down field from the starting chute (diagram 1).  Note:  It is best to have two such groups if possible to increase reps and allow you to work the same cut on both sides of the center.
  2. On “hit” the first player in line will run a hitch route and comes back to the QB through the next window to the inside.
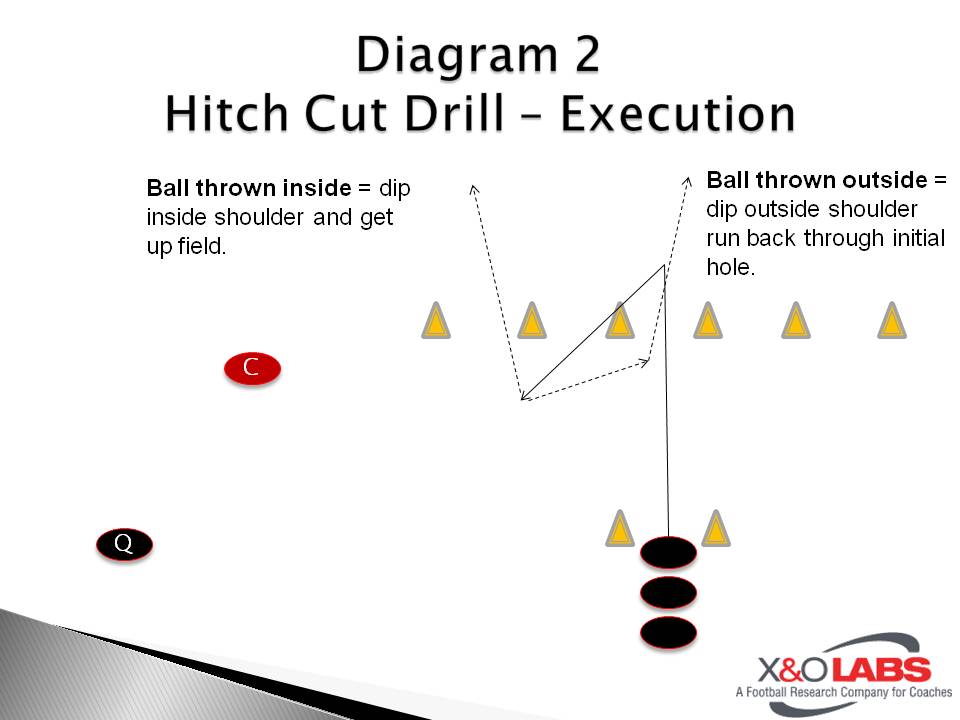
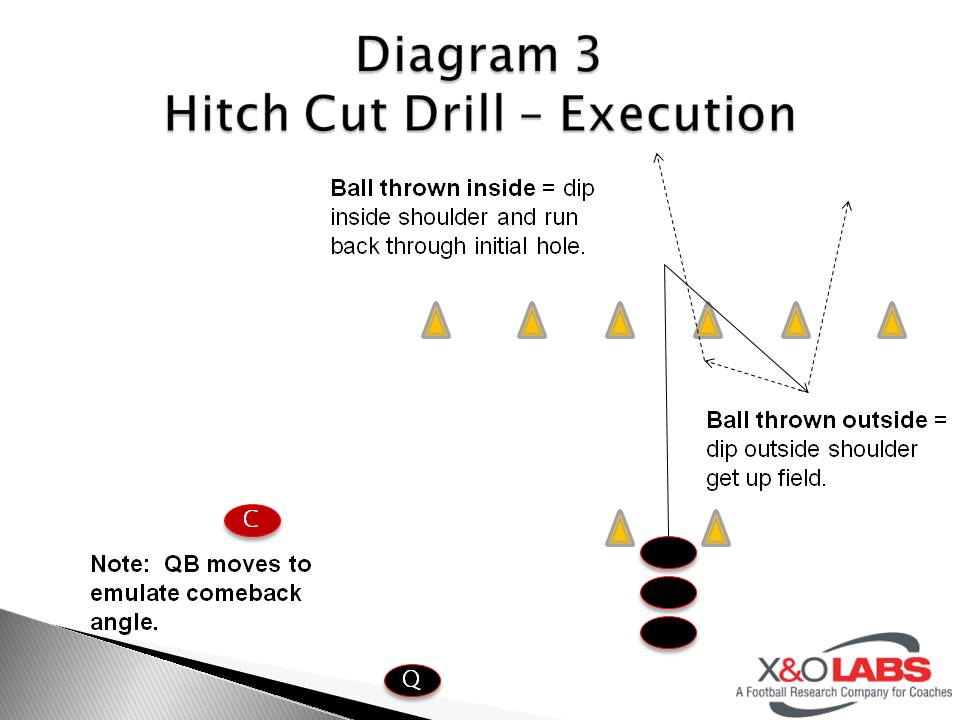
  3. As the WR cuts, the ball should come out and the WR should continue to work to the ball until it hits his hands.  At that point, he will dip the shoulder to the side that the ball was thrown to and run straight up field through the nearest window (diagrams 2 and 3).
  4. Players run the drill cutting inward in both directions and cutting outward (comeback or stop cut) in both directions during the time allowed.

Coaching Points:

  1. Sink hips into each cut and flash your hands.
  2. Keep your feet under your body and cut off the inside of your foot.
  3. Hands and eyes should come round together.  Give the QB a target.
  4. Catch and tuck the ball in the arm closest to the QB at the time of the catch.
  5. Explode up field and do not try to dance or juke.
  6. Make sure the ball arrives right out of the cut.

Read More

Perfecting Your Pass Rush Progression

William Lund, Defensive Line Columnist, X&O Labs

By William Lund

Defensive Line Columnist

X&O Labs

Sacks, QB Knockdowns, Interceptions, forced fumbles, incomplete passes and general disruption of the quarterback are the reasons a pass rush is so critical to the overall defense. These negative plays are potential momentum shifters in a given game and are created by a relentless unyielding pass rush.

Pass rushers come in all types and abilities. I believe it is paramount that a pass rusher establish a level of physical dominance first to set up the primary of pass rush moves in one’s arsenal.  If the offensive lineman believes he is in for a physical battle established early in the game, when you need that critical move you have a greater chance to hit it at the crucial time.

I believe a great pass rush starts and ends with the Bull Rush. It’s not flashy and sounds simplistic to coaches, but rushing the QB is not about moves, it is about attitude, relentless all out attitude. Your Bull Rush establishes the physical onslaught the OL is about to endure. The natural reaction of the Offensive Tackle is to set and brace for the violent attack and punch he will receive the majority of the game.  As the game progresses your speed moves will open up and become more effective. When the offensive tackle sets his feet in preparation to absorb the punch, you can change up and speed around the corner. With this subtle change up he has to adapt to your speed and you are better able to use another violent punch back to power as he “soft sets” back.  The key is to read the offensive lineman’s pass set, you want to look for him to turn his hips and shoulders to the sideline and his chest to come up exposing himself to a violent punch dropping him right on the QB’s lap. Even if you are a speed rusher you can set up your best rush move more so by establishing a physical nature in your pass rush by utilizing a Power/Bull Rush.

Read More

3 Fire Zone Blitzes From the Under Front

By Eric Jones

Defensive Coordinator

Roy High School (UT)

Eric Jones, Defensive Coordinator, Roy High School (UT)

Editor’s Note:  Eric Jones played for Weber State University in Ogden, Utah. After college he spent 5 years as a Linebackers coach and Special Teams Coordinator at Woods Cross High and Syracuse High. Last season was his first year as a Defensive Coordinator at Roy High School in Roy, Utah.

In this clinic report, I’ll be describing our approach to installing and using fire zones within our 4-3 defensive scheme. First, we base our defense primarily out of the Under front.  All of our fire zones, which I call Dogs, are used from the Under front. I prefer strongly to run my Dogs when the ball is on a hash mark. This doesn’t mean they can’t be run from the middle of the field, but I’m more comfortable when the ball is on a hash and I’ll explain why in later in the article. I’m all about simplicity so we only install three fire zones. However, using a simple tag word for each Dog, we can show up to 6 Dogs without much hassle to the original three. We run a Field Dog, Short Dog, and Pipe Dog. I’ll detail each below.

Field Dog

Field Dog (the common NCAA fire zone) is my favorite Dog in the litter. It’s simple, effective, easy to teach, and safe to run. With the ball on a hash mark, I’m always looking for situations to bring pressure. I won’t blitz much if our “base” defense is getting the job done. However, I’m not shy about blitzing if we need a momentum play or simply want to keep the offense on their toes. Some basic rules for our fire zones are as follows:


1) We always declare strength to the field.

2) The DL always slants away from where the blitz is coming from.

3) The boundary side DE is always the dropping lineman.

4) The blitzing LB’er will always blitz the gap originally covered by the DT on his side.

My huddle call would be “Under Field Dog 3.” We call it Field Dog because the pressure is coming from the wide side of the Field. Therefore, the DL will align in an Under front and slant one gap away from the Field. I know this is contrary to many fire zones out there. The current lingo with many universities involves landmarks such as Long Stick, Radical Slant, Hot, Inside Rush, and Outside Rush. That’s how I learned them in college but I’m not comfortable using those concepts with high school kids. So we simply slant one gap away from the call. That means the field side DE slants from his 5-technique to the B-gap inside of him. The Nose slants from the field side A-gap to the boundary side A-gap. The 3-technique Tackle slants through the inside hip of the boundary side OT and continues working for contain. The boundary side DE takes 1-2 read steps up field to decipher run or pass. If he reads run, then he plays run by setting the edge into the boundary. If he reads pass, then he drops into the boundary side flats. His goal is to take away the quick passing game to #1 and then react up the any swing routes by the back into the boundary.

The two blitzers that are active with Field Dog are the Sam and Mike linebackers.   The Sam is blitzing outside the EMLOS from the field side. He aims at the deepest shoulder of the deepest back and must not let the ball or QB get outside of him. The Mike backer is blitzing through the field side A-gap where the Nose is vacating. For coverage rules, both Corners are playing a press-bail technique. They align pressed initially and bail to a deep third during the cadence. We aggressively squeeze slants and posts. Anything that releases hard inside we will back off and play over top of #2. The Strong Safety becomes the Curl/Flat defender by replacing the blitzing Sam backer. In our base Cover 3 scheme and in our Dog scheme, our Curl/Flat defender uses the SCIF (Seam to Curl to Flat) technique. That means the SS will align and play off the #2 receiver to the field side. The SS will play #2 man-to-man on any vertical or outside releases. The SCIF defender can release any shallow inside route to the “Gut” defender. If he releases the hard inside route, then he’ll zone off underneath the #1 receiver. The Free Safety rotates to the middle of the field and plays the middle third. He’s a typical middle third defender and aligns over the #3 receiver in the formation.

Read More

No Huddle Communication

By Dan Ellis

X&O Labs Columnist

Dan Ellis, X&O Labs Columnist and Head Coach at West Chester East High School (PA)
Editor’s Note: Coach Dan Ellis is one of X&O Labs’ most popular monthly columnist.  His columns focus on offensive schemes that just flat out move the ball.  His previous post have been some of the most read and commented articles in X&O Labs’ history.  Ellis is the former record-setting quarterback at Virginia and currently serves as the Head Football Coach at West Chester East High School (PA).  And one of the best things about Coach Ellis is that he takes the time to answer any and all questions asked. So, if you have any questions after reading his column, just post it in the comments section below this report and Coach will respond shortly.

As a no huddle team, one of the things that I have thought about is the best way to operate and communicate in a no huddle.  We have tried two different ways to do it, using wristbands and using signals.  The key thing that we have found through experience is to make sure you have a good philosophical reason behind your no huddle and make sure your communication works with that philosophy.

Start Slow

Our original philosophy behind going to the no huddle was to make the defense adjust to us.  We felt that we could get the defense to line up in a specific way and then exploit it.  Our goal was very simple and so we used the wristband as our original means of communication.  We were moving from an offense where we used a lot of formations and motions, and using the wristband allowed us to keep some of that.  The means of communication was a player with a white board and a marker.  Some people we studied used flip numbers.  We used the white board because we thought it was easier.  On our wristband, we had it sectioned off into a run game section, quick game section, drop back section, and tricks.  It consisted of about 80 plays total.

Read More

4 Factors in Designing a Red Zone System


By Ed Zaunbrecher 

Editor’s Note: Coach Zaunbrecher (EZ) coached 34 years at the FBS level, including a three-year stint at Marshall as the Offensive Coordinator where he tutored QB Chad Pennington and Byron Leftwich and spent a five-year duration at the University of Florida in the same role while developing Rex Grossman.  He currently runs the Ed Zaunbrecher QB School (http://www.ezqbcoach.com) developing young QB’s into leaders. 

Step 1: Know the Tendencies of Your Defense Opponent

Ed Zaunbrecher, former Offensive Coordinator, University of Florida and University of Marshall
 

Most coaches know that in preparing a game plan for the red zone it is crucial to study the upcoming opponent to see what they do on defense in that area of the field, but even that concept is not specific enough. You must understand if they do change and where on the field those changes begin. These areas and concepts vary from team to team and are not etched in stone.

I always like to start the study at the 25 yard line. The first section of the red zone continues through the 13 yard line which we’ll call the ATTACK ZONE. This area can show the attitude of a defense if they make drastic changes. Some go from not blitzing to major blitzing to make a big play and switch momentum. Depending on the time left and score, it could be to keep you out of field goal range. Other teams stop blitzing here and try to make you earn your way on a short field. There are usually not defenses specifically for this area but rather how and when they are used.

The SCORE ZONE starts at the 12 yard line and extends to the 4 yard line or wherever the opponent likes to go to a GOAL LINE defense. If they never go to a heavy package it goes all the way to the goal line.  This also applies for two-point plays. This area of the field does have a higher chance of getting a defense special for the situation. Many teams are playing some variation of quarters coverage by playing 7 players across. The 12- yard line is the farthest out they play the coverage because the depth of the end line gets too great. Most teams will wait until the 10 yard line. You need to observe how they play the coverage if they do. Some drop to specific spots such as 2 yards deep in the end zone while others use more of a matchup zone principle.

Step 2: Determine the Essential 6 Questions

When designing your red zone offense, there are several questions you need to ask yourself when putting your game plan together.  The questions I would always ask are as follows:

  1. Do they load the box? If you spread the field, will they spread as well? If so, you may gain an advantage in the run game. If they move in tight you could get the ball wide.
  2. How much are they stunting the line? Will it be feast or famine if they take too many chances? See if they have a pattern against certain formations.
  3. Do they disguise their defense? See if a pattern emerges from your study. Some never play what they line up in and others always do.
  4. Will they take chances? Some are overly cautious and some go only for the big play with numbers of defenders and max blitzes.
  5. How do they play within their coverage schemes? Do the deep defenders play tighter or react faster to play action fakes? Do they back up at all? Do they play any man coverage and how do they play it? Do they flood the end zone with defenders?
  6. What have other teams done well against them? Which types of schemes have they stopped? Adjust your plays to fit the opponent if necessary.

Some teams change week to week so go more by what they do against teams similar to yours above the rest. What they do against a spread team might not matter if you are a wishbone team.

Step 3: Design Must-Have Offensive Concepts

Once you have completely scouted your opponent’s tendencies in the Red Zone, now it is time to develop your “menu” of must-have concepts to attack this area of the field.  Although they are certainly not limited to the selection I include below, in my experience I’ve found that utilizing these types of ideas can produce big-time results.

  1. To start with, have plays especially designed for this area of the field. This is more important in the SCORE ZONE on in to the end zone. Of course, you can vary how you get to them with motions, shifts, etc., but I would practice them weekly so your players know them inside out.
  2. Be able to attack all basic looks, not just the ones they have shown before. They are allowed to change to try and stop you. Prepare for looks that have worked well against you recently.
  3. Have a new wrinkle or two each week. It can be the same play from different formations or motions or it can be a variation off a favorite play of yours like a new misdirection. Just have a surprise ready.
  4. Don’t let your opponents relax by changing your tempo. Go on long counts but not when a penalty will kill you. Change personnel or use a different formation but run the same base plays. Practice these as you will use them in a game. Don’t try and surprise your players.  Give them some familiarity with what you’re doing.
  5. Use formations to create space. Study a defense’s reaction to different formations and pick the best plays for their normal alignments. Have a plan if it is different. Your QB has to understand the concepts.
  6. Vary your receiver splits. This causes adjustment issues for the defense in their support patterns. Get them more worried about getting lined up than reading their keys or using good technique. You can also vary the splits of bunch and stack formations that are especially good versus man coverage.
  7. Work few runs and get proficient with them. Use plays you are good at running and then the players will have great confidence in them. Have your play action passes off the same looks.
  8. Know when a defense changes concepts. Better still, make sure your players know when to expect the changes. It is not an exact science but most teams do have tendencies by yard line or down and distance. It is important everywhere but especially when points are at stake.
  9. Give the QB a chance to create a score either by run or pass. If you drill the same base concepts weekly it really helps the QB more than anyone. He makes better decisions that way.
  10. Against man coverage protect the QB and attack with your best receiver matchups. If you have trouble with releases use bunches and stacks. On stacks I prefer to offset the deep receiver about a yard outside the one on the line.
  11. Against zone coverages use levels to work in front and behind a defender so he cannot be right. You can use 3 level routes farther out and 2 level routes in close.
  12. Occupy the safeties then go over their head. This is relevant all the way from the ATTACK ZONE in. They tend to sit down since they don’t have as much depth to defend.
  13. Use play action to distort coverage. Open more space between deep coverage and underneath defenders.  Use boots and nakeds to take advantage of fast flow. Be sure to have quick throws available as well.
  14. Have at least one receiver going deep on each play. The more plays it takes to score the more there is a chance of a bad play to prevent a TD. Don’t force it but have it available.
  15. Is anyone peeking? Take advantage of a defender looking at the QB in man coverage. Beat him with a quick double move and be careful not to bring the safety over to the play too soon with your eyes.
  16. How tight is the coverage? School the QB on when to go deep or short by the cushion and matchups that are available on that play.
  17. From the 15 yard line in, the QB should be sure his throws to the front part of the end zone are down in front of the receiver. T

Read More

Read Coverage: Simple Quarters & Pattern Reading

By William Mitchell,

Head Coach,

Lewisville High School (SC)

As a grad assistant in the late 90s, I was introduced to a form of pattern reading out of a 4-4 at the IAA level. Later I was at a few places where we tried to run Quarters coverage. In both situations it never seemed to click with our players. Sure, it seemed simple to our coaching staff, but we never seemed to get the production from it in proportion to the practice time used installing it. As my career progressed, I began to embrace the 3-3 package and the Cover 3 / Man-Free concepts that fit so well with this front. But as the offenses we faced became more & more advanced and proficient in throwing the ball, I began to see the need for a change-up. What we eventually came up with is our version of READ Coverage.

Originally I wanted a way that I could turn my 2 inverts (We call them Spurs) loose to play 100 % run vs 2 RBs without telegraphing the fact that we were in Cover Zero. What we came up with is this:

The READ Technique

This technique is used by 2 defenders against 2 receivers. The way that we teach it to the players is by telling them that this is going to turn into Man coverage within the first 5 yards; we are just letting the receivers determine who has who. Once the defenders have identified their responsibility, they attack the receiver as if they are Out of Phase (using the Saban terminology). They drive at the proper angle (more on that later) and try to get in a hip to hip relationship with the WR.

The CB aligns at 7-10 yds deep over the #1 receiver. The interior defender (FS or Spur) aligns 10-12 yds deep over the #2 receiver. Both players will “Read” the #2 receiever.

We tell our players that #2 can do 3 things in the first 5 yards. He can go inside, he can go outside, or he can go vertical.

  • If # 2 goes inside or vertical, both players yell “Stay,Stay” and the FS takes #2 man to man and the CB takes #1 man to man. The FS may have to get on his horse and chase the Drag route but the LBs are looking to wall off anything coming across.
  • If #2 goes outside, both players yell “Switch, Switch” and the CB jumps the route of #2. The FS has #1 but he will take a cut-off angle to defend the go route by #1 first. (Since that can beat us the fastest).

Read More

Maximizing the Impact of Your Pre-Snap Reads

By Sam Nichols

X&O Labs

The “Pre-Snap” read is far from an innovative concept.  Every quarterback is taught to do it in some way as he prepares to run the next play.

The difference between “making a read” and “making a purposeful read” all goes back to teaching.  Coaches that tell the QB to “look at the defense and take what they give you” will find that this only works if you have a coaches son at the helm.  Furthermore, many coaches stop short of teaching the rest of the offense how to use the information that they gather in conjunction with what the QB communicates to maximize the potential of every single play.

For that reason, I have always found it best way to create consistency for all players is to have a standardized approach to identifying and communicating pre-snap information. This means we will use the same format every play for all positions.  Here is a look at how I have taught this concept.

What is a pre-snap read?

  • Definition:  A survey of the defense to determine the play / scheme that they are going to run.
  • Objective:  Identify their play to speed up the decision that we must make once the ball is snapped.
  • Result:  Allows us to better attack our opponents weaknesses and avoid their strengths forcing them to change their plans and giving us control.

From there, we outline for our guys what that means to them on a play-by-play basis.

What are they reading?

Every snap, the players will identify pieces of information that will define the defense and allow us to “play fast”.  This information is, of course, different for the various positions.  For instance, the Offensive line is very interested in understanding who is in the box, but they likely don’t need to be concerned about the depth of the corner.  To simplify this whole process for the players, we have broken down the diagnosis into four distinct areas.  They are as follows:

#1:  The Number of players in the “Middle”

The middle of the field is defined as the area from hash to hash and over tackle to tackle This read is basically telling the Quarterback and receivers how many safeties are involved in the defense allowing them to fit their routes, stems, and blocking concepts to fit that alignment.  It also helps us eliminate coverages and check into better vertical passing concepts.  The quarterback communicates the box information as part of the snap count.

#2:  The Number of players “Box”

The box is the area between the tight ends to the heels of the deepest linebacker.  This tells us how many players are dedicated to the run / are in a position for a quick blitz at the snap of the ball.  The line and backs need to be aware so that they can diagnose where their lanes and landmarks might be depending on the number of defenders and their arrangement in the box. The quarterback also uses this number to determine if the play can be run or if a check needs to be made to get us out of a bad play.

#3:  The Edge

The tackles, tight ends, and wide receivers must understand how the defends plans to play the edge of our alignment.  That means identifying and communicating the technique of the end man on the line of scrimmage and the force defender on that side.  This information effects blocking assignments and route angles.

Read More

Zaunbrecher: Developing QB’s Hands and Feet

An Exclusive Interview With Ed Zaunbrecher

Coach Zaunbrecher coached 34 years at the FBS level, including a three-year stint at Marshall as the Offensive Coordinator where he tutored QB Chad Pennington and Byron Leftwich and spent a five-year duration at the University of Florida in the same role while developing Rex Grossman.  He currently runs the Ed Zaunbrecher QB School (http://www.ezqbcoach.com) developing young QB’s into leaders.

X&O Labs Senior Research Manager Mike Kuchar was fortunate enough to conduct a two-part interview series with Coach Z.  Part two of Mike Kuchar’s interview with Coach Zaunbrecher, developing a red zone offense, will be published in next Tuesday’s report.

Mike Kuchar (MK):  What are 3 to 5 must have qualities for a successful QB at any level?

Ed Zaunbrecher (EZ): You need intelligence to make good decisions, pinpoint accuracy and quick twitch in that order.  You could play in a lot of different offenses if you’re intelligent.  If you’re accurate you improve your chances of completions against tight coverage.  You need quick twitch to be able to react fast enough to situations, both mentally and physically.


MK:  In your research, what is the ideal grip for a young QB on the football?  Why? At what point in his development would you change your QB’s grip?

EZ: As long as the middle finger is perpendicular to the laces and the size of the hand relative to the football will determine how far up on the ball they can grab it.  The fingers don’t want to be to the center of the ball, but if a player has giant hands they may be close to it (center of ball).  You want to have something to push against where the curve of the ball is.  The key thing is to make sure when you hold the ball, it’s still in the fingers and not in the palm of the hand. The other thing is not to grip it too tightly.  Anytime you compress the muscles to hold something tightly, you’re not fluid in your motions.

As far as changing throw patterns go, if they can repeat their motion and they are accurate with it, I don’t want to mess with them.  If they are not repeating it, then they have to work on setting the ball consistently.  If it’s a fifth grader who doesn’t know too much you’ll work on a few more things.  If you got a guy who is a senior and is already a good thrower, I’m working mostly with the feet and the head.  Some guys get in and set the ball differently every time they throw it so we need to work on that.  There’s a great drill to work on that.  Everyone has a mirror in the bathroom.  The kid puts a piece of tape down on the floor where he lines up and he practices stepping with the front foot and setting the ball.  He sets it in the right position and he gets another piece of tape up on the mirror at the bottom of the ball where it’s set correctly.  He will stand there in front of the mirror and step and set repeatedly.  I tell them everytime they go to the bathroom do ten of these drills.


MK:  What is the biggest mistake you see young QB’s make when gripping the football?

Read More

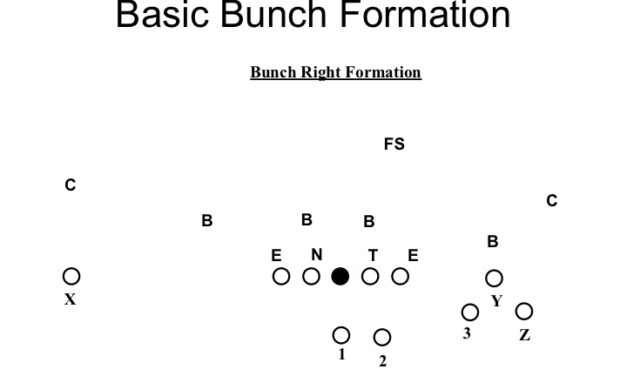
The Bunch Pass Game

By Greg Lauri

Offensive Coordinator

John Glenn High School

I would first like to thank X&O Labs for the opportunity to contribute to the study of the bunch formation on their Insiders website.  I think that this website is representative of all the good that football coaches do.  The sharing of information is critical to the development of coaches and the advancement of the great game of football.

I would also like to thank Dave Shanahan, our Head Coach, for the opportunity to develop our offense.  Over the past four years we are 43-3, with back-to-back County and Long Island Championships.  Over the past two years, as the offensive coordinator, along with the support of Coach Shanahan, we have moved our offense to a new level.  We are a spread team, then we implemented our empty package, which helped us obtain our first championship.  This past season we continued to develop our empty package and added some bunch formations, which helped us obtain our second championship.

Read More

14 No-Huddle Do’s and Don’ts

By Sam Nichols

Wide Receivers Coach

Hope College (MI)

Sam Nichols, Wide Receivers Coach, Hope College (MI)

Like many things in life, much of what I have learned about the no-huddle I learned from trial and error.  But the older I get the more I don’t feel I have the patience or time to deal with failures on my path to success.

This fall thousands of teams across the country will be installing No Huddle concepts as part of their offense, so I thought this would be a perfect time to share what I have learned through years of using and consulting on the no huddle to help you avoid the common mistakes and encourage important concepts.

#1:  Don’t Change Just to Change 

Too many coaches add or re-tool offenses without understanding why they are doing it.  Make sure that you know exactly what you are hoping to get out of the no huddle and be prepared to make sacrifices to reach those goals.  Obviously, I believe that it can help your offense, but it will not fix an offense that is poorly run in the first place.  If you are to this point and you cannot convincingly explain why and how the no huddle is going to take your offense to the next level, it might not be worth your time!

#2: Do Use a Preset Formation

Another way to take precious seconds off your time between plays is to set a default formation.  Even better at the HS level where most of the game is played from the hashes, you can set defaults from the left middle and right to help eliminate the movement between plays.  This coming year, will be having our players pre-align in a trips formation to the field when we are on the hash and a 2×2 formation in the middle of the field.  The default formation will be determined weakly based on the defense we plan on seeing that week.  This eliminates the extra movements and speeds up our rate of play.

#3:  Don’t Add No-Huddle to an Already Bloated Playbook

Chapter two discussed how to trim your offense to fit within the Full Throttle  system.  While most people will take that advice, there are a few people who will insist on keeping every single formation, motion and play into their new system.  This may work, but you will likely not get the most out of the system.  Remember the K.I.S.S. principle and use this as an opportunity to focus your offense on what you do best.  You can always add once the system is up and running.

#4:  Do Use Your Personnel Wisely

Here are a few things we know:

  • We all know that receivers in a pass centered offense can get tired and not run great routes.
  • We also know that defenses usually only scout 1 deep and know little about the subs you bring in.
  • We know that DB’s are always told to not let anyone behind them.

So what does this mean in the No Huddle?  Well, teams will usually be playing their studs against your studs and they likely will not change when you send in a sub.  Therefore, you will have their starting TB, for instance, against your 5th, 6th, or 7th best receiver.  No contest right?  Wrong.  If you shift your mentality from beating that defender to wearing him out, you will make real hay with the 7th receiver of yours.  Here is what you do.  Tell him to run to the end zone every play.  Gas that TB and force them to sub.  If they don’t, you just killed their running game in the 4th quarter.  If they do then not you put your stud back in and throw right over their backup.


Read More