Post-Season Self-Scout Protocols

By X&O Labs
Twitter: @XandOLabs

Introduction

graphAfter the conclusion of each season, many coaches start the progression of evaluating and assessing each concept to measure its proficiency. It’s a process intertwined in two folds: cutting ineffective concepts from their play menus and building on productive concepts for future seasons.

While conducting our research on this topic, we’ve heard the following phrase uttered many times, “We should’ve called that play more.” So, we studied how six coaches (five college and one high school) use their self-scout process to evaluate what worked this season and what didn’t. Their question and answer session is below.

Contributors

• Justin Iske (JI): Offensive Line Coach, Southwestern Oklahoma University
• Gerald Hazzard (GH): Offensive Coordinator, Lake Erie College (PA)
• Shaun Weaver (SW): Defensive Coordinator, Gettysburg College (PA)
• Matt Kerstetter (MK): Co-offensive coordinator, Westfield High School (TX)
• Jake Olsen (JO): Offensive coordinator, Loras College (IA)
• Vincent Digaetano (VD): Linebacker Coach, Nassau Community College (NY)


1. How long after the season do you start your self-scout procedures?

(JI): “We do a weekly self scout during the season by play efficiency, down and distance and personnel tendencies. We also do a weekly efficiency report to determine why runs/protections were inefficient based on technique errors, assignment errors, scheme issues, etc. After the season, when we have a little more time, we go back and do a little more in-depth evaluation.”

(GE): “We will start our self-scouting during the season. Every Wednesday, I will receive a report from our offensive GA on our play call tendencies. We track our run/pass tendency based on the following downs: first down, 2nd and 7+, 2nd and 4-6, 2nd and 1-3, 3rd and 7+, 3rd and 4-6, and 3rd and 1-3. We will also track our play calls by formation and our run/pass tendency by formation. After the season is over, I usually begin our end of the year ‘efficiency’ reports after the signing day in February.”

(SW): “I start after the AFCA convention on the official breakdowns, but I watch film throughout recruiting.”

(MK): “We will self-scout after the first three games of season, before going into district/conference Games, and then self-scout again around the game 6/7 mark. These are just to help get a feel for how our identity evolves as an offense over the course of the season, what are our best plays, followed by getting our tendencies. The big self-scout for me comes almost immediately, usually the day after the last regular season game. This is so we can start preparing for playoffs and really understand what tendencies we have developed over the course of the season. We start having a plan to have ‘tendency breakers’ built into the game plan. We always assume the opposition has almost all of our film; therefore they will have a game plan of how to try to slow us down based on our tendencies. We need to do our best to recognize that and prepare for it ourselves. The goal is to always have answers in the game plan moving forward. Usually our most recent three games are more heavily valued as a reflection of who we are. Upon completion of the season (it does depend on when it ends) we won’t usually do a whole season analysis until January. We clear our heads, take a step back, and then merge everything together and run reports and attempt to do an analysis of what we did well and what needs to be improved during the off-season.”

(JO): “It varies. Due to our off campus recruiting schedule we hit the road right away and do not get too in depth with the self-scout until around Christmas break. At that time, we’ll begin the initial data and research. Thus far I’ve taken a look at our run/pass ratio, RPO ratio, and cleaned up some date entry mistakes to streamline reports.”

(VD): “The self-scout has become an ongoing process throughout the season. The weekly data is kept in the video editing system, currently using HUDL, under the custom fields. Once the last game film is graded the post season procedure begins. Initially this was something that started at the end of the season, but as the procedure was completed it became more productive to complete week by week to utilize real time data to make decisions and adjustments.”

2. How long does the self-scout procedure last?

(JI): “We will do our end-of season self scout analysis after signing day in February. It will last about two weeks.”

(GH): “Our off season efficiency reports take a few days to do.”

(SW): “A full month.”

(MK): “These in-season self-scouts are fairly quick, only about an hour or so. HUDL really helps cut the time down needed to organize the material and run some reports.”

(JO): “It’s off and on from Christmas through March. We’ll try to get most of it done with new questions and angles before we approach other programs or start heading to other spring practices. Our spring ball doesn’t start until mid-April, so we have a window to make adjustments.”

(VD): “Self-scout procedure is a constant assessment used throughout the season and in the offseason. It helps to determine the drills that will be scheduled during individual period during the season. It also helps to determine what the off-season focus will be for both fundamentals and scheme. The self-scout also is used for the re-evaluation of the position manual.”

3. How do you delegate the self-scout process to your staff? Which responsibilities do you give them specifically?


Read More

4 Essentials in Developing Chemistry for the XP/FG Unit

By Sam Watts           
Kicking and Punting Coach
Owner of Sam Watts Kicking
Phoenix (AZ)
Twitter: @samwattskicking

Introduction:

As a consultant and kicking coach, I have found common mistakes coaches teach when developing field goal units. We will discuss in detail how a holder, snapper and a kicker can become better individually while on their way to becoming an efficient field goal unit.

Missed extra points in the NFL increased last year when they moved the distance of 20 yards to 33 yards, resulting in the most missed extra points since 1972. The operation time (snap to kick) in the NFL is between 1.20-1.25. College specialist’s times range from 1.25-1.35. High schoolers time can range between 1.35-1.45. Coaches at the highest levels record every kick, snap and hold of their field goal operation.

Unit Responsibilities

Let’s start with who has what responsibilities in our unit and why.

Snapper: The snapper is to address the ball in his stance, and the stance sets the alignment for his fellow linemen. In video clip #1, watch how the snapper waits for the kicker to move sideways before he grips the ball. This allows for him to not be over the ball for too long.

Read More

Steal Points by Using Tricks, Specials, and Formations

by Jay Wilkinson

Offensive Coordinator

Broken Arrow High School

If you are at all like me, after a few weeks of running the base plays of your offense, you have to be itching to add something that can create a big play and bring a little new life to your offense.  These concepts can give you a chance to steal points and create mismatches all over the field, but they also can derail your practices and distract your team from what you do well.  In order to keep avoid the potential negatives of special plays and formations, consider the following questions.

  • How much teaching / practice time will be needed?  Is it worth it?
  • Can it be used against multiple teams or is it only for a specific opponent?
  • Success Rate vs. Turnover Rate.
  • Are you willing to ACTUALLY call it in a game?
  • Does the play come off of something we already do?
  • When / in what situation are we going to call it?

More Than Gimmicks

Too often coaches make trick plays far too difficult.  The fact is, you can get the same impact without having to add a whole new concept into your offense.  There are a variety of ways that you can throw a curve ball and they don’t all require an entirely new play.  One such way is by using formations.  Here is why:
  • Defensive rules are based on formations.
  • One small change and the D could be thrown out of position or forced to play vanilla.
  • Formations are easier to install and allow you to still stick with your offensive philosophy.
Here are a few ways we use formations to stress opponents:


Read More

7 Def. Scouting Report Essentials

By Nick Hill 

Safeties Coach

Santa Rosa Junior College

Editor’s Note:  Coach Hill is entering his first year as safeties coach at Santa Rosa JC.  Prior to this assignment, he spent 2 seasons as the quality control coach at Cal Poly while also assisting as a linebacker coach.  Coach Hill started his coaching career coaching outside linebackers at Santa Rosa JC after graduating from Linfield College in 2008.


Introduction

srjcEach week defensive staffs across the country face the challenge of formulating a game plan that will slow down today’s high-powered offenses.  In order to do this, they must have an understanding of what they are up against including strengths, weaknesses, tendencies, and developing an overall feel for what the offense is trying to do.  The process of breaking down film accurately as well as creating scouting reports will help your staff achieve this and hopefully lead to a game plan that will allow them be successful on game day.  Listed in this article are some ideas on how a defensive staff can go about preparing for an offense on a week to week basis. 
 

1. Grouping Plays by Field Zones and Down and Distance

One task you want to take care of before you start to break down the opponent film is set up your program that groups together plays by field position and down and distance.  By putting these into the settings of your film breakdown program, it should automatically put the field position in for you based on what yard line you type in when you are doing the down and distance segment. Below is an example of how you may want to set up the field position on your program.

-1 to -5 YDL= Backed up

-6 to -19= Coming out

-20 to -50=Field Zone Minus

49 to 26= Field Zone plus

25-16 YDL=High Red Zone

15 to 5 YDL=Red Zone

4 YDL to 1 YDL= Goal line

The same thing goes for field position.  Listed below is an example of how you can set up your distances.

2nd & 11+=2nd & Extra-Long

2nd & 7-10 yds=2nd & Long

2nd & 4-6 yds=2nd & Medium

2nd & 1-3 yds =2nd & Short

***You can set up third down the same way

The first part of film entry is known as Down & Distance (D&D).  To do this aspect it is best to get an official play by play from the games that you are breaking down.  If you can’t find an official box score you may have to go off the scoreboard shot, or you may have to look at the down markers on the field and try and eyeball the distance.  When working on the D &D part of the film, one person will read the play by play, while the other person enters the data into the computer and ensures that the play by play matches up with the film.  If for whatever reason this doesn’t match up then you need to stop and figure out what the problem is.  I’ve found common problems include: missing clips from the film, clips that are out of order, end zone and sideline view not matched up, or the play by play will be off or missing a play.  Whatever the problem is, it is important that it is fixed right away so that it doesn’t throw the rest of the film off and ensures accuracy.  Other information that should be entered into the film during this time period include:

  • 1st play of series
  • Series number
  • Punts
  • Turnovers
  • Sacks
  • Scrambles
  • Penalties
  • Quarter.

General information summary

  • Use play by play and partner if possible to ensure accuracy
  • Information to be entered into film-quarter, 1st play of series, series number, when the series ends (punt, turnover on downs, turnover), down and distance, hash (from defensive point of view), run/pass, yds. gained/lost on play, incomplete/complete, enter penalties, QB scrambles,


2. Evaluating Formation and Personnel

The next information to be put in is the formation/personnel of the offensive team.  Before getting started with the data entry for this section you should print out a two deep depth chart as well as a roster to help with personnel identification.  One thing I found helpful when doing this was taking a small sticky note and putting it on the two deep with a column for QB’s, RB’s, WR and TE’s.  I would then write down the number of the players in the appropriate column as the game went on, making my own two deep that was easier to read.  When entering personnel data into the film it is important that you are not only accurate but that you are also consistent in what you are labeling the personnel groupings.  This requires a lot of attention to detail.  Throughout the season you may run into a team that uses a primary personnel group, but gives you formations that are of another personnel group.  An example of this would be a team that runs a lot of 12 personnel but has an athletic tight end that will at times line up in a detached position in the slot, giving them an 11P look.  Although the offense is presenting and 11P picture, the film should still be labeled as 12P, to distinguish from when the offense is truly in 11P.  Other scenarios to keep in mind that may come up during the season include teams that use two QB’s, or perhaps they bring in another quarterback for a wildcat type of package.  These should be labeled with something to distinguish them to allow them to be sorted out later when the film cutups are being made.  If a team runs wildcat but the regular QB stays in the game, then just label it what the personnel is, and add wildcat in the formation or backfield set box.  Others scenarios to watch out for include extra OL in the game, especially by the goal line or in short yardage situations.

Formation/ Personnel summary

  • Personnel
  • Formation name/ backfield (note for 20/21/22P groups make sure to label whether the two backs in the backfield are both tailbacks or

Read More

11 as 1 Team Defensive Pursuit

By Jason Sedlak
Defensive Coordinator
St. Thomas Academy (MN)

Introduction

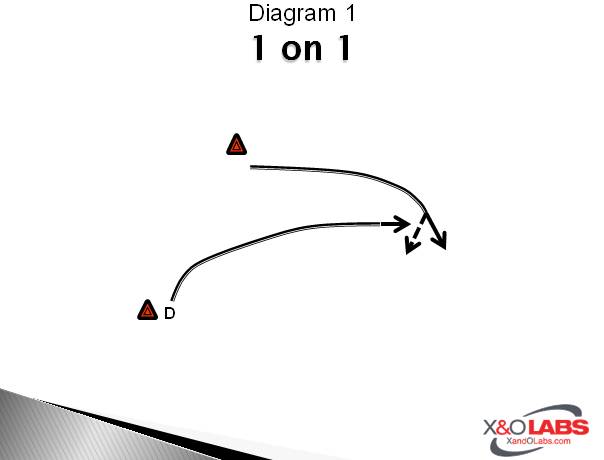
11as1PursuitThere are very few completely original ideas in the game of football today, and the pursuit angles that we use at Saint Thomas Academy (STA) are a result of a clinic presentation made by Coach Chuck Martin who was at the time, the Grand Valley State University Head Coach.  Coach Martin presented the idea that running to a spot at some point down the field where you hope to intersect the ball carrier actuallyprovides more opportunity for big yardage on cutbacks because you are creating space for the ball carrier.  This type of angle suggests that you are trying to tackle the ball carrier by yourself and do not have any help on the field.  He called it a one on one pursuit angle.  He then went on to present the team tackling angles that they used at GVSU and that is the basis of the pursuit angles that we use at STA.
We play an aggressive pressure style defense at STA, and like all defenses, we put a premium on playing team defense and getting as many players to the football as possible on each play.  We emphasize speed and want our kids flying to the football without hesitation.  One of the foundations of our team defense concept is trust.  We don’t want 11 heroes running around the field all trying to make the big play.  We want 11 guys who are focused on doing their jobs and trust their teammates to do the same.  We feel that the way we pursue to the football emphasizes our team defense and trust concepts. 

Identifying Force

Every one of our defensive calls has a primary and secondary force player and it is absolutely necessary that all 11 defenders know and trust that the ball will be turned back to the inside where we have the most help.  It is just as important that our force players trust their teammates to pursue aggressively and on the correct angles in order to minimize the offenses effectiveness.  We feel that this allows our players to go full throttle to the football because they know, and over time and through repetition, trust that their teammates will turn the ball back to them.

Knowing that we have players assigned to force the ball back to the inside of the field, we teach our players to pursue to the inside or back hip of the ball carrier.  The only exceptions to this rule are for the primary force player on the backside of the play who looks for reverse and all misdirection plays coming back his way, and the backside corner who takes an angle towards the far pylon for the “touchdown saving tackle.”   The remaining non-force players are on inside out pursuit paths pressing the inside hip of the ball carrier.  We feel that this puts them in great position to make a tackle when the force player makes the ball carrier turn back to the inside.   Using this general concept, we are trying to restrict the amount of space available to the ball carrier and therefore taking away the big cutback play.

Drilling Pursuit

We conduct at least one, if not all, of the pursuit drills below in practice on a daily basis.  Some days we will work through four of the drills in an eight to ten minute pursuit circuit.  On other days we will mix these pursuit drills with tackling and take away drills in a skills circuit.  We emphasize getting to the football as fast as possible and on the correct path during every one of our practice periods.  It doesn’t matter if we are in our pursuit circuit, a unit drill, skelly, or team against scout cards, we are constantly telling our kids to get after the football and to take the correct angles.  Like any skill in football, repetition with constant feedback is the key.

1 on 1 Concept Drill

Slide1

We use this drill in summer practice and the first day or so of two-a-days to introduce and solidify the back hip concept.  The ball carrier is to take an outside path and at some point in time try to cutback across the face of the defender.  The defender should pursue to the back hip and know that the ball carrier will cut back into his pursuit path.    We conduct this drill at ½ to ¾ speed to really solidify the concept and focus on the following coaching points:

  1. Initial steps should be directly at back hip and bend as the ball carrier turns upfield.
  2. Do not get out in front of the ball carrier and run to a point in space where he might go.
  3. Close the distance with the ball carrier as fast as possible.
  4. Shimmy/breakdown under control as the ball carrier cuts back.
  5. Never let the ball carrier cross your face.

Check out the film below for a closer look at this drill.

Read More

In-Season Ball Disruption and Takeaway Progression

By Dave Marean
Head Football Coach
Wayne Central High School (NY)


As a defensive coordinator, one of the things I like to do after every season is review each game film and try to see what made us successful and what hurt us each game. Defensively, the main things I like to focus on while watching film are: our alignment, assignment, tackling, team pursuit and ball disruption (turnovers). Recently, I started to look at our results from season-to-season to see if there were any continuous traits that were not allowing us to be successful defensively. Some years it could be as simple as we just did not have the “Jimmy’s” and the “Joes”, but more often than not it came down to ball disruption and getting turnovers or lack of.

Years ago (2010), I stepped down from being the Offensive Coordinator and I took over our defense, as I felt we were not accomplishing what we needed to do defensively. One of the biggest things I wanted to do was get our kids to understand on defense you can score. I wanted them to not look at our defense as “defending” our own end zone but attacking our opponents’. I wanted them to get the mindset that we are going to score on defense and if we cannot, we will at least get the ball back so our offense can.

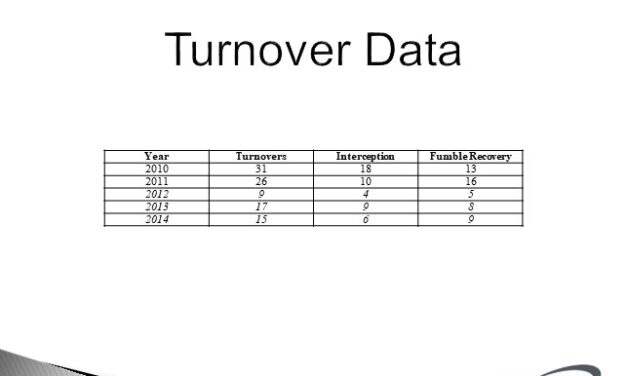
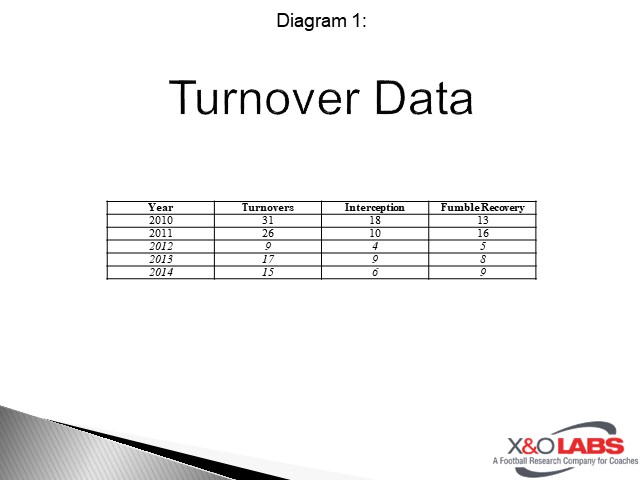
In 2010, we went 7-0 in the League and finished 8-1. The most regular season wins our program had ever had prior to 2010 season, was two (since starting varsity football in 1998). Now, we had some special players on that team, but we as a team also created 31 turnovers (18 int. and 13 fumble recoveries) in 9 games. In 2011, we went 6-1 in the league (6-2 overall) and we created 26 turnovers (10 int. and 16 fumble recoveries) in 8 games. In 2012, we went 3-4 in our league (4-5 overall) and created 9 turnovers (4 int. and 5 fumble recoveries) in 9 games. In 2013, we went 4-3 (6-4 overall) made it to the sectional finals and we created 17 turnovers (9 int. and 8 fumble recoveries) in 10 games. In 2014, we created 15 turnovers (6 int. and 9 fumble recoveries) with a record of 4-3 league and 4-4 overall. See diagram 1 to see a clearer picture of this data.

Diagram 1


After the 2012 season, I quickly realized that defensively we were not getting as many turnovers in recent years as we did in 2010 and 2011. Looking back at our practices that year, we also got away from our turnover stations in any part of our practices, which by the 2012 data you can see it affected us on Friday nights. So, when 2012 season finished, I realized we needed to continue to implement some type of turnover stations in our practice plans.

The big thing is that doing turnover stations by itself is not enough. You must incorporate some type of turnover work within your individual periods and group periods. This is something that you have to get your staff to “buy” in to as well. I will actually put on our practice plan: “Turnover stations last 5 minutes” of each individual and group period. I have a great staff and they want to take advantage of every minute they have during their individual or group period. So, I have to make sure I stress how important it is to have 5 minutes of turnovers mixed in, so we may add more time to the whole Indy and group period so they get covered what they need along with me making sure some type of turnover work is accomplished.

Most of our original turnover stations and philosophy on turnovers came from Rutgers University back at the NYS Coaches clinic we attended in 2009. Over the years we have added and subtracted some of them or simply “tweaked” how we run them to better fit our kids and our program. Most recently, though, we have added to our stations and our philosophy of turnovers based on a lot of what Syracuse University does. Their concept of ball disruption is something we have taken on and we try to drill this into our player’s habits of disrupting the ball. Our belief now is that if you are causing ball disruption on defense that in turn will create more turnovers. We talk to our players a lot about attacking or disrupting the ball more than anything else we do on defense. I think kids now days, need to attach words with drills that will help them understand what we are trying to accomplish. If you ask any of our kids what are key words that describe our defense, they will say ‘attack’ and ‘disrupt.’

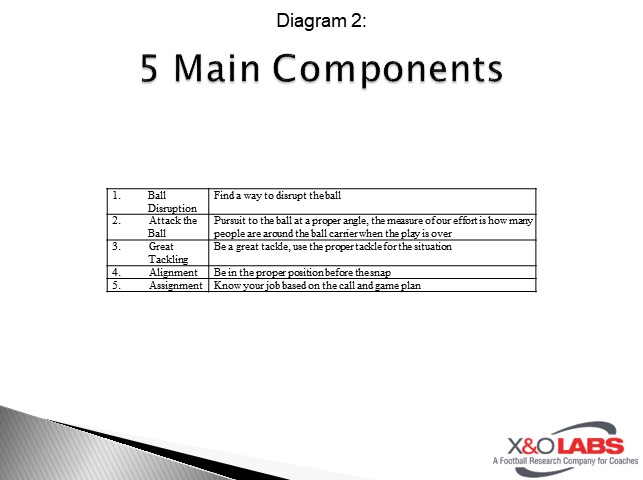
Our defensive fronts (based on our personnel) have changed a little over the years, but our philosophy has always stayed the same. We want our players to focus on five main components (see Diagram 2).

Diagram 2


In Diagram 3, you can see our turnovers compared to ball disruption. Since implementing this past season some of the ball disruption concepts to our defense, you can see we actually forced a lot more fumbles and interception opportunities then we have had in the past two seasons. Unfortunately, the ball didn’t always bounce our way. So, one thing we will be doing next year in practice is incorporating ball disruption drills within our pursuit drill. On film a lot of our missed opportunities to turn a ball disruption into a turnover, was the lack of effort in pursuing to the ball, especially on fumbles. The majority of fumble recoveries are not recovered by the person who caused the fumble so everyone must pursue to the ball, because the next person is the one who will get the ball. The same goes for interceptions, if someone breaks up the pass, the caught tipped ball usually is not the person who broke up the pass.

Read More

Treating Trick Plays as Equalizers

By Eric Walkingstick
Head Football Coach
Akron-Westfield High School (IA)


Every coach has a trick play or gadget, many are known for that special play that they like to run in that key or crucial game. What I find interesting is most teams don’t run them till they need them.  If these plays are so good why do we put them in our hip pocket, why do we just break them out 2-3 times a year? The fear is that we don’t want to use them up, we want to save them till a crucial juncture in a special game where we must have them to win.

My philosophy is the opposite. I want to use at least 3 new specials a week and by the time we get to the playoffs we have tons of special plays. We don’t run them all in a week just the 3 or so we plan on actually using. This approach forces our opponents to work on a concept that may take us 5 min to install but over the course of a season adds up to overwhelming numbers of plays that they must prepare to defend.

We coach our players to trust these plays while understanding that we don’t live and die by them.  We use them so often that if they don’t net a touchdown it is not a big deal. Instead, it is just part of our overall philosophy. Often these plays are designed to generate small gains.  In general, they are low risk high reward and the kids love them and they want to be part of it either by naming them or searching the internet to give me ideas. It creates a real degree of team ownership.


Creating Specials

We don’t call our special plays gadgets or tricks instead we just refer to them as special, so they are thought of more as just a common part of our offense not a prayer play. We will introduce these plays at the beginning, on 2 point plays, after halftime or certain down and distances situations during the game. Below are examples of some of the concepts that we have used over time, but we have others that we are rotating into the game plan as well from week to week.


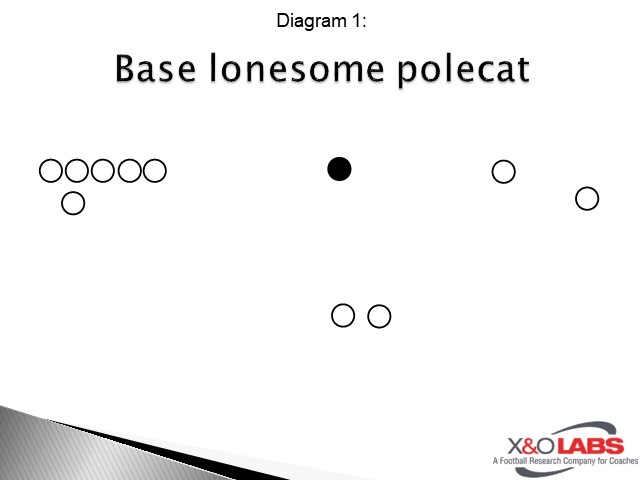
Lonesome Pole Cat

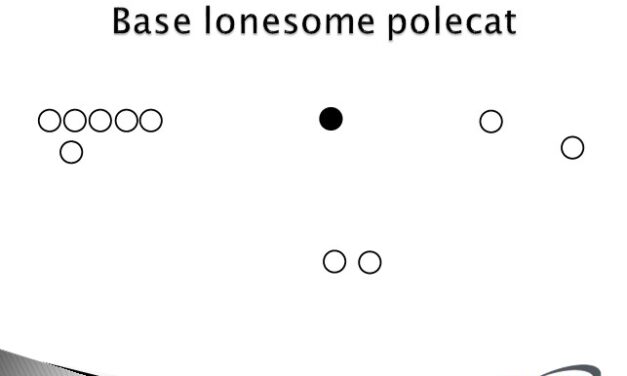
The first play we will look at is called the lonesome pole cat (Diagram #1). I was introduced to it as a defensive coordinator many years ago, and as a coach the things that we find the hardest to defend should be things we research and possibly incorporate. If you adhere to the philosophy motion creates emotion then this may have you seeking psychiatric help.  The concept is simple unbalanced set that can attack any defensive approach. We package it as a two play check. While we like to use this at any point in the game, for this report we are looking at ugly downs and distances like 3rd and long or even on 4th and long.

Diagram 1


To study game film of this concept, click on the video below:

Read More

Avoiding Late Season Complacency in Practice

By Jeff Minter

Columnist

X&O Labs


Editors Note:  Since 1998 Coach Minter has served as a head coach, coordinated all three phases of the game, and worked with the defensive line, offensive line, linebackers, quarterbacks, and wide receivers. In the past few years, Coach Minter has become one of the most popular and respected coaching bloggers on the web and is excited to be a regular contributor for X&O Labs.

The best teams are almost always great closers.  They don’t just start fast, but they get better as the game progresses.  This same logic can be applied to seasons as well.  The teams that understand how to continue to get the most out of their players as the regular season comes to an end and the post season begins.  So, with that in mind, I have put together a list of do’s and don’ts that should be applicable for any team, anywhere.


Practice Planning “Do’s”

Do… Film Everything

With the increasing access to technology, and the growing popularity of the iPad, it has become exponentially easier to film practice sessions for later viewing and correcting. You can now easily use apps such as CoachMe and Coach’s Eye, along with any video app, to film practice for immediate feedback or diagram things on the go. Even if you’re still using cameras, DVD duplicators, allow you to quickly burn anything for multiple players or coaches to watch at home. By using technology to help you teach either before, after, or during practice you are more likely to be able to coach on the run…which happens to be the next key idea.

Do… Coach on the Run

Don’t take time to stop practice for each coaching moment. Especially if you are able to teach off the practice film, make sure you are coaching as practice is moving. Ever see a coach stop the whole offense to review something with one player? It kills the tempo of practice and can lead to players losing focus.

Do… Script Everything

Seems obvious, but it sounds like this doesn’t happen everywhere. Scripting accomplishes a few things. First of all, you can control what your team is practicing as you aren’t doing it on the fly. This gives you a better opportunity to spend quality time on reps your team really needs. Scripting also allows you to control the number of reps your team is getting. When you chunk a team time into 20 minutes you are likely to go the whole 20 or possibly over. However, when you follow the script you can avoid over repping your players by going longer than is necessary to accomplish your goal. Finally, scripting allows you to work in special situations or field position needs.

Do… Properly Label Scout Cards

How many times have you told your team where they will be and then run the play only to be told that the defense was in a different place?  Fix that problem by being more specific with the scout team and give them more information.  Tell the scout team they are “X”, “H”, or “32”. Whether you use numbers or letters is up to you, but it’s a lot easier for the kids to get where they need to be if they only have to look at one position.

Do… Use Your Terminology for Scout Teams

Whenever possible use your own words for plays, formations, and alignments so you can effectively communicate with your scout team. This is especially helpful with the scout defense and offensive lines. Your offensive line probably has a counter trey blocking scheme, so no matter what the backfield is doing, if that blocking scheme is being used make sure it is noted on the scout card.

Do… Use Two Huddles

If you have the players available use two huddles. Yes, your scout team won’t be as good when it divides into two groups, but more players are active, more players are getting reps, and your first team is able to get more looks and reps as well.

Read More

Developing a Defensive Game Plan


By Tom Hochhalter

Head Coach,

Calvin Christian High School (MI)

Researchers’ Note: Coach Tom Hochhalter is entering his first year as head coach at Calvin Christian High School in Grandville (MI).  Before taking on this challenge, Tom served as Defensive Coordinator at West Ottawa High School and at Holland Christian High School where his team won a State Championship in 2008.  Tom is known for his exhaustive preparation and understanding of the 3-5-3 defense.

The first year I was a varsity defensive coordinator my head coach told me that defensive game planning was simply matching up your best defensive calls to the offense’s best plays. I thought that was easy enough. As that first season progressed so did my skills of developing a defensive game plan each week. I thought his idea was straight forward, but I had to figure out when and where the offense was going to call their best plays. So I devised a method that I continue to use and tweak weekly.

The first step is to determine tendencies that the offense has. The ones I look for are:

  1. Down, Distance, and Field Zone location.
  2. Personnel grouping which is determined by the number of running backs and tight ends.
  3. Formations.

Of course getting all of this information can be quite a laborious task.  I have worked to minimize the time it takes to find this information by using film breakdown programs like Hudl.  These are great tools for breaking down scout film of an opponent and allow break down film in many different forms and create scouting reports for your staff and players.


Once all of the data is logged in Hudl, I use a variety of custom reports to help me construct a detailed “Hit Chart.”   This “Hit Chart”combines the two most common defensive gameplan concepts, down and distance breakdown and field position breakdown, creating a hybrid form that has proven to really find the tendencies that the offensive coaches lean on during the game.  Here is how it works…

First, I established the list of down and distance categories that I want to assess with the chart.  You can get as detailed as you want, but I have decided to use the following 18 categories.

  1. 1st and Possession
  2. 1st & 10
  3. 2nd & 1-3
  4. 2nd & 4-6
  5. 2nd & 7-10
  6. 2nd & 11+
  7. 3rd & 1-3
  8. 3rd & 4-6
  9. 3rd & 7-10
  10. 3rd & 11+
  11. 4th & 1-3
  12. 4th & 4-6
  13. 4th & 7-10
  14. 4th & 11+
  15. 1st & Goal
  16. 2nd & Goal
  17. 3rd & Goal
  18. 4th & Goal

Each of these categories will become it’s own chart that tracks the type and direction of the offensive plays from of that particular  down and distance in the different field zones.

Read More

Teaching Destruction to Edge Defenders

By Zach Watkins
Co-Defensive Coordinator/Special Teams Coordinator/Linebackers
Washburn University (KS)
Twitter: @Zach_Watkins

Introduction

The offenses that we face weekly in the ultra-competitive MIAA conference are great at attacking the edge. Whether that be running the ball outside, throwing bubbles, utilizing their screen game or RPOs, block destruction on the edge is extremely important. With up-tempo offenses hitting the edge quickly and getting the ball out in space, it often becomes a numbers game. If the offense feels they have a numbers advantage, they will try to exploit it. With that mindset, we feel that we have to win some 1 on 1 battles on the edge to successfully defend these plays. We also teach proper pursuit angles through drills and practice as well as tackle leverage on the ball carrier from the pursuit players. We ultimately feel that defeating blocks on the edge and out in space are what helps us effectively defend these plays.

Attacking the Ball

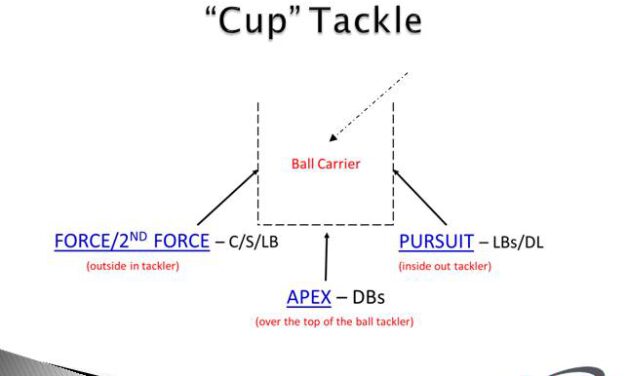
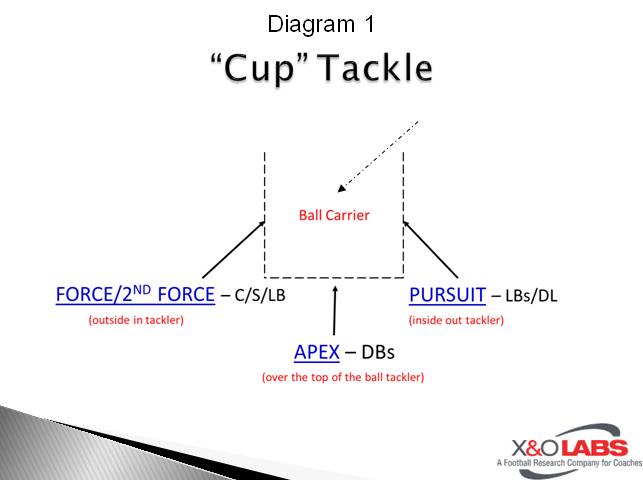
Before we teach block destruction techniques, we will teach how to properly run to the ball to put ourselves in the best position to make the tackle. As we teach proper pursuit angles with drills and in practice, our “cup” tackle begins to show its’ effectiveness.  In our daily tackle/turnover circuit, or in specific individual time, we will work on our “cup” tackle. I’ve heard people also call this inside-out tackle, vice tackle, etc. We teach our players that there will always be 3 types of players in a tackle:

  • The force tackler – Outside-in tackler who turns the ball back inside. The force tackler will usually be a CB, S, or LB who begins the play outside of the box.
  • The pursuit tackler – Inside-out tackler who does not let the ball cut back. The pursuit tackler will be someone running inside out to the ball, usually a LB or DL.
  • The apex tackler – Over the top of the ball tackler who must make the play if the ball gets to him (Diagram 1). The apex tackler will always be someone staying over the top of the ball, usually a DB (high safety or CB).

diagram1

By teaching the players to understand which type of player they are in any given tackle, they can understand where their help is and where they must position themselves to make the tackle. We will utilize a tacking/pursuit circuit to effectively teach the defenders which part of the cup tackle that they are assigned to fulfill.

Below is our “Cup” tackle pursuit drills.  We begin with just the pursuit tackler keeping a good inside out path.  We will progress into adding the force tackler.  Then we will progress by adding the apex tackler.  This way the players can understand in a logical progression which part of the cup tackle they are. (bottom right corner of the field)

Read More

Unbalanced FG/Extra Point

By Terry Kent
Offensive Coordinator & Offensive Line
Downers Grove South High School (IL)


One of the great joys of watching the college bowl season every year is to see what new and innovative ideas college coaches come up with during the time leading up to their games. The unbalanced extra point is one of these ideas. As a retired math teacher, I was intrigued by the angles and distances the formation creates and how difficult a block would be, assuming the snap, hold, and kick are on time. If the fastest 10 yd time in the NFL Combine is 1.4 seconds, then no one should be able to block our kick, if everyone does their job correctly.


Alignment

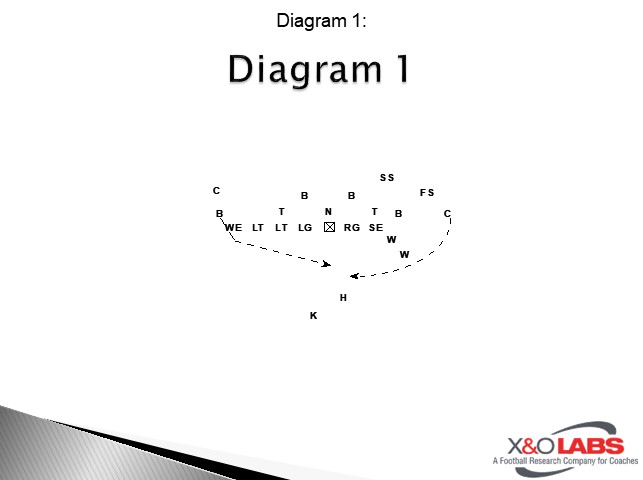
Diagram 1


Linemen Rules:

  • 3” splits in the A gap
  • 6” splits elsewhere on the line
  • Inside foot back, toe to heel stagger
  • Right side uses a left handed stance, left side a right handed stance.
  • We often flip our OL in PAT so they can use their normal stance.


Step with inside foot up and lateral. DO NOT MOVE Outside foot!! Keep outside heel on the ground.

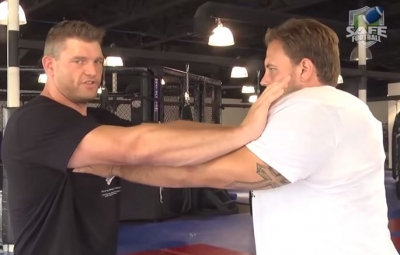
We punch up and out with their fists, so we have two hands in every inside gap. Arms should end up in bench press position. We teach them to hold their ground and absorb the rush.

DO NOT TURN YOUR SHOULDERS. If worse comes to worse, grab some cloth and fall backwards like a tree.

The wing steps inside like the linemen, but he punches straight out with his outside arm to push any outside rusher farther away. The SE steps & punches as the linemen.  We prefer the SE to be a defensive lineman with an eligible number. The snapper’s job is to deliver a tight spiral, hitting the holder in the hands. After he snaps the ball, he should get his head up, and try to help out the two guards in the A gap as best he can.

Read More

6 O-Line Techniques to Defend the Bull Rush

By Mike Kuchar
Senior Research Manger
X&O Labs
Twitter: @MikekKuchar


Introduction:

petersScott Peters spent seven years in the NFL with the Philadelphia Eagles and New York Giants before launching Fight Ready, a Mixed Martial Arts Academy in Scottsdale, Arizona where he trained the likes of Cain Velasquez and Brock Lesnar. He has since started the “Tip of the Spear” leverage program, which incorporates MMA leverage techniques to help offensive linemen in the use of run and pass blocking. Peters’ program has been implemented by over 400 football programs at every level. His methods have been touted by former NFL offensive line coaches Jim McNally and Bob Wylie every year at the C.O.O.L. clinic in Cincinnati. He begins our in-season trouble shooting series with a Q and A with X&O Labs Senior Research Manager Mike Kuchar on techniques that offensive linemen can use to protect themselves against the ever-popular and ever evolving bull rush.
MK: Why did you decide to start safe football? What motivates you to spread this information to football coaches?

SP: I love football and what it can offer to young athletes developmentally. Concussions and sub-concussive head trauma remains a serious threat to the game’s future, but more importantly, the welfare of the young men who play it. I had a lot of unnecessary concussions when I played due to poor or limited technical information available to me, and I feel strongly about raising the collective level of knowledge to bring confidence back to the game. Ultimately Safe Football exists to empower players to take safety into their own hands through the development of superior technical skill, and this can only be achieved through the leadership of coaches.

While the public waits for answers from doctors, helmet companies and football organizations, Safe Football has teamed up with the true leadership (football coaches) to influence necessary changes to protect the game and its players. We believe this is particularly important at the youth and high school levels, where the majority of football is played.

Through my experiences in MMA, I discovered certain movement patterns and postures that yielded exceptional strength of the body, which indirectly correlates to football. In 2011, I began developing football techniques based on those leverage principles, emphasizing the use of hands to transfer force by using the body as it was designed to move from a biomechanical standpoint.

In 2012 and 2013, I was hired by the University of Washington to teach their players my techniques (and drills), which were later credited by the coaching staff for their success on both sides of the ball. In 2013, running back Bishop Sankey set the single season rushing record in school history, and in the same year the athletic trainers confirmed zero reported concussions or neck stingers among their offensive and defense linemen; the first time this has happened in recorded history according to UW medical personnel.

Although “bigger, faster and stronger” is still the mainstream approach to player improvement in the off-season, more and more teams, coaches and organizations from youth to the NFL are recognizing the need for football specific skill development. Over 400 coaching staffs from youth and high school to the NFL have adopted the Safe Football curriculum, which provides them a detailed and comprehensive technical instruction plan along with over 200 drills designed to expedite skill development. With the constant advancements in technology, it seems we’ve lost sight of the importance of human interaction and hands on teaching. Safe Football is here to partner with coaches in every community where football is played to advance technical mastery to save the Game of football and to do it on our terms in a proactive manner, as opposed to accepting undesirable policy.

Mike Kuchar (MK): Why do you think the bull rush move continues to be a popular move among pass rushers at all levels of football?

Scott Peters (SP): Great question; there are a couple of reasons the bull rush is still a staple move for players at all levels. The first reason is its simplicity as a pass rush. I think youth, high school and many college players use the bull rush because they lack the technical know-how to win using finesse moves. In the case of less experienced defensive linemen, they know there are 3 potential routes to the quarterback: 1. Left 2. Right or 3. Down the middle. The bull rush is the most obvious pass rush for most beginners, and it is for this reason it is widely used at all levels. The second reason the bull rush remains a popular move is because it works. Take for example two inexperienced players of equal size, strength and athletic ability (one offensive and one defensive lineman), and line them up in a 1 on 1 pass rush drill. Who wins? Defenders have the advantage of momentum and vision into the backfield when it comes to 1 on 1 pass rush situations. Offensive linemen are asked to stop penetration from a charging defender while doing a glorified backpedal, and this takes a high degree of skill, which in turn takes knowledge and time to develop, also giving rise to the popularity of the bull rush.

The third reason the bull rush remains a popular move is understood by higher level defensive linemen, and that it is used to set up pass blockers for speed or finesse moves. I teach defensive linemen to develop explosive, shocking power with their hands before developing advanced finesse or disengagement techniques, because of the physically and psychologically disruptive threat it presents to offensive linemen. I think of the bull-rush like a fastball in baseball. It’s the first pitch a pitcher learns. If you have a good fastball, you can add a curve, slider, or change-up. When a pitcher comes with a high velocity fast ball, the batter has to get everything moving a little faster to initiate his swing and get the bat around. A hitter has to hold his water when he sees the change up or curve ball, which is difficult to do. This is paralleled with the pass rusher who shows a formidable power rush early in a game. The typical outcome from offensive linemen is loss of balance and posture to combat the power. Intuitively, pass blockers will lean on defenders when attempting to stop their bull rush, opening the door for other moves. This is the synergistic value of having a multidimensional repertoire of pass rush moves.

Read More

Creating Disruption with Your Even Front DEs with the Bend, Squeeze or Jet

By George Karafantis
Defense Coordinator
St. Anthony’s High School (NY)
X&O Labs Advisory Board
Twitter: @fb_captain42


When building your defense, and before implementing it, you must have a vision of what you want it to look like. I think most Defensive Coordinators would envision an attacking, relentless and physical defense. But how exactly you get there and where you begin to build this, matters to the success of your unit. I believe that winning defenses are built from the DL backwards. My philosophy, is and always will be, that in football the BEST LINEs WIN. In the following we will focus on the most important and disruptive parts of our defensive LINE, the DE’s. 

Our defense will be most successful by placing a large emphasis on playing speed and aggressive defensive ends, with length. The size or weight of the player is not the most essential part required for the construction, physicality and effort are most essential. This is especially true when choosing your ends.  I have always played these types of players and in the following article I will map out three specific techniques that will allow your defensive ends to be the disruptors that they should be.


Even Front Personnel

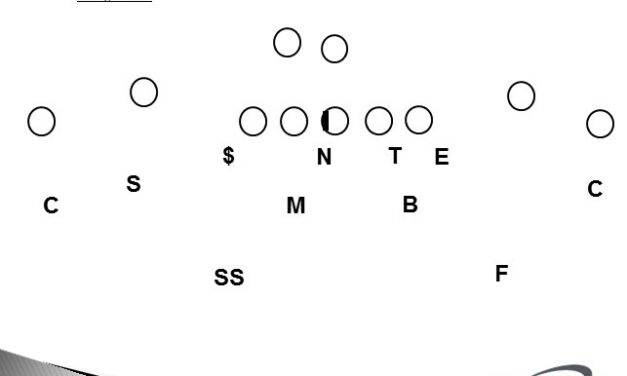
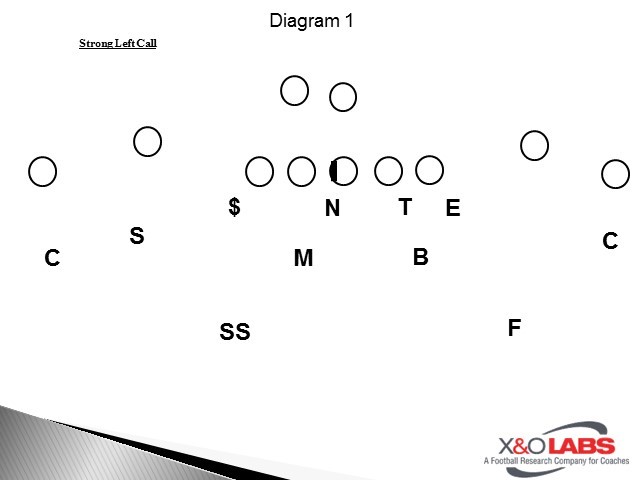
Before we get into the specifics of our defensive end technique it is important to point out that our even front consists of two DT’s and two DE’s. One side is identified as the strong side and they travel to the passing strength. These two are the Nose, who is either in a 2i or 0 shade, and a 5 tech $tud DE. The other side is referred to as the weak side End (5 tech) and 3 tech Tackle.

See Diagram 1

Diagram 1


Many of our calls are based on the hash including playing the three technique (weakside) to the boundary as well as playing the better safety to that side as well. In the Diagram 1 the boundary is to the right. That safety, our Free Safety, must be a dynamic athlete capable of playing a variety of spots.


Assessing Personnel of DE

Since at the high school level we cannot shop for our groceries, as Bill Parcells so eloquently stated, we have to find the correct players to play the correct positions. The positions we put them at are critical to the individual’s success as well as the team’s success. We prioritize the following traits when looking for our defensive ends:     

  1. DE’s that can move. Stud athletes – size is not required, physicality and explosiveness are. Basketball types (forwards/big guards) that can jump and are long limbed.
  2. Ability to change direction, capable of bending, dynamic flexibility and balance.
  3. Have tremendous takeoff, be a DISRUPTOR.
  4. Great hand fighter.
  5. Plays with great leverage.
  6. Be the alpha male (not a bad word, although most think so). Worker, tough, physical.
  7. Plays fast & relentless.
  8. A “captain” type of player


The proper explosion & physicality that is necessary for our DE’s to play with, begins with the stance. The proper stance that is to be utilized by our linemen will allow for an explosive takeoff and the ability to read as they give relentless effort. We teach a sprinters type stance. They MUST learn, practice AND BECOME COMFORTABLE USING BOTH A RIGHT HAND STANCE AND A LEFT HAND STANCE. We plan on a future entry that will focus on developing your DE’s through specific skills and drills in a progressive manner.

The stance technique is taught as follows:

  1. Feet are shoulder width apart
  2. The covered foot’s toe drops past the gap foot (Up foot).
  3. Pretend to sit in a chair, & fall forward with man hand down, gap foot up.
  4. On fingertips of the down hand, ALWAYS.
  5. Butt slightly higher than the head.
  6. Bull neck, eyes inside key ball for initial movement.
  7. Dangle the opposite hand, allowing the use of the hands as a weapon.
  8. Align nose on offensive player’s shoulder (Unless in a head up alignment or jet technique where he’ll be wider).


Read More

Limiting Frequency and Creating Tempo for In-Season Workouts

By David Hopper
Strength & Conditioning Coach
Washington High School (SD)
Twitter: @SFWStrength


Imagine working for something for nine straight months. You spend hours on end in a room that is like a freezer in the winter and a sauna during the summer. Instead of sleeping like most people you must wake up early to go to this room and pick up heavy things to earn this special something. Not only do you pick up heavy things in this room, but you must go outside and sprint like your life depends on it.  On top of doing all these things yourself you must constantly encourage your friends to do the same thing every day. Now imagine you finally have this special something in the palm of your hands and you decide to let it go!

I believe this is what exactly happens when athletes train to develop speed, strength and power before the start of the season, but do not continue training during the in-season. Why train for nine months if you will not continue it during the time that truly matters? Athletes shouldn’t peak during training camp, they should try to peak during the championship game!


Key Points for an In-Season Model

It’s important to continue to develop strength & power in the weight room as the athlete continues to improve game speed on the field.  We want to develop these things while limiting energy expenditure, muscle soreness & decreasing time spent in the weight room.


Less Frequency

We use two days instead three or four days per week. We also use less volume with 2-3 sets and about 30-45 mins in the weight room instead of 3-5 sets and 45-75 mins in the weight room.

During the off-season our top priority is the weight room, but the moment the pre-season starts the weight room is secondary and they must focus on the actual game. To minimize the mental and physical drain we limit the amount of lifts throughout the week. During the summer we spend four days training, but the moment summer training ends we switch to two days a week. Not only do we limit the lift frequency, but we decrease the overall volume of the actual lift. We do this by limiting exercise number and exercise sets/reps. In total we try to trim our normal 45-75 minute work outs down to around 30-45 minutes. This is important because athletes will be spending extra time on the practice field spending energy. I always tell our athlete that the body has a certain amount of money that it can spend on physical activities. During the winter we spend most of our money on increasing strength and we see our maxes go up because of that. During the fall they are spending large chunks of money on the football field increasing game speed/technique/etc. so we must limit our spending in the weight room to counter act that.

Read More

Stealing Points With 2-Point Play Organization

By Nate Stierhoff
Offensive Coordinator
Benjamin Logan High School (OH)
Twitter: @QBTheClinc14

Introduction:

What if I told you a small high school that missed 13 extra-point kicks in 2 years actually scored 97 points in their 95 PAT opportunities over that same time frame?

If you do the calculations, that is a 102% return on PAT opportunities based on conventional football math. Yes we are that team that goes for 2 a lot, and you should know our data shows we should be going for 2 much more often! 

In my two years as offensive coordinator at Benjamin Logan High School, we have taken a program that was scoring 13.2 ppg in 2013 (1-9) to scoring 43.1 ppg in 2015(6-4). I follow second year head coach Jeff Fay in creating a mindset in our players that we are trying to score as many points as possible every snap that we are on the field. A huge factor in creating this mentality in our program is our exotic, yet structured PAT muddle huddle concept. We have found this concept very cheap to install (10 minutes from install to scoring more points) and flexible to allow for endless tags and variations.  

PAT Muddle Huddle System

Slide1

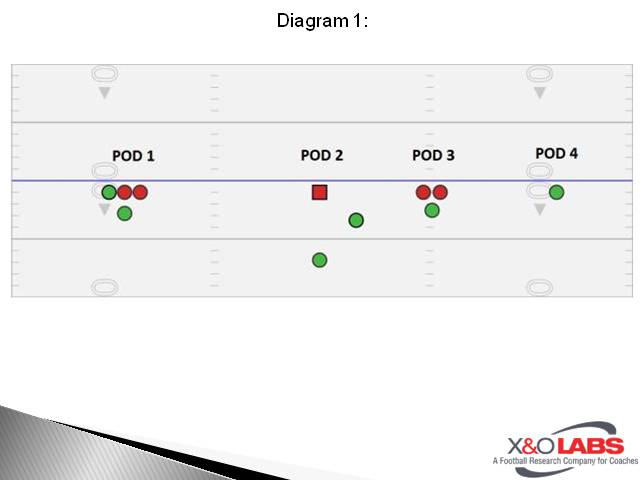
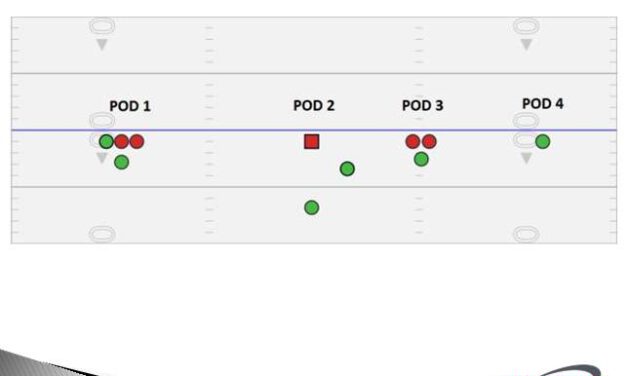
Diagram #1 shows the base formation our players know to line up in as soon as we score a touchdown. The green players are eligible to receive a forward pass, however on a 4th down or special teams play non-eligible numbered players are allowed to line up at any eligible positions as long as they do not receive a forward pass. During team periods every practice our offense drives the length of the practice field. Upon scoring on our scout team players immediately line up in this formation and the kicker is ready beside the coaches with his block. If we do not like the look we get our kicker is ready to sub in for any player and we shift to a traditional PAT formation. Our players understand from day 1 of camp that trying to get a quick 2 point conversion is the last offensive play we run before we celebrate and head off the field.

Diagram #2 shows just how confusing the formation can look to a team who just gave up a big score. 

Slide2

Pod 1

With the pods labeled 1,2,3,4 we are able to see how the team aligns to our formation, or look for a matchup to exploit and then signal in a number of where we want the ball to go. Once that concept is mastered, advanced tags can also be added to the number. We are a tempo offense so all of our players communicate to each other and our coaches through common hand signals.

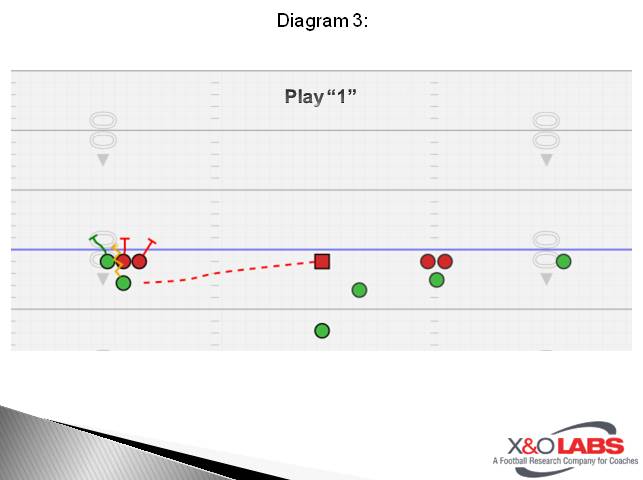
When we decide we like our match up in Pod 1, we signal in a “1” and the center will wait for the ready whistle and upon grabbing the ball he will laterally flip it to his left. (Diagram #3) This is technically a backwards lateral to the eligible player standing behind pod 1 who will then push into the end zone. The 3 players in front will handle the numbers they get man to man or just wedge block the pod into the end zone. We have found we like the eligible players in pod 1 to be a Tight End type on the line and a RB behind the pod who can catch the ball and make 1 cut into the end zone.

Slide3

It is important that the center moves the ball LATERALLY FIRST, as soon as a ref declares that he brought the ball UP first the play will be blown dead and you will lose the try. When teaching right handed players the lateral we tell them their first movement is to lean to the left then push off their right foot falling towards the target after they throw. When they step with their left foot first instead of leaning the ball will naturally move the opposite direction making the ball movement slow enough for the ref to blow it dead.

Read More