Training Overhang Defenders to Diagnose and React vs. Run and Pass

By Mark Theophel
Defensive Coordinator
Hartwick College (NY)


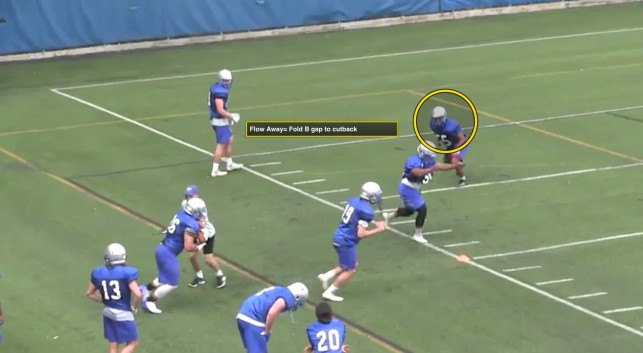
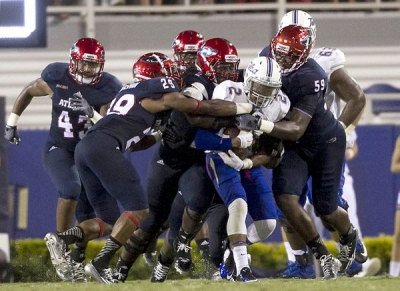
Overhang defenders have a critical role in perimeter run force as well as in underneath coverage vs. the pass. In our defense, the term “overhang” is referring to a drop outside linebacker or low safety in a rotated coverage. It is essential that we train these players to effectively read run/pass at the snap and react to multiple different types of plays. Having a thorough understanding of proper alignments, key reads and technique is crucial to our defensive success. Overhang players that are able to do this well should make a significant impact on defensive production. Ideally, we want our overhang defenders to be among the most versatile athletes on the defense.


Overhang Alignments

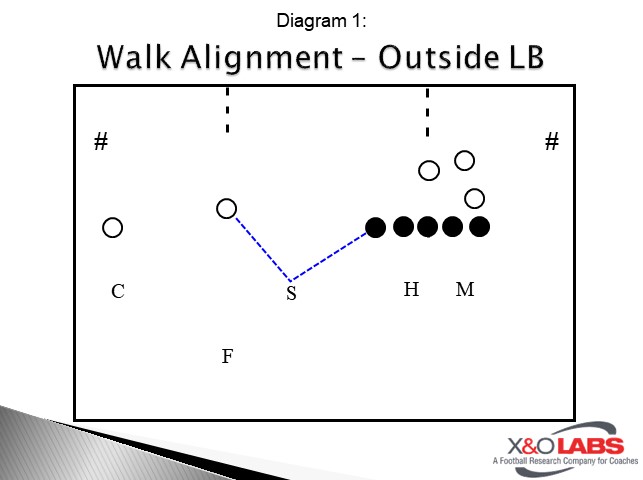
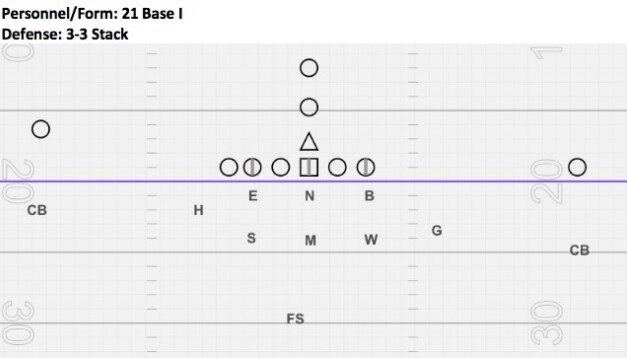
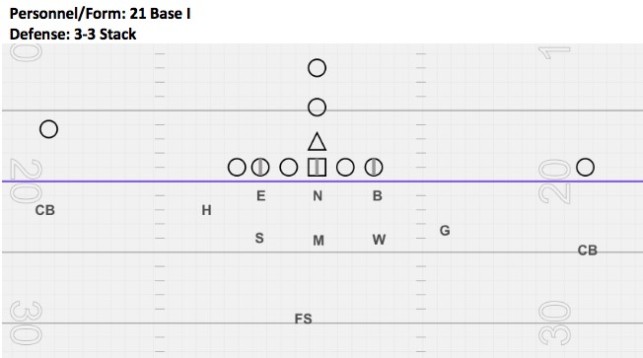
As with most things in football, when it comes to successful defense on the perimeter, it all starts with alignment. Our alignment rules are simple and uniform so that our players can easily understand where to line up and why. Most formations that we see will be spread formations with at least one slot receiver. Overhang defenders are taught to split the difference between the end man on the line of scrimmage and an open #2 WR. We call this a “walk” alignment.

Walk Alignment Rules:

  • Split the difference between the EMOL and the #2 WR
    • OR #2 and #3 vs. any Trips Formation
  • Approximately 5 yds depth
  • Eyes on the OG for run/pass read
    • Trips = Eyes on #3 WR


Diagram 1

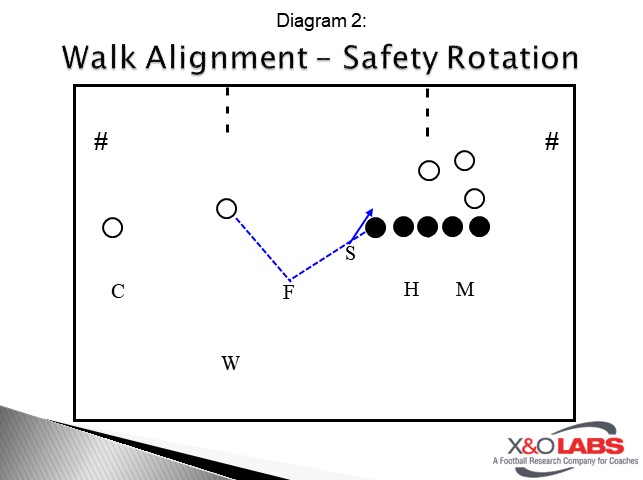
Diagram 2


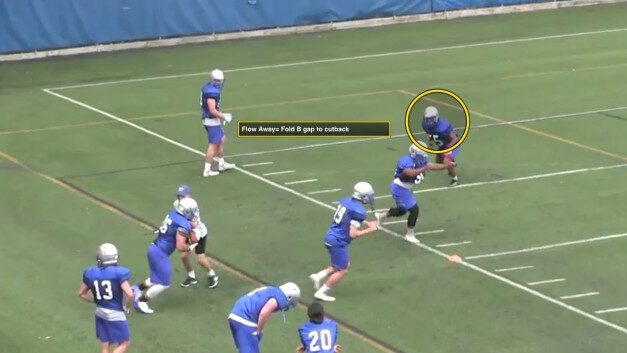
The walk alignment is designed to position us wide enough so that we can be a factor on the perimeter and in coverage, but also to leverage us inside of #2 so that we can avoid being cut-off when folding for inside run. This is “Day 1” teaching for outside linebackers, and when we start to involve the safeties in our rotated coverages, we will use the same language so the teaching is uniform.

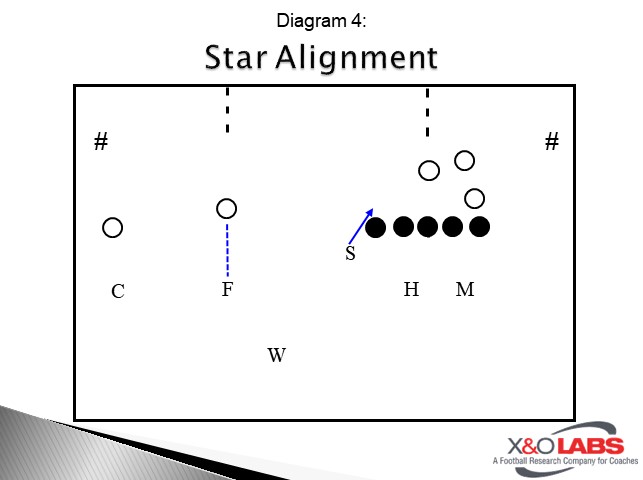
If we are in a coverage that requires our overhang to defend #2 outside the hash, we will make simple adjustments to our standard walk alignment. This is most applicable in our 3-Deep coverages that require our overhang to defend #2 in the seam or in the flat. For these alignments we will use terms like “backer” or “star” in reference to the support calls that we make in those coverages. “Backer” is obviously backer support and “star” is safety support.

Backer/Star Alignment Rules:

  • Align wide enough to maintain outside leverage on #2 post-snap
    • Slight outside, head-up or slight inside
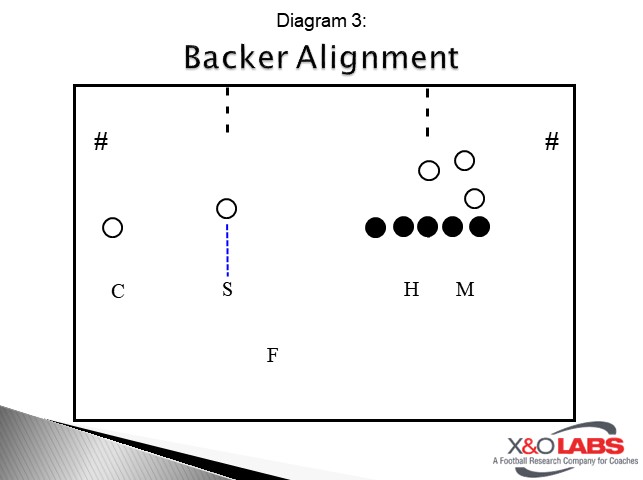
      • Based on match-up/offensive scheme
    • Depth based on match-up and situation
      • At least 5 yds deep
      • Safety can disguise/show two-high
    • See through #2 to the OG for run/pass read
      • Or through #2 to #3 vs. Trips


Diagram 3

Diagram 4


Backer/Star alignments are wider than a typical walk alignment, though the exact width depends on how our overhang matches up with the #2 WR and which types of routes we expect to defend based on film study.

An outside linebacker to a single-width WR aligns in a “hip” alignment. This would occur on the backside of a two-back or trips formation. Our base alignment in this situation is outside of a “ghost” TE with our toes aligned as deep as the nearest defensive linemen’s heels. Depending on the game-plan, we may walk that alignment out as wide as the slant window of the #1 WR.
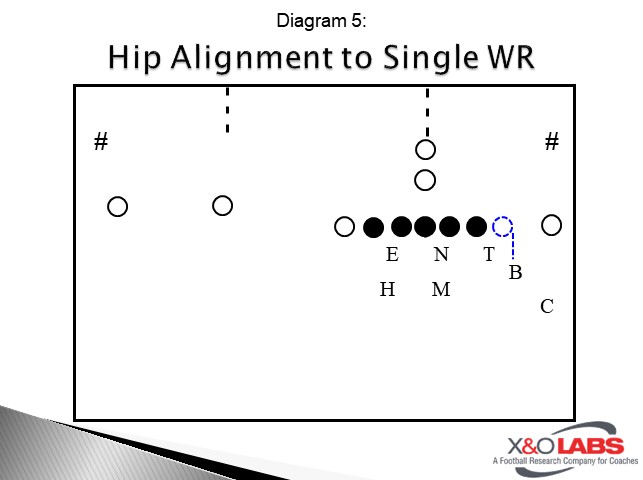
Diagram 5


Hip Alignment Rules:

  • OLB align outside a “ghost” TE at heel depth
    • Possible adjustment to walk inside of #1

      • Split the difference between EMOL and #1 WR
    • Key progression is the same as walk alignment
      • Eyes on OG for run/pass read


Read More

50 + Drills to Improve QB Pocket Presence

By Sam Nichols

Managing Editor

X&O Labs


Introduction

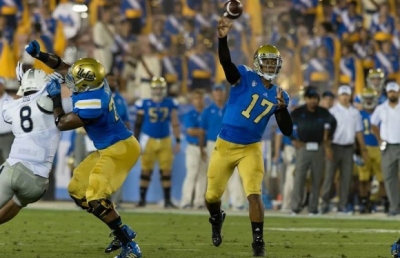
uclaqbWhen we first began conducting research on Quarterback development, we cast our net wide.  We wanted to explore every component of the position:  exchanges, drops, read progressions, throwing mechanics, etc.  What we quickly found is that it be difficult to write volumes on this topic, much less a 10,000-word research report like XandOLabs.com is accustomed to doing.  So we decided to subscribe to the “addition by subtraction” methodology by simply honing in our research on what a QB does at the top of his drop.  How he gets there is one thing- now what does he do when chaos ensues, and whatever well organized scheme or plan flies by the waste side.  Many coaches have told us that the easier part of a QB’s footwork progression is the drop, the most difficult is teaching him to move with the ball post-snap. 
In many ways, the drop is the simplest part of the pass play from a fundamental standpoint.  The answers are straight forward.  While coaches may teach different drops, what a Quarterback does at the top of his drop is essential.  The variables that exist are all determined by the play call and the situation.  But that all changes the second the Quarterback plants his dominant foot and works toward the line of scrimmage to throw the football.  At that moment all of the variables that defenses bring come into play.  It is that moment where a QB’s ability to execute his footwork under pressure will determine his long-term success at the position.  In this case, we will look at how coaches are teaching proper footwork through their route progressions from the last step of their drop to the end of a scramble. 

Establishing a Base

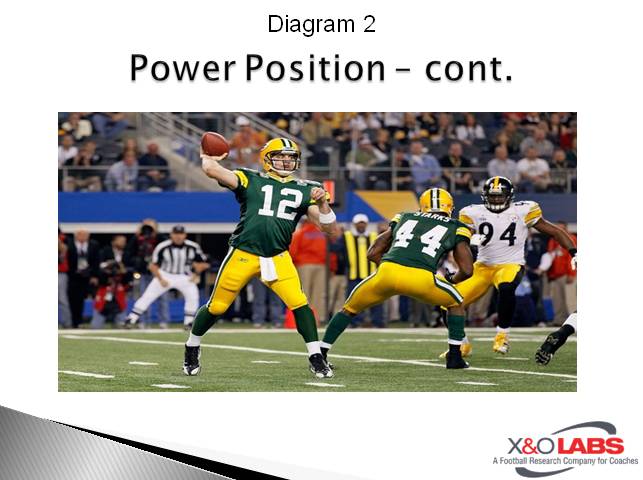
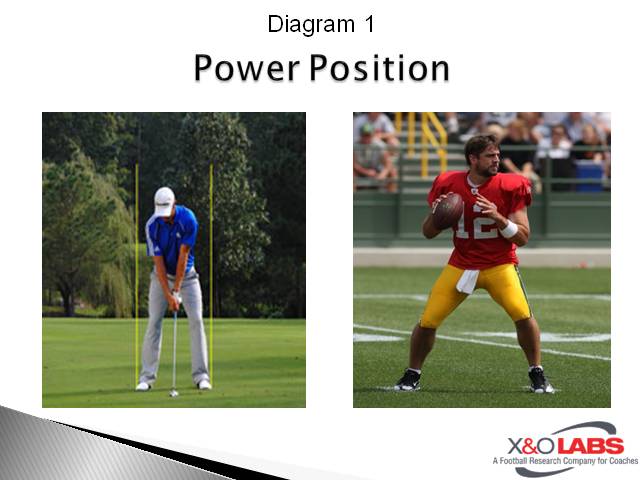
Before we begin with the footwork mechanics, it all starts with a solid base, or what Tommy Zeigler, offensive coordinator, Scottsdale Community College, calls his power position.  This is what he told us below:

The Power Position: I relate the power position to a golf stance.  Feet are usually more than shoulder width apart, weight evenly distributed on the inside part of your feet, front foot/toe NEVER pointed at the target. 

We coach our QBs that every throw should be the same and that starts with the “power position” or their base.  The way we come to find the “power position” is by finding where their stride takes them.  I don’t teach a stride so where their body takes them is where we start.  Once we find the base we will use for each individual QB we take a ton of time becoming comfortable in that position.  We make every throw from the same position stressing the hip turn and follow through. 

Slide1


I teach it this way to cut out on wasted movement and erratic footwork.  Also, by having no stride in our throws we’re less likely to be inconsistent with when, where and how your front foot hits the ground…because it’s already there.  Lastly, by taking away the stride you are less likely to “over stride” point your toe and lock out the front knee thus negating your full hip potential.    

Slide2

One of the more prominent drills that Ziegler does to teach the power position is what he calls the “Manning Drill” which can is explained in his words below:

The emphasis is to keep our QBs in their power position.  Knees bent, elbows relaxed, eyes down field as they work the bags.  First time through is typically done without a throw.  After going once or twice each way I incorporate a throw.

As the QB navigates the bags in his power position I will then randomly clap at which time the QB will make a throw to a WR 10 yards down the field working within the framework of the bags.  The emphasis here is still eyes downfield, relaxed elbows and bent knees…incorporating the throw I talk to the QBs about less being more.  I want them keeping their feet active but close to the ground at all times, never on their toes, never feet close together.  By staying in the power position they can set their feet and make a throw will no time lost and with power and accuracy. 

Read More

Campbell University’s Press Technique Drills

By Bryan Butterworth
Defensive Backs Coach / Defensive Pass Game Coordinator
Campbell University (NC)
Twitter: @CoachButterCU

Introduction

Like most coaches, I feel the best way to teach anything is through a part to whole progression. To do this, we break down each individual step, create a drill, rep it and put it to use in practice so it will be effective on game day. This report will break down the base press man progression we use and teach at Campbell University. This is a four-drill progression that is designed to teach stance, eyes, footwork, posture, release and strike. We will focus on multiple techniques that will allow us to be physical with receivers, disrupt routes and make plays on the football.

Stance

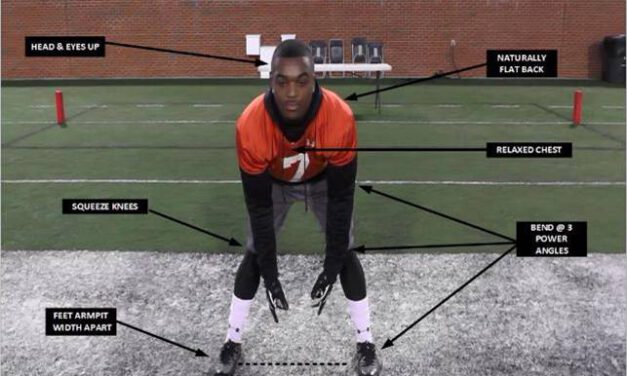
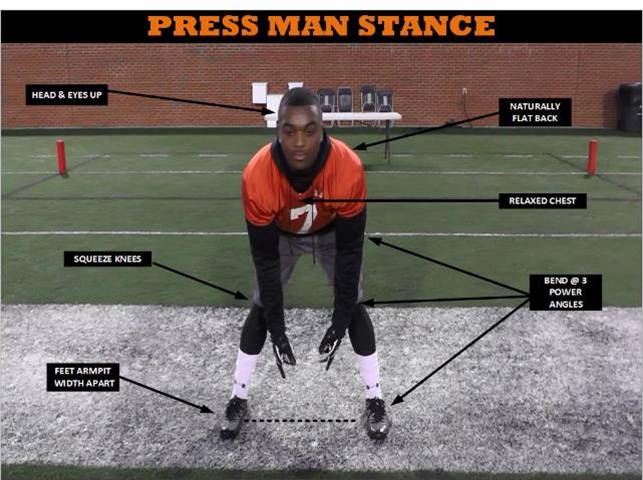
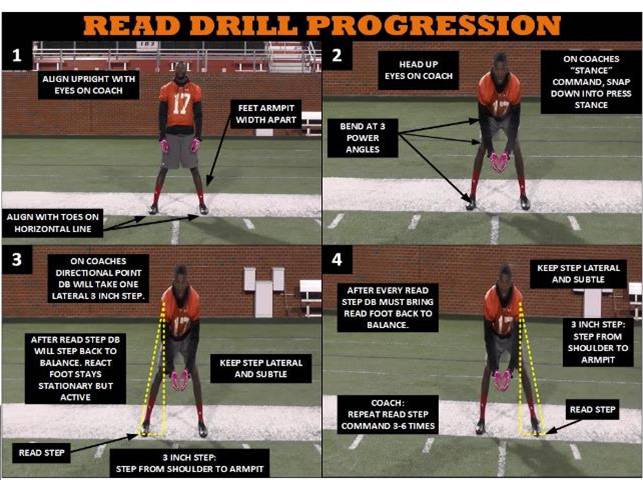
In teaching our press man stance, the key is starting with a great foundation. We align players in an upright position with feet armpit width apart. Every player is different, taller guys might need to have a wider base, as will guys who don’t bend as well. Adjust each players’ base to their own comfort level without compromising your coaching.

Next, we teach the bend. I will give players a “stance” command and they will snap down into a press man position. To effectively get into a respectable press stance players must bend at their three power angles. Players must bend fluidly at the hips, knees, and ankles. At this time, you can measure ankle flexibility by noting whether the players’ heels are firmly on the turf.

With the base side, we move on to the upper body. We teach a nice flat back and relaxed chest with eyes up and on the coach. Any arched lower back or protruding chest will not be acceptable. If the player exhibits upper body stiffness tell them to stand up and “shake it out.” Before putting the player back in press stance, we make them aware that as they bend at their three power angles to “drop” their head and eyes and let their back flatten naturally. When they are comfortable and have a flat back, then we tell them to look up. Bring their eyes to a target while maintaining a flat back. The flat back will eliminate most chest stiffness as well. If there still is some chest protrusion, just remind the player to relax his chest.

Slide1

Stance Coaching Points:

  • Bend at 3 power angles (hips/knees/ankles).
  • Drop head and eyes, let back flatten naturally, relax chest.
  • Eyes up.

Drill #1:  Read Drill

Read drill is designed to teach the proper base and first reactionary step for defensive backs playing press man. Start the drill by aligning the defensive back(s) on a horizontal yard line in an upright position. Make sure that his toes are on the line. I like to use the edge of the sideline as my starting point. Use the line or lines as a visual reference to make sure DB is stepping properly.

If you are working with multiple DBs at a time, make sure that you stagger their alignments on different levels. On the coaches “stance” command DB will snap down into a press man stance with eyes on the coach.  The coach will give a directional point, left or right, and echo the command “read”. On coaches’ command, DB will take their read step with coaches’ directional point. On each “read” command the defensive back will take a 3-inch lateral read step. The step must be subtle and under control. The coach must make sure the step is within DBs cylinder.

Common mistakes by players are overstepping (long steps), stepping too fast, and stepping with both feet. To correct overstepping, we tell the player to step from armpit to shoulder with a read step. It will make the player aware of keeping his feet in his cylinder. Correct fast steppers by slowing the drill down and echoing words like “patient” and “subtle”. Finally, players who step with both feet, make them aware that the foot away from the read step is active but stationary. The foot must remain stationary because after coaches read command and read step by DB, the read foot must come back to balance in DB’s home position. Coaches repeat “read” command three to six times. Make sure player takes good tempo’d lateral 3-inch steps. Players must always finish in the home position. Once defensive back has completed the drill, the coach will give a “melt” command and they can come up out of their stance. 

Slide1

Read Drill Coaching Points:

  • Read step must be short (3 inches) and subtle. Step from armpit to shoulder.
  • Work read steps in both directions, mix it up.
  • Hip level should be the same with each read step.
  • Keep react foot stationary but active. DB’s must exhibit calm feet.
  • Be patient, don’t guess… react.

Drill 2: React Drill

Read More

Training the Eyes and Hands of Defenders to Promote Takeaways

By Anthony Kerr
Defensive Coordinator
Black Hills State University (SD)
Twitter: @tkerr12


Three years ago, we made the decision that we would be a defense built on taking the football away from our opponent. Our priority on game day is to gain two or more takeaways. We stress the importance of takeaways in all our meetings.  We start every practice with a takeaway drill.  Over the past three years, we have worked hard to develop a progression that puts our kids in the best situations to get takeaways. 

For us to reach our takeaway goals our scheme must allow our players to be in positions to make interceptions. Playing zone coverage majority of the time maximizes the opportunities that our players will have to make interceptions. Our zone coverage progression is zone eyes, lean vacate, vice and be alert.


Zone Eyes:

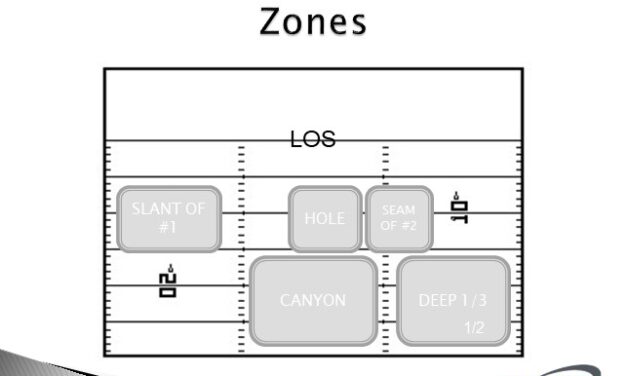
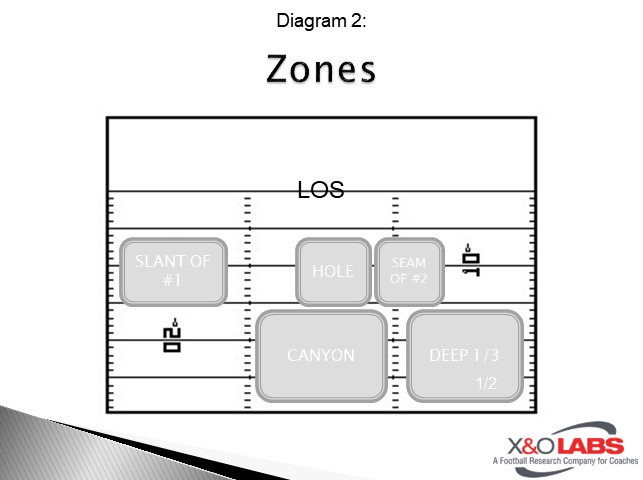
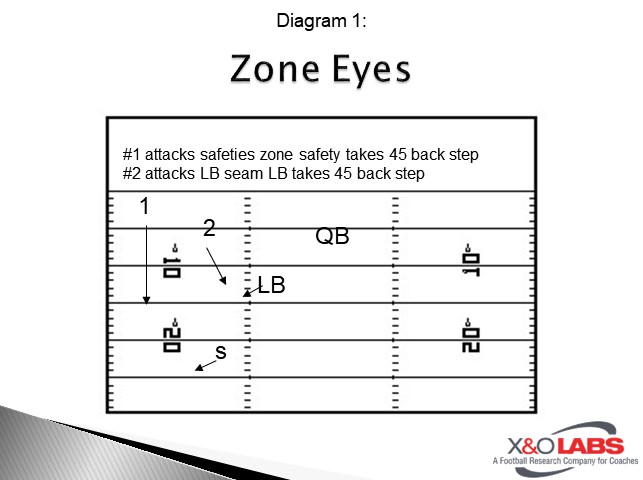
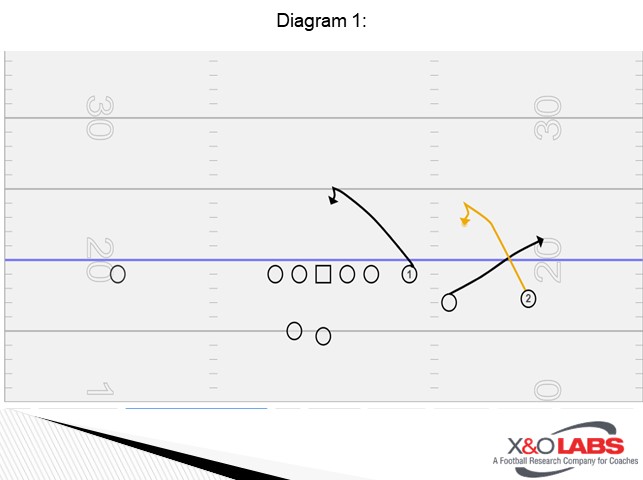
We define zone eyes as identifying the route of the receiver that starts the play in a position closest to the defender’s zone. The route will determine defenders first step. If the receiver is attacking the defender’s zone the defender must step towards the receiver taking the space away. Our defenders utilize a 45-degree step outside and back when guarding against an immediate threat to their zone. We label our underneath zones slant of 1, seam of 2, and hole. Our high zones are 1/3, 1/2 and canyon.

Diagram 1


If the receiver is not attacking the defender’s zone the defender does not need to step. The defender can be patient. After the defender reacts off the receiver the eyes of the defender will transfer to the QB and the defender will react off of QB intentions. Our DL will use zone eyes as well. The DL will read shoulder of QB and react to his intentions getting hands up attempting to tip balls up in the air.

Zone eyes- is a technique emphasized in our skelly drill. Drilling zone eyes in an individual period during practice requires a player lined up in the position that will be a most immediate threat to the zone being emphasized. That player is labeled player A.  If the zone being emphasized is the seam player A would be lined up as a slot receiver.  Player B will line up as the defender in the alignment required by the defensive scheme. The coach will start as the QB. Player A will start the drill by stepping towards or away from the seam.  Player B will react accordingly. If player A steps toward the seam, then player B will execute the proper step to close the space in the seam and then get eyes to the coach to read QB intentions. If player A steps away from the seam Player B will keep patient with his feet and get eyes to the QB front shoulder to read QB intentions.

Diagram 2


To study game film examples of this concept, click on the video below:

Read More

8 Closed Space Tackle Drills

By Mike Kuchar
Senior Research Manager
X&O Labs
Twitter: @MikekKuchar


Introduction

fautackleWe were surprised to find that these types of tackles had a 31 percent missed rate. Open field tackling is perpetually touted as one of the bigger challenges in defensive football, yet we’ve talked to numerous coaches who have worked hard on enforcing how to teach their defenders to make one on one in the hole tackles with limited space around them. While these types of missed tackles may not present the highest rate of big plays, they do present the risk of ball carriers lunging for extra yards on contact, which could result in drive sustainability. We found the following common errors as it pertains to open field tackling:

  • Not staying square on ball carrier
  • Not striking up and through ball carrier
  • Not running feet on contact

So we combed through our drill library to find the eight drills that best presented the most effective ways to fix these issues complete with coaching points and video. We classified them into which of these problem areas they alleviate.

Editor’s Note: The following drills are cataloged in our drill film library. Insiders members can gain access to our entire drill and game film library, which contain more drills done by these programs.

Issue: Not Staying Square on Ball Carrier

In a one on one tackle situation in closed space, the defender must know that he has the option of using either outside in or inside out leverage. But whichever leverage he chooses he must stay square or risk the ball carrier falling forward for extra yards after contact. Chris Ash, the defensive coordinator at Ohio State University talks about keeping the outside hip closed in order to stay square. These are the best drills we’ve found to reinforce this fundamental.

Read More

7 Every Day Drills to Teach Ball Security

By James Guest
Running Back Coach
University of Virginia – Wise
Twitter: @CoachJamesGuest

Introduction:

The topic of ball security is talked about heavily in our game and stats like interceptions, fumbles lost and turnover margin are often used to explain outcomes of games. With this being such a big part of our game, it is imperative that protecting the football is coached well if you want to win games and ultimately keeping your job. Around here, we say that “ball security = job security.”

There are two things I believe in when it comes to coaching ball security:

  1. Teach the fundamentals on how to carry/run with the football and drill it daily
  2. Train reactions that enable the athlete to protect the ball from being in jeopardy.

In the drills below, you will see how we were able to drive home the importance of ball security for our players. The results speak for themselves. Before getting to UT-Martin in 2013, they were last in the OVC in fumbles lost (21). My first year in 2014 we cut them in half (10) (523att) which ranked tied for 2nd in conference. In 2015 we continued the decline and improved to 8 fumbles.

Exchange/Ball Security Drills

Drill #1: “Two Line Exchange”

Drill Setup/Instructions

  • “Early eyes, early pocket”
  • Near elbow up
  • Top hand = thumb down against chest
  • Bottom hand = flat hand against belt
  • Roll over ball with top hand
  • Fake = roll over with top hand

Coaching Points

  • Eyes up
  • Perfect pockets
  • Roll over
  • Snap ball to high n’ tight (outside hand)

To study practice film of this drill, click on the link below:

Read More

Mirror Blocking Progression for Wide Receivers

By Dan Shula
Wide Receivers Coach
Florida Atlantic University
Twitter: @danshula14

Introduction:

The key to any elite offense is generating explosive plays. Generating big plays dramatically increases your team’s chances to score points. For example, here at Florida Atlantic during the 2015 season, 78% of our touchdown drives contained at least 1 explosive play. 

How can WRs help an offense generate more explosive plays? The obvious ways are by catching deep balls and generating yards after catch on shorter routes. However, the far less glamorous way to aid the offense is in the run game. Last season, on our runs of 20+ yards, a WR made a key block on 67% of those runs. It’s these important blocks that turn 7 yard runs into 40 yard TDs. It’s these important blocks that turn a drive that ends in a FG into a drive that ends in a touchdown.

Drill Objective:

This drill is designed for outside WRs that are attempting to block a defender downfield in space.  This type of block typically happens on an outside run or screen.  It is ideal for the WR to give the ball carrier a “2 way go,” meaning the ball carrier has the option to break either inside or outside of the WR. This makes the movements made by the defender much less predictable.  The WR must be able to adjust to the defender and which way he breaks.

The Mirror Progression is made up of 3 phases

  • Phase 1: Mirror (hands behind back)
  • Phase 2: Mirror (hands in front, punch)
  • Phase 3: Diamond drill

Phase 1: Mirror (Hands Behind Back)

Read More

Creating a Stem System for DL to Disrupt Blocking Schemes

By Jordan Fast
Defensive Coordinator
Sioux Valley High School (SD)
Twitter: @RealJordanFast @CossackFootball


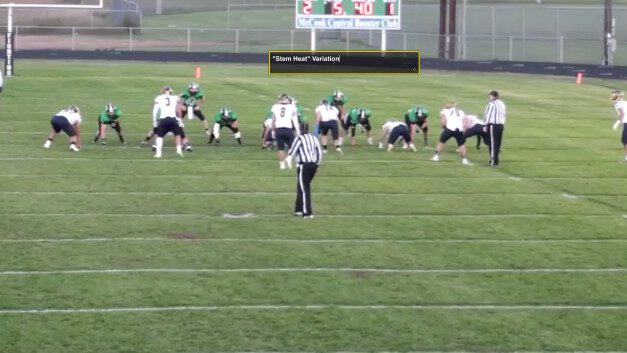
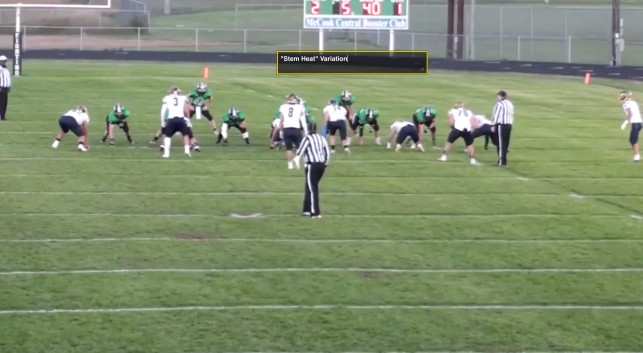
Pre-snap defense line stems create the appearance of complexity, thus creating confusion while giving defense lineman sound responsibilities. Organized stems place blockers in conflict, create negative plays, force offensive lines to have sound blocking rules and allow defensive lineman to make aggressive plays and keeps offensive line pads off linebackers. Every organized and competitive team has spent numerous days working through defensive fronts and blocking schemes. Stems, in both odd and even fronts, place blockers in conflict and creates a defense which is destructive rather than reactionary. Any offensive line can block “vanilla” defensive fronts. Incorporating and using stems among your defensive front will make your players faster and more explosive.

At Sioux Valley, we have a mixture of players who put their hand down on the defensive line. We believe in an aggressive style of defense, which often places eight players in the box.  The reoccurring non-negotiable theme among our defense line players is “no one gets off the ball harder than us.” At Sioux Valley, we place athletes on the line and stems are one way to allow our athletic lineman to make plays. Our Head Coach, Dan Hughes, has integrated a lifting program which has yielded success in order to have athletic lineman who can get off the ball. Sioux Valley defensive linemen are extremely strong in the hips, core, and explosive muscles. This tactic yields success in pre-snap movement among our defense. Our players can be even faster and more explosive if we place them in situations which allow them to showcase their weight room gains.

Eighty to ninety percent of our defensive line strategy is gap alignment. Stemming allows us to show a gap and fill that gap, or show a gap and cross-face into a gap with which we were previously aligned. Every stem has a counter action. Just because we stem over, this does not show which gap is each player’s responsibility. Along with deceptive defensive line gap alignments, stemming allows second level players more opportunities to mix in simple blitz schemes, which appear very complex in cohesion with stems, but are very simple. Mixing in stems will also keep second level players pad free from offense lines blocking linebackers.


Communication

Sioux Valley is a communication-based team. With this pillar in our framework, stems force communication and the recognition of offense formations and alignment. Each stem is tagged with vocabulary, which dictates the action of each particular stem. Stemming action is dictated by the strong (Sam) and weak (Will) side offense alignment. Second level players establish which is the Sam and Will side. Defensive lineman should never have to think, only react. The defensive line needs second level communication to function as a unit. Every year, within the first two weeks, a defensive lineman will become upset for lack of communication from the second level because it is creating confusion on his stem. This leads to a healthy opportunity to reinforce communication, which leads to increased recognition of offenses and more complex reads. Stand up players will vocally state their position, such as “Sam left” or “Will right.” This commutation conveys on which side stems will take place based on the call sent in by the coach.  Here is the order of our communication to stem:

  1. Coach relays a number to the signal receiver using wristbands
  2. The receiver transmits the call to the rest of the defense
  3. Second level players establish Sam and Will sides which dictate the action of stem or another action is applicable.
    1. Based on weekly check calls, defensive captions, traditionally the player(s) who establishes Sam side can “kill” called actions.


Vocabulary

Our basic stem vocabulary using Sam and Will calls:

  • Down: towards the Sam side
  • Up: towards the Will side
  • Fluster: Back to the gap you started on


This is our basic vocabulary.  Upon mastery, you can begin to merge these.  For example, “Up Fluster.” Now players will stem to the weak side and return to the gap they started on. As an introductory to stems, we simple use Fluster, which in more complex thought would be “Down Fluster” 


Progression:

We start with simple stems during the summer and from day one. While we may stem as little 10% to 50% in game action, many of the reps that we drill on in practice and team time contain pre-snap movements. The more time defense lineman spends practicing stem actions the quicker and more confident lineman become. Practicing stems more than we use them also forces team communication and defensive line engagement during team time. Now defensive lineman has to cognitively engage in team play, rather than the monotonous activity of beating the gap or JV player across from them. Stemming also forces defensive lineman to know defensive techs/alignment.  In order to build vocabulary and practice stems, here are just a couple ways we use to build on stem progression:

  • Sled work
  • Football on a stick drill work
  • Team pursuit drills
  • Handbags or shields drill work
  • Individual time defensive line time before games


When do we Stem?

Read More

Using Pullers in the RPO Game

By Phil Hamilton
Offensive Coordinator
Saint Vincent College (PA)
Twitter: @coachphamilton


Adaptability is so important in today’s fast-moving society.  It is also vital on the football field.  Defenses have slowly but surely adapted to the “RPO” world we currently play in.  Having the ability to continually keep a defense on their toes is always at the forefront of our offensive game plan.  RPOs and Play-Action Passes are an integral part of our system.  Because of this, adapting and enhancing the run game, while incorporating passes off of it, has been imperative.  With the idea of keeping a defense aggressive, using pullers is effective. 

Essential Coaching Points:

The first essential coaching point of any RPO or Play Action Pass is ball-handling.  When we start this process in practice, our quarterbacks must understand the importance of making everything look exactly like run.  Defensive players, at their core, are just like dogs; if you show them a piece of meat, they will run to it.  The quarterback must treat every RPO or Play Action Pass as if we are handing the ball off.  When it comes to the RPOs, we stress the importance of riding the ball hip to hip.  This gives the quarterback ample time to make his read, for the defensive player to react, and for him to make an educated decision on what to do with the football.  When the quarterback gets a pull read, we want to stress being “violent” with the football. Rip the ball up into a perfect stance and let it rip!  If he hands the ball off, we stress the same things–carry out your fake!

The second essential coaching point is the demeanor of the offensive line.  Just as the QB does, the OL must treat RPOs and Play Action Passes just as we would any run play.  With the leeway that they receive to push up to three yards downfield, they have plenty of room to block for the run while keeping their boundaries in the back of their mind.  Coming off the ball with aggression is key. 

The third essential coaching point is the demeanor of the running back.  At the risk of sounding like a broken record, the running back must treat these types of plays like he is getting the ball.  In the RPO game, the running back has a very good chance to receive a hand-off, so whether he does or not, we want him to go through his read process; carry out the fake as if you have the football. If the RB attacks his aiming point and cuts off his blocks, he is always able to get reps at reading the run game, even if he does not have the football.  With all fakes, if we are able to take one defensive player out of the play, the job has been accomplished.

Pin and Pull Concept:

Pin & Pull is a great way to get our big guys blocking smaller guys.  It takes some athleticism for the OL, but it also gives our running backs a way to get into open space quickly.  Being able to incorporate run/pass options off of Pin & Pull has helped us tremendously.  There are several ways we can do it.  We always want to identify an aggressive defensive player.  Whatever level we are attacking, we want the defense to return to their core identity: aggression.  With their aggressive nature, we gain numbers in the passing game.  If they are coached to take a more passive approach, we will have favorable numbers in the run game.  Pullers tend to emphasize run and bring out that aggression, especially when multiple guys are pulling.

Reading a Linebacker:

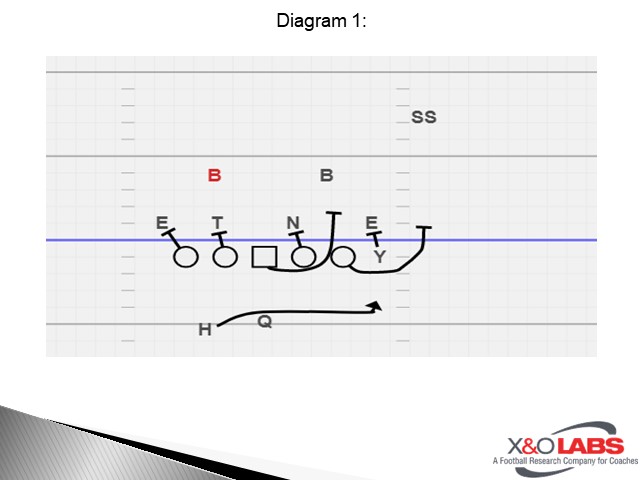
Diagram 1

When we have identified the read linebacker, our next step in design is the pass concept.  When reading a linebacker, we always would like to have something quick behind it.  We love to keep our quarterback in a 1 to 2 read.  Give him two options.  Throw the first, until it is taken away.  Shift your hips and throw the second.  As a quarterback, we have to know that the OL is not pass-blocking! The read and throw must be quick. In both of these examples, you see the quick hitters we have in place behind the linebackers.  The aggression of the linebackers is accentuated by the pulling action.  In both cases, each linebacker is sucked in by the action, leaving great throwing lanes.

To study game film of these RPO concepts, click on the video below:

Editor’s Note: Coach Hamilton has provided clip by clip narration of this playlist below.

The first, double slants, is good against man or zone coverage.  Although we lose a man up front, the quarterback does a great job of maintaining his base and moving to his second option. The first window is open, but because he has to move, he throws the outside slant.

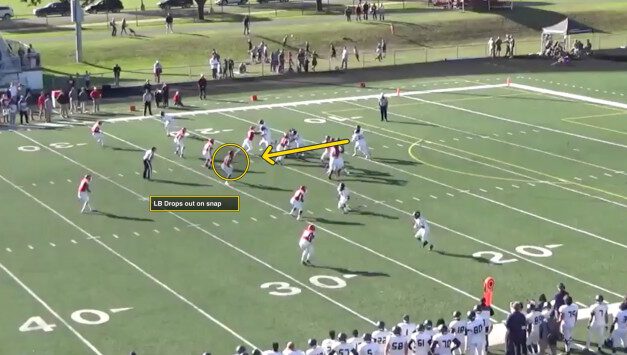
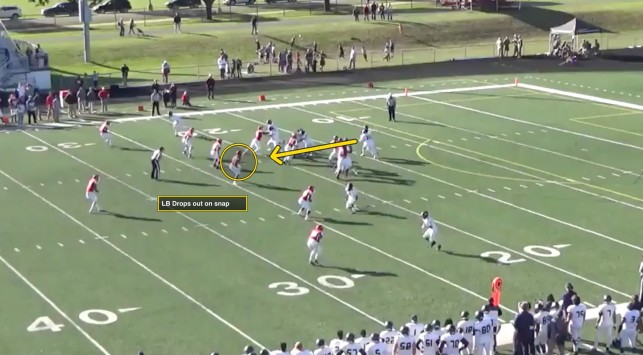
In the second clip, you see the backer in the box drop at the snap.  This is great for us.  Most linebackers trigger when they see pullers.  In this case, his aggression has been taken away.  By dropping out, we now have a hat on a hat. 

In the third clip, we receive heavy pressure off the edge. Blitz provides us two ways out; make the quick decision to throw or hand the ball off to and not take a hit. In any offense, limiting quarterback hits is essential. The quarterback does a great job of making the decision to hand the ball off.

The fourth example is a slant/bubble concept.  Again, this can be used against man or zone coverage.  Our receiver does a great job of attacking leverage and causing the defenders to collide in man coverage.  The route is great, but the quarterback performs perfectly here as well.  He gives great ball action, riding it hip to hip.  That action allows the defense to react.  Being inside the ten-yard line helps as well, attacking the aggressive nature of the defense in the red zone.

The fifth clip is gray.  The quarterback makes the decision to give the ball because of the linebacker whom we are reading “slow plays” it.  Being decisive is huge in this offense, and the quarterback does a good job with that here.

Read More

IZ Leverage Drills for 1st/2nd Level Blocking


By Mike Fossum
Offensive Line Coach
Wisconsin Lutheran College


Introduction

There are many challenges in coaching NCAA Division III football, but having consistently huge/physical offensive linemen is certainly one of them. At Wisconsin Lutheran College, we have been working for years to reduce our inside zone play to the simplest form possible to fit our personnel and our spread offense (wide splits and no tight ends). Our A gaps are typically 3 feet in width and our B gaps can get as wide as 4 feet at times. That width has forced defenses to quickly define themselves and puts our OL in advantageous leverage positions while also creating natural seams for our ball carriers. If our players understand what they see in front of them and know how to use their leverage, then we are able to effectively execute the zone/read play as a base part of our offense.

The drill sequence that I will demonstrate in this report will cover a few of the fundamentals we believe in for blocking the 1st and 2nd level within our zone scheme.

Body/Leverage Drills

I am a big believer in having players understand what a good “fit” position is as opposed to a bad “fit” position. One of the real keys to great OL play is being able to correct yourself when you are out of position. We have a series of body/leverage drills that help with this.

Bad Block Drill

Here we are training the body to recover and understand how a proper fit position feels. A blocker starts out in a good fit position, squatting in front of a defender with inside hands, head up and a solid base (knees under armpits, toes under knees). The defender slowly walks backward while holding the blocker’s elbows. The blocker keeps his feet stationary and allows his body to get way out in front of his feet. Just as he is nearly going to fall forward we have the blocker widen and fire his feet, lower his hips and raise his eyes to “recover” back into his starting fit position. This is very much a low speed drill and is really all about body awareness for the blocker. On the demo video you’ll see a good look at this drill, the only coaching point I’d emphasize more is bringing the head/eyes upward during the recovery action.

To study narrated film of this drill, click on the video below:

Read More

Bracketing the X in Trips Formations

By Ty Gower
Defensive Coordinator
Norman North High School (OK)
Twitter: @coachgower

Introduction:

At the 6A level in Oklahoma, it seems almost everyone has a big time FBS recruit playing the X. Due to this, it was imperative for us to find ways to combat our opponents who would get in 3×1 formations and isolate the X. At the same time, it was important not to live in the same coverage to the trips. For that reason, we found multiple ways to play trips. This kept the offense guessing by what coverage we were playing while keeping us sound to the X’s side.

The “Walk” Concept:

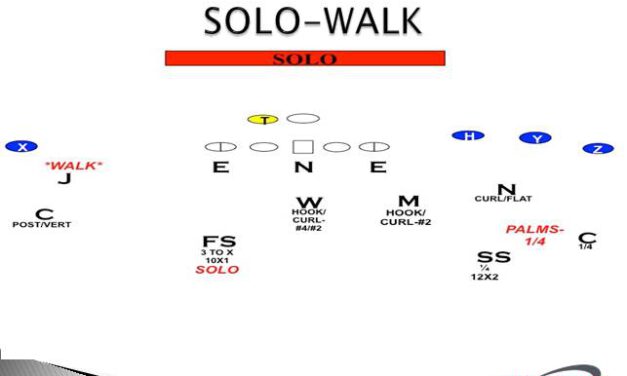
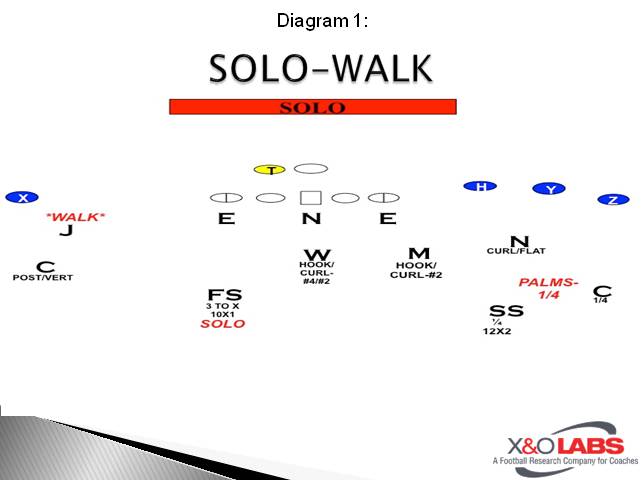
The “walk” call within our 3-4 has allowed us to play a variety of ¼ based coverages such as palms or a quarters to #1 and #2 receivers, and “solo” to the #3 receiver (Diagram 1). This makes it an easy change up to trips, but also giving us the ability to play 2 on 1 on the single receiver side (X). Although we might have taken away the X, it was still important that the offense didn’t get too comfortable seeing the same coverage to trips. For that reason,  we employ a mixture of palms, cover 4, cover 8, and off man to that side.

Slide1

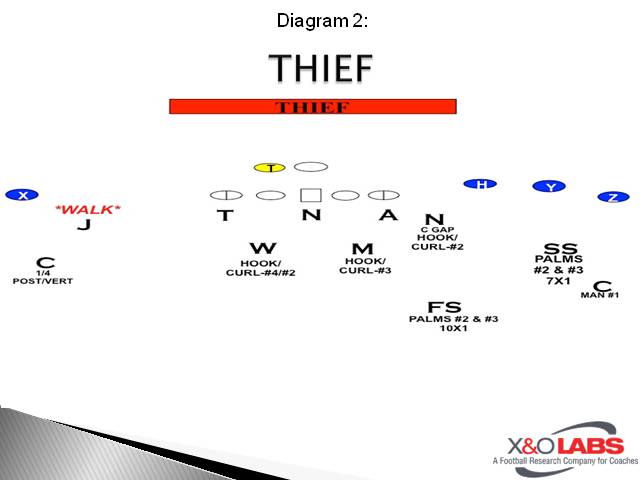
What also made our “walk” call effective was the ability to play various palms coverages on #2 and #3 receivers. One of which being our “Thief” coverage (Diagram 2). In this diagram, we are playing a palms coverage on #2 & #3 with the SS and FS, while still maintaining a true six man box with “20” Linebackers. This worked well because we were not teaching a new concept to anyone except the SS, who becomes like the “Palms CB.” Because of our flow fit concept of the inside linebackers, we were gaining a “flow gap” player in the WLB. That said, we found gap scheme concepts to the weak side could cause us issues at times because our force player was slow on same side power/dart weak. Now it was our turn to find answers for having a fast force player, but still keeping the ideology of our defense and “Defending the X.”

Slide2

Coaching Points:

To go back to our walk call, it was so easy to install due to we didn’t have to teach anything new out of our base structure to trips. It also fit how we were playing flow fit run fits with the inside linebackers. While the OLB was the C Gap-Force player, we were still able to pick up an extra C gap run player in the WLB. On our walk call, we taught the OLB like a “Cover 5” CB. He would have an inside technique on the X with his hands on and wall to the sideline. At the same time, he had to be very aware of where the RB was. If the RB was away from him, he had to trigger fast and was not allowed to get his hands on the X.

While the pre-snap disguise was there, it was not always effective due to “run action” by the QB/RB mesh. For this reason, sometimes we found that we were defeating the purpose of the “walk” call.  This forced us to find another a variation of keeping the “2 on 1” thought process on the X.

To study game cutups of the “Walk” coverage concept, click on the videos below:

Editor’s Note: Coach Gower has provided segmented clip narration for each cutup below:

In the clip below, here is our walk concept. This was the first game of the season in a new defense, so we were still working out some kinks. Notice how the OLB gets hands on and is physical with the X. Because the RB is set to him, he knows he can more physical on the X. Would like to see him wall to the sideline, but will take the physicalness. Also as we discussed earlier, notice the flow gap fit by the WLB that allows him to flow into the C gap.

Read More

Using Read Families to Train QB Progressions

By Jeff DiSandro
Offensive Coordinator & Quarterbacks Coach
Bishop Kenny High School (FL)
Twitter: @Coach_disandro


I am going to talk about some of the basics of our passing game.  I like to think that our approach with the passing game and pass installation is just one way of “doing simple better.”  As I work through our pass game structures, I will also include some specific comments on game planning pertaining to the concepts and ideas being discussed.  I am going to intentionally stay away from QB fundamentals discussion for the focus of the article.  I want to thank X&O Labs for being a tremendous coaching resource and I know I have learned a ton from other coaches over the past few years. 

To start, we are going to break our passing game down into four major types of read families.  Our major read categories are progression reads (P), defender keys (K), matchups (M) and combinations (P + 1).  All playbook plays and potential additions in the passing game will fit into one of these read families.  Each week our staff will spend time analyzing each these structures and how those read families will influence the defense we see (for our advantage).  We work hard and drill the QB on the differences between each family and thus how our plays are designed to attack the defense.  At times we may seem very multiple; especially in the passing game, but we are not.  Every play we have fits into a family of QB read types and once he (the QB) identifies the nature of the family and what we are trying to do he can have confidence and mental command with his processing week to week.  I am very picky and about the QB reads in the passing game.  As a coach, if I am not 100% certain on what we are trying to accomplish and how it fits into the above-mentioned families then how can I expect the players to be confident?  We do build and add as the season goes on but as coaches, we must be certain that how we present plays and our plan to the kids (and the QB) and it must neatly fit into the above schemas we are creating in the passing game.  We always talk about putting players in a position to succeed and this is one of the ways we do that regarding throwing the football. 

Progression reads (P)   

The first family we start training the QB with is our progressions reads.  These are pure progressions and the QB will learn to work through a primary, secondary and check down route (1-2-3).  With almost all these concepts, we are trying to build some type of 3 man passing triangle.  We group all our progressions as either weak triangles, strong triangles or middle triangles.  Grouping our progression reads this way helps me arrange my practice and film study teaching time and be efficient and organized with my teaching methods.  We like our passing triangles no matter the coverage or defensive structure.  These are calls that we like to think of as “coverage proof.”  This just means that we don’t look for a specific cover 3 or cover 2 looks to work a certain progression.  Through the game planning, the coaching staff will decide how we want to flood the field or what specific triangles we want to use.  Using formations and different motions, we are always trying to find ways to put our 3 on their 2 or our 3 on their 3 with some type of winning leverage.  Again, we can deploy a variety of progression reads and the QB can feel confident in being diverse so long as we communicate the family and get him to understand how this play influences the defense.

Diagram 1

QB progression is sit, curl, flat. This is a strong triangle. 

Game plan thoughts would be how do you want to flood the field (formations?).  No matter how many ways you choose to do it the family the basics don’t change for the QB.  What personnel groups and formations will utilize your best players and put them in primary or secondary spots in the route concept?  For example, will you see middle blitz in a certain area of the field, and can you work the middle sit to an explosive athlete in that situation?  That could require you to move an athlete around a little, but the basics and nature of the play don’t change at all.

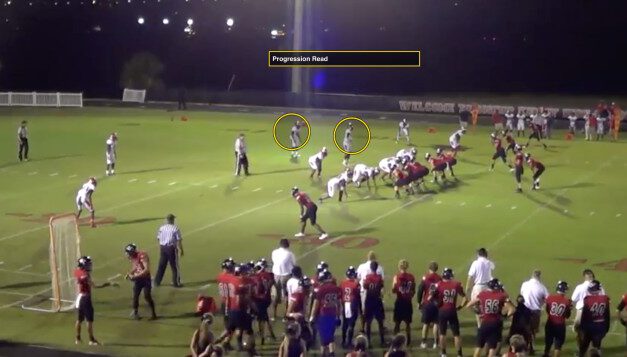
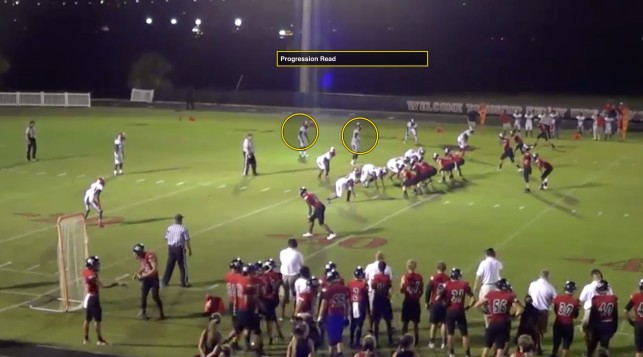
One of the big things with the QB in the progression read family is for him to avoid locking into a wide receiver during the play.  We work hard on repping the QB and his eyes and we want to create good habits of field awareness in the progression passing game.  One of the drills I use for progression reading is shown below.  We do a lot with the drill.  Not only is this a good way for the QB to develop the ability to move through progressions and create some situational awareness but it is also a good way for me, as the coach, to teach the defensive coverage reactions and how the weeks opponent will match our concepts.  It is the QB’s job to evaluate those spots (or a phrase I use is do you want to buy this land) and throw the football into the open grass.  As mentioned above the QB cannot lock into a WR.  A lot of the interceptions that happen on progression reads can be traced back to locking onto a WR in the progression and losing that awareness – thus not feeling/seeing a defender that eventually can make a play on a throw.  All the QB footwork is tied into the progression, meaning he always has rhythm, hitch 1 or hitch 2 with the internal clock in his head.

Drill 1 – Progression Drill Ideas

3 cones will act as routes being run into the appropriate areas.  Our spacing concept has a sit over the center at six yards, a mini-curl that adjusts off the flat defender and an arrow / flat throw.  The colored mesh or cloth will form a box around the route to help the QB gain specific progression or triangle awareness.  We talk the QB through each route in the progression and review how the trigger players may or may not meet the colored mesh near the cone and route.  We will cover how the specific defense that week will react to our spacing progressions.  All of this is designed to get him to play with triangle awareness within his progression reads.  I also use this drill to review any special scenarios and play call situations we might encounter.

The drill is a good way to teach about defenders within the coverage scheme and how spots of the field get covered and routes become dead thus moving the QB to his next progression.  The drill has some flexibility because the coach can work specific parts of the progression, simulate different defender tendencies or have the QB just work eyes and throwing to open grass based on simulated awareness.  One way we would add to the first skill is to add a pressure or pocket movement component to the drill.  We will still work QB football and progressions all the same but add a 3-man DL rush and force the QB to fit in the pocket a variety of different ways while keeping his eyes down the field.

This is our spacing concept to the trips side.  The QB reads are Sit, Curl, Flat.  We would like the #1 WR to throttle into the open area or grass better in this situation.  We teach this curl as adjust off the flat area and he can sit in a first window or second window based off the flat defender response.  He should present numbers and hand target for the QB.  #2 (the flat route) must get width as his route really helps create the stron

Read More

3-3 Stack Adjustments to Handle Heavy/Unbalanced Formations

By Brock Harney
Defensive Coordinator
La Crosse Logan High School (WI)


Defensive packages benefit from having “canned” or “automatic” adjustments to different situations designed to put stress on a defense.  Every defense installs a coverage check or base adjustment to Trips formations in the passing game.  In order to be sound and prepared, defenses must also have a base adjustment to:

  1. Heavy Personnel (31, 32, 22, or other creative sets with 1 or no WRs)
  2. Unbalanced Sets (Any set that only has 2 players on the LOS on one side of the ball)
  3. An additional offensive lineman on the front (Extra OL- we refer to as “Fat”)


Failure to prepare for these situations will cause breakdowns in run defense in the same way that failing to account for Trips/Empty/Quads will cause breakdowns in pass defense.  Defenses usually know how to adjust to these groupings once presented with the formation, but the challenge lies in teaching players to recognize these situations and go to adjustments before the offense can use the formation to their advantage.

Our version of the 3-3 Stack is predicated on control of the interior 6 gaps, C gap to C Gap.  Depending on personnel, we may do this by playing a single gap control defense or by having specific players playing 2 gaps.  Regardless, our 6 players in the box must be able to shut down the interior 6 gaps in order to be sound vs the run.  Adjustments to heavy and unbalanced sets largely involve the players responsible for setting a hard edge and 2nd/3rd layer support behind the front.

Diagram 1


3-3 Adjustment Rules


Heavy (31, 32, 22, 23 Personnel)


CB/FS (Defensive Backs) Adjustments:

The defensive backs adjust to Heavy personnel groups with a “wide as the widest” rule.  The CB will align as wide as the widest eligible WR.  The down safeties (Hammer and Gun) will remain down to provide a hard edge in the run game.  This adjustment provides support balance in virtually every Heavy situation they encounter.  In situations where there are no WRs removed from the box (23 Personnel), the FS is able to tighten down to a Robber alignment and scrape to action while the CB’s provide a deep ½ vs the pass on each side.


H/G (Down Safeties) Adjustments:

The two down safeties will typically align 3×3 on the EMLOS but will adjust to 1×1 alignment vs Heavy Personnel.  In these situations, they become run first players that set an ultra-aggressive edge and lever plays back to the interior 6.  If the scouting report shows that the offense is likely to show a lot of Heavy personnel, this position may be subbed with an OLB or a really athletic DE that can handle themselves in space.  The down safety positions tend to be the most reliable players who are both sturdy and athletic.


S/M/W (Linebackers) Adjustments:

The primary goal with these players is to maintain stack alignment against these personnel groupings while really keying these players on what an offense is likely to do.  It is important to know if the offense is in Heavy to gain leverage on the edge or if they are in Heavy to create run gaps inside.  These players will fit based on the line call given to the front (Gaps or Slant) and take care of their interior 6 gaps.

Read More

The Navy Way: Combos, Scoops and Veers

By Mike Kuchar
Senior Research Manager
X&O Labs
Twitter: @MikekKuchar


Introduction

Regardless of what offensive system you run, you must admit you’re curious about the flexbone. How can this offense produce the top rushing numbers year in and year out despite an often disparity at talent? Sure, the basis of this offense is to run the football, but we’re talking about yards per carry here. Specifically, 5.7 yards per carry over the last four seasons as it pertains to the Naval Academy. In fact, of all the major rushing categories (yards per game, yards per carry, yards per season) the Midshipmen have only been out of the top five two times in each of those categories since 2013.

We were curious too. So, we took what are believed to be the three cornerstone blocks of the flexbone offense, the front side combination, backside scoop and veer release, and organized an exclusive first person tutorial with offensive line coach Ashley Ingram to learn how he taught these blocks. We spent a day with offensive line Coach Ingram this spring to research how he teaches these three blocks. As hard as it was to fight the urge to tour Annapolis in the spring time, we hunkered down in the backroom facilities at Navy to study how he’s able to get his offensive line to perform at such a high-level season in and season out.

You don’t need to run the flexbone offense to learn from this report. If you run outside zone, you scoop on the backside. If you run gap schemes, you combo on the front side. And if your offensive menu has any option element in it, you’ll need to teach the veer release to evade the read key. At its bare bones, this report is about how to teach offensive linemen to get off the ball and play with a physicality that is unmatched. Its what Navy does.

Teaching the Stance (Diagram 1)

Slide1

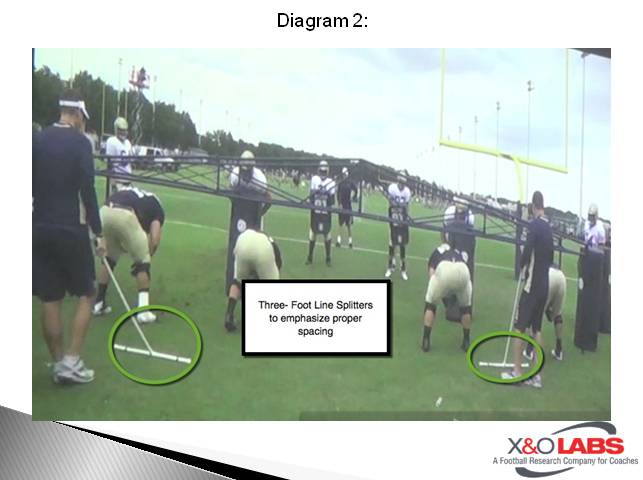
When you watch Navy’s, offensive line get off the ball, and boy do they get off the ball, you will notice the almost sprinter like stance used by the front five. Their feet are directly under their armpits with some air under their heels. The front hand is a good deal in front of them. Although Coach Ingram down played how important weight distribution is by just talking about having the weight forward, he did emphasize how important it was to have depth off the football. “We push it to legally breaking the belt line of the center,” he says. “We only cheat on the ball if the defensive line plays back on us. We put our hand on the toe of the center. Our helmet will break the belt line.” In order to teach a three-foot split across the front, he’ll start each of his individual drills with a line splitter that you can see in the diagram below (Diagram 2).

Slide1

In order to execute the backside scoop block more efficiently, he teaches both a left hand and right hand stance. “Our left side linemen play with their right hand down with a right foot stagger,” he said. “Our right-side linemen play with their left hand down with an inside foot stagger. The outside foot should be a little more cleated than the inside foot. Our inside hand is down on both sides which helps with scooping because that’s the hardest thing in our world.”

Coaching Points on the Stance:

  • Feet Under Armpits, narrow base
  • Weight in front of body
  • Toes and Knees up field
  • Teach both a left hand and right hand stance

Coach Ingram provides his tutorial on how he teaches stance in the video below:

Read More

Protecting Your Gap Runs Vs. Common Defensive Adjustments

By Mike Kuchar
Senior Research Manager
X&O Labs
Twitter: @MikekKuchar


Introduction

fordamOffensive coordinators don’t want to be taken out of their rhythm and how defenses do this is by eliminating what offenses run most efficiently. If gap run concepts are one of your most efficient run concepts, defenses will find various ways to combat these schemes. Below are what we found to be the most common problems defenses pose to gap scheme run concepts and more importantly how offenses are alleviating these issues.
Problem #1: Kicking Out the C/D Gap Defender at the Point of Attack

Whether you’re running your gap scheme to the open or closed side of a formation, it’s imperative to get a kick out block at the point of attack or the play stalls. And while some offensive coaches will preach a “log” block to account for aggressive, spill defensive ends, we’ve found that the majority of coaches will force the kick out regardless. How they are able to force the kick out block is presented in the following methods.

Solution 1: Varying Footwork of F, Justin Gumm, South Beloit High School (IL)

“The technique we use with our F when kicking out is critical to the success of the play. He steps with his outside foot first, so on his second step his hips will be open to the end. This ensures that he doesn’t get beat inside. If he were to step with his inside foot first, his next step will then leave him vulnerable to getting beat inside. He must gain ground towards the line of scrimmage with the first step to ensure he is not reaching and opening up the gate for the defensive end.”

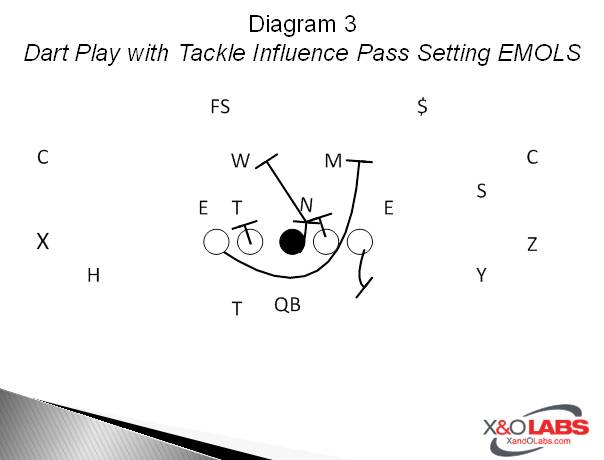
Solution 2: Dart Scheme Variation, Ryan Schleusner, Offensive Line Coach, Fairmont State University (WV)

“We would use this against teams that were consistently ‘trapping the trapper’ or defensive ends that were easier to block by pass setting than by pulling and kicking out. As you can see, all that we have done is eliminate the kick out block by pass setting the play side EMOLS. It should be noted that this play can only be effectively run to an A gap defender without having to change all of your base counter rules. It should also be noted that the tackle who is pass setting must ‘invite’ the EMOLS to beat him up field and pin him there or he must actively engage the EMOLS if he does not use a hard pass rush.”

To see video of this technique, click on the video below:

Read More