The Pistol Triple Option and PAP Package with Duo Blocking

By Eric Davis
Head Football Coach/Offensive Coordinator
Mankato East High School (MN)
Twitter: @davismn6


Why the Pistol Triple Option?

The Triple Option is one of the most prolific rushing attacks ever invented. When combined with elements of the modern passing game, we believe it provides us with the best way to attack high school defenses. Our offense attempts to blend some proven offensive philosophies into a cohesive system that fits our program. Simply put, we are going to align in Flexbone formations and force our opponents to defend the Triple Option along with an Air Raid-style vertical game. Our experience has been that the threat of the Option keeps pass coverages relatively simple and the threat of a competent Passing Game makes exotic option-specific defenses difficult to execute. We use the Option and the Quick Game to move the ball while we look to take our shots and score points with the Play-Action Pass (PAP).

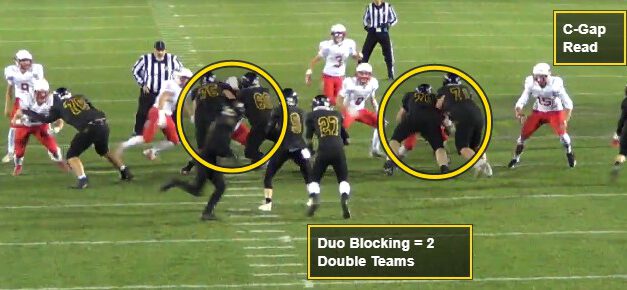
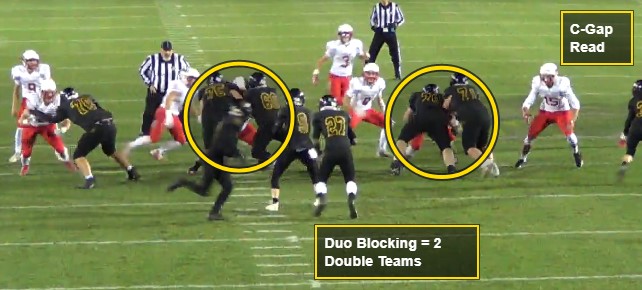
We ran the Flexbone from 1999–2007 and it is a great offense. Nothing written here is intended to disparage a system which is enjoying yet another resurgence with the recent success of the military academies. Our use of Flexbone formations is intended to create 8 Gaps for the defense and our use of Air Raid concepts and coaching techniques is intended to present 4 credible vertical threats. Our blocking scheme for the Triple can best be described as Duo Blocking with a C-Gap Read.
 

We run our offense from the Pistol for the following reasons:

Enhanced Passing Game: today’s high school players are far more proficient at throwing and catching the ball than they were when the Triple Option was invented 50+ years ago. We’ve averaged 18-19 passes per game in our two seasons of running this offense. Our QB depth is 4 yards, which simplifies all of our pass drops and helps our pass protection.

Easier Mesh: our experience is that our Pistol Mesh is much easier to master and maintain than the Inside Veer Mesh from under center. This frees up practice time for us to diversify our offense. It also allows our QB to get downhill off the Mesh even if we’re getting no better than a stalemate upfront. We don’t have specific Mesh Drill periods each week as we did in the Flexbone. Rather, we film our Inside Run periods with the offense coming off the sideline and the ball being snapped on a stripe, meaning the Center, QB, and TB are all straddling a straight white line pre-snap with the camera behind the TB. We originally did this to give the TB a landmark to follow on Midline, but we have found it useful for other phases of our offense, including the Triple. The QB is also getting more realistic reps with the offensive and defensive fronts out there as he reads defenders.

Adaptable Dive: rather than trying to pry open a crease in the defense, we are trying to push the Front vertically with double teams and gap blocking. Our Dive can hit anywhere from the frontside B-Gap to the backside B-Gap, meaning that the Triple can act as its own counter-play. This also allows us to run the play to 3 technique side of the defensive front, which is a common deployment against the Triple Option. Finally, the depth of our TB opens up a large menu of complimentary runs. Last season we ran Duo, Isolation, Trap, and Tackle Wrap as changeups to the Triple Option.

Some of the position labelings in the following diagrams may be confusing.  We don’t use traditional X and Z designations.  Instead, we have Field (F) and Boundary (B) WRs.  Our slots (H and Y) can be running backs, wide receivers, or tight ends, depending on what we are trying to do. For the purposes of this article, we will refer to the slot who goes in motion as the H and the slot who is either the lead blocker for the Triple or the #2 Receiver in the PAP concept as the Y.


The Triple Option

We have taken the Air Raid’s 3-Day Install plan and fit it to our offense.  The 3-Day Install provides focus during training camp. For those not familiar with this model, we basically install our offense in 3 days as the name would suggest. We then go back and repeat our Day 1 Install on Day 4, adding formations and tags to certain concepts each time we go through it.  We repeat our installation process three times before we begin specific preparation for our 1st opponent. Each installation has a set of skills that must be emphasized for each position in our offense, and this provides a roadmap for our position coaches as they plan their Monday, Tuesday, and Wednesday Indy periods during the regular season. On Day 1 we will install the Triple Option:
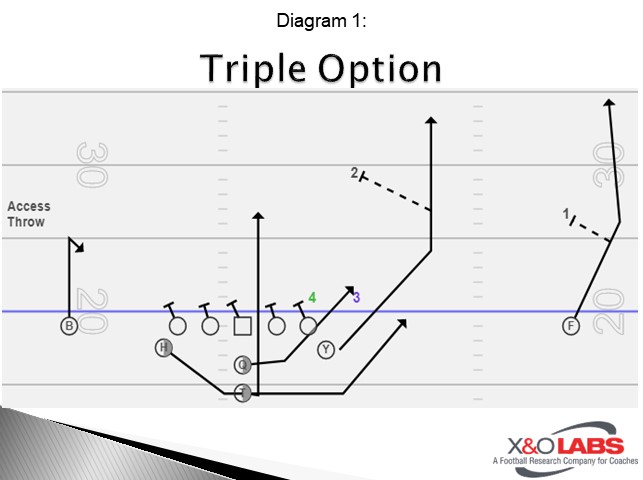
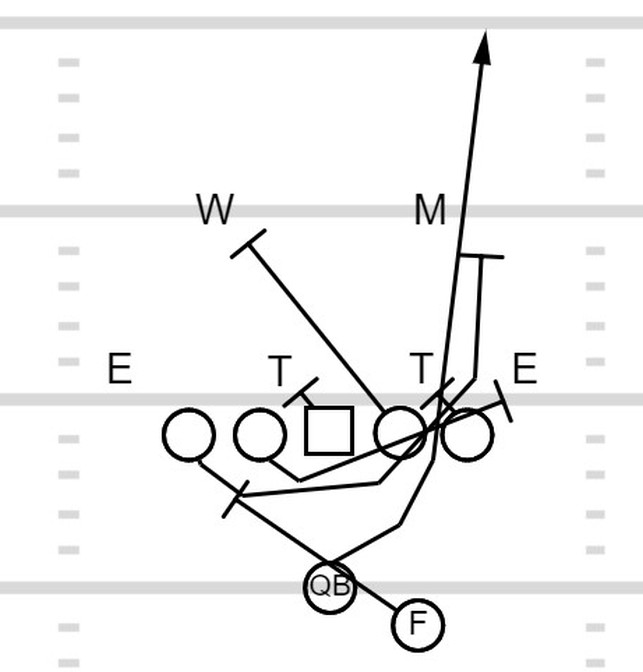
Diagram 1


Assignments:

PSWR: Elimination PS Slot (Y): Elimination Seam
PST: Gap Block B-Gap to PSLB PSG: Gap Block A-Gap to PSLB
C: Gap Block Backside A-Gap to BSLB BSG: Fan the B-gap
BST: Fan the C-Gap BS Slot (H): Sprint to Pitch Relationship
BSWR:  Access Throw QB/TB:  Triple Mesh


Our offense is designed to eliminate defenders from the point of attack and create space. Defenders are eliminated by blocking them, reading them, and/or deceiving them. Option purists will notice an outside-in count system, as opposed to the traditional inside-out Flexbone count. We’ve used both, but in the context of marrying the Triple with the PAP, it’s helpful to count the defense from outside-in, as the old Wishbone teams did. Our WR will eliminate #1 (usually the CB) by running a Fade. Y will eliminate #2 by running a Seam route. The QB is typically responsible for reading #4 and pitching off #3, but that can vary based on how the defense aligns and reacts.

Read More

Bracket Coverage Concepts From 3-High Safety Structures

By Jacob Gill
Defensive Coordinator/Safeties
Shiloh Christian School (AR)
Twitter: @Coach_JGill


As you break down your opponents every weekend you start to see trends, concepts, and preferences from your opponent that you know you’re going to have to defend in the week to come. One of the hardest match-ups to equalize is when your opponent has a “go-to” receiver and they go to him… a lot. It’s hard to defend people who have an explosive player and even harder to do when they know how to get him the ball and they consciously find ways to get him touches. At times we will all play someone who has this type of player and will need to find solutions within our schemes that allow us to successfully defend this player without compromising the integrity of our scheme. In 2019 we saw a few of these players and this is how we bracketed those players.

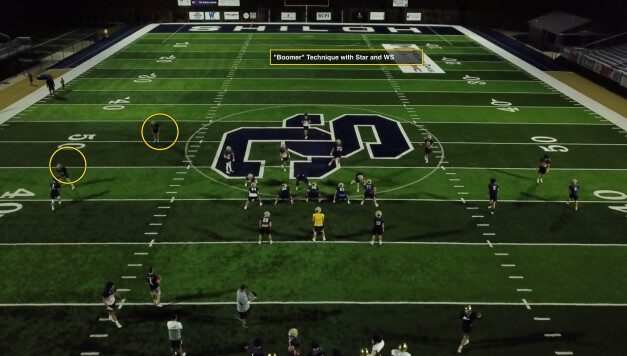
At Shiloh Christian, we base out of 4 down / even spacing concepts but get to 3 down / odd spacing concepts quite often. Additionally, in the past few years, we’ve added to our 3 down concepts by using a 3-safety structure as well. We’ve modeled a lot of what we do based on what Iowa State has made popular in recent years and what one of my mentors, Adam Gaylor (@CoachAdamGaylor), has run successfully everywhere he’s been. We normally prefer this structure in long yardage, end of the half, and 2-minute situations, but at the tail end of our 2019 season, this became a base of sorts when we would play teams that majored in 10 personnel sets. From this came the need to figure out a way to be able to bracket another team’s best-receiving threat and still play good defense with our other 9 players. Here is how we used this concept in our second-round playoff game this year.
 

Front Alignment

We checked the front based on the offensive formation. If the bracket was to any 3 WR or 1 WR formation we were going to play our version of the “TITE” or “MINT” front (4i / SHADE / 4i). If the offense lined up in 2 WR formation to the side of the bracket we wanted to play outside leverage on the #2 wide receiver to the side of the bracket so we were going to play a shade/5 to the side of the bracket and a 4i on the backside. So, we gave a single front call with this coverage concept and our linebackers checked the front based on where the bracket was and how many other receivers were on that side.

Diagram 1


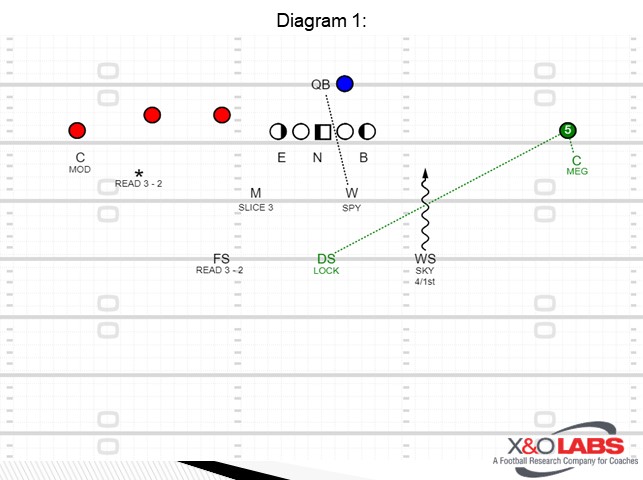
“Lock” Defender:

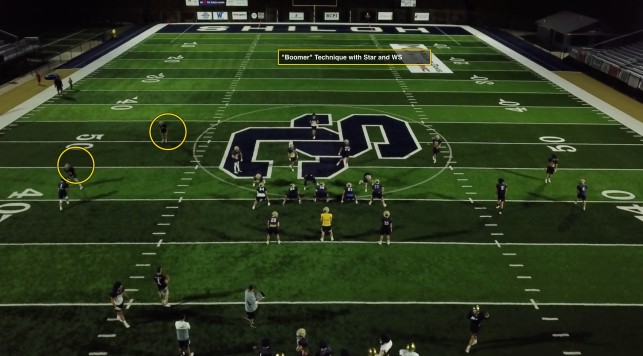
We knew that our opponent was mostly a 10 personnel team and tended to put their best receiving threat to their left regardless of formation. We knew when we were wanting to “lock” their best receiver we were going to use our second-best corner and play outside leverage trail man while utilizing one of the 3-high safeties to play the inner half of the bracket. We knew their best receiver would be lined up as the outside receiver most of the time, but had he been aligned in the slot, we would’ve doubled him with our strong safety (*) and one of the 3 high safeties. We hadn’t seen him in the slot very much and hadn’t seen him run very many routes across the formation so we believed this alignment would allow us to keep the pre-snap integrity of our defense without tipping our hand by moving the corner to the slot.  In ‘Lock” the defender locking the Wr is not involved at all in the run fit.  His job is to cover the receiver and not worry about the run until late.  The defender doubling the Wr should remain inside and on top of the Wr at all times.  

Read More

A/B Gap Divide Runs vs. Odd and Bear Fronts

By Mike Kuchar with Brian Gabriel
Run Game Coordinator/OL Coach
Monmouth University (NJ)
Twitter: @CoachGabeMU


The split zone and insert zone concepts have proven to be effective concepts against Even front defenses because of the presence of a B gap bubble somewhere along the front. This allows for a clean release for the backside Tackle to work to the backside linebacker in split zone concepts.

Diagram 1


It also can provide for a cleaner entry point for the tight end in zone insert concepts.

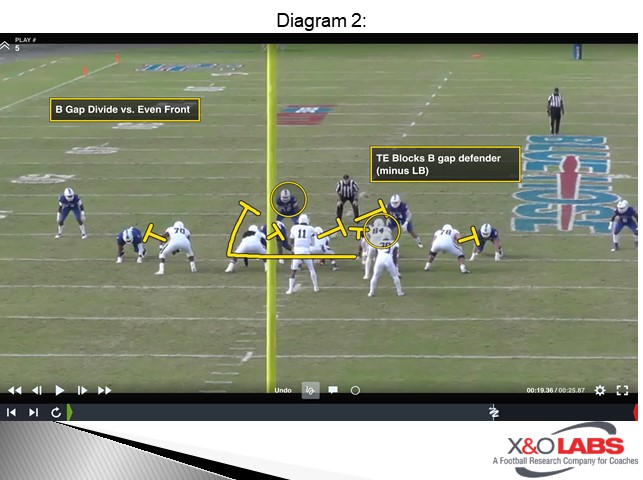
Diagram 2


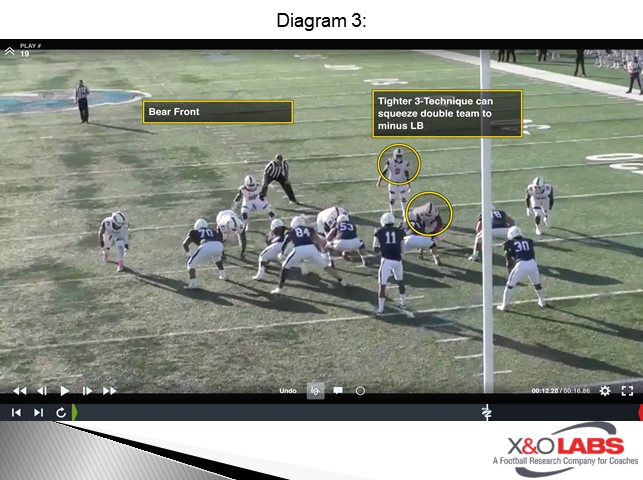
But the increasing popularity of the Bear front has placed a great deal of pressure on the backside B gap combination block in tight zone runs. Often times, the backside Guard cannot find his way to backside linebacker because of a heavy 3-technique that can squeeze the combination block.

Diagram 3


And the Bear front is a prevalent early down defense for good reasons- it draws double teams off zone and gap concepts in the run game and becomes nearly impossible to create movement along the run box. So, in order for offenses to get traction in the run game it becomes vital to split the front at the seams. And perhaps the best way to do so is by using some form of A gap divide principle, or better known as the “Wham” concept. While Monmouth University calls it “Able,” it has been a productive add for the Hawks this season, tallying a 7.6 yards per play efficiency.

The concept is built off tight zone by dividing the backside B gap or A-gap defender, rather than the C-gap defender most common in divide zone schemes. “We feel like we needed another way to divide the defense, rather than having the backside Tackle/Guard cut off the B gap,” said run game coordinator Brian Gabriel. “So, we divide at the 3-technique rather than the 5-technique. Some of the A gap divide worked us as well. We wanted to change the divide point from split flow zone and change who we’re cutting off, particularly against blocks we’re having trouble with.”


Concept Installation

Like most inside zone teams, Monmouth University uses three different concepts in its base A gap zone installation and has the ability to insert the tight end on the front side or on the backside of the concept based on the tag. Often times, it becomes a check at the line of scrimmage.

Below are three tags Monmouth uses off its tight zone scheme. In each of these concepts, the backside is locking or “fanning” away.  

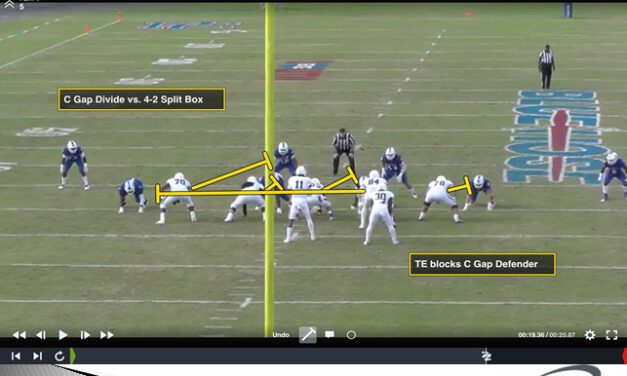
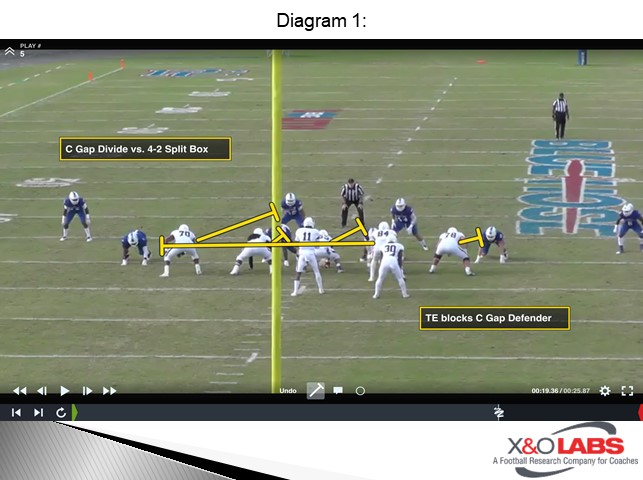
“Easy”: This is a C gap divide concept. Tight end would come across the ball and kick out C gap defender. This is the most common form of divide zone.

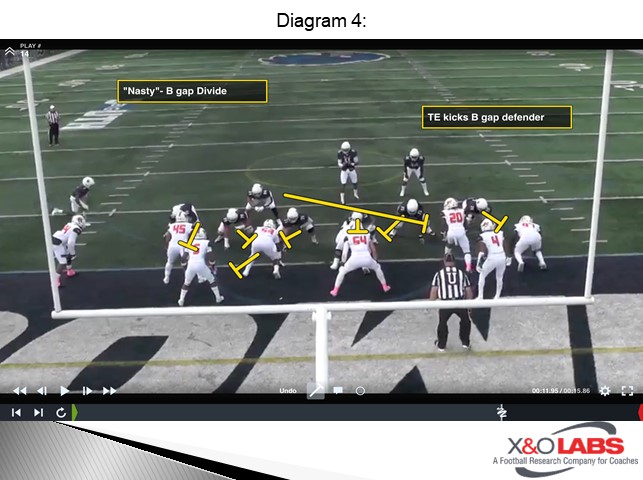
“Nasty”: This is a B gap divide concept where the Guard takes his best release to the minus linebacker and the tight end will block the 3-technique defender. “This became a bear check for us,” said Coach Gabriel. “We prefer it to the 3-technique because that is the best release for the Guard. Good against Bear and Under fronts with 4i techniques”

Diagram 4


“Able”: This is an A gap divide concept where the tight end will block the A gap defender weak, which can be the Nose in Odd fronts. According to Coach Gabriel, it’s a solid fix if you can get a tell against Odd outfits that move the Nose post-snap, but may be more of a challenge against the two-gap technique Nose. “One of our opponents this season were crossing the Nose so the Center was disciplined enough to keep going play side and the tight end would block the Nose,” he said. Many defenses are not true Odd teams with movement so you can live with it. We tell the Center to block him like he’s coming to your gap. If he disappears go and the tight end will insert.”

Read More

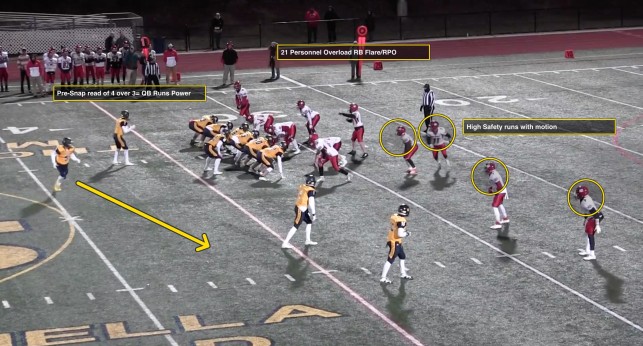
QB Power/Flare RPO

By Virgil Romer
Offensive Coordinator
Shoreham-Wading River High School (NY)
Twitter: @CoachRomer


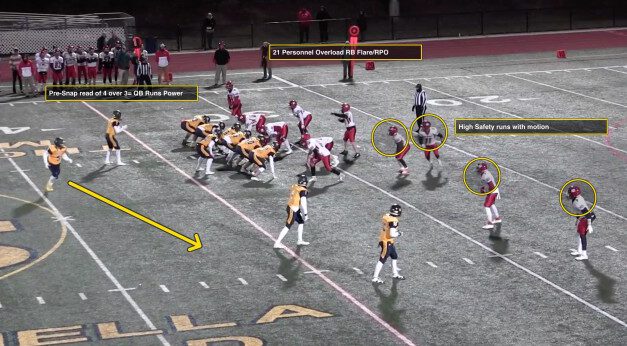
At Shoreham-Wading River High School, we employ a run-heavy offense built on a foundation of inside zone, power, and counter. Because of this, we see many packed boxes and Cover-0 looks throughout the season. Around the mid-season mark, we were looking for ways to add some wrinkles to the offense that brought big results and required minimal learning for our athletes. During one of our post-game film sessions, our head coach Aden Smith – the man who deserves the credit for introducing myself to the concept – brought up the idea of running a QB power paired with a flare-motion by the RB – The QB would make a pre-snap read of the playside-support defender (or any other adjuster) and either throw the flare or keep the QB power. This added wrinkle to our offense yielded large gains to our offense and helped us on our way to winning a Long Island Championship.


Overview:

Before beginning, I would like to mention that I am extremely fortunate to work with an incredible coaching staff – Head Coach Aden Smith, line coaches Tom Foley and Bobby Puckey, and running backs coach Nick Mauceri. This package I am about to present does not achieve the success it does without their hard work and input. 

We initially installed this concept to be run out of a 21 personnel-look with the fullback in the sniffer position and the running back offset-weak in the gun. Teaching it to our kids was very simple for us as we just combined two concepts we were already using in our offense. We had our line, tight end, and fullback block power, while the frontside WR stalked for the flaring RB.  While we didn’t stress it at first, we eventually had the backside WR run a slant route.


Coaching Points:


QB:

While some flare-type RPOs can be considered post-snap reads, we felt strongly about making this a pre-snap read. We were fortunate to have an incredible athlete at QB, and we didn’t want him wasting any time after the snap, in deciding if he should keep the ball or throw it. If he wasn’t sure as to what to do, he was instructed to keep the ball.

As mentioned before, we initially noticed that the defender that adjusted to the motion would “slow-play” the flare, almost as if to believe that we were never going to throw it. Of course, his slow adjustment would trigger our QB to keep the ball and sometimes get tackled by the adjusting defender. It’s important that the QB knows that there needs to be a full commitment by the adjuster to attack the flare – If the QB is reluctant to throw the flare when it’s there because he’s not sure from his point of view, instruct him too! The defense must respect the flare motion in order to open up the QB run.

The most important thing we had to do in practice (aside from reps) to make this concept efficient was practice our flare throws. During our special teams’ periods, we had our QBs throw flares to any kids who weren’t on the field during our special teams periods.  The amount of throws kids can get over the course of two five-minute periods is unbelievable if they are focused.


RB/Flare-Motion Player:

The flare motion must be run in a manner that puts horizontal stress on the defense.  We are looking to create distortions with our motion, just as you would when you run a full-speed jet-motion. This means that the flare motion should be run as fast as possible that allows the athlete to maintain the ability to adjust to and catch the football.  If the motion is too slow, the defender adjusting to the motion may be able to make the play on the QB if the QB keeps the ball – something that we don’t want to happen. The motion should also stretch as wide as the QB’s arm allows him to throw.


OL/TE:

Even though we are running a basic power with a fullback kick-out, it’s important to note that there will most likely be defensive flow to the flare motion, especially after you run the concept a few times.  At this point, you can take the approach of blocking power as if you were running power read – Prepare your pulling guard to possibly take a wider track to the play side LB, and have your double team be alert to the backside LB scraping to the play side a little sooner.  I will include some constraint plays towards the end of the article to help combat the fast flow of the defense in this case.

Read More

Using “Sticky” Alignment Techniques to Defend Gap Schemes

By George Karafantis
X&O Labs Board of Advisors
Twitter: @greek42e


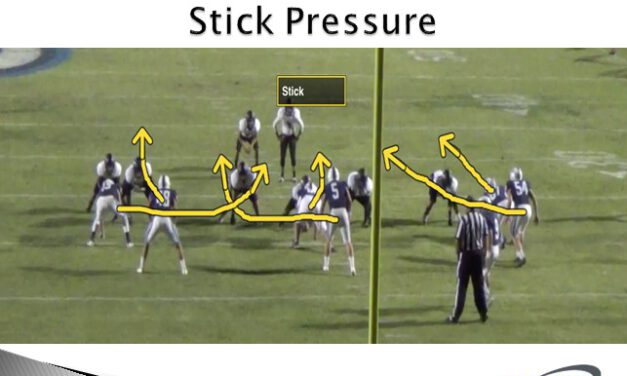
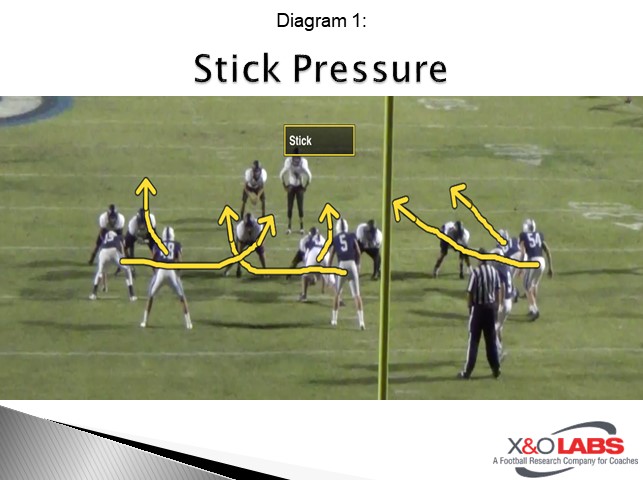
Great defense begins with stopping the run. Defenses that are dominant will always be great against the run. This requires a strong front 6 that play sound, physical and fast defense. One of the most challenging run schemes that great offensive rushing teams possess are gap scheme runs. For the sake of this article we will focus on defending these gap schemes. Gap schemes will include Guard pulls, Tackle pulls, G and T pulls as well as any combination of OL / Back pull or wrap blocks.

The modern gap schemes are run from traditional under center, shotgun and/ or pistol backfield sets. They utilize pullers at the point of attack that can be lineman or backs. They come from play side or backside or a combination of those. Some are run from one back or two back, others from empty. As defensive coaches we understand that offensive structure changes fits however, I believe that there are five simple steps and/or requirements that a defense must follow in order to help themselves stop any and all gap runs.

The first step a defense should incorporate to help defend gap scheme is to employ a sticky defensive line.

“Sticky” DL

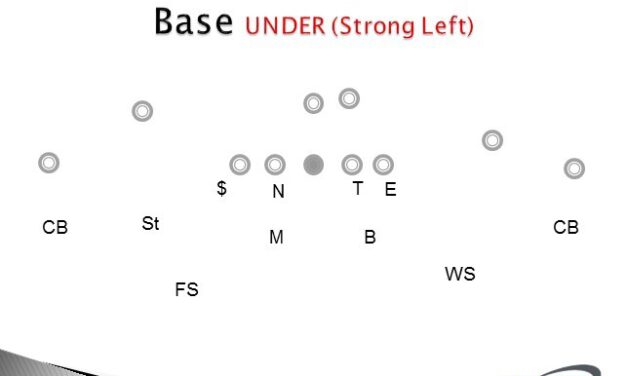
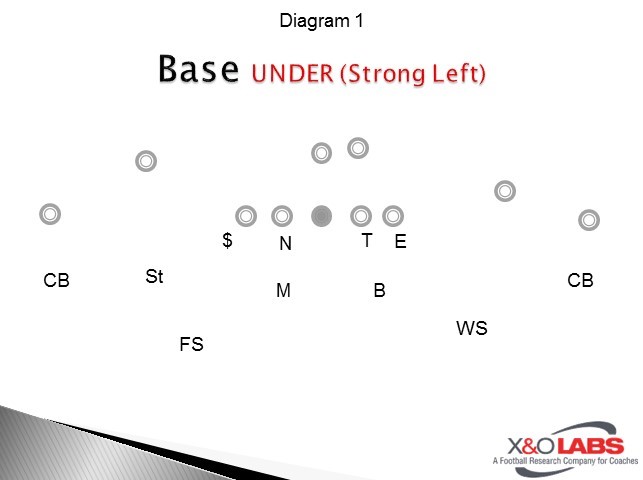
Any great run defense with have a strong front six in addition to a back 5 that is not afraid to get involved in the run game. Defense comes down to ability to align properly, desire and effort, and position integrity. Defending gap scheme is no different. We base out of an even front with our DL playing “sticky” to the OL. This sticky alignment helps our front four use their hands against an offensive lineman. This is a critical prerequisite to controlling the line of scrimmage. We have four DL that, ideally, will include two physical DT’s, a hybrid type DE/OLB type and a fast/disruptive DE. We call these positions a Stud (Strong End), Weak End (DE), Nose (Strong DT) and a weak defensive tackle (DT). Our base and most utilized front is an under front shown in diagram 1.

Diagram 1

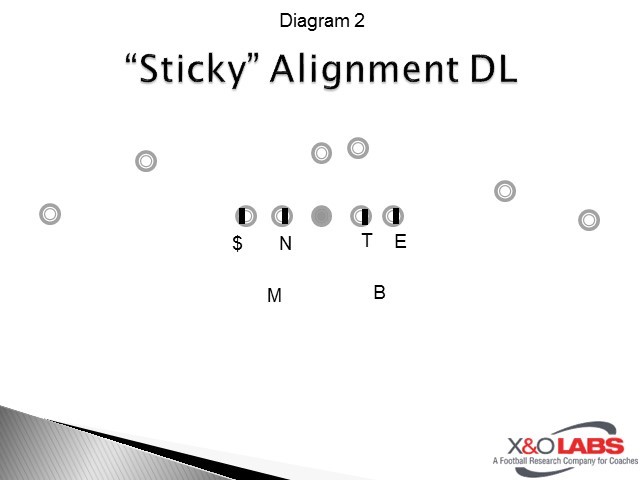
Some successful defensive coordinators swear by utilizing penetrating and disruptive DL that aim to attack gaps and cause havoc through penetration, we DO NOT. We use the stud as the primary disrupter and allow him to play with slightly more freedom when it comes to alignment and responsibility. All other DL are taught from day 1 to be “Sticky” to the OL that they are aligned on. This means heavier alignment on their physical key. The sticky nature of alignment is to help them use their hands, which is a requirement of any defensive linemen we play.

Diagram 2

We tell our DL that their nose should align with the OL’s outside number on their jersey. We utilize both right- and left-hand stances and their stance depends on the alignment technique. A simple rule we tell them is, whichever hand is closest to the man they are aligned on, goes down (3 pt stance). Diagram 3 is a screenshot of our sticky alignment with the strength being to the offensive right. 

The $tud is the strong DE to the right. He is allowed more flexibility with alignment whereas the other three DL are more head up or sticky. The weak end on the left is slightly wider than I would have liked here and can be even stickier. The tackles are almost head up, but not quite.

Why Sticky?

The thought process for having stickier defensive linemen is that our aggressive and physical get offs will disrupt the down blocks that are synonymous with gap scheme. Because of the closer proximity to the OL that they are aligned on, they could prevent a clean “release” of the OL onto another DL or second level defender. This is done with hand placement and extension against their physical key.

From the offensive line perspective, they will also make the back block, by whoever covers for the puller, much more difficult to execute. We want to reduce the size of gaps that the offense thrives on. Stickier, aggressive and physical DL play helps with this. We bend one, or both of our ends, so if they see a down-block they should be flying down the line of scrimmage and if the OL is slow to pull or have tight splits, the backside bending end can factor into a front side power or counter.

To study game film of this concept, click on the video below:

Read More

Installing the Choice Package in the Pass Game

By Jim Glover
Offensive Coordinator
Centennial High School (TN)


In the Run and Shoot one of the first things we try to establish is the threat of the QB rolling and throwing to the field. At the high school level, this is a great way to put your playmakers in space. However, defensive coaches soon realize what you are doing and commit defenders to the field. The “Run and Shoot’s” answer to that is to be able to throw to the boundary.

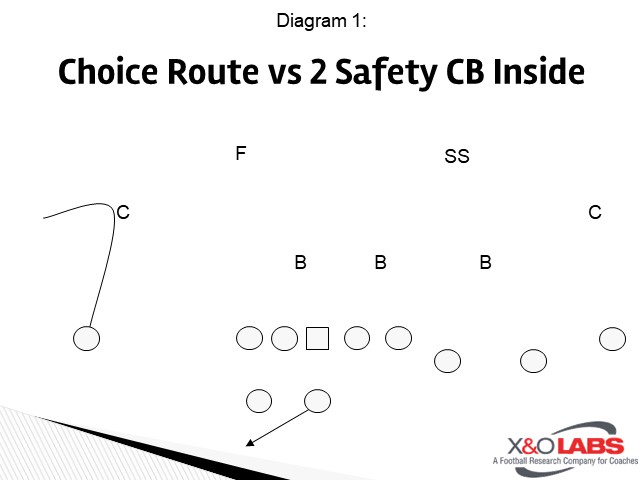
One of the first package of routes we put in to accomplish this is the “Choice Package.” In the traditional Run and Shoot, this would come from a 3×1 formation with the single receiver to the boundary. (Our “Choice Package” also gives us the ability to run it from a balanced set as well as putting the single receiver to the field.) As the name of the package intimates, we give the single receiver a “choice” of routes to run based on the coverage/leverage of the cornerback. Properly read by the WR and the QB, it puts us in the correct play without having to check to another set of routes. The backside or three receiver side will also have its own set of reads.

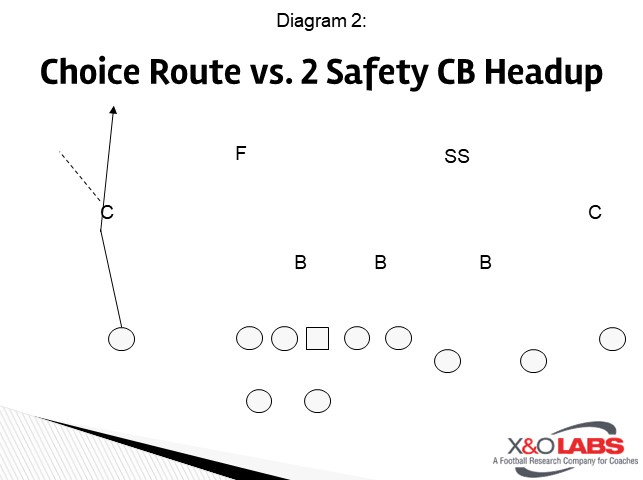
When we start teaching this route, we want to teach it versus the coverage we will see most often. For us, that is a two shell. After identifying the safeties, the receivers and quarterback will scan the under coverage for the leverage and locate open spaces. The single receiver seeing two safeties could possibly get a cornerback with “off inside leverage, off head-up to outside leverage, press inside leverage, or press head-up to outside leverage.” Each of these would designate a different route the single receiver could run.

Off coverage to us is defined as more than six yards cushion. When we get off coverage, we instruct the receiver to run a seven-step stem at the leverage of the cornerback. (If the cornerback has inside leverage, we want to run a stem that has a slight inside angle. The same would be true if we see head up to outside leverage. His stem will have a slight outside angle.) We do this to create more space for the route we are going to run. The seven-step stem ran at full speed will put the receiver around 9-12 yards deep.


Speed Out Concept:

For a CB that is off and has inside leverage with two safeties, the WR will run a “speed cut out” on his seventh step. (We do not want him to drop his hips or chop his feet.) This is done to maximize the timing of the route with the QB and take advantage of the spacing created. The quarterback seeing the inside leverage will also know the WR is running an out and will throw the ball at the top of his drop. The ball should be on the way when the receiver comes out of his break. (We execute this in practice and in our warm-ups enough that the QB and WR get a feel for the timing.)

Diagram 1


Skinny Post Concept:

If the QB and WR see the cornerback is in an off—head up or outside position with two safeties, we are now thinking skinny post. We will attack the CB with the same seven-step stem with a slight outside angle. On his seventh step, if the CB is still head up to outside, he will now break off his outside foot and get inside leverage on the CB. This is not a dramatic break to the middle of the field. We want the WR to get inside position and never cross the hash mark. (As a coaching point, the WR must feel comfortable with a defender running on his hip. Some WRs will run away from the defender putting them in closer proximity to the safety.) The farther he can stay away from the hash, the more room the QB has to place the ball.

Diagram 2


To study game film of this concept, click on the video below:

Read More

Multiple Pressure Concepts from Double A Gap Front

By Adam Gaylor
Defensive Coordinator
Jenks High School (OK)
Twitter: @coachadamgaylor


From Jimmy Johnson’s Philadelphia Eagles and the Chicago Bears defenses of the 2000s to Mike Zimmer and Jim Schwartz, the Double-A Gap/Split Mug front has become extremely popular in modern football. A favorite on 3rd & long situations, it gives the offense the illusion of max blitz but gives the defense the flexibility of max blitz, zone pressure, max coverage, or the use of simulated pressures.


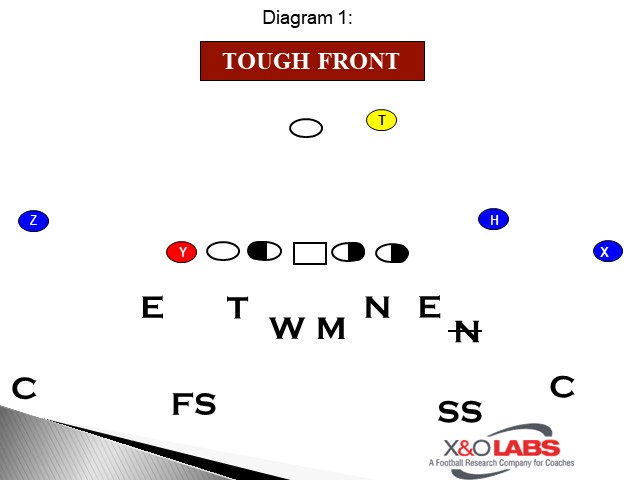
The Double-A Gap front is our “Tough” front, most often utilized during 3rd & 7+ down and distance situations. This front is played with two wide 3-techniques and the ends are in wide 5-techniques or 9 techniques. The Mike and Will are “mugged” into the A gaps showing pressure. Based on coverage responsibility, we like to “Hollywood”, or give the illusion of blitz, with the Sam/Nickel and the FS. 

Diagram 1


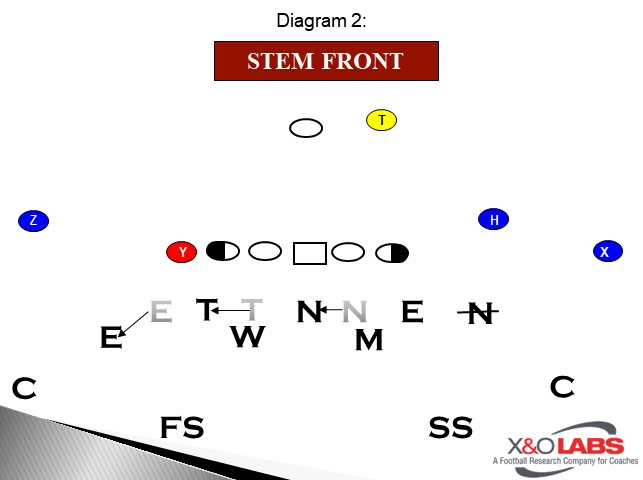
The adjustment to the “Tough” front is to move from a “Tough” front into a 3-4 front; the call for this is simply, “Stem”. By doing this, the defensive front knows to align in our “Tough” front and then on the “Move” call from our Mike, move into our 3-4 pass rush front or our “Falcon”

Diagram 2


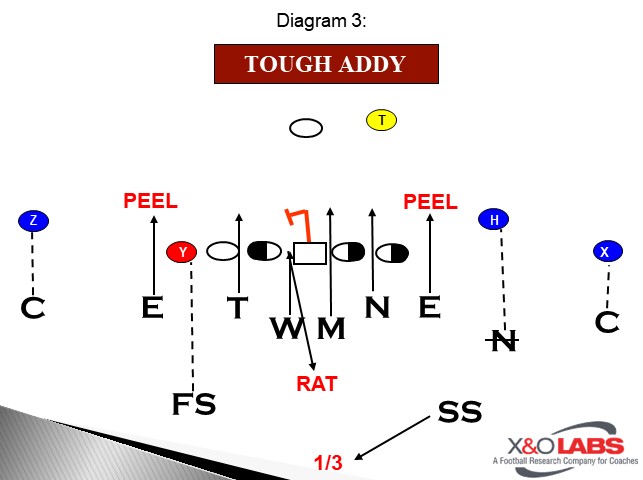
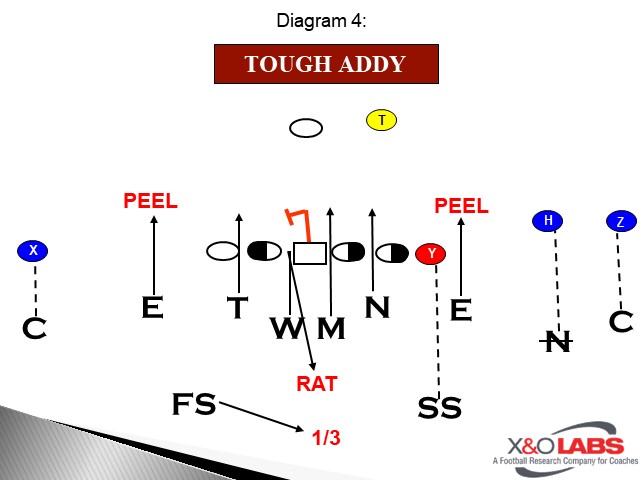
“Addy” Pressure:

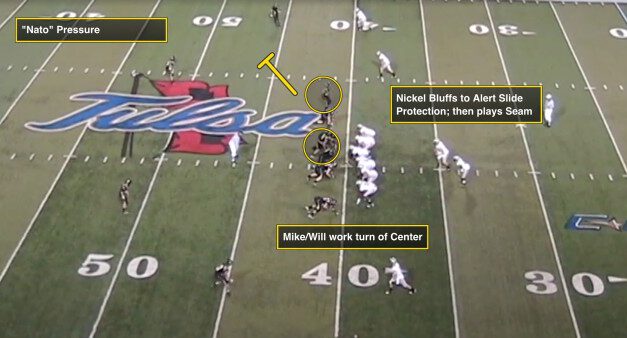
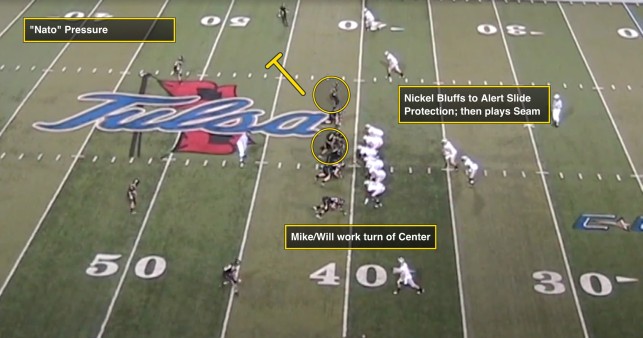
The first pressure installed in the Tough front is “Addy”, or Double-A Gap blitz. Cover 1 is usually played behind this blitz, but “Hot” or 3 deep 2 under can be played as an alternative. “Addy” can be utilized as either a blitz or a simulated pressure. “Addy” is first installed as a simulated pressure. In this case, the Mike and the Will both blitz their A gap; both read the turn of the center. Whichever way the center turns, that linebacker will “dent” or drop out and become the “Rat” player or low hole cut player.

Diagram 3

Diagram 4


Any normal split by the inside receivers or the Tight End, outside leverage will be used by the inside cover guys. When this occurs, one of the inside linebackers becomes a “Rat” or low hole player. Blitzers are taught that they are all responsible for the coverage on the running back. Blitzers need to understand to “peel” if the RB flares/swings out of the backfield and will “Bury” the RB when he remains in the pass protection. If we “Bury” the RB, we want to engage him and drive him back to the QB. By doing this, we prevent the possibility of the RB releasing out into a screen.

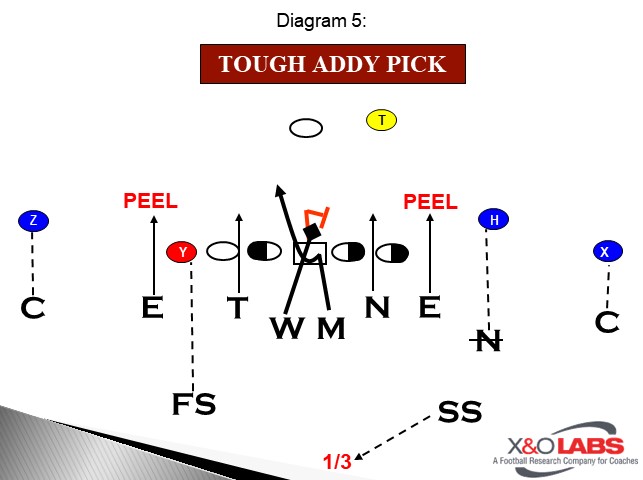
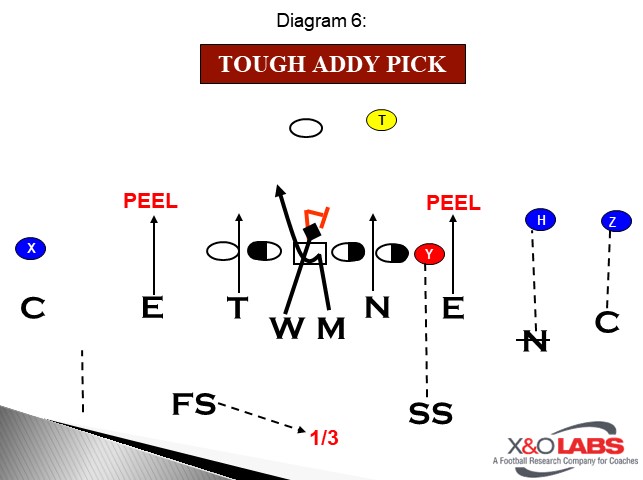
The alternate blitz pattern of Addy is called “Pick”. Pick is similar because the blitzing inside linebackers will still read the turn of the center. However, with “Pick”, the LB away from the turn of the center will “Pick” and work through his near hip. The LB to where the center turns will wrap tight from the picking LB, like a defensive line twist or game.

Diagram 5

Diagram 6


To study game film of the Addy Pressure, click on the video below:

Read More

Utilizing the Back in a Triangle Read (3×1 Spacing/2×2 Mesh)

By Nate Zitnik
Offensive Coordinator
Otto-Eldred High School (PA)
Twitter: @nzshuttlesworth


“Only three things can happen when you pass the football, and two of them are bad!” 

You can make any excuse you want to not throw the football but, in the end, that’s all it is – an excuse.  The game of football is changing and evolving.  Regardless of where you coach, what level you coach, or what offense you run; the pass game is something that needs to be integrated into your repertoire.  With that being said… How do you do that?  And more so… how do you do that easily and effectively?

The Triangle Concept provides a framework for your pass game and can be adapted to defeat pressure using the running back (F) in a rush progression.

“Our quarterback can’t throw the ball 20 yards and couldn’t hit water if he fell from a boat!” 

Most of the throws in the Triangle Concepts are short to intermediate high percentage throws.  However, these throws need to be practiced and more importantly practiced within the circumstances of the progression. 

“We’ve got kids that couldn’t pour water out of a boot with instructions on the heel.”

Drilling these throws and following a drill progression is paramount to the success of these concepts.  Athletes, especially quarterbacks, appear incapable often because they don’t understand the reads and progressions of the plays they’ve been asked to execute.  With, efficient and meaningful drills scaffolded within consistent practice plans over the course of the season can turn even the most improbable player into a functional and effective passing threat.

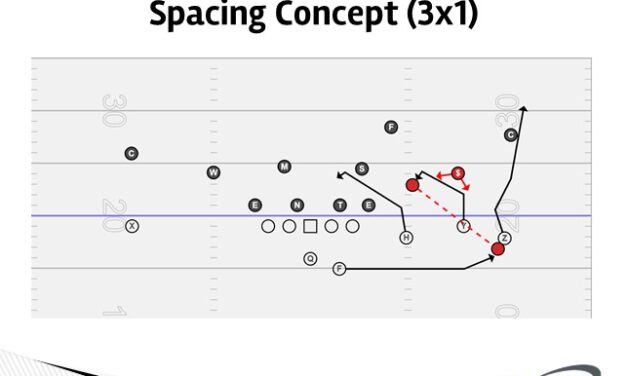
Spacing Concept

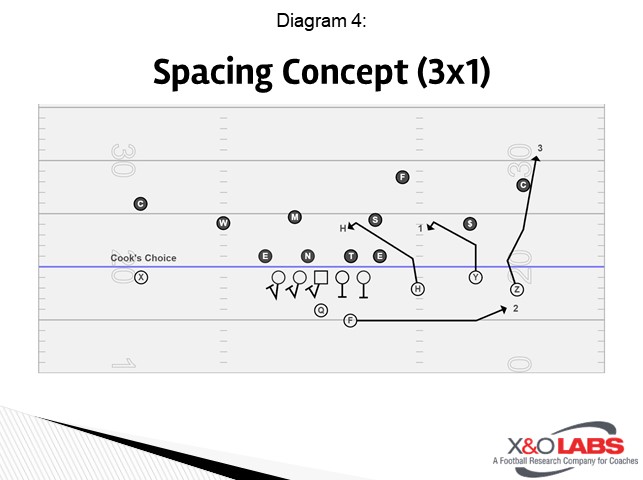
The Spacing Concept uses fast-developing routes of three or four receivers versus two or three defenders respectively.  This in conjunction with short/intermediate high percentage throws makes the Spacing Concept an ideal pass play for any offense.

There are variations to this play, but the triangle of the concept remains constant.  The Spacing Concept to the three-receiver side is favorable for any team that Inserts some sort of zone coverage to the Trips formation.  The receivers and the back releasing to the concept side create both a horizontal and vertical stretch of the defense. 

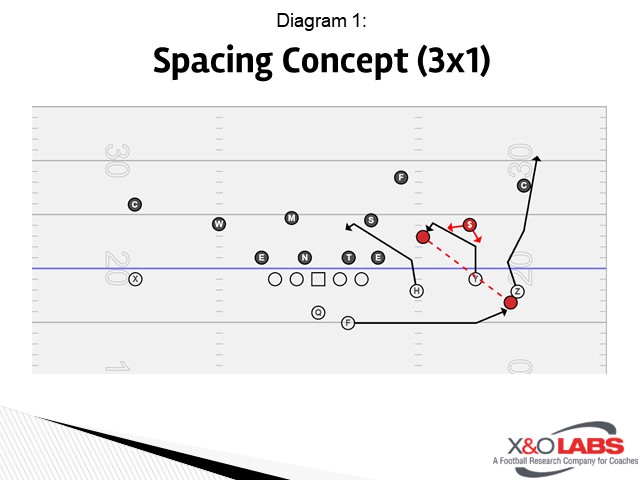
The horizontal stretch of the defense is achieved with the back (F) swinging out to the numbers and the middle receiver (Y) receiver running a six back to five-yard snag route.  The flat defender is then faced with the decision of running inside with the snag route by the Y receiver or taking an outside angle towards the numbers to intercept the F out of the backfield. 

Diagram 1

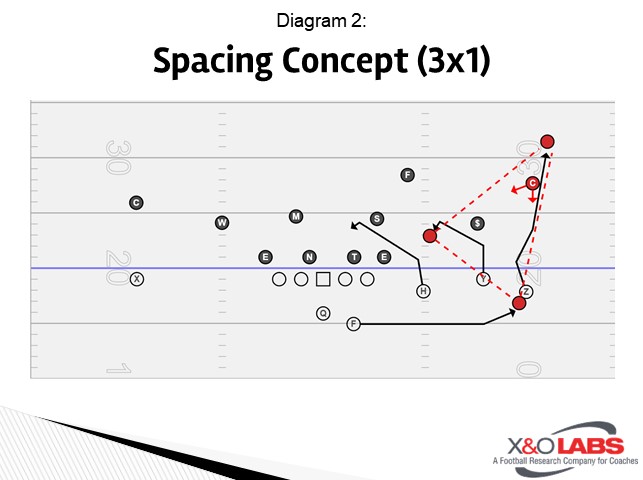
The vertical stretch of the defense is accomplished by the outermost (Z) receiver running a fade route.  The fade route will prevent the defenders playing over top of the hard deck (approximately 7 yds from the LOS) from attacking that downhill space being attacked by the snag and swing routes.  This completes the triangle and illustrates the three-receiver vs the two-defender read concept. 

Diagram 2

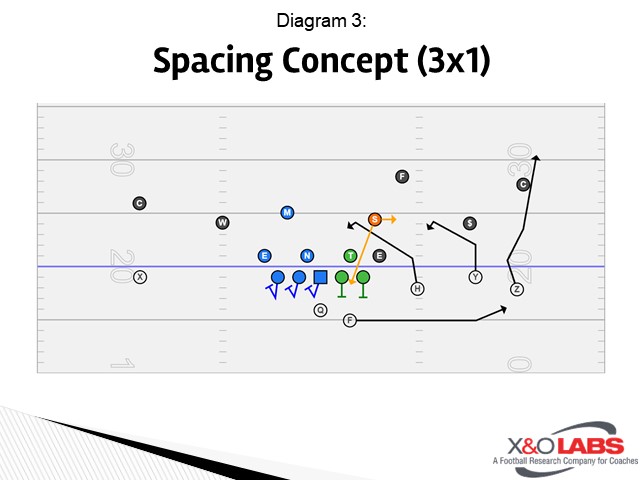
The final aspect of the routes within the Spacing Concept is the inside receiver (H) in the Trips formation running a six to five-yard snag route as well.  This route takes advantage of the inside linebacker (S) attacking the snag, following the back (F) out of the backfield, or bringing pressure.  Because the back (F) must be a free release player in this concept, you must employ a five-man protection.  I prefer and use a half slide/half man protection.  The zone side is always called away from the concept.  The left tackle, guard, and center (Blue) must account for the three backside defenders (Also Blue).  The man side is to the concept.  The right guard and right tackle (Green) must account for the nose and defensive end (Also Green).  The sixth defender (S) must be accounted for by the quarterback. 

Diagram 3

The progression of the routes is (Hot vs Rush) Y Snag, to F Swing, to Z Go.  The backside single (X) receiver can be given essentially any route.  The route should effectively attack the most anticipated coverage of your opponent, be something your receiver runs well and is an everyday throw for the quarterback.  A PSR man beating option route is ideal if it fits within the framework of your offense.

Diagram 4

Overall Coaching Points: 

The free release/concept side should coincide with the man side of the pass protection as it protects the quarterback’s blindside and provides a built-in rush progression. 

Aside from the ability to include the F in the triangle with a free release, it also incentivizes the quarterback to take an interest and ownership in protections.

Trust the process.  Do not allow players to force or lobby for the ball.  The defense dictates the quarterback’s decision as to where to deliver the football.

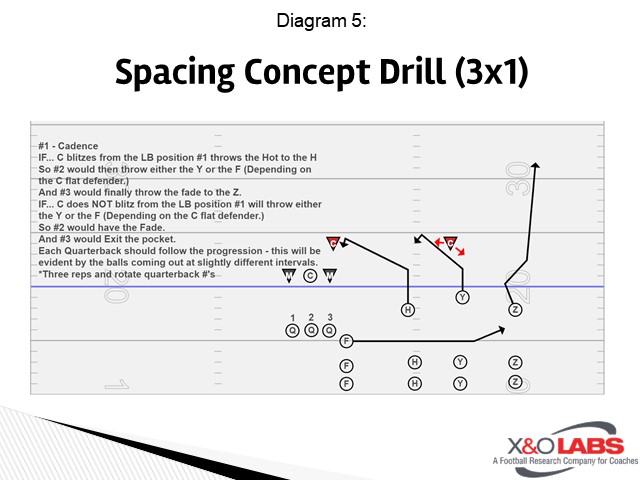
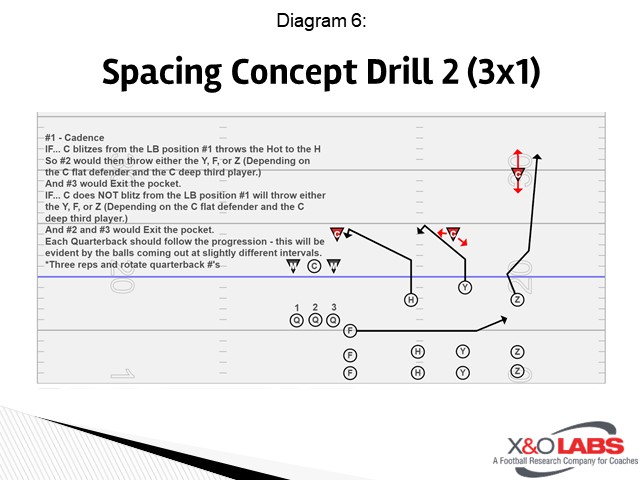
Spacing Concept Drill Work:

There is no return without investment.  The Triangle Concept requires a significant amount of time to install and consistent practice repetitions over the course of the season.  Drilling each aspect of the concept is a non-negotiable.  Start separately at first and progress as your quarterbacks and receivers become comfortable within the concept regardless of the defensive scheme or progression. The progressions listed on the slides provide a starting point for the drills.  Creating a rush progression to utilize in certain situations or as the defense adjusts will develop consistency and confidence in the reads. 

Diagram 5

Diagram 6

QB Coaching Points:

This is a

Read More

“Choke” and “Hammer” Tags to Adjust Play Side Blocking in Counter G/T

By Chris Norton
Head Coach
Perryville High School (AR)
Twitter: @Coach_Norton


Over the past eight years, our offense has evolved from being zone heavy to entirely gap scheme in the run game.  Using the quarterback, heavily, in the run game was part of that evolution.  I love the ability to get an extra man involved in the box using the quarterback and the stress it puts on second-level defenders.  Offensive football is about creating grass and winning leverage – QB run helps us do this.

Quarterback GT

GT has become our bread and butter run game concept. Our quarterback position accounted for 987 yards rushing and 15 TDs with, specifically, quarterback GT producing 481 yards of that total and averaging 8.29 yards per play!  We called quarterback GT 58 times this fall.

Most of our snaps, 21%, this season were run from Early (trips right), which is the base formation used in the diagrams below.  In my opinion, the use of the quarterback is critical when running GT from anyone back set as it helps hold backside defenders.  Our base rules for GT, like virtually everyone else’s, are as follows:

10 Personnel Quarterback GT vs. 4-2

PST:  B Gap to BSLB

PSG: A Gap to BSLB

C: Backside A Gap

BSG: Kick C Gap

BST: Wrap to PSLB off G

F: Fill Backside Pursuit

A major tenant of our offensive philosophy is to run as tight to A gap as possible.  This is especially true with our GT game – we want to hit it as tight as possible by collapsing the playside defenders.  If A gap is cloudy, we teach our kids to work gap over, gap over as needed. This is a difference from most spread teams, who either do not or cannot test A gap effectively in the running game.  It is a goal of ours and on most of our explosive runs this fall, we hit tight to A gap downhill.

To study game film of this concept, click on the video below:

Read More

Play Action Progressions from Power Read

By Matt Kelly
Offensive Coordinator/QBs
Worcester Polytechnic Institute (MA)
Twitter: @CoachMKellyWPI


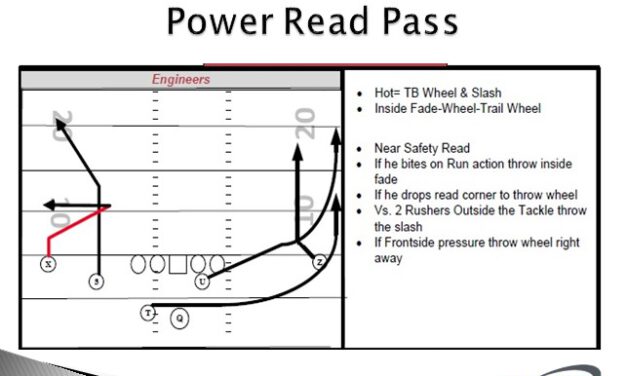
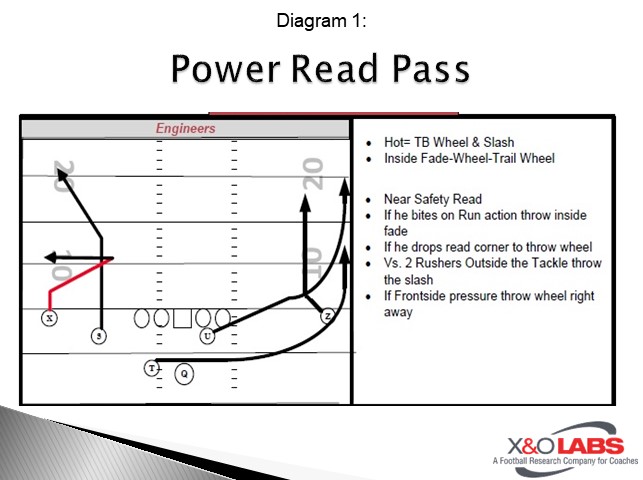
Every play action concept is understood to take advantage of the defense, focusing on the run action; being able to attack voids left by those displaced defenders.  For us at Worcester Polytechnic Institute (WPI) we run a majority of Power Read and Buck Sweep (same backfield action, different blocking scheme).  WPI installed a play action pass that essentially becomes a flood concept with an inside stem vertical; a wheel and a trail wheel to attack the support players in each defense that we see.  This is not a common action, resulting in naming this “Power Read Pass” to simplify for our student-athletes, instead of naming each route individually. 


Concept:

The passing concept is similar to a flood type concept.  Instead of the routes breaking out, they will all continue vertical.  Although you may not think of it as a “flood”, plotting the points, where the routes end for a flood concept would result in the same end points in this concept. 

Diagram 1


QB Reads:

At WPI, we have changed the reading pattern, making it as simple as possible for our quarter back.  His progression is to read top down, but at WPI we instruct to read defenders.  For this concept, we begin with the Corner, (Safety should not matter with how tight we run the #1 WR route) moving to the Overhand/flat player to the hook/curl player.  Our focus is to hit the tight seam route on a line first, and then the wheel, with the trail wheel being a check down.


Protection:

At WPI, we are mainly a gap scheme rushing attack, with our most called run plays being Power (Power Read)/Counter and Buck Sweep.  Our main play action pass protection is based off the power (counter) scheme; the backside guard pulling and being responsible for the front side C gap player. Our Tailback receives the fake running in front of the QB and continuing outside the puller to account for the play side D gap.  This specific play, we free release the TB and leave the D Gap player for the QB to take care of with a hot throw.  With this look, we show “power” to the defense and get the conflict defenders to trigger on the run action.  The inside stem by the WR gives the illusion of a crack block they have when we run Buck Sweep, forcing the secondary to execute their crack replace rules.

An adjustment we make and utilize the most with this concept, is to put our sniffer back on the backside of the protection.  We insert him in the backside B gap and let the tackle fan for C gap.   This now makes it so that we would not have to throw “Hot” off three rushers weak.


Coaching Points:

WR Rules:

We give the #1 WR very specific rules when running his route.  There was never a given name for the route, as it mimics a seam route run from the outside.  The WR is told to align on the bottom of the numbers (normal alignment for WPI) where he should take two inside stem steps, (get to the top of the numbers), concluding with taking three vertical steps before he looks for the ball.  The vertical steps are necessary due to the following reasons:  Everyone loves to drift and we do not want the safety to be able to have involvement on this route, where his skinny stem should keep him away from the safety when we would be throwing him the ball.  The inside stem sells a crack block forcing the secondary to utilize their crack force rules, resulting in the action we are trying to create.  Thirdly, we inform him to be inside the corner, as his vision to be to want to protect the throw if the QB decides to throw him the ball against a bail corner. 


RB Route Rules:

Wheel routes are run differently within our offense depending on the alignment of the back.  If he is in any position near the line of scrimmage, we teach the wheel as an arrow initially, with the RB getting width over depth and turning up once he hits the bottom of the numbers.  When he is aligned in the backfield, we tell him to go right now, aiming for the bottom of the numbers.  Once on the vertical part of the route, fade rules apply, no further towards the sideline than ½ way between the numbers and the sideline, to give the QB room to throw away from defenders.

Read More

Disguising 3 Deep, Two Under Coverage Pressures from Odd Stack Looks

By Mason Hughes
Head Coach
Central Valley Christian High School (CA)
Twitter: @mason_hughes


At Central Valley Christian, we employ a 3-3 stack defense with quarter’s coverage. We believe that the best way to defend the modern high school offense is to base out of a 2-high safety look. However, modern offenses are too good at making adjustments if the defense only runs one scheme. In order to combat the offense, we believe that we must blitz. We use 4, 5, 6, and 7-man pressures to disrupt the offense and cause chaos. In each of those pressure schemes, we incorporate a different type of coverage behind the pressure (pattern matching zone with 4 and 5-man pressures, true man-to-man with 7-man pressures, and spot dropping with 6-man pressures).

One of our most successful pressures has been our 6-man pressure scheme with true spot dropping zone principles. When these pressures with spot dropping zones coverages are coupled with our other pattern match and man-to-man coverages in our defensive game plan, it allows for our defense to create chaos to the offense and keeps the offense on edge. We believe that the spot dropping zone coverage allows for the defenders in coverage to make plays on poorly thrown, or rushed passes by the quarterback, and often results in interceptions and big plays from our defense. Since the coverage defenders are spot dropping with their eyes on the quarterback, we believe that this pressure scheme is also effective against run plays and screens. These pressures and coverages made up 10% of our defensive calls this past season, yet yielded over 30% of our forced turnovers and sacks.


The Basics

We employ 3 defensive linemen, 3 linebackers, 3 safeties, and 2 corners in our defense. Two of our safeties (Bandit and Will) can play low as a linebacker or high as a true 2-high safety. Our Free safety will always be a true 2-high safety player. This allows for many different blitzes, but we have found that there are two pressure paths that attack the types of run plays and pass protections that we see the most.

We like to think of our pressures as “plays” or patterns for the defense. The two 6-man pressure patterns that we run are in diagrams 1 and 2 below.

Diagram 1

Diagram 2


We can blitz any of the 11 players on the field based on calls, but the paths are all broken down into these two basic patterns.


Coaching Points:

Below are the coaching points for each type of player in our 6-man pressures.


Slanting defensive linemen:

  1. Attack the slant side shoulder of the offensive lineman in front of you
  2. Hands before feet
  3. Eyes below his chin
  4. In pass situations, you can use pass rush moves immediately
  5. In run situations, you must remain square to the line of scrimmage and use stimulus-response (down=squeeze, reach=press, and mirror, base=extend)


Long sticking defensive linemen:

  1. Attack the inside shoulder of the guard you are sticking to
  2. Feet before hands
  3. Eyes below his chin
  4. In pass situations, you can use pass rush moves immediately
  5. In run situations, you must remain square to the line of scrimmage and use stimulus response on the guard (down=squeeze, reach=press, and mirror, base=extend)


Blitzers:

  1. In run situations, the pre-snap movement must be minimal
  2. In pass situations, the pre-snap movement must occur
    1. Learn the snap count, bluff early, get momentum if you can
  3. Use your hands, not shoulders
    1. In run situations react to blocks as you would on non-blitzing plays, just do it on the move
    2. In pass situations use chop and rip moves on the blocker, finish the play – hitting the quarterback is always better than jumping to deflect his pass


Hash Droppers:

  1. Play the run first, if run you are responsible for forcing the ball back inside
  2. If pass, drop/move to a landmark of 10 yards deep and just outside the hash mark on your side
    1. Eyes must be on the quarterback let his face move you laterally
    2. You must feel receivers in your area
    3. Use pedal, turn/run or shuffle technique to get to your drop
  3. Once the quarterback takes his front hand off the football to throw break in the direction he is throwing – looks to intercept the ball
  4. Make sure to not get too wide, we want to defend curls and rally to passes in the flats


Read More

Defending 20/11 Y-Off Runs Personnel with Multiple Fronts

By Spencer Leno
Co-Defensive Coordinator/ ILB Coach
Massillon Washington High School (OH)
Twitter: @SpencerLeno


More offenses are incorporating a hybrid fullback and tight-end type of player into their offensive scheme. With this hybrid player, teams can align in 11, 20, and sometimes even 10 personnel without subbing anyone in or out. As coordinators, it is harder to distinguish when an offense may align in a specific formation that correlates with the personnel grouping they have on the field. For this reason, our defense wants to have the ability to attack an offense using multiple fronts, while still maintaining our rules and fits.

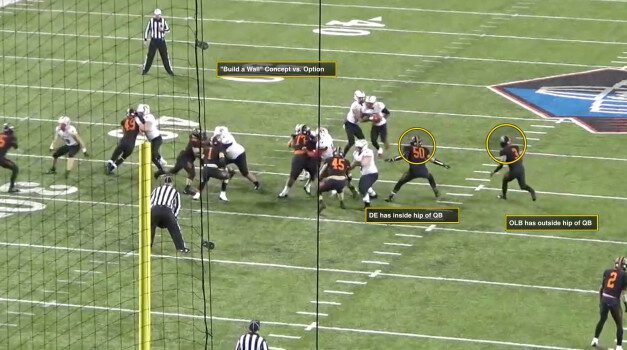
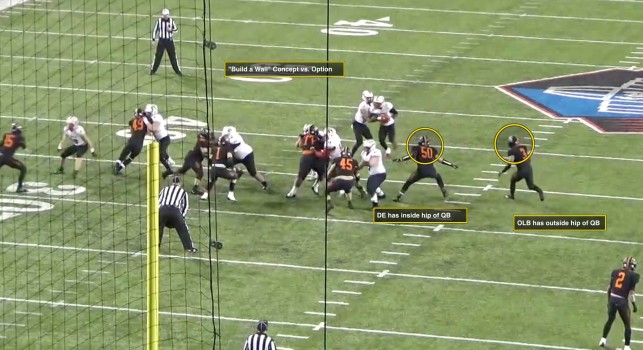
One of Massillon’s top defensive goals is to stop the run. We believe that if we can win the rushing war, we will win the game. We are a base 3-4 defense that can align in multiple fronts. Throughout a game, we will present both odd and even looks to an offense. Our defense also values the importance of using these multiple fronts while still being able to keep the same personnel on the field. It is crucial that when utilizing different looks, we can keep our reads and rules the same for every position. At Massillon, we are predominantly a spill defense, but depending on our game plan, we can box the ball inside as well. We ultimately want the ball to go lateral to allow our athletes to run to the ball and make tackles. We’ve taken on the mindset of “building a wall” and being gap sound in everything we do. Two of the fronts we utilize are our Under and Okie fronts.

Key Terms:

Our players and coaches all must use the same universal terms that apply to all of our position groups. The scheme must be simple along with our communication, reads, and fits. Before we drill any team sessions, we make sure that our position groups practice these techniques and aiming points throughout individual, half-line, and inside run. These terms can be applied to all of the fronts we use.

The main terms we use when introducing our run fits are below and will be explained throughout the article.

-Spill
-Press
-Secondary support (Corners)
-Box
-Cutback
-Inside point of QB
-Scrape
-Alley
-Outside point of QB

20/11 Personnel vs. Under

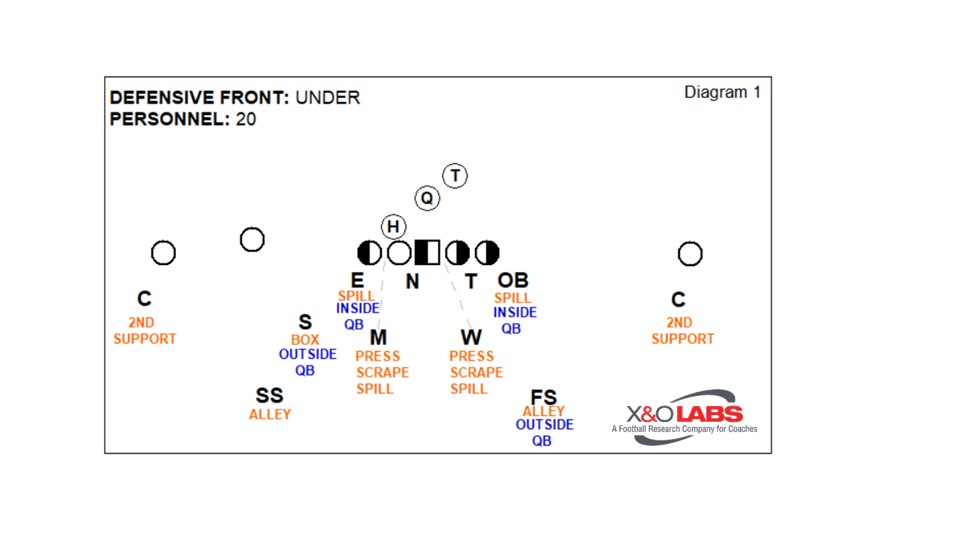
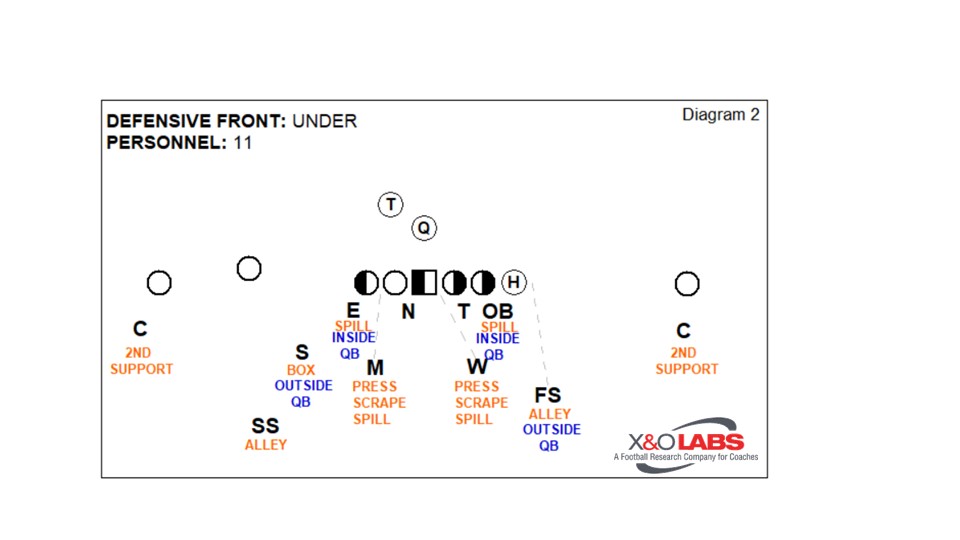
The use of an H forces the defense to account for an extra gap. As coordinators, we have to decide how we’re going to attack and align with the extra gap. The extra gap can be created through the offensive play call or by their initial alignment. When the H is on the ball, a defense must decide on how to play the C gap based on what an offense wants to do. Since the H can move when he is aligned off the line of scrimmage, we want to be multiple in our fronts and alignments. We don’t want to have too many checks and do not want a formation to dictate which front or coverage we run. This past season, we saw a mixture of gap and zone schemes out of these personnel groupings.

Diagram 1

Diagram 2

5 Techniques

In our Under front, the E and OB’s are aligned in 5-techniques and are C gap players. Even versus a three-man surface (H on the line of scrimmage), the E and OB will still align in a 5-technique to keep their rules consistent in our Under front. They read the “V of the neck” and are responsible for squeezing any down block by their tackle and wrong arming any kick out forcing the ball to spill outside. When wrong arming, we teach our players to take their outside arm and strike through the inside leg of the kick out. After they strike, they need to get vertical immediately to knock off any second puller. Versus any zone read or split zone arch, the 5-technique to the read side is responsible for what we label as the inside point of the QB. He needs to squeeze down and attack inside out on the QB, aiming for his inside hip. Any base or reach block read, the 5-technique must maintain control of the C gap.

Interior DL (N/ T)

The N and the T are taught to read the “V of the neck” of either the OC or OG. We teach these players to attack half of a man, work to heels depth of the OL, and to control their gap. Versus a down or back block, they must not get washed down the line of scrimmage to create vertical seams. If at any point during a double team or combo block, the OL releases up to the ILBs, they need to disengage and make the play if the color shows in their gap. We also preach to them the importance of not running up the field versus a back block because of the risk of creating a vertical seam. For example, when their key pulls away from them, they cannot chase up the field. When a back block occurs from the C, they need to fight the pressure and be ready to disengage if the RB were to cut it back to their gap. If at any time the T gets trapped or whammed, he is expected to wrong arm and spill the block. We want the 3-technique and the shade to fight pressure and maintain their gap at all costs.

Inside Linebackers

Inside linebackers are expected to master three basic reads and fits. If an ILB gets an open window read or flow towards their gap they need to press and fill it. When they read a closed window, they are taught to scrape tight to the wrong arm of the 5-technique and if necessary, spill any puller or kick out that climbs to them. Versus gap scheme and pullers, the ILB whose guard is pulling away from him must press over top reading cloudy to clear. If the run-through is clear, they take it. If it’s cloudy, they are responsible for pressing overtop. Although we have the ability in our defense to gap exchange zone read with the 5-techniques, this article only covers our ILBs attacking the dive versus any zone or split zone. They attack the dive by pressing their gap.

Sam Linebacker

The S reads the EMOLS to RB flow. His two primary run reads are an on-block and a down block. Versus 20 and 11 personnel formations, once the S reads the OT or TE block down, he condenses down to play the D gap. If the offense attempts to kick him out, he is taught to box the ball back inside. When the S boxes, he works no further than heels depth of the line of scrimmage and his aiming point should be the outside shoulder of the kick out. The S must not allow his shoulders to get turned when he boxes. If the S reads flow away, we teach him to shuffle into the cutback, keeping his shoulders square to the line of scrimmage. Against zone, the S has two reads. If it’s zone away from him, he needs to condense down and be in a position to play the outside point of the QB. Sometimes 20 personnel teams will run split zone arch and instead of kicking the 5-technique, th

Read More

OL Count System in Double Screen Options from Empty Formation

By Jamie Scruggs
Offensive Coordinator
Brookwood High School (AL)
Twitter: @JamieScruggs


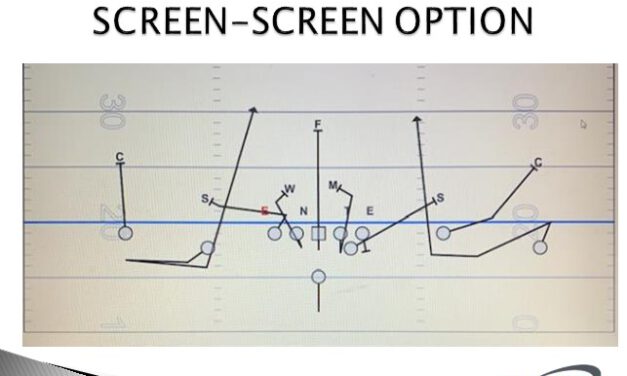
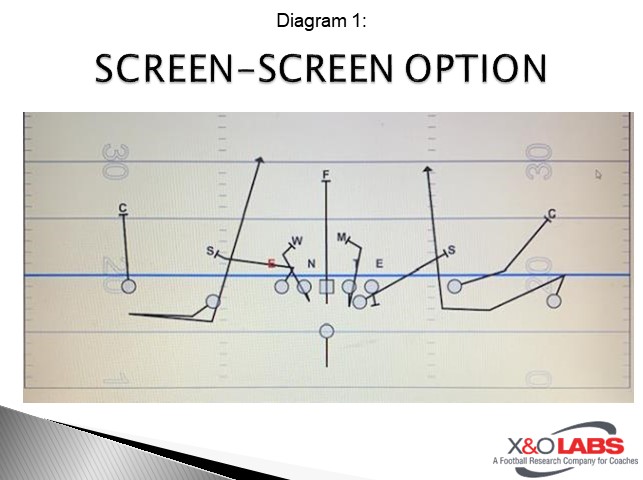
In the Spread to Run offense, we are dedicated to methods of efficiently attacking the perimeter. The screen-screen option below is one of the primary methods we utilize. We base the play out of the empty formation with a sniffer back.  The empty formation with a sniffer is a portion of a bigger picture that provides the offense with a 7-man run game box while still being able to 6-man protect the drop back game and attack the perimeter with linemen in the screen game.

Diagram 1


Offensive Line Play

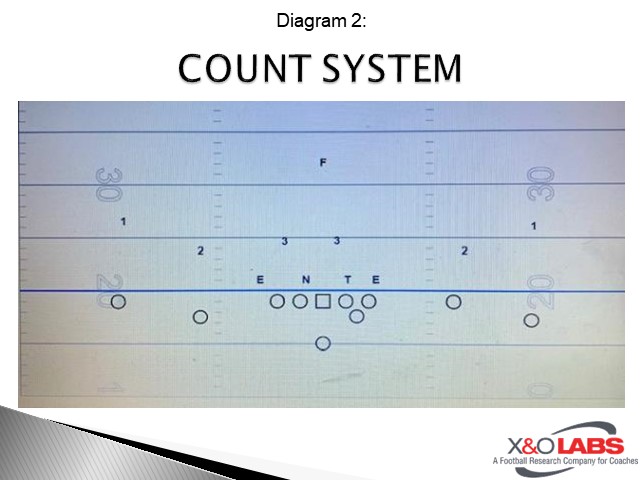
Proper identification of second level defenders is of utmost importance to ensure that all defenders are blocked. We employ a count screen count system to minimize mistakes and help the line play fast.

Diagram 2


PST: The play side tackle’s job is to inside release and kick out the #2 defender. His aiming point is the near hip of the defender. After his release, his path to kick out must be flat down the line of scrimmage. If his path is too far up field, he risks the defender beating him to the point of attack.

PSG: The play side guard’s job is to pass set for a 2 count, punch the down lineman, and block the #3 defender. He will over set, or under set a defensive lineman depending on his technique to create an easier path to get to the next level defender. He must also release flat to keep the defender inside the tackle box.

C: The center’s job is to pass set for a 2 count and block the middle linebacker to the free safety. Like the play side guard, he will pass set to create an easier path to get to the next level after the 2 count and punch.

BSG: The back-side guard has the exact same job as the play side guard. 

BST: The back-side tackle’s job is to quick set the defensive end. He will quickset to stop any up-field penetration that may interfere with the tunnel screen to the wide receiver to his side.


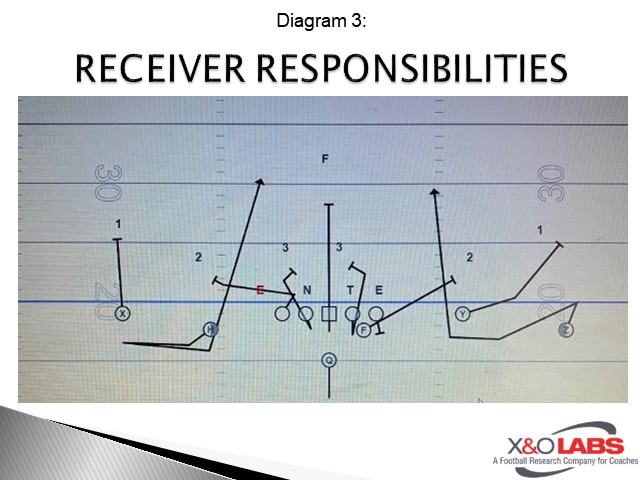
Receiver Play

Diagram 3

Read More

Dime Package Coverage for the 4-2-5 Defense

By Mike Nahum
Associate Head Coach/Safeties
Marvin Ridge High School (NC)
Twitter: @coachnahum60


As a base 4-2-5 defense, we utilize 4 down linemen, 2 linebackers, 3 safeties and 2 cornerbacks and base out of quarters coverage. Our front six is set separately from our back five. Since the ball is on the hash at least 80% of the time or more in high school, we focus on teaching from the hash the majority of the time. Our defense is field/boundary based since we declare passing strength to the field most of the time.


These 3 players line up to the Boundary/away from the passing strength.

BC: Boundary Corner

Buck: Boundary Inside Linebacker

BS: Boundary Safety


These 4 players line up to the field/to the passing strength.

FC: Field Corner

Mike: Field Inside Linebacker

Rover: Field Low Safety

FS: Field High Safety


Our Dime (D) package is a personnel grouping where we take our NT (A gap defender) out and replace him with a Dime. We then simply slide our DT (B gap defender) to a head up Nose (0 Technique). This simply puts us in a 3-2-6. Nothing more.

This allows all our players to play in normal alignment keeping their reads and keys same as. In high school, in my opinion, this is the cornerstone to having success.


There are four reasons we needed to have this change up in our arsenal and they are:

1) Provide the ability to play man coverage and drop 8 using a DB rather than a LB on their receivers. 

2) Provide you the ability to stay in immediate safety force (Rover/Dime) while staying 2-high.

3) Provide multiple looks with Buccaneer front, while matching skill on skill with our Dime-preventing a LB from having to play in space. 

4) Eliminates having a skill player on the sideline while having a static 4-man front vs. the spread or on passing downs. 


In addition, I will discuss this package vs. 10P 2×2 and 10P 3×1.

Our Dime (D) is generally our second-best Rover (Low Safety). The Dime (D) will generally play to the boundary unless coverage dictates something different.

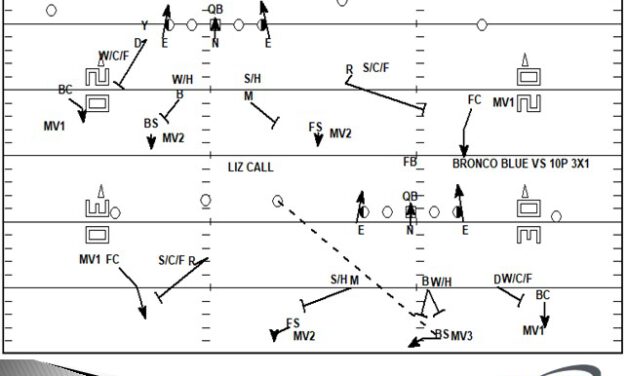
First call will be Bronco. Bronco is a 3-man rush and dropping 8 defenders. We will play 2 coverages from Bronco.


Bronco Blue:

This will be called in our Dime Package to drop 8 defenders and rushing 3 playing Cover 4 (Blue) behind it.


Versus 2×2

  • DE’s 5-techniques
  • DT: 0-technique (Rush Opposite of Center Turn)
  • Mike/Buck are vertical/hook defenders
  • Rover plays flats to field/Dime plays flats to boundary
  • FC Match Vertical (MV) #1 player to field
  • FS Match Vertical 2 player to field
  • BS Match Vertical #1 player to boundary
  • BC Match Vertical #2 player to boundary


Versus 3×1

  • DE’s 5-techniques
  • DT: 0-technique (Rush Opposite of Center Turn)
  • Mike/Buck bump to trips and are vertical/hook defenders
  • Rover plays flats to field/Dime plays flats to boundary
  • FC Match Vertical #1 player to field
  • FS Match Vertical #2 player to field
  • BS Match Vertical #3 player to Field
  • BC Match Vertical #1 player to boundary


Read More

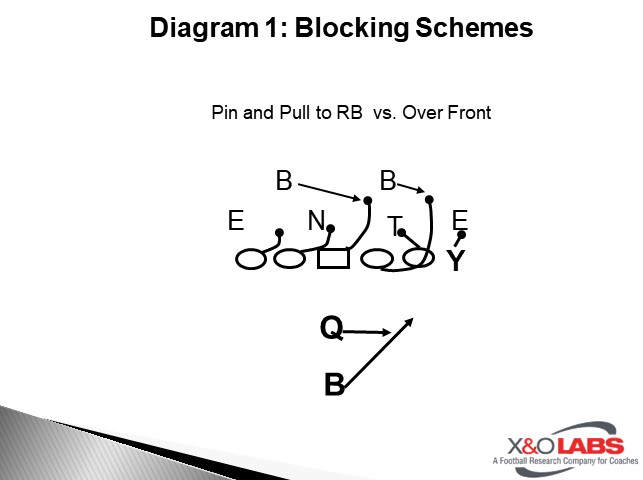
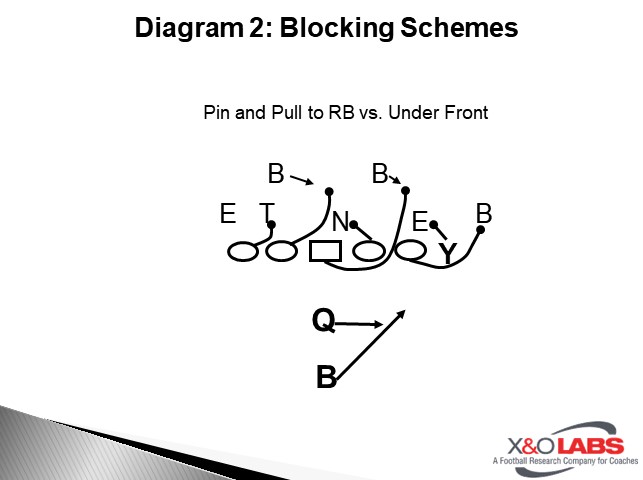
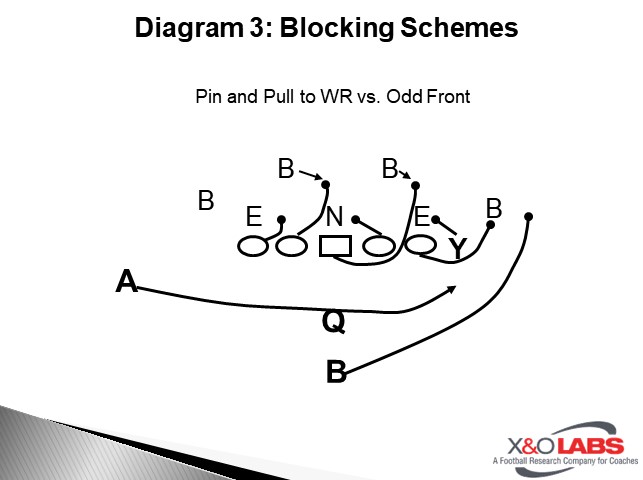
5 Essential Principles of Pin and Pull Run Concepts

By Steve Monninger
Head Coach
Norfolk Academy Head Coach (VA)


For the duration of the 2019 football season, our Pin and Pull scheme was the number one offensive run play on our call sheet.  We had a lot of confidence in the play and we used it in almost every situation.  As part of our balanced attack, we ran pin and pull 80 times for 453 yards (5.67 yards per carry) and scored six touchdowns over 9 games.  I am excited to share with you five essential principles of the Pin and Pull play and explain why the play worked effectively for us.   


What is Pin and Pull?

Our version of the Pin and Pull is a middle zone run concept that utilizes down blocks (pin) and wrapping lineman (pull).  It is a bit different than a true middle zone that uses all zone blocks and it is different from a buck sweep that pulls both guards.  It is a versatile running play that can take advantage of the horizontal “stretch” of the defense.  The ball can hit anywhere from inside the tight end to the far sideline.   


Essential #1 – Simple Blocking Scheme with Concrete Rules

When I learned this play nearly 20 years ago, I used lots of combination calls (“TED”, “POP”, “GAC”) that reminded our offensive linemen how to block the play based on the defensive front that we faced.  Years later, I found it easier to use a simple “if / then” statement for our frontside offensive lineman.  Here are the base blocking rules:

Playside TE – Always block the Defensive End (the 1st person on or outside our tackle).  Depending on the alignment, it could be a down block, a base block or a Reach Drive block. 

Playside Tackle – If I have a down block then down block.  If I do not have a down block, then wrap to the (outside) LB

Playside Guard – If I have a down block then down block.   If I do not have a down block, then wrap to the (playside) LB

Center – Reach and climb playside gap or if guard down blocks, then wrap for (playside) LB

Backside Guard – Reach and climb playside gap

Backside Tackle – Reach and climb playside gap

Backside TE – Reach and climb playside gap


Down block:

On our down block, the offensive lineman will take a 4-6-inch step with his near foot pointed directly at the defender.  The second step is with the trailing foot that will time up with punch (elbows in, thumbs up) on the cylinder of the defender.  The head placement of the offensive lineman is not a rule, it is a read.  If the defender is a hard charger we will quickly put our head across to stop the penetration.  If the defender tends to sit and read, we will keep our head in the playside gap to prevent the defender from crossing our face and spilling over into the play.  Film study and scouting can help us understand the types of defensive lineman we are facing that week.  In either case, once we are engaged, we want to stay locked on with our hands in tight and use good demeanor as we get a push on a 45-degree angle. 


Wrap Block:

We use a “skip pull” technique for two main reasons.  First, the skip pull will give our lineman good depth so he can clear the down block that is next to him.  Second, we feel that the skip pull assures square shoulders, which is vital for our lineman in terms of vision and approach on the LB in space. When our lineman run in space, they will pump their arms, keep a low center of gravity and avoid drifting to the outside.  Our lineman will take a good inside-out approach on the defender.  We do not automatically “hook” or “reach” or defenders because there is no guarantee that the ball will travel outside.  Wrapping lineman will punch the inside number of the defender while putting their head in front.  If the defender “peeks” inside, the lineman will execute a reach block.  If the defender fights for outside leverage, the lineman will lock out his inside arm and press the defender toward the sideline.  It is the RB’s job to read these blocks.            

When offensive lineman wraps to linebackers, they must take the best path to match the linebacker.  If the LB flows over the top, it is typical for a lineman to wrap around a down block and meet him in space.  If a LB gets downhill quickly, it is typical for the lineman to take a tight path to match that flow.  If there are LBs walked up into the LOS with a blitzing demeanor in the frontside gaps, the lineman must honor their down block rules.

Diagram 1

Diagram 2

Diagram 3

Read More