Training Trap Corners in the Run Game

By Jamison M. Bisch
Defensive Coordinator
Bemidji State University (MN)
Twitter: @coachbisch


At Bemidji State, we believe all 11 players on Defense should have the ability to defeat blocks and make tackles when given the opportunity. I am fortunate to have an upper-echelon defensive staff here at Bemidji State that starts with our passionate Head Coach and former DC Brent Bolte, two DB coaches Rich Jahner and Sheldon Tucker, DL coach Darius Carey, and Sam/Nickel coach Alex Gray.  Rich Jahner is a former Defensive Coordinator with over 20 years of experience overseeing the Secondary, and Sheldon Tucker a young, cutting edge coach who focuses on the CBs. More than anything we have a group of selfless young men who buy into our system, our coaches, and each other, they play with relentless effort, communicate, and have a team-first mindset. We were fortunate to have 3 All-Conference DB’s in 2018 as well as an All-American in Gunner Olszewski #36 who played both CB and Safety. Players make plays, players win games!

We will play a variety of different concepts in a given game plan including Quarters, Man, Cover 3, Cover 2, and Pressures. Being multiple means, we must train each player on the field how to fit the run accordingly. While it is not our main concept, we have played some variation of Cover 2 or Cover 3 roughly 20% of the time in 2018. In doing so we typically ask one or both Corners to fit the run game whether it is Cover 2 or Cover 3. When we play Cover 2, we usually play one of the following variations: 2-Man, 2-Carry, 2-Carry with pressure, or Tampa 2. In the coverages we usually allow the CB to play pass first except for Tampa 2, where he becomes a primary run defender and a Curl-Flat pass defender essentially. Likewise, within our Cover 3 calls, we can roll the secondary strong, roll the secondary weak, insert the safeties strong/weak, or cloud/trap the CB’s strong or weak. When we trap the CB’s strong or weak, they become primary run defenders much like Tampa 2 and we will teach the run fit and eye progressions the same in 3 Trap/Cloud and Tampa 2. Therefore, for this article I will focus on the CB run fits in Tampa 2 and 3 Trap/Cloud calls.
Coaching Points

Whether we are playing Tampa 2 or 3 Trap/Cloud the rules for our CB’s become the same. Both Tampa 2 and 3 Trap/Cloud are what we consider “Even” fit systems. In other words, we will have an even number of fitters vs the run as the opponent has gaps/blockers. In our “Even” fit systems we will use the Lever-Spill-Lever concept with our LB’s/Secondary. We define a lever player as someone who attacks Fullback outside in, keeping outside arm/leg free, keeping the ball inside, not letting it bounce. We define a spill player as someone who attacks Fullback inside out, wrong shoulder, to make the ball bounce/spill outside to the lever player.

Basic rules for the Trap CB are as follows:

Vs 2 or 3 WR

  1. Eyes: QB thru 3 Step
  2. Run Fit: Primary Force (Outside 2)
  3. Pass: Curl-Flat, field-side CB can be slower to landmark if working outside-in


Vs 1 WR:

  1. on Fullback if applicable, no Fullback key QB thru 3 Step
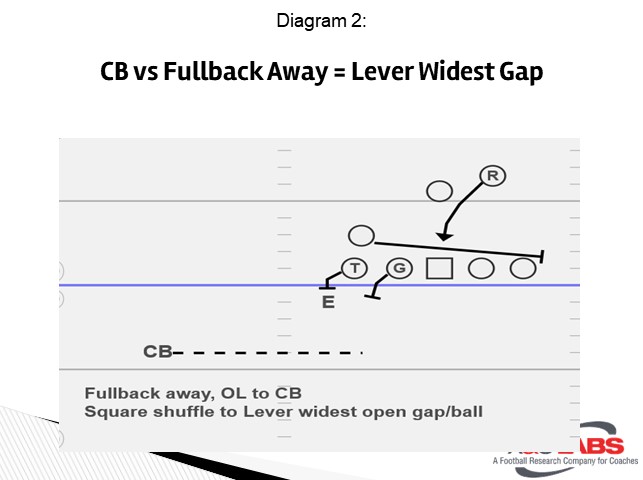
  2. Run Fit: Lever Fullback. If FB to = Lever. If FB away = Lever widest gap/ball. Must be aggressive vs run.
  3. Pass: Curl-Flat


We allow our CB’s to have some freedom to play off at 6-8 yards or to play closer to the line of scrimmage from a press look when they are the trap CB. We base their alignment on formation, field position, field/boundary, type of player, and other factors based on the game plan. Both an alignment and a press alignment have their advantages and disadvantages when playing trap technique.
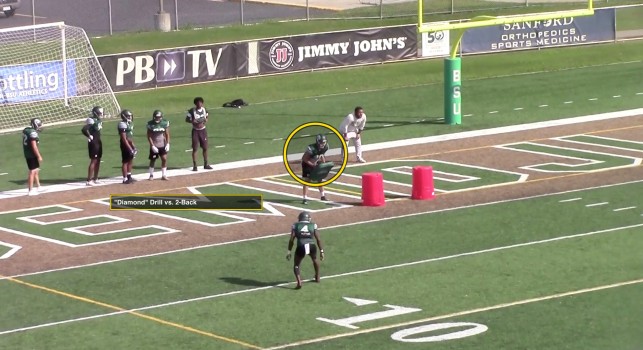
Off Alignment

Advantages: Broad vision, Angle to run fit, reduces whole shot vs pass

Disadvantages: Further away from the line of scrimmage to fit, WR can scoop or crack him with a good angle

Stance/Technique: 6-8 yards off, can play it at 10-12 yards off to field in certain situations. Heal-Toe alignment with inside foot back, hips angled in at QB. Versus run trigger with downhill angle.

Press Alignment

Advantages: Closer to the line of scrimmage to beat the block of WR, can jam WR while keying run game (good vs game-changer at X)

Disadvantages: Vision/Angle not always ideal vs run, opens whole shot down sideline more than off alignment.

Stance/Technique: 1-2 yards offline of Scrimmage, can loosen up slightly for vision. Square stance. Make it look just like press man. Versus run trigger with a flat angle parallel to the line of scrimmage to find an appropriate fit.

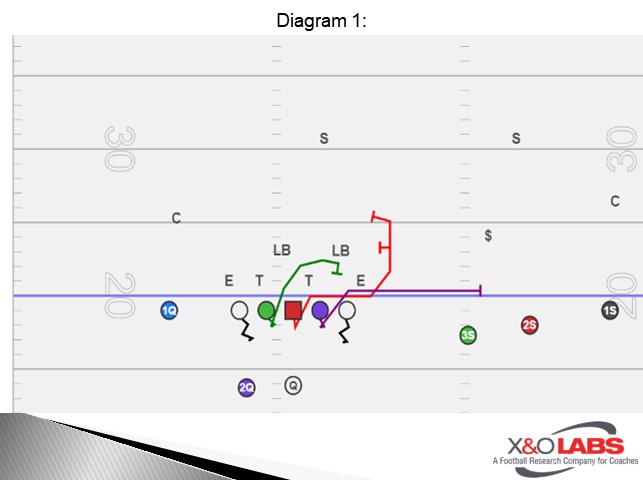
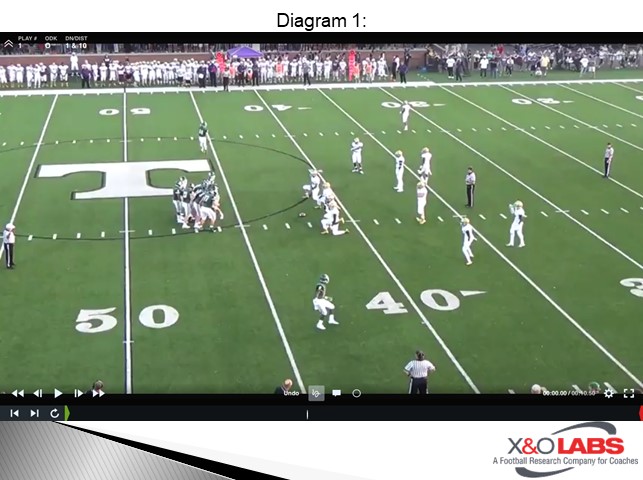
I prefer initially teaching off what we call Flex Formation, which is illustrated below with some coaching points for Tampa 2. From this formation, you can move the Y (Fullback) to get 2×2 and 3×1 formations and the fits remain the same based on where Y is at. For reference Cuff = Curl/Flat.
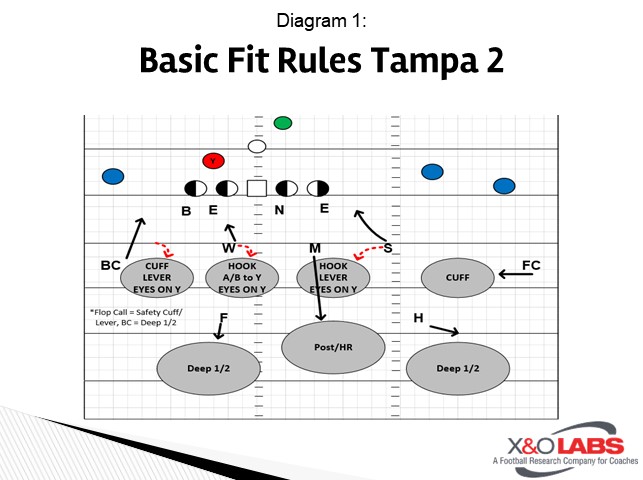
Diagram 1

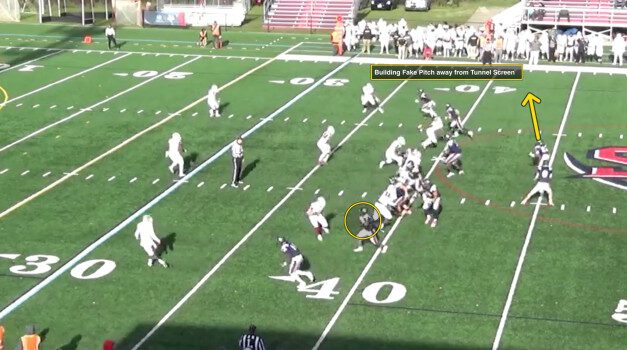
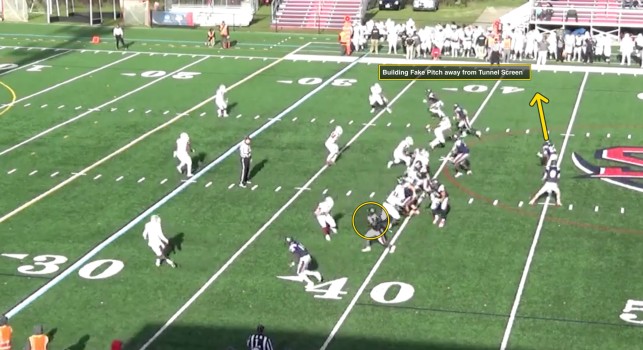
Game Film Vs. 2-Back Formations:

Diagram 2

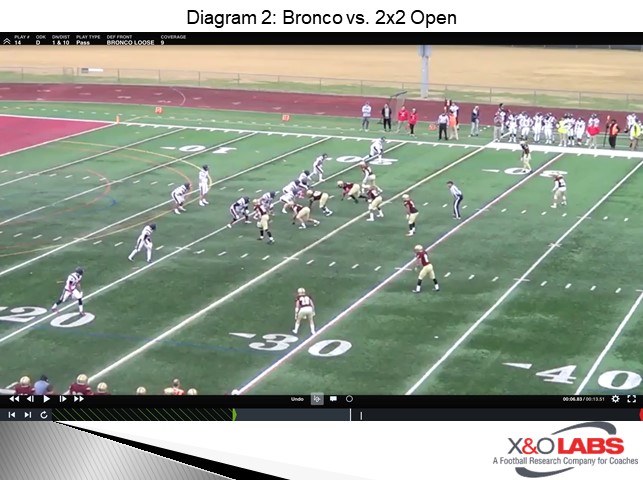
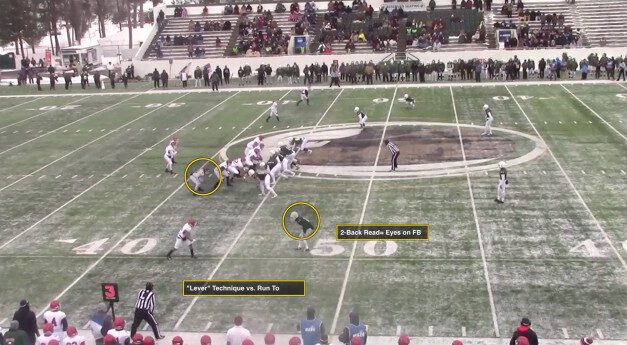
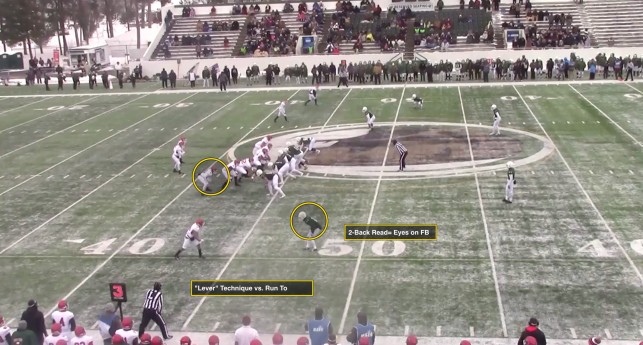
Vs Flex. Right CB: Shows press, eyes inside on fullback, trigger vs the run, lever widest open gap


Read More

10 Total Techniques: A “Small College and High School” Approach to Training O-Linemen

By Anthony Franz
Offensive Line & Offensive Coordinator
Trinity International University (IL)


Reps Win

First, let me tell you that this type of training comes from my belief in repetition. I believe that the team/unit who has more reps of a scheme/technique will win that play. If my OL base block drill gets more reps than your DL base defeat drill… I believe I will win that rep or at least increase the probability that we will. I am not saying that athletic ability does not play into my thought process, what I am saying is that I can create talent through quality repetitions. Thus, closing the athletic (talent) gap between your defense and my offensive linemen.

I do not have the luxury of having the pick of the litter when it comes to O-linemen therefore, I must be intentional about my player development. Developing complete O-linemen is a long process and I believe I have created a system that speeds up that time.

There is only so much time in the week. So, when building your practice plan keep in mind:

  • We are trying to master techniques that show up on game day
  • If it doesn’t show up on game film… We don’t rep it
  • If we don’t rep it… We don’t run it


Simplified Approach

Small college football has taught me how to get the most “bang for my buck” out of limited resources and limited time. Because of this, I have also simplified my O-Line techniques to maybe 10 total techniques that they must master in order to be able to execute our entire playbook. I do this because if we can rep 10 techniques 10,000 times and our opponents practice 30 techniques 5,000 times…We will win. I am looking for mastery of skills and techniques, I do not want to create a Jack of all trades and a master of none.

Read More

Using the “Biff” Technique in Tunnel Screens

By Stan Hodgin
Offensive Coordinator
Shenandoah University (VA)
Twitter: @S_Hodgin


At Shenandoah University, we attempt to use concepts and schemes that best fit the players we have in any given season.  The value of our screen game is measured in our production in three areas.  First, how effective are we in producing explosive plays? Second, how well do we alter pass rushing aggressiveness? And third, how can we use what the defense knows about us against them?  Specifically, with the tunnel screen, we believe we can greatly impact all three areas and produce measurable results that benefit the other aspects of our offensive attack.

The presentation we give the opponent is tied to our game plan in the run game and pass game. It is also influenced by the style of defense we expect to face on Saturday. The presentation can vary game-to-game and series-to-series. We will cover this later in the article.


Offensive Line Responsibilities:

Our Tackles are responsible for the widest defensive linemen.  Let’s identify them as Des for this article.  Our Tackles will try to invite a C-Gap rush lane and “lose” in the C-Gap, but the play will end with a push by of the DE by our tackles.  If the DE attempts to cross the face of our tackle and pressure through the B-Gap, our tackle must engage the DE and collapse him inside to the midpoint of the formation. The play side Guard will pass set and release flat down the line of scrimmage and kick-out the “force” player. Our guard is taught to release flat down the line of scrimmage and identify the first wrong color jersey that shows.  We attempt to educate our guys each week on who and from what alignment the force player will be, but the path of the guard is consistent, and the force player will present himself as the play unfolds.

The Center will pass set and then work flat down the line of scrimmage turning up and looking inside for the first wrong-color jersey pursuing from inside-out.

Our backside Guard will pass set and then work down the line of scrimmage looking for the first retracing defensive lineman that has recognized the screen. All three interior linemen will initially attempt to get the interior pass rushers off balance with some variation of a “biff” technique before releasing for the screen. 

We attempt to “biff” the down linemen rushing the QB.  We pass set them and work opposite their rush lane responsibilities.  As we vertical set, we allow the defensive linemen to get inside of our punch zone, so they believe they have an advantage. As they continue, we want our interior linemen to nudge them forward hoping to get them off balance and as a result, be much slower to retrace or react to the screen pass.

Diagram 1


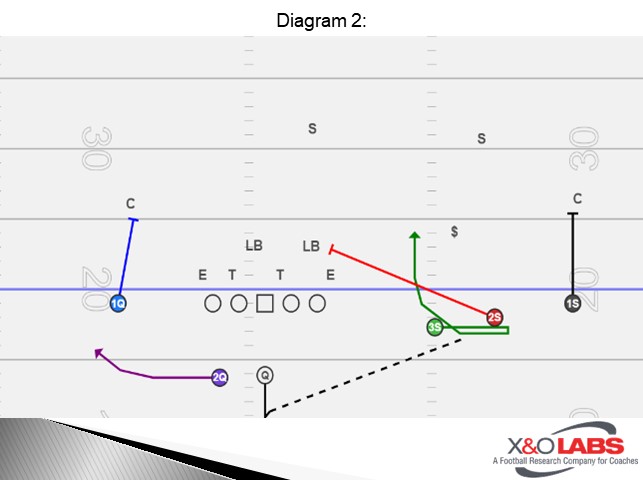
On the perimeter, our receivers are assigned specific defenders for blocking on the tunnel screen.  Beginning from outside-in, our number 1 receiver not catching the screen is responsible for the widest defender, usually the Corner. Our second receiver not getting the football is responsible for cracking the inside linebacker nearest the play side.

Diagram 2

Read More

Applying Leverage and Pursuit Rules in Pop Kickoffs

By Steve Erxleben
Head Football Coach
Southern High School (MD)
Twitter: @CoachErxleben


The execution of Kickoff coverage is, especially at the high school level, one of the most opportune times to either make an explosive play, or in the case of the coverage unit, give up an explosive play that either ends in 6 points or creates a short field. In most cases, the typical H.S. kicker has the ability to roughly hit the 5, 10, or 15 yard line so in most cases, kicking the ball into the end zone for an automatic touchback (federation rules) is out the question for most High School Teams. In the end, a Kickoff is a defensive play that asks all 11 players to close the distance between themselves and the ball carrier, avoid unnecessary blocks, defeat necessary blocks, and in most cases tackle in an open field or “ball away” situation. Therefore, like any play in football, the scheme and the skills needed to execute it are extremely important in limiting yards during the return and improving field position for the Defense. At Southern High School we have incorporated a “Pop 30” philosophy in our coverage scheme. However, the execution of our scheme is really how we have incorporated our established Force and alley rules as well as our Rugby-tackling and “ball away” principles to open field tackling that ultimately make our kickoff coverage unit a successful part of our special teams structure.


Open Field Rugby Tackling Principles:

Even though from a schematic aspect this article is dedicated to Kickoff Coverage, an explanation of the applied defensive skills with regards to Open Field tackling and Force/Alley rules are needed before applying them to our Kickoff Scheme

As a Defensive Staff both at Southern, and before that South River High Schools, we have completely dedicated ourselves to a rugby tackling style methodology. As a staff we do not feel you can be an effective tackling team in either Defensive or special teams play without completely drilling the concepts of tracking the near hip or pec, contacting with a same foot/shoulder fit, wrapping and pulling tight to the body, and finishing with either a drive for 5 steps or a hawk roll situation. We drill these principles continuously throughout every practice and in many ways, they are drilled in as many non-contact as contact situations. Like many Rugby style schemes, we split our tackles up into three scenarios that really fit into one of two categories.

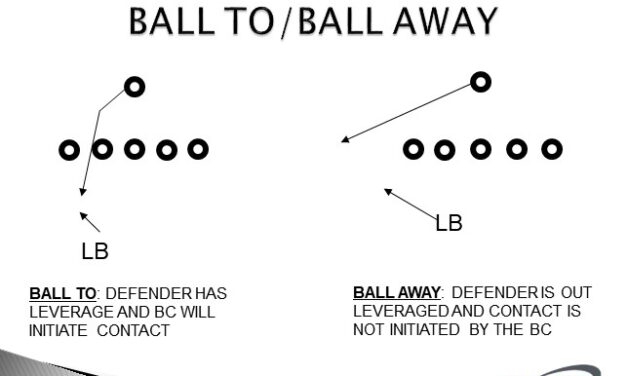
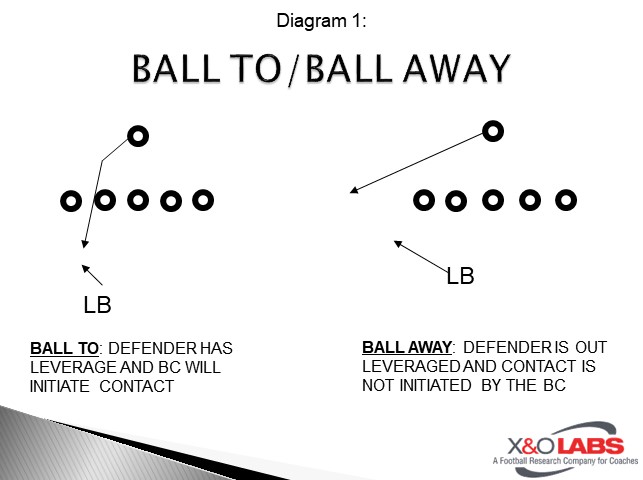
  1. Ball To situations
  2. Ball Away Situations


Diagram 1


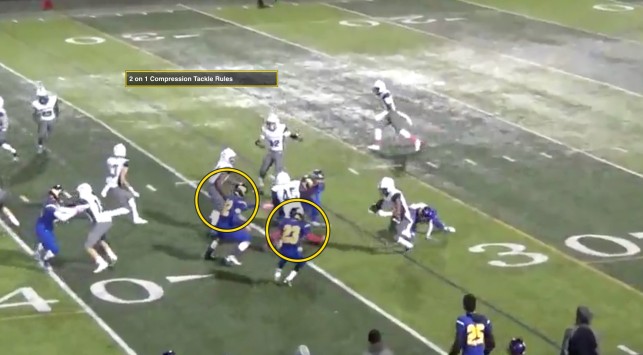
Editor’s Note: Included with this report is a tackling clinic cut up we have used as a staff that highlights the coaching points of both a ball to and ball away tackle.  It is at the end of this report.


“Ball To” Scenario:

Even though this article is about open field tackling and how it applies to Kickoff Coverage, it is warranted to first begin to talk about a Ball To scenario. A “Ball To” situation is a situation where the defender has leverage on a ball carrier and there will be contact initiated by the ball carrier. For example, an inside linebacker playing downhill on an Isolation or power play. In this situation the Defender is going to have to initiate contact as well and can use the pec or upper body as the primary key to fit same shoulder/same foot on the ball carrier. In most cases a Ball To tackle, which we refer to as a profile tackle, is an in the box situation or near the line of scrimmage, so it usually is not going to be a solo tackle. In this case we are contacting, wrapping, and really focusing on driving for 5 and limiting yards after contact while also providing a head out of contact situation in a high contact area.


“Ball Away” Scenarios:

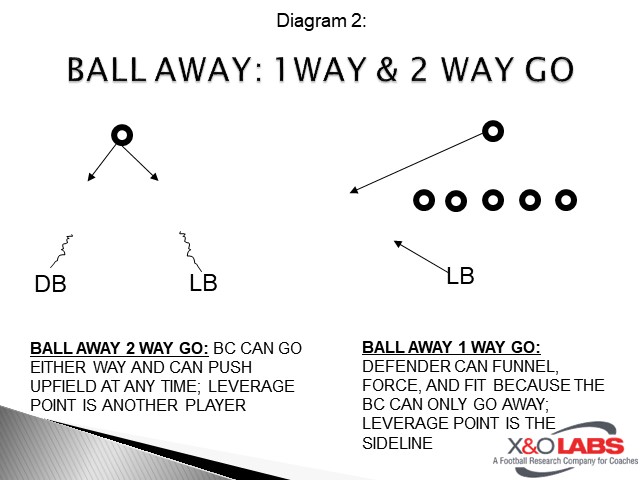
Ball Away situations in our methodology really have two scenarios that can both apply to kickoff coverage. Ball away situations are situations where the defender has either lost leverage or comes to balance in a no leverage situation and must properly fit to either funnel to an adjacent defender with leverage or must regain leverage in a 1 way go situation where the ball carrier is not initiating contact.

Diagram 2


One-Way Go:

The first situation is when leverage is lost in either the open field or away from the box/leverage position and the ball carrier changes direction or bounces into the alley with a 1 way go. We refer to this as a “Hawk” Tackle in our verbiage. In this situation the defender has lost leverage and now must use the near hip as the primary point of contact with eyes, near foot, and near shoulder. Since the hip is a smaller surface than the pec, the wrap and squeeze of the legs is an imperative detail to effectively bringing the ball carrier to the ground because in most cases, there will not be an immense amount of contact to aid in getting a solid fit same shoulder-same foot. The last detail that is important is the concept of rolling towards and not away from leverage, which does not provide the opportunity for a broken or missed tackle.

Read More

“Box and Triangle” Coverage Tags to Weak Side of 4-2-5

By Zach Watkins
Defensive Coordinator/Secondary
Washburn University (KS)
Twitter: @Zach_Watkins


Our base defensive structure here at Washburn University is the 4-2-5 and our base coverage is cover 4.  We feel that cover 4 gives us the flexibility, disguise, and effectiveness to be our “go-to” coverage.  Like most teams that base out of quarters, our scheme has a variety of checks and adjustments that allow us to look very multiple to opposing offenses while maintaining simplicity for our players.  Quarters also allows us to play the best coverage possible regardless of what the offense aligns in.  A defensive coordinator’s game plan must always include how to defend 3×1 sets the opponent utilizes.  Many offenses get into 3×1 sets to isolate their best WR on the backside, usually being singled up vs. the boundary CB.  Using quarters coverage and our away side “tags”, we have confidence in how we combat 3×1 offensive sets.

STRUCTURE

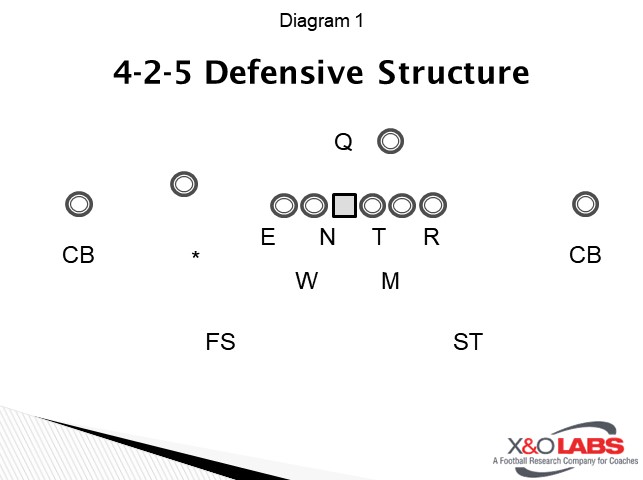
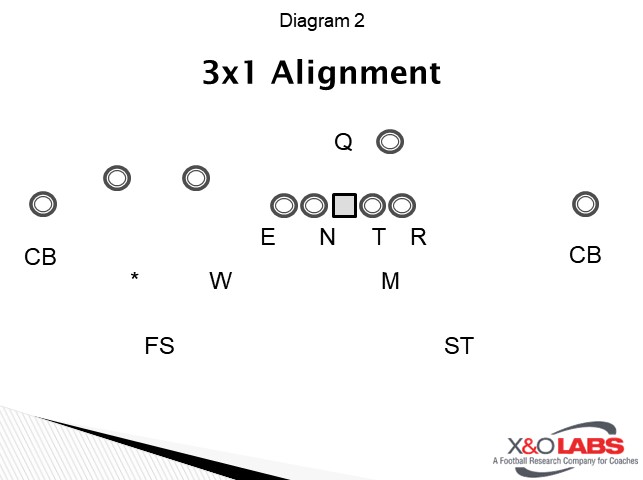
In our 4-2-5 structure, we have a “read-side” and an “away side”.  The read side is the side of the offensive formation that has the most receivers (or most dangerous threats based on game plan).  The free safety (FS) and star (*) align to the read side.  The away side is the side of the offensive formation that has a lesser number of receivers (or less dangerous threats based on game plan).  The stud (ST) aligns to the away side.  Mike (M) aligns to the front strength and the Will (W) aligns away from front strength.

Diagram 1

We call our front strength away from three WRs (under front) so that the Will backer can expand out of the box and get himself out of his run/pass conflict. 

Diagram 2

With that terminology, we will discuss “box” coverages to the read side and “triangle” coverages (“tags”, when discussing cover 4) to the away side vs. 3×1 formations.

“BOX” and “TRIANGLE” COVERAGES

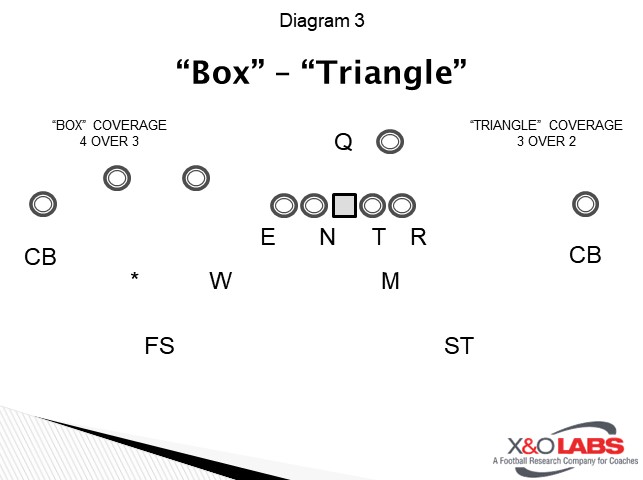
We define “box “coverage as four defenders over three offensive players.   We define “triangle” coverage as three defenders over two offensive players.  We call these variations of triangle coverages “tags” when talking about quarters specifically.  In Diagram 3, the read side CB, *, FS, and W are playing the box coverage and the away side CB, M, and ST are playing the triangle coverage.  Anytime the ST is not involved in the read side box coverage, (spinning to the read side, poaching #3 vertical, etc.) any of our triangle coverages can be played on the away side. 

Diagram 3

As you have realized, box coverages are always played to the read side and triangle coverages are usually played to the away side.  Triangle coverages can be played to the read and away side if the formation isn’t 3×1.  For this report, I will only discuss two box coverages that we utilize so that I can elaborate on the away side “tags”.

BOX COVERAGES

MATCH

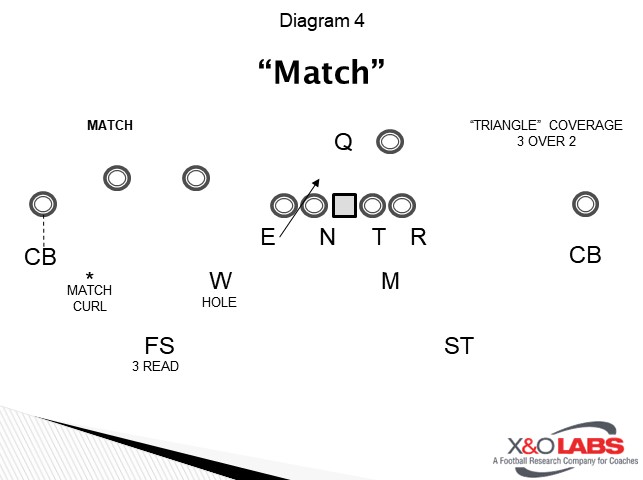
Our preferred box coverage is “match”.  Most coaches know it as a variation on “Palms” or “2 Read”.  Simply put, CB plays man to man on #1.  The *, FS, and W are playing a 2-read concept on #2 and #3.

Diagram 4

The aligns outside of #2, usually 5-7 yards deep, and is termed a “match curl” player.  The match curl player plays all routes of #2 unless #3 gets width (under LBs, usually 5 yards), then he must leverage/man #3.  If #3 doesn’t get the width, the * is man on #2.  The FS is termed a “3 read” player.  The 3 read player reads #3 just like in our quarters’ scheme.  If #3 is vertical past LB depth, FS plays him, man.  If #3 goes out or under, (under LBs, usually 5 yards) he becomes a read player.  If #3 goes out, FS will weave and play #2.  If #3 goes under, FS will play curl/dig/post (CDP) of #2 just like in quarters.  W will play the “hole”. The hole player plays #3 shallow and will disrupt/re-route #3 on any vertical.  Depending on the away side “tag”, W’s responsibility may change to a cut/wall player.

STRESS

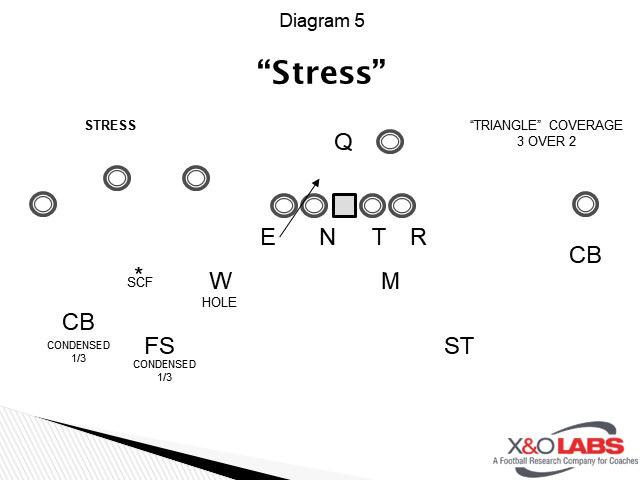
The second box coverage we install is “stress”.  Stress is a way to play zone coverage to the read side and force the QB to make a very long throw to the read side #1, something most offenses aren’t willing or able to do.

Diagram 5

The rules for stress are complementary to other coverages we run.  The CB and FS are playing condensed 1/3s over the 3 WRs.  The * is a seam/curl/flat player (SCF).  W is again the “hole” player.  The * and W MUST disrupt and re-route the #2 and #3 WRs.  The read side flat will be a late break and rally, forcing the QB to make the long throw to the field.  Depending on the away side “tag”, W’s responsibility may change to a cut/wall player.

These coverages can be played interchangeably to the read side, with no effect on which tag you choose to play to the away side.

TRIANGLE COVERAGES – “TAGS”

Once we have determined what our read side box coverages will be, we can dive into the expansive menu of triangle coverage “tags”.  The only thing limiting what types of tags we play is if the ST “spins” to the read side and cannot be involved in the triangle coverage.  We break our tags down into two categories: coverage tags and pressure tags.

COVERAGE TAGS

DEUCE

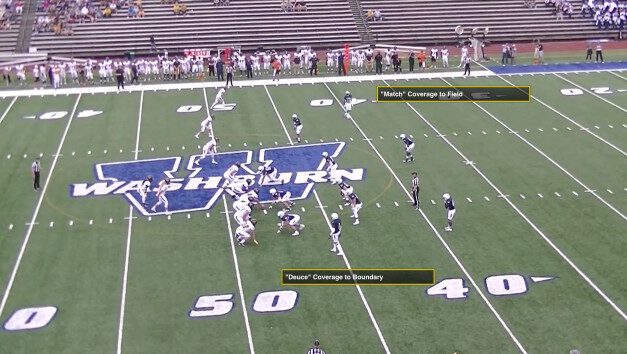
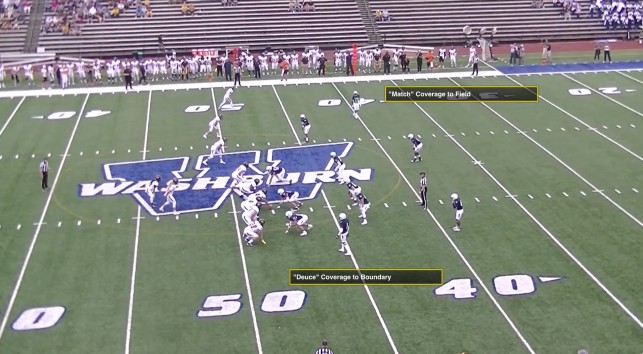
Deuce is one of our primary tags.  Deuce is cover 2 on the away side.  CB, ST, and M are playing their normal cover 2 drops.  CB’s technique is jam/funnel/ride (JFR) and plays the flat.  M is a seam dropper, rerouting any WR out of the “seam” (two yards on each side of the hash).  ST plays the true deep 1/2.  With only one WR to the away side, the CB can play heavy on #1 until a receiver gets width to his flat.

Read More

Using “On” and “Off” Calls to Defend Option in Odd Fronts

By Isaac Sturgis
Defensive Coordinator and Inside Linebacker Coach
Guerin Catholic High School (IN)
Twitter: @IsaacSturgis


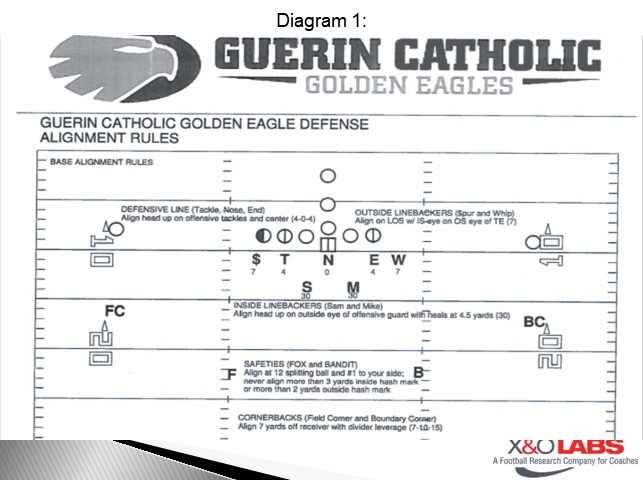
We play multiple teams that use an element of option in their offense.  I think when you have to defend option, you have to be pretty basic in your design, or kids get confused. Unsound defense leads to big plays.  To combat option teams (teams that use what I call Zone Read, Triple Option, and Power Read) we use a simple On/Off call.  On means a gap exchange between the C Gap and B Gap defender, is onOff means a gap exchange between the C Gap and B Gap defender, is off.  All of my calls are ON by default.  If I want the gap exchange off, then I signal off (My signal is I act like I am turning off a switch). For us, we want to be simple but appear to be multiple to the offense. 

The On/Off call helps us give multiple looks to the offense.  We don’t want the QB to become comfortable making his give or keep read.  We try to show different looks to create confusion for the QB.  I want to dictate to the offense.  I want to give the QB a keep read, then stunt to stop him or I want to give the QB a give read and then stunt to stop the RB.  The On/Off system, allows our defense to do just that.  All of your calls need to be synced with the On/Off Principle in mind.  I know when I call a particular stunt/blitz or coverage I need to tell the defense that we are in our off.  You have to think about this ahead of time, so there aren’t Friday night mistakes. 

We are a Slant/Angle 3-4 defense.  We play Cover 3 (& variations), Cover 2 (& variations), Man Free, 0, 3 under 3 deep or 4 under 2 deep.  We try to have as many responsibilities and techniques for our players be similar or “Just Like” in everything we do.  The On/Off principle is the same.

Our Base Defensive Alignment in below in diagram 1.  We want to show this look every time the offense breaks the huddle.

Diagram 1

If Off is called, our defenders know that if they are playing an off technique (Outside Blitzer, Straight Defensive End) then they are responsible for the QB in Zone/Triple and the Jet against Power Read.  This is the same principle in all of our calls.  If Off is called and you are a C gap rusher, you have the outside portion of option.  If no Off (on) is called and you are a C gap rusher then you become a chase player responsible for the dive while the ILB to that side is the QB player.

If you are an Edge rusher (Cover 0) then you have QB (Zone Read) or Pitch (Triple or Speed Option), or Jet against Power Read.  Nothing can get outside of you.  You must also know that if you are on or off you can spill or wrong arm against a puller.  If you are and edge rusher you cannot spill the ball. 

*Important coaching point is that I think it is very important to have flexibility in your defense to be able to call the strength where you want it.  I like calling the strength to the back against option teams, but also want to have the ability to call the strength away.  Maybe you don’t want to call strength to the back for a particular reason, but want to call it to the field or boundary or the TE.  Don’t box yourself into only defending the Field or Boundary in your defense. 

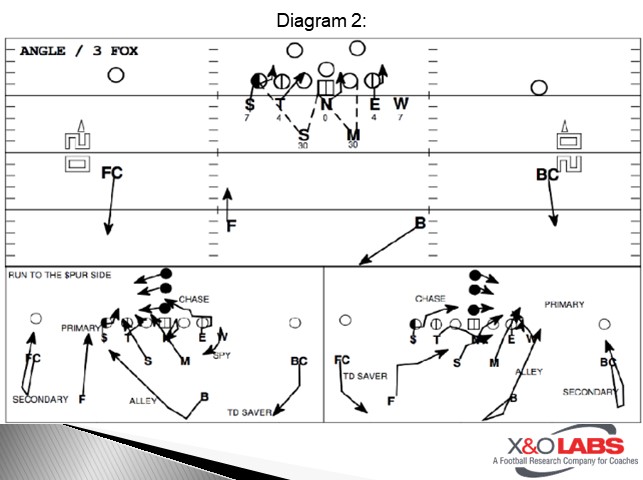
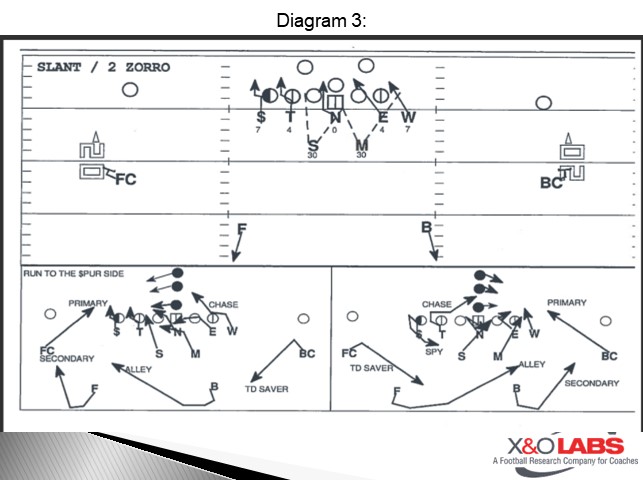
Diagram 2 and 3 are our base calls.  Diagram 2 shows “Angle 3” and Diagram 3 is our “Slant 2” These are our two major looks that we use.  *If we are playing an option team, then we will most likely end up playing these two looks the majority of the time.

Diagram 2

Diagram 3

The very first thing we do as a defensive staff when playing an Option team is decide who we want to carry the ball.  If the QB is dangerous we want to give him as many give reads as possible, then stunt to the back.  If we want the QB to carry the ball because he’s not as dangerous as the RB, then we will give him as many keep reads as possible.  At the end of the day, our kids have to know only a few things.

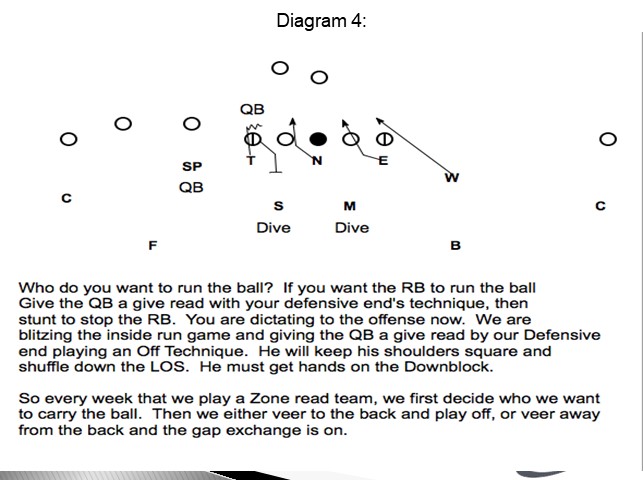
If we are veering to the back, then we are going to be in Off most of the game.  Defensively that means that we want the RB to carry the ball, we don’t want the QB to carry the ball, and we are going to give the QB a give read and stunt to stop him.  See Diagram 4.

Diagram 4

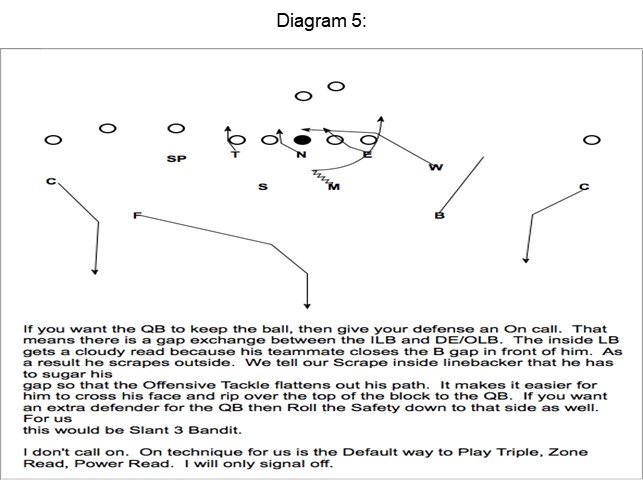
If we want the QB to keep the ball, then we will be veering away from the back.  When we veer away from the back, our OLB knows he is in chase technique and our ILB is in scrape technique. 

Diagram 5 shows Veer away from the back – There will be no Off call made, so we are ON by default

Diagram 5

To study game film of this concept, click on the video below:

Read More

Inside Zone: 17 Solutions to Increase Production

By Justin Iske
Offensive Line Coach
Southwestern Oklahoma State University
Twitter: @justiniske

iskeIntroduction:

The most important on the field job of any coach is to improve your players’ technique. Here at SWOSU, we use practice and game film to point out errors in technique and, more importantly, how to fix them.

This clinic report will review the main coaching points for the offensive line on the Inside Zone play and how to correct common mistakes based on whether they are facing a play side shade, back side shade, or if they are uncovered.

Common Errors Against a Play Side Shade:

Rule/Footwork: The initial six-inch step works for width with play side foot. The second step mirrors the first step with the back side foot. As he moves, he must keep his toes slightly outside of ankles and knees inside of ankles to maintain power angles. He must also pound the insteps of his feet into the ground to create power.

Error #1: Lineman is not gaining width on first step

The player is stepping underneath himself with first step and not gaining width. A major coaching point to fix this is to have him put the majority of his weight opposite the direction he is going. This allows him to push off that foot and forces him to step with the correct foot.

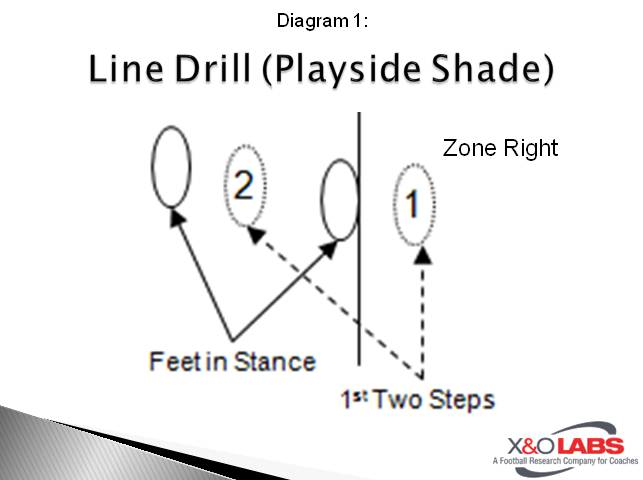
Solution #1:  The Line Drill

Have the player(s) line up with play side foot directly next to a line on the field. This gives a visual landmark to show the player that they are gaining width on their first step. When we don’t have lines, I often use a rolled up towel or t-shirt can be used instead.

Coaching Points:

    • OL starts in two or three-point stance with play side foot directly next to a line on the field.
    • On command, he will take his first step over the line for width.
    • Drill can be done for one step, two steps, or through a whistle.
    • Drill can be done on air or versus a defender.

Slide1

Solution #2:  Hand Technique

We want to get our hands on the defender as soon as possible. To accomplish this, our players must not load up their elbows. We want the player’s hands as tight as possible to each other to get inside hand leverage. Upon contact, we want the player to be heavy with the back side hand so he can’t be thrown by a defender as they react to the runner cutting back.

Error #2: Hands too wide on contact

This not only decreases power, but it will result in holding penalties by grabbing outside the framework of the defender. 

Solution #1: Clap/Volleyball Drill

One way to get the hands tighter is to have your players clap their hands together in front of their body as they execute the punch. This also takes care of anyone with the habit of loading their elbows. We also use volleyballs or medicine balls instead of hand shields to force our players to get their hands tighter. We teach them to “aim small, miss small.”

Coaching Points:

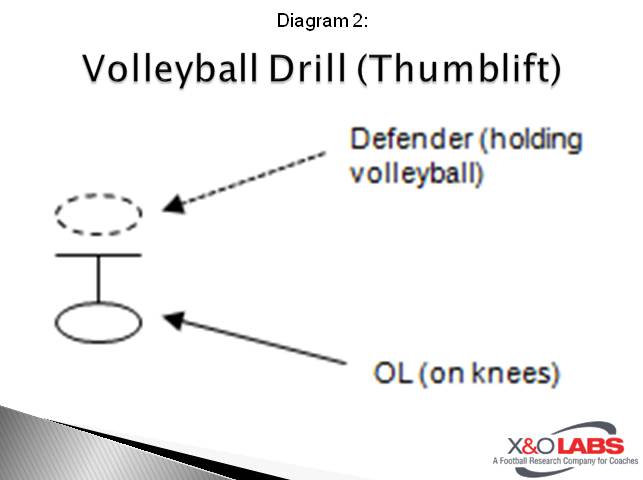
    • OL starts on his knees with hands on thigh boards and butt on heels. Partner stands in front of him with a slight bend in the knees holding a volleyball in the middle of his chest to give the OL a target.
    • On the command, drive hands to bottom of the volleyball while driving hips through. Strike on the rise. Stress hips and hands!
    • Knees and feet do not move. As upper body and hips follow through, the OL should end up with chest on the ground.

Slide2

Read More

Southern Oregon’s 4 Every Day Drill OL Circuits


By Chris Fisk
Offensive Line
Southern Oregon
Twitter: @CoachFisk

Introduction:

southernoregonNational championships are won one yard at a time. Here at Southern Oregon, we believe that each of those yards is hard won as a result of detailed technical drills. Over the past 3 years, we have averaged over 4.5 yards per play and less than one sack per game. This consistency and production is a direct result of the detailed focus we take into our drills. In this clinic report, we will look at four drill circuits that have been and will be critical to our success.

Before we get into the drills, it is worth mentioning that these drills reflect the rules that we expect our linemen to live by. Those rules include:

  1. No one touches our QB! (From 2012 – 2014, we only gave up 1 sack for every 30 passing attempts.)
  2. Be smart!
  3. Bet the best!
  4. Out-hustle everyone!
  5. Do it the SOU way!
  6. Block through the echo of the whistle and FINISH the play!

Each of these drills is done EVERYDAY in the spring, summer, and preseason. From there, we will do some every day and others every other day through the season. We believe these are the cornerstones to what has made us effective in all parts of our blocking game.

Circuit #1: Agility Circuit

Be great in space.

We do these because we do a lot of screens. This is done every day in the summer and every other day in the season. These skills are essential to the success with our screens.

Drill 1: Angle Cuts (cones)

We treat this like WRs. Toe in at the top of the cone and toe out with of the inside foot at the next cone. Chin over chest and chest over knees.

Drill 2: Fast Feet (cones)

We are trying to get our guys to lower their center of gravity with their chin over chest and chest over knees. This allows them to change their direction in space.

Drill 3: You Chop, I Chop (line)

This teaches our guys to identify the target, and when the target converts to a chop, they need to chop. This is a concept that we got from our special teams drills and we think it connects well to what linemen do in space.

Drill 4: Mirror Drill (line)

Read More

Complete Installation: Odd Robber Defense

By Adam Hovorka with Rob Everett
Former Defensive Coordinator
Bridgewater College (VA)
Twitter: @nineinthebox


Editor’s Note: Coach Everett uses several play simulations in this report. More information on these products can be found at Go Army Edge.


Defending the modern spread offense has become increasingly more difficult as offenses continue to stress defenses with RPOs, option run game, QB designated run game and shifting/motioning. Defenses have had to counter and recent adjustments for many coaches is the Odd Front robber looks that are being played by Iowa State courtesy of Coach Campbell and Coach Heacock. If you think only the Big 12 has these defensive challenges, you couldn’t be more wrong. High school defensive coordinators, and small college coaches around the country, are continually searching for answers to the riddle that is the RPO and spread game. For Coach Rob Everett, former DC of Bridgewater College and currently a defensive staff member of Coach Mike Singletary’s Memphis Express of the AAF; the answer was and is to play odd front robber.


Advantages of Dime Robber Package:

  • Allows for 50/34 defense to stay in its base personnel
  • Play a version of two high coverages
  • Account for two overhang players
  • Adding a middle of the field third level player to help in coverage and more importantly an extra hat in the run game


At Bridgewater College, Coach Everett’s odd robber package held offenses to 3.1 yards per attempt and was 60% efficient (65% when blitzing). Most importantly, his system allowed his players to line up fast and play aggressive because he was utilizing it with his base quarters personnel. This defense helped Bridgewater to a 6-4 2018 record and their middle linebacker won Defensive Player of the year in their conference.


Adjusting to Base Defense

Bridgewater College is a quarters outfit by trade, so this was not anything different, it was just deploying people in a different fashion. So, they played it on all downs. The thing Coach Everett likes the most about it is that you get a four-man rush (with the late inserting Mike) and because of the front, pass protection is forced into a full slide or big on big with bad leverage. In addition, the middle hole Robber plays as the “number three relater” that the Mike normally does but he is a better athlete and “closes” the middle of the field because they play match coverage enough. It may not be a great answer against 22 personnel because, like in most odd defenses, speed personnel have to match with bigger offensive linemen.


Base Personnel and Alignments:

Below are the base personnel he’ll use with this package:


Nose: O-technique defender

Tackles: Two 4i-technique defenders

Mike LB: 10-technique defender; 3 yards off the ball (tighter than normal alignment)

Whip: Field overhang, apex end man on line of scrimmage and number two receiver

Backer: Boundary overhang defender; apex end man on line of scrimmage and number two defender.

Bronco: The “robber” (called Bronco in this defense)

Free Safety: 10 yards over #2 to the field

Rover: 10 yards over #2 to the boundary

Corners: 8 yards over #1 receiver


Below are the alignments based on common offensive formations. It’s important to note that a “loose” call tells the Backer and Whip to get depth off the line of scrimmage. A pure Bronco call will put the Whip and Backer closer to the line of scrimmage.


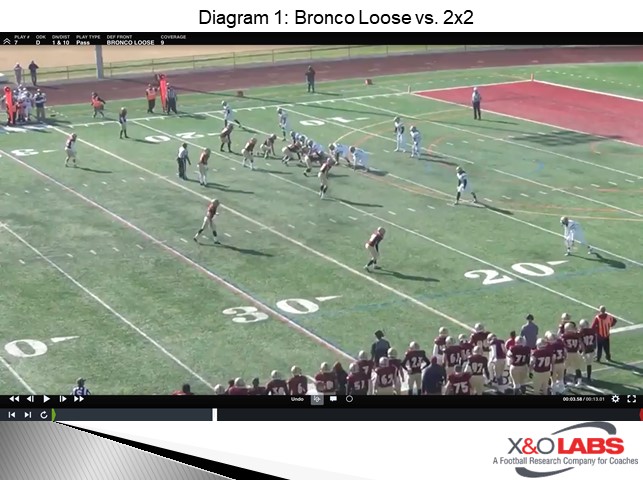
Bronco Loose Vs. 2×2 Open

Diagram 1


Bronco vs. 2×2 Open

Diagram 2

Read More

Track Blocking the Wide Zone

By Andrew Coverdale & Mike Kuchar
X&O Labs Research Staff
Twitter: @XandOLabs


Introduction

Many offensive systems package the wide zone run concept as part of its offensive play menu. Many of these same offenses are teaching horizontal zone combination blocks on the front side of the play to create space for entry points for the running back. While zone combinations could be a viable way to block the scheme, we’ve found other coaches are finding that “track” blocking the scheme can be a better solution, particularly for inexperienced offensive linemen in a tempo offense.

We heard Coach Coverdale speak about how track blocking the wide zone concept has fostered his tempo offense and made it easier on younger linemen to block the play. So, we reached out to Coach Coverdale to talk about his most efficient run concept. It’s been the foundation in the Trinity offensive system, but this season its merits were tested. Working through continually attrition on the offensive line, Trinity had to still find ways to run the scheme. Because of this inexperience, Coach Coverdale and his offensive staff (head coach Bob Beatty and offensive line coach Cliff Dawson) leaned more on track blocking the wide zone concept, rather than using combination blocks.

Though he will teach both tracking and combination blocking, according to Coach Coverdale, there are three main reasons why track blocking can be more effective:

  1. Alleviates confusion: “If you are getting a lot of multiplicity and your talent is not great, we tend to use tracking, “ he said. “It is more simplistic and you will not get negative plays with this scheme. That is the first layer of preventing negative plays because of the communication.”
  1. Cultivates Tempo: “We are a multiple tempo team. We are not a no huddle team per say but we use a speed break from our huddle. We want to get on the ball and snap it. That does not allow for a tremendous amount of communication at the line of scrimmage.”
  1. Provides protection against line stunts: “If we are getting a lot of long sticks, two gap exchanges, or zone dogs, we always carry more tracking into those kinds of situations,” he said.

Track Blocking vs. Combination Blocking

It is possible to teach both combination blocking and track blocking and it’s beneficial to carry both in an offensive play menu. “Why do we need both ways of blocking the wide zone?,” he asked. “We have to use the strengths and weakness of both types. Sometimes we start with tracking and use the combination blocking later. Often times we do it just the opposite. It depends on the players we have and the situation.”

If our linemen were more thumpers we would lean to more combination schemes because it’s more physical, but it’s harder to teach,” he told us. “The combination blocking takes more time. If you have years where you have more continuity the combination block methodology may work better but if you have years where there are young players or you go through injuries, tracking is easier to learn. It’s about running off the ball and take your chances.” Other factors, such as defensive structure are factored into the decision making process. “If there are linebackers in leveraged positioned or stacked behind the ends in three down, we would want to track it because we couldn’t combination to them,” he told us. “If they were in traditional techniques like 20 techniques, we would combo it.

Pairing Tracking with Sugar Huddle Tempo

One of the major advantages of the tracking system is that it correlates with tempo offenses. Since there is little to no pre-snap communication like identification of Mike points for combination blocks, it’s really about getting off the ball and going. While Trinity High School is a tempo team, it has paired the wide zone scheme with a sugar huddle formation, similar to what is being used at Auburn (Diagram 1). “We need to have a lot of weapons against players with great get off and the sugar huddle is one of those mechanisms,” he told us. “We will huddle within two yards of the ball. We are not afraid of people hearing us. We want our linemen to just be able to turn around, snap the ball and go. It helps us to go fast. We’re going to shift, present four man surfaces and it creates urgency. The tracking allows us to still play fast in the middle of uncertainty and chaos. We love chaos and we get used to functioning that way.”

Slide1

Trinity will have two or three different kinds of the sugar huddle. It may release the receivers first or release everyone all at once. “If we want to be more disruptive to the core (defensive box), we will have a sugar huddle for at least the outside receivers first and then we break so there is no response time in the core,” said Coach Coverdale. In these cases, he wants to snap it within two seconds of breaking the huddle. “If we want to be more disruptive to the secondary or the defenses support mechanisms then we will release everybody all at once so they don’t get as long a look at the overall formation,” he said. While the timing may be slower on this one, the issue is getting receivers on or set and the quarterback doesn’t snap it before they are set. “Kids will lose their edge over time if you over do it,” he said. “You have to enforce it in practice.”

Read More

21-Hour Football Program: Building a Competitive Weight Room Atmosphere

By Jeff Wood
Head Football Coach
Bedford High School (MI)

And

Don Stewart
Strength Coordinator
Bedford High School (MI)

Editor’s Note: X&O Labs is continuing its study into how coaches are advancing their programs to achieve higher levels of success in an ever-changing culture, society and world. We’re calling our study The 21-Hour Football Program because these concepts focus on the 21 hours before and after practice that build a winning culture. In this report, Coach Jeff Wood and Coach Don Stewart outline how they used competition in the weight room to build support for a “doom and gloom” football program. The results are stunning. To access our brand-new study, The 21-Hour Football Program, please go here.

Introduction

In 2008, the Bedford Kicking Mules football program began a weightlifting program that included all sports in the building. We took over a football program that had dilapidated facilities, no money to fund it and an overall “gloom and doom” attitude towards football with only 9 winning seasons in 58 years. We stressed quick, 45 minutes lifting sessions with base core lifts and auxiliaries to enhance the muscle groupings. Our players observed results immediately.

In 2010, we began looking in to ways to take the gains that we were seeing in the weight room and enhance them through team building. We spent particular time studying ways to create methods of competition in the weight room as a means to foster this team building. Our future Senior players mentor our future Juniors and Sophomores while improving their bodies for the upcoming season.

The bond that was built during these workouts and competitions has been immeasurable in how it has impacted our program. We have had 9 winning seasons in the past 10 years, won the conference 3 times and won 3 district championships. We believe very strongly that the key to this change has come from how we coach in the offseason in our weight room. Furthermore, the competitive nature of our weight room created a “refuse to lose” attitude on the football field. We have won over 3 close games (10 or less points) each year since putting this system into place.

Lifting System Basics

We lift 4 days a week, Monday to Thursday for 1 hour. We have lifting times at 5:30am-7am before school and 2:40 – 4pm after. Players must lift 4 times per week, it is their choice of when. We have found that lifting 3 days a week for 90 to 120 minutes did not make the gains necessary to compete. The 4-day system has worked much better for our athletes and it also doesn’t require nearly as much attention span to lift for 60 minutes. We also found that lifting on Friday was a terrible idea.   It seemed that all “non-players” found an excuse to miss on Friday. Instead, we changed and held them accountable for missing workouts, which is where Competitive Weight Room entered the scene. 

Read More

Defending Mobile Quarterbacks with the “Cage” Concept

By Holden Whitehead
Special Teams Coordinator/Defensive Line Coach
Alfred University (NY)
Twitter: @hwhitehead45


It is safe to say that the evolution and utilization of the mobile QB have become a staple in many successful offenses, at all levels of football. As a defensive-minded coach, having to game plan to stop a mobile QB, who can make things happen and extend plays with his feet, to hurt you with his arm, is a challenge that more and more defenses face every Saturday. Here at Alfred University, we embrace the challenge of being a relentless pass-rushing team, accumulating 113 sacks in 4 seasons. A large part of our success is since we look at our D-Lineman as playmakers, not sacrificial lambs. We want our D-Lineman to make plays, whether it is stopping the run, setting up the blitz, or our four-man pass rush, we utilize The Cage. The Cage works to give each player in our scheme a job to execute beyond just owning their gap. We utilize our cage in four-man, five-man, and six-man rushes. We stress to our players that if everyone does their job correctly in The Cage, then everyone will eat. We look at everyone in the backfield as food for the defensive line and we are the wolves that must embrace the hunt. Each wolf has a specific and crucial role.


Cage Concept:

In our defense, we want our guys playing fast, not thinking, so we keep the concepts as simple as possible. What the cage presents is a vision beyond maintaining your gap. On day one, we present the cage to our men as being comprised of the four cage players, two high cage players, and two low cage players.  This gives each of our defensive linemen one of these responsibilities.  Pass Rushing is an art, but at the end of the day it comes down to three things: get off, having a plan, and the finish. Our read keys are simple, and we call them the “Three B’s”- Ball, Block, Backfield, and we read them with our eyes. When seeing movement we get off, exploding low off the ball. Then, our eyes go to the block, where we read the offensive lineman’s pass set and technique. Finally, once we defeat the block, our eyes move to the backfield. Now we are ready to dive into The Cage.


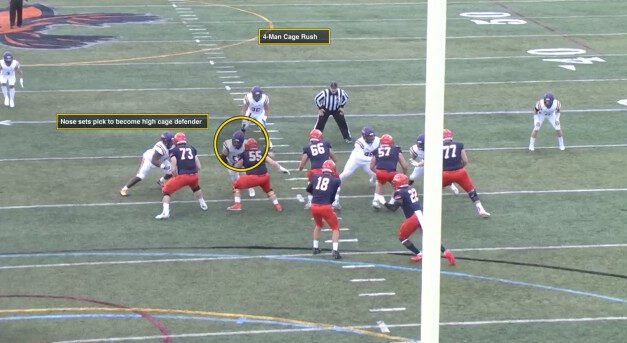
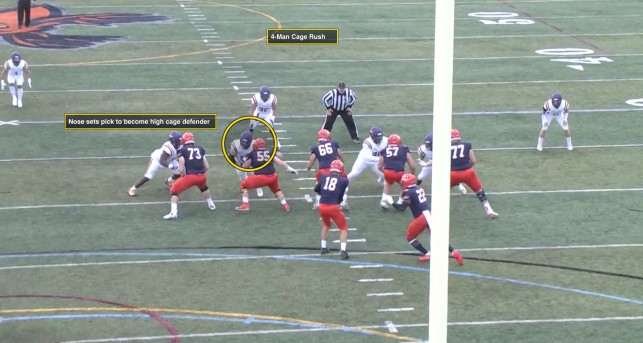
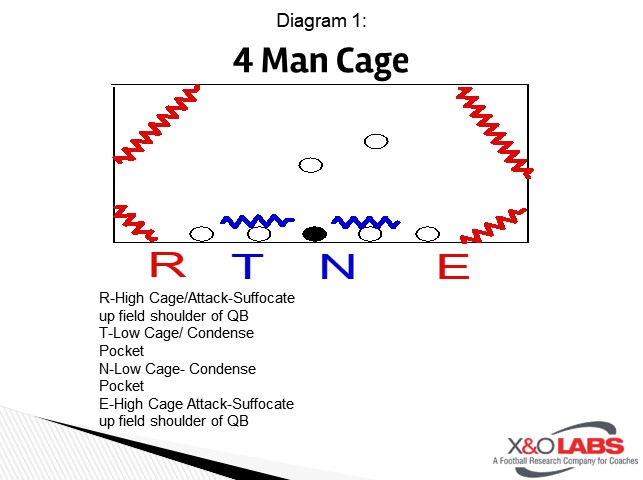
Our base four-man front is comprised of a 5-tech defensive end (our End) and 1 Tech Nose Tackle on the strong side, with a 3-tech defensive Tackle and a 5-tech defensive end (which we call our Rush) on the weak side based on our defensive call. Both the End and Rush are declared to be high cage players, with the low cage players being our interior Nose and Tackle. Each player must understand where they fit in the run scheme with their gap assignment first, then implement their cage responsibility. Everything starts up front, and our guys must take ownership of their jobs, playing for the man next to him, and the defense as a whole. That is when we have something special. Our cage players work in unison to condense, squeeze, and suffocate the backfield. Notice, we never use the phrase “contain the QB.” I cannot reiterate enough the shackles that it puts on a defensive lineman when you say contain. We never want to contain our players; we want to unleash them. Our words reflect our mentality and using terms such as condense, squeeze, and suffocate motivates our players and allows our guys to play relentlessly. Diagram 1 shows our four-man cage and the responsibility for each player.


Four-Man Cage Concept

Diagram 1


Our four-man cage gives us four chances to disrupt the QB. We preach to our guys that we need 25% from each of them, for each defensive lineman to execute his role and responsibility, and that is all it takes to end a football play. We begin with the job of our low cage players, the interior defensive linemen. These are our bigger bodies, capable of eating and beating double teams, and we owe a great deal of gratitude to these monsters up front. Their jobs are to “CONDENSE” the pocket, squeeze the passing lanes.


Low Cage Defenders

Our low cage is the first wave when it comes to defending the quick pass and RPO game that has taken football by storm in recent years. The low cage players know they must suffocate any step-up lane in their gap and with quick passes they need to fire their hands up to disrupt the vision of the QB. Even if the low cage player has no chance of getting a shot on the QB we can still do a great job of disrupting the timing of the QB’s mechanics with a relentless low cage rush, and by getting into and removing the quarterback’s throwing windows. Our low cage players know why they cannot leave their rush lane because that will compromise the cage, which goes down as a minus in the film room. Our players are keenly aware of this fact. An example of compromising the low cage is when that defender rushes outside of our high cage player to make his play or is displaced by the block of the offensive linemen. The two low cage players work to suffocate the QB in their portion of the cage by working off each other. This philosophy requires an unselfish mentality that reinforces playing for the guy next to you.  Our guys utilize a half-man technique on every single play, whether it is run or pass. We continually preach that half of a man is easier to defeat than a full man.


High Cage Defenders

The second phase of our cage is the high cage players. Our two high cage players in the four-man cage are the End and Rush. The End and Rush target their key, which is the up-field shoulder of the QB. The Ends never let the QB outside of them, this is the constant battle many teams have against the mobile QB.  Again, our verbiage never uses the word contain- we want to Condense, Squeeze, and Suffocate. Based on opponent tendencies, our defense uses specific calls to signal to our defensive line that we anticipate a pass. This will trigger them to have their plan ready pre-snap. Pass rushers on our team will build their moves off of their skill set, we will never ask a player to do something that does not fit their skill, strength, or comfort level. We always emphasize having a plan, a secondary move, countermove, and finish. Every day we practice the fundamentals, working our hands and feet, always preaching the importance of a relentless pass rush. High cage players work together to condense the pocket and track the QB’s upfield shoulder. Again, we revert to the Three B’s for the Ends as the key to getting to their aiming point. Ball, Block, Backfield, are our focal points throughout the entire play. Going back to another of our philosophies, we have a saying within our defense- “Be the giraffe, not the turtle.” We want to see everything that is going on around us to make the best football plays.

Read More

Horizontal Reads off Tight Zone Runs

By Braden Layer
Offensive Coordinator/QB coach
Bowdoin College (ME)
Twitter: @Coach_Layer


Our offensive philosophy here at Bowdoin College is “Players, Formations, Plays,” and we are very purposeful on that order. We want to be able through motions, formations, or alignment changes, to isolate our best matchups or ensure numbers to where our offense can be successful. Furthermore, because the NESCAC has some strict limitations on practice time and the abilities to meet with players once the season has concluded, we must be very concise and clear with our installs each fall. If our goal is to play the best football player regardless of age, it doesn’t make any sense to design and implement an offense impossible for an 18-year-old freshman to walk on campus and digest. We want to run a few schemes well, and tweak or adjust those to fit our personnel best each year.

Over the course of the last 7 years as an offensive coach (Denison University, Sewanee, Allegheny, and now Bowdoin) in a pistol, spread-based offense, we have run many zone variations, and inside zone has always been one of our staples. Another huge piece of our offense has been centered on simple jet motion from our best perimeter threat. We used outside zone most often and were a true reach and run team. Our tailback was athletic enough to keep in pistol which was huge for our self-scout to eliminate tendencies. He blocked the first dirty-jersey in the alley, inside-out (aware not to cut back to the middle of the field).

When I got to Allegheny College as the offensive coordinator in 2017, our slot receiver was one of the most-feared athletes in the conference. A true burner, he possessed the ability to score any time he touched the football. Thus, his “influence” on a jet sweep was incredibly powerful. We found that by devoting a handful of plays each game to the jet action with the original goal of challenging the perimeter, we were in turn able to dramatically influence the box, specifically in the zone read game.

This became a great fit when we didn’t necessarily have a dominant H-back that could consistently handle DEs on zone/split zone, and our QB was limited in his keep ability on zone read. We needed a way to encourage a handoff while still feeling solid about our numbers and angles, and matching zone read with jet motion allowed us to do just that. We married two different components of our offense without installing any new techniques or major learning, keeping it simple.


Zone Read With Jet Motion

On this play, our quarterback oversees putting the slot in motion. He aims to snap the football when the S receiver hits the outside leg of the tackle for our jet motion. Because we want to encourage our receiver to reach the mesh as close to full speed as possible, he tracks the motion in more of a banana path. Flat to the outside leg of the tackle, then bellies to directly in front of the quarterback.

On the snap, the quarterback turns and reads the defensive end towards the side the S will finish his motion. There is no dummy fake or show to the motion-man. Again, with the threat of the S receiver getting outside and finding a perimeter running lane, we are hoping to influence the read key to widen on the snap. Should the defensive end crash, our S now becomes an extra alley blocker for the QB on any keep read (can handle a hard squeeze/scrape).


At Allegheny and now as the OC at Bowdoin, we have clear visual keys for what is a keep read for our QB. Another reason we love this zone variation is that is allows us to encourage the give read if we are not the most dynamic runners at the QB position. Unless the defensive end turns his shoulders to chase and reaches a landmark of the BSG on his crash, we aimed to give. Obviously, depending on the ability of your QB, this read changes for your offense.

The jet sweep threat allowed our tailback to feel VERY comfortable with his backside cutback. Our aiming point on the zone play is the playside leg of the center, and our tailback is taught to press the heels of the center, reading the A gap. If we have a solid double team and get vertical displacement, our tailback is free to bang the playside open gap. If he sees a muddy A gap and no vertical push, we teach a one-cut rule on his cutback. He is free to jump-cut and find the open gap all the way back to the C-gap defender.

With the jet motion, we are hopefully encouraging a much clearer C-gap for our tailback. If he doesn’t find playside A-gap to be open, he is naturally thinking “hit backside C.”


Adding Bubble

Changing the technique of the S on this zone-read variation post-snap has given us the option of now throwing bubble on the perimeter.

Read More

Adjusting 5, 6 & 7-Man Protection Schemes to Handle Superior Personnel and Pressure

By Grant Gower
Offensive Coordinator/QB Coach
Oklahoma Baptist University
Twitter: @OBUCoachGower

and Greg Gothard
Offensive Line Coach
Oklahoma Baptist University


Protecting the quarterback at all levels of football is of primary importance for any offense.  Regardless of your style of offense, it is imperative to not allow sacks and give up negative yardage to the defense.  At Oklahoma Baptist University, we are a spread, no-huddle, up-tempo offense that likes to attack all areas of the field.  Within our throwing game, we have become very successful in passing offense and limiting the number of sacks allowed.  In 2018, we had 506 passing attempts and only allowed 3 sacks in 11 games.  In 2017, we had 423 passing attempts with only 9 sacks allowed, for a 2 year total of 929 attempts with 12 sacks, while completing 60% of our passes.  This was coming off of 2016 where we allowed 22 sacks in 362 attempts.  So how were we able to decrease the number of sacks while increasing our number of attempts dramatically?  This report will explain some of those concepts and ingredients that have been beneficial for us.


Body/Coaching Points

To be able to be effective in any offense, it involves everyone to be on the same page and executing each play successfully.  Obviously, the challenge that we all face is to be able to do that consistently day in day out and game in game out.  Here are some of those key ingredients for our position groups:

  • Offensive Line-Continuity/Consistency-all 5 must work together seamlessly regardless of who the personnel is on the field. In 2018, we had 3 senior offensive linemen that had played a lot of games together and were very experienced.  Having that was a huge asset, but another key ingredient that we have utilized is rotating our OL guys in throughout practice and games.  We travel 10 offensive linemen and it is important for all of them to know and understand each other and their assignments.  We like to play at a very fast pace, and having a deep OL unit really enables us to work together and stay fresh as well.
  • Tight Ends/H Backs-Pass Blocking or Receiving-our TE/H Back is a key ingredient not only from a blocking perspective, but also to be able to get out in routes. We will have our tight ends stay in at times for our 7 man protection, but also will release him into the route concepts as well.  It is important for them to be strong enough to block a defensive end, and also agile enough to block a blitzing linebacker or defensive back.
  • Running Backs-Pass Blocking or Receiving-our running backs not only are the main ball carriers but have an integral role in the passing game. One of those key ingredients is their pass blocking ability.  Whether it is in a 6 man or a 7 man protection, he has to be able to pick up the rush or a stunt and “make us right”.  When he is on the route, it is important for him to be able to catch the ball and become a playmaker.
  • Wide Receivers-Getting off of coverage-one of the major ingredients of not allowing sacks is for wide receivers to get open. Receivers must understand how the DB is playing him, whether that is in a zone look or in a press man coverage.  The key is in varying releases off the ball to create the space necessary and beat the leverage that the defensive back is applying to the receiver.
  • Quarterbacks-Pulls it all together-the main job of the quarterback is to keep everyone functioning as one unit. That entails many variables.  His mobility and his ability to escape pressure if it does break down, recognizing coverages and where blitzes are coming from, and where his hot receivers are, all make for a quarterback that will be very effective.  It is also important for him to know when and where to throw the ball away to avoid the sack.


For all of the moving parts to function effectively, there are several key ingredients.  It starts by introducing the pass protection concept.  We utilize a multitude of protections, and it is important for all the position groups to know and understand when and why we will use a certain protection scheme.


OL Pass Pro/Coaching Points

 Bison Pass Protection Absolutes

  1. Knowing job/responsibility (Eyes)
  2. Trigger first
  3. Staying square/pad level
  4. Hands/Feet


First of all, we must know our job, who or what gap am I responsible for, and we must train our eyes to stay on our responsibility and not chase false reads.  I must trigger or get my hand out of the grass first; if I start behind I will never catch up. It is imperative that we keep our hips square and our pad level down.  By doing that, it allows us to maintain our leverage on our defender we are responsible for blocking.  Keeping our hands and feet active throughout the play is key in keeping our defender off the QB. Our blitz pick up is no doubt the most important thing we do for pass protection, and we are able to work on these 4 Absolutes repeatedly at game speed.

Read More

Adapting the Shuffle Reach on the Backside of Zone and Gap Runs

By Mike Kuchar
Co-Founder/Senior Research Manager X&O Labs
OL Coach/Run Game Coordinator
Rahway High School (NJ)
Twitter: @MikeKKuchar


In all my time as an offensive line coach, I had been teaching the hinge block on the backside of gap schemes mainly because that is what I knew. I remember giving my lineman the visual of how a door opens and correlating that to how his hips should open to block the interior B gap. Of course, I was not the only one that was teaching this technique. But I found that my lackluster way of teaching it yielded lackluster efforts in return often times letting a backside B gap defender run unobstructed to the ball carrier.  It made it seem as if that block wasn’t important to the overall concept.

It was only recently that I took what longtime NFL offensive line coach Bill Callahan was doing with teaching the two-step and four-step shuffle reach for uncovered lineman in his zone schemes and incorporated it for my backside Tackle in both zone and gap runs. I found it to be extremely productive for several reasons. For most young players, a shuffle technique is a common movement. It’s something even non-basketball players have done before. Keeping their shoulders squared allowed for greater surface area when making the block. So, this season I made it an effort to implement a shuffle technique for my offensive Tackles on the backside of both zone and gap runs.  And in doing so, I’ve found the shuffle reach to be more productive than the hinge for the following reasons:

It’s More Assertive Block Than a Hinge:

The backside hinge was a staple in gap schemes. The Tackle was asked to secure the B gap defender before working out to the C gap. Problem with that is teaching 45 degree step footwork required on the hinge cultivated a weaker block. There wasn’t enough body surface needed to clean up the B gap. First level defensive lineman with tremendous get off were able to dent the B gap and cause problems to the scheme. Using the shuffle reach helped in securing that gap.

It’s Non-Athlete Proof:

I say this all out of love: offensive lineman are not the best athletes on the team. After all, they don’t call them the “big uglies” for a reason. They are a usually an inclusive group of awkward teenagers that don’t get the credit they deserve. We all know this, so they deserve a little more love when we coach them up.  I’ve found that just by using this technique instilled confidence in their ability  to get their job done and as a result as football players. We had a left tackle this year as a senior that didn’t play a down of varsity football in his career, but at 6-0, 345 pounds with good hands had the potential to be a solid offensive lineman. So naturally, we ran most of our gap and zone schemes away from him and he became a master of the shuffle reach block. Getting 350 pounds plus to move laterally with his shoulders square shut down any thought of  penetration in the B gap. As it turns out this same novice was an All-Division selection for us this year.

It’s Effective Against 4i Technique Defenders:

Like many other offensive coordinators, I’m constantly pressed with the task on how to prevent backside B-gap penetration most synoymous in Odd fronts. More than have of our opponents this season operated out of a three-down outfit and not surprisingly the best players along the front played the 4i technique. So, in order to get that B gap sealed off, we would cut our splits down in the B gap with the Tackle and get him reached. And if we couldn’t reach him, we would cut him. This was rarely the case. In most cases, we were able to get the block done.

It Negates Assistance From Center:

Back blocking a 3-technique on power is a hard enough task, but executing the same block against a 4i defender can be nearly impossible. Using the shuffle reach on the backside B gap from the Tackle allowed our Center to stay on the front side of the run game, either by Ace blocking the Nose with the play side Guard (if he’s uncovered) or base blocking the Nose alone. 

Shuffle Reach Technique:

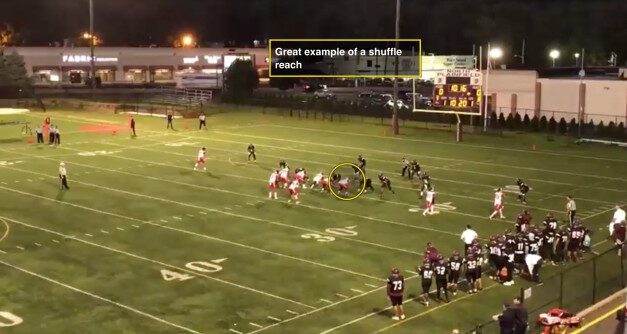
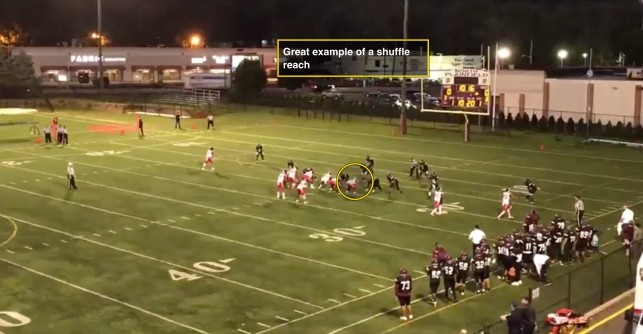
Quite simply, the shuffle reach technique is mainly a two-step shuffle footwork with a landmark of the play side “V” of the neck of the B gap defender. Once we have the inside landmark, we work to extend the play side arm (we call this a strong arm technique, many call it a drag hand technique) while working to secure ourselves in the B gap. It’s the same block in principle as a reach block, with the difference being we want out shoulders squared. We felt that was a better way to negate penetration.  

Incorporating the Shuffle Reach for Various Concepts:

We were able to implement the shuffle reach technique on the following for the following run concepts:

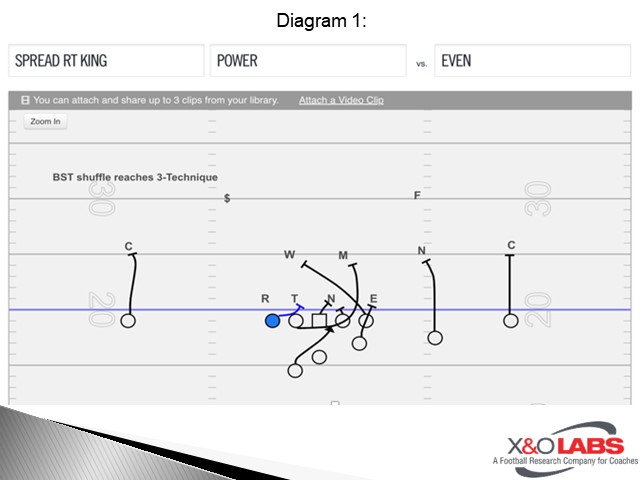
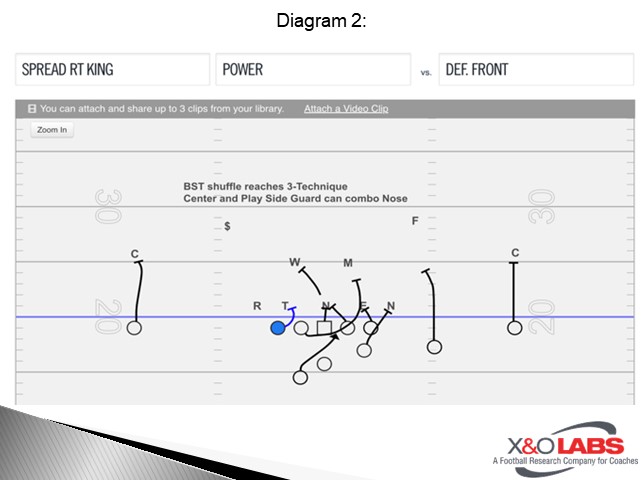
Power Concept:

Here we were able to double the Nose with the Center and play side Guard. We would turn the C gap defender loose in power and shuffle reach the Tackle. In most cases, he wouldn’t be involved in the play. If he was, we would simply read him and make it a double option concept.

Vs. Even Front

Diagram 1

Vs. Odd Front

Diagram 2

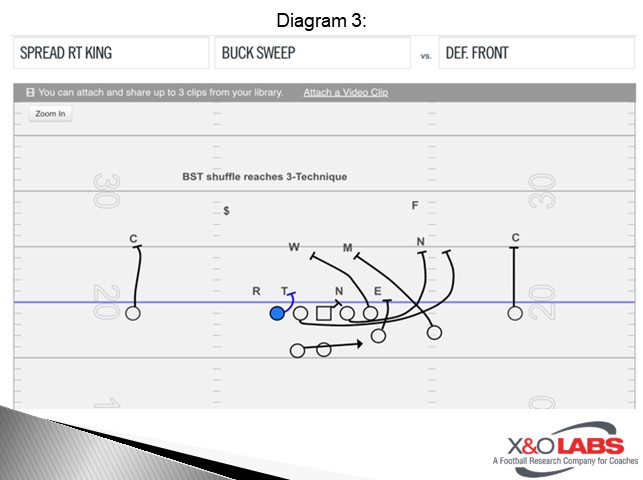
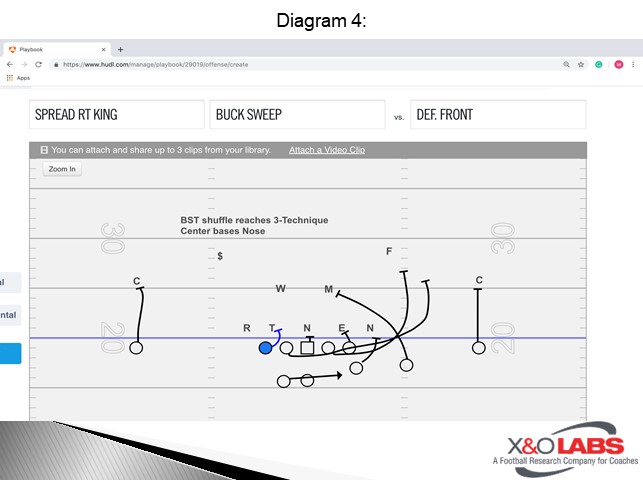
Buck Sweep Concept:

Even though buck sweep mainly hit to the front side, using the shuffle reach with the Tackle allowed the Center to stay on the front side of the scheme. We were able to pick up an extra hat to the play side.

Vs. Even Front

Diagram 3

Vs. Odd Front

Diagram 4

Read More