8 Check Points for Improving QB Throwing Mechanics

By Ian Shoemaker Offensive Coordinator/Quarterbacks Coach St. Cloud State University (MN)

Editor’s Note:  Ian Shoemaker officially joined the Husky football coaching staff on July 1, 2008. This past season, Shoemaker directed the St. Cloud offense to average 426 yards per game, including 264 passing yards per game. The Husky offense also scored 35.8 points per game this past season. Shoemaker had been the offensive coordinator, quarterbacks and strength and conditioning coordinator at Baldwin Wallace College (OH) previously.

I consider this a tremendous honor to be allowed to share some of our ideas on QB play. I also appreciate X&Os Labs for providing this platform for coaches to share some of our tricks of the trade. What I am going to present is just what we feel is important to our QB position at St Cloud State University. Nothing that I am going to present here is revolutionary and all of the mechanic ideas and drills are things that I have pillaged from other QB coaches that I have had the opportunity to visit with or study. As you watch the film you will see our QBs are not perfect, far from it, however, we aspire to perfect these points of emphasis in every drill we do. I think that these check points and drills provide our QBs the best opportunity to produce and replicate a consistent release, which in turn gives us a chance to be an accurate passer. I just hope that there are a couple of ideas here that you might be able to use to improve your coaching of the QB position.

Check Point #1 = Carriage – Good Ball Control & Posture – Quiet Upper Body & Athletic Lower Body

The proper carriage sets the foundation for your throwing motion. A correct and consistent carriage will provide your QB the initial environment needed to produce a repeatable arm circle. Right handed QBs should carriage the ball comfortably on their right peck with elbows relaxed and pointed toward the ground. You do not want the ball too close to the body, nor extended too far from the chest. A ball held too close to the chest will impede the initiation of the throwing motion (i.e. Check Point #2 Short Circle). Holding the ball too far away from the chest will cause balance issues and tend to draw your QB’s upper body toward their toes. Upper body posture is very important to the carriage, throughout the drop back and any step-ups or resets, I would like to see consistent carriage and upper body posture. I feel this provides a consistent platform to trigger the throwing motion. Below the waist, I like to see an athletic knee bend and active feet. I really like the analogy I heard once of a duck gliding across the pond. Looking at his torso you would never guess how hard his legs were working to keep him moving forward. That is what I am looking for.


Coaching points: Quiet upper body and athletic lower body, separate the footwork from you upper body carriage and ball at peck.

To see the drills that Coach Shoemaker uses to drill QB Carriage, click on the link below:

Read More

Ron Zook: Bring the Pressure

Editor’s Note:  After leading both the University of Florida and the University of Illinois football programs, former head coach Ron Zook has taken what he plans to be a one-year hiatus from coaching before he returns to the sideline.  This off-season, he spent some time with X&O Labs’ Senior Research Manager Mike Kuchar discussing what he’s earned his stripes for as a defensive coordinator – the inns and outs of brining pressure. 

Part 1: Elements of a Pressure Defense

Ron Zook speaks exclusively with X&O Labs


MK:  Coach, can you talk briefly about your philosophy on bringing pressure?

RZ:  Systems nowadays have to be adjustable enough to adjust to your personnel.  One of the things I learned from Frank Beamer when we were together at Murray State is that when you’re getting after people, kids enjoy it.  They have fun.  There is no more read and react defense anymore.  You’re attacking.  Your defensive players are now on the offensive and they have fun doing it.  You have to be smart in what you’re doing by not giving up big plays, but he changed my philosophy defensively.  Football is an emotional game and you need to play with intensity.  Bringing pressure lets you do that.

MK:   How do you develop the “blitz makeup” of your defense?

RZ:  We always talked about what we called “blitz attitude.”  If you got people that are pressuring, they have to beat blocks to do so.  If you’re asking a linebacker to beat a running back – he needs to beat him.  It’s the same as a defensive back beating a wide receiver. We didn’t want to get beat.  When I coached the secondary, I always taught from a man coverage point of view.  If you can play man coverage, than you can play zone coverage.  What you’re doing in zone pressures is giving up a certain area of the field while attacking protections.

MK: What is your preference when designing zone pressures?  Which kinds of pressures are you most comfortable with?

RZ:  When you bring five people there are two things you can do: you can play a three deep three under principle like what Dick LeBeau and Dom Capers are known for by trying to get a guy free.  You’re trying to force an offensive lineman who is normally blocking a first level defender who then drops off.  This gets a guy coming free.  The QB’s are so good in the NFL and now in college they are going to get their line in the best protection.  You have to make the QB read on the run.  We got into the two-deep zone pressures while I was coaching with the New Orleans Saints.  I used to coach Joe Johnson who at the time was the best defensive lineman in the NFL.  We used to run our zone dogs and drop him in the flat.  So one day he turns to me and said, ‘look you’re paying me five million dollars to rush the passer not drop back in pass coverage.’  I told the head coach he had a point.  So we got into the two deep zone pressures to let our DL rush the QB.  You’re still bringing five defenders, but now you’re bringing the  four down and a second level player.  In college, we couldn’t play both three deep and two deep pressures because we didn’t have enough time to teach it.  If you teach everything from a man point of view- where you’re teaching where your eyes need to be and your leverage- you can teach any zone coverage.  Playing three deep and two-deep changes how you play the corners and safeties but it all depends on how much you can do.  If you choose to do too much, the less productive you will become.

MK:  How many pressures will you go into game week with?

RZ:  When I was in the NFL we had a whole bunch.  In college we may have 8-10 but they were “same as, same as” meaning that we had a lot in the repertoire, but you need to work the ones you are going to use the most.  You’re really putting in pressures to attack protections or take advantage of personnel that you may be superior than.  The ones you practice the most are the ones that are most successful.  I had to teach myself that less is more because that’s what your guys know in the heat of the battle.

MK:  How much does personnel play a part in how you’re bringing pressure?  Will you not run a certain pressure because of your personnel?  Are you more confident with the scheme or more confident with your players?

RZ:  I learned this at an early age at Murray State.   We had a terrific safety that could blitz and cover, so we used him.  The next year we didn’t have those same abilities.  So just because a pressure is good at one place, it doesn’t mean that it will work everywhere.  It’s all about putting your players in position to be successful- at any level.  Your systems must be flexible enough to put players in position to make plays.  Players will be more comfortable in doing their job that way.  If you have a guy that has a knack for getting off the ball, making guys miss and making plays on the QB, that’s the kind of guy you want to get free.  More often than not, that’s when you’re changing your blitzes from week to week.  For example, you may want a safety coming through the A gap or B gap based on the protection to get him free.

MK:  What are some proven indicators in determining pass protection when bringing pressure?

RZ: What you try to do is get an overall feel for their protection.  From there, you can disguise your coverage or your front where you can get their offensive line confused.  It’s fun to blitz- let those guys move around. Is the offensive line sliding?  Are they working a five-man protection?  Six man protection?  Go back and study the blitz reel of your opponent.  Once you see this, you can determine where the QB is trying to go with the football.  Find out where his hot reads are.  It’s easy to see if the back is free releasing or checking.  How do you get them to slide their protection?  It usually starts where the Mike LB is or where the center is counting from.  You try to disguise him that way.

Read More

Pistol Zone Read Variations

By Kyle Schmitt

Head Coach

Atholton High School (MD)

Kyle Schmitt, Head Football Coach, Atholton High School (MD)

Editor’s Note:  Coach Schmitt has put together a 38-9 record through 4 years as the head coach at Atholton High School.  During that time, his teams have won 1 County Championship and appeared in three Regional Championships during that time.  Prior to his time at Atholton, Coach Schmitt served as a graduate assistant at the University of Maryland and as Tight Ends coach at St. Vincent College (PA).

In 2009, my first year at Atholton, our football team was primarily based out of 21/11 personnel sets running both Zone and Gap Concepts. The success of that season encouraged us to stick with these sets that many would consider a “Pro Style” offense. In my second season as Head Coach at Atholton we started 2-2 and lacked any true cohesiveness or identity on offense. We had an underachieving offensive line and we weren’t correctly utilizing our skill players.  Our offense was a collection of plays, rather than a system. The Offense was diverse and gave defenses plenty to prepare for but little to truly worry about.

At the suggestion of my assistant Coach Jon England, I watched a Friday evening primetime game between Nevada and California. I was aware of the Pistol but gave it little consideration. I felt the short gun snap and deep tailback gave the offense minimal advantage. However, that night I came away extremely impressed with the Zone Read, QB Runs and paralyzing effect the misdirection had on the defense.  While it was easy to see that QB Colin Kaepernick was a special player he also played in a system perfectly suited to his skill set. Chris Ault’s system combined Wing-T, Veer Option and Spread principles to create a powerful run game. Needless to say Nevada games soon began to fill the Schmitt family DVR.

Our offensive staff began to experiment with the Pistol during practice in order to take advantage of our strengths.  We found the Pistol enabled us to better utilize all of our skill while simplifying our blocking schemes. The past two years we have evolved into a base Pistol offense. We are not exclusively Pistol because we feel the need to have additional backfield sets, formations and personnel groupings for different situations we will encounter as an offense. However, the Pistol has become the core of our offense and has been an excellent set to build upon.

Basic Tenets of Our Pistol Run Game

Zone Read

The base play in our Pistol offense is the Inside Zone Read. In 2010, we dedicated ourselves to running Inside Zone because our offensive line was struggling. The Pistol allowed us to feature this play from a variety of looks, especially Zone Read Play. The balance the Pistol provides allows us to dress up the Inside Zone from different formations and motions, without giving away our intention. Defenses struggle to cheat their backside ends, OLB’s and alley players to confuse the QB Read because of the possibility of the play coming either way.


The zone read has become the emphasis of our offense and the first concept we teach our offensive line. Instead of teaching a variety of plays we pride ourselves in blocking this scheme to a variety of fronts and pressures.

Quarterback Run Game

Over the past three seasons we have been fortunate to have talented Quarterbacks who are able to run the football. Moving the QB out from under center has opened up the QB run game. Each week we include QB Zone, Power, Counter, Power Read and Zone Read plays for our Quarterback out of Pistol. We found that running the QB was going to be a crucial element of our game plan versus top defenses. Some of our biggest wins and most successful offensive performances have featured our QB’s rushing upwards of 15-20 times on designed runs.

Base Run Concepts

The base run play of our Pistol Package is the Zone Read. Numerous teams from the NFL to High School football have adopted some type of Pistol backfield set, but very few of them are running a true Pistol Offense based on the Zone Read. We have very specific goals when running the Zone Read.

  1. Establish the Tight Zone play with multiple double teams at the Point of Attack. Our #1 goal is to run the Inside Zone when calling this play.
  2. Eliminate a defender by reading him. We will read the: 1. End Man on the L.O.S .;  2. 1st Defender from the Center backside; and, 3. backside LB’s.
  3. Create an open alley for the Quarterback Keep by formation or lead blocker. When teams dedicate their defense to stopping the hand off the QB will keep the football. We want to make sure that we have properly taken care of the alley in which the QB will run.
  4. Slow the downhill reads of the Inside LB’s with Bluff, Jet and Orbit action. We can also slow down linebackers by making them the read player.
  5. Establish constraint plays that do not allow the opponent to dedicate their defense to stopping this play.

We have the ability to run the Zone Read play out of any Pistol formation in our offense. The past two years we have concentrated on 10 and 20 personnel sets due to the lack of a true tight end in our program. Below are some of the ways that we run the Zone Read Play out of our 1 Back sets.

Read More

Utilizing the H-Back in Zone Schemes

By Stephen Rice Head Coach Richton High School (MS)

Editor’s Note:  Coach Rice is entering his fourth season as head coach at Richton High School.  Richton is currently coming off an 8-4 season, which was its first winning season since before 2004.  Coach Rice had completed a five game swing from last season, when Richton finished 3-8.

We are a run first pass second concept team. We run the ball almost twice as much as we pass it yet we do throw it enough to keep teams honest. We run the spread formation with a Nasty Slot or H-Back. I feel this gives us a chance to spread people out but at the same time gives us an extra blocker in the Box. Most nights we are playing teams that have better athletes when we step on the field, but believe this formation gives us the best chance to be competitive. We use multiple shifts and motions to try and gain an edge.

 Like most spread teams we use the inside and outside zone as our base run plays. As with most of us, the simplicity of running the zone and the lanes created by being in the spread formation are very conducive for us. The key for us is the H-Back. Most times this kid would be a fullback in traditional offense such as the I or Wing. He must be physical at the point of contact, but also must be able to move because he will be pulling and used in our play action and passing game.


H-Back Lead Zone

This is a basic zone concept but we use the H-Back to Zone up on the play side Linebacker We have two foot splits and our H-Back lines up splitting the stance of the Guard and Tackle. On the snap of the ball he leads up into the play side gap to the first second level linebacker that shows up. Our offensive linemen block the normal and traditional zone concept. They are responsible for the gap to the playside. (Diagram 1):

Read More

Monmouth University’s Take Concept

Watch a video tutorial of Monmouth University’s “Take” Concept provided exclusively by XandOLabs.com.

Researchers’ Note: Below this video are the PowerPoint slides.  You can scroll down to review these slides or just Click here to download the complete PowerPoint from Monmouth on their lethal “Take” concept.

Read More

The I Option Attack


By Ross Maddalon

Offensive Coordinator

Old Bridge High School (NJ)

Editor’s Note: Coach Maddalon is the offensive coordinator at Old Bridge High School. This past season, the Old Bridge Knights finished with an 8-3 record including a semi-final birth in the state playoffs.


When I joined the coaching staff at Old Bridge High School in New Jersey seven years ago, I was predominantly an I-formation guy. This was the offense I played in high school and ran when I coached my old high school team during college. I never really understood the concepts of “veer” and “triple” because none of the teams I was associated with had ever run them. At Old Bridge, however, I quickly became familiar with the triple option philosophy and its effectiveness.

What I saw at Old Bridge was a number of teams teaching their defensive ends to “bomb the mesh” and keep the offensive tackles/tight ends off of their scraping linebackers. Some teams were better at it than others. The well-coached teams were able to contain the option, and that left the traditional wishbone/flexbone team to answer with the “rocket toss sweep” or play-action passes.

For years I asked myself this question: “Why can’t we run the triple option from the I-formation?” By combining veer and midline with ISO/power/counter trey, an offense can really mess with the head of the defensive end. In 2011, we transitioned to the I-option attack and it paid off dividends.

Base Flexbone Option

In the traditional wishbone/flexbone option attack, most even-front teams played the option with the “squeeze and scrape” philosophy.


Inside Veer (Diagram 1)

Outside Veer (Diagram 2)

Even when we ran midline option (reading the 3-technique, double option), many teams decided to teach the defensive ends to slant hard inside and have the linebackers scrape for the quarterback, bouncing out a hole wider because of the slant-end.

Midline Option (Diagram 3)

Read More

Building A High School Offensive Line

By David Sedmak,

Offensive Coordinator,

Edina High School (MN)

Editor’s Note: Coach Sedmak is presently entering his second year as Offensive Coordinator at Edina High School, a suburb of Minneapolis, MN. Prior to Edina, he was the head coach at Mason High School, and at Shaker Heights High School in the suburbs of Cleveland, Ohio for 13 seasons (99-40 record). Coach Sedmak has had offensive linemen earn scholarships and go onto play at Ohio State, Michigan State, Penn State, Louisville, University of Toledo, Miami University (OH), University at Buffalo and Northeastern University, among others. Three of those went onto make NFL rosters.

As a high school football coach for over thirty years at five different public high schools in three metropolitan areas (Cleveland, Cincinnati, Minneapolis), I’ve always found building a competent offensive line can be very challenging. Although more kids play high school football than any other single sport, they don’t grow up in the back yard blocking people. The fun of football to a youngster is the throwing, catching, or running with the ball. If a kid is really aggressive, he may enjoy tackling, but he’s not running around saying “I want to play offensive guard.”

Additionally, if one has never actually played offensive line, he has no idea what it is like to play there. It is physically difficult, in that the lineman is himself moving and attempting to use his strength to move someone, his size or larger, on many consecutive plays. It is mentally difficult, because the lineman must know whom to block, how to block him, and on a variety of different plays with the defense rarely in the same spot two plays in a row. Most difficult is the emotional challenge – never being allowed to fulfill those desires that were most fun as a youth (playing with the ball itself) and receiving much criticism if the offense doesn’t move the ball, and receiving little recognition when the offense does move the ball well.

Quite frankly, an offensive line may face all/some of the following obstacles in one season:

  1. Potential lack of players with the size to be competent varsity linemen;
  2. Potential lack of players with the desire to be competent varsity linemen;
  3. Potential lack of effort by the linemen to do the work year round to increase strength, size, and quickness/agility;
  4. Potential myriad of other activities that can interfere with the lineman’s ability to improve physically, even if that athlete is motivated to improve;
  5. Potential coaches’ lack of understanding of the mind of an offensive lineman, especially if that coach never played offensive line.
  6. Potential coaches’ inability to properly instruct, develop, and motivate the offensive linemen.

Of the five high schools where I’ve coached, four were in the division or classification that included the state’s largest schools and suburbs of large cities. I can only imagine how much more difficult the problems are in small schools (with less potential players) or in rural areas (where theoretically it is tougher to build a coaching staff).


However, success for a football team cannot exist without a good offensive line. Fortunately there are solutions to each of the obstacles, all of which I’ve listed below.

1) Potential lack of players with the size to be competent varsity linemen:

A lack of “big enough” linemen can be rectified by utilizing gap blocking schemes and by pulling and trapping. Emphasizing the quickness of the first step and building size in the weight room are obvious benefits, as well as allowing the linemen to “play fast” by limiting the analysis of blocking assignments each play. I follow the mantra “keep it simple” because “cloudy” minds equal slow feet.

Read More

Identifying Defenders Using the Option Count System

By Jeff Minter

Columnist

X&O Labs

Editors Note: Since 1998 Coach Minter has served as a head coach, coordinated all three phases of the game, and worked with the defensive line, offensive line, linebackers, quarterbacks, and wide receivers. He has developed the blog GridNotes as a home for the wealth of coaching related articles, blog posts, and forum topics found on the net.

In running the Triple Option it is important that all players are able to easily identify which defenders will be read and which defenders the offense will need to block. In order to develop a clear system to identify these defenders many coaches implement a count system. The following count system effectively identifies the important defenders so that all athletes can easily determine who the key players are.

The count always begins with the first player head up to outside the Tackle. This defender is referred to as #1 and he will be the read key. We then rotate outside in a circular fashion to find the next defender that is not the cornerback. This player will be #2. The #3 defender will be the next player in this count and is always a linebacker or safety. #1 in the count is the Handoff Key (HOK), #2 is usually the Pitch Key (PK), and #3 is typically the player being blocked by the play side slot.

Read More

The 4 Pillars of Offensive Line Play

By George Penree,

Offensive Line Coach

Utica College (NY)

Editor’s Note: The following clinic report was written by Utica College (NY) offensive line coach George Penree, a post he has held since 2007. In 2010 Utica broke more school-records including points in a single game (78), pass completions (231), passing a receiving yards (2,742), passing yards per game (274.2), total offensive yards (4,007), total yards of offense per game (400.7), and all purpose yards (5,049). Coach Penree will be happy to answer any comments or questions by leaving them below.

After each season is complete, I review all the game film and make adjustments to the techniques and schemes we utilize. The past few seasons have led me to certain truths about offensive line play. When it really comes down to it, every great block incorporates 4 qualities; a good start or “get off”, a devastating “strike”, perfect “body position”, and “finish and effort.”

I call these qualities the “4 Pillars of Offensive Line Play” and stress them from the first meeting in camp to the last meeting and practice of the season. In my experience, any offensive lineman who cannot grasp these 4 qualities will not develop to the level we will need them to compete at. On the contrary, continual reinforcement of the qualities will develop dominating offensive lineman.

Get Off

To execute effective blocks, whether run or pass, an offensive lineman has to snap out of their stance as fast as possible. Every day in practice we start with a stance and start drill making sure to include a technique we will utilize that particular week. If the game plan calls for an inside running play where the offensive lineman will have to perform drive blocks, we will utilize a stance and start drill performing drive blocks on air. I utilize T Boards and field lines to give them a landmark to step over. I utilize the trap shoot to promote great knee bend and leverage.

Read More

DL Head Up Techniques in an Odd Front

By Mark Miller, Defensive Coordinator, Katy High School (TX)

Editors Note: Coach Miller has 18 years of coaching experience with 7 years on offense and 11 years on defense, with the last 5 years as a Defensive Coordinator / Assistant Head Coach at Taylor HS a 5A school in Texas. He has experience at both the high school and college level.  In 2011, was recognized as Katy ISD’s Boys Sport Assistant Coach of the Year. Miller has his Bachelor’s and Master’s Degrees from LSU. 

This article is intended to define fundamental techniques for defensive linemen within an ‘Odd Front”.

Why employ an Odd Front Philosophy of defense?

  1. It maximizes Personnel by Body Type, Athletic Ability and Mental Capacity.
  2. It puts direct Pressure on the Center
  3. It’s a balanced Defensive Structure
  4. It’s availability and Ease of ‘Move’ / ‘Stem’, ‘Stunt’ and / or ‘Blitz’ Packages.

Our first consideration is always our personnel and what we have to defend. An inherent and unique characteristic of high school football is the fact playing football is voluntary. High school coaches cannot ‘recruit’ or ‘draft’ for a specific offensive or defensive scheme. Coaches place athletes in positions where they can maximize their abilities and help the team become successful. Some of these determining considerations are:

  1. Body Type: height, weight and composition
  2. Athletic Ability: strength, power, speed, agility and reaction time.
  3. Mental Capacity: Cognitive function to physical application / action.

Within those position assignments, the scheme applications are designed as a coordinated help for the individual players abilities. We define our ‘odd front’ through a strength declaration and an identification tag word. The ‘strength declarations’ can be made in seven different ways:

  1. Tight: to the Tight-End
  2. Open: opposite from the Tight-End
  3. Field: to the wide side of the field
  4. Short: to the short side of the field
  5. Over: to the RB in the ‘Shot-Gun’
  6. Under: opposite from the RB in the ‘Gun’
  7. Strong: to an offensive lineman / side

Base Alignment

The term ‘Base’ defines the front alignments (Diagram 1).


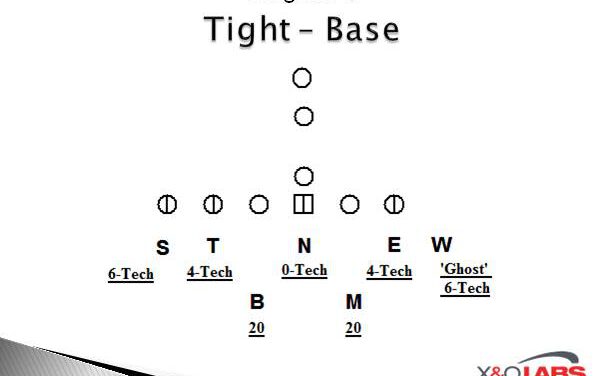
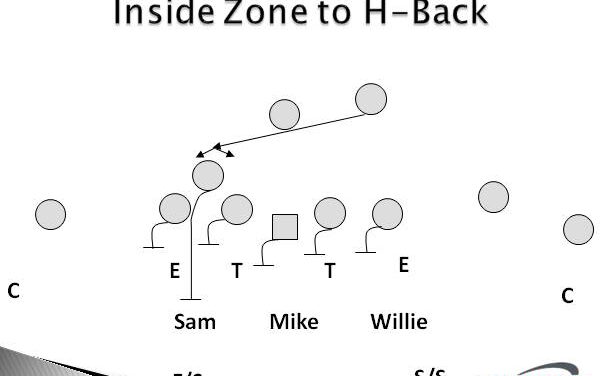
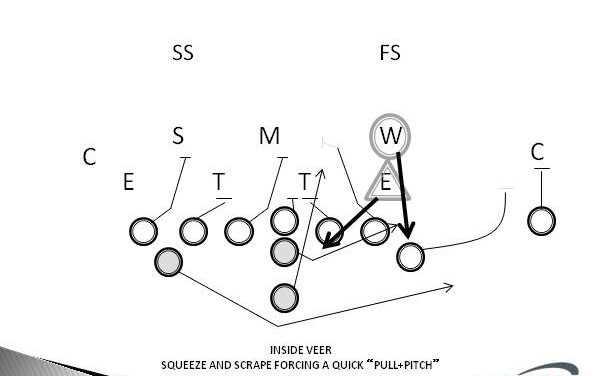
‘Base’ tells the noseguard to align head-up as a “0” technique on the center. The DT will align to the call as a 4-Technique. The Buck LB will align as a 30-Technique to the call. The DE will align away from the call as a 4-Technique. The Mike LB will align as a 30-Technique away from the call. The Sma LB aligns on the Tight-End as a 6-Technique and the Will LB aligns opposite the Tight-End as a ‘Ghost’ 6-Technique. It is a balanced structure.

The presence of the “0” technique noseguard and two ‘30’ backers over each offensive guard places three defenders over either A-Gap. (Diagram 2)

The ‘Odd Front Structure’ places ‘Direct Pressure’ on the first person handling the football, the center.

The foundation of teaching / coaching these head-up techniques is physicality. Assuming a head-up alignment increases the likelihood of having to take on an offensive lineman’s initial charge right down his midline. This places a greater emphasis on the defensive lineman understanding and applying proper pad level, striking out of the hips with a blow and separation.

Read More

Villanova University’s “Peek Concept”

By Mike Kuchar, Senior Research Manager, X&O Labs

Last spring, as I was making my spring practice tour through the northeast, I stopped in at Villanova to sit down with offensive coordinator Sam Venuto and wide receiver coach Brian Flinn, a longtime friend and devotee to X&O Labs.

After documenting an up tempo and intense practice (click here to read our spring practice report from our visit to Villanova) Coach Flinn enlightened me about a pass concept he was starting to toy with, which he called his “Peek” play. According to Flinn, it was a scheme modeled after what Dana Holgerson was doing at West Virginia that replicates the same action as Villanova’s bubble screen concept. It’s a play-action scheme that targets the middle or inside linebacker by “peeking at him,” and taking advantage of how he defends the run-action of the single back zone read in trips formations.

According to Flinn, against his offense, defenses will either close the middle of the field (Diagram 1) or push the outside backer to the trips side to stop the bubble screen (Diagram 2). Because so much of what Villanova does offensively is laterally, defenses don’t fly up the field on them. So, the Peek Concept is what he uses to put the Mike LB in a bind.


Peek Concept Receiver Rules (Diagram 3):

  • Z receiver: blocks the MDM (Most Dangerous Man) on the edge, just as he would in a bubble screen concept.
  • S receiver: bubble screen path. Flinn calls this the Nike Swoosh (because of the way the emblem curves is similar to the path the WR takes).
  • H receiver: runs a stick route. If the ball is on the hash, he gets on the outside edge of the hash. It’s a vertical, no stem, inside hitch. Three times with the outside foot, which equals five total steps, should get him to five yards. His goal is to make the Sam LB travel and Mike LB widen. “The further we get from the Mike, the more open we get,” says Flinn. “If we widen our split enough- we tell him if the ball is on the hash he’s on the outside edge of the hash. If the ball is in the middle of the field, he will split the difference between number two and the tackle but he will plus two (get two more yards outside). I’ll never tell him he’s too wide. I tell him to get as much space as you can.”
  • X receiver: run a backside slant.

Read More

Using Motion and Shifts to Gain Offensive Advantages


By Mike Garner

Offensive Coordinator

Broken Bow High School (NE)

It is something that exists at every level of football: An opponent has one defensive end who plays the run better than the other, one corner who is better against the pass, etc. When you are a power-running team, defenses may simply load up against you to stop the strong side power play. You can go to your counter game, but then the defense has succeeded in dictating to you what you are going to do offensively. So, how do you gain an advantage when you are undersized along the line?


One possible solution to these problems was made clear to me after listening to a clinic by Coach Dan MacLaughlin of Wayne State College (NE). Much of what I’m about to explain about using motion and shifts to gain an advantage and dictate to the defense stems from both that clinic and subsequent conversations I had with Coach MacLaughlin, and I would be remiss if I did not give him credit for causing me to think about how I have used motions and shifts with my teams.

First, I want to discuss how we have used motion in our offense to create an advantage. We have employed the following types of motion: Sprint (across the formation) and Crack (motion back to the ball) by the wide receivers; and Fly (left) and Storm (right) motion by the running backs, either the fullback or the tailback.

To illustrate how wide receiver motion can be used to create an advantage, I want to illustrate four possible scenarios using Sprint and Crack motion.

In Diagram 1, we use Sprint motion to give us another blocker on the perimeter and outnumber the defense to that side of the field. We could do the same thing by pulling a lineman, but the advantage of using receiver motion is that our extra blocker will be at the point of attack when the ball is snapped. Of course, the disadvantage is that the defense simply has to chase or shift with the motion with their safety or linebackers to get the numbers back in their favor.

Diagram 2 is one response to a defense that adjusts its strength in response to motion. We use Sprint motion again, but this time we want the defense to flow with it so we can run a counter play back in the direction from which the motion came. The two keys to using motion to set up a counter play like this is that the receiver going in motion has to “sell” his fake just as much as the tailback as to sell his. Obviously, the action of the tailback is the second key to making a counter off motion work.

The scenario in Diagram 3 is no doubt one of the most utilized forms of motion: having a receiver go in motion and crack back on an outside linebacker/safety who comes up hard to play the toss. Against teams that play a wide 9-technique with their defensive end, we have even, at times, crack blocked that player. Obviously, your receivers have to be well coached to avoid a block in the back call and one of the most common things we have seen opponents do is to have their outside linebacker turn his back to the receiver as soon as he sees the motion coming. Still, if you have receivers who are physically aggressive, using crack motion can enable you to get out on the edge of the defense quickly.

Again, we want to have a counter off of Crack motion, and Diagram 4 shows a play that has been very successful for us over the years. Once the defense has seen the toss play run off of Crack motion a few times, the defense begins to flow very hard toward the motion as soon as we show it. Faking a hand-off rather than a toss does not seem to hurt the effectiveness of a play we call Stretch Boot Pass. We could also run the same counter play shown in Diagram 2, but the advantages of Stretch Boot Pass are that we usually see at least one receiver running uncovered across the field and the quarterback also has the option to pull the ball down and run.

Read More

Running Back Drill Series

Here is an everyday drill progression that I have always used with my running backs. Places an emphasis on holding on to the football at all times. Only takes 3-4 mins max.

Drill #1 – Hops

Purpose: Reps proper running form with a football in one arm. Practice keeping the ball “high” and “tight.”

Procedure:

  1. All backs will start sitting on a line with their legs out in front of them and the ball tucked in the “high” position of the right arm.
  2. On “hit” the players will begin running in place with only the arm motion. The ball should be gliding along the side of the players body and the running motion should be forward and fluid.
  3. On the whistle, the back will move the ball into the “tight” position and continue running in place.
  4. On the next whistle the ball will go back to the “high” position and then back into the “tight” position. The total drill should take 20 sec. for the right side and then another 20 for the left.

Coaching Points:

  1. Keep the elbow tucked and drive it back when running. No outward motion.
  2. Maintain 5 points of pressure in the “high” position.

    1. Fingers over tip, palm on side, forearm tight to the side, bicep locking in back tip and armpit / chest to control the back tip.
    2. Add the interior chest as a 6th point of pressure in contact zones. It should serve as the other hand.

  3. Off arm should remain locked at 90 degrees with the hand open in perfect running form.
  4. The butt should get off the ground if they are running correctly and hard enough. If not, repeat.

Verbal Cues:

  1. “High and Tight”
  2. Drive Elbows
  3. Vision through your eyebrows
  4. 5 / 6 points of pressure
  5. “We do not fumble”

Drill #2 – Form Running

Purpose: Next step in the ball handling progression. Reps proper running form with a football in one arm. Practice keeping the ball “high” and “tight.”

Procedure:

  1. All backs will on a line with the ball in both hands in front of their body. Stance should be balanced and the eyes should be down the field.
  2. On “hit” the players will flip the ball into the air and catch it with both hands. They will then tuck the ball in the high position to the right side and break into the prescribed drill.

    1. Form Jog
    2. Form Skips
    3. High Knees

  1. The player will carry out the drill for 10 yards with the ball “high” and then break into a sprint with the ball in the “tight” position.
  2. Turn around and go back with the left arm and repeat with the other drills

Coaching Points:

  1. Catch and tuck in the “high” position.
  2. Don’t run till the ball is tucked in the high position.

    1. Once they get better at the drill, have them move to the side they are going to tuck as they toss / catch the ball.

  3. Remind them of the running form information from the “Hops” drill.
  4. Stress the explosion into the sprint and through the goalline. Score the ball every time.

Verbal Cues:

  1. Watch the ball into the tuck.
  2. Focus on form.
  3. Smooth arm motion.
  4. Drive elbows.
  5. We do not fumble.
  6. Score the ball

Read More

Creating a Strategic Advantage on Kickoff

Importance of the Kick Off Team

In my opinion, Kick Off is probably the 2nd most important special team. Punt is the first. When you design your kick off coverage, you have to make sure that there are no huge gaps in the cover lanes. When repping it, you have to be certain that your players understand their relation to each other on the field. Your cover unit has to stay even relative to each other. If not you’re going to give the return team a seam to run through.

I really don’t think this is an area overlooked by many coaches. Most coaches today are aware of the momentum that a KO returned for a touchdown can bring a team. It means a lot to me, personally, because, I started my first season as a head coach with a kick off returned for a touchdown. That’s definitely something I want to ever happen again. Why We Do What We Do

Our basic philosophy on kickoff and special teams over all is that we want to force the other team to spend time preparing for some thing that they will not see on a regular basis. The more time they spend in preparation for special teams , the less time they are going to have to spend on offense and defense. If they don’t prepare for what we are doing then we are at an advantage. If they simply extend their practice time, then they are risking loading their players down with too much information or wearing them out mentally. Goals

We want our opponent to start behind their own 30 yard line. The odds say that you’ll only score 1 in 8 times you get the ball behind your own 40 and 1-30 if you start behind your own 20. We want to give you the ball as far back as possible. We basically want our opponents to cover as much ground as possible. Alignment

Our base kick off sets up 3 huddles each 7 yards from the ball. The outside two huddles each consist of two players, stacked on the top or middle of the numbers. The middle huddle is 7 yards off the ball in the middle of the field. There are 6 players in this huddle, lined up shoulder to shoulder. The formation should look like this. The Kicker will set the ball up on the field, based on the call he gets on the sideline. He will kickoff from the right or left hashes or from the middle of the field.

We like this formation for several reasons.

We always have the threat of the onside kick to the middle of the field. We also have the threat of the onside kick to the right or left if we line the kicker on the middle of the field. This formation makes it very hard for the return to identify who they are blocking. Because we are stacked, the return to is forced to either use a simple wedge return, or to use a zone blocking scheme. If the team uses a man scheme, you have forced them out of their comfort zone by doing something they are not familiar with. They will have to rep the new return or not be very good at it, or, if we are lucky, spend a lot of time on a new return AND not be very good at it. The return team can’t zero in on one man to block. The players are likely to become a little confused and therefore end up blocking no one.

Personnel

Ideally, our kickoff team would be filled with 2 free safeties, 4-6 strong safeties or outside linebacker types, and 2 inside linebackers. The kids would be fast, athletic and great tacklers. Unfortunately, none of us lives in an ideal world. To compensate for this, we look for kids with a lot of heart, desire, and willingness to be coached. We have a wide range of position players on our kickoff team. We have a back up corner all the way down to our 6’3″ 285 offensive tackle. The one thing they all have in common is that they all hustle and can get downfield in their coverage lane. The Element of Surprise

We motion from the stack before each kick off. Our players will move on the kicker’s signal. Ideally, when the ball is kicked, they should be in a straight line. This takes some practice with your kicker. He has to be consistent his timing or else, you’ll have uneven cover lanes. One of the nice things we’ve noticed about this coverage is that even if you come off uneven, you can still get good coverage. Because we are bunched up at the middle of the field, we have the threat of onside at all times. If we notice that a team is leaving the middle open, we can surprise them with an onside kick. Additional Kicking Resources:

With an understanding of why we use this kickoff strategy (See Creating a Strategic Advantage on Kickoff – Part 1), we can now move on to implementation and drilling the kickoff.

We really only use three drills for the kick off team: Team versus Air to work on proper takeoff and coverage lanes and live team to work proper cover lanes, tackling, and block avoidance. Those are the two we use the most. During two-a-days and in the early part of the season, we use a drill I got from AFCA’s Complete Guide to Special Teams in an article by Greg McMahon. The diagram below shows how we set up the field for this drill.

Equipment Needed:

  • 8 Cones or something to be used for landmarks, 2 hand shields, Bag or dummy large enough to be tackled

Description:

Cover man (CM) starts on one sideline, then on coach’s command, sprints across field. He must avoid first bag while staying w/in the 3 yd box, he then regains his coverage lane to the next scout player. The CM then uses a two-hand butt technique in the ATTACK zone to defeat and shed the 2nd block. Once past this point, the player will sprint to the cones and settle his feet (chopping) in a good football position. The returner will then be released by the coach to run full speed to one of the landmarks. The CM will shuffle to the side that the returner is running to and execute an open field tackle on the bag the returner is holding. The players will then rotate to the starting position at the opposite sideline. One coach will be on each side to release the CM and returner. Variation: This could also be down using a kicker or punter, so that the returner gets practice fielding kicks and the CM get accustomed to moving on the kicker’s movement.

Coaching Points:

  • Players should use any means possible to avoid the first blocker, but must stay w/ in the 3 yd box and regain lane integrity.
  • On attacking the 2nd bag, players should gather feet to prepare for contact. On contact, they should stun pad with heel of their palms and shuck pad to one side.
  • Do not release return man until CM has gathered feet at cones.
  • Ensure proper form tackle on the returner’s bag. Have CM execute form tackle and bring bag to returner’s spot while still in form tackle.

Any great play starts with communication. In the case of our kickoff scheme, that is certainly the case. Here are some details regarding how we communicate the play to the team.

Read More

Punt Block Drill Series

Objective

  • To teach the proper placement hands and arms when blocking a kick.
  • To teach the blockers to work their arms until the very last minute
  • To help identify players who will be successful on the block teams.

    • This drill requires that the players dive onto the ground and not catch themselves. The players that perform the drill exactly as described and can keep their eyes open will be on the block teams and have the greatest chance at success.

Equipment

  • No equipment is required for this drill, but you can use volleyballs to have the players actually blocking a ball when extending their hands from their hips.

Description

The whole team begins on a yard line going across the field. The players start out on their knees, then on ball movement or coaches’ sound, begin moving their arms as if they are running. I take this time to emphasize form running with their arms bent at the elbows and pulling their elbows back as far as possible. Then on the whistle, the players, will shoot their hands straight out from their hips. Their arms should pull their body out onto the ground and their hands should cross at the wrists. If done properly, they should look like Super Man taking off.

Coaching Points

  • The arms should go straight out from the hips, not up into the air. The arms will pull player’s body out. If they shoot their hands into the air, they will end up doing a belly flop on the ground.
  • The hands should be crossed at the wrist, not parallel. This way, the ball will not go in between their hands.
  • The players should also keep their eyes open as they hit the ground, so they can watch the ball come off the kicker’s foot.

Objective

  • To work on the get off phase of punt and PAT block
  • To work on Proper Angles used when blocking a punt or PAT
  • To work on running through the block point and not leaving your feet
  • To get used to making contact with the ball at the block point

Equipment

  • You will need a spacing tape, a snapper and a punter and several balls. Depending on the variation of the drill, you may also need blocking bags or volleyballs to use instead of footballs

Description

The players will align in A-D gaps on the spacing tapes. They should be in a 3 point sprinter’s stance. On the movement of the ball, one player at a time will execute a perfect get off and run through the block point to block the punt or kick. A punter or coach will be catching the snap and punting the ball. The punter will take slow steps initially to allow the blocker to block the ball. The drill should be performed as rapidly as possible to get the maximum number of reps. Variations: This drill can be done using volleyballs instead of footballs because the volley ball will be softer on the players’ hands and make repeated contact easier. The players will not shy away from contact with a volleyball. Also, bags can be added to the OL to force the rushers to get skinny through their gaps.

Read More