Drilling the Twitch, Hands and Hips in Pass Rush

By Mike Giancola
Defensive Line Coach
Bridgewater College (VA)
Twitter: @CoachGiancola


For the most part, playing defensive line is a thankless job.  Masterful hand and footwork are not sexy.  Absorbing a double team to allow a teammate to make a tackle never shows up on a stat sheet.  The grueling, physical, violent nature of the position and what is asked of it usually goes unnoticed by a majority of people that watch the game.

However, the one thing defensive linemen are asked to do that everyone sees is getting to the QB in the pass rush.  This is where “the money is made” at the position, literally and figuratively.  Sacks can turn the tide of a series, and win games at the highest levels (think Von Miller in Super Bowl 50). 

The art of the pass rush is not something most players are able to just show up and do.  It needs to be approached in a methodical and precise way.  Here is a base overview of coaching the pass rush that yielded success for our defenses.


Initial Twitch Drills

The mentality of the defensive line is passing situations needs to be focused on the get-off at the snap of the ball.  This starts not only starts with quick recognition of the snap, but also an explosive first step.  The coaching points we use are to drive the knee to the chest and gain two yards in the first step with violent arm action to put stress on the offensive lineman.

Working quick twitch and explosion drills into individual periods every day can help with this.  Below are examples of a couple of those drills we do:


Long Bag Get off Drill

Read More

Strategic Use of OL Splitting to Gain Blocking Angles and Improve Double Teams

By Rich Duncan
Offensive Coordinator/Offensive Line Coach
Berry College
Twitter: @coachrichduncan


In starting our program at Berry College in 2013, we quickly found that developing our offensive line was going to be vital to our success.  In our first two seasons, we were not able to effectively run the ball.  While the schemes we had in place were time tested and traditional, we needed to find ways to help our guys upfront gain an advantage.  Simply stated, doing what I had been doing over the past 20+ years in coaching the offensive line was not going to be enough.  I had to find creative ways to help us improve quickly up front in order to become a successful football team.

We started this process by asking the question, “What would make it easier for our players?”  We started watching film of teams that were successful, trying to study ways to improve.  Through this process, we discovered that using strategic line splitting was something we needed to explore.  We were hopeful that our splitting plan was going to help our guys gain an advantage.

We began maneuvering our splitting in different ways that were not traditional uniformed spacing.  Instead, we adjusted our splitting in ways to give our linemen an advantage of increased blocking angles and technically efficient double teams as well as reducing gaps for penetration by the defense.  As this process evolved, we began to achieve our ultimate goal of finding success in the run game.

Now that we have been using our line splitting rules for three full seasons, we have found many benefits that were not necessarily intended but have aided us greatly.  These benefits include identifying and picking up twisting defenders, seeing line movements pre-snap because of alignments, as well as recognizing blitzes. Additionally, our running backs and QB’s are able to visually see blocking schematics and running lanes before the snap of the ball.

Procedurally, we are a no huddle offense and we practice at a high tempo pace.  Our goal in practice is to get a high volume of reps while coaching with buzz words.  Most of our corrections happen through meeting time and video sessions.  For visual learners, the more interactive we can be with video, the faster they will develop.  Show them how to do it correctly and also show them previous errors and why they are a problem.  What I have learned through coaching in this manner is that our players start to learn the “why” of our splitting, often through their correctible mistakes on film.

I must note that we do a fair amount of walk through coaching.  At Berry, walk through sessions are committed exclusively to assignments, which includes splitting for our OL.  For those that are primarily tactile learners, this is a great way to spend time “doing it” while allowing them a slowed down way work through the process of splitting.


Split Groupings

As a general coaching point, we have defined maximum, minimum and over splitting to our players: 

  • Maximum splitting is 2-3 feet from the offensive lineman inside you with emphasis on being as wide as you can to do your job.
  • Minimum splitting is “shoe to shoe” or about 6 inches from the lineman inside or adjacent to you. One of the flaws we have had to work through with minimum splitting is allowing enough space between us that we do not step under ourselves with our first step.  We tell them they must be able to use their footwork without stepping on one another. 
  • The final term we use is over splitting. It is for our tackles when the guard has split away from him and he is trying to maintain as much space as the defense will allow. Over spitting can range between three and five feet from the guard.


Split Sub Groupings

We have grouped our splitting into four categories. These are:

  1. Big
  2. Interior
  3. Gap
  4. Zone


We refer to these different splits as BIG Z.  This acronym is a way for our guys to memorize the splitting concepts we use.


Big Splits

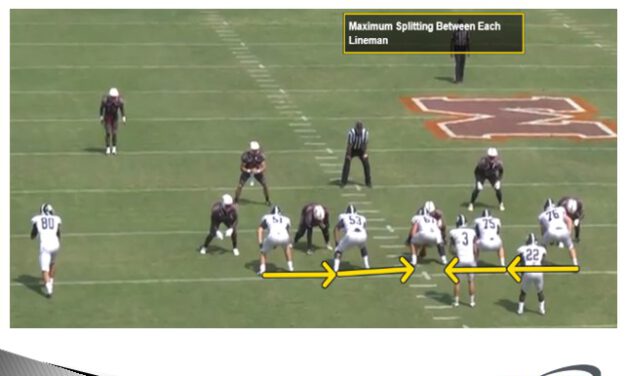
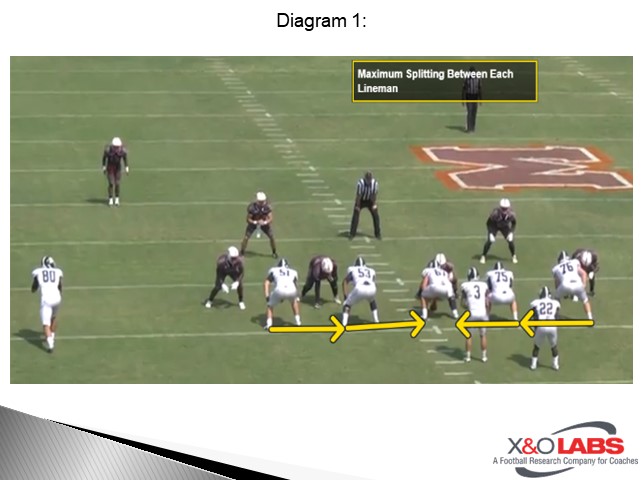
In Big splitting, we are trying to take maximum splitting between adjoining offensive linemen. Our goal is to spread the defenders as far as possible from one another increasing the size of the gap or fit they need to defend.  In this particular splitting, defensive alignments do not matter to us as we are only concerned with spreading the run box as wide as possible.

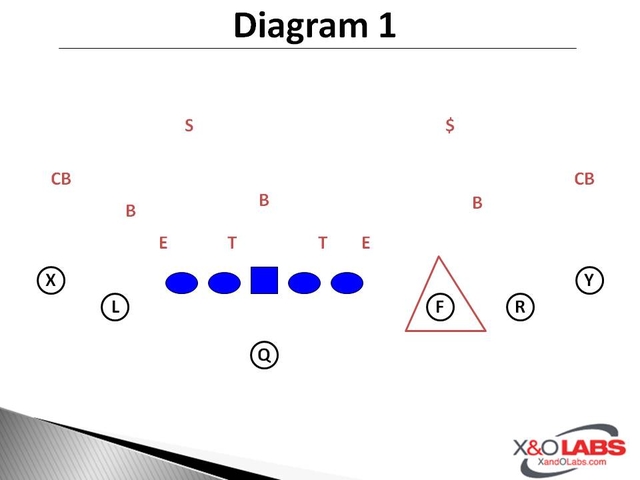
The splitting rules are simplistic.  We are looking to gain between a two to three foot split between the center and the guards as well as the guards and tackles.  Ideally we would like to take the splitting to three feet. Looking at this splitting as a practical application can be seen in

Diagram 1

Read More

Training the 6 F’s in LB Read Progressions

By Tim Yourison
Defensive Coordinator / Linebackers
Hamline University (MN)
Twitter: @CoachYourison


Here at Aurora University, we are always trying to get an extra hat to the ball on defense. Whether we are in our three or four down fronts, our linebacker play remains the same. We do not teach them to play one specific gap, but they need to understand where the open gaps, or as we call them windows, are and fit off the ball. This report will go through our linebackers’ fits and techniques and how we teach them.


Linebacker Techniques:

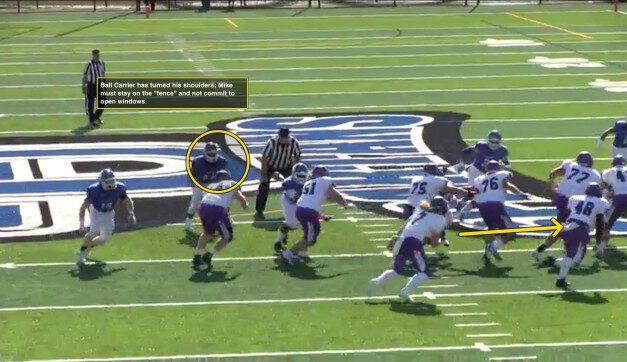
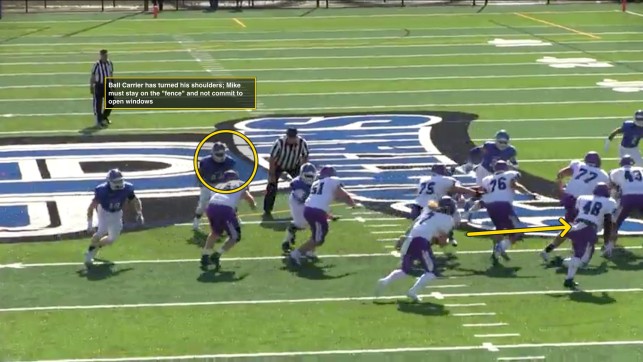
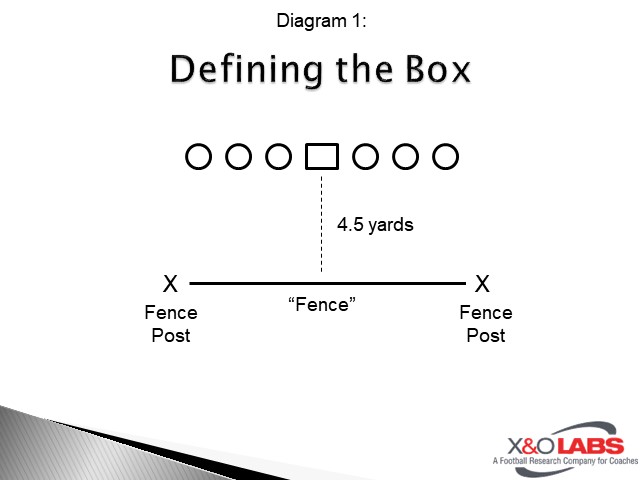
In order to play linebacker here at Aurora, our players must understand the game of chess. We want to move like a rook, not a bishop – we want them to stay square and attack downhill, not turning our shoulders and coming down at an angle. Our linebackers are taught to stay on the “fence” – toes four and a half yards from the line of scrimmage. Since we play both a four down and an odd front, our linebackers need to learn how to be a force player or a box player, regardless if their position is an inside or outside linebacker.

Linebackers at Aurora key offensive linemen to the running back or ball. The coaching point for them is to have their low beams on the lineman and their high beams on the running back. As soon as the ball is snapped the linebackers will take their read step. Read steps for them are a heel pop, then one six inch lateral step in the direction of their lineman, staying at linebacker level, or “on the fence”. After that initial movement, they find the running back or the ball. The reason we have them stay on the fence is three fold. First, it allows them to read and diagnose the play without over committing to one gap. Second, it allows them to stay out of the mess on the line of scrimmage. Third, if a linebacker buries themselves into the line, an offensive lineman is very comfortable engaging and blocking them. If an offensive lineman has to climb and try to block a more athletic player in space, we feel that is an advantage for us.


The “Three F’s”:

Our linebackers are taught three F’s for their run response techniques. If they are a force player the three responses are: Force, Fold and Fence.


Force – Outside action at you

  1. Make the play – Tackle the ball carrier.
  2. Force the ball back inside.
  3. Make the ball go backwards if it continues outside.


Fold – Inside run at you

  1. Maintain outside leverage on the end man on the line of scrimmage (EMLOS), beware of crack block, stay at fence level.
  2. Expect ball to bounce to you.
  3. Once ball is into the line of scrimmage (LOS) inside of you, fold inside.


Fence – Ball is away

  1. Patience to the fence post – linebacker depth over the tight end or where the tight end would be.
  2. While moving to fence post, move eyes to opposite tight end or the #2 wide receiver for boot indication.
  3. No boot indication slide the fence, staying square, looking for open window to shut.


The inside linebackers’ three responses are: Fill, Flow and Fit.


Fill – Back is to you

  1. Offensive line action is away from you
  2. Open window, fill it now
  3. Expect an offensive lineman to climb up to you


Flow – Back is to you

  1. Offensive line action is away from you
  2. No open windows, stay at fence level
  3. Stay on back hip of running back, wait for open window


Fit – Back to away from you or behind the quarterback

  1. Step with your offensive lineman key (action to you)
  2. Eyes to running back
    • If runningback is downhill now or cutting back, rock back and fill an open window, creating the vice with the other inside linebacker
    • If running back cuts the ball back all the way outside, slide the fence looking for an open window
    • If the running back stays on a path to your side, fill open window


Diagram 1


Once we have taught the three F’s in the classroom we can teach it on the field. Our linebackers practice together because all of the positions could end up being a box linebacker or the force player.


Linebacker Practice Progressions:

Our defensive practice plan is divided in half each day – the first half is a run focus, and the second half in a pass emphasis. We start each individual session with every day drills from stance and first steps to block defeat. We then do a group run fit session before inside run. The second half of individual is spent working pass drops, then coverage fits before 7 on 7. We finish practice with our scout sessions.

Read More

5 Components for Simulating Tempo in Practice

John Wagner
Run Game Coordinator/RBs Coach
Monsignor Bonner/Archbishop Prendie (PA)
Twitter: @JWags42

Introduction

With more and more coaches moving to the no huddle, it is important to be able to simulate game tempo during practice. In my first year running a no huddle, high tempo offense, I found it difficult to run the practices at a tempo that would help us come game time. We had revisit the way we ran our practices. This started from the daily schedule to the way that we coached our players. 

We completely revamped the practice schedule and shortened each period to keep a better flow and avoid lulls in practice. Our longest period is 15 minutes and are team periods. Our normal periods are typically 5 or 10 minutes in length. By doing this, we are constantly moving preventing our players from becoming stagnant. 

What we learned was that we did not start the practice at a fast pace. We did not transition well from stretches to the next period. The 1st thing that we did to correct this was start each practice with 4 stations of 1 minute a piece. This got our players moving immediately at the start of practice. 

The next thing that we did was add a team take-off period. This is a period where we line up and march down the field on air.  Again, this is just to get the guys moving and used to the tempo that we want to have in a game. 

Team Take-off

During team take-off, the 1st and 2nd team offenses move the ball down the field on air. Both offenses will start with the ball on the plus 40. Each huddle will have their own signal caller and will march down the field. Once the ball crosses the goal line, we flip the huddle and start with ball on the ball on our 5 and move out to the 40. This is great work for the 1s and 2s.

For us, it is a great opportunity for the JV guys to get reps in a high tempo period. This period will run 5 minutes and typically we will get off between 30-40 plays. During our 1st year doing team take-off, we really increased the tempo of our practices. The players started to realize that we needed to keep this tempo throughout the whole practice in order to be successful in the game. By going against air, you will get your team to move at a tempo that will be impossible to match on game day, thus slowing things down for your team in the heat of the moment. 

Read More

Quarterbacks: 12 Drills for Game Simulation

By Ryan O’Hara
Quarterbacks Coach
Mt San Antonio College


Introduction

PTEX6849 srFor Quarterbacks, the offseason is when the work begins. In this clinic report, I will provide you with some new, simple, and effective ways to improve your QB play. The focus of these drills is to improve a QB’s balance, foot speed, feel, evasion, timing, rhythm, weight transfer, and confidence.

My goal as a coach is to try and recreate any possible movement a QB can do in a game and get him as many repetitions at them as possible. These drills are meant to do just that.

Note: It is recommended that you do at least half of these drills daily. Our pre-practice, individual warm-up is usually 15 minutes and we usually get 8-10 of these drills done a day.

Drill #1: Live Pocket Presence

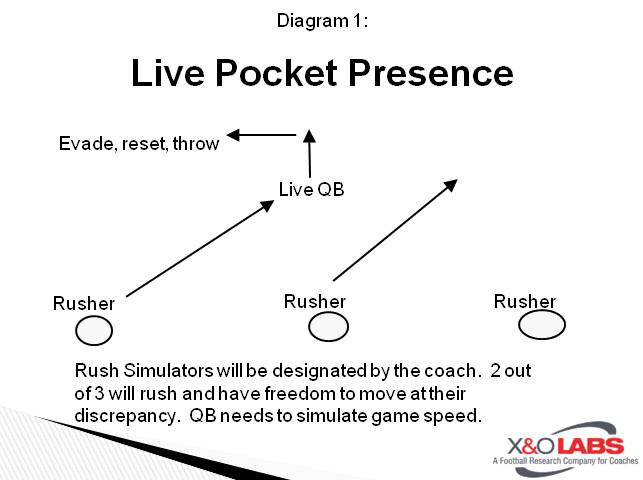
This drill starts with one QB under center or in shotgun. Two or three additional quarterbacks will be lined up on cones spaced 4 yards apart (see below). The QB will take a 5 step drop with a hitch from under center or a 3 step drop with a hitch from shotgun. When he sets at the top of his drop, two rushers will backpedal at him quickly, make him move, reset, and get the ball out as quickly as possible. A coach or receiver will stand 15 yards away. This works on movement within the pocket while staying poised to throw accurately, a skill that I believe is essential for good and consistent quarterback play.

Slide1

Drill #2: Eye Manipulation W 2-Ball

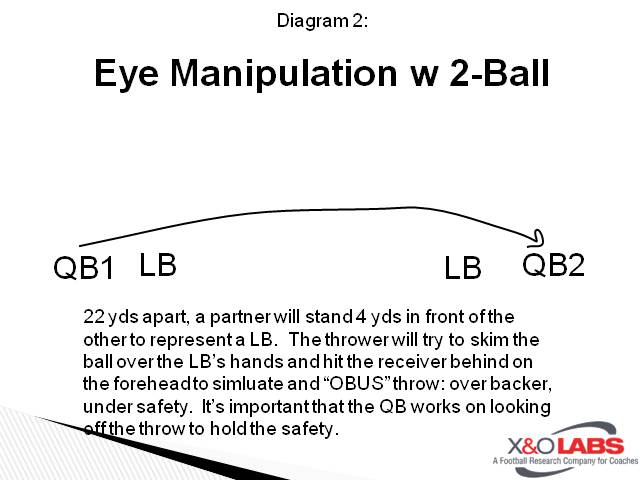
In this drill, four quarterbacks will stand 22 yards apart from each other, with two on each side. One QB will stand in front of another to simulate a linebacker. The opposite QB will take a 3 or a 5 step drop with a hitch and try to skim the ball over LB’s head. This throw will have a little height and a lot of speed. The ball needs to come out off the first hitch and the QB should work on looking off the safety. This drill simulates timing, rhythm, arc and manipulation of defenders.

Slide2

Drill #3: Quick Set-Up & Throw

Read More

Four Run/Pass Play Checks for PAT Attempts

By Eric Struck
Special Teams Coordinator/WR Coach/JV Head Coach
Washington High School (SD)
Twitter: @EricStruck

Introduction:

Touchdowns are obviously a great momentum boost for your team so why not take advantage of that momentum on the scoreboard by going for two if the defense is unprepared. Using the PAT as an extension of your offense can be fun for your kids and cause headaches for the opposing teams.

Philosophy

I have been the Special Teams Coordinator at Washington High (SD) the past two seasons. When I was given the job, I had three philosophical goals in mind:

  1. Do things that set us apart from the competition
  2. Make special teams fun and exciting for our players
  3. Use schemes that gave us an advantage on game nights

Using the PAT and creating different formations while using the same set of checks on a week in week out basis accomplishes all of those things for us. When we first install PAT, we start with a basic formation that we will tweak from week to week.

Slide1

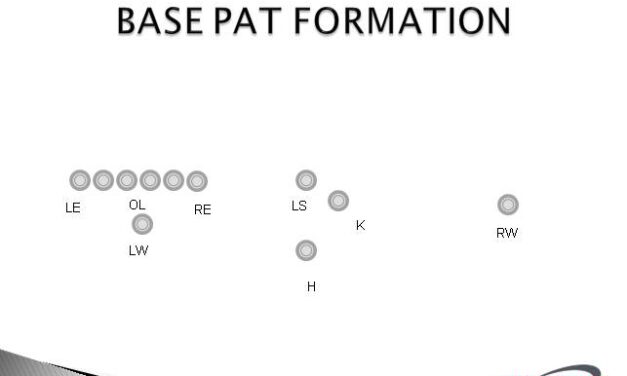
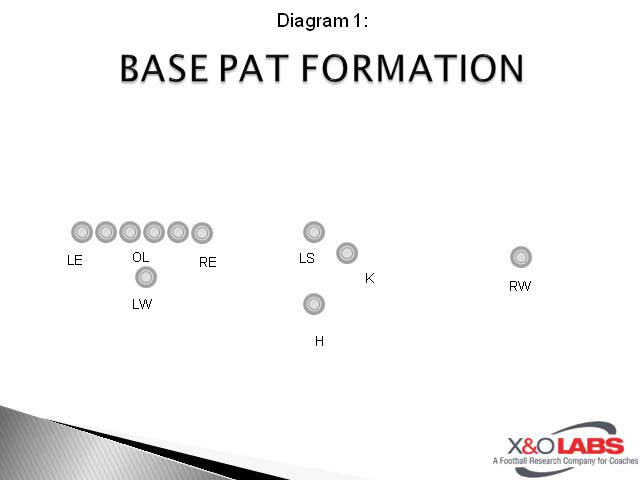
We will install 4 basic checks that we will use determine what our course of action will be when we get lined up. Those checks will be consistent throughout the season and we may add or tweak things as we go along. For our checks, the Holder will look to the sideline at me and after I survey the defense I will give him a signal if we want to run a play to go for two points or if we will line up and kick it. I give a arm/hand signal that tells the Holder what we want to do then he will call it out to the rest of the PAT team. It is important that they get lined up quickly so that we have enough time to survey the defense as well as get lined up to kick if we need to.

Read More

Methods in Creating On-Edge Positional Meetings

By Andy Merfeld
Cornerbacks Coach
Benedictine College (KS)
Twitter: @Coach_Merfeld


As coaches, we have all heard the expression, “It’s not what the coaches know, it’s what the players know that really matters.” I think most of us believe in this statement, but how many of us truly practice it? How many of us emphasize player learning as a central tenet of our programs? As coaches, our success is directly linked to our ability to effectively communicate with our players. We must examine complex problems, come up with solutions within our existing scheme, and figure out how to impart the necessary information to our players. One of the reminders I keep on my desk is to “be the best teacher on campus.” Over the course of my career, I have spent a lot of time thinking about better ways to teach and communicate with players. In this report, I want to share some ideas for teaching and learning aids that I have used. I am indebted to several other coaches for most of these ideas and tried to give credit to the proper men where I could. Among those not otherwise mentioned, I am specifically grateful to John Steger at the University of Minnesota Duluth, Travis Walch (formerly of the University of St. Thomas), Dante Bartee at Cal-Berkeley, and Justin Wyatt at Upper Iowa University.

As an aside, I want to emphasize that I started out as a high school coach and have always worked at the small-college level where we are not blessed with an army of support staffers. With some organization and creativity, I think all the activities I will discuss today are doable at any level of football. Secondly, I would like to make a disclaimer that my background is primarily coaching the secondary and many of my examples relate to that area, but I believe most of these practices can be adapted to other positions and the offensive side of the ball as well.

In this report, there are a few different areas on which I’d like to focus. One area focuses on the general procedures I use in my position meetings. A second area where I will spend some time is on special activities in position meetings. Thirdly, I wanted to pass along some general guidelines that I have found help facilitate player learning and information retention.


Position Meetings: General Procedures

I am a firm believer in requiring players to sit in their position groups in meetings. In a smaller setting, this means I have the safeties grouped together and the corners grouped together. The primary reason for doing this is to allow the players to coach each other throughout the meeting. I always make it clear that quiet conversation is encouraged within groups (if it is on topic, of course). If I’m covering a coaching point for the corners and one of the young safeties has a question about something different, I will let one of the older safeties quietly help the younger one. If the point is especially important or I want the players to hear a different voice, I might ask the older player to explain the point to the entire group. I feel like this format allows us to cover as much ground as possible in a limited amount of time. It also gets the older players more invested in our scheme and in the development of younger players. Allowing the players to coach each other benefits both the player doing the teaching and the one(s) who are learning. As we know, the best way to learn a skill or concept is to have to TEACH it to someone else. I also try to be very clear about the players needing to be comfortable communicating with and coaching each other, since that is essentially what they have to do on the field all the time (the theme of players working with and coaching each other will be consistent throughout this report).

Sitting in position groups can also be used in larger settings where the entire offense or defense is meeting together, or in a special teams meeting where players can sit in small groups with their position coaches (the coach working with the right side of the punt team, as an example) and get extra coaching while the lead coach runs the meeting.

In the defensive systems in which I have coached, the safeties are responsible for nearly all the pre-snap communication among the defensive backs. In my meetings, I require the safeties to make each coverage check in the meeting just as they would if they were on the field. When we watch practice or game film, whoever is in on the play we are watching makes the check in the meeting. This serves several purposes. From a practical perspective, it keeps the players active and involved in the meeting. Secondly, it gives the players many more quality mental reps. They get the coverage call from me in the meeting (just as they would get it from the sideline in a game), go through their mental checklists, and must make a clear and confident coverage check. (Depending on the situation, you may not even need to watch the play! You could just have the safeties make their checks and move on to the next play.) The corners, who are typically not making checks, also get repetitions listening for the checks from the safeties. Thirdly, requiring the safeties to make their checks each play allows me, as a coach, to get an accurate feel for their comprehension. If the less-experienced players are comprehending everything well, I can feel confident that everyone is ready to progress to the next concept. If the more experienced players have questions or are overly confused, I’ll know I need to slow down or possibly even back up and review the material.

Another way that to encourage players to take ownership is by giving them the opportunity to contribute to the game plan. The QB coach and offensive coordinator at Upper Iowa, Ben Curran, likes his QBs to come to their Tuesday meeting with several game-plan ideas for the upcoming game. This ensures that the players are watching the film on their own and that they are putting some thought into what they are seeing.


Position Meetings: Special Activities

Pre-Snap Coverage Test

When I was coaching at Upper Iowa, we tried to place a high premium on pre-snap disguise in our secondary. One way we emphasized this is by administering a video test to the players. I believe our linebacker coach, Jason Hoskins, had the initial idea for this test. Usually, on an off day late in spring practice, I will pick out ten plays against a generic offensive formation (10 personnel 3×1, for example). Then, I will use a Hudl note to pause the video exactly one second before the ball is snapped. I will allow the players about ten seconds to look at the still picture, and they will have to write down what coverage they think we are in, as well as why they think we are in that. This forces the players to look at their own position, as well as the players around them, for clues about what coverage we are in. Clues could be based on a safety’s eyes, a corner’s stance, or a linebacker’s depth, among many other things.

Read More

Adding Empty as a Mid Season Wrinkle


Editor’s Note:  At this point in the season, everyone is looking for a new edge.  Some are looking to keep their struggling teams engaged and competitive while others are focused on adding wrinkles that can push their team over the edge into post season play.  In either case, adding the empty formation, along with a few complimentary plays is a simple way to create such wrinkles without having to completely change your teams offensive philosophy.  The following article gives a great overview of the simplicities and possibilities that can come with the empty formation and will provide you will multiple ways to use as part of your offense starting this week. – Sam Nichols, X&O Labs Managing Editor


Adding Empty to Create Mid Season Wrinkles

By Chris Parker

Head Coach

Pickens High School (GA)


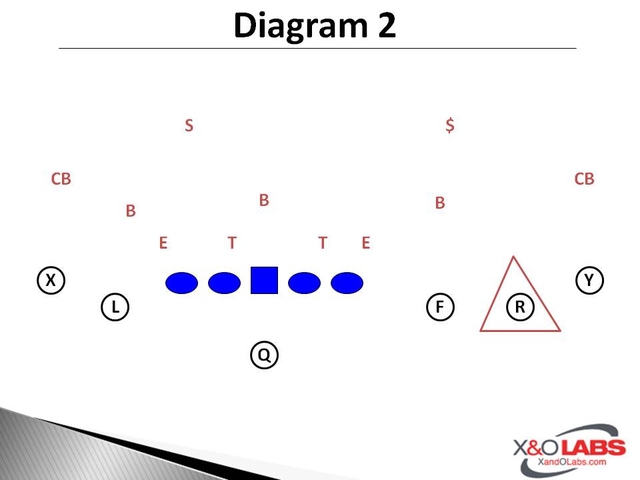
Empty creates matchup problems for the defense.  They must remove defenders from the box in order to cover all receivers or they must keep the box sound and leave a defender uncovered.  If the defense keeps 2 high Safeties, a receiver is always uncovered.  If there is only one linebacker on our 2 inside receivers on the Trips side, one of them is uncovered.  Diagram 1 shows a 2 high look where the #3 receiver is uncovered.  Diagram 2 shows a look where #2 is uncovered.


Slide1Slide2


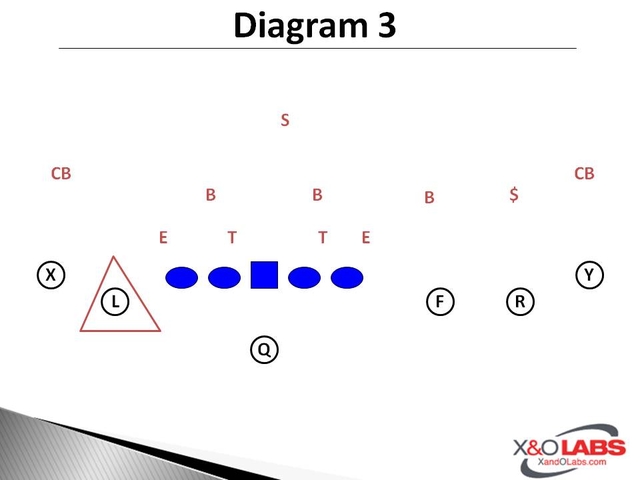
Diagram 3 shows the weak side inside receiver uncovered.  We get this a lot on the hash.  In order for them to leave only the weak #2 receiver uncovered, they have to roll to 1 high which can create some passing matchups and an uncovered receiver underneath. 

Slide3

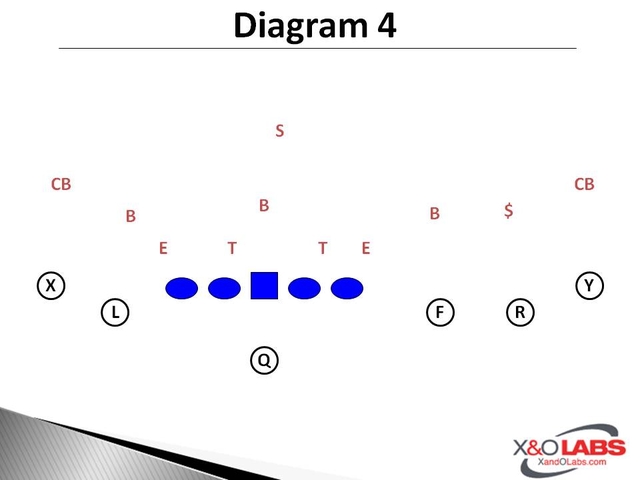
The only way that all receivers can be covered is if the defense rolls to 1 high and leave 5 in the box (could be 4-1 or 3-2).  With 5 offensive linemen you should be able to get four yards or more on a running play to this box with your inside run game (Diagram 4).

Slide4


Empty Package

The empty formation is full of possibilities, but most of all, it clarifies the defensive responsibilities to allow for a simpler and smaller offensive playbook.  We break our playcalling down into 4 play groupings which include inside run, screens, quicks, and drop passes.  Within those groups we run the blocking scheme, passing combinations that are the cornerstone of our offense.  Here is a look at each of those groups and what we are looking for. 

Read More

Game Planning: Scripting to Play Fast

By Alan Stanfield
Offensive Coordinator
Whitworth University (WA)
Twitter: @coachstanfield5

Introduction:

whitworthI began coaching 16 years ago at a small high school, and have been calling plays from a No Huddle offense ever since. The largest evolution for me has been streamlining plays in two specific ways: First, the terminology used in a play, from many words to as few as one; and two, taking single stand-alone plays and combining them into a singular play concept. As a staff, we now try to live by a 25-play script rule in our game planning process.
Consequently, our players maximize the practice reps they get with specific play concepts and we think a greater mastery of our offense is accomplished through how we practice the game script. This process, more than anything else, has sped up our play calling on game day and allowed our players to play at a high tempo pace.

Playbook Organization:

Every staff will go about deciding their offensive plan of attack in different ways, but clearly organizing the playbook is a key starting place for any style of offense. Our playbook is broken down into six categories:

1) Base Run: 2-3 Concepts (These don’t change week to week)
2) Miscellaneous Run: Tool box of 2-4 concepts or add-on’s
3) Screen/Draw: 3-4 Plays
4) Base Pass: 3 Concepts (These don’t change week to week)
5) Miscellaneous Pass: Tool box of 3-7 concepts or add-on’s
6) Quick Game: 4 Concepts

Editor’s Note: Click here to download Coach Stanfield’s sample game plan on Excel.

Weekly Install:

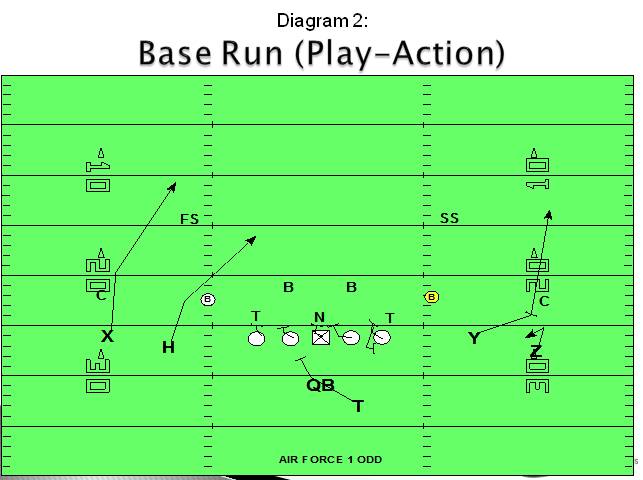
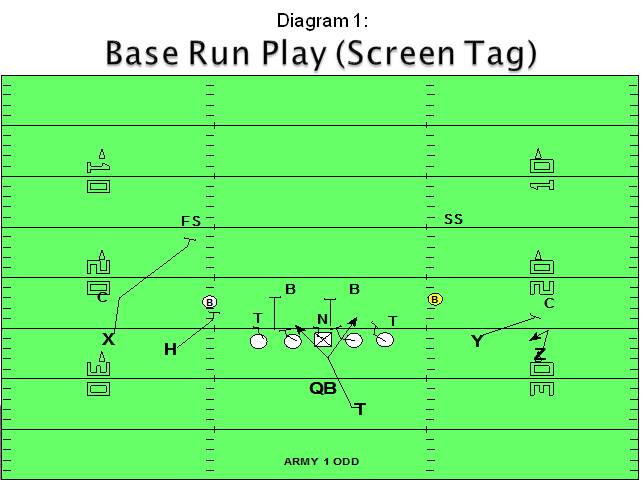
Sunday: The staff sets the script. Rarely are there actual new plays installed week to week, but how we mix and match our base concepts can change by opponent. For example, with our base run play (Inside Zone) we can feature a variety of formations and receiver screen options based off our specific opponent scout profile. In addition, we like to run different play-action WR screen look-alike plays that attack the field vertically when the secondary starts over committing to our Inside Zone or perimeter screen game. In every game script, we try to package our base offense to be great at three specific attack zones: 1. Interior run game (the box); 2. Perimeter (horizontally stretch); and, 3. Verticals. (See Diagrams #1 and #2)

Slide1

Slide2Next, we carry our scripts through three specific play-calling situations:
#1: Openers (1st & 2nd down)
#2: Red Zone
#3: 3rd Down by distance

Read More

15 In-Season Block Destruction Drills by Position

By Mike Kuchar
Senior Research Manager
X&O Labs
Twitter: @MikekKuchar


Introduction

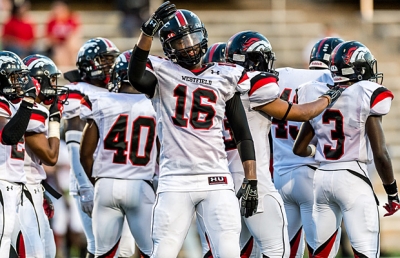
westfieldIt would be impractical to teach how to get off blocks without first teaching the proper hand placement in order to do so. Many of the following drills emphasize the actual placement of hands as well as how to defend against types of blocks.

Defensive Line Block Destruction

We categorized the defensive line component of block destruction by presenting both run and pass. The focus of these drills is to teach defensive linemen how to defend against one-on-one run blocks (base, down and reach blocks) as well as pass blocks.

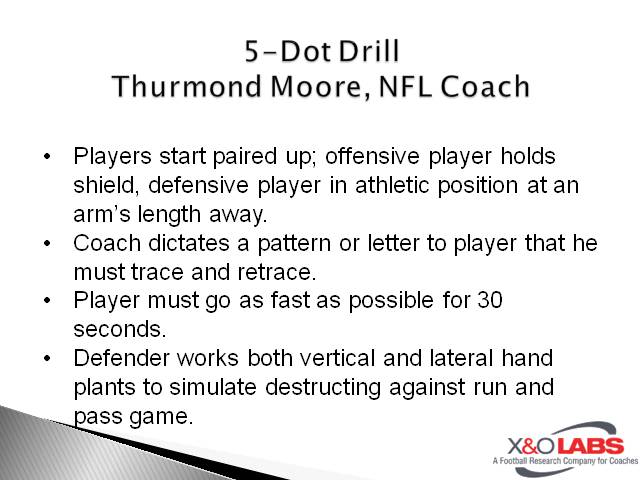
Drill 1: 5 Dot Drill, Thurmond Moore, former NFL Defensive Line Coach

Reinforcement: Teaches proper vertical and lateral hand placement of defensive linemen as well as the quickness of punch.

Diagram1

To see video of the 5 Dot Drill, click on the video below:

Editor’s Note: The following videos by Thurmond Moore are contributed thanks in part by FootballUniversity.org.

Read More

5-Point System for Post-Game Evaluations

By Casey Miller
Offensive Coordinator
Cottonwood High School (UT)
Twitter: @cqmiller4


Coaches spend hours and hours of time each offseason doing installs, drills, footwork, conditioning, and many other countless activities with their players to prepare them for the season. These many activities are critical to the success of each and every player regardless of their position on the football field. When evaluating player performance in practices, scrimmages, or games, often players are only given grades based on a +/- system which more often than not, is mostly based on the result of the play, not based on more of the skills that coaches spend so much time working on with their players. Being able to give each player much more specific feedback on which things they are doing well, and more importantly the things they need to improve upon can give them the buy-in to focus on those skills during practice sessions the following week, which will lead to more focused players in practice. The number one thing that tends to be the driving force behind not having a more specific and detailed grading system is TIME.


The System:

Our grading system gives each player a score of 0 or 1 in 5 categories for each play. These scores are then turned into an overall grade for the play, an average score for each category for the entire game, as well as an overall grade for that player’s performance that week. Using an Excel spreadsheet, the coach grading that player just has to copy-paste the playlist from HUDL and start grading… the worksheet does the rest of the work for you. Since each position has slightly different things they focus on, each position has their own set of categories that get scored. For instance, a QB has both a pre-snap decision-making process and a post snap decision- making process for each play. He could do one well and not do the other one, so they need to be tracked separately. A running back may only have his read post snap, so giving him a grade for “pre-snap read” would be a waste of time. We feel as if we have created an objective way to grade all positions with great detail, give specific feedback to each player about their performance, and have tried to eliminate the often times result-based grading system that many coaches use. The 5 categories for each position in our grading system are:


Quarterbacks

  1. Pre-snap
  2. Post snap
  3. Footwork
  4. Mechanics
  5. Finish


Runningbacks

  1. Presnap
  2. Assignment
  3. Footwork
  4. Mechanics
  5. Finish


Wide Receivers

  1. Pre-snap
  2. Assignment
  3. Footwork
  4. Mechanics
  5. Finish


Offensive Line

  1. Pre-snap
  2. Footwork
  3. Head Placement
  4. Hand Usage
  5. Finish


Tight Ends

This is always the fun position… they are graded as OL on run plays, but WR on pass plays


Defensive Players

  1. Alignment
  2. Assignment
  3. Technique
  4. Reaction
  5. Finish


Read More

In-Season Strength & Conditioning Model

By Robert Hubbard, Jr.
Safety Coach
Douglass High School (OK)

Introduction:

Since football is a ballistic sport, the in season emphasis or our S&C program is on anaerobic conditioning. To introduce the body to the dynamic interchange of distances during a football game, “interval sprints” are performed for post-practice maintenance. Different distances are sprinted with a rest period of 15 seconds between sprints:

Sprint:                                Rest:                                                                          

  • 30 yards                               15 seconds
  • 60 yards                               15 seconds
  • 5 yards                                 15 seconds
  • 40 yards                               15 seconds
  • 20 yards                               15 seconds
  • 70 yards                               15 seconds
  • 5 yards                                 15 seconds
  • 90 yards                               15 seconds
  • 30 yards                               15 seconds
  • 5 yards                                  15 seconds
  • 100 yards                             15 seconds
  • 30 yards                               15 seconds

Over a four year period, each year representing a cycle, the intensity level will increase. Therefore, our players will continue to grow in stamina throughout their careers.

Read More

RPO: 9 Drills to Train the QB’s Eyes

By Mike Kuchar
Senior Research Manager
X&O Labs
Twitter: @MikekKuchar

Introduction

sscWhen conducting our research on RPO concepts, we found that the majority of coaches package their RPO concepts together, meaning they will teach both the run element and pass element at the same time. Then, they will work on developing the QB’s pre-snap read key and post-snap movement key. This comes in the form of constant drill work, which is done on a daily basis. These are the drills below that these coaches are using to train their QB’s eyes to make the correct reads in RPO concepts.
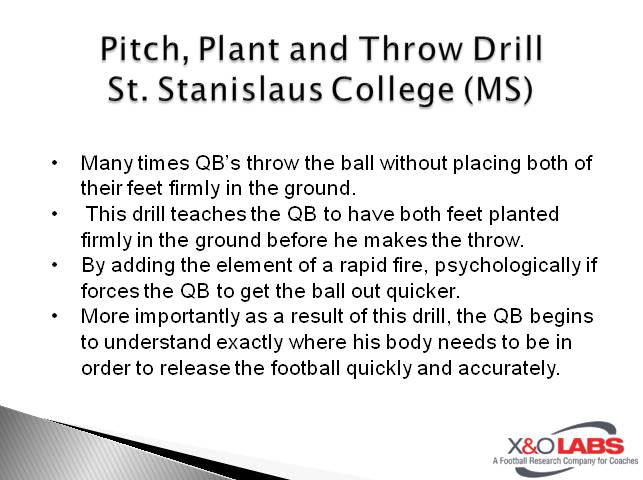

Drill 1: QB Pitch, Plant and Throw Drill

Slide1

Contributor: Bill Conides, St. Stanislaus College (MS)

Purpose: Teaches QBs to receive snap, threaten line of scrimmage and get ball out to pitch key.

To see video of this drill, click on the video below:

Read More

Virginia Tech’s Defensive In-Game Operations

By Mike Kuchar
Senior Research Manager
X&O Labs
Twitter: @MikekKuchar


Introduction

budfosterLast spring, X&O Labs Senior Research Manager Mike Kuchar spent three days with Bud Foster and his defensive staff studying the Hokies Bear Package, which the Hokies used on 54 snaps to hand Ohio State University its only loss last season. While the entire Bear study can be found here. Coach Foster also spend some time talking to Kuchar about what many feel is one of his biggest strengths as a defensive coordinator, his in-game adjustment ability.

Mike Kuchar (MK): What do you work off of in the game to relay your calls?

Bud Foster (BF): I have my call sheet which as the following components:

  • First and ten to start a drive
  • First and ten within a drive
  • Second down and 11 or more
  • Second and 7-10
  • Second and 6 or less (which is just like first and ten)
  • Third down variables by separating run vs. pass tendencies
  • Third down and two or less
  • Third and medium which is 3-6 yards
  • Third and long
  • What do they do after a first down run of three yards or less
  • What do they do after a first down incompletion
  • What do they do after an explosive play

I got that down on my sheet. But let’s say you got an offensive coordinator who likes to run nakeds on first and ten to start. After each series, I write down the plays they ran to see if they are starting with what I studied. Is he staying on track or is he changing? I’ve been doing it long enough where if he has a little wrinkle in somewhere, he is probably doing something to counter off of it, like a naked. If he is going to run naked on one of his big naked downs and he hasn’t run it on the first two first and tens, I’m probably going to bring pressure the third time. You’re playing the odds.

MK: What is something about first down that has recently changed in tendencies?

BF: Nowadays you’re getting coordinators who are 50/50 (run/pass) in early downs like first and ten. Sometimes you get guys that are 70/30 and then I get excited because it’s a tendency. But if you get 60/40 or 65/35, I consider that to be 50/50.

Read More

Four Day Defensive Game Plan Model

By Rob Everett
Former Defensive Coordinator
Bridgewater College (VA)
Twitter: @NineintheBox


The process of creating a weekly game plan is a fluid experience. The game plan and corresponding practice plan, should contain elements of familiarity, while incorporating opponent specific components that will get your team ready to perform at its best.  This article will focus on the daily workflow of a game planning method we use at Bridgewater College. Each day contains a different phase of the game plan, which will be outlined below. If you are playing on Friday, aim for the game plan to be locked by Wednesday after practice so your team can settle in. It is ok to let them know the staff may be “testing” things to see how they look in practice. It is important to note, no way is the “right” way; coaches should be true to themselves and their teams in order to maximize results.

No matter what the time distribution is, the best approach is an inclusive and diverse teaching style that addresses all the players needs. There are many (free) products out there that supplement a good practice and allow the players and coaches to interact in an additional environment. At Bridgewater College, we use the free simulation program Go Army Edge, which allows us to get on the field in the players eyes (goarmyedge.com). Also, we use google forms to assess and survey our players to understand what they are (or are not) learning. This information helps build the practice plan.


THE DATA

Before a game plan can even be begun, the cataloging of opponent film and data must be done. With the accessibility and ease of the video software that most teams have at their disposal, there is no excuse not to have data points attached to film. Even if your staff is small, there are easy (and cheap) ways to get this data entered. In previous years, we have had student assistants enter data during the school day. They were not football players, but rather students who were interested in being involved with the program or the field of athletic support. The more data entered at the start the better, as this will be the foundation of your teams defensive strategy.

Once the data is entered, your staff should be able to grab a big picture overview of the opponent, which will provide the first step in finding important differences in situations that arise that can be exploited. The following are certain situations to investigate for differences from your opponent’s norm:

  • Down and Distance
  • Personnel
  • Formation
  • Backfield Set
  • Score Differential
  • Field Zone (Horizontally & Vertically)
  • Previous Play Result
  • Motion


Have a base set of situations to investigate and cross reference, but use your instincts on things that may be unique to each opponent.


DAY 1 – ALL DOWN DAY

The first day of the week should be a replica of your pre-season install. The 2 to 4 base coverages and 1 or 2 fronts that you put in as your foundation of the defense. As the season goes on, you may consider pairing down the All Down calls to 1 or 2 that you are most efficient with. These are the calls that you can call on 1st down or non-descript 2nd and 3rd downs. All downs calls should contain a zone and man free concept and have set formation adjustment rules (empty, motion, 2 back, etc.)

Read More