New Research Reveals the Most Effective Defensive Adjustments
Researchers’ Note: You can access the raw data – in the form of graphs – from our research on defending pre-snap movements: Click here to read the Statistical Analysis Report.
Two weeks ago we released a new research report, Pre-Snap Movement to Gain Leverage, detailing how offensive coaches are using pre-snap movements to out-leverage and out-number defenses at the snap. We featured the schemes, complete with detailed film cut-ups, of the three most prolific offenses in the country: Boise State, Auburn and Oregon to show you exactly why they do what they do. I learned quite a bit researching that particular report. As a defensive coach, I was mesmerized by the way in which Chris Petersen and his staff at Boise would manipulate defenses by using pre-snap movement to gain leverage and get them into compromising positions. Gus Malzahn, the newest offensive prodigy, was baiting defenses to fly to the perimeter with his jet motion, just to gash them inside with Cam Newton on the power read scheme. Then you have Chip Kelly shredding defenses with his “flash sweep concept” by sending the offensive line opposite the motion of the back and reading the front-side defensive end. It was in a word…stealing. They are all simple offensive concepts to teach and implement, it’s just that those three had the guts to run it, and run it at the highest level of college football.
So enough marveling, this report will focus on how defensive coaches are adjusting to these types of motion and more importantly how they are putting their players in the best spot to make plays.
My research staff and I were surprised to find that 57.5 percent of coaches surveyed said they see pre-snap movement on less than half of all offensive snaps. This was somewhat surprising considering Boise moves on nearly 80 percent of its total offensive snaps. Truth is, most offensive coaches (the good ones anyway) run their motion for a reason, and not just to “window dress” their playbooks.
For a quick refresher from our last report, the following reasons are why offensive coaches will utilize pre-snap movement:
- Gain a mismatch in personnel
- Gain a leverage advantage on the perimeter
- Gain a numbers advantage
- Identify coverage rotation
- Promote a “toe-to-heel” mentality to the defense
So after my staff and I analyzed the data from our survey results (1,724 coaches responded), we were interested in determining which movements give offenses the best opportunity to capitalize on those five indicators above. We found the following three pre-snap movements to be the most used against defenses:
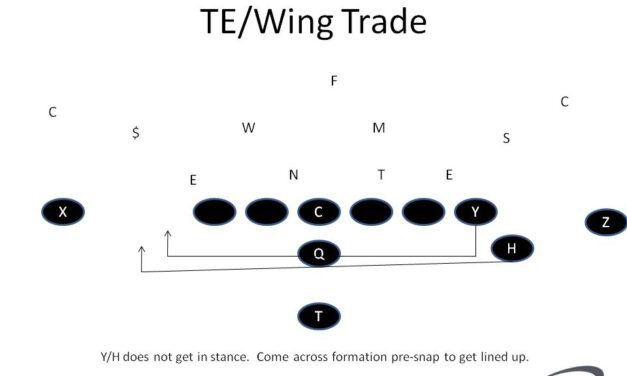
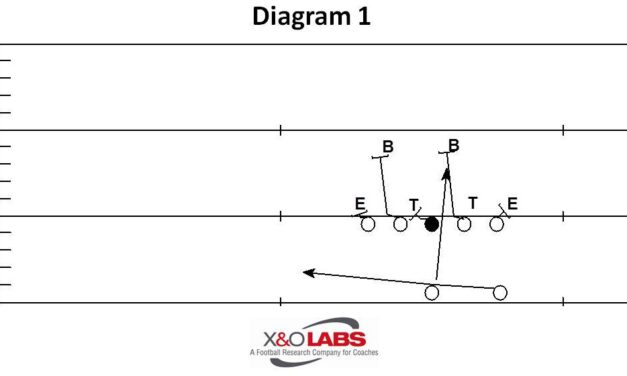
- TE Trade (Diagram 1): This is a trade/shift, where you bring your tight end from one side of the offensive formation to the other. It also can be used in conjunction with an H-back or wing where both will travel together.

- Jet or Flash Sweep (Diagram 2): The jet sweep motion is a full-speed motion from one side of the formation to the other, mainly utilized by a slot receiver. It’s been a staple of the Wing T offense, but has integrated itself into more spread schemes recently.

- Shuffle or Return Motion (Diagram 3): This motion is a square-shouldered motion by an H-back or Wing who will start on one side of the line of scrimmage and either shuffle across the formation or return to his original location.

Those are the top pre-snap movements that defensive coordinators will see from offenses. Now let’s take a look at how they adjust.
 Case 1: Defending the TE Trade Tight end trade, or as some teams refer to as “Y walk,” is used mainly by the offense to dictate the formation strength of the defense. Most defenses, particularly four down lineman fronts, will call the strength to the tight end or three-man surface. “Walking” the tight end from one side of the formation to the other can cause various personnel problems for the defense. A weak side defensive end may end up playing on the strong side once the tight end resets, it’s a position he’s not familiar with. Also, a nose guard who will line up away from the tight end, may end up playing to the tight end surface on a trade. This can make the nose guard susceptible to playing double teams, a block he may not be used to seeing because he’s now on the front-side of the play. In our last report, I detailed how Boise State was able to trade its tight end and get Fresno State to play out of position.
In any movement by the offense, it’s important to note that there are really only three ways in which a defense can respond to offensive pre-snap movement. They can adjust with their first level players (DL) their second level players (LB’s) or their third level players (DB). How they adjust these levels could vary in dropping a defender down, moving a defender up, widening defenders or slanting defenders. In this instance, we found that 61.8 percent of coaches will bump their defensive front against the tight end trade, perhaps creating some of the same personnel mismatches that were mentioned earlier.
Sam Tavlealea, the former defensive coordinator at the St. Louis School in Hawaii, has seen the evolution of the spread trickle down from former Hawaii coach June Jones. Jones has been using H-backs and slot backs in his package for years, and now many high school coaches on the west coast have adopted those same principles. So one of the challenges Tavlealea faces each year is to adjust his personnel/coverage depending on whether or not a wing is a smaller slot receiver or a bigger H-back. Most smaller slots would signify a pass concept, whereas the H-back would be used as an additional blocker in the run game.
“We’re seeing a lot of bounce back motion with that wing,” said Tavlealea. “What he’ll do is line up in a wing alignment and either motion full across the formation or stops and bounces back to where he came from. The coordinator was actually trying to see if anyone was going with him. If it wasn’t man coverage, he would go across the formation hoping you would bump your front. They would run the inside zone to the shade technique then trap the three-technique. It got to a point where we were seeing it 15 times per game.”


306")
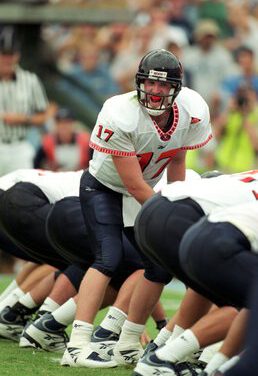
 Prior to coaching, Dan Ellis was a two-year starter at the University of Virginia finishing his career fifth in school history with 3,974 yards passing and 28 touchdown passes.


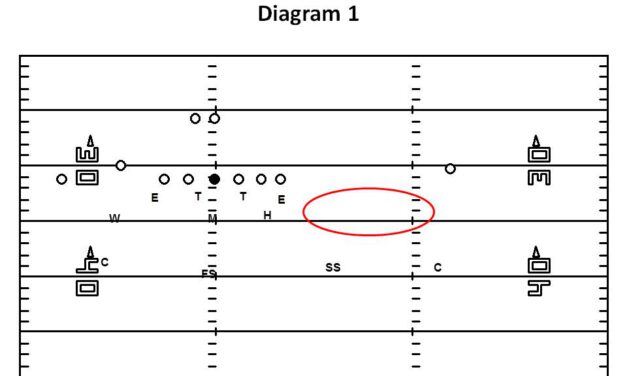


 We start each drill with three things in mind that we hope the athletes carry over into games: alignment, stance, and key. Generally, when our safeties make a run call to their sides, they align at 8-10 yards deep, on the outside shade of the EMLOS; in most cases, this is a tight end or an offensive tackle, depending on the offensive set we see that week. For the stance, we ask our safeties to use a square stance, with knees and hips flexed, back slightly flat, hands loose in front of the body. During a run call, we want our safeties to keep their eyes out of the backfield. As a result, we tell them to key the EMOLS solely. We find that, in most cases in high school offenses, the tight end or open side offensive tackle tip off the type of play. At the snap of the ball, we tell our safeties take a couple pop steps in place as they key the EMLOS; this gets their feet moving without losing ground.


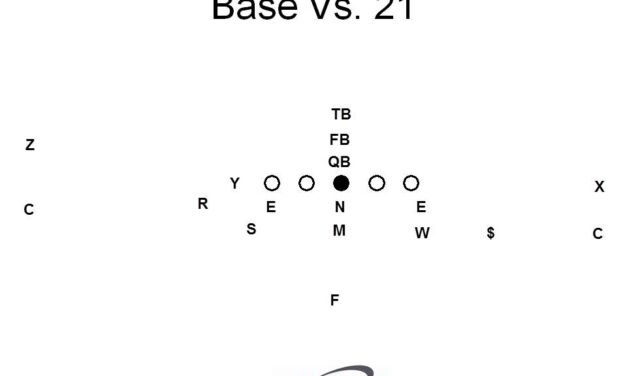
 Conversely, if we are out-numbered at the point of attack the QB must recognize this as a bad situation and check the play into a more advantageous run or pass based on the game plan for that given week – our 3 vs. their 4 (See Diagram 2).
  As I mentioned earlier, one way that you can account for that 4th defender is to create a four man surface to the play side by motioning into a 3×1 formation so that the slot receiver can account for that edge player (See Diagram 3).
  You could also call the play out of a 3×1 formation to begin with, giving you a 4 man surface to work with right off the bat (See Diagram 4). If you have a slot WR that is a physical blocker this could be a great matchup for you, or it could be a nightmare if that guy isn’t willing to be physical blocking an OLB/Safety type player.