By Dan Ellis Head Coach W.C. East High School
 Prior to coaching, Dan Ellis was a two-year starter at the University of Virginia finishing his career fifth in school history with 3,974 yards passing and 28 touchdown passes.
Throwing the football is something we did with enormous success during the 2011 season at W.C. East High School. We threw it often and threw it well. However, it is not necessarily the number of attempts you make in a game, but it is the efficiency with which your QB executes the passing game that matters. When you choose to call passing plays, completing the ball is of the utmost importance. Whether we threw the ball 25-30 times a game or 10 times a game, the Spacing Concept and its various adjustments is an outstanding play that we can utilize against any defense and coverage. I will discuss in this report my spacing concept, including the QB’s footwork, and the top variations I use to maximize this play’s effectiveness.
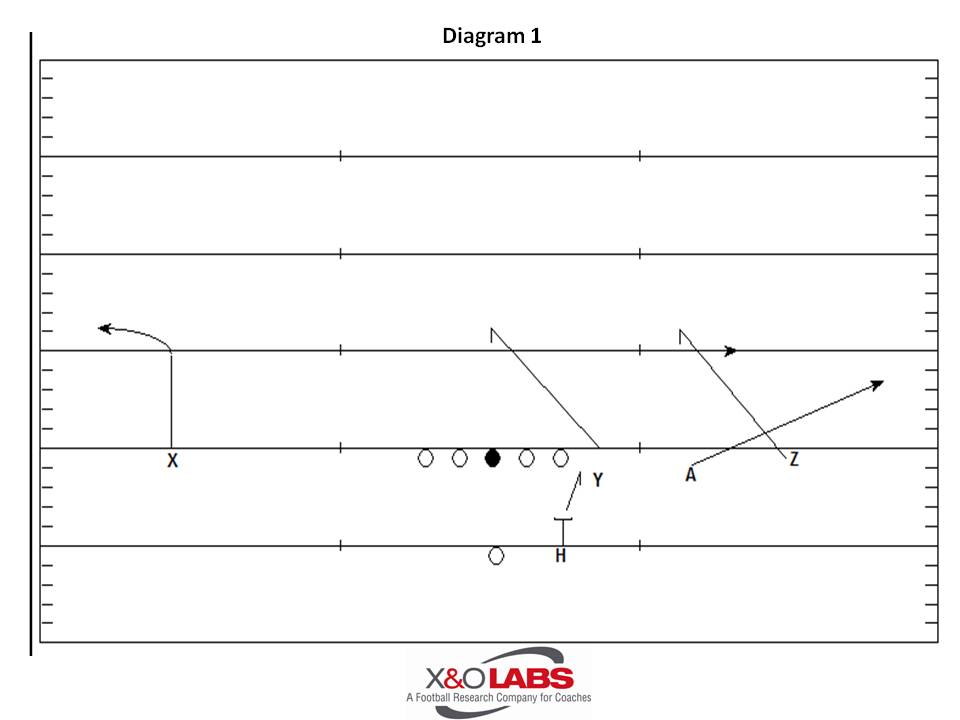
Personnel: First off, as you look at the diagrams, I want to give you a quick breakdown of our personnel. This way you may be able to fit and adjust the play to your specific offense (this concept can be used in any offense).
Z – Usually a quick, fast receiver, plays most of the game to the field. X – Our best receiver and in spacing, the guy we are trying to get the ball. A – Our Adjuster. In our offense can be a RB or a WR depending on the formation. Y – Our fourth receiver, also lines up as our TE. H – TB.
Spacing Concept: Using Spacing is a great way to stress the defense in a lot of ways. Here is the basic concept, a play that will horizontally stretch the field. For us, we want to line up in some type of 3x1 formation, which forces the defense to adjust to it, and then single up our best receiver on the back-side. He will be our first read (diagram 1).

At the QB position, we teach progressions. So our progression for this play is two-fold depending on what the QB sees from the defense pre-snap. First, with this play, we want the ball to go to our X and tell our QB to make his decision pre-snap if he will look at the X.
Pre-Snap – Yes to X (X back across formation)
- X – Quick out
- Y – Ball route
- Z – Snag
Pre-Snap – No to X (to trips outside in)
- A – Flat
- Z – Snag route
- Y – Ball
Diagram 2 and 3 – X 1 and then A 1


