Adjusting the Bear Front to Defend RPOs

By Kevin Gaul
Defensive Coordinator & Linebacker Coach
Colts Neck High School (NJ)
Twitter: @kevgaul              

Introduction:

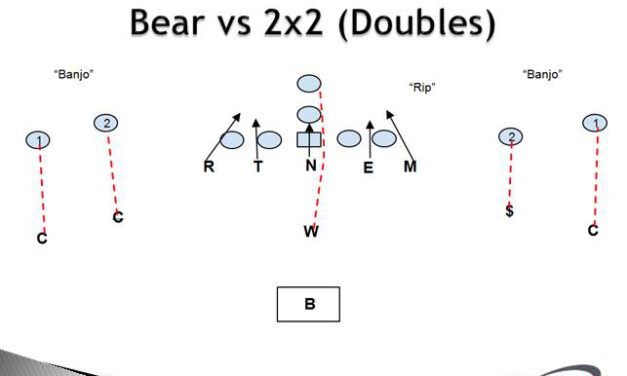
In today’s game, we see so many opponents who place a premium on having a dual-threat quarterback with run/pass options. Our staff utilizes a multiple scheme that shows both 3 and 4 down fronts with the mindset of trying to dictate the tempo of the game from a defensive standpoint. In an attempt to combat difficulty forcing the perimeter versus a mobile quarterback, we installed our 5 man “Bear” front while using Nickel personnel. We found that the concept gives us the best advantage to effectively apply edge pressure and contain the pocket while remaining strong against power run schemes. Scheme aside, we believe that the most important aspect of any well run defense is the overall ability to align properly, get off blocks and most importantly tackle. The scheme is primarily run out of a man to man coverage alignment, which we call MEG (man everywhere he goes). In our base Bear look, we play Cover 1 almost 65% of the time and use a Cover 3 “Robber” scheme as a zone based changeup. Our 3 Robber coverage is derived from our Cover 8 variation of quarters in which the SS/OLB on #2 will take outside leverage to funnel all flow towards the middle of the field, where we have a safety or MLB jumping the route with inside leverage.

Personnel & Structure:

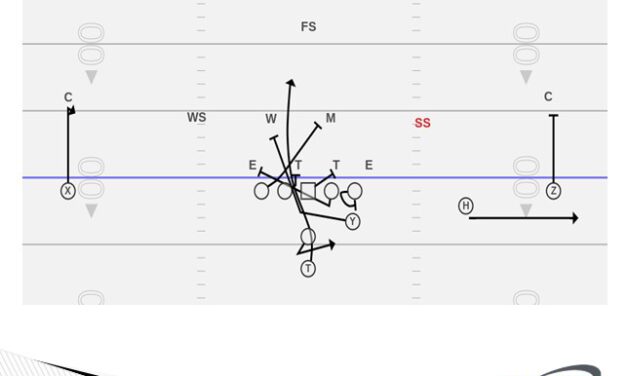
This scheme derives from a traditional 46 bear defense used commonly against 21/22 personnel power running teams. We keep our Nose in a 0 technique and have modified by shifting the End/Tackle into 4i’s. This allows the E/T to have better leverage versus a down block from the OT and combo blocks that include a TE or H-Back wing.

Our hybrid DE/OLB “Rover” is our weak side edge rusher and we ask our Mike LB to walk up in this package to become the strong side edge rusher. Both of these players are “box force” players versus the run (discussed below). Walking the Mike LB up to the line of scrimmage (LOS) allows for us to keep an extra safety on the field, as opposed to a traditional Sam LB in a 34. 

The Will LB is the most critical position in the unit. He is stacked 5 yards off the ball behind the Nose Guard and acts as our runner. He plays inside-out as he reads through the “big triangle.” In cover 1, our CB’s are in MEG on #1, while our Strong Safeties play #2. Against a 3×1 set, the weak side SS, which we label the “Cougar,” will bump over to cover #3 to the strength. This leaves the Will LB to be responsible for the RB. It is vital that our edge rushers do a great job in rerouting any RB quick release to help the Will in this situation. The FS, our “Bandit,” is aligned at 10-12 yards and acting as a centerfielder to assist the CB/SS on any Vertical or Post routes. At the same time, he must be able to attack downhill to become an extra secondary support run defender.

Coaching Points vs 2×2 Doubles:
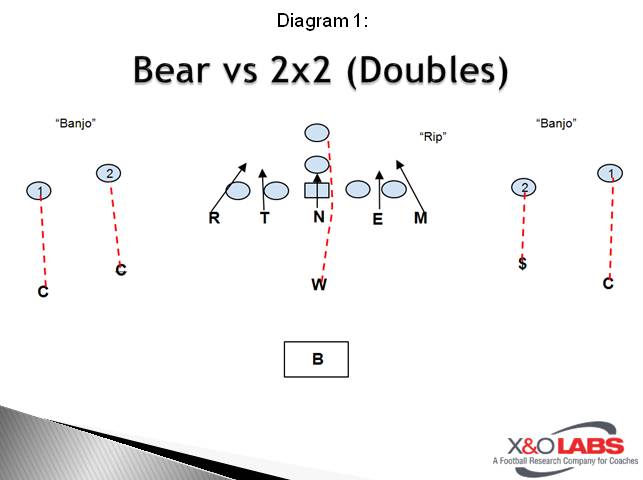
Slide1

Run Defense:

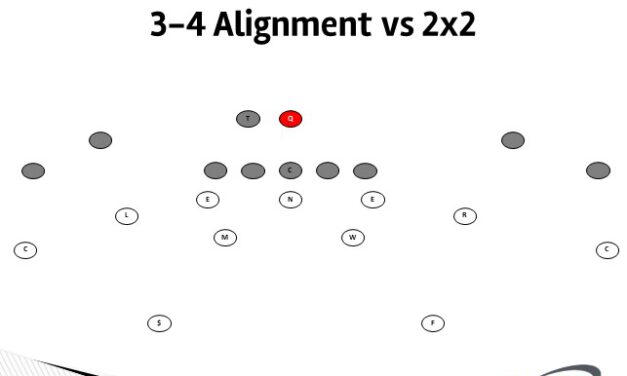
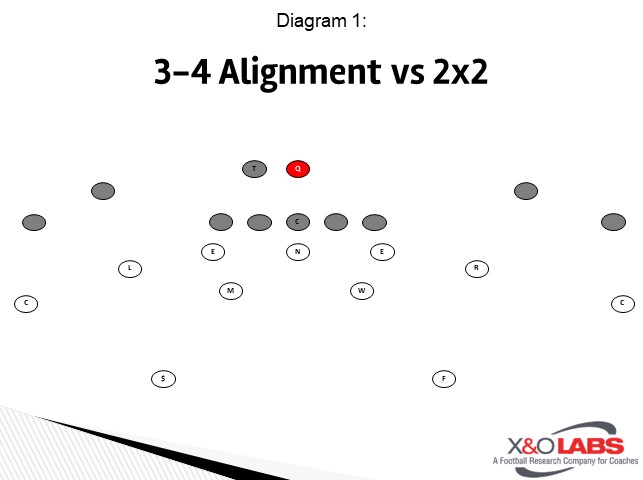
DL: Against a spread 2×2 set, we play a 6-man box. The Nose is a 2-Gap run defender reading the “V” of the neck of the center. We train this player extensively to use his hands as a way to shock and shed the center while maintaining a strong base to set the middle of the formation.  Our End/Tackle players are in 4i alignments and will attack the outside hip of the guard. We ask these players to be aggressive and cling onto the hip of pulling guards. If run properly, this helps to eliminate cutback alleys against pin/pull and power schemes. 

LB: The Rover and Mike serve as our box force defenders off the edge attacking the outside hip of any lead blockers or the back itself. Their general technique is to stay square and squeeze the LOS to deter any cutup lanes while always maintaining contain. Our general rule is as follows:

  • If the QB opens to the QB, that backer will stay home for the QB pull.
  • If the QB opens away from me, attack his back hip. This allows us to play any boot flow from the QB while being able to fall in on the RB. 

The Will plays over the top of the 5 down and is a free runner. We read a “Big Triangle” of the guards through the RB. The weakness of this scheme is the secondary run support over the C gap. As a result, we train the Will to track the inside hip of the deep back by working a “Track & Close” drill to prevent cut ups against zone offensive runs. In our MEG structure, the Will is responsible for the RB in pass, therefore he must be a guy that can run exceptionally to the perimeter and your best tackler.

Read More

Blocking Techniques To Acquire Numbers in the 2/3 Back Zone Option Game: Case 1 – Blocking Techniques to Acquire Front Side Numbers

By Mike Kuchar 
Senior Research Manager 
X&O Labs 
Twitter: @MikekKuchar 


We Want Your Input: Throughout this case, I’ve posted discussion topics and questions that I’d like to get your input and feedback. You can join the discussion down in the comments section at the bottom of page. We’ll be continuing the discussion all week. This is just not for today. You’re going to see what others are talking about and you’re invited to join the discussion. Be sure to post your email address so you can network with other coaches. Like always, if you have questions, just add them in the comments section and my research team and I will get them answered. Again, we’re starting with case one this week. We’ll go on to cases two and three next week. So, get started below and I’ll meet you down in the comments section below. Thanks, coaches!


Introduction 

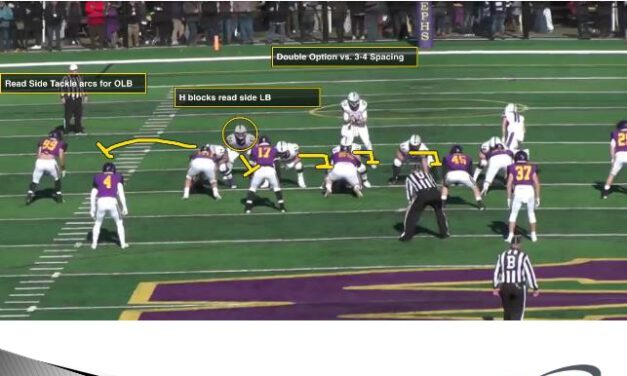
The option offense is all about numbers. We all know that. So much time is spent with coaches devising formation structures to find ways to get an advantage at the point of attack. Much of this comes in formation placement, but we found that’s not the only way to outnumber defenses. Some of this manipulation comes in the form of how coaches are teaching their players, mainly offensive linemen, to block the option game. In order to defend the zone read and zone read option game, a defense needs to out-number it. It’s as simple as that. But the problem is the defense doesn’t know where the play side is going to be and where the read side is going to be. Sure, there are tells like the placement of the offset or the placement of the cruiser, but that all can be manipulated.  

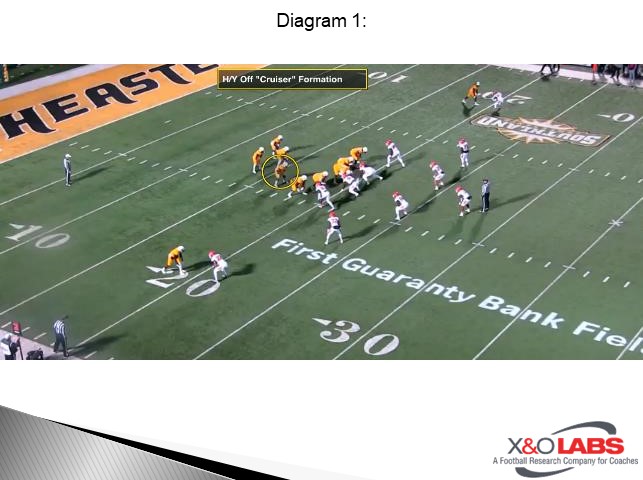
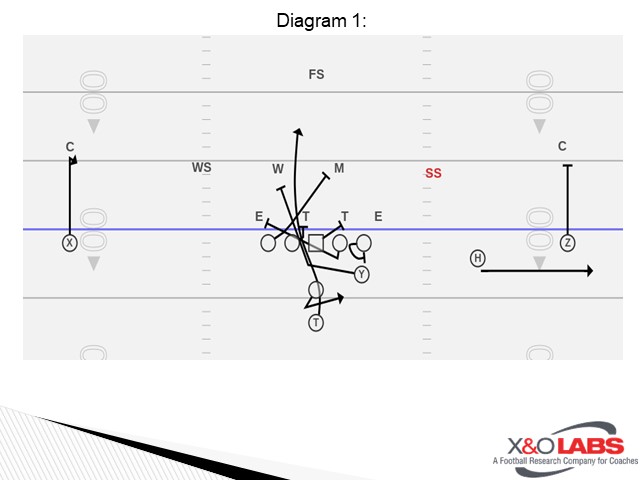
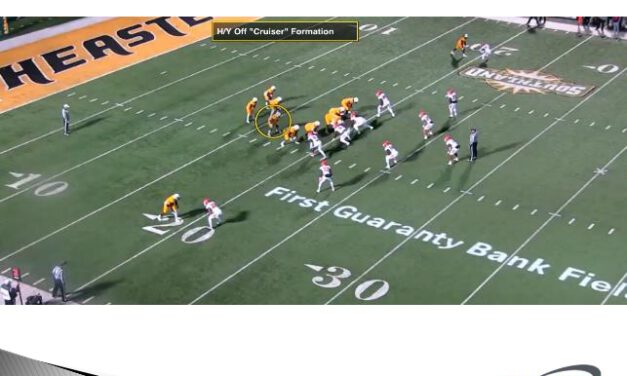
We studied two zone read option offenses from two successful programs. It’s important to note that these teams are not what you would call pure option offenses. They are zone offenses that have found ways to integrate the two and three back option game into their play menu with a great deal of success. They were spread option coaches that simply adjusted their zone run game to add a double option element to the read side of the play. That adjustment came in the form of adding another offensive player in the hip position (whether it be a tight end or another back) into their formation structures, who has the potential to be a front side or backside blocker (Diagram 1). This formation is nothing new. These days it’s a challenge to watch any game at the high school or collegiate level and not see this formation. So, rather than focus on the formation, we wanted to tailor our research on how run game coordinators were designing their zone option run game around this formation and specifically how they were attacking defenses with it.  

Slide1

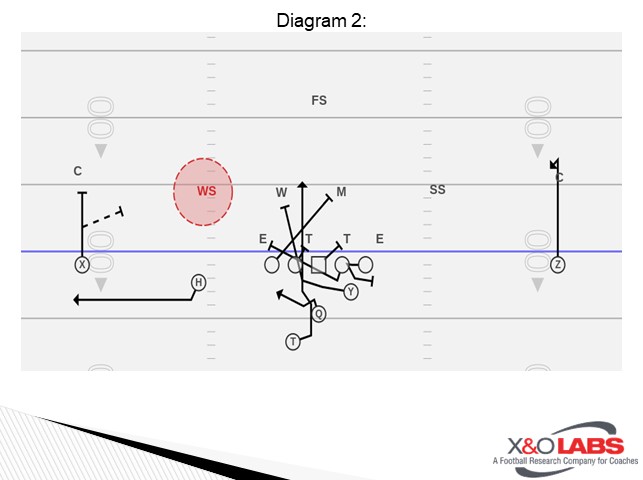
The benefit of having this player tied into the option game lies in the predictability of how defenses will defend it. In many cases, that comes in the form of “back gapping” the movement of the H/Y, or the cruiser in this system. The potential presence of that H/Y to the read side of the option scheme, will enlist the presence of another defender to account for him. And what that happens it 

The video below began the process of this project. After watching the University of New Mexico under former offensive coordinator Bob DeBessee gash opponents with its three-back option attack, I was astonished at how they were getting play side numbers in the zone scheme. Consider the following clip from the 2016 season against the University of Wyoming. As Wyoming back gaps the movement of the H/Y, the back is able to push the ball out the front side for a huge gain.  

Read More

Blocking Techniques To Acquire Numbers in the 2/3 Back Zone Option Game: Case 2 – Blocking Techniques to Acquire Backside Numbers

By Mike Kuchar 
Senior Research Manager 
X&O Labs 
Twitter: @MikekKuchar 


Introduction 

In zone option football the backside of the scheme (or read side) is just as important, if not more important, than the play side. In order to keep defenses honest, an offense needs to show its capacity to make reads backside and get the ball pitched. But it order to do that the offense needs to have a favorable numbers advantage. In this case, we will present our findings on how coaches are not only attaining numbers on the read side by not only by formation, but also by blocking scheme.  

QB and Dive Back Mesh  

Although this is mainly a study on how coaches are blocking the two and three-back read option, we felt it necessary to detail the mesh game of the zone read, both from Pistol and offset alignments. The mesh is a vital component of any option offense and if not timed up with the blocking angles up front, the concept doesn’t have a chance of being successful. SELU and Amherst will use both pistol and offset alignments in its option game. While the offset can present tells to the defense based on which side is the play side and which side is the read side, flopping the back pre-snap could easily alleviate that issue.  

As far as teaching the read of the quarterback, SELU makes it as clear as “can you beat the read defender or not” (which is the C gap player) while Amherst gets a little more specific. “We read hips and read eyes of read key, which is the first guy outside the hip of the read side tackle,” said Coach Ballard. “We are looking for hip bend. If his hips bend, we got him. We are starting to see more sits and say their defensive line is better than the offensive line and dare us to run inside zone. In these situations, we need to find a way to option the football outside.” 

Mesh Game Mechanics from Offset Alignments 

From the offset alignment, the quarterback is taught to not move the near foot, pivot with opposite foot and square up to the read key. The dive back steps at the play side hip of the Center but the key coaching point is to not move until the ball hits the quarterbacks hands. This is done to give the offensive line, which lines up deeper in SELU’s system, to get into their blocks.  

The clip below provides an illustration of this technique: 

Read More

Blocking Techniques To Acquire Numbers in the 2/3 Back Zone Option Game: Case 3 – Building Formations and Play Tags to Manipulate Defenses

By Mike Kuchar 
Senior Research Manager 
X&O Labs 
Twitter: @MikekKuchar 


Introduction 

As in any pure option offense, coordinators spend countless hours studying the structure of defenses to find ways to manipulate numbers based on formation. The three-back zone read option coaches are no different. And when these offensive coordinators are game planning, a decision needs to be made on whether they want to acquire numbers to the read side of the zone scheme or acquire numbers to the read side of the scheme. While this, of course, depends on personnel matchups (who these coaches want carrying the ball) we wanted to present our research on how these coaches are building formation packages to attain extra numbers either to the zone side or read side. These can be done in both a pre-snap or post-snap manner.  
Zone Read vs. Zone Read Option Methodologies 

While Ohio State and Auburn started to popularize the two-back zone read systems from 11 personnel groupings, other programs like New Mexico under former offensive coordinator Bob DeBesse has started to implement the three-back zone read system from 20 and 30 personnel groupings with a great deal of success, the Lobos lead the country in rushing in 2016 using these formations. SELU will use both of two-back and three-back groupings, but will vary between both based on two components: 

  • What kind of personnel they are working with from year to year 
  • How defenses are defending both two-back and three-back option schemes 

Of course, the benefit of the three-back option schemes is that it provides for a dive back, a pitch man and a cruiser. Coaches can, and often do, designate who the cruiser is and who the dive back is from play to play provided you have the personnel to do so. Whereas in the two back option game, a coach may be limited to one dive back and one cruiser. All of this can be manipulated by numbers and SELU is no different when it game plans using both these personnel groupings.  

“Three back is easier to scheme,” said Coach Mikel. “But when deciphering between both of these, the first question asked is does speed benefit us (by having two backs) in this certain situation? The second question asked is can the speed guy perform the blocking function as well as the tight end? The third question is does the defense change depending on personnel.” One of the issues in running two back zone read is that an offense has to decide if it wants to run it to the two receiver side or can you run it both directions. The issue with running it to the one receiver side is blocking the bubble inside linebacker (as detailed in case two). It’s a difficult block for that read side tackle to man block up the bubble backer, which is why SELU committed itself to utilizing the two-back zone read to the two-receiver side. “We didn’t want to give the tackle more things to learn,” said Coach Mikel. We didn’t want the tackle doing anything else but going lateral, lateral and blocking what is on his track.”  The H/Y can account for the first play side linebacker, but when defenses back gap, they can easily gain another defender to the read side. The two-back zone read from 20 personnel is more advantageous being run to the two receiver side, where the slot is able to block number four to the read side and the ball can be pitched off the next threat.   

For Coach Ballard, deciphering between two back zone read and three back zone read option is a personnel factor. He initially tried to make it universal for the back and tight end to be cruisers, but found that running backs couldn’t execute cutoffs or arc blocks. “These backs didn’t have the power to get that done,” he told us. “We would switch responsibilities for key breaking tendencies. You will see us run inside zone and have the tight ends arc release as a key breaker. It got secondary running and chasing tight ends on an inside zone play (this concept is called “bang tease” will be detailed in case three). So we would tell him to arc release as a default if they didn’t get anything from us.” 

This coming season, Coach Ballard (who is also the tight ends coach) plans on cross training the backs and the tight ends. “The tight ends will spend time with the backs. I will teach the tight end in the run game. Tight ends are really doing different things. They used to work zone combinations but now everything is from off line formations. We don’t have enough backs on the team that we want on the field. If we did, we could’ve taken our tight end off the field, and ran all of these same plays with three backs. “ 

No RPO Zone 

Both Amherst and SELU don’t major in run/pass options. In fact, they don’t even tinker with them. As Coach Ballard told us, “We used to be an RPO team, but teams have started to get to man free coverages to stop it. Now after three years, I said all we’re trying to run the option is lets run the option. You have to decide what you are going to spend your time on.” So, instead of manipulating the conflict defender, they attack him by forcing him to make tackles in the option game. But in order to get the numbers advantage this offense needs, they have to be creative with their formation design. In this case, we are going to study how these coaches are using double and triple option schemes to manipulate defenders based on formation. We realize that some coordinators may play a “defense of the week,” when defending option teams, we segmented our research on the most common defensive structures these coaches see: 

Read More

Incorporating Air Raid Concepts into a High School Offense

By Jon McCune 
Head Coach/Offensive Coordinator 
Moniteau HS (PA)
Twitter: @coachJQmccune 


Introduction 

Teams at all levels of football incorporate some sort of option or read route. Based on the depth, leverage and coverage of the defensive back, the receiver can choose a specific landmark to hit on the field. The QB and his receivers know through practicing routes-on-air and building chemistry, how to attack the field efficiently and react to different types of defensive leverage. This idea has evolved over time and blends right in with the air raid philosophy of taking what the defense gives you. This makes it even harder on the defense to make adjustments while moving at a high tempo.  

Option routes make it harder for a defense to decipher the play you are running. One play can look like four different plays out of the same formation. It has been easy to incorporate it into the high school level based on the amount of time you have to rep it. To do this, I suggest you study one route and not one whole play in the beginning. You can work that route in 7on7 practice or at competitions.  

You shouldn’t have to read a term paper for kids to understand one concept. Wide receivers play with a different intensity knowing that they could get the ball on any given play, and it’s all on them and how well they run their routes. It puts stress on the QB and WR’s to know the pre-snap reads. Good communication and reps in practice will develop discipline and teach these young men how to chase green and find grass with precision and ease.  

It is important to note that option/reads are not double move routes. I did not include routes like DINO or HI-GO or pivot, nods, in and ups, out and ups, because I believe those are double move routes that do not have a true option/read. Hitch-Go, for example, is tough to do with a true post snap read. If it is a read, it’s pre-snap only, not mid-route. Those are great concepts, but they don’t fit this topic. The remainder of the article will be focused on the read concepts we currently use. 

Implementation 

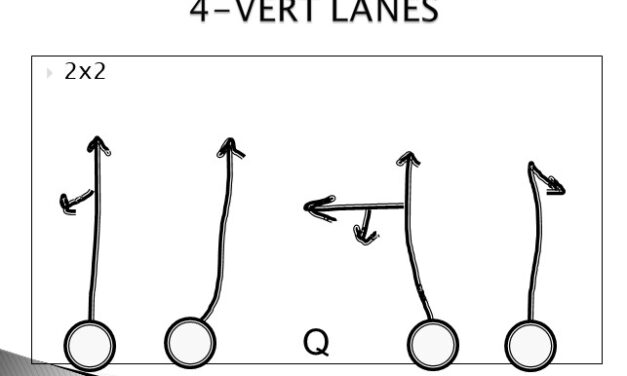
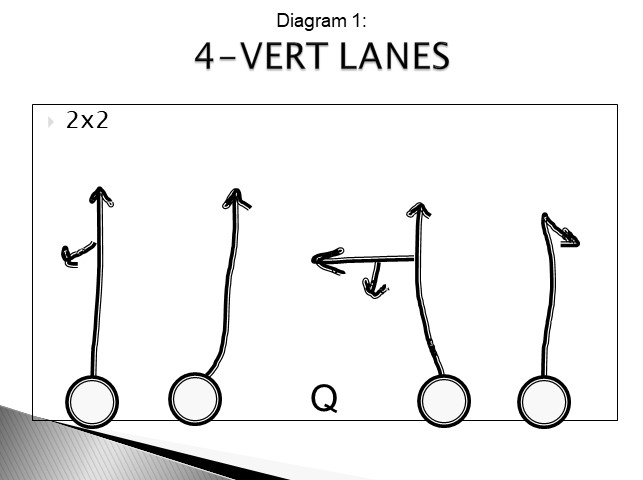
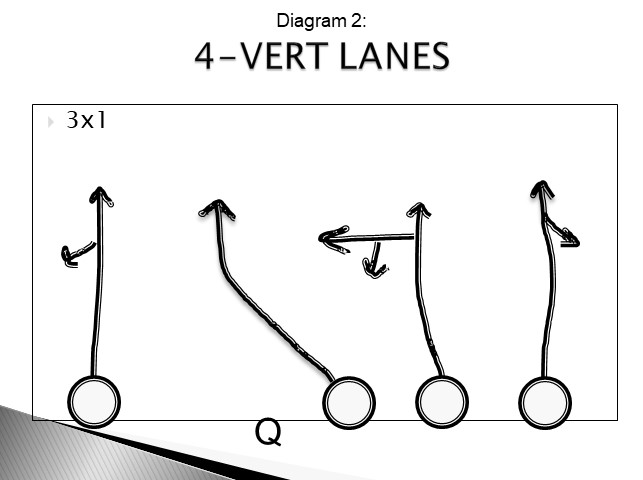
The evolution of option routes can be seen in classic Air Raid concepts like “Y Cross” and “Mesh.” Even if you are not an air raid enthusiast, chances are that your offense has some sort of 4 vertical concept. For example, 4 verticals can contain two different option routes within the play. They contain the SOCO (streak-comeback) read for the outside and the “POGO” (post or go) read for a tagged inside receiver. The inside receiver identifies if the middle of the field (MOF) is open or closed based on coverage off the snap. 

Slide1Slide1

The coaching point I stress to my receivers is to create lanes of operation. Being too close to another receiver leaves one man to cover two and it’s a tough read for the QB. With that in mind, we have our four lanes. An issue coaches may have at any level is dealing with the possibility of the defense dropping 7-8 men into coverage. That is why we have the “POGO” tag.  SOCO and POGO will be detailed below in the deeper routes section. 

Quick Read Routes 

There is always space open on the field. Regardless of the strength of your QB’s arm, there is a way to create space for the offense. The quick read routes are high percentage passes. Easy throws = easy catches = easy yards. 

Snag  

Slide3Slide3Slide3Slide3

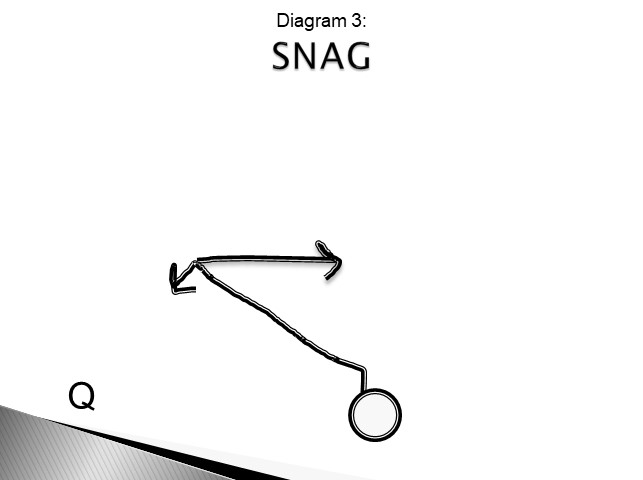
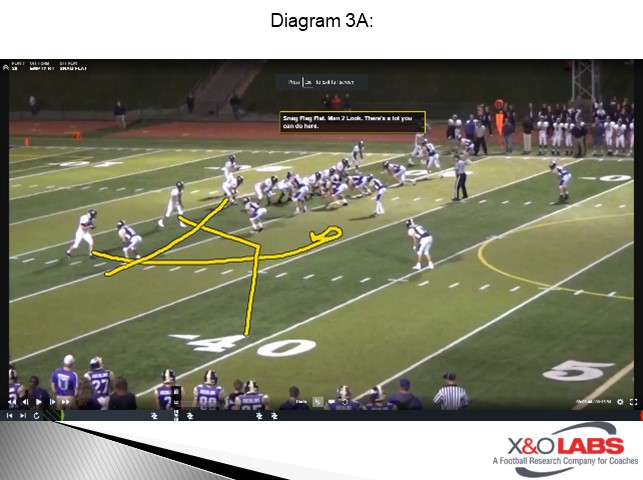
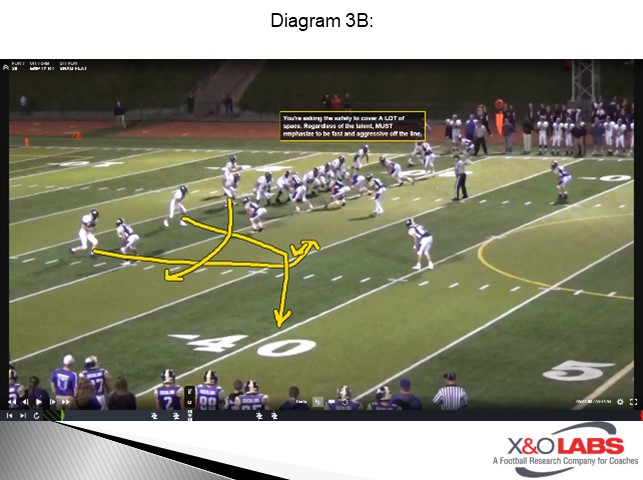
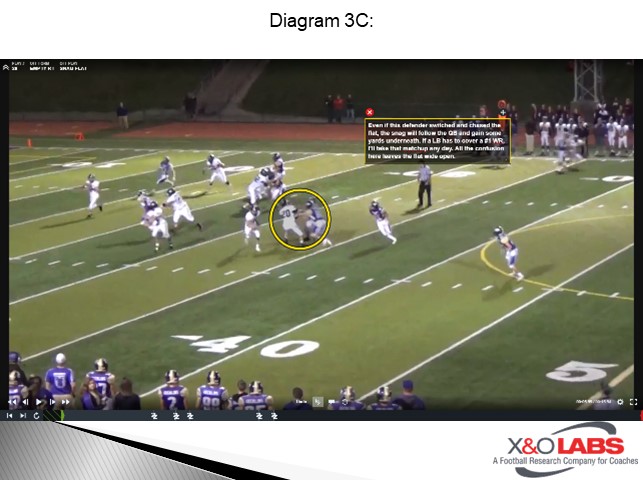
The snag is a combination of the spot and the pivot. Off the snap, the receiver immediately runs the spot. If green is open between the linebackers off the bat, hit the spot immediately. The snag can be run from any of the WR positions. The key that they must not cross the center of the line of scrimmage and go no further than 4-5 yards upfield. 

If the receiver notices immediately off the snap that linebackers are coming to cover the area, he attacks hard off the snap, then vacates and heads to the outside. In this highlight, even with the #2 WR slow off the line, there’s enough clutter on the defense that opens up some green.  

Read More

Creating a System of Pressure Disguise Protocols

By Bobby Peters 
Contributing Writer 
X&O Labs 
Twitter: @b_peters12 

Introduction 

In the modern era of no-huddle offenses, coupled with look tempo, it has become necessary for defensive coordinators to disguise their pressure patterns pre-snap as to not tip off the quarterback or coaches in the other press box. It almost becomes necessary to have a system in place where defenders on the back end do not give away any pressure indicators. But how they disguise their pressures must fit within their system. There are techniques behind these movements and the slightest hint of poor eye discipline or false movement can trigger the offense and result in surrendering potential big plays.  We reached out to several defensive coordinators, both at the high school and college level, to ask them how they disguise their pressure concepts as to not tip off the offense and asked the following four questions: 

  1. What coaching points do you use to instruct your cornerbacks to vary their disguise in corner pressure, trap coverage and cloud coverage as it pertains to the following: QB cadence, offensive formation structure and field location (boundary/hash)? 
  2. What coaching points do you use to instruct your safeties to vary their disguise in transitioning from MFO (middle field open) to MFC (middle field closed) pressure concepts as it pertains to the following: QB cadence, offensive formation structure and field location (boundary/hash)?  
  3. What coaching points do you use to instruct your second level defenders to vary their disguise between showing (mugging) pressure and bailing out as it pertains to the following: QB cadence and pass protection indicators?  Provide a specific example of how you will check your pressure against look tempo teams? How do you double call your pressure? Will you have an auto check opposite? Do you pair your pressure packages each week based on game plan? 

Their anonymous responses are below:  

Question: 

What coaching points do you use to instruct your cornerbacks to vary their disguise in corner pressure, trap coverage and cloud coverage as it pertains to the following: QB cadence, offensive formation structure and field location (boundary/hash)? 

Responses:  

“As a pressure defense that does a lot of pre-snap rotation, at the snap we have a general rule of trying to show a s much two-high as possible and trigger as late as we can to affect not just the look we give the QB but also to hide our force and alley players in the run game. We also like rotation on the back end because it gets our guys playing faster and not having to react from a static position.” 

“We use two triggers in all of our pre-snap movements dependent upon if the quarterback is in gun or under center. In terms of corner pressure, most QBs either under center or in gun will check both sides of the formation to identify the alignment of the corners and if the outside receiver is on the line or not. We show a pressed quarters look every play pre-snap so our trigger for our corner pressure (boundary only) is either when the QB looks away or when his head gets even. In the Gun we tend to show coverage and pressure when the QBs hands come together, obviously to accept the snap. If the quarterback bluffs and looks to the sideline we reset.” 

“Against trips to the field we may have a situation where the Corner wants to bail a little sooner if the offense likes number two on the out or wheel and we are in our cloud/read two scheme. We want to try to stay pressed as long as we can though, to maybe invite a check to a fade, especially on the backside of trips where we usually are playing some sort of invert coverage or a bail to 3 deep.” 

Read More

Running the Veer Option With A Gap Mindset

By Shea Monroe 
Former Offensive Coordinator  
Lincoln High School (AL) 
Twitter: @Coach_Monroe3 


Introduction 

In the years leading up to my last season at Lincoln, we were primarily a 20 personnel Pistol team that ran power, counter, split-zone, and buck sweep variations. Going into the 2017 season, we knew that we would be greatly undersized but still very athletic on offense. For that reason, we adopted more veer option concept going into the year. The thing that makes this offense unique is the ability to read any defender that we feel is a match-up problem for us on the line. It sounds difficult but all I am trying to do is fool that 15-17 year old on the other side of the ball and we found it to be rather simple. 

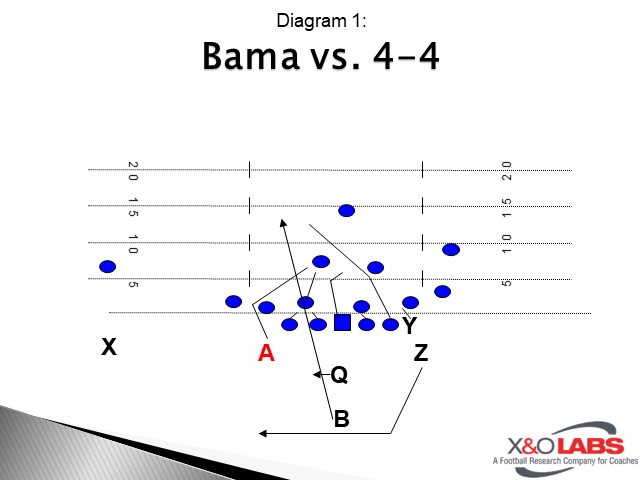
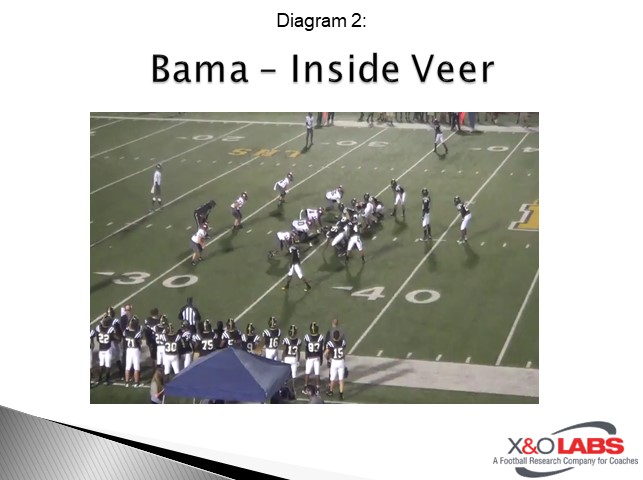
We really want to run Bama to an even front whether it’s a 4-3 or 4-4. Odd fronts can be a little dangerous because of the threat of a Hot #1, and #2. In a perfect world we would really like to attack the A-Gap defender, but it’s not the end of the world if we run it to a 3 technique.  

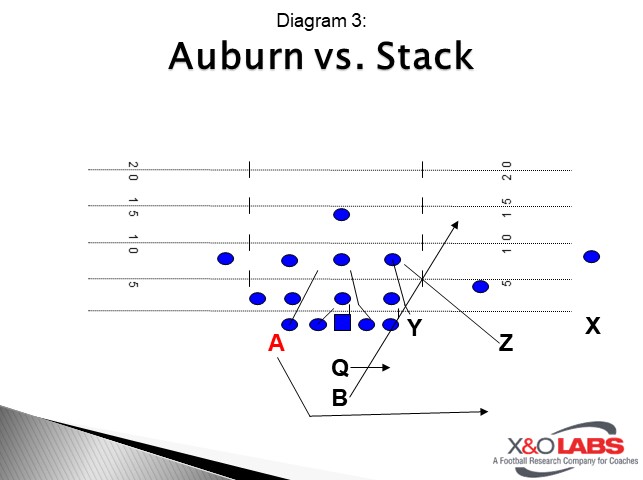
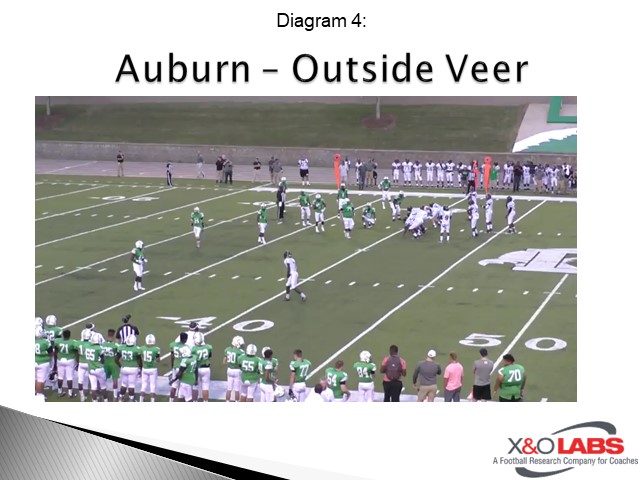
Inside Veer (Bama) / Outside Veer (Auburn) 

Slide1Slide1Slide1Slide1

Back Side Tackle, Guard, and Center: Scoop 

Play Side Guard: Double to the backer. 

Play Side Tackle: BD (B-Gap Double Team to Backer). Against a 4i he will make a “loop” call. 

Tight End (If applicable and play side): Veer release to the backer. 

QB: Bama footwork is simply flipping hips to the side called. The dive key is the first man head-up to outside the play side tackle. The pitch key against a 2-high safety look is the stacked LB. Against 1-high looks, it is the Force Player. His Auburn footwork is 1 big step to the side called. On Auburn, the only change we make is our dive key. The dive key in outside veer is now the last man on the line of scrimmage. Note that we want to “give, unless” meaning give it unless you are 100% sure you can pull it. 

B-Back: Slide stepAiming point in Bama is the outside leg of the play side guard. Once you have cleared the defensive line, your aiming point becomes hash, numbers, and sideline. Aiming point for Auburn is the outside leg of the play side tackle. Once you have cleared the defensive line, your aiming point becomes hash, numbers, and sideline 

A-Back: Pitch relationship is 4×2, meaning 4 yards deep and 2 yards from the QB 

Z-Back: Against a 2-high safety look, he will block Alley defender. Against a 1-high safety, he will crack the box.  

Read More

Whole, Part, Whole Teaching of the H Counter Concept

By Jacob Knight
Offensive Line Coach
Waverly High School (OH)
Twitter: @CoachKnight55


Introduction

At Waverly High School, we are a “hang-our-hat” on being an 11 Personnel offensive team that wants to establish our running game with an inside zone focus. When running inside zone, we do it almost exclusively with our TE on the backside of the run kicking out the backside DE. The counter scheme has become a great changeup off this run look. Over time, counter has become our staple run to counter the inside zone.

Concept Overview

We teach counter as a physical downhill A gap run play. We want our running back to stay in the A gap as long as possible. When we run counter, we typically run it from 11 personnel and with a TE. We primarily live in formations where our TE is aligned directly behind the tackle three yards from the ball; this is our most common formation. During the season, we found different ways to formation this run so we could appropriately tag RPOs with this. For example, we would vary the location of the back as well as mix this concept with jet motion.

Slide1Slide1

To study game film of this concept against Even fronts, click on the video below:

Read More

“Keeper” and “Creeper” Pressure Concepts to Defend Screens

By Zach Cunningham
Assistant Coach
Spring Valley High School (NV)
Twitter: @CoachCunny


Introduction

An attacking defense is one of the toughest things to game plan for and play against. Bringing heat and blitzing a flustered quarterback makes everybody’s job not only easier, but more fun. We all know that a well-executed screen can not only neutralize a blitz package but make the defense extremely cautious throughout the (rest of the) game. We play a 3-4 defense which means we like to bring heat, a lot. We will still bring 5-man blitzes vs teams that have an effective screen game by using our “Keeper/Creeper” concept. This philosophy works whether we are in man or zone in the secondary.

Alignment: For the purposes of this article, I will introduce our “Keeper/Creeper” concept versus a 2×2 formation. In our base 3-4, our DEs are in a tight 5-technique alignment. Mike and Will are basically in a 40-I technique and our Leo and Robber are set at 3×5 off the tackle depending on the width of the #2 WR (Diagram 1).

Slide1

Importance of the Back

We use two main blitz packages in our 3-4 defense. Each of these can adapt into multiple variations. The RB alignment will dictate which linebacker is involved in the blitz in our Ambush and Crash blitz concepts.

Slide1

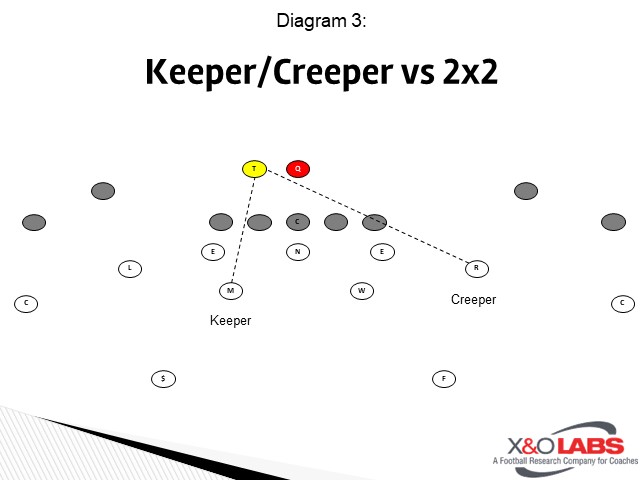
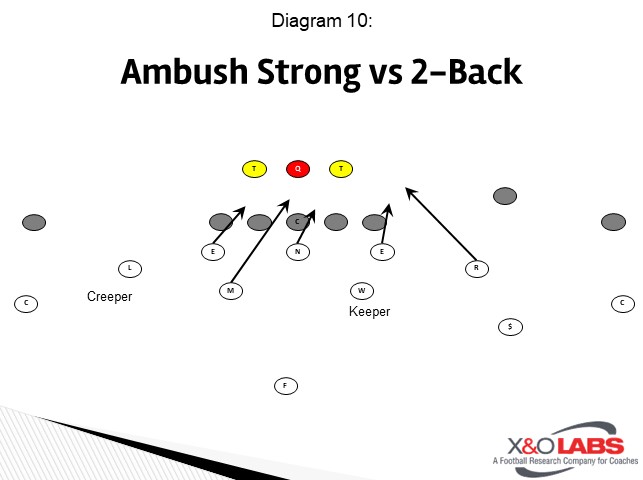
The RB is the key to our pressure game. We can call the blitz however we want (i.e. strength, field, back, etc) but the players need to know how to adjust based on the alignment of the back. In every blitz we have what we call a “Keeper” and a “Creeper”.

  • Keeper – ILB aligned to the side of the RB
  • Creeper – OLB aligned opposite of the RB

Slide3

These two players need to know on every play who is the Keeper and who is the Creeper. The ILB tagged as the Keeper will never blitz. The OLB tagged as the Creeper will still go if he is involved in the call, but he will blitz with caution.

Ambush Blitz

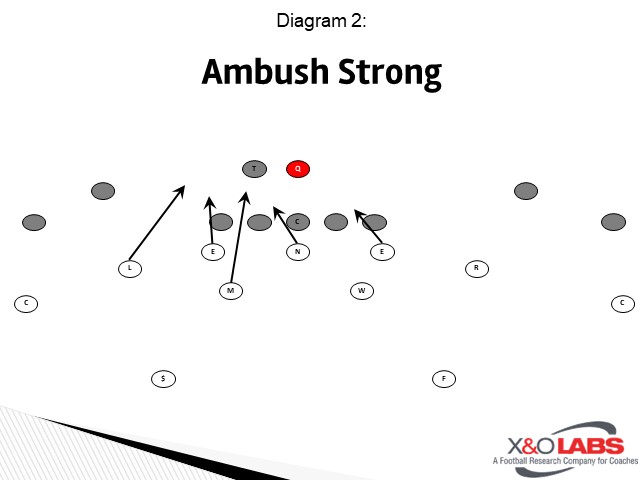
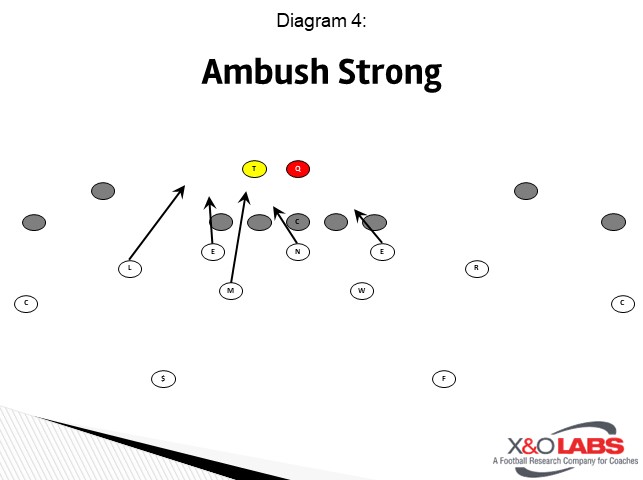
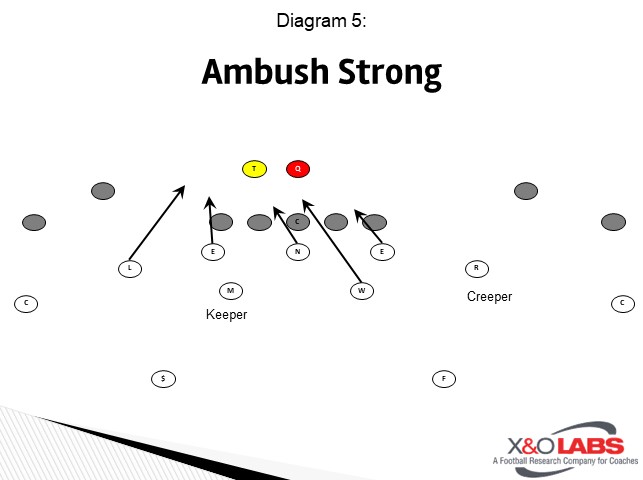
We like to call our Ambush blitz to the strength which against 2×2 would be to the RB (Diagram 4). The Keeper is the Mike called into the blitz and the Creeper is the Robber. The adjustment made is that the Mike will then pass his blitz off to the Will. The Robber is still the Creeper even though he is not called into the blitz (Diagram 5). We still get our 5-man pressure but are not susceptible to the RB screen to a certain side.

Slide3Slide3

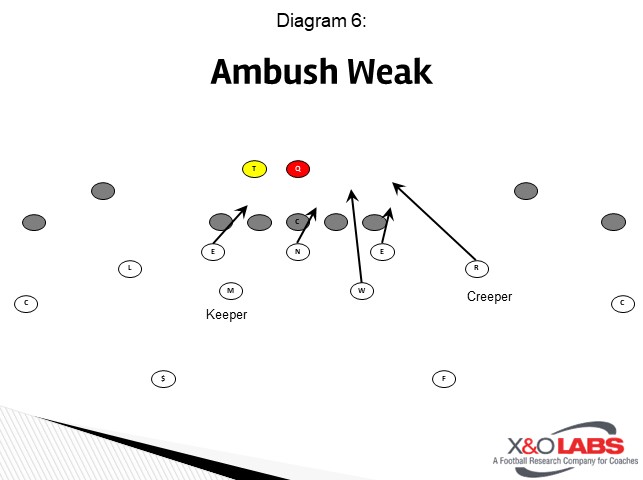
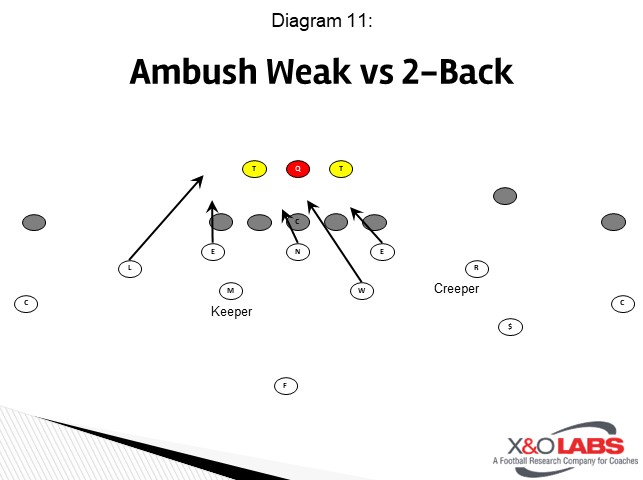
If we call an Ambush Weak against the same look, the Keeper & Creeper rules still apply (Diagram 6). The Mike is the Keeper so the Will is free to continue on his blitz.

Slide6

The Robber is still the Creeper, but he will still go in the call. His technique changes though as he is essentially spying the RB while blitzing. This is done by keeping the proper blitz angle of the upfield shoulder on the QB, but his eyes are tracking the RB’s release. If the RB goes away or stays in to block, the OLB will continue his path to QB. If the RB releases towards him, he will peel off and stay on the back. In doing this we do occasionally lose a blitzer, but it always guarantees us that somebody will be on the RB for screen or any other route he may run.

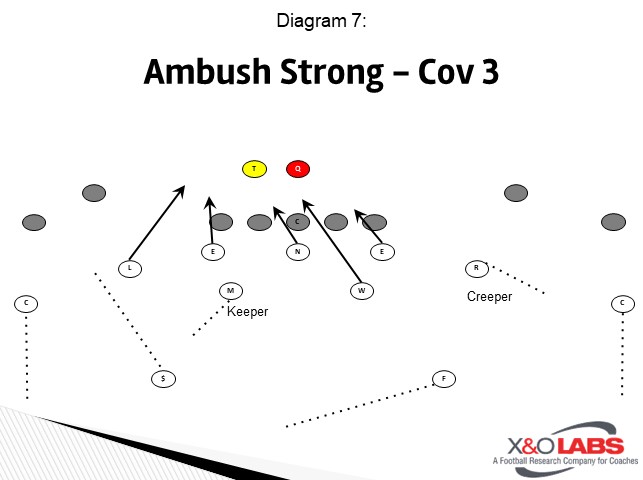
This system is used in both man coverage and zone coverage. In Man, we run a Cover 0 in the 3-4. This is due to not enough skill guys to cover 4 to 5 receivers and it also simplifies everybody’s job. We will use the same exact Keeper/Creeper rules in both Man and Zone. The last thing we want to do is blitz people out of an open half of the field or be outnumbered to a side in Zone (Diagram 7).

Slide6

Variations

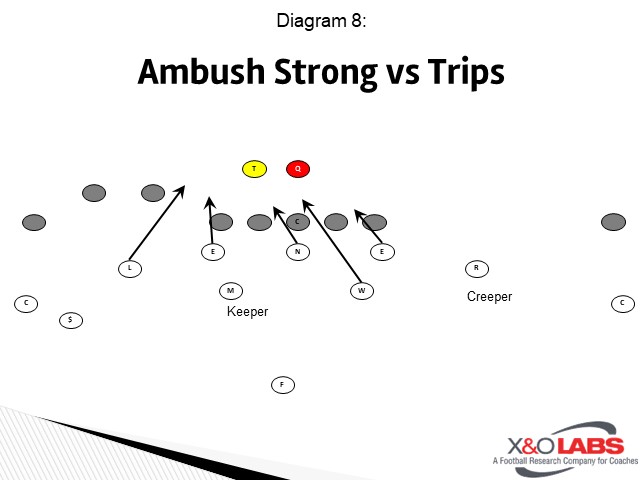
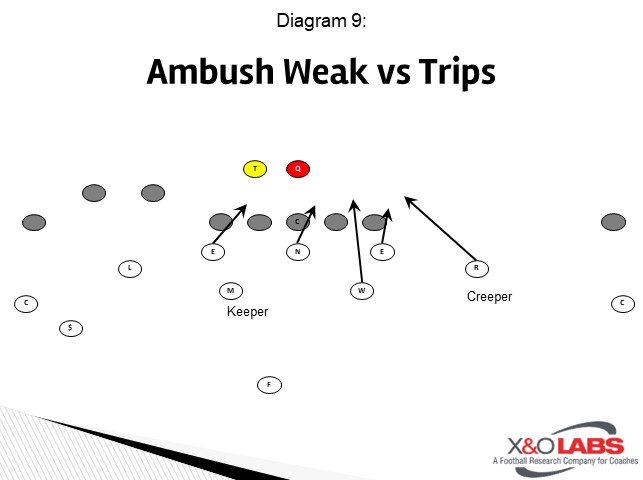
This concept works against every formation. As you will see, there is always a Keeper and a Creeper in every case.

Slide8Slide8Slide8Slide8

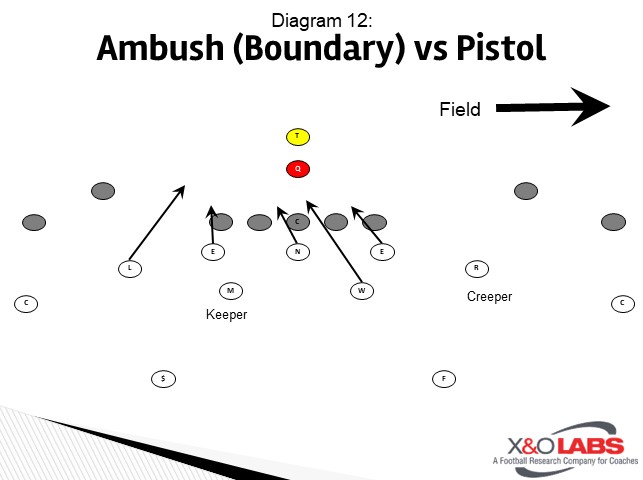
A very common issue that many of us face is the Pistol backfield. One reason offenses do this is, so a defense cannot predicate themselves to the RB. This directly affects our Keeper/Creeper concept. One way we adjust, besides breakdown data, is based on the field and hashes. If the offense is on a hash with a Pistol backfield, we will automatically make the boundary ILB the Keeper and field OLB the Creeper (Diagram 12) The called blitz is still on.

Slide8

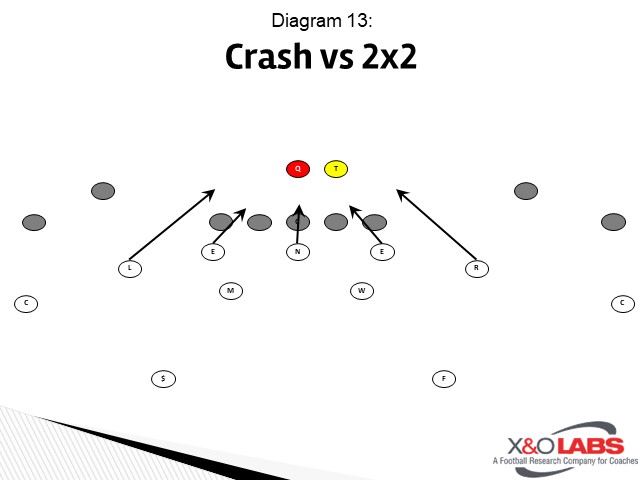
Another variation to this concept is with a different pressure package. We can use the same system when bringing two guys off the edge. This is our Crash blitz (Diagram 13).

Slide13

Here you have a couple options on how you want to defend the RB screen. Since you still have both ILB’s free for RB, you can have only them on Keeper responsibility and let the OLB be free to go. The other option is to maintain the same teaching principles

Read More

Creating a Winning Culture in the Off-Season

By Tony Hurps
Defensive Coordinator/Strength & Conditioning
Berne Union High School (OH)
Twitter: @Coach_Hurps

Introduction

In the majority of my experiences at both the high school and college level of coaching football, I have been tasked or have assisted in turning the football team around into a winning program. In every one of these situations, the project is really about improving the program’s culture. It has been my belief that the only way to do that is by creating change during the off-season.

The majority of my coaching experience has been at small schools, and many of our players play multiple sports (which is encouraged), but also makes it difficult to make sure the players continue to train and build the culture we desire.

As much as we would like to believe that all of our players love football as much as we do, that is just not true. Many of our players do not watch any football at all unless they are watching film with us. Because of this, we are challenged with the task of creating that love in other ways.

Like others, we have faced excuses from players and obstacles to overcome during the off-season:

  • It isn’t fun
  • It takes too much of my free time
  • It is painful to train
  • I am participating in other sports
  • The off-season is “my time”

With that as a background/challenge, I attack the offseason with two main priorities in mind. My number one priority as a coach is to keep my players safe. The second priority is to make it fun. The off-season is a great time to have fun with our players, and that is what we do to help build that culture of trust, effort, competition, and, ultimately, winning. It helps to get players talking about football all year long in a positive light.

Read More

Cardinal Double Team Technique in Gap Schemes

By Gabe Fertitta
Offensive Coordinator
Catholic High of Baton Rouge
Twitter: @fertitta_gabe

Introduction

CatholichighOne of the staples of our offense for 3 years at Catholic High has been the power play. In three seasons, we have averaged calling some version of power over 150 times per season and have averaged 7+ yards per carry. One of the most influential changes we instituted to the fundamentals of our blocking came from our study of Stanford University’s techniques on the front side double team, or what we now call our “Cardinal Technique.”
Coaching The Tackle/Guard Combination on a 3 Technique

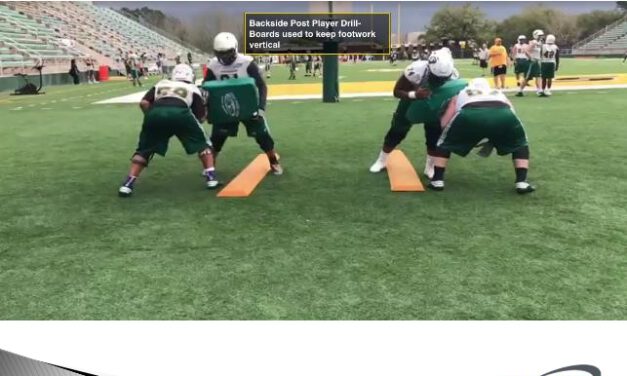
In the past, we have taught traditional footwork for the power double team. The inside (or post man) would take a settle step with his inside foot and work his second step through the crotch of the 3 technique and use “half bench” hand technique. For the most part, this part of the concept hasn’t changed. Our tackles used angle footwork with their backside (non-play side) foot and attempted to “dent” the defense vertically. He used “full bench” hand technique. We taught both the guard and tackle to work the 3 technique as vertical as they could to create a dent in the defense to run power.  Our running back aiming point was and continues to be “A-Gap to Bounce.” We do not allow our running backs to cut back on power unless they score. Stanford’s coaching point on this is “we only cut back for a $20 bill and not a $1 bill.” 

This technique worked well for us and Power was a staple run for us even before we changed techniques.  That said, the wisdom we gained from hearing Coach Bloomgren discuss the technique they use at Stanford illuminated a fatal flaw in how were blocking the front side double team on power. We were asking our guard to work toward a 3 technique in one direction and our tackle to work toward a 3 technique in another. Simple physics tells us that resulting vector from those two forces will not be as strong as if both forces were moving in the same direction. Fixing the angles would allow for more movement at the point of attack.

Understanding the Cardinal Technique

Our “post man” in the double team will still use his “settle – lift” footwork. This is what Stanford calls jab and crotch. However, instead of trying to force the 3 technique vertically, the guard will attempt to “torque” the 3 tech down the line of scrimmage when he feels the “bump” from the tackle.

The tackle uses what we refer to as “high leg shuffle” footwork. This technique assumes that the tackles are in right and left hand stances on the right and left side of the line, his dominant foot will be his inside or post foot. We work a high leg shuffle or gallop technique in which the tackle will attempt to knock the 3 technique over and on to the guard. His first step should still be with his “backside” or inside foot. We look to make contact on the third step of this footwork (although it doesn’t always happen just like that)  We target the hip of the defender and use “half power technique” which resembles old school shoulder blocking. 

When the guard feels the tackle bump the down lineman, he then torques the defender using the force from the tackle and works the DL down the line of scrimmage. If there is not enough initial “bump” to completely torque the DT, the two then work hip to hip on the double team similarly to the way we would teach the power or gap double team before. 

Coaching Points

Aside from the usual coaching points, there are some things that must be emphasized when using this technique. The tackle’s pad level must remain low so that he can target the hip of the DL with the top of his shoulder pad. Although this is what we teach, many times this doesn’t happen. The OT will usually end up being a little too high, but if we teach them to target the hip and the miss a little high we can still win on the double team.

The guard and tackle must also be extremely aware of LB run through in the A gap. If this happens, the guard must come off of the 3 and block down to protect his gap. The tackle then must respond by working from half power to full bench hand technique

One of the benefits of teaching this technique is that it helps the tackle to stay square for the LB when he gets to the second level. Many times in our old power technique, the OT would be turned at a 45 degree angle and would not be able to redirect if he had to come off for the backside LB running over the top of the double team. The cardinal technique allows us to stay squarer longer and makes catching the LB running over the top of the double team a lot easier. By staying square, the tackle also has a much easier time picking up movement from the 3 technique if he were to move from a 3 to a 4 or 5 technique.

We also like to teach the OT (or driver of the block) to not come off the double team early for the LB. Stanford refers to this as “U-Out.” When the LB works hard over the top of the double team, the tackle can simply work a U path to widen the LB past the A-Gap. As long as your RB is patient and presses the A gap, this technique will be extremely beneficial. This technique can also be used between a TE and tackle as well against under defense. The tackle becomes the post man and the TE becomes the driver.  The technique also allows smaller TE’s or offensive linemen to deliver far more force into the down block than previous techniques. This particular technique makes an already physical play much more physical. 

Read More

Lion Coverage vs. Trips

By Chris Endress
Co-Defensive Coordinator/Secondary
Seneca High School (MO)
Twitter: @ChrisEndress1


Introduction

Trips presented us an issue a couple seasons ago because our weak safety was tied into #3 strong for vertical routes (Solo coverage). That left him out of place in his run fits to the weak side and got us in trouble. With the rise of more power read and speed/lead option to the weak side, we needed an answer that kept our Willie (weak safety) to the weak side while still be sound against trips routes. Lion coverage was that answer. It is a quarters based coverage to trips where we will use two deep defenders versus a possible threat vertical threat while remaining solid in perimeter run defense on both sides of the offense.

What is Lion Coverage?

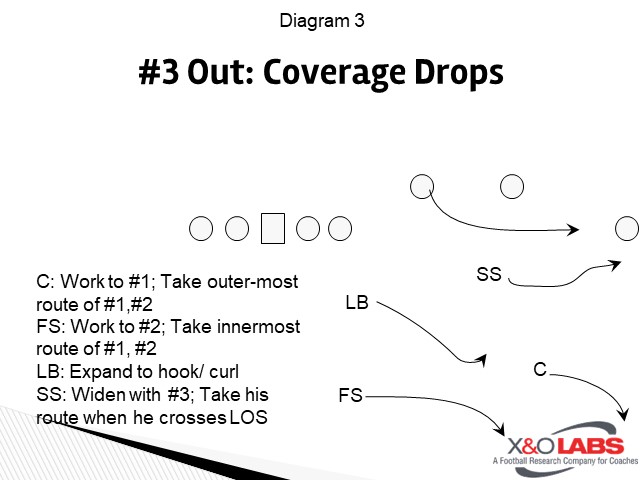
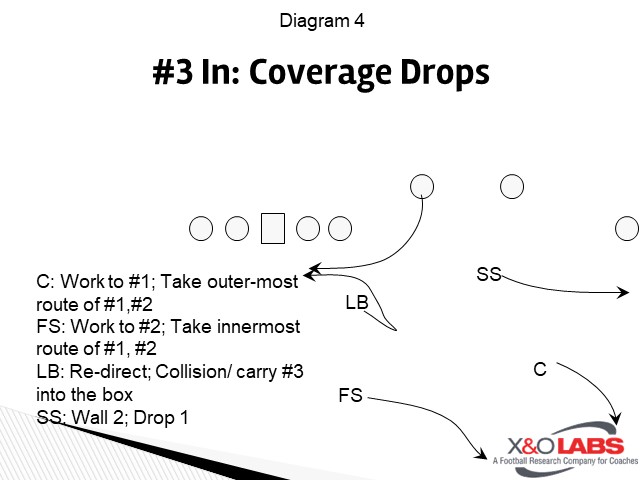
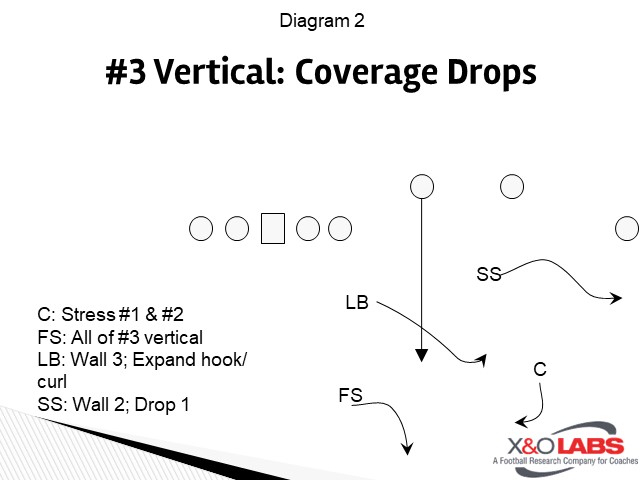
At its core, lion is a split cover concept used against trips formations. It resembles a ¼, ¼ look with two deep defenders. It also has an overhang player responsible flats and force on run and a linebacker expanding under the hook/curl zone and collisioning and carrying the first incut threat.  All the secondary players except for the PSLB are keying #3 to the trips side for keys and assignments post-snap.

Overhang Player: Base Key, Alignment, and Assignment

The base assignment for our overhang player in 2×2 looks is to be force on run and work under #1 on pass read (Drop 1 in our language). He will then pick up any final #3 from the backfield or the other side of the formation. We try to keep our key, alignment, and assignment the same in our base coverages as often as possible for simplicity of teaching and because techniques and fundamentals overlap.

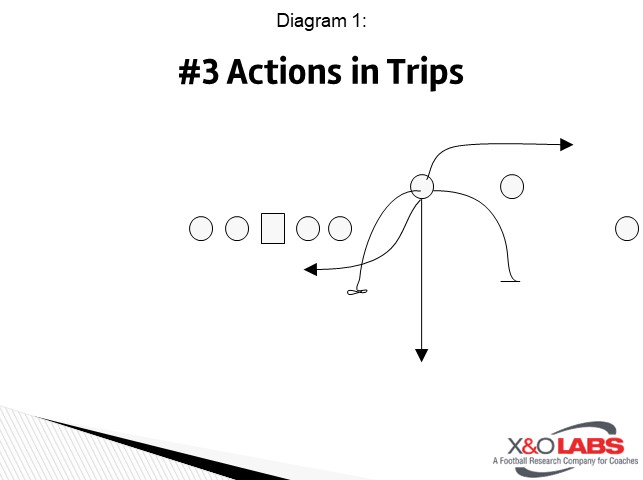
The overhang player aligns 1 yard inside by 5 yards off the #2 receiver.  We base the 5 yards depth from the LOS if #2 is a slot receiver. He keys the #3 receiver for his run/pass key.  We teach the following different actions from #3:

  • Vertical release
  • Outside release
  • Inside release
  • Outside run block (arc)
  • Scoop block

Slide1

We designate any route where #3 is at a depth even with the starting depth of the overhang as a vertical release. That has made teaching a lot easier for overhangs to identify vertical routes.

Slide1Slide1Slide1Slide1Slide1

These are the assignments for our overhang versus each release:

  • Vertical release: Drop 1 (get under #1), walling #2 on a vertical or inside release. Be on alert for a final #3 from the other side (drag or RB out from backfield).
  • Outside release: Expand with #3 walling #2 on a vertical or inside release. The overhang has #3 as soon as he crosses the LOS or the QB throws to him (i.e. bubble, arrow, wheel).
  • Inside release: Same as vertical. Wall 2, Drop 1, alert for final #3.
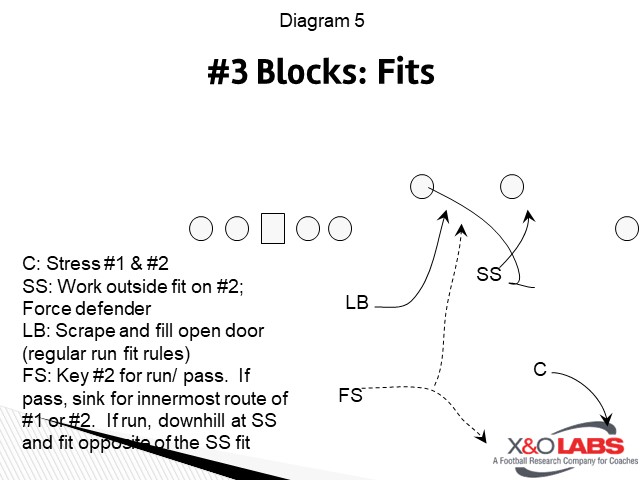
  • Outside run block: Eyes on #2 now! Work for outside fit on #2 because the overhang is now the force defender on run his way.
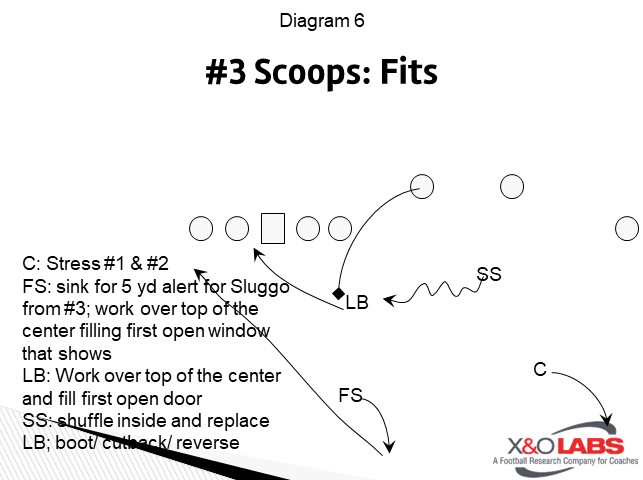
  • Scoop block: shuffle inside the box to replace the nearest LB. The flow is away and the overhang is now responsible for cutback, bootleg, and reverse.

PLSB: Base Key, Alignment, and Assignment

The base assignment for our PSLB versus trips is align toes at 5 yards apexing the #3 and the ball.  This stays the same even if #3 is a TE because the PSLB will need to widen slightly because of the trips but not too far from his original alignment. In a trips look, the LB will be cross-keying the QB and the RB. He keys the one furthest from him for run/ pass. In our pass defense, we account the LB as a ½ a pass defender because he is a run first player in our run fits.

Depending on our front alignment, the LB could be responsible for A or B gap to his side on runs his way. We keep try to keep his run fits the same regardless of fronts, and in our base coverages, the LB pass rules are always the same:

Read More

Pairing the Peek RPO with Power, Counter and Pin and Pull Runs

By Pete DeWeese
Offensive Coordinator / QB Coach        
Sprayberry High School (GA)
Twitter: @petedeweese

Introduction

The 2017 season marked a season of change for me and my team. After calling defenses for the past 6 seasons, I moved to a new school with an almost entirely new staff. Along with that change, I returned to the offensive side of the ball as the QB coach and Offensive Coordinator of the Sprayberry Yellowjackets. My hope was to take many of the schemes and formations that had given me fits as a defensive coordinator and to develop them into a sound offensive system that fit our kids.

For the team, the offense was an adjustment. In the years prior, the team utilized only a few formations and schemes. Our staff knew that we were asking them to do more, to learn more, and to execute more than what they had been asked to do the previous season. On top of that, the program had just lost an excellent senior class and we knew that we were going to have to rely on many young players with limited varsity experience. As an offensive staff, we knew that we wanted RPOs to be a big part of our arsenal. With that, we understood that we needed versatile RPOs that were easy to teach and easy for young players to grasp and execute. That is why we focused on the “Peek” RPO tag.

Why Peek?

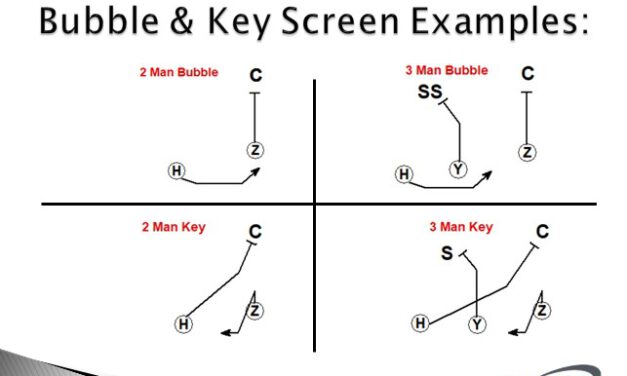
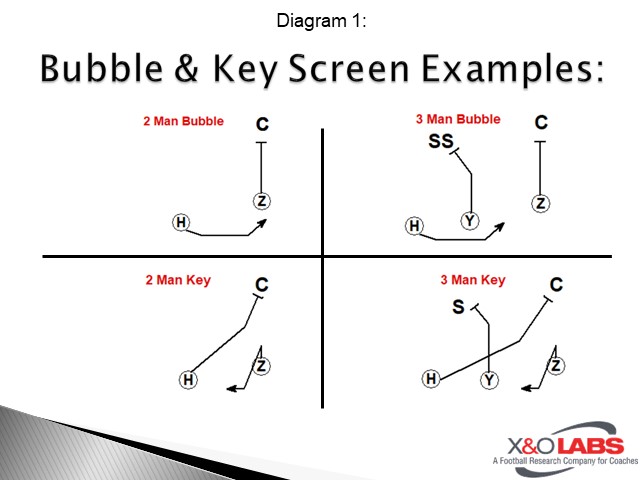
Like most teams that utilize RPOs, we installed perimeter screens as part of our run game. With every run play that we installed, we had screens that were part of a pre-snap read for our quarterback. Depending on the formation, we had the ability to utilize bubble screens to the 2nd or 3rd receiver in a formation. We also had the ability to throw key screens to 1st or 2nd receiver in a formation.

Slide1

These screens are effective ways to help an offense move the ball and stay on schedule. As a DC, there were few teams that ever scared me when they were throwing the screens. I always felt that there were ways that I could leverage the screen and take it away pre-snap. When you combine that with the knowledge that bigger/stronger/more athletic DBs do more than level the playing field, I started looking at RPO tags that allowed us to throw forward passes (not lateral) in a timely and efficient manner. Our peek RPO tag proved to be just that. 

What Is Peek?

We first installed peek for use in our 3×1 formations. Over time, we adapted the tag to use with almost any formation that gives us 2 or 3 receivers on one side of the formation, regardless of personnel.

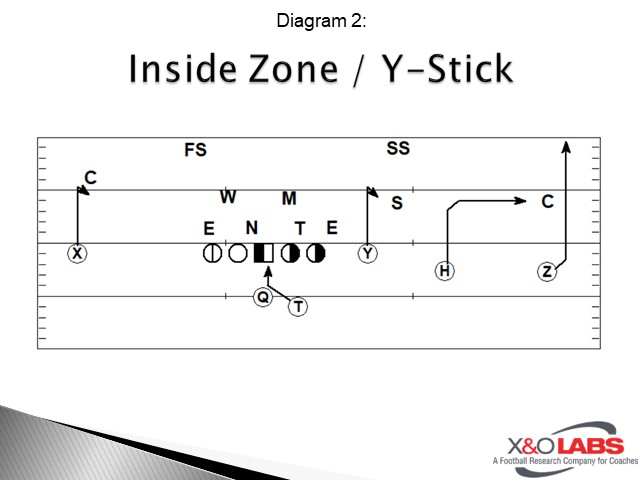
During our spring football instillation period, we had some success throwing Y-Stick off of our Zone Read run game. While the play had early success, our staff agreed that it was too easy for a defense to leverage the stick route and maintain a numbers advantage in the box.

Slide2

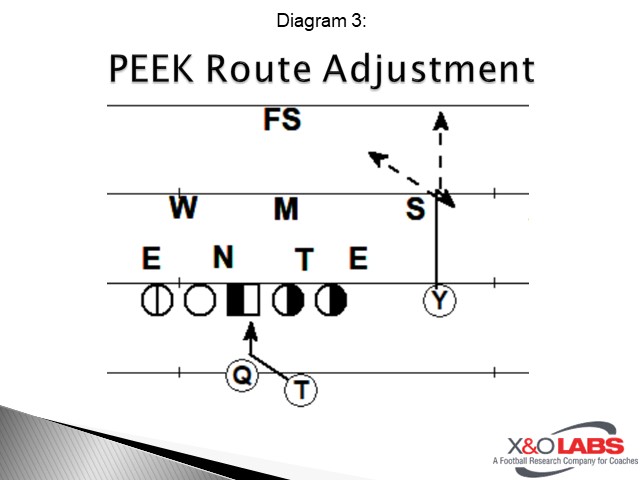
Our staff decided that we needed to find a way to take advantage of any LB or safety that is trying to cut or rob the stick route by giving our WR an opportunity to bend his route to open grass and find the void created in the defense.

Slide2

Read More

Adjusting the Pop RPO to Attack Man Coverage

By Mark Holcomb
Head Football Coach
North Davidson High School (NC)
Twitter: @FootballHolcomb


Introduction:

As our program has delved into the world of RPOs the past 5 seasons, we have added many concepts to our offense, but none have been more productive and easier to install than the Pop Pass. We did not have to change any concepts for our offensive linemen which are the most important part of any offense. This article will focus on formations, reads, and wrinkles we use to make this play as successful as possible and it remains a mainstay of our offense.

We run the Pop pass concept with a variety of run looks. Below I will detail the Iso, Counter, and Truck concepts as they relate to the Pop pass.

Isolation Play:

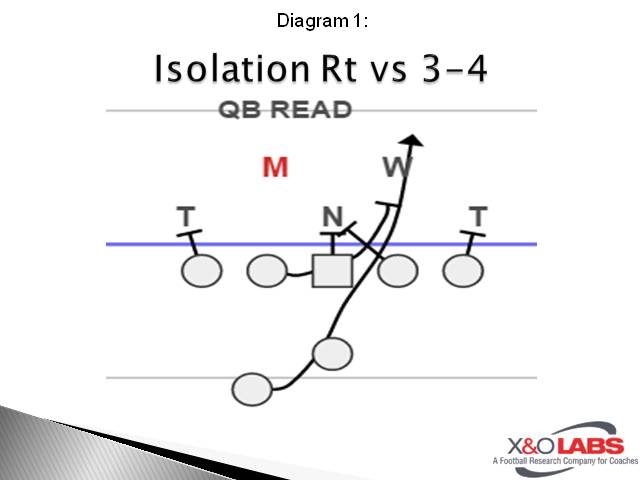
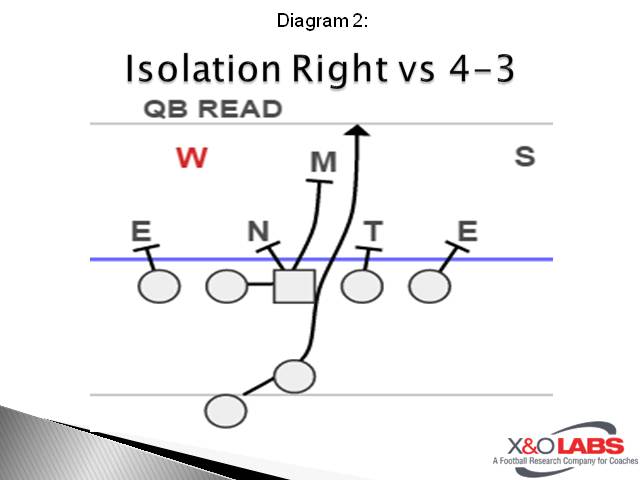
The isolation play is a simple fold play with the back side guard pulling into the open gap to lead up or isolate on the play side linebacker. The play side Guard and Tackle will simply zone or fan block based on the front and open gap. Against a shade Nose, the play side Guard will block down because B gap is open. The Center has the job of blocking back on the first down defender on the backside.  The back side Tackle must make sure there is no penetration by the Defensive Tackle or Defensive End into the B gap. There are numerous adjustments that can be made against slanting fronts and blitzes.

The main adjustment we use against blitzing Linebackers is to make a “zone” call and the Offensive Line will zone block and there will be no pullers. This read is usually is fast and easy for the QB because the zone covered by the Linebacker(s) will now be open for the Pop pass. Below are the most common fronts we see and the blocking assignments against each.

Slide1Slide1

Counter Play:

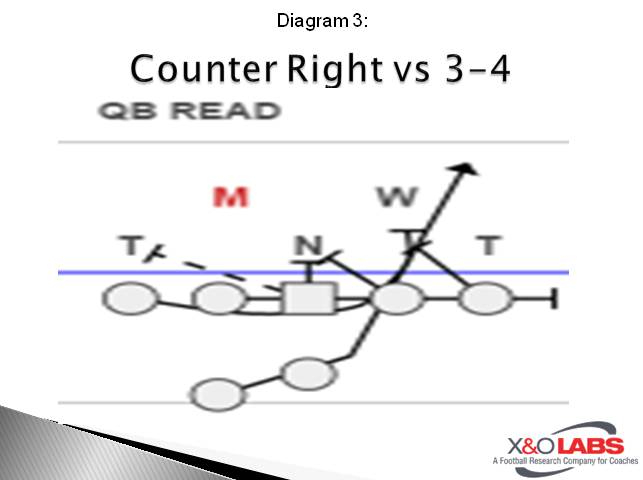
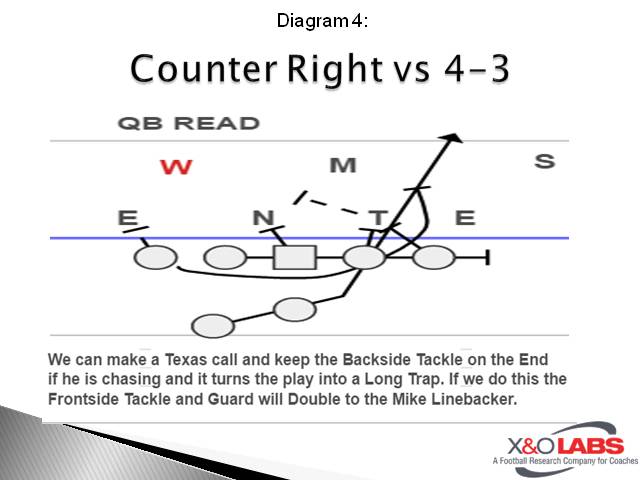
The Counter has always been a staple of our offense no matter whether we were in a Pro I offense or the Spread. The rules remain the same for the front side and back side no matter what front we are facing. The front side rules are “Gap, Down, Backer” and we double everything we can to the back side Linebacker who is our actual “QB Read” on the play. The Center has the job of blocking back on the first down defender on the backside. The back side Guard will pull and maintain a track into the line of scrimmage and attempt to “dig out” the Defensive End to the play side. The back side Tackle will pull and fit in the line to the front side Linebacker. We drill each week against teams that will use the “squeeze and spill” technique with their defensive ends. Against that technique, our back side Guard will log the Defensive End and the back side Tackle will continue on the outside of the Guard to the play side Linebacker.

The main adjustment we make on the Counter is against a chasing back side Defensive End. When we see this, we simply make a “Texas” call which locks the back side Tackle on the back side Defensive End and the play is essence becomes a long trap by the back side Guard. We will also try and double the front side Guard and Tackle to the front side Linebacker in the event of a give read by the QB. Below are the most common fronts we see and the blocking assignments against each.     

Slide3Slide3

Truck (Pin/Pull) Play:

The Truck play is the new version of the old Packer Sweep but is used now as a change up to the Outside Zone play. We will typically not take both the Truck play and Outside Zone play into the same game plan. As a staff, we will decide if we can reach the Defensive End. If we can, we will run the Truck play with the advantage of pullers as lead blockers. If we cannot reach the Defensive End(s), we will run the Outside Zone and reach to widen for the cutback by the Running Back. 

Our Truck play has simple rules except for the play side Tackle. The play side tackle will reach block the Defensive End and attempt to set the edge. All other players have the same rule which make this a simple play to implement.  If the player has a down block they will take it and if they do not have a down block they will pull to the play side. For example, if you are running the play against a 3-4 defense that is not slanting the assignments will be as follows:

Read More

Utilizing Shifts & Motions in Situational Football

By Brian White
Offensive Coordinator
Rose-Hulman Institute of Technology (IN)
Twitter: @CoachWhite_RHIT


Introduction

Our offense is based on playing fast. We want to snap the ball as quickly as possible as often as possible. In a play fast offense, success breeds success, meaning that first downs must be achieved in order to keep up the pace and continue to snap the ball quickly. For example, we find it ineffective to use a Green Word, or 1-word play call, after an incomplete pass or rush for a short gain. Another issue that all play fast offenses must addresses is how to attack the defense during a four-minute drive. Our staff has found out the hard way that continuing to play fast while protecting a late lead can sometimes allow the opposition to get back into the game. On the other hand, the unfamiliar mechanic of calling plays from huddle and approaching the line of scrimmage deep into the play clock can disrupt the rhythm and execution of your own offense.

With these two thoughts in mind, a major addition to our offensive package this season was the use of shifts and motions. This package allowed us to still line up quickly and give the threat of snapping the ball then rapidly changing the picture that the defense sees. One of the major benefits of this pre-snap movement was the amount of communication that the defense was forced to make. This mimicked the effects that playing fast on a defense, by giving them a very short period of time to diagnose the formation, then the new formation, and make their calls and adjustments.

We also found that the use of shift and motion was effective in disguising some of our top plays.  Through self-scout, we found some major down and distance and formation tendencies. The use of shifts and motions helped us runs plays that our offense is comfortable executing while not allowing the defense to lock in on their call. This is especially useful on 3rd down calls.

Mechanics

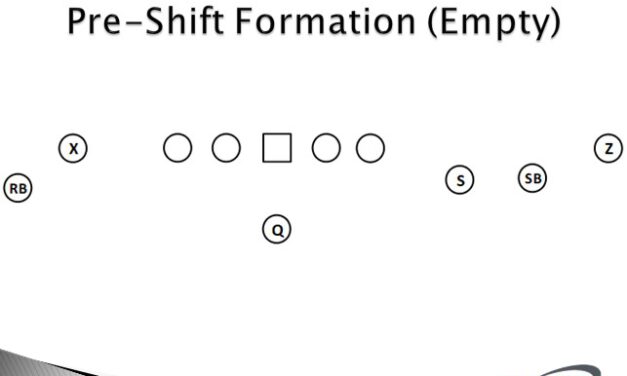
All of our shifts start in an empty formation. This causes a defense to get out of the call that they wanted to play and forces them to make their empty check. In addition to the formation signal, the movement (shift or shift with motion) will be signaled as well as the play. All formations, shifts, motions and plays are identified by a single signal; so the combination of formation, movement and play is accomplished with a minimal amount of signs.

In our base offense, we align with a RB in the backfield, left and right side outside receivers, a slot WR to the field and a Superback that adjusts his alignment to the formation called. When shifting, we will call one of our one-word empty formations then signal the shift in. All players know to end up aligning in their base alignment, with the Superback adjusting to the new formation. The RB will motion into the backfield in an alignment based on the play called. We want to place the most stress on the defense by having our Superback align opposite where the shift will bring him. Many defenses that we see like to make their formation strength call to the location of our Superback. Having him cross the formation results in the maximum amount of defensive communication and personnel movement.

Repeat

In our regular offensive procedure we will use a “repeat” word to execute the same exact play from the same formation immediately after the whistle ends the previous play. We will use this after an explosive play in an attempt to get the same result, assuming that they defense will either have to make the same defensive call or not even be ready to play. If we “repeat” a play that includes a shift and motion, the shift and motion should be repeated as well, as the second play is an exact duplicate in the first.

Read More