Varied Screens Through Simple Offensive Line Rules

By Matthew T. LemMon
Head Football Coach
Tamalpais High School (CA)
Twitter: @tamhighfootball


The idea behind all our screen concepts is that the Offensive Line will run their screen tracks the same way on each screen type, except our middle screen.  The idea behind this is to limit the amount of teaching to our offensive line and limit the input they must process before running their tracks.  The concept tries to create a funnel with lead blockers to attack a potentially weak piece of the defense to give the receiver a clean lane to the endzone.
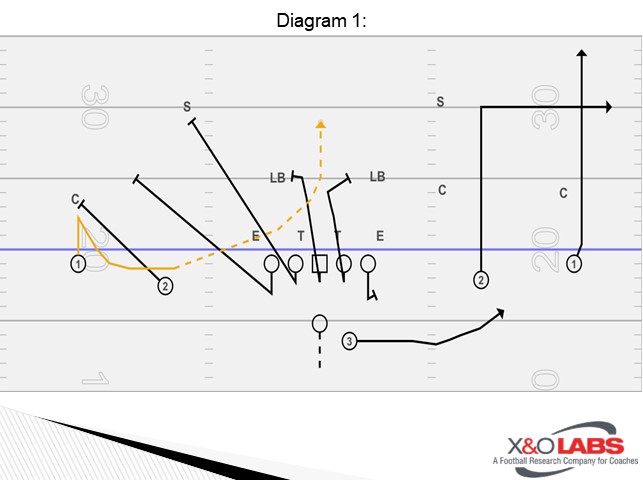
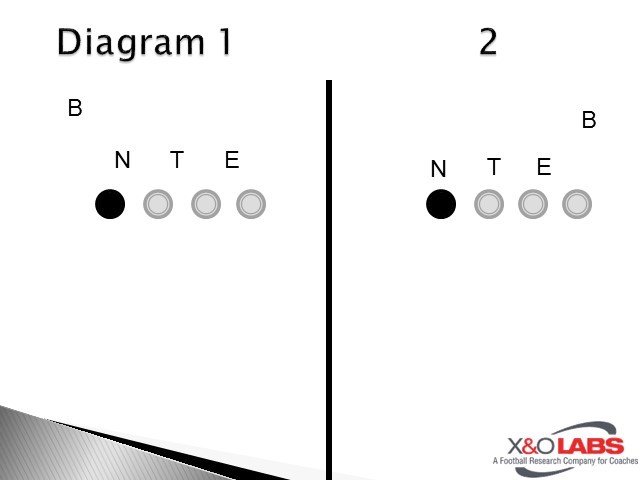
Diagram 1


The simplest way to break down the process of our screen is by each position on the Offensive Line and how they process who they are to block and at what angle is most effective.  We will go through each position and then include how we teach and coach our middle screen concept.  We teach three tracks for the Offensive Lines, they are Sidewalk, Alley and Kill.  These three tracks will be explained throughout the article. 
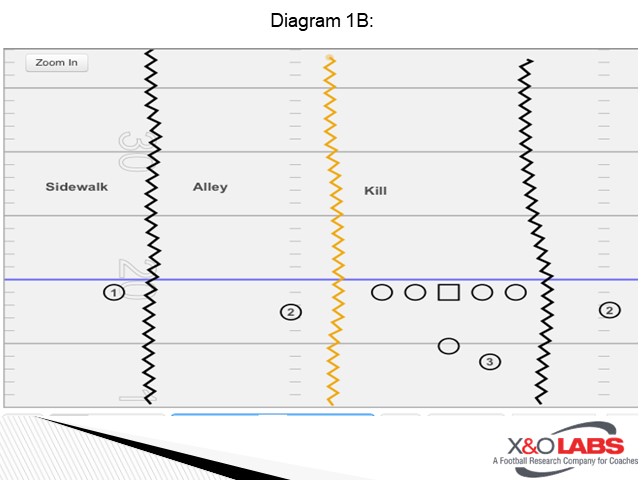
Diagram 1B


Play side Offensive Tackles:

We teach our offensive tackles are coached to take two and a half kick steps (this can alter depending on the speed of the Offensive Tackles on your team, quicker guys may need to take three or more kick steps, while slower guys may need only to take one kick step – timing is everything) and throw their hands violently in an attempt to convince the defense they are indeed pass blocking. 

After these kick steps, they should look to attack what we call the “alley” – this is the area between the farthest defender and the hash.  Before the snap of the ball, the Offensive Tackle should identify the first defender in this area between the depths of 5 and 15 yards, so that we may know exactly who our aiming point is and how they might move to the play.  Usually, this individual is either the Overhang defender or the Safety to the side of the screen. 
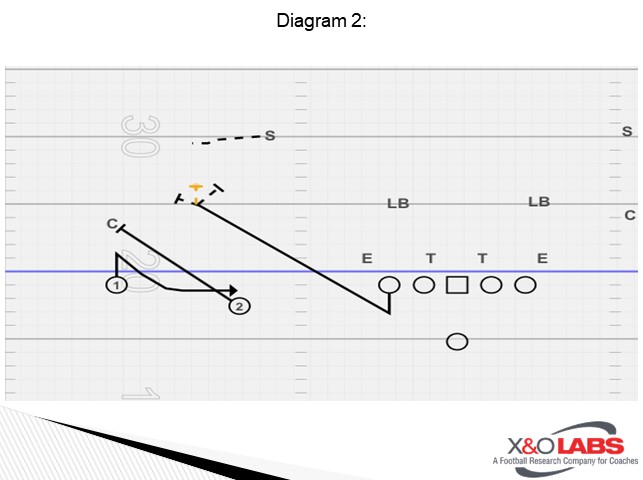
Diagram 2


If we are dealing with a defender that is in-between the depths of 5 yards and 8 yards, our goal is to attack the upfield shoulder.  So, if we are running a screen to the right and the overhang is located at 7 yards depth, then we would attack his right shoulder looking almost to kick him out and ride him to the sideline. 

If we are dealing with a defender at a depth greater than 8 yards, our goal is to simply attack the middle of the defender, usually a safety, and force him to choose a direction and wall him off in that direction.  If he bananas greatly in one direction, simply basketball shuffle to help create the funnel.  


Play Side Offensive Guard:

The offensive guards will take one and a half kick steps and pump his arms as if he is pass blocking.  He needs to sell the pass block as most of the Linebackers in our league are reading the guards for their keys. 

After their kick steps, they should look to what we call the sidewalk, which is the farthest defender away from the offensive line and closest to the sideline.  Offensive Guards should identify three things before the snap: how many defensive players are within 5 yards of width to the outside receiver, how deep these defenders are, and if there is one or less defender, who is the next most immediate threat to the play.  We have to recognize how they might move on the play when the movement begins to happen.  This defender will likely be the safety to that side, the overhang defender, or the corner depending on what formation we are using.
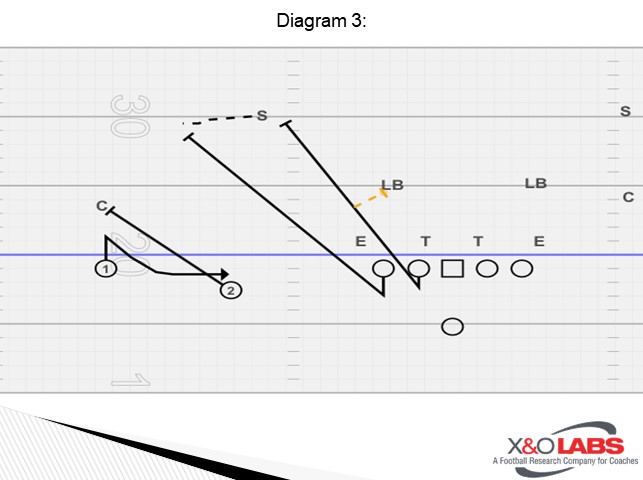
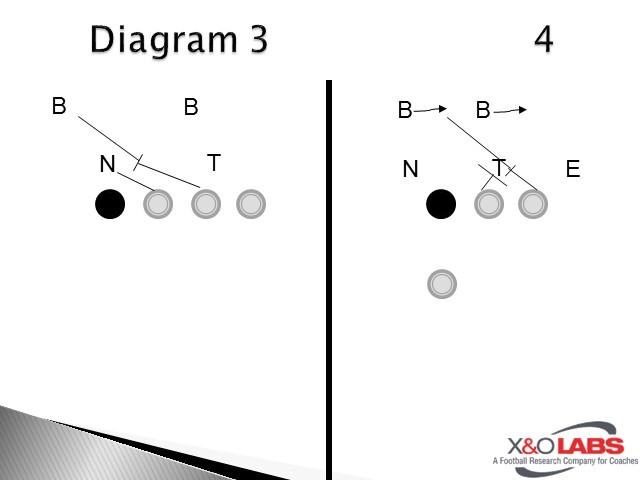
Diagram 3


If we are dealing with a defender that is in-between the depths of 5 yards and 8 yards, our goal is to attack the upfield shoulder. So, if we are running a screen to the right and the overhang is located at 7 yards depth, then we would attack his right shoulder looking almost to kick him out and ride him to the sideline. 

If we are dealing with a defender at a depth greater than 8 yards, our goal is to simply attack the middle of the defender, usually a safety, and force him to choose a direction and wall him off in that direction.  If he bananas greatly in one direction, simply basketball shuffle to help create the funnel.  


Center:

The offensive center will take one and a half kick steps and pump his arms as if he is pass blocking.  He needs to sell the pass block.
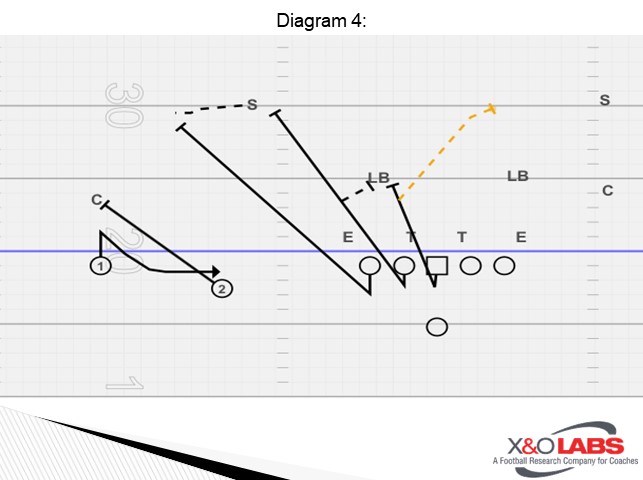
Diagram 4


After these kick steps, they should look to attack what we call the “alley” – this is the area between the farthest defender and the hash.  Before the snap of the ball, the Offensive Center should identify the first defender in this area between the depths of 5 and 15 yards, so that we may know exactly who our aiming point is and how they might move to the play.  Usually, this individual is either the Overhang defender or the Safety to the side of the screen. 

Read More

The Bounce Post Technique to Defend QB Run, RPOs, and Modern Offenses

By Woody Blevins
Special Teams Coordinator/Cornerbacks Coach
University of Northern Colorado
Twitter: @CoachWoody2


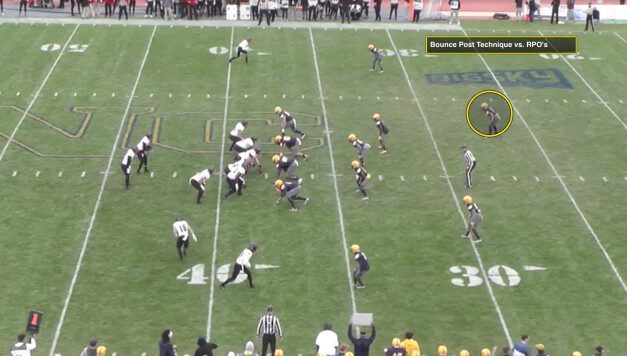
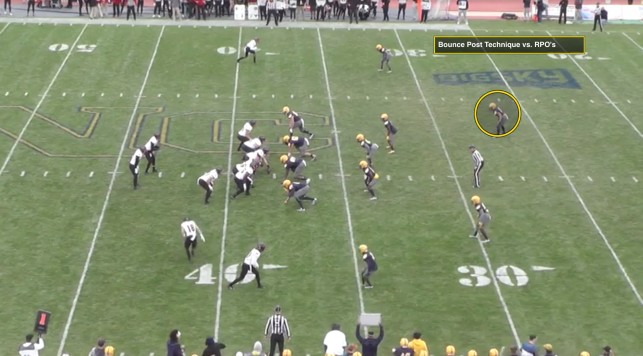
Offenses are more dynamic than ever. With the increasing popularity of the Quarterback (QB) Run Game and RPO’s most defenses have begun to favor 1-high coverage structures. As most of us know, 1-high coverages take defenders out of run/pass conflicts. While 1-high defenses are one of many solid answers to defend modern offenses, one of the most important parts of single high defense remains out of date: the post technique. In this report, I aim to uncover the major chink in every 1-high defense’s armor and teach you how to fix it by updating your post technique. A change in how you teach your post technique will help you effectively defend QB Run, RPO’s, and modern offenses. At the University of Northern Colorado (UNC) we call that post technique the Bounce Post.


THE PROBLEM: IT’S IN THE NUMBERS

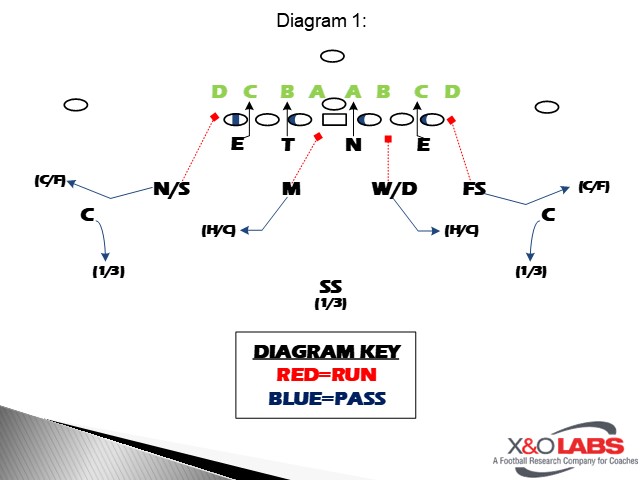
Before we begin discussing the Bounce Post technique it is imperative that we understand some of the strengths and weaknesses of 1-high defenses, specifically as it pertains to the run game. Let’s begin with its strengths. Any coverage which closes the middle of the field (Middle Of The Field Closed: MOFC) has at least eight defenders in the run fit. I would be hard-pressed to find a defensive coach on the planet who does not agree that 1-high defense is excellent at stopping the run. As we see in the diagrams below, any 1-high coverage has the same, gap sound fit.

Diagram 1


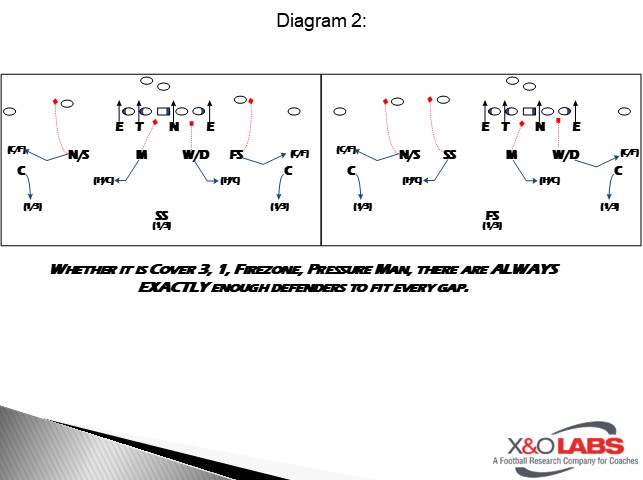
In the next diagram you can see that even though the formations are spread, 1-high defenses are still GAP SOUND.

Diagram 2


Another fact that is noticeable from the previous diagrams is that while 1-high defenses are gap sound, they also take defenders out of run/pass conflicts. For example, Curl/Flat (C/F) defenders are always relating to their #2 threats. Hook/Curl (H/C) defenders are always relating to their #3 threats. Regardless of coverage (3, Match, 1Rat, Fire Zone, Man Free, etc.) we always have every receiving threat covered and out of run/pass conflicts. 

It is clear that the strength of a 1-high defense is stopping the run, but its biggest weakness is hidden. The glaring issue with the 1-high defense is clearly revealed when we take a look at it from a different perspective. As I – and the diagrams above – have made abundantly clear, a 1-high defense is gap sound; however, it is not hat sound. To demonstrate my point, let’s take a look at the numbers of the run fit:

Diagram 3


Yes, you read that correctly. The offense has one more player in the box than we have. Why is this important? Well, to illustrate this efficiently please take a peek at the next diagram:

Diagram 4


When you factor the QB into the run game, 1-high defenses are outmatched. While defenses that close the middle of the field may be gap sound, they are not HAT SOUND. Essentially, the defense is playing with 10 people in the QB run game and the offense is playing with 11. It is also important to note two additional flaws brought about by QB Run game…

In Read Zone, the offense is putting arguably their best athletes in space (their QB) against a Defensive End (DE) [arguably one of the defense’s lesser athletes in space]. While we use a squeeze scrape to put a LB on the QB, offenses have started to adjust to that technique in many ways. The most common way is to kick out their tackle on the DE. This places two defenders outside the tackle and no one in the now open B-gap. Offensive adjustments to squeeze scrape are starting to become very effective in making it obsolete as a fix-all answer for Read Zone. Regardless, below is a clip of us using a squeeze scrape technique in an effort to put a better defensive player (he went to an NFL Mini Camp) on their QB in Read Zone.

The clip below best illustrates this coaching point:

Read More

Combination Coverage in 5-man Pressures

By Grant Caserta
Defensive Coordinator/LBs Coach
Illinois Wesleyan University
Twitter: @gcaserta1


5-man pressures have become the go-to blitz of choice for us here at Illinois Wesleyan. Not only do they carry less risk than 6 or 7-man pressures, but they also offer the opportunity for us to be creative with our scheme, and flexible with our personnel. We can devise plays that attack weaknesses in protections and create positive matchups for us. We can be endlessly innovative with how we bring our 5 rushers. Using just a handful of techniques, we can give the offense the appearance of many different blitzes, while keeping things simple for our defensive players.


Two Read Coverage (Tex vs. 2×2)

I believe any pressure is only as good as its coverage. If there are wide open receivers running around, the ball will be out too quickly for the rush to get home. Although we have multiple different coverage options behind 5-man pressures, I will focus on just one, Tex. We will use Tex most often when blitzing one linebacker out of our 4-2 base defense. We also use it when blitzing two linebackers out of our 3-3 package. We like to use Tex for a few reasons:

  1. It can be used with any kind of 5-man pressure pattern involving a linebacker
  2. It uses coverage techniques that we already use in base coverages
  3. We can cover 4 verticals
  4. We can disguise our pressure well


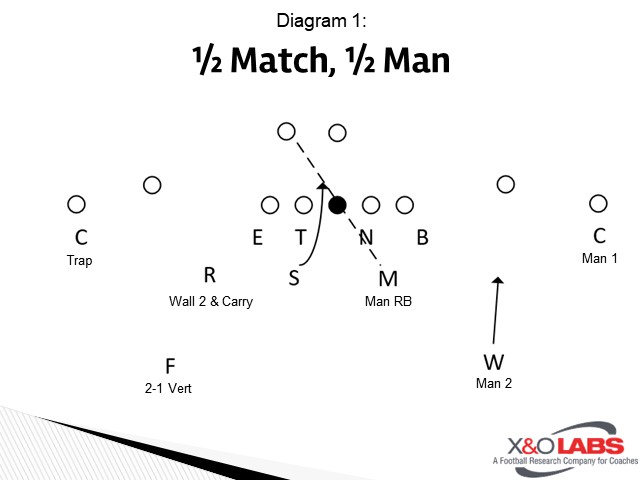
In simplest terms, Tex is a combination coverage. It is like 2-read/Palms (man match) to the field and man to the boundary. There are only 4 coverage techniques involved in Tex. In our lingo, they are:

  • 2-1 Vert
  • Trap
  • Wall 2 and Carry
  • Man


Diagram 1


2-1 Vert:

The deep safety will be the 2-1 Vert player. He is aligned 1×10 outside #2 (can be wider if there is a large split between #1 and #2). He is keying #2 to #1.

We teach all man match coverage players to look for 3 types of routes: vertical, in or out.

On a vertical route, the safety will man #2. He needs to understand there is no post help. If #2 breaks to the post, he must work to get to the top shoulder (downfield) of the WR and cut him off. If #2 breaks outside after his vertical release, the safety must maintain his outside leverage.

On an inside route (under 5 yards), the safety will rob #1. Our coaching point to the Safety when robbing #1 is to look to undercut inside breaking routes (dig, curl, slant). If #1 goes vertical, we want to take an angle to cut off the WR down the field.

On an outside route (under 5 yards), the safety will call “out, out” to the corner and man #1. The safety must take a top-down approach to #1. If his angle to #1 is too shallow, there will be no recovering on a fade/go ball.


Trap:

The corner will be the Trap player. He is aligned in outside leverage on #1, pressed up. He is also keying #2 to #1. The corner is playing #1 man to man, unless he sees #2 coming to the flat (or hears the safety call “out, out”. This is a technique that takes a lot of practice, especially if it’s being done from press alignment. Our coaching point to the corner is to keep his eyes on #1 on the initial release off the ball and steal a peek back to #2 while he is executing his press technique. As you can imagine, this takes some getting used to by the corners. However, even if the corner doesn’t see #2 coming out, he must trust his safety to make the “out” call to alert him to come off #1.


Wall 2 and Carry:

The overhang player will be the Wall 2 and Carry player. His alignment is apexed between #2 and the offensive tackle. He will key the OT for run/pass but can be late to the run. The Wall 2 and Carry player will read #2 if he gets a pass read. His responsibility will be based on the route of #2. 

On a vertical route, the overhang will be a “Wall 2” player. He is going to carry #2 to about 12 yards while looking for an inside breaking route from #1. If #1 is coming inside, he will leave #2 and cover #1. If #1 does not come inside and #2 continues vertical, he will settle around 12 yards and eye the QB.

On any inside route (any depth), the overhang will carry #2 across the field. He has him, man, to man on any type of in-breaking routes (drag, slant, dig, etc). On an outside route, the overhang will rob #1. We will use the same coaching point as I mentioned when describing the safety’s “rob” technique. The main difference is we will not expect the overhang to cut off a vertical route by #1.

Read More

Altering Sprint Draw Blocking vs. Multiple Fronts

By David Porras Jr.
Offensive Coordinator
Roma High School (TX)
Twitter: @deelow127


Teaching gap blocking schemes in your offense can help add new wrinkles to your offense.  Gap blocking allows our offensive line to understand exactly whom to block in any front.  If your offense runs sprint out passing plays, installing a sprint draw to your offense will help you keep defenses honest. Our sprint out passing plays are very important to our offense, so adding a sprint draw play was a must. We run our sprint draw typically when we have a long yardage situation and/or against teams that are not as aggressive with their blitz packages. Sprint draws are also another great way to get the ball to your running back showing full flow and countering back. In addition, sprint draws are another great play to attack bubbles in defensive fronts.


Reasons to install a sprint draw into your offense.

  1. Great way to attack defenses that rotate their coverage to your strength.
  2. Shows full flow in the backfield and countering back.
  3. Great against aggressive pass-rushing defensive ends.
  4. Protects your sprint out passing game
  5. Creates great angles in your blocking scheme.
  6. Simple scheme


Coaching Points vs 3 common fronts:

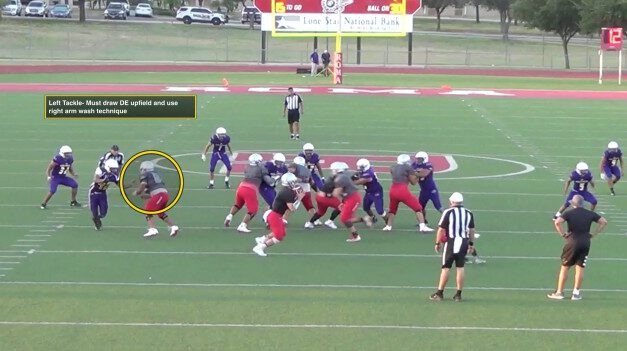
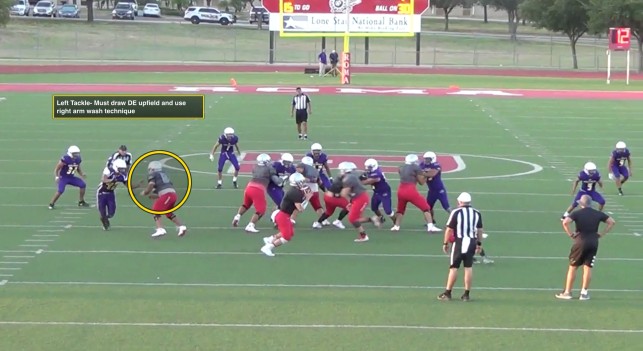
4-3 Defense: the main coaching point when we face a 4-3 front is the left tackle inviting the defensive end to go up the field which allows us to open up the gap even more.

3-3 Stack Defense: the main coaching point when we face a 3-3 front is getting our down blocks and not allowing any penetration by any down linemen.

50 Defense:  the main coaching point when we face a 50 is again the left tackle inviting the defensive end to up the field.

Read More

“Sugar” Huddle Directives and Communication Process

By Cameron Cox
Offensive Coordinator
Refugio High School (TX)
Twitter: @CoachCamCox


If you’re like me, when the dust settles at the end of a long football season, hardly any time passes before you begin searching for any small addition, or change, to improve your scheme. It may be something as simple as a new passing concept, or a small, new, series of plays. Often, the addition/change ends up fading away; for one reason or another, it wasn’t quite as good for your team as you thought it would be. However, other times the addition/change ends up being a home run. The process of designing and implementing the sugar huddle into your offensive scheme takes patience and commitment, but for us at Refugio High School, it was a grand slam.

Overview

The sugar huddle is a tight, well organized, huddle set up approximately 2-3 yards from the line of scrimmage. When the huddle is broke, offensive players sprint to the line and the ball is snapped as quickly as possible. You can imagine the advantages of the sugar huddle. Defenses face many struggles when trying to defend an offense that utilizes the sugar huddle regularly throughout a game. There is no time to make a strength call, hardly any time to communicate blitzes/stunts, and very little time to recognize tackle over sets, four-man surfaces, or even which receivers are on and off the line of scrimmage.

I do not know the origins of the sugar huddle, but the major program that I first noticed utilizing it consistently was Auburn University. Coach Gus Malzahn and his staff refer to their sugar huddle package as, “fire alarms.” Many of you are probably familiar with this concept, or package, but may be curious as to how to go about implementing it into your offense.

cox 031020

Planning and Installing the Sugar Huddle

The first thing you need to know about installing the sugar huddle is that you can utilize it out of any offensive scheme. I’ve witnessed Slot-T and Wing-T teams use it and I’ve seen spread offenses use it. At Refugio High School, we run a multiple offensive scheme. We base out of a power spread offense, but we also use under center, pro-style sets. Because of this, we will operate out of both the shotgun and from under center in our sugar huddle package. 

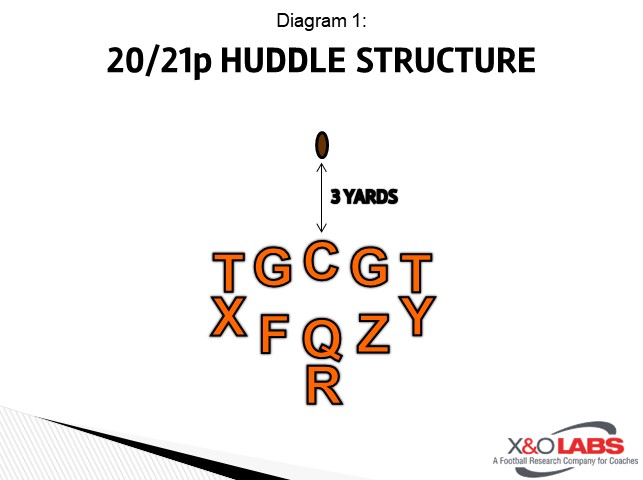
When you have decided to utilize the sugar huddle in your offensive scheme, you must select the huddle structure that best fits your offense or base personnel grouping. The huddle structure is where your players set up in the huddle. The key is to align your players in the huddle so that they can break out and get to the line of scrimmage, or their respective spots, as quickly and efficiently as possible. We choose to have our center set the huddle 2-3 yards from the ball, with his back towards the line of scrimmage. The right guard and right tackle will line up to the left of the center. The left guard and left tackle will line up to the right of the center. All offensive linemen have their backs to the line of scrimmage. From here, you need to strategically align your skill players in a way that will get them out of the huddle with as little traffic as possible. When we first installed the sugar huddle, we only utilized 20 and 21 personnel, under center sets. We also only aligned in a strong right formation. By starting simple, and keeping everything very consistent, it was easy for our players to get comfortable with the sugar huddle procedure and getting in and out of the huddle quickly and efficiently. We installed five plays from our base offense – jet sweep, power off the jet fake, play-action pass off the jet/power, toss sweep, and naked boot off the toss sweep. We practiced these 5 plays from the sugar huddle all spring long. Our base sugar huddle structure, from 20/21 personnel, is shown below.

Diagram 1

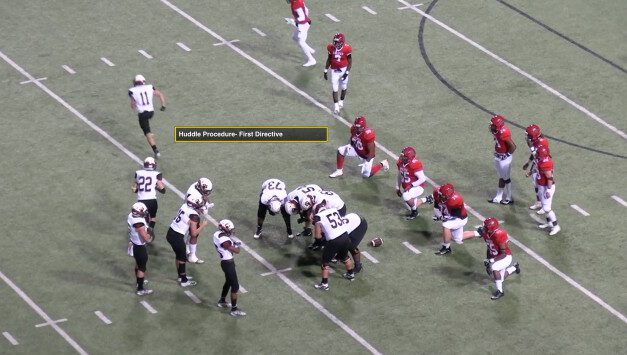
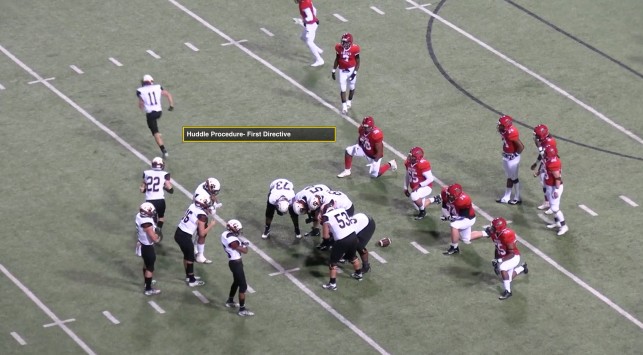
After you have decided on the huddle structure that best fits your offense or base personnel grouping, you need to decide your huddle procedure. The huddle procedure is how you will get your play to the quarterback, how the quarterback will verbalize the play call to the other 10 players, and how your players will break the huddle. This may seem like a very simple process, but it takes great planning and practice. We use wristbands in our offense, so we signal in the play to the QB from the sidelines. The quarterback will then approach the huddle, take a knee, and relay the play to the other players. The quarterback uses these directives:

Wristband 7 on go…….Wristband 7 on go……..Ready break!”

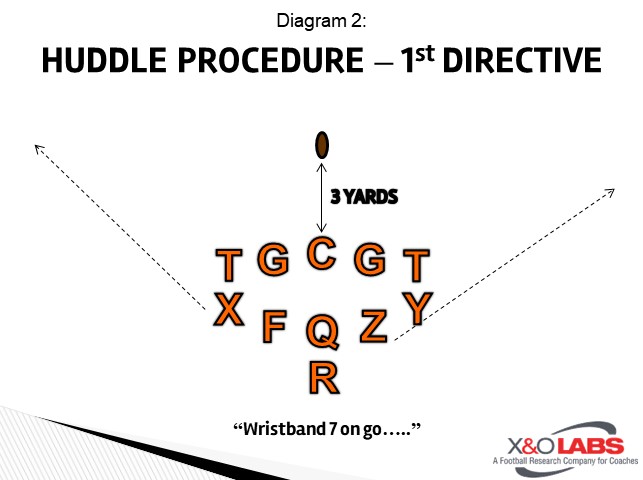
The way that the quarterback gives the directives in the sugar huddle is very important. Players break at different times during the quarterback’s directions. When the quarterback gives the first directive, “Wristband 7 on go”, all players will look at their wristband and find the play. Any player who is not attached to the formation (typically receivers that are not aligned tight to the formation) will break the huddle once they find the play on their wristband.

Diagram 2

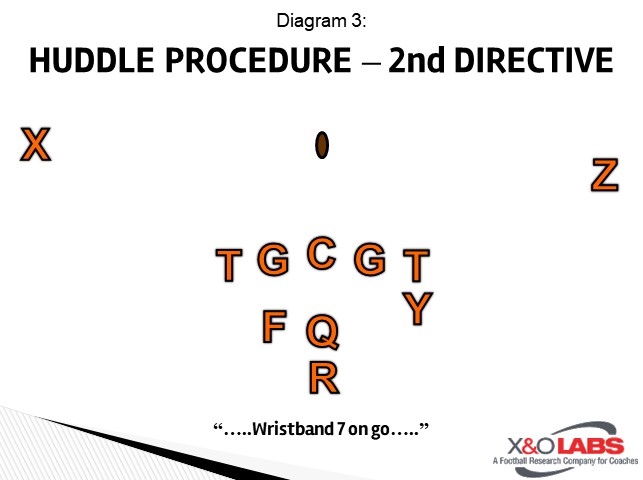
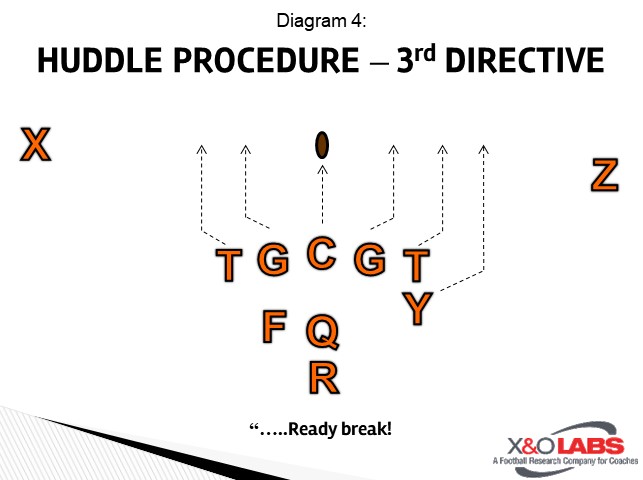
When the unattached players are nearly getting set at their spots, the quarterback will give the second directive, “Wristband 7 on go.” The quarterback will give a slight pause, and all remaining players will break the huddle on, “Ready break!

Diagram 3

Diagram 4

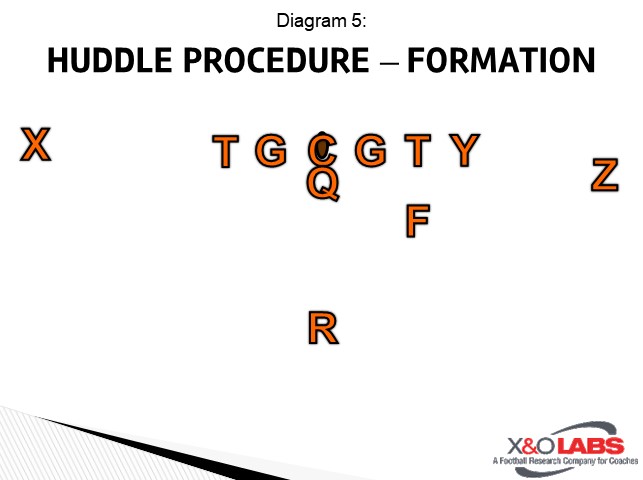
In our sugar huddle procedure, all offensive linemen will turn outside, away from the center, as they break the huddle and get set as quickly as possible. The remaining skill players, that are attached to the formation or aligned in the backfield, will get to their respective spots as quickly as possible. All players must get set as quickly as humanly possible once they get to their spots.

Diagram 5

Coaching Points:

When you are utilizing the sugar huddle scheme, the snap count can be whatever you want. Sometimes it is beneficial to go on two. The quick tempo of the sugar huddle will often have defenses very antsy and you may be able to draw an offsides penalty.

It is very important to make sure that your players are comfortable and relaxed. The more often you practice operating out of the sugar huddle, the better you will

Read More

Handling “A-gap” Pressure in the Gap Scheme Run Game

By Doug Taracuk
Offensive Line Coach
Capital University (OH)


The gap run scheme has constantly evolved from the Wing-T days and Robust T days of my early coaching years. It is hard to watch a game on Friday night, Saturday or Sunday and not see several gap scheme runs. The concept of building a wall inside, kicking someone out and leading a blocker through the hole lives today just like it does on the classic Vince Lombardi film explaining the “Packer Sweep”. One key difference offenses face today is the multitude of line stunts and second level blitzes designed to attack the running game.

At Capital, in the Ohio Athletic Conference, we face more pressures on run downs than we consistently see on passing downs. As we build a running package each week, we must make sure that it can account for the pressures we will see that week. We start by examining the common fronts used by our opponent. We like to know the alignments and favored techniques of the down linemen and the alignment and reads of the linebackers. We need to understand what is “normal” from this front. From there we will examine their pressure package used to stop the run game. Do they do this out of the normal front or do they align differently to get it done? We see both situations. Obviously, if we can see a key for a stunt or pressure via an alignment key, it helps us. In this report, I will walk you through some of our adjustments used to handle the various combinations of “A-gap” pressures used to stop our Gap Scheme Runs.


Defining Gap Rules

Our base rule on the play side is “Gap-Down-Backer”. Simple as it may seem, this rule has held true for my four decades of coaching. Gap is defined as a down defender aligned between my nose and the near shoulder of my inside partner on the play side. A player in the “gap” will be tough for my inside partner to assist with blocking. He would have to step outside while his responsibilities are inside. “Down”, for us, runs from the inside V of the neck on my inside partner to the tip of my partner’s near shoulder. Here, we could receive help on a combo block used to move a down lineman. “Backer” comes into play when there is no down man in my Gap or Down rules.

Using these guidelines, an offensive line could block most any look presented to it on the play side.

Here are “Gap” alignments.


The defenders are aligned somewhere between my nose and the near shoulder of my play side partner in Diagram 1. Diagram 2 are “Down” alignments. The lineman is aligned head-up or aligned on the outside half of my play side partner.

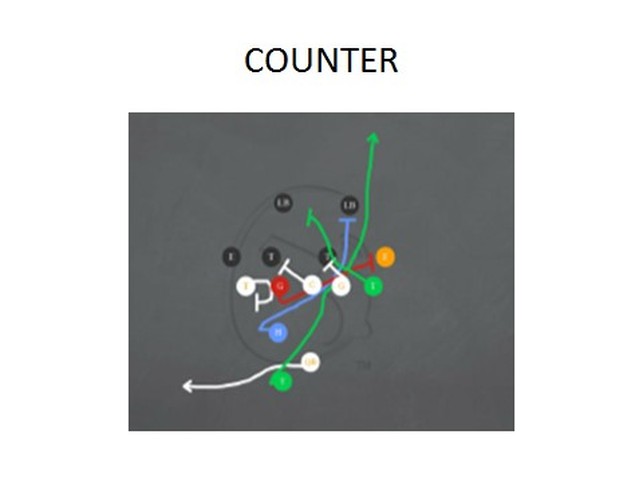
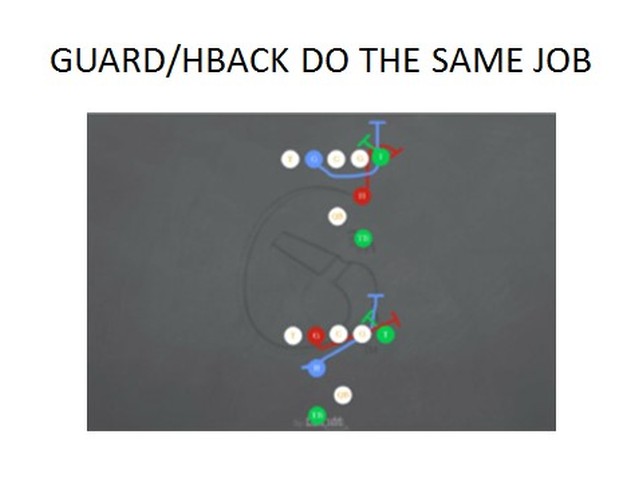
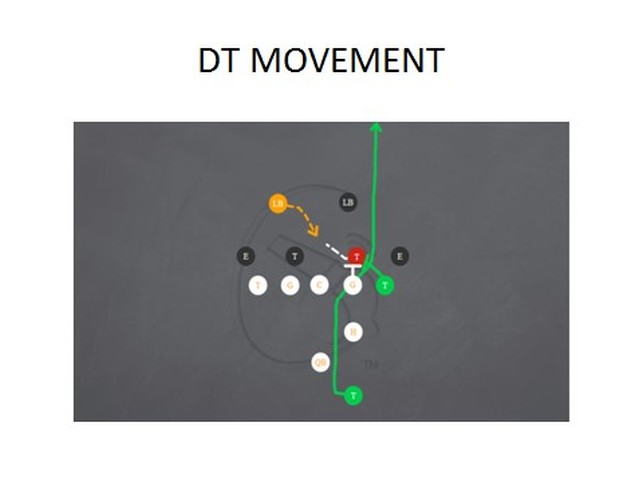
The Tackle has no one in his Gap or Down rule. To get to his “Backer” he will work a track through the rear of the Nose to pick off a loop move which would be difficult for his Guard to get. Refer to Diagram 3.  On the backside we will pull one or two of the lineman and we must control pinching movements which threaten our run from the inside-out. We are not set on who we pull for our gap plays. If it makes sense to pull the Center instead of the Backside Guard, we will. There are times when it makes sense to pull the Backside Tackle instead of the Guard or the Center. The key is for the three of them to know who should pull and why that pull takes preference. On Counter, we will pull the Center and the Tackle, the Guard and the Tackle, the Center and the TE/H-Back, the Guard and the TE/H-Back, the Center and the RB or the Guard and the RB. Once we determine the most dangerous pressures, we will select the pulling schemes.


Handling A Gap Threats in Base Fronts

Now, let’s look at some of the common fronts and I will explain how we handle the “A-gap” threats that we see. We will run our gap scheme runs to a Tight End or to an open side. From here on, I will focus on the schemes from the FST (front side Tackle) back. Let’s start with the common 4-2 front with the Tackle aligned on the outside shoulder of the Guard.

The Nose is aligned on the inside shoulder of the backside Guard. Both linebackers are in the box and in their normal alignments. The hardest block here would be the block of the FST. If the FSG (front side Guard) worked inside for the backside linebacker immediately, a pinch move into the “A-gap” would be difficult to stop by the FST. We would want to combo the block the tackle to the BSLB. Through film study, we want to know how the inside linebackers flow when they read down and pull action. If they are going to flow along on level two, we will have the FST use his hard angle footwork inside to knock the Tackle to the FSG. The FST will climb on he feels the FSG taking control of the block. The FSG will step vertically with his inside foot first and then step through the crotch of the defender with his second step. His eyes are in “A-gap” looking for a run through, but his hands are prepared to grasp the defender as the FST knocks him inside. Once the block on the defender begins, we want breast plate hand placement and our eyes on the outside V of the neck on the man. Again Refer to above Diagram 4.

The FST will lead step inside with the high knee aiming for the near armpit. The backside knee will aim for the near hip of the defender. We are coming with power moving him inside to the FSG.

If in our film study, we see that either of the inside backers will fill through “A-gap” on a regular basis through blitz or by running through an open window, we will alter the combo block. The FSG must be able to help on the down man but he must stop any penetration through his gap. His footwork does not change. He will lead with his inside foot and use a shortened step. He will still place his second step into the defender. To help the FST, we will use a shoulder and flipper to distort the defender’s momentum. Our eyes are still focused on the near linebacker to the backside linebacker. The FSG must be able to stay as long as possible and disengage when necessary to stop penetration inside. The FST will now use his slide base footwork. We will execute two quick lateral steps inside to gain position and they execute our angle drive block footwork. The third step would angle across and the fourth is the “through’ step into the man. The FST has to be able to react to a pinch move by the defender. The combo becomes a delayed version of the first one explained. The FSG’s rule is “Backer”. His primary gap is the “A-gap. He will help the FST until his assignment is threatened.

Read More

Gap Scheme Self-Scout: Troubleshooting the 7 Main Problem Areas

By Wendell Fevrine
Offensive Coordinator
New Utrecht High School (NY)
Twitter: @WFevrine


Gap scheme runs are great foundational concepts for any offense.  They force the defense to play assignment football, which displaces defenders in order to overcome the favorable angles for the offense.  This article will analyze how an offense running power and counter schemes can account for the most common defensive adjustments.  Opportunities for RPO’s and play action passes are prevalent, but this article will focus on strategies that keep the ball in the belly of your running back.  Handing the ball off for first downs and touchdowns has a visceral effect on an opponent’s pride that will pay dividends late in games.   Getting gutted in the run game is discouraging to a defense and often leads to undisciplined play, which in turn can lead to explosive plays for the offense.


On power, there is a front side combination block to the backside backer (2nd backer in the box).  Giving the down block options to stay on the DT or go to backer softens him at the point of attack on the DT.  Coach Sam Pittman of the University of Arkansas was the offensive line coach of Northern Illinois when QB Jordan Lynch assaulted the NCAA record books using gap schemes.  Coach Pittman teaches the combo block with only the post block reacting to the backside backer.   The down blocker stays on the DT no matter what, going down like an avalanche, to ensure movement on the DT.  The post block will take a tough step and lift the DT vertically while eyeing backside backer (Inside gap threat).   In essence only one person is looking at backside backer in the combination; the running back is responsible for hitting the point of attack with a head of steam and the confidence to make an explosive decision at the heels of the down block while reacting to flashes of color.

The Power play is a part of the gap scheme family.  Transversely, there is no gap scheme without a gap block (aka down block).  Not getting movement on the DT at the point of attack is the most problematic feature of the play.   All the other components of the play mean nothing without maximizing movement at the point of attack.   The more movement you have at the point of attack, the more room you have for error with the other components.  Movement at the point of attack on the DT is the foundation of the play, trying to fix anything else is futile without ensuring this component. 


Problem 1: Play Side Movement

Answer: RB Bang Cut

If the linemen being down blocked tries to play over the top of the down block or is trying to play 2 gaps, the down block will snap his hips into him while staying engaged like a man blocking scheme.  The running back needs to maintain eye discipline on the down block and press the A gap full speed.  As he approaches the A gap he will break to the tail of the down block (bang cut) and hit the hole “face first” to ensure body lean and low pad level.


To study film of this concept, click on the video below:

Read More

3rd Level Add On Pressures to Defend 12/21 Personnel Run Game

By Mark Theophel
Defensive Coordinator & LBs Coach
Hartwick College (NY)


As an odd front, zone pressure defense, we look for opportunities to pressure our opponent’s top run plays every week. If teams can run the ball, they will run the ball, so the challenge when formulating a game plan is to find ways to make the prospect of leaning on the run game seem discouraging. This means not only being sound vs. the run but also utilizing aggression to create negative yardage plays. We usually do this in the form of 5-man pressures, with a variety of patterns involving inside and outside linebackers. However, teams that run out of 2-RB and 2-TE formations present a unique challenge of defending extra gaps that are not present in single-back/spread formations. To meet this challenge, we have been leaning more on secondary blitzes to gain additional unblocked players at the point of attack. These are still 5-man pressures that utilize familiar blitz patterns. However, these pressures will involve a safety or a corner in place of an additional LB.

Philosophy of DB Blitzes:

Our game plan philosophy every week is to attack what our opponents do best. The formations that present the biggest challenge to this are ones that utilize multiple RBs and/or TEs to create additional numbers in the run game. The “8-man box” gets talked about a lot to get the extra defender, usually a DB, involved in the run fit. However, just having the extra DB in the box doesn’t necessarily help us pressure these heavy run formations. If we still only run blitzes that involve our front seven against 21-personnel (or heavier) formations, a well-designed run play can still get blocks on those defenders, and in some cases even use their blitz angles against them. This means that regardless of whether we are in a pressure or a base call, we will often still be relying on our DBs to make tackles on the second level.

Adding DBs to our pressure package, however, opens new possibilities to attack our opponent’s run game while limiting our risk vs. the pass. This fits our philosophy of being aggressive, while at the same time being easy to teach and fun for our DB’s. Here are some advantages that come with running a DB blitz as opposed to a “traditional” zone pressure.

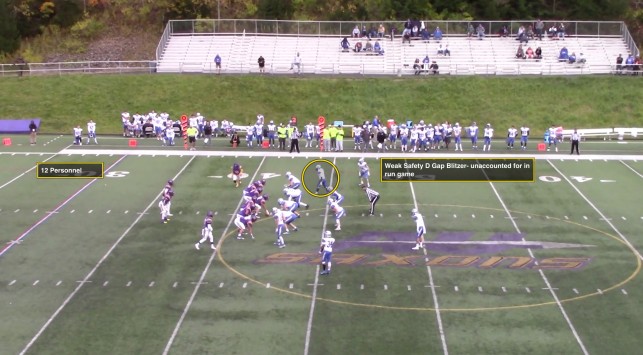
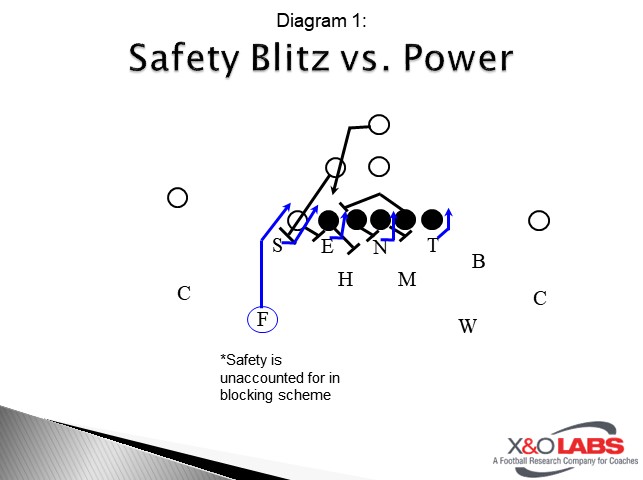
1)  We gain defenders in the backfield who are unaccounted for in the blocking scheme.

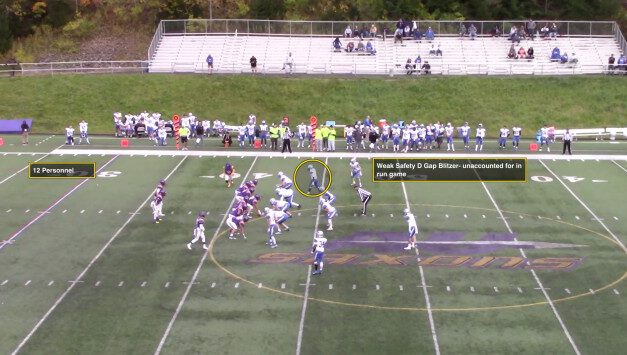
Most power and man blocking schemes do not account for defensive backs, and RBs are taught that if the front is blocked up, he is responsible for making the “extra” man (usually a DB) miss. By adding the extra man to the pressure, we ensure that he will meet the play at or behind the LOS, rather than having to make a difficult open-field tackle. This gives our defender the advantage in that matchup against the RB.

Diagram 1

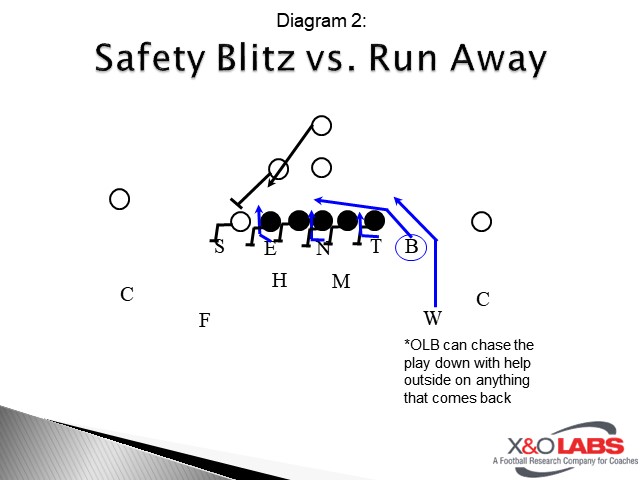
2)It allows our LBs to pursue more aggressively and chase plays down.

In a 5-Man pressure, we account for counter/boot/reverse with the widest outside rusher when the play goes away. That responsibility would normally fall to an LB in a base call or a typical zone pressure, so adding the safety as the D-gap/outside rusher allows other players involved in the blitz to chase down anything that goes away, knowing that he doesn’t have to worry about containing anything that comes back to his side.

Diagram 2

3)It clears up the fit for second-level defenders not involved in the pressure.

When we blitz DBs, we are running blitz patterns that normally occur with multiple linebackers, so adding a safety/corner will mean subtracting an LB from that pressure scheme. That linebacker then becomes a second-level defender with a coverage responsibility. If an offense can diagnose the pressure and block everyone up, the extra man is now a linebacker who is closer to the ball than a DB, and his progression will take him directly to where he is needed to “clean up” and ensure a minimal gain on the play.

4)The movement up front wrecks the vertical run lanes and forces runs to the edge.

Most of our DB pressures are edge pressures that involve collapsing the front by stunting our linemen to inside gaps on the side of the blitz and crossing down-blocks away from the blitz. By taking away the vertical run lanes with our front and containing the play with the blitz and with the run support opposite the blitz, we can swarm the ball and create negative yardage plays.

5)We can run them as add-ons to our base defensive calls.

Most of our DB pressures are simple add-ons to a base defensive call. A base call for us will involve an OLB rushing to one side of the formation and the DB to that side will be involved in the perimeter run force. Turning that into pressure is simply a matter of blitzing the run force player (DB) off the edge and playing man coverage to that side. On the side of the defense opposite the blitz, our coverage can still function as called, and we can use the same terminology we use in a base call.

To study game film of this concept, click on the video below:

Read More

Targets and Tracks in Inside Zone Blocking

By Matt Lester
Defensive Coordinator, Linebackers, and Offensive Line Coach
Madeira High School (OH)
Twitter: @matt_lester_


The offensive line is arguably the most nuanced position in football.  Offensive linemen must react to a wide variety of situations and have tools to make proper adjustments pre and post-snap.  The pre-snap procedure tells the linemen “who” they are going to block, and the post-snap procedure tells the linemen “how” to block.   In this report, we are going to explore the post-snap procedure in the Zone Blocking scheme and explain how specific aiming points on a defender (target), the path to arrive at the block (track), and footwork to support makes the play successful.


Targets

We use the Covered/Uncovered rules for Zone Blocking in our program.  The communication of those in our pre-snap procedure sets up the identification of whom we will block which determines our target and track.   We define our target as the aiming point we want to block on the down lineman.  This is dependent upon being covered or uncovered.

Uncovered – Near number of next down lineman play side

Covered with Combo Call – Far number of down linemen covering

Covered with no help – Breastbone of down lineman covering

The first step in finding a target is locking in with the eyes.   Our philosophy is “aim small, miss small.”  From the time we take our first step, we lock on the target with our eyes.  On the second step, we strike the target with our hands.  If the offensive lineman is comboing to a linebacker, he is splitting the down defensive lineman in half.   The uncovered lineman will strike underneath the shoulder pad right at the pectoral muscle with his backside hand and at the breastbone with this play side hand.  The covered lineman will strike under the shoulder pad at the breastbone with his backside hand and at the pectoral muscle with his playside hand.   The strike of the target will lead to the path (track) the offensive line will take.

If the offensive lineman has no help, he has the responsibility of blocking the defensive lineman one on one.  His eyes go the middle of the chest in order to size the frame of the shoulder pads directly underneath the pectoral muscle.   The eyes will always lead the hands and feet.


Tracks

On Inside Zone, our track is going to be as vertical as possible.   We want to create vertical displacement of the defense.   In scenarios where teams are blitzing five or more defenders, lateral displacement is acceptable.  We ultimately need to account for everyone; however, we want to move the line of scrimmage down the field.

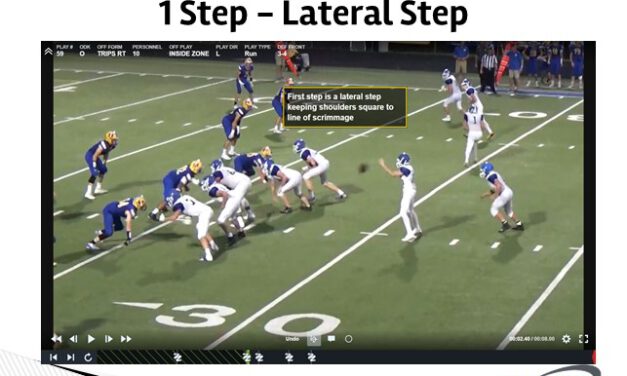
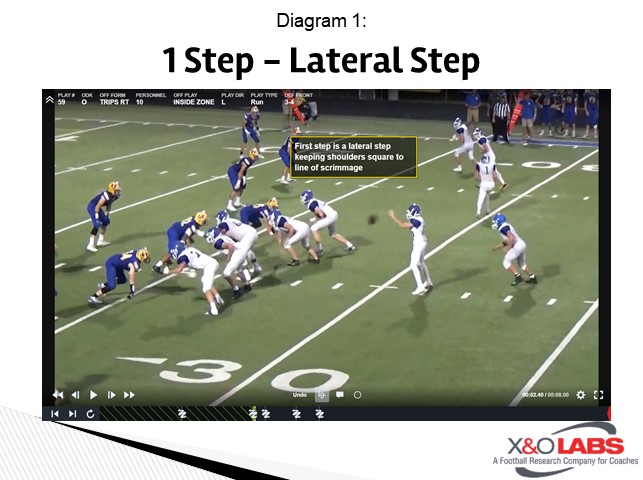
Our first step is a 6-inch lateral step to the playside, towards our target.

Diagram 1


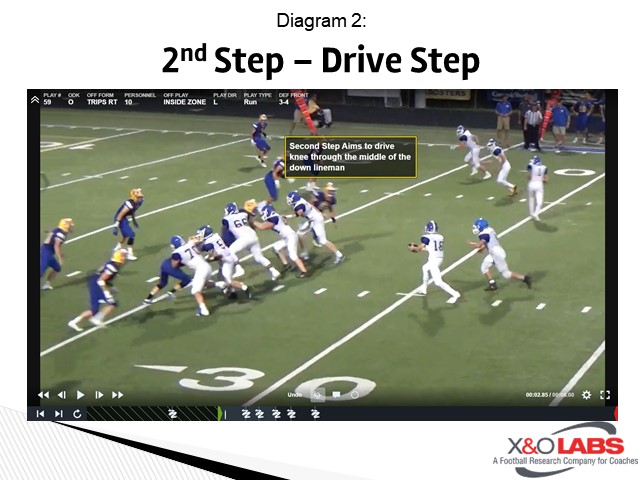
We want our shoulders square to the line so we can react to a defensive movement or blitz.  Our second step will aim through the crotch of the defensive lineman we are comboing.

Diagram 2


This step sets our track.  From there, both linemen will be working in a co-operative mentality trying to block their assigned defensive lineman and linebacker. They will stay on the path that their second step takes them down the field.

Their track is as wide as the frame of their body and starts at their assigned gap moving to the playside.  Once on their track, they are like trains.  They will not leave this track and will destroy whatever crosses their path.

If a lineman isn’t involved in a combo, he is Big on Big (B.O.B).  His job is taking a jab step with his inside foot and block his assignment outside.  He has a target, but not an assigned track.  His only assignment is to keep his defender from crossing his face while using proper technique.


Coaching Points:

Target Steps/Punches – Drills and Pointers:

Read More

Defending 2 Back Runs and Heavy Formations from the 3-4

By Lawson Green
Defensive Coordinator
Oak Grove High School (LA)
Twitter: @lawson_green45


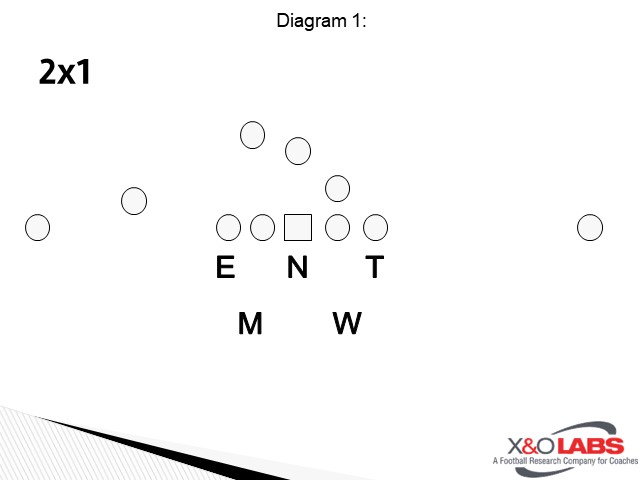
We are a base 3-4 cover 2 team with our defensive linemen aligned in a 4-0-4 front.  Our defensive line is usually bigger kids that must demand a double team and can eat up blocks. Our End is the more athletic of the two tackles. He will bump to a 5 at times. Our Tackle is a true Defensive Tackle that will have to play 3 at times. We teach our defensive linemen a shade technique for when they are lined up on the shoulder of an offensive lineman and a head technique for when they are lined head up. Our inside linebackers are decent runners, but they have to be able to get off blocks and make tackles. Our outside linebackers must be able to play the curl area in pass and set the edge or play a 9 tech against a Tight end. Our Corners are our best cover guys and our safeties need to be our best tacklers. We have adapted our defense over the years to try to stop the spread attack. We no longer start our defensive installation with defending the Pro formation.  We now start with defending 2×2. The way offenses are utilizing H back/Y off formations and TE’s now can pose a problem for that. When defending 20, 12, or 21 personnel offenses the first thing we want to do is make sure we can account for the extra gap created by the H back or TE. The second thing we want to do is make sure we account for any passes off their run concepts. We use our OLBs and our Safeties to account for both issues created by the offense.


Defending 2 Backs 0 Tight Ends

The Front Five:

We keep the alignment of our front five the same when defending 20 and 12 personnel. We want to take way gaps from the inside out. We play our tackles in 4s, they will utilize our head technique. They are responsible for the B gap on runs and they are contain rushers against pass. Our nose is aligned in a zero. He is the backside A gap player. We want our nose to disrupt the middle as much as possible while maintaining the backside A gap. Our ILBs align in 20s and are frontside A gap players on runs away and scrape players on run to. The ILBs are fast run fitters. 

Diagram 1


Outside Linebackers vs 20:

Our Sam will apex the #2 receiver and the offensive tackle. They will align 5 yards off the ball with their inside foot up. Our Jack will align 3×3 from the offensive with his inside foot up.

Diagram 2


The Sam and Jack are force players vs any run to them, and they are cutback players vs any run away. Because they do not have to fit fast into the box, they can hang in the slant window for a second to prevent any pass off of the run action. 


Safeties vs 20

The Strong Safety will align 12×1 off of the #2 receiver. He is a pass first player. His job is to fit outside in vs any run to his side and to play long cutback away from him. The Free will align 5×7 off of the offensive tackle to the single receiver side. He has the same responsibility as the Strong.

Diagram 3


Corners

The Corner to the 2-receiver side is aligned 1×5 outside the #1 receiver. He is a pass 1st player with secondary contain responsibility vs run to him and last man pursuit vs run away. The Corner to the single receiver side is aligned inside eye of the single receiver and has him man to man.


Coaching Points:

Defending Power/Counter

Diagram 4


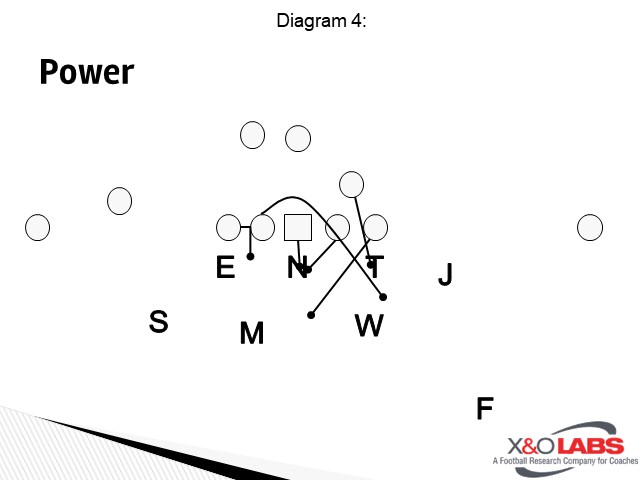
Diagram #4 shows a typical way that people block us when running power.  The H back will create a new gap on either side of the center depending on whether they are running Power or Counter.  I will describe how each position is to play the blocks they are given.

End- Attack the breastplate of the Offensive Tackle. fight the cut off block and get into the B gap the guard is pulling from. If the Tackle gets down really hard, we can come off his hip. He just must make sure the b gap is secured.

Nose- Attack the breastplate of the Center. Try to create knock back and fight pressure. When the guard doubles he wants to get his hips in the crack and hold his point as much as possible to keep the backers free.

Tackle- Attack the breastplate of the Offensive Tackle. Squeeze the down block. Splatter the kick out block from the H by attacking his inside pec and getting under the block.

Mike- Attack front side A gap.  If it is closed, scrape to B anticipating a block from the Opposite offensive tackle.

Read More

Three High Safety Pressure Fits to Defend 11 Personnel RPOs

By Chris Bunting
Defensive Coordinator & Safeties
Millbrook High School (NC)
Twitter: @bunting36


Here at Millbrook, when I was hired here, we transitioned away from a 4-2-5 look. We installed a 3-4 mostly due to a lack of quality depth at the defensive line. Our 2019 defensive line had 2 starters that weighed 205 or less. We also knew we would have a lot of “tweener” type guys. Our 3-4 has given us lots of answers, but not all that we need. When looking for answers to stop Air Raid offenses, defend RPO’s, and to find ways to win 3rd down, we looked at incorporating a 3 high safety package. Our Psycho package accounted for 25% of all calls in 2019 and we gave up almost 1 yard/play fewer than our base package calls. We used it predominantly for 2nd & long or 3rd down calls, though it can be far more than that.  We used it as our primary package against an RPO-heavy conference opponent to limit the conference offensive player of the year at wide receiver.  We also used it as a major part of our game plan against the eventual state runner-up in the highest classification in NC. We held that team, averaging 32 pts/game, to only 4 field goals. In this report, we will discuss our run fits out of the Psycho package.

Installation:

Our goal when implementing our Psycho package is for simplicity to win out. We want to limit any new teaching that needs to occur. We want guys playing techniques they know and allow them to play fast. When we meet as a staff, I always ask position coaches how we can teach concepts with our terminology & minimize confusion. Because of our 3-4 structure, we only must teach one new position when we transition to our Psycho package- our Prowler (P) who replaces a linebacker. We use Hudl to share installs, we draw it up on the board in our Monday install meeting, and we include drawings in our scouting reports during the season. The only time investment we use on the field is during our group time (9 on 8 run period, ½ field pass, 7v7, etc.) or during team time.

STRUCTURE

We keep our run fits the same as our base defense when possible. Again, we want guys playing what they know and limiting over-thinking. We use our Prowler as the replacer when needed for overload pressures or sim pressures. Our Tite front was used on 56% of all calls out of our Psycho package, so, we will use that front when discussing how to defend RPO’s.

Position Responsibilities:

D- Devil is field side defensive end in a 4i. Responsible for strong side ‘B’ gap.

N- Nose either in a strong shade or 0 tech & slanting to the strength. Responsible for the strong side ‘A’ gap.

E- Edge is the boundary side defensive end in a 4i. Responsible for the weak-side ‘B’ gap.

W- Will linebacker is our plugger. Responsible for the weak-side ‘A’ gap.

S- Sam linebacker is our field-side overhang. Responsible for strong side ‘C’ gap and has seam/curl responsibilities in Cover 3. Force player with seam/curl responsibilities in Invert (Quarters).

J- Jack linebacker is our boundary side overhang. Responsible for the weak-side ‘C’ gap and has seam/curl responsibilities in Cover 3. Force player with seam/curl responsibilities in Invert (Quarters).

LC- Left corner, will know coverage from the nearest safety.

RC- Right corner, will know coverage from the nearest safety.

F- Free safety is our field-side safety.  We will play the post in Cover 3. Communicates coverage to the nearest corner and makes all coverage checks.

R- Rover is our boundary safety. Communicates coverage to the nearest corner.

P- Prowler is our middle safety and is like our queen in chess. He is the RPO player for us and has the freedom to move around. He is the adjuster for trips checks and replaces linebackers on overload or sim pressures.

Pressure Patterns

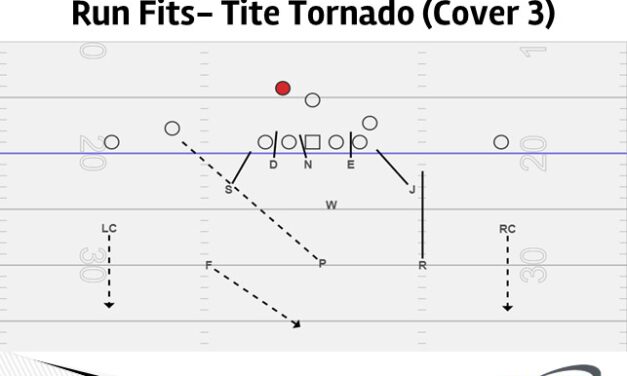
TITE TORNADO (Cover 3 variation)

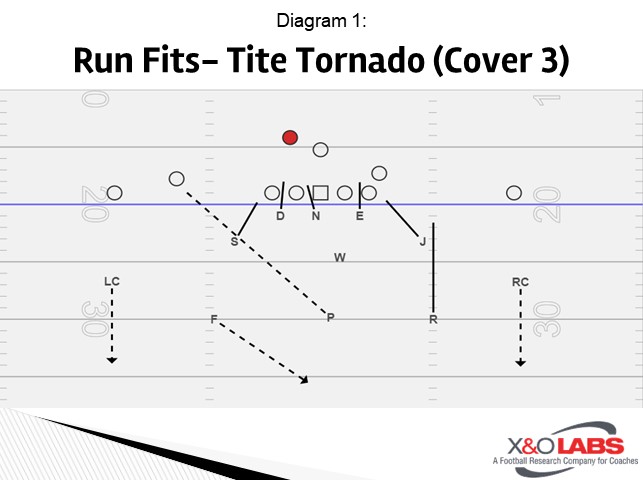
Tornado is our RPO coverage and we change up how we play it is based on our opponent’s tendencies or formations. In Cover 3, we like to play our Sam & Jack a little tighter to the box unless we get a Trips check. Against Trips, we can give the Jack multiple calls. He can play base, he can pressure through the ‘C’ gap, or he plays ‘Walk” technique where he walks out to jam the #1 receiver. Whichever Safety is playing the post is also an alley runner in run fits.  The Prowler will be the force player to the RPO threat.

Diagram 1

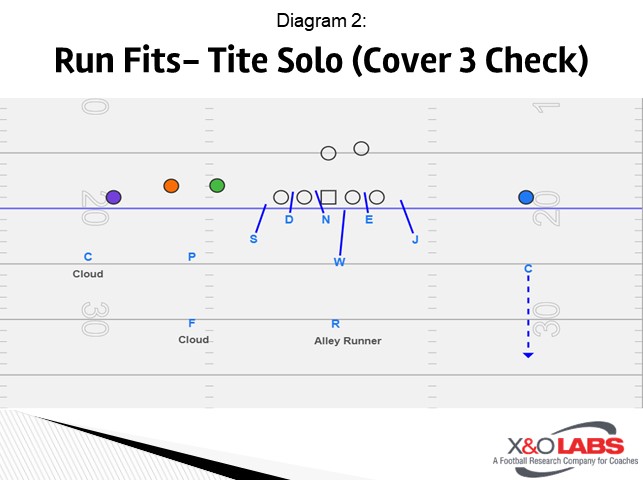
Against Trips formations, we keep the box intact and adjust with the safeties. We have multiple Cover 3 checks for Trips, but this was our most common check this past year based on our personnel’s abilities.

Diagram 2

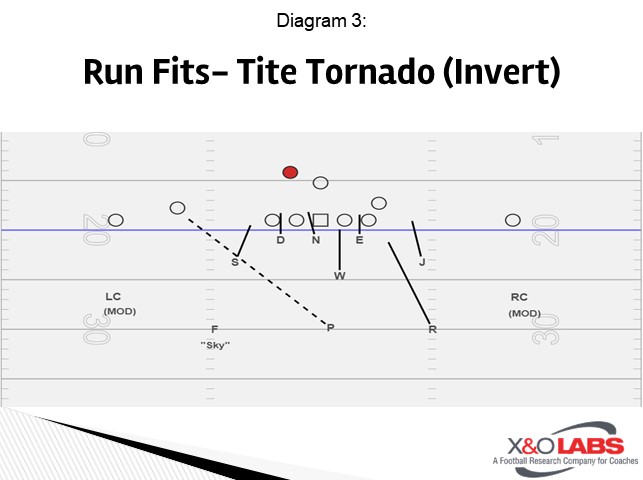
TITE TORNADO (Invert variation)

Invert allows us to play quarters and still have the RPO defender we need. We will play our Sam & Jack a little looser and allow our safeties to insert. The Rover will now have the boundary ‘C’ gap.

Diagram 3

Playing Invert allows us to get an extra body on the H side while getting some pass help to the RPO side. We play by our ‘Sky’ quarters rules where corners are MOD (man on deep) and safeties take #2 receivers vertically or play post/dig/curl of #1. The Prowler is still the RPO player as well.

OTHER VARIATIONS

We can also pressure to maintain gap integrity and still play our coverage rules. In the next diagram, we call an overload pressure in the boundary and get the same Cover 3 run fits as shown earlier.

Read More

Adjusting Route Progressions in Air Raid Staples

By John Haberman
Offensive Coordinator & Quarterbacks Coach
St. Stanislaus High School (MS)
Twitter: @johnolaf15


In 2018, our offense struggled to throw the football, completing less than 50% of our throws for less than 150 yards per game. We scored just 19 points per game and our inability to consistently throw the ball was a huge part of that because it limited our ability to create big plays and we struggled to convert 3rd downs.

Things changed drastically last season. With the same QB and WR core, we scored 33.5 points per game, led the state in passing yards per game (280/game), completed 65% of our throws, and were second in passing touchdowns (39) in all classifications in Mississippi.

The biggest reason for this jump in production was a complete overhaul in the way our offensive staff taught and communicated the basic tenets of the Air Raid. We adapted routes, reads, and language to make the offense easier to understand for our players.

I’m going to go through a few of the concepts that were most responsible for the success we had throwing the ball last year. I would love to discuss all our passing game with you if you reach out via email.  I’ll also go into how we changed the way we taught and installed the concepts during the off-season, which gave us a more efficient way to communicate during games and while watching the film.

Before I do this, I know the Air Raid has a sort of cult following to it and that in many ways we have changed not only the concepts themselves, but the way that we teach them, including the route progressions. Although the basic structure of this is ‘Air Raid’ some of it is substantially different from what most would call traditional Air Raid.


The Concepts:

One of the major advantages of the Air Raid system is each concept has a name and corresponding number. We are primarily a no-huddle team, and although we do not always push the tempo, the ability to signal plays from coaches to players and from players to players in multiple ways was an advantage all coaches should be utilizing. I mention up-tempo because this multifaceted communication system would be even more useful in high tempo situations. The numbers we used were totally arbitrary, though you could easily develop a numbering system that would communicate more than just play. For example, 40’s concepts are supposed to be mirrored, but we don’t mirror anything, so it has lost that meaning for us. The names of the concepts are what we use to communicate with each other in the classroom and on the field.  This gives us another way to signal our base plays (for example, we have a number signal for Smash and a hand signal for Smash). This is useful not just for coach to player signaling from the sideline, but in two-minute situations our QBs can call Smash by yelling either “61” or by using a hand signal to their receivers, which means nothing to defensive backs, whereas yelling the more commonly known “Smash” would likely give the play away to the defense.

Our base drop-back concepts are as follows (I’m going to leave the numbers out that we use, but would happily share more info via email with coaches) :

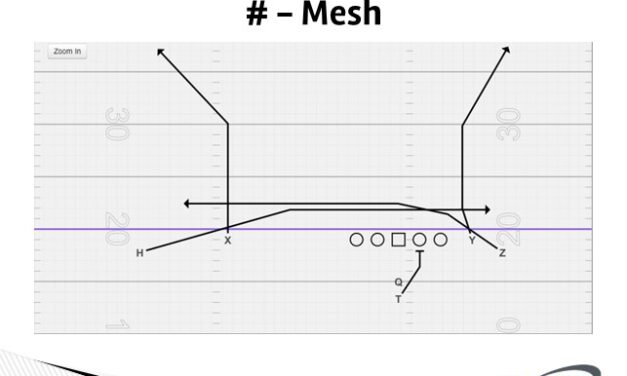
# – Mesh

# – Flood

# – Cross

# – Seam Read (Dagger)

61 – Smash

# – Spacing

# – Drag

# – Choice

# – Levels

# – Four Verticals


Each of these concepts can also be ‘flipped’ by tagging a receiver to the concept call (if no letter is attached to the concept it means Y, so in 2×2 ‘ace’ formation, we can run ’61’ which is Smash to the Y or ’61-X’ which is Smash to the X).

Additionally, you can help add more depth to your language by naming your concepts (we do this with our run game but are just starting to do this with our pass game). For example, most defensive players would immediately pick up on a ‘mesh’ call from QB to WRs but having a verbal call of ‘Leach’ would take some time for defenders to figure out.


Philosophy Behind the Base Concepts:

Regardless of the defense, each play has a progression that doesn’t change. The most basic part of our passing game is that all our plays have a constant set of defined reads regardless of coverage. This process is not complicated. We want our quarterbacks to play confidently, and these straightforward constant reads help them do that.

  1. Almost all our plays are based on reading one defender and making him wrong, most commonly the overhang defender and/or the deep hash defender. I know this sounds rudimentary, but the simplicity of this process is its strength because our QBs don’t have to spend extra time memorizing different ‘plans’ for different coverages which can lead to uncertainty during the game. We don’t want our QBs thinking “is it this coverage and I do this, or is it that coverage and I do that”. It is also important to realize that we as coaches can understand the subtle and not so subtle differences between cover 2, read 2, cover 4, cover 6, roll 3, etc. and apply that knowledge to make quick decisions, but can our high school quarterback do the same under pressure? (the Bum Phillips quote: “coaching is not how much you know. It’s how much you can get players to do”) I believe it is vital to free your quarterback from being bogged down by the burden of over-processing. Equip him with a plan that will make him successful, rep it relentlessly, and then just let him play confidently.
  2. Make the defense cover the whole field. Almost all of our concepts have either a pre-snap ‘gift’ throw or a quick 3-step throw built into the read. Making the defense defend the box and all the under zones, makes it much harder for them to disguise what they’re doing and properly cover the deep zones. This also allows an offense to essentially use the passing game as an extension of the run game. We stress our quarterbacks not to shy away from deep throws in a 1 on 1 situation. Even though those are lower percentage throws, going 2-6 on deep throws in a game could be 14 points and the difference between winning and losing. We completed a crazy amount of 5-yard hitch and speed outs which helped us

Read More

Weak Side Overload Fire Zone in the 4-2-5 Defense

By Ed Raby
Defensive Coordinator/Safeties
SUNY Morrisville (NY)
Twitter: @CoachRabyJr


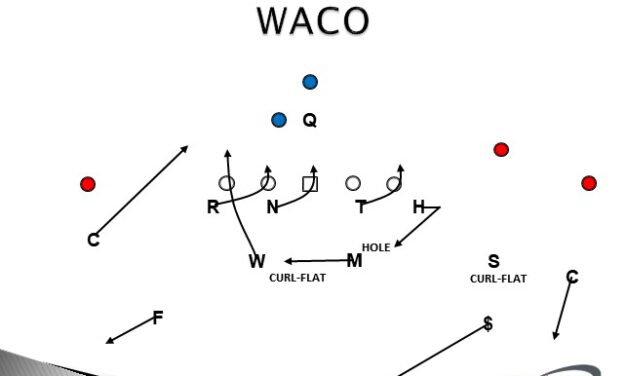
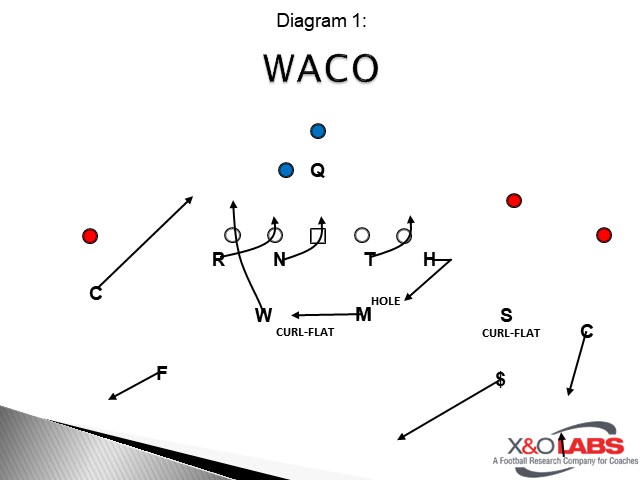
One of the biggest issues in the 4-2-5 defense is blitz angles. Particularly when blitzing from the weak side; you are presented with numerous issues in terms of angles that your players will have to blitz from. In this article we will look at our weak side overload fire zone pressure that we run out of our base 4-2-5 defense called “Waco.” Waco comes from the boundary using our boundary corner and Will LB. In this fire zone we will cut the Mike to cover the weak side for coverage; and drop our strong side DE in the hole. In order to help with the back in coverage we will peel our corner on the blitz. We will also discuss our “Switch” call when presented with 2 quick receiving threats to the boundary.

In addition to discussing the specifics of this weak side pressure we will dive into a couple of different items as well.

  • What situations we are looking to use this pressure in
  • The specific defensive line and linebacker teaching points of the blitz
  • Coverage rules and teaching points for this pressure


The Scheme:

As I discussed above, blitzing from the weak side out of the 4-2-5 can become problematic, because the angles are not as good as some other defensive alignments.  When you start talking overload blitzes on the weak side with the 4-2-5 it can be even more challenging because of coverage. When we came up with this pressure, we had 3 goals in mind:

  • Design a weak side overload blitz that could be disguised out of our base look
  • Design a weak side overload blitz that could be used as 3 under 3 deep fire zone option
  • Design a weak side overload blitz that would be effective against both run and pass


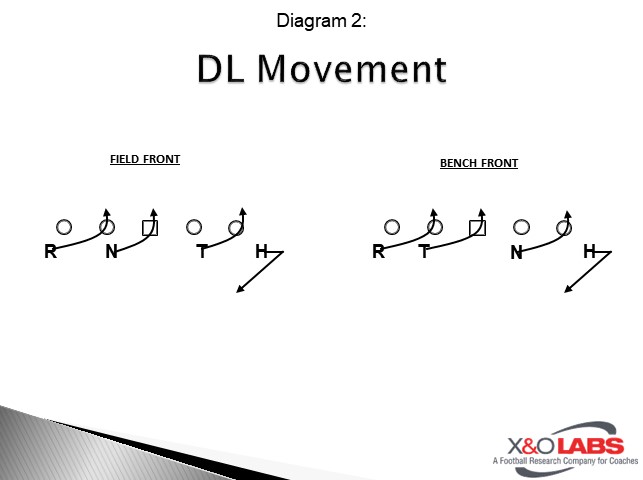
In order to accomplish all three goals, we came up with our Waco blitz. In this blitz the defensive line will stunt strong. Typically, we will run this out of a Field Over front, but we can go with a Bench front and change up the DT’s stunt responsibilities if we want. Most teams in even fronts will marry this with the 2 under 3 deep coverage that has become popular over the last few years. We wanted a way to stay in 3 under 3 deep coverage but keep the blitz pattern. We will drop our strong DE to the hole and have our Mike LB cut to the weak side when he reads pass to accomplish this. The Mike would have a hard time covering the back if he flared; so, we have the corner peel on the blitz. This has the added benefit of helping vs option to the boundary as well.

Diagram 1

The Defensive Line

The defensive line stunt in the blitz is key for the success of the blitz against run or pass. The Hawk (Our Field DE) is an edge to fold run fitter against run and the hole dropper against pass. He must take a settle step to the outside before his drop. This settle step allows him to read run/pass. If run comes outside to him, he can fill and stay in the gap. If run is inside or away, he has freedom to fold, and will become the cutback player with wide runs away. With a pass read we want to keep it simple on our DE’s. In the hole drop we tell him to drop to the middle, with awareness of where #3 is, and key the QB for pass intentions. As he reads the intentions, he should work for depth to help take away the middle of the field and lean towards the QB’s eyes. 

The other 3 defensive linemen are executing the stunt. The tackle is a contain player to the strong side vs pass and will play C gap vs run. As he stunts outside his key is the OT. If that OT tries to reach our Hawk, he can play the run through the backside hip. All other blocks he will work to defend C Gap or contain vs pass. The Nose will usually be aligned in a 2i alignment (inside shade of the OG). He will long stick the OC; that is the term we use with our DL. In Long Stick the technique we teach is a face to butt read on an offensive lineman; not just blindly going to A gap. Face to butt read means we want to put our face to his backside. The Nose will read the OC; if the OC blocks to him, in either run or pass, he is crossing face. If OC works away, he will work to the opposite A Gap off his backside. This will be illustrated easier in the film clips later. The Rush DE (Boundary DE) will execute a long stick on the OG to his side; working to A gap.

Diagram 2

The Blitz Path

Now let’s look at the blitz path of both the Corner and Will LB. For the Corner we want him to make sure he understands that his alignment must not tip off his intentions. Looking like our base is important in order to have the element of surprise. We tell our corner to align in his normal open stance at 5 yards or in a press alignment with inside leverage; depending on how much we are pressing that game. On the snap of the ball he should blitz off the edge aiming for the near shoulder of either the RB or the QB depending on which one is closest to him. He is the force player in this particular blitz, so he must match that shoulder at all time. In pass he will be the weak side contain player. If the back flares weak than the corner must run with him (this is the peel portion of the blitz). The Will is what we call a B Gap read blitzer. He is going to blitz the B Gap on the snap of the ball reading the OT to determine his path. Like the DL long stick technique, we will tell him to execute a face to butt read on the OT. If the OT blocks down on the stunting DE, the Will wants to fit tight off the outside shoulder of the OT; vs run he must spill all other blocks that could show up. If the OT works outside, he will fit tight off the inside shoulder of the OT to fill B Gap.

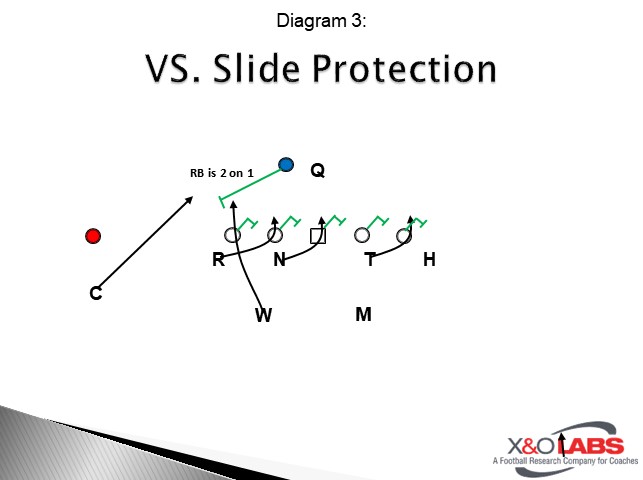
The beauty of this read for the Will is the advantage it can give us vs. multiple pass protections. If we see full slide protection, he will fit outside creating a 2 on 1 with the back vs the Corner and the Will.

Diagram 3

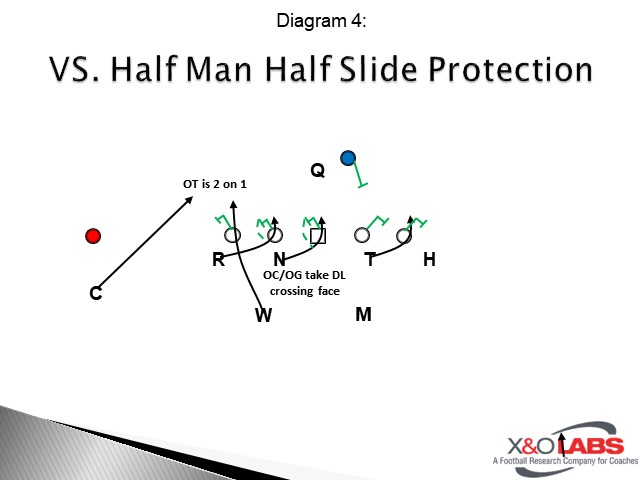
Against a half man half slide protection, we can usually get a 2 on 1 vs the OT if either the OC or OG follow with the Nose or DE crossing their face.

Diagram 4

The Coverage

Read More

Complete Training Progression for Kick and Log Scenarios in Counter Concepts

By Justin Vorhies
Head Football Coach
Cloverleaf High School (OH)


During the last two seasons we broke an 8 season streak of losing records (5-5 in ’18 & 6-4 in ’19).  We have also set the school record for total yards gained in each of the last two seasons and set the scoring record this past season.  A huge part of our success started mid-way into the 2017 season.   During this point in time we stopped running our zone schemes and ran primarily gap schemes.  During the 2017-2018 off-season we committed to becoming a run concept offense, using primarily gap schemes along with the Sweep/Jet blocking scheme.  We ditched the zone scheme and the number system.  This simplified, yet enhanced our playbook.  We now have five base concepts that we use out of a variety of formations.

Cloverleaf Over the Past 10 seasons:

Year

Wins

Losses

Points Scored

Total Yards

2010

4

6

212

2776

2011

4

6

239

2740

2012

3

7

273

2803

2013

2

8

182

2851

2014

0

10

49

1484

2015

1

9

82

1657

2016

0

10

120

2044

2017

3

7

Read More

Drop 8 Coverage from “31” and “32” Box Structure

By Josh Franke
Head Coach
Toronto High School Toronto (OH)
Twitter: @Coach_Franke


Heavy passing offenses have slowly trickled down from the NFL to the collegiate level, and now they are becoming commonplace among high school teams. With the ever-growing popularity of things like 7on7s, the Elite 11, and private quarterback coaching, high school quarterbacks are better today than they ever have been. Having to defend these heavy passing offenses a few times a year put a huge burden on our defense. Although we traditionally run a 3-3 stack, we were still getting beat in coverage. If we played quarters, slants, hitches, and bubbles would hurt us. If we tried to stop those underneath routes with different coverage, we would get burnt deep on vertical routes. We used to play by the old adage “If they want to nickel and dime us down the field, that’s fine, no one has that patience”, well, those days are over because these offenses will do that. We had to develop something different that would allow us to play max coverage but also allow us to be solid in run support. I have to give credit to my defensive coordinator and defensive backs coach Steven Rebich and Matt Ludewig because together we sat down to develop our 31 and 32 defenses to counter the rising trend of the spread pass-heavy offense.
Alignment:

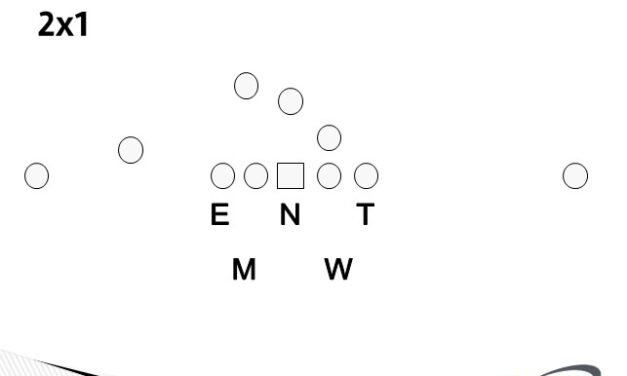
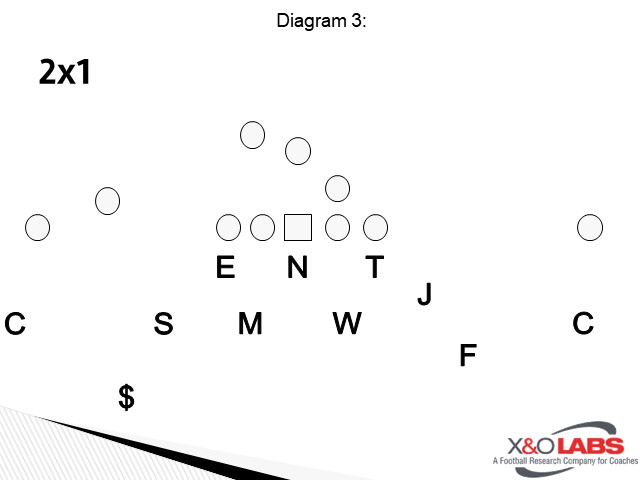
The 31 and 32 defenses were designed to be played against teams who love to pass the ball out of 3×1, 2×2, or any type of empty set. We wanted it to be a “defend everything” type of coverage but we also wanted to take away any type of jet sweep and stop the inside zone with a QB read off it (which is usually a complimentary run play for these offenses).

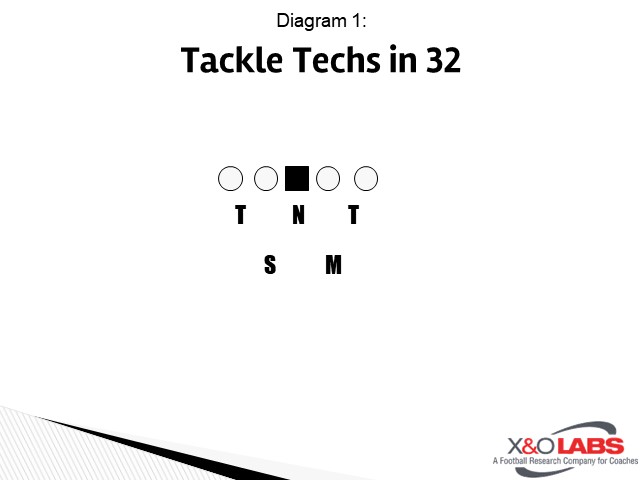
The term 31 and 32 are used to determine the number of box defenders we have. We are traditionally a 3-3 stack, therefore, when we go 31, we will have three down linemen and one linebacker, in 32 we have three down linemen and two linebackers. The trick and one of the most important pieces of this defense is that your tackles line up in a 4i position.
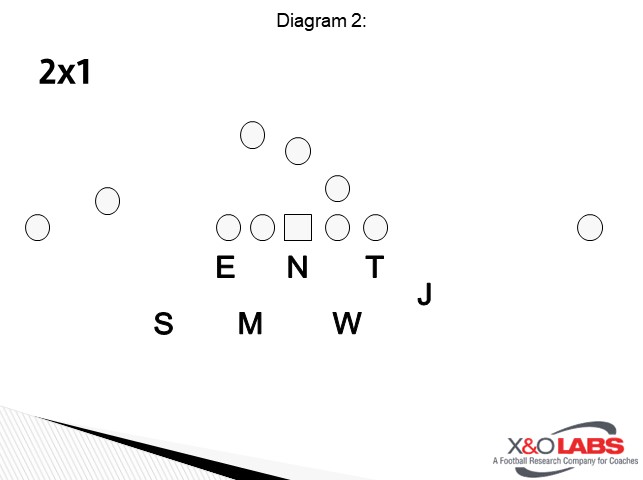
Diagram 1

This is one of the most important coaching points in this defense. The tackles are responsible for the B gaps and must be prepared to take on double teams, especially against the pass. You can play the NT in a variety of different ways, you can slant him opposite of the back alignment, you can have him control double-A gaps by playing straight up, we also have incorporated a couple of different defensive line stunts we like to integrate, which works well because of the closer alignment of the tackles and nose tackle.
The interior linebacker/s will be responsible for the A gaps and are responsible for all inside runs and will act as the alley or fill players on any outside runs. Our interior linebackers tend to love this defense because they have no major responsibility and are freed up to play instinctively against what they are seeing and reading. 

Coaching Points for Run Defenders

Force Players:

By far the most important position on the field because they’re the only two players who have both run and pass responsibility. In this defense, the secondary is a pass-first responsibility and the box defenders are a run-first responsibility.

Your force players must be able to force all outside runs, jet sweeps, and QB pulls on reads back inside to help. We tell all our force players that their first responsibility on a run is to make sure they don’t get the edge if they can make the tackle, great, but it’s not their primary responsibility.

We have our force players pivot their stance to face the backfield. This way their backs are already turned to the potential WR block. As I mentioned before, we’ve had several blocks in the back called because of this alignment. I cannot stress enough that they must attack the outside shoulder of the ball carrier so they don’t give up the outside alley.

4i Tackles:

Our tackles hate this formation and alignment because they always get double-teamed, almost every play, regardless of pass or run. They will often try to play head up or even sneak themselves outside, or they’ll say, “I’ll line up outside and rush into the B gap.”. Make sure that they’re lining up in that 4i technique and just work on splitting double teams by getting skinny through the hole with a solid rip move. We’ve learned that having speed guys on our line has been more effective than having strength guys on our line and it helps with this alignment and we still got a lot of penetration.

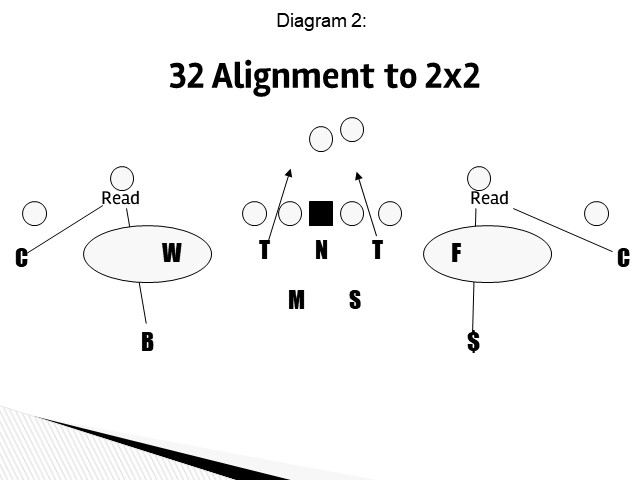
32 alignment vs 2×2:

Against a 2×2 set, we would align in our 32 defenses. Our Mike and Sam linebackers will stay in the box, our boundary safety will drop to give us a two-high safety look, we will press our corners, and play a press quarters coverage. This allows us to defend against four verticals but also, by pressing our corners, we can defend any quick hitches, slants, or bubbles.

Another very important and key aspect of this defense is that we apex our will linebacker and field safety between the tackle and slot receivers. They have the most important responsibilities of this defense. They must serve as force players on any outside runs. By alignment, they can defend against any jet sweeps, bounced inside zone runs, or any pulls by the quarterback on a read play. Against the pass, they are responsible for taking away any inside slants or hitches by the #2 receiver, because we are playing press quarters, the corner would be responsible for any bubbles or out routes.

By aligning this way, we have now taken away all short game passes and the four vertical threats. With our will linebacker and field safety, we have taken away any outside run or quarterback pulls on read plays, and with our alignment by our box defenders, we’re safe against any inside run.

Diagram 2

31 alignment vs 3×1:

Our front three alignments on the defensive line don’t change, tackles in 4is and nose in a zero tech. However, we will only play one linebacker, our Mike, and we will stack him over the nose. Now, the NT has to take one A gap and the Mike will be responsible for the other A gap. You can communicate this however you choose, whether they communicate it to each other or you always have your nose slant one way or the other. Regardless, you will still be gap sound inside the tackle box.

Read More