306")


By Ed Raby
Defensive Coordinator/Safeties
SUNY Morrisville (NY)
Twitter: @CoachRabyJr
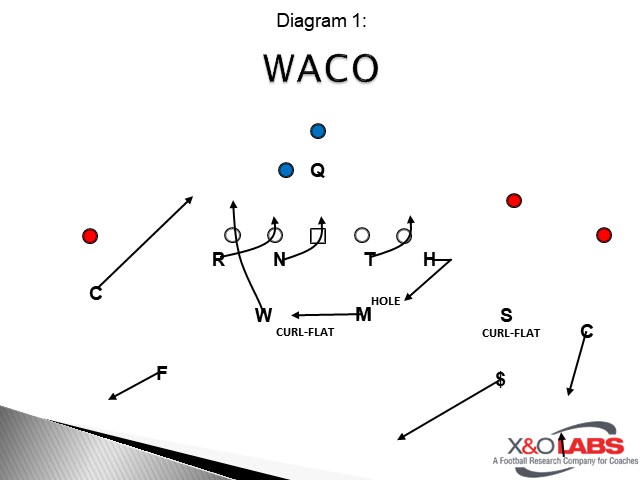
One of the biggest issues in the 4-2-5 defense is blitz angles. Particularly when blitzing from the weak side; you are presented with numerous issues in terms of angles that your players will have to blitz from. In this article we will look at our weak side overload fire zone pressure that we run out of our base 4-2-5 defense called “Waco.” Waco comes from the boundary using our boundary corner and Will LB. In this fire zone we will cut the Mike to cover the weak side for coverage; and drop our strong side DE in the hole. In order to help with the back in coverage we will peel our corner on the blitz. We will also discuss our “Switch” call when presented with 2 quick receiving threats to the boundary.
In addition to discussing the specifics of this weak side pressure we will dive into a couple of different items as well.
The Scheme:
As I discussed above, blitzing from the weak side out of the 4-2-5 can become problematic, because the angles are not as good as some other defensive alignments. When you start talking overload blitzes on the weak side with the 4-2-5 it can be even more challenging because of coverage. When we came up with this pressure, we had 3 goals in mind:
In order to accomplish all three goals, we came up with our Waco blitz. In this blitz the defensive line will stunt strong. Typically, we will run this out of a Field Over front, but we can go with a Bench front and change up the DT’s stunt responsibilities if we want. Most teams in even fronts will marry this with the 2 under 3 deep coverage that has become popular over the last few years. We wanted a way to stay in 3 under 3 deep coverage but keep the blitz pattern. We will drop our strong DE to the hole and have our Mike LB cut to the weak side when he reads pass to accomplish this. The Mike would have a hard time covering the back if he flared; so, we have the corner peel on the blitz. This has the added benefit of helping vs option to the boundary as well.
The Defensive Line
The defensive line stunt in the blitz is key for the success of the blitz against run or pass. The Hawk (Our Field DE) is an edge to fold run fitter against run and the hole dropper against pass. He must take a settle step to the outside before his drop. This settle step allows him to read run/pass. If run comes outside to him, he can fill and stay in the gap. If run is inside or away, he has freedom to fold, and will become the cutback player with wide runs away. With a pass read we want to keep it simple on our DE’s. In the hole drop we tell him to drop to the middle, with awareness of where #3 is, and key the QB for pass intentions. As he reads the intentions, he should work for depth to help take away the middle of the field and lean towards the QB’s eyes.
The other 3 defensive linemen are executing the stunt. The tackle is a contain player to the strong side vs pass and will play C gap vs run. As he stunts outside his key is the OT. If that OT tries to reach our Hawk, he can play the run through the backside hip. All other blocks he will work to defend C Gap or contain vs pass. The Nose will usually be aligned in a 2i alignment (inside shade of the OG). He will long stick the OC; that is the term we use with our DL. In Long Stick the technique we teach is a face to butt read on an offensive lineman; not just blindly going to A gap. Face to butt read means we want to put our face to his backside. The Nose will read the OC; if the OC blocks to him, in either run or pass, he is crossing face. If OC works away, he will work to the opposite A Gap off his backside. This will be illustrated easier in the film clips later. The Rush DE (Boundary DE) will execute a long stick on the OG to his side; working to A gap.
The Blitz Path
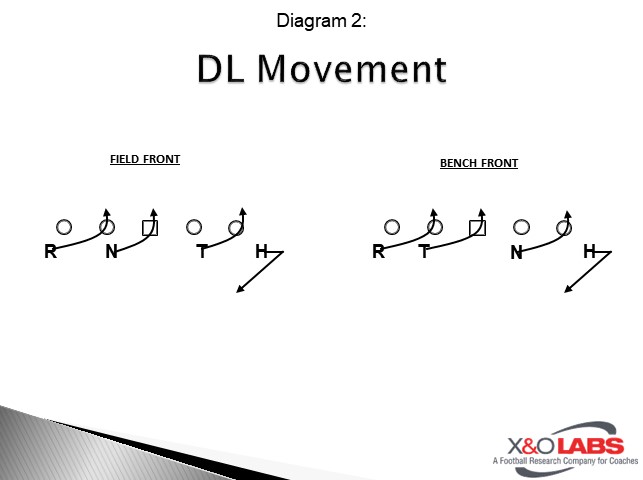
Now let’s look at the blitz path of both the Corner and Will LB. For the Corner we want him to make sure he understands that his alignment must not tip off his intentions. Looking like our base is important in order to have the element of surprise. We tell our corner to align in his normal open stance at 5 yards or in a press alignment with inside leverage; depending on how much we are pressing that game. On the snap of the ball he should blitz off the edge aiming for the near shoulder of either the RB or the QB depending on which one is closest to him. He is the force player in this particular blitz, so he must match that shoulder at all time. In pass he will be the weak side contain player. If the back flares weak than the corner must run with him (this is the peel portion of the blitz). The Will is what we call a B Gap read blitzer. He is going to blitz the B Gap on the snap of the ball reading the OT to determine his path. Like the DL long stick technique, we will tell him to execute a face to butt read on the OT. If the OT blocks down on the stunting DE, the Will wants to fit tight off the outside shoulder of the OT; vs run he must spill all other blocks that could show up. If the OT works outside, he will fit tight off the inside shoulder of the OT to fill B Gap.
The beauty of this read for the Will is the advantage it can give us vs. multiple pass protections. If we see full slide protection, he will fit outside creating a 2 on 1 with the back vs the Corner and the Will.
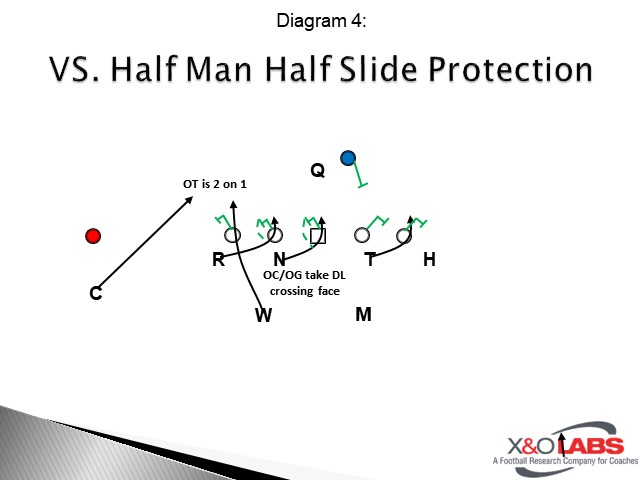
Against a half man half slide protection, we can usually get a 2 on 1 vs the OT if either the OC or OG follow with the Nose or DE crossing their face.
The Coverage
Defensive Coordinator/Safeties
SUNY Morrisville (NY)
Twitter: @CoachRabyJr
One of the biggest issues in the 4-2-5 defense is blitz angles. Particularly when blitzing from the weak side; you are presented with numerous issues in terms of angles that your players will have to blitz from. In this article we will look at our weak side overload fire zone pressure that we run out of our base 4-2-5 defense called “Waco.” Waco comes from the boundary using our boundary corner and Will LB. In this fire zone we will cut the Mike to cover the weak side for coverage; and drop our strong side DE in the hole. In order to help with the back in coverage we will peel our corner on the blitz. We will also discuss our “Switch” call when presented with 2 quick receiving threats to the boundary.
In addition to discussing the specifics of this weak side pressure we will dive into a couple of different items as well.
- What situations we are looking to use this pressure in
- The specific defensive line and linebacker teaching points of the blitz
- Coverage rules and teaching points for this pressure
The Scheme:
As I discussed above, blitzing from the weak side out of the 4-2-5 can become problematic, because the angles are not as good as some other defensive alignments. When you start talking overload blitzes on the weak side with the 4-2-5 it can be even more challenging because of coverage. When we came up with this pressure, we had 3 goals in mind:
- Design a weak side overload blitz that could be disguised out of our base look
- Design a weak side overload blitz that could be used as 3 under 3 deep fire zone option
- Design a weak side overload blitz that would be effective against both run and pass
In order to accomplish all three goals, we came up with our Waco blitz. In this blitz the defensive line will stunt strong. Typically, we will run this out of a Field Over front, but we can go with a Bench front and change up the DT’s stunt responsibilities if we want. Most teams in even fronts will marry this with the 2 under 3 deep coverage that has become popular over the last few years. We wanted a way to stay in 3 under 3 deep coverage but keep the blitz pattern. We will drop our strong DE to the hole and have our Mike LB cut to the weak side when he reads pass to accomplish this. The Mike would have a hard time covering the back if he flared; so, we have the corner peel on the blitz. This has the added benefit of helping vs option to the boundary as well.
The Defensive Line
The defensive line stunt in the blitz is key for the success of the blitz against run or pass. The Hawk (Our Field DE) is an edge to fold run fitter against run and the hole dropper against pass. He must take a settle step to the outside before his drop. This settle step allows him to read run/pass. If run comes outside to him, he can fill and stay in the gap. If run is inside or away, he has freedom to fold, and will become the cutback player with wide runs away. With a pass read we want to keep it simple on our DE’s. In the hole drop we tell him to drop to the middle, with awareness of where #3 is, and key the QB for pass intentions. As he reads the intentions, he should work for depth to help take away the middle of the field and lean towards the QB’s eyes.
The other 3 defensive linemen are executing the stunt. The tackle is a contain player to the strong side vs pass and will play C gap vs run. As he stunts outside his key is the OT. If that OT tries to reach our Hawk, he can play the run through the backside hip. All other blocks he will work to defend C Gap or contain vs pass. The Nose will usually be aligned in a 2i alignment (inside shade of the OG). He will long stick the OC; that is the term we use with our DL. In Long Stick the technique we teach is a face to butt read on an offensive lineman; not just blindly going to A gap. Face to butt read means we want to put our face to his backside. The Nose will read the OC; if the OC blocks to him, in either run or pass, he is crossing face. If OC works away, he will work to the opposite A Gap off his backside. This will be illustrated easier in the film clips later. The Rush DE (Boundary DE) will execute a long stick on the OG to his side; working to A gap.
The Blitz Path
Now let’s look at the blitz path of both the Corner and Will LB. For the Corner we want him to make sure he understands that his alignment must not tip off his intentions. Looking like our base is important in order to have the element of surprise. We tell our corner to align in his normal open stance at 5 yards or in a press alignment with inside leverage; depending on how much we are pressing that game. On the snap of the ball he should blitz off the edge aiming for the near shoulder of either the RB or the QB depending on which one is closest to him. He is the force player in this particular blitz, so he must match that shoulder at all time. In pass he will be the weak side contain player. If the back flares weak than the corner must run with him (this is the peel portion of the blitz). The Will is what we call a B Gap read blitzer. He is going to blitz the B Gap on the snap of the ball reading the OT to determine his path. Like the DL long stick technique, we will tell him to execute a face to butt read on the OT. If the OT blocks down on the stunting DE, the Will wants to fit tight off the outside shoulder of the OT; vs run he must spill all other blocks that could show up. If the OT works outside, he will fit tight off the inside shoulder of the OT to fill B Gap.
The beauty of this read for the Will is the advantage it can give us vs. multiple pass protections. If we see full slide protection, he will fit outside creating a 2 on 1 with the back vs the Corner and the Will.
Against a half man half slide protection, we can usually get a 2 on 1 vs the OT if either the OC or OG follow with the Nose or DE crossing their face.
The Coverage