Defending Option and Gap Schemes with the Bear Front

By Kai Smalley
Head Coach/Defensive Coordinator
Snohomish High School (WA)
Twitter: @fbcoachsmalley


Introduction

I have been fortunate enough to play for and work under some great defensive coaches which has helped me develop my defensive philosophy. The first coaching job I received out of college was as a defensive line coach under a coordinator that based out of the 46 Bear. I spent two seasons learning the adjustments and nuances of the defense. Two seasons later, I was hired as a defensive coordinator and I have been using it since. Though it has never been a base defense for my teams, the bear has remained a mainstay adjustment in my defensive playbook. It is always in our spring and summer installations so that we can use it and rep it any time and not have to spend valuable practice time during the season to teach a “new” front.

Adaptability

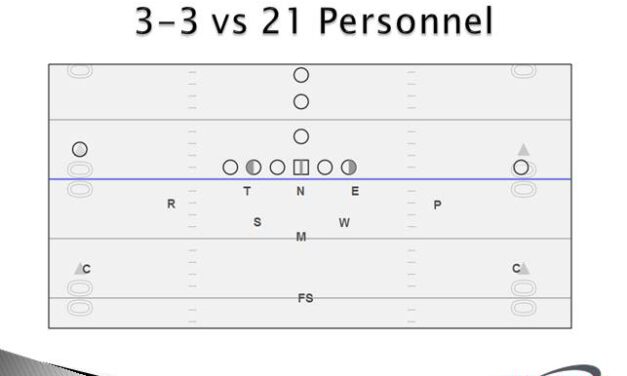
The architect of the 46 Bear defense, Buddy Ryan, developed it to create an 8-9 man front and outnumber the offense, especially on the strong side of the formation. Originally the Bear was used in 4-3 personnel, since becoming a defensive coordinator I have based out of both even (4-3) and odd (3-4 and 3-3) fronts. Each front allowed me to get to the Bear front. As offenses have evolved the Bear defense has had less of place in most schemes, but we still see plenty of 21 personnel and other run heavy sets that the Bear is designed to stop.

At Snohomish, we base out of a 3-3 stack. Throughout the season, we will see several different offensive schemes, the 3-3 has allowed us to be flexible enough to adjust to the offenses we see. We have found that the 3-3 has been the easiest to shift to the Bear. This is mainly because the personnel and positions allow us to make the correct adjustments without having to teach to many different / new techniques.

Base Alignments for the 3-3 and the Bear

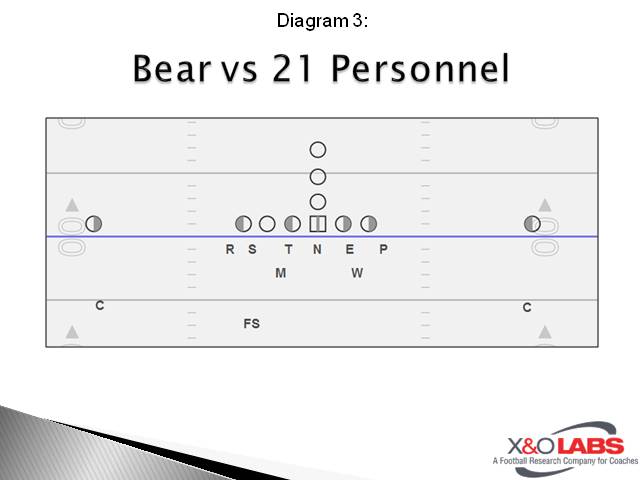
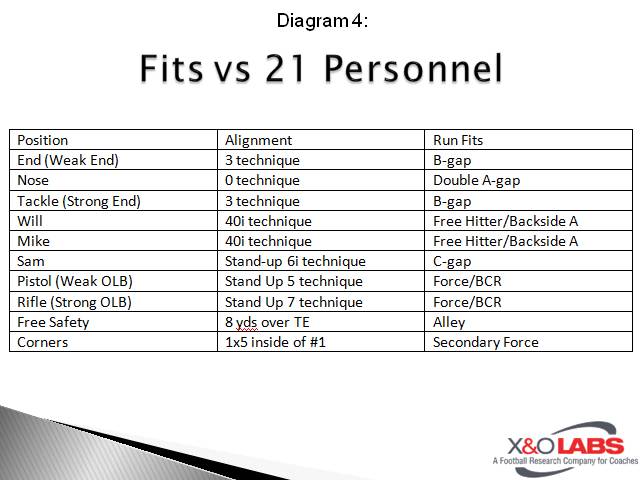
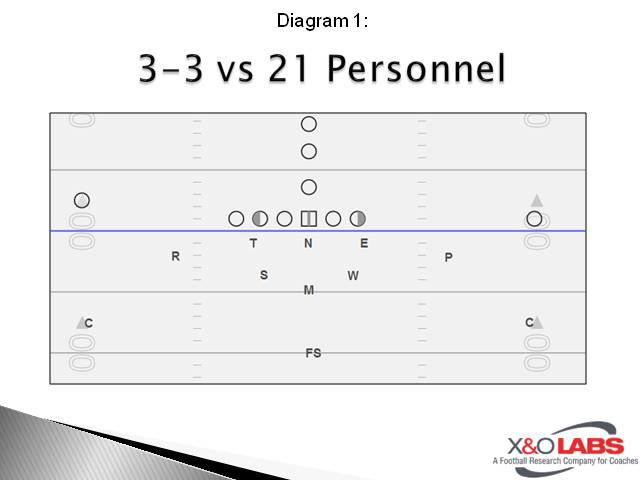
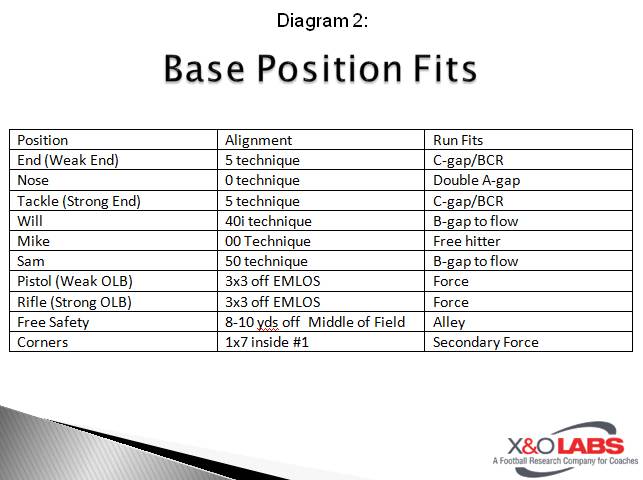
The charts and diagrams below list how we align in both our base 3-3 front as well as our Bear front. The whole purpose of using the 46 Bear is to get 8 or even 9 players in the box to stop the run, so I have listed the base alignment and run fits below.
Slide1Slide1Slide1Slide1

The alignments and assignments are similar for each position which keeps new teaching to a minimum. This allows us to be able to teach the basics of alignment and assignment without having to treat it like a different defense altogether. 

  • The Tackle and End both practice playing 3 technique players in our 4-man fronts, so their jobs are easy to teach.
  • The Nose is always a two-gap player so his job remains the same in both fronts.
  • The outside linebackers remain force players, just walked up outside of the offensive tackle to the weak side and the tight end to the strong side. We teach and work on force technique everyday with our outside linebackers in the 3-3, so this is a simple transition.
  • The Mike and Will remain inside linebackers. The Mike and Will play a back out to their side. The Mike takes #3 to the strong side and the Will takes #2 to the weak side.
  • The Sam, who is usually our bigger, more physical inside linebacker is used as our fourth man when we reduce to a 4-man front. He plays the same way in Bear and is a C-gap player. 
  • When we are in the Bear front, we play primarily running cover 0. The Corners are responsible for coverage first.
  • The Free is also primarily a pass player, but we will play him closer to the line of scrimmage than normal because we are jamming the tight end on the line with 2 players. This allows him to insert in the run game quicker.
  • Our Corners know they have no help and must play tight man coverage.

Keys, Reads and Rules

Defensive Line:

The Nose will play off the block of the center. His job is to never get reached, meaning he will play off the block of the center and work his body into the appropriate A-gap. The backside A-gap can be covered by the backside inside linebacker. He will also be getting double teamed so he must be able to either split the double team or eat up the blocks.

The Tackle and End will play in a heavy 3-technique and key the guards block. They have two rules playing this position:

Read More

Flare and Now RPO

By Mike Kuchar
Senior Research Manager
X&O Labs
Twitter: @MikekKuchar


Introduction:

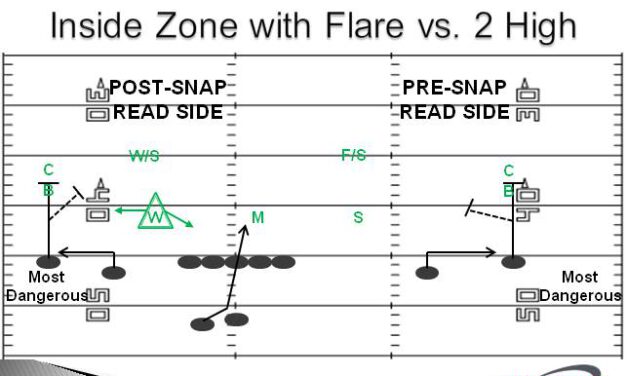
Hendrix College pairs its Inside Zone run concept with both a flare and now screen.  The read is predicated off the apex player in run/pass conflict based off his reaction on the Zone scheme. On the flare concept, the inside receiver is catching the screen (like bubble), while on the now concept, the outside receiver is catching the screen.  The offensive line blocks the five most dangerous defenders and the read is off of the perimeter force defender.  Here is a breakdown of each of those concepts:

FLARE:

    • When “Flare” is called, the INSIDE receiver is catching the pass.
    • Outside receiver “oozes” off the LOS towards the CB and blocks the most dangerous threat.

NOW:

    • When “Now” is called, the OUTSIDE receiver is catching the pass.
    • Inside receiver “oozes” off the LOS towards the CB and blocks the most dangerous threat.
    • Note:  If neither is called, receivers decide at the LOS who is getting the ball. Receivers assume we are running “Flare”. If CB is 5 yards or less, or if the wide-out gives a “Now” call, run “Now.” This takes practice!

Jordan Neal, the Offensive Coordinator at Hendrix College, spends a great deal of time educating the quarterback to make the correct read on this run/pass concept.  He emphasizes how much practice it takes to develop the correct read. Neal talks about the quarterback making a pre-snap “snap-shot” of what the defense presents before the ball gets snapped. His protocol for making the correct pre-snap read is below:

  • QB must take a “snap-shot” of the front to determine what the DL/LB configuration is. Is it a 4-2 box? Is it a 4-1 box? Is it a 4-3 box with straight man behind it? Is it some sort of odd front?
  • The next thing after identifying the box configuration is to see what we call the next “puzzle-piece,” which is the secondary configuration.

“We teach our quarterbacks to understand that if it is a 4-2 box, then he must immediately find the alley or force player to the side where his post snap-read is,” said Neal. “That guy (most of the time we are referring to the weak-safety, or the safety on the boundary side of the football field) can either be in a cover-two or cover-four alignment, or he can be walked up closer over the #2 receiver in an invert relationship with the CB which signifies cover-one or cover-three. If that weak-safety is deep, then the quarterback knows the outside linebacker on that side is his read key. If that safety is walked down over #2 and he is taking away the numbers and leverage advantage to that side, then the quarterback reads the defensive end on that side. At this point, the play just becomes old-fashioned Zone Read where the QB either hands it off to the running back or pulls it and runs the edge on a QB keeper. Everything works in conjunction because the tackle takes a snap-shot of the box and decides to block either the DE or the LB based on the box alignment and the QB is going through his progression as well. Receivers and the rest of the OL don’t have to do anything different at all from situation to situation.

Read More

Teaching Leverage and Strike Points to WRs for Perimeter Blocking

By Kenneth Tinsley
Wide Receivers Coach
Morrisville State College (NY)
Twitter: @CoachT_82

Introduction

Perimeter blocking at the wide receiver is very critical to the run game. Making a block at the 2nd and 3rd level of a defense can turn a small gain by the ball carrier into an explosive play, even a touchdown. Great blocking not only comes from effort and desire, but also from sound technique, fundamentals and understanding leverage.

It is also important to note that blocking as an outside receiver can be different than blocking as a slot receiver. Today we are going to go discuss some drills and fundamentals on how to put the wide receiver in the best position to make a block and how do adapt it to the position that they play.

Here are the points of emphasis that we focus on when teaching our receivers to block:

  1. Understand the run scheme – Knowing the direction of the run and who the ball carrier is will help the receiver to know which angle they need to take to their blocking responsibility and use proper technique that corresponds with the run scheme.
  2. Active hands and feet – If a receiver is constantly active with their hands and feet, then they can react quicker to the defender. Once the receiver is not actively moving, the defender can work around them and make a play on the ball carrier.
  3. Force the defender to have to go through your body to get to the ball carrier – As a receiver, we never want the defender to have free access to the ball carrier. If the receiver can put themselves into position to force the defender to come through their body, then the ball carrier will have a high success rate of gaining yards and creating explosive plays.
  4. Never leave your block to find another defender – Too often, I have seen receivers leave the guy that they are blocking to go for a knockout shot on a defender who is well behind the play. This has often result either in penalties or the first defender that was block ends up making the play. Once the receiver is engaged on his blocking assignment, he must maintain that block for as long as possible.
  5. Play full speed in between the whistles – With good technique and effort, the receiver will be very successful in blocking. He must never take a play off. As a coach, you have to get your players to buy into blocking. You never know when you can create opportunity for someone else to score. One thing I tell my receivers is “As a receiver you have to be able to score with or without the ball in your hands.”

Blocking Process

When we teach the blocking process, we break it down into four distinct categories. Each of these pieces can be drilled individually and grouped together to build the receiver’s blocking skill set. The categories are as follows:

Pre-Snap Identification

  • Once the play is called and the receiver aligned, the receiver should quickly identify their target and follow their rules and responsibilities to be successful in their block.

Approach

  • Come off the ball hard at full speed and come to balance.
  • Breakdown about 2-3 yards from the defender then work to close the distance between you and the defender. A slot receiver would need to get their responsibility quicker because they are closer to the run so their reaction time will be faster than an outside receiver.
  • Keep and athletic base. Feet about shoulder-width apart, knees bent, chest up, and biceps against the rib cage with the elbows pointing back. When the elbows are pointing back this will force the hands up. Hands open, thumbs pointing to the sky.
  • Keep the feet and hands active.

Attacking and Maintaining Leverage

  • The receiver should attack the leverage of the defender and to maintain that leverage. The receiver needs to put themselves in position that will force the defender to come through their body.
  • For example, if the receiver is on the right side and the run play is an inside zone play to the right, then the receiver’s attack point is the midline to the play side number of defender which would be the inside number.
  • Some coaches want to the receiver to be directly square in front of the defender which is fine. What I teach my receivers is to protect the run scheme. So if the run play is inside, the receiver is going to have an inside attack point. If the run scheme is to the outside, then the receiver will have an outside attack point.

Strike and Engage

  • When a receiver is engage with a defender, the receiver is either “in-phase” or “out-of-phase.”
  • “In-phase” is when a receiver is squared with the defender while engaged in the block.
  • “Out-of-phase” is when a receiver is engaged with a defender in the block and the defender pulls away.
  • Once the receiver is in position, the receiver must react first. The smaller the gap between the receiver and defender the faster the receiver must react. The receiver doesn’t know exactly where the ball carrier is so the receiver but be aggressive to the point of attack and strike first.
  • Once engaged keep arms strong and not fully extended. The receiver will have more control if their arms are strong. Get the receivers to think their doing a bicep curl once engaged with a defender.
  • Eyes up,

Read More

Offensive and Defensive Pre-Season Installation Models

By Mike Kuchar
Senior Research Manager
X&O Labs
Twitter: @MikeKKuchar


Introduction

With the pre-season rapidly approaching, high school coaches are now designing their installation schedules for summer camp. Finding a way to delegate an entire offensive menu into segments can be a challenging operation, which is why we wanted to research which methods coaches were using to most efficiently plan their pre-season accordingly. 

Editor’s Note: This report is designed for high school coaches exclusively. Please keep in mind that each state has its own regulations regarding pre-season practice time. This will in turn, affect the overall time duration of the installation process. We’ve included corresponding coaches emails if there are further questioning.


Offensive Installation Protocols

We wanted to research which factors were most vital in devising an offensive installation plan. So, we asked contributors what their methodology is in selecting which concepts they begin their install with. Do they base it on last season’s proficiencies? The adaptability of the skill set of their returning players? A mix of both? Their responses are below:

Mark Holcomb, Oak Grove High School (NC) [email protected]: “We will first assess the players we have coming back for the next season. We will then run reports from HUDL based on the most often used plays and success rate. We will then marry the two together based on personnel and proficiency.”

Brian Spicer, Saint Joseph Central Catholic [email protected]: “We are a perimeter first team. We tell our kids that we want to get the defense running to the sideline so we always start off with our perimeter plays during installation. This sets up our attack philosophy right out of the gate.”

Glenn Duff, Spalding High School [email protected]: “The methodology starts with the type of QBs we have for the upcoming season. Next we’ll evaluate the OL (big slow / big agile / small quick, etc) to determine run game. Finally, we look at our receivers to determine if we’re a vertical or horizontal pass team.”

Matt Kuempel, Oelwein Huskies [email protected]: “We base our installation process based on what our bread and butter play is going to be. From there we install the complements and constraints to that play. We do all of that from our base formation, but from there, we will change formations and install the same play with any additional compliments or constraints that this formation allows. This process is determined by our players’ abilities and who we want to get the football to.”

Rod Stallbaumer, Basehor-Linwood HS (KS) [email protected]: “We are a system offense so we install based on series and type of play. Try to show how they fit off each other. Day one we install our fast flow plays (jet, Iso). Day two we install our mis-direction (FB & QB Counter), Day three we install our option game (IZ triple, speed option) A lot of our pass install is done in the summer with 7 on 7 but we install PAP pass with our fast flow, quick game with our mis-direction and screen game with our option (a lot of our screens are RPO’s off IZ).”

Nathan Ferency, Shepherd High School [email protected]: “Our methodology mainly focuses on our personnel of returning players and the abilities of incoming juniors. We will predetermine what we feel will be our strengths and build our offense based on what is best for our personnel.”

Run Installation Methodologies

We’ve found that when installing the run game, most coaches will group run concepts by families such as gap runs, zone runs and man runs. While the priority of each may differ between contributors- the majority of our coaches will base their install off the zone concept- most coaches will choose to select one of these run families per day of install to rep. We asked our contributors what important correlation they use when installing their run concepts. Their responses are below:

Read More

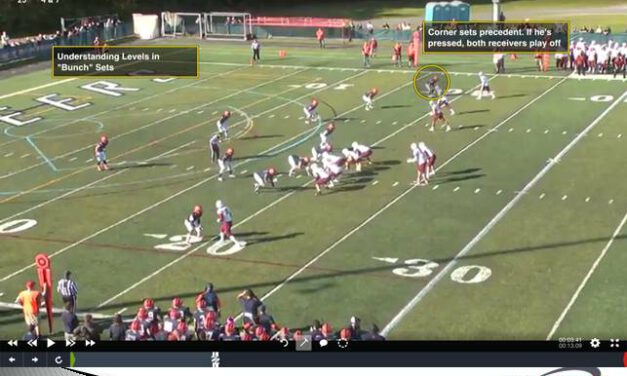
Understanding Levels to Defend Stacks/Bunches in Man Coverage

By Mike Kuchar
Senior Research Manager
X&O Labs
Twitter: @MikeKKuchar


Introduction

The following research was conducted as part of X&O Labs special report on “Man Coverage vs. RPOs,” which can be accessed in our exclusive membership website, Insiders.

Defending Compressed Formations:

Quite simply, if you’re going to play man coverage you’ll need to learn how to handle compressed formations. Bunches and stacks are pre-requisites for offensive coordinators now when they prepare against man coverages and adding the RPO element to these structures can further perpetuate a defensive coordinator’s anxiety. So we felt it was necessary to research man adjustments on how coaches were playing these formations. We’re talking pure man adjustments here, not “bunch” or “area” checks, which are synonymous with zone coverage.

Read More

Multiple Variations on Red Zone Power Pass


By Cameron Keller, Assistant Head Coach / Offensive Coordinator, Winona State University (MN)


Over the past season, Winona State ran some form of this concept 22 times inside the 30 yard line. Of those 22 snaps, they completed 17 of those passes with 4 TDs and 0 INTs. At nearly 78% completion, this concept was their most successful concept within our whole passing attack. Read about it here…


By Cameron Keller
Assistant Head Coach / Offensive Coordinator
Winona State University (MN)
Twitter: @WSUQBCoach

Introduction:

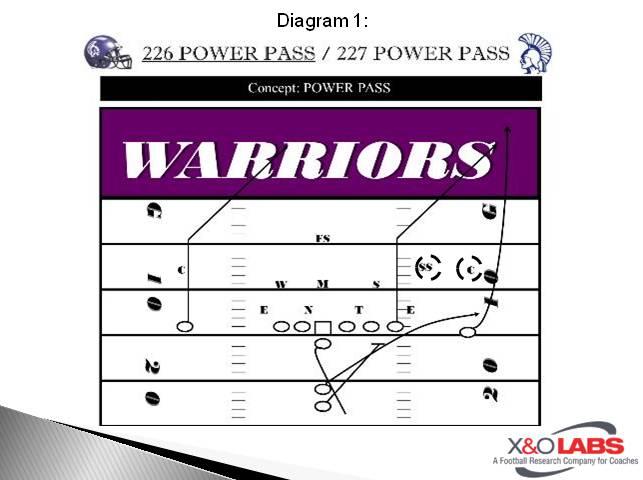
winona1In today’s game, everybody runs some version of play-action pass to match their desired run game.  For us, being an Inside/Outside Zone & Power team, the ability to effectively run our Power Pass has been instrumental in our offensive success.  Especially in the red-zone, the Power Pass concept for us is one that we have leaned on a lot for great success throwing the football inside the 30 yard line.  Where I think we have done a really nice job over the past 6 years is being able to take whatever it is we are running that week in terms of formations, and fitting our power pass concept to those same looks to better eliminate any tendencies we might show in our formational play calling from week to week.  We run Power 3 different ways:  2 Back, 1 Back, and QB power.  The trick for us is to be able to install the base concept for our Power Pass in such a way that no matter what the formation we run it out of, our guys always know what the base concept looks like and can adjust accordingly from there.
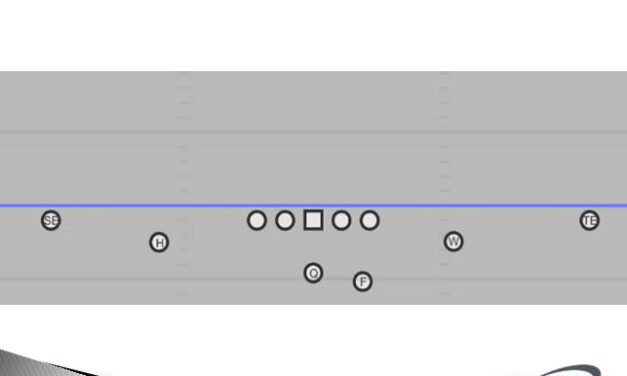
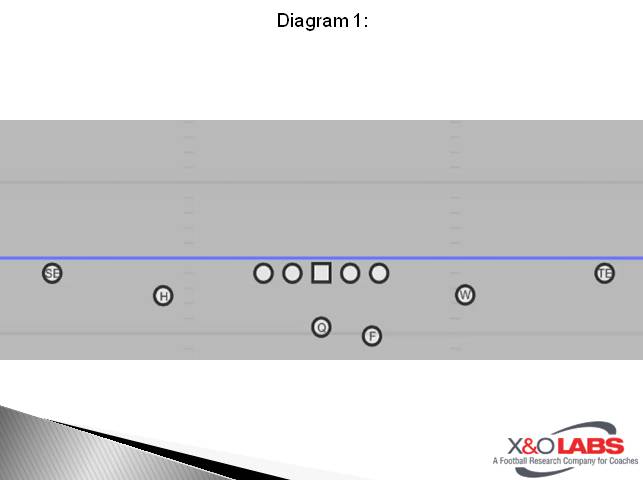
Base Power Pass

Like most teams running power pass, our base concept is based off of a “Flood” Concept:  achieving 3 distinct levels outside of the numbers.  We do this with a number of route combinations, but our base concept involves a vertical, corner route, and a flat route (Insert Diagram #1).  This base concept teaches our QBs how to read High to Low and also have the automatic hot route built in.

Slide1

In the red-zone, specifically, we don’t run this exact route very much due to spacing issues with the vertical but I like to show this base install for teaching purposes so people can see what we are trying to accomplish from the beginning with the teaching of our QB’s read progression.  Specifically for our QBs, they read the CB first to determine if we can take a shot with the vertical.  If the CB bails and stays over the top, their eyes travel to the alley player the read the Corner/Flat route combination.  Where a lot of young QBs make their mistake, in my opinion, involves the initial read on the CB.  I teach all of my QBs if the CB is looking at you and trying to play both the vertical and corner route, take the shot.  If he turns his back and runs, find the alley player.  If the alley player sinks, throw the flat route to the FB.  If the alley player jumps the Flat route, throw the Corner route.  We have 2 main teaching points with all of our Corner Routes:

  1. Always run the route skinny, aiming at the front pylon until we get inside the 30…at that point the aiming point changes to the back pylon.  This give the QB leeway to flatten out the route if the safety sits over the top.  This is the main reason I say to throw the corner route if the alley player jumps the flat route.
  2. If we get a safety that has outside leverage on our corner route, we will convert the corner to a skinny post.  This adjustment will be shown in one of the video clips.

The one thing I want to point out with this read involves how a lot of people talk about the FB route in the flat in terms of “You can’t go broke taking a profit”.  I’m not sure this has ever been talked about in my QB room because last I checked, you can throw a TD on 3rd and 3 even if the FB is always open!  For us, the defense always dictates where we throw the ball regardless of the down and distance.

Protections

One of the questions I get asked the most when it comes to our Power Pass revolves around our different use of protections based on the type of play action we are running.  With three different types of Power Pass comes 3 different types of protection as well.   Our base protection gets installed out of our 2 back Power Pass and is taught based on the Turn back protection concept.  With this protection, we will pull the back side guard to emulate Power and he is ultimately responsible for the first defender to show in the C Gap.  With our FB being out in the route, we keep the IB in to be responsible for the second defender to show in the C gap or outside.  Where I think we do a really nice job is at our play side tackle.  We teach our QBs to make sure and alert our offensive line anytime we see a threat of pressure to the call side.  With this alert, our play side tackle, who’s main responsibility is the B gap, will be slower to turn back to the B gap, anticipating the 5 technique to cross his face.  We call this a “Hump” technique.  I’ve seen teams turn the tackle to quickly and a good defensive end will play off of the tackle’s outside hip leaving the protection a hat short.  Our play side Guard and Center will block back as well leaving the backside tackle to funnel hinge and take the most dangerous threat: either the defensive end or the WILL LB if he blitzes.  If we choose to run this away from the TE, keeping him in for protection, we water fall the back side with the Tackle and TE.

Read More

Three Tags in the Four Vertical Concept

By Eric Struck
Wide Receivers Coach/Passing Game Coordinator/Special Teams Coordinator
Washington High School (SD)
Twitter: @EricStruck

Introduction:

One of our favorite pass plays, and one that is popular with a lot of coaches, is the four-vertical concept. We want to run this play as much as possible but be able to give the defense different looks as well as take advantage of what the defense will give us. We feel that by adding a simple tag system allows us to be very diverse and multiple within our passing game but keep things very simple for our players.

Set Up

Slide1

In our basic 2×2 formation (diagram 1) each one of our receivers has a rule as well as a specific landmark they need to follow. We tell our outside receivers that they own the numbers and we tell our inside receivers that they own the hash.

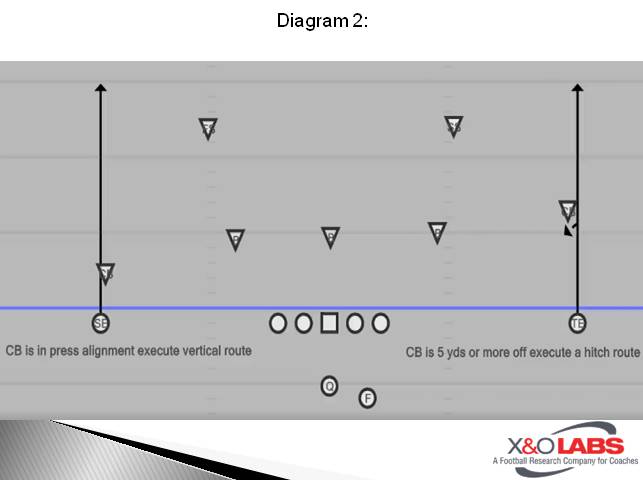
Along with sticking to their landmarks, our receivers are also executing a read as they run their route. Our outside receivers are reading the depth of the corners both pre-and post snap. They have what we call, the “Hitch Read.” As a general rule, if the CB is deeper than 5yds then they will execute a hitch route at roughly 5-7 yards. We tell them on their 5th step they should know if they are continuing vertical or hitching it up (diagram 2).

Slide1

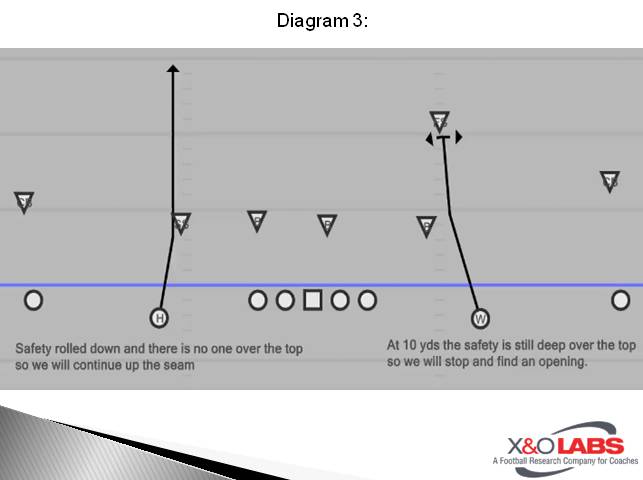
Our inside receivers have what we call the “Seam Read.” They will get a pre-snap read if the safety is over the top as well as a post snap read. Once the inside receivers reach 10 yds. and the safety is still over the stop then they will hitch up and work 3 yds. to either side of the hash and settle in a window (diagram 3).

Slide3

If there is no safety over the top, then they will continue to run the seam. We spend a lot of time working on this play and we feel we can execute it no matter the situation.

QB Read Progression

He will start by assessing the safeties. How many deep safeties are there? Our quarterback coach uses the terminology of “Open or Closed Roof.” An “Open Roof” would be 2 deep safeties and a “Closed Roof” would be a 1 high safety look. If it is an “Open Roof” our QB will read from the outside receivers to the inside receivers. If it is a “Closed Roof” then our QB will read from the inside receivers to the outside receivers.

With an “Open Roof” read the QB will read the depth of the Corner. If the hitch is there we will take it every time. If the Corner alignment does not allow for the Hitch then the QB will read the near safety. If safety stays on or close to the hash then the QB has a one on one match up the outside. If the safety widens then the seam route should open once we clear the alley defender.

Switch Tag

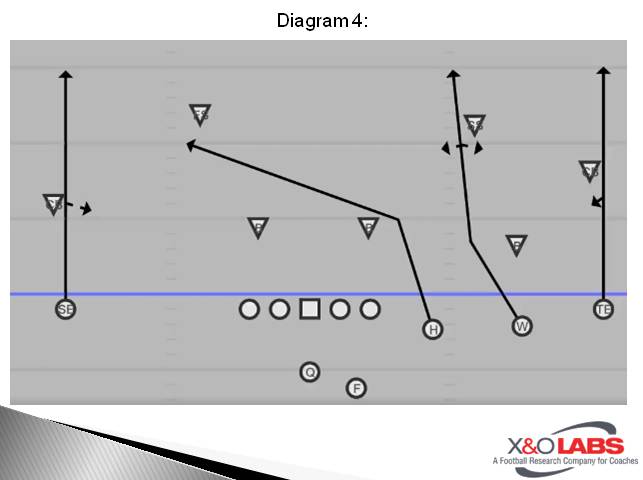
Our favorite tag for our Four Verticals concept is our “Switch” Tag. In our basic 2×2 formation, both sides would execute the switch tag (diagram 4).

Slide3

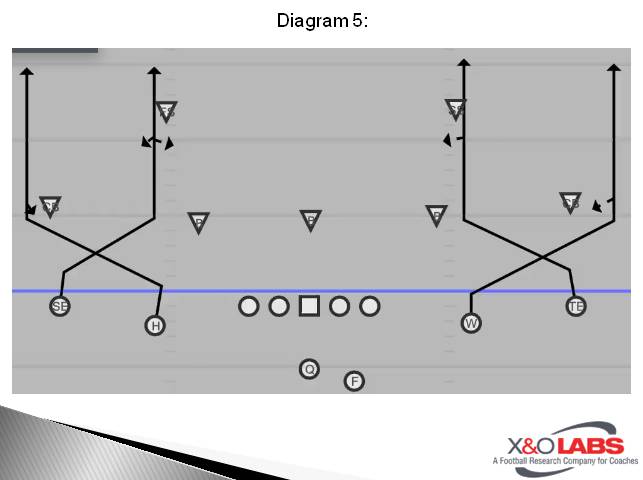
This tag applies to not only the release we want to execute but the reads on the route as well. Our outside receiver will push vertically 2-3 steps then work their way inside up the hash so that can execute the “Seam Read.” Our inside receiver will push vertically 1-2 steps then work behind the outside receiver and get to the numbers and execute the “Hitch Read (diagram 5).”

Slide5

The great thing about the “Switch” tag is that the read stays exactly the same as our basic four vertical concept. If we are in a 3×1 alignment then the “Switch” tag applies to the 1st two receivers from the sideline. The inner most receiver will work to get vertically to the opposite hash and he no longer has a read. He is getting vertical no matter what the defense does.

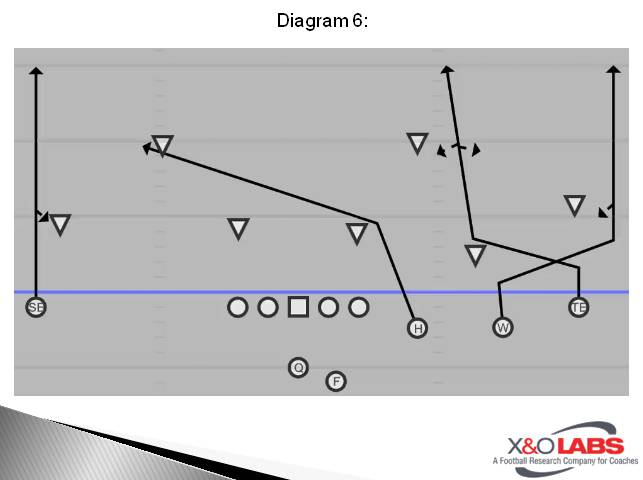
We really enjoy the switch especially when we face a Cover 2 type defense or a defense who aligns their CB’s in press or a tight alignment. This allows for our receivers to get a fairly clean release off the line of scrimmage. With the switch release against a press corner we feel the “Switch” release gives us an opportunity to out leverage the corner with the slot receiver. The CB must carry the outside receiver and when he does this it gives our slot the opportunity to get outside and hopefully be able to gain a step or two advantage on the CB (diagram 6).

Slide5

The “Switch” tag is also very effective when using motion. Faking the “Jet Sweep” action to the boundary and using the motion man to run the outside vertical route is a great way to out leverage the CB (diagram 7). This also takes advantage of a rotating secondary. If you are a team that uses a crack scheme or some type of switch blocking scheme on the perimeter, then the motion paired with the “Switch” tag can be especially effective against an aggressive alley player.

Read More

WIN Slant/Fin Lock RPO

By Cole Kristynik
Offensive Coordinator
Cypress Springs High School (TX)
Twitter: @ColeKristynik

Introduction:

A trendy offensive phrase is to “play in space.” To many, that could mean bubble, smoke or swing screens. At Cypress Springs, we use all three of these at times when the defense gives us luxury looks to do so. Our sense of space or the holes we want to puncture tends to be further down the field. We are members of the RPO group and they have been a big part of what we do for a while now.  We use the 3×1 Stick/Gift Concept, Glance Routes, Screens, among others.

That said, the WIN Slant/Fin route combination has taken us to another level in the past few years. A big component of this is our constant evolvement of this route combination. One of the first additions we made was to not just attach it to a run but to also use it off a hard Half Slide play action. This allows the Win Slant route to find more depth, space and pierce a hole in the defense in more areas. This is what frustrates defenses, along with our ability to get the ball out of our hand with lightning speed and a confidence that our WR’s will find the space.

There is no doubt that some defenses know what we are trying to do, but they do not always account for the multiplicity and options of the routes. At times they try to overplay and rotate coverage where they think the routes are designed to hit. The truth is we do not always know where the vacated space will be pre-snap. In some instances, we have not executed upfront picking up a blitz or our undersized OL may be overwhelmed and allow penetration with defenders on a path to our QB, but the mesh freezes enough for a quick pull and deal of the ball. The RPO version is our best way to run option.

Rules and Coaching Points

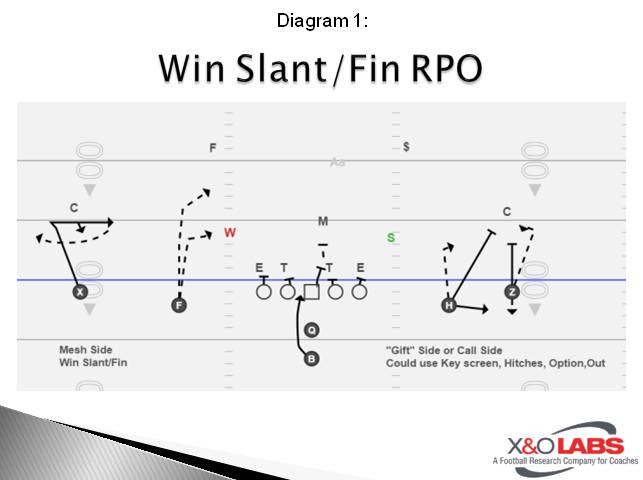
When we RPO this concept we use Locked Zone (Diagram 1) about 70% of the time. We have also have used Split Zone, Double Fold, 2 Back Iso and G/H Power. We prefer the latter with our Single WR tags and 3rd level reads, another piece of the RPO and Play Action route Family. 

Offensive Line Notes:

This article is more about the multiplicity of the route concept and pairing it with a leverage beating  Gift side as a RPO or using Play action. However, in Diagram 1 we will see the highest percentage RPO scheme. Some call it Tight Zone, we use the term Locked Zone.

RPO version with Locked Zone in 2×2.

Slide1

WR Notes:

Called Side: Gift

The gift side has been key screens, option hitch routes, and other quick leverage beaters. Note that when we do bubble it is a small step controlled crawfish to get corners to trigger outside of #1 while our slot pushes for the space vertically. We use multiple splits, stack, adjustments, or whatever helps us gain leverage for the Gift or to hold that half of the field.

This is the same concept in place whether it’s the play action or RPO scheme, it keeps it simple and allows us cheap yardage on proper down and distance even on play-action call.

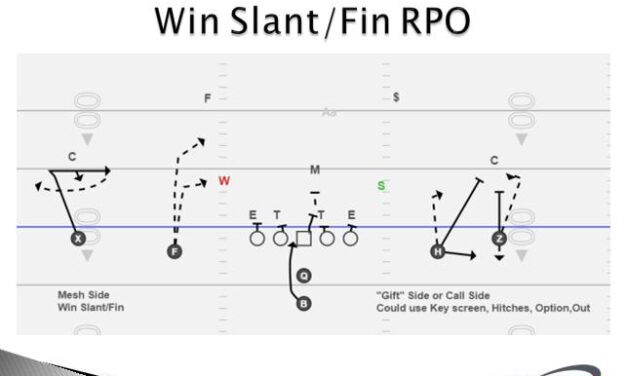
If on Mesh Side: Win Slant/Fin.

Read More

Tao of Kickoff: 4 Drills to Improve Your Coverage

By Coach William Lund
Special Teams Coordinator and Linebackers Coach
Saginaw Valley State University
Twitter: @lundsanity51

Introduction:

I arrived at Saginaw Valley State in the spring of 2016 with the goal of making our Special Teams unit one of the best in the country. A big part of reaching that goal was to turn around the kickoff coverage unit. Thanks to great players and the drills used in this report, we improved our kickoff rankings 80 spots during the 2016 season for NCAA Division 2 football programs. The key was developing an efficient way of balancing the skills and techniques needed, while still maintaining the ability to run the opponent’s schemes for the upcoming week within a tight time frame.

These drills are done pre-practice in a five-minute time frame. It is a teach tempo, but we try to work around ¾ speed. We utilize these drills as a prep for the day’s practice where the Kickoff team will be the focus.

Each of these drills can also be applied and used to develop your team’s Kickoff Return unit by merely changing the emphasis to blocking. The “Flyzone Drill” and “Cardinal Drill” can be used as competitive drills between units to create a more intense work atmosphere.

Speed and Backdoor

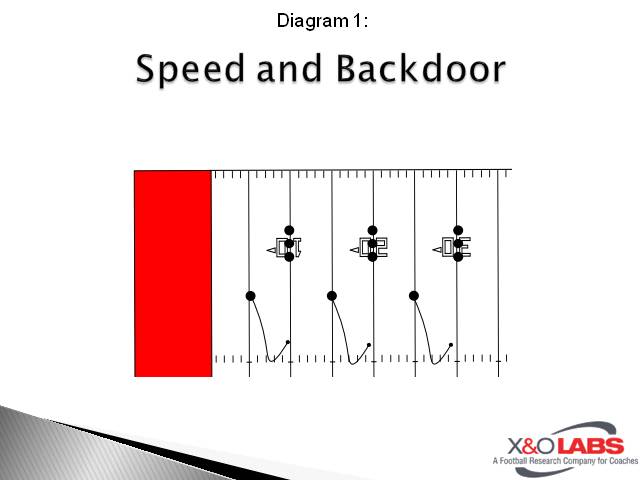
Slide1

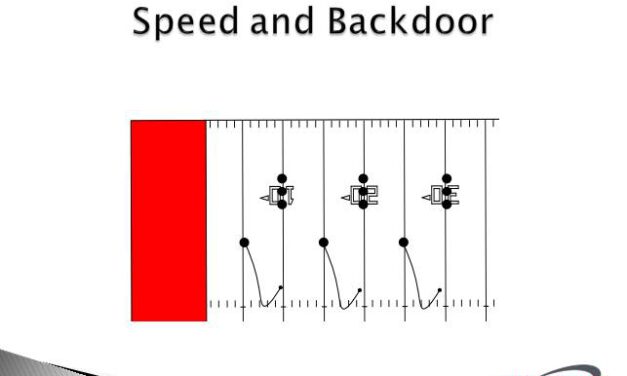
This drill is our pre-practice drill we work on to develop using a “dip and rip” when beating a block with speed or working a back door move with a stick and move a al “Allen Iverson crossover.” We will settle on the hash with a near foot near shoulder approach or work on tackling using donuts.

Film Notes: These first 4 clips of drills are variations of skills needed to defeat blocks in space. The first one is defeating a block with speed. Starting on the sideline, we want to dip and rip through the blocker, and on approach to the hash we work a near foot- near shoulder shuffle, simulating our preparation for the tackle. We added a tackling donut to provide a functional vehicle to tackle, and execute our near foot – near shoulder tackling technique.

To study film of this drill, click on the video below:

Read More

5 E.D.D.s for Shield Punt Coverage

Zach Watkins
Co-Defensive Coordinator/Special Teams Coordinator/Linebackers
Washburn University (KS)
Twitter: @Zach_Watkins

Introduction

watkinsOur coaching staff here at Washburn University believes that special teams can win or lose you two games in a season. This belief held true for us in the 2016 season. It might be a missed extra point, kickoff return TD, or the kickoff team pinning the opponent deep in their own territory, but each unit has a responsibility to the team to win their play and help win the game. As I always tell our special teams units, “field position is the purpose of special teams.” No unit has a greater task of flipping field position in our favor than the punt team. 
The PRIDE Unit

We call our punt unit “Pride.” We use this term to stress to our team how important this unit is. Our staff calls it “the most important play in football.” “Pride” is also a part of our special teams’ mantra that we say before each meeting. 

We are a shield punt team.  We use the shield for three basic reasons:

  1. Ease of teaching/understanding the scheme
  2. The ability to plug guys in from week to week because of injury/playing time, etc.
  3. Most importantly, provides the most effective coverage.

Base Coverage

We will utilize different formations/shifts/motions, directional kicks, rugby style roll out, and other wrinkles from week to week, but our base coverage and drills will stay the same. All of our coverage drills for special teams fit in well with what we want to teach on defense. By doing this, we can keep terminology the same across all areas of coverage, tackling, and leverage, which has translated well for our players.

Slide1

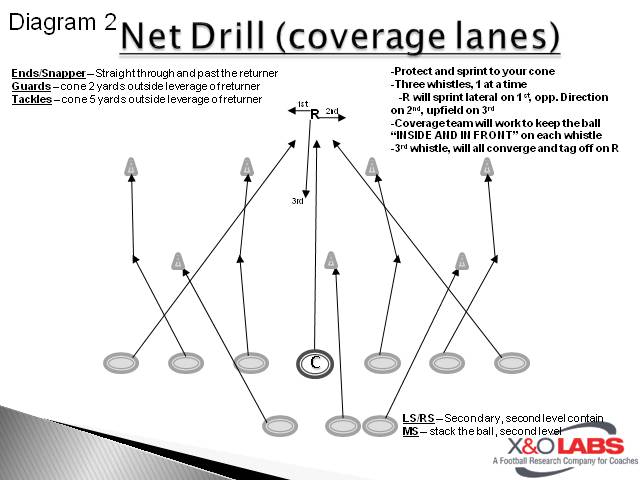
In Diagram 1, our base coverage is shown. We have tweaked scheme from year to year to fit our personnel, but this has been our most consistently effective coverage. Ends (E) are our speed guys (WRs/DBs) whose only job in coverage is to get to the returner as fast as possible. Their job, along with the Snapper (S), is to take a shot and make the returner go east and west. The E’s are taught to aim for the returner’s near shoulder, while the S is taught to go right down the returner’s middle. Everybody besides the E’s and S have one base principle in coverage which we apply across all coverage teams and to our defense; “KEEP THE BALL INSIDE AND IN FRONT!” If the ball is inside of you and in front you, we will make the tackle. 

We teach the Guards (G) and Tackles (T) to have specific leverage rules. G’s have 15×2 rule and T’s have 15×5 rule. This means that when they are 15 yards and closer to the returner, they must be leveraged 2 and 5 yards respectively to their side of the returner. The Left Shield (LS), Middle Shield (MS), and Right Shield (RS) are second level contain players. As with any coverage team, we want to create levels to ensure we can still make the play if a front line player loses their leverage. The LS and RS will keep the ball inside and in front of them, while inserting between the G and T to their side. The MS will stack directly over the ball as he covers downfield.  The Punter (P) will always be our true safety and will stack the returner.

Coverage Drills

Read More

Developing a Dominant Pass Rusher

An Interview with Craig Kuligowski, Defensive Line Coach, University of Missouri


By Mike Kuchar
Senior Research Manager
X&O Labs
Twitter: @MikekKuchar


mizzuIntroduction:

It’s no secret that former University of Missouri defensive line coach Craig Kuligowski knows how to produce NFL ready talent. When edge rusher Charles Harris went 22nd overall in April to the Dolphins, it marked the fifth defensive lineman since 2009 that he has mentored to go off the board in the first round. It’s the most of any program since that time. Now as the defensive line coach at the University of Miami, Coach “Kool” shares the methodology and drill work he uses to get his players ready to play at the highest level of football.

Mike Kuchar (MK): What makes a great pass rusher?
Craig Kuligowski (CK): Many of them have that unblockable mentality. You have to believe that they (offensive lineman) can’t block you. They may come in with it (that attitude), but it gets washed away really quickly. It needs to get built up. There is no defensive lineman I’ve ever met that doesn’t want to sack the quarterback.

MK: Why are your players such effective pass rushers?
CK: We take the mentality that if we don’t know if it’s run or pass we are going to play the pass. We are going to stop the run on the way to the passer. We are going to penetrate. We attack and react instead of using block reaction then find the ball. You can’t rush the quarterback playing the run first. What we do drill wise, better show up on the football field.

MK: What is the pre-snap and post-snap visual landmark you use on your pass rush?
CK: The first thing they key is the ball with their periphery. The second thing they key is the screws of the helmet. High hat= pass. Block down = close the trap.

MK: How do you teach hand placement on your pass rush?
CK: Well, hands and feet have to go together. Every drill involves the hands. When we run circles, we use hands. We do the sled. We overemphasize the hands.

MK: What is the process you use to decipher which pass rush moves work for each kid?
CK: Every kid is not good with every move. We do one on one pass rush every day. I watch them to see what works better and what doesn’t work. The real challenge is getting them to do what they do well and try to make them better. Instead of doing what they want to do or do every move. When you do too much, you lose. They have a tendency to try and overwhelm and opponent.

MK: Is there a set number of moves you teach? What is too much? What is too little?
CK: I teach them everything and they find the ones they use most effectively. It’s really a sales job to get them to do it. It depends on each player. I see what he does. We teach power rush, club rip, club swim, chop rip and speed rush and we teach a swim. Off all that stuff we can combination into one thousand moves. We might do club and rip and hit the tricep. Now some kids are using shake club rip or some are better and stabbing the outside hand and then progressing to club rip. Or I can go club rip and the offensive line pushes my hip and now I spin back to the quarterback. We have all those combinations just for that guy.

MK: Do you cross train your perimeter pass rushers with your interior pass rushers?
CK: Yes, but some moves are more accessible on the outside.

MK: What are some problem areas that arise in the pass rush?
CK: Does a kid come off the ball or does he stand straight up? Does he expose his chest? Is he not getting off the ball fast enough? Those are the main issues I try to address.

MK: What’s the mentality of your get-off? How do you coach that?
CK: You never want to go off on cadence as much as possible. You need to move on the ball. When the ball is snapped, where are you on the line of scrimmage? Have you gone past? Are you still in a stance? If you don’t do that well, you can’t be successful. When we’re not successful, we don’t penetrate.

Read More

Gap Scheme RPO Organization and Implementation

By Brian White
Offensive Coordinator
Rose-Hulman Institute of Technology (IN)
Twitter: @CoachWhite_RHIT

Introduction

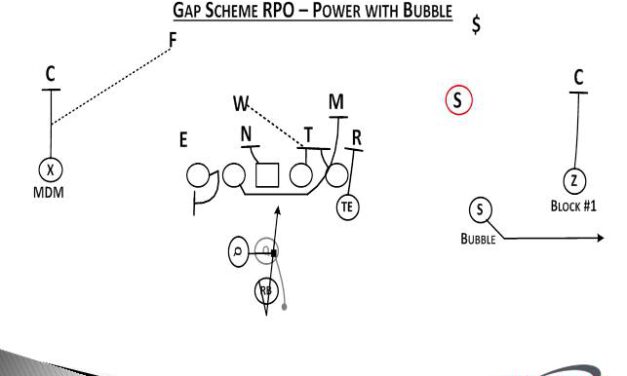
At Rose-Hulman, we have had success running RPO concepts attached to our Inside and Outside Zone runs. During the 2016 season, our personnel dictated that we needed to rely more on our Gap schemes. We still wanted to put opposing defenses in a run-pass conflict with an RPO based offense so needed to find a way to read a defender on our Gap schemes. We researched other successful programs and found that an effective way to tie in a RPO with a Gap scheme is to read a second level defender, namely the overhang LB to the side of the run.

Gap Scheme Runs

The two gap scheme runs we tied into our RPOs are Power and Counter. We like these two runs because most of the teaching is the same for the QB, OL, TE and RB.

Power Rules

Quarterback = Align with toes at 4.5 yards. Secure the snap. Clear the midline by taking a lateral step with your backside foot and a hinge step with your front side foot to get to 90 to get to 90 degrees. If a called run, hand the ball to the RB and carry out naked fake opposite the run. If RPO, read the play side OLB for run or pass as you mesh with the RB. Carry out throw fake if you hand the ball to the RB.

Running Back = Align with toes at 6.5 yards. Take a drop step with the backside foot, secure the handoff, blink the back side LB for cutback then read the A-B-C gaps. Be aware that the QB may pull and throw if RPO. In that case, carry out run fake.

Tight End = Block the play side C gap defender. He will usually align off of the ball with his inside foot just inside of the play side OT.

Play Side Tackle = Block the play side B gap defender. Has a possible double team with play side guard.

Play Side Guard = Block the play side A gap defender. Has a possible double team with play side tackle.

Center = Block the back side A gap defender. Has a possible double team with play side guard.

Back Side Guard = Skip pull for the play side LB.

Read More

OLB Play in the Cover 2 Robber Defense

By Shawn LaMothe
Defensive Backs/Running Backs Coach
Grosse Ile High School (MI)
Twitter: @CoachLaMothe


Introduction

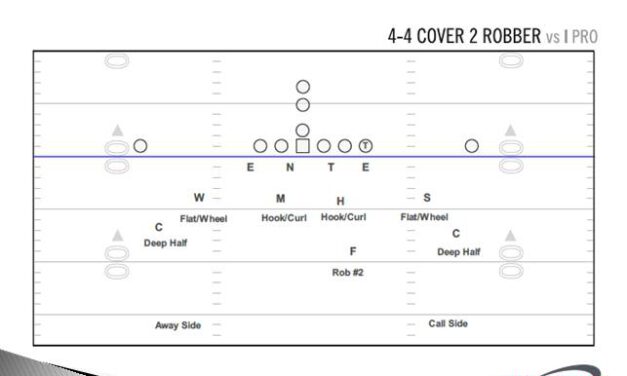
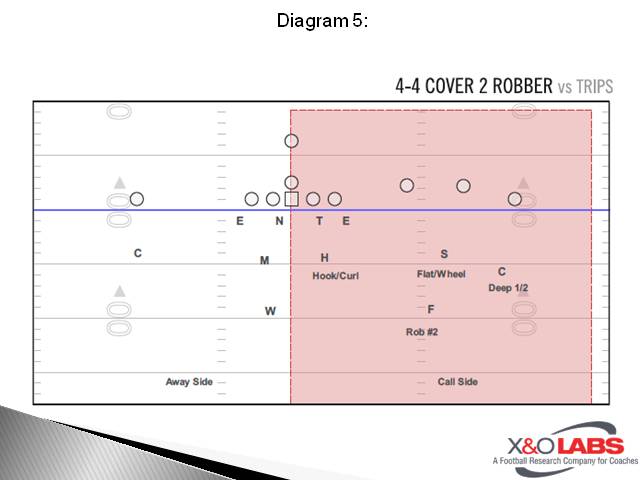
In our base 4-4 Cover 2 Robber system, our goal is for our outside linebackers (OLBs) to be run stoppers first. In our league, we compete against three, very tough, double-tight, full house backfield offenses, which run 90% of the time. Overall, 70% or more of the plays we will see from our remaining opponents are run plays, as well.

Defensive Structure

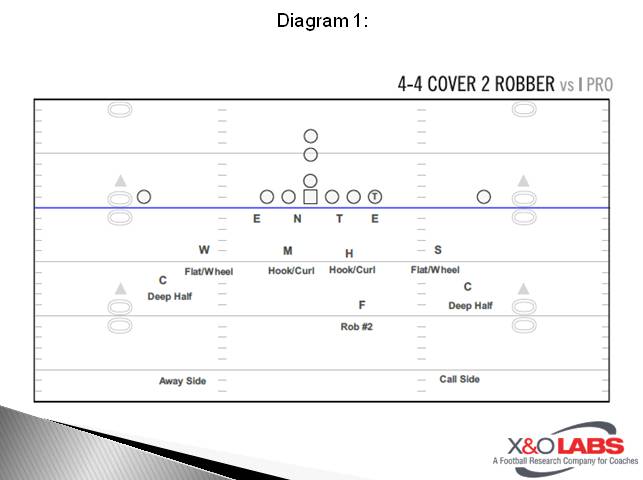
So we are all on the same page, when I speak about the 4-4 Cover 2 Robber system, we have two OLBs, two corners, and one free safety.

Slide1

In our system, we have a “Call Side” OLB and an “Away Side” OLB. Before each play, the free safety communicates a directional call telling the OLBs which side to line up on and what side the free safety will be on.

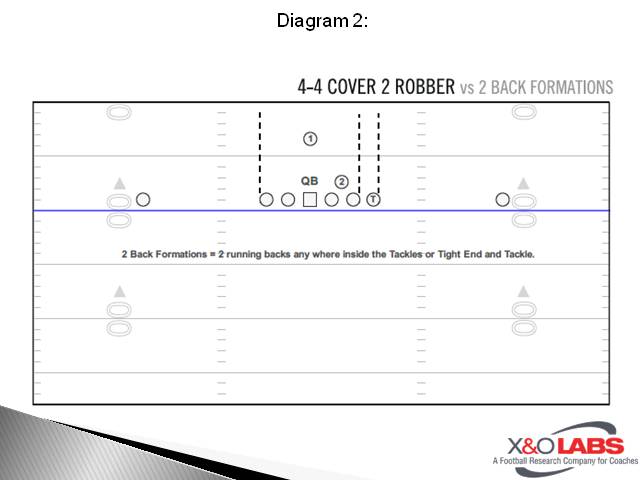
Against any two back formations, this is our go to concept. It is important to note that we define two back formations as any formation in which there are two players lined up between the tackles (not including the QB).

Slide1

When we see one back spread formations, the first coverage adjustments we will make is to keep the responsibilities the same for the Call Side players with some changes to the Away Side. We do have additional coverages vs 2×2 and 3×1 formations; however, our first check keeps the Call Side the same.

The OLBs’ responsibilities are:

  • Force players vs the run
  • Flat players vs the pass 

Alignment

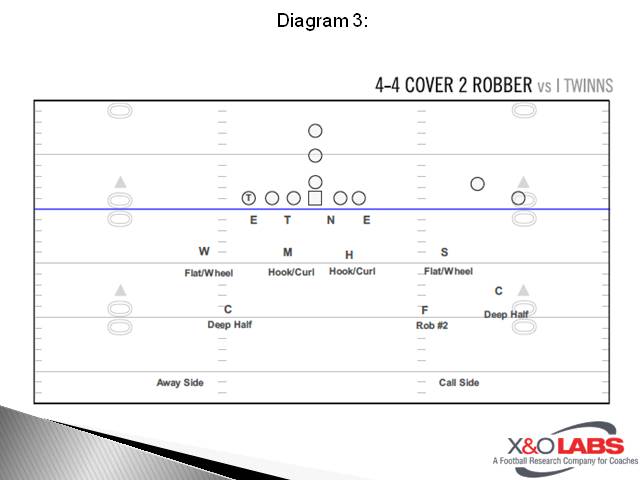
  • Against only Tight End:
    • Align four yards deep and four yards outside the Tight End.

Slide3

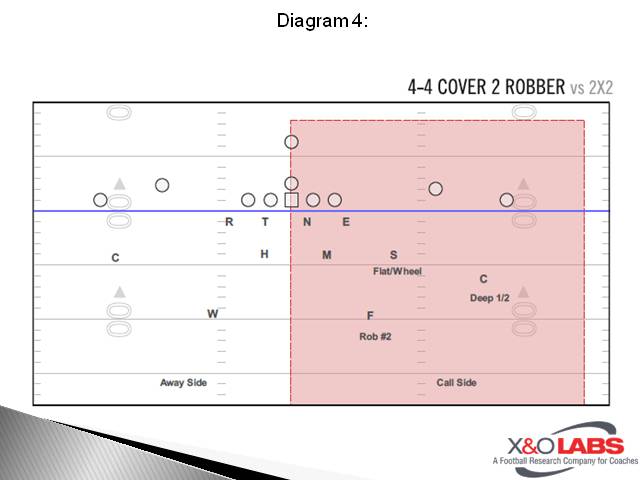
  • Against Two Split Receivers:
    • Split the difference between the Offensive Tackle and the #2 Receiver and five yards deep.
    • If #2’s split closes and he aligns closer to the tackle, we tell our kids always align in position to maintain outside leverage. Once the player feels like that is threatened, he can move head up to outside #2.
    • If the scouting report shows heavy pass from this formation, we will move the OLB out, closer to the #2 receiver to five yards deep and two yards inside #2.

Slide3

  • Against Three Receivers:
    • Split the difference between the #2 and #3 receivers and five yards deep. It does not matter if #3 is a tight end or in a wing position.
    • If it is a bunch formation, the OLB will align head up with receiver on the line of scrimmage. If the bunch is close to the tackle, the OLB will maintain outside leverage.
    • If the scouting report shows heavy Bubble/Now screens from this formation, we will move the OLB out, closer to the #2 receiver to five yards deep and two yards inside #2.

Slide5

Keys

Read More

Eight Tips for Maximizing Your Program’s Summer

By Product Specialist Team
MaxOne.com

X&O Labs Note: We recently met with the guys at MaxOne to talk best practices for summer. MaxOne is also a sponsor of X&O Labs. These guys are doing some cutting-edge stuff. We looked at the research they have been doing with coaches and realized the results could help our readers. So, we asked them if we could publish it. We really believe in what MaxOne is doing and think it is the future of how coaches will run their programs.

Take a look below at the findings – and take a minute to download the 42 things that the best coaches do in the summer.

max11

Summer is coming. What do those words mean to you? The season most often associated with vacation, time off, and relaxation has a very different significance to those who run football programs. As the temperature rises, so does the urgency to get better for the season ahead.

There is no one single recipe for driving improvement within your program; there are a million different ways to attack it, and it happens one day at a time. If you’re looking for new ideas here are eight of them broken down into three categories:

  1. Strength and Conditioning
  2. Program Building
  3. Communication

If you put just one or two of these to work in the coming months you will set your program up for even more success in the season to come.

Report continues below…

Are You Doing These 42 Things?

There are 42 things that successful coaches are doing within their program every summer. Download this FREE checklist. Go here.

Strength and Conditioning

1. Think Creatively About Strength

There are countless strength building tools and resources available to coaches. Outside-the-box options such as CrossFit, Kettlebells, and even yoga can provide outstanding options for customizing your summer workout program.  Bringing fresh ideas and new challenges to your strength program will not only boost the excitement of your athletes, but also keep them engaged and working hard.

John Allen Snyder, Head Football Coach at Indiana Area High School described his diverse and creative approach this way:

max12“Our program is spearheaded by our OL coach… our district Strength and Conditioning Coordinator…and myself the head coach. We feel the three of us together bring a varied approach to Strength and Conditioning…[One] Powerlifting, [another] HIIT/CrossFit and Flexibility, and myself the football aspect. This allows us to throw everything on a wall and see what sticks. It allows us to create varied programming based on three fundamentally different strength approaches, but we always make sure that there is on-field application for everything we do.
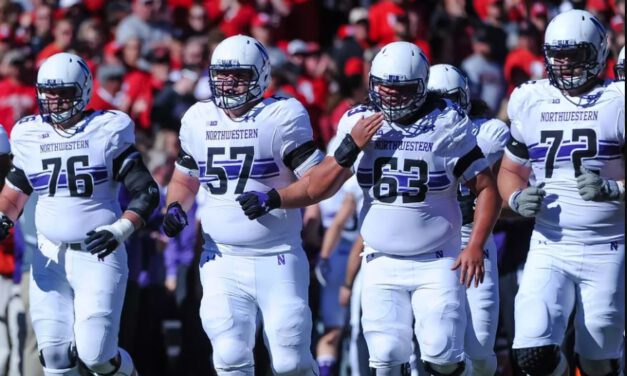
It doesn’t have to be a new fad workout, either. Something as simple as unique warm-ups that are introduced in a different space, or a finisher exercise that generates energy and competition in the weight room can help to increase engagement in your program.  

Read More

Teaching the Dead-Snap in 5-Steps

By Mike Kuchar
Senior Research Manager
X&O Labs
Twitter: @MikekKuchar

Featuring:

Adam Cushing
Offensive Line Coach
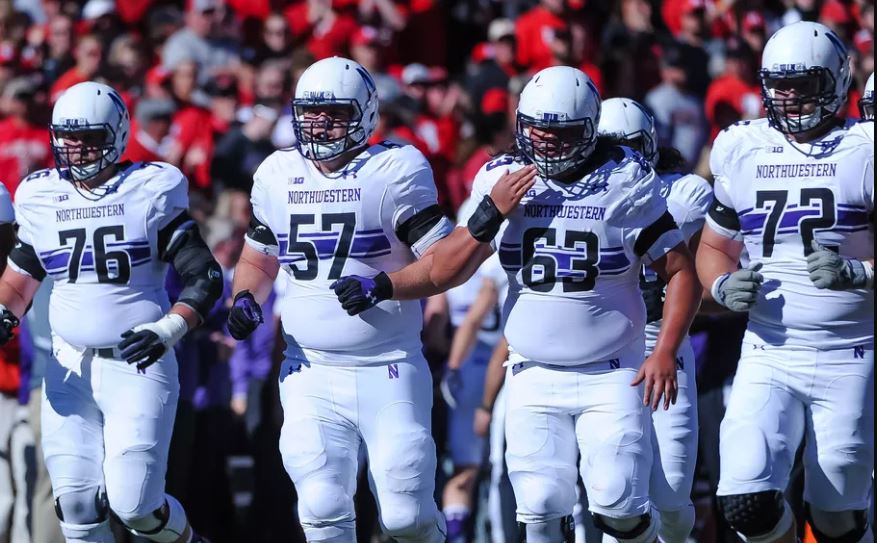
Northwestern University
Twitter: @CoachCushing

Introduction

nwIt was directly after the 2015 season when Northwestern offensive line coach Adam Cushing felt he needed a change. That season seven snaps negatively affected the outcome of the offensive play, including one that turned into a pick six. So he did what most good coaches do, scoured the earth to find better information on how to make the shotgun snap more efficient. So after consulting with offensive line coaches at all levels he decided to invest fully in the dead-snap shotgun technique, which compromises speed for accuracy by eliminating the wrist flick of the center.

Read More