306")

By Cameron Keller, Assistant Head Coach / Offensive Coordinator, Winona State University (MN)
Over the past season, Winona State ran some form of this concept 22 times inside the 30 yard line. Of those 22 snaps, they completed 17 of those passes with 4 TDs and 0 INTs. At nearly 78% completion, this concept was their most successful concept within our whole passing attack. Read about it here...
By Cameron Keller
Assistant Head Coach / Offensive Coordinator
Winona State University (MN)
Twitter: @WSUQBCoach
Introduction:
 In today’s game, everybody runs some version of play-action pass to match their desired run game. For us, being an Inside/Outside Zone & Power team, the ability to effectively run our Power Pass has been instrumental in our offensive success. Especially in the red-zone, the Power Pass concept for us is one that we have leaned on a lot for great success throwing the football inside the 30 yard line. Where I think we have done a really nice job over the past 6 years is being able to take whatever it is we are running that week in terms of formations, and fitting our power pass concept to those same looks to better eliminate any tendencies we might show in our formational play calling from week to week. We run Power 3 different ways: 2 Back, 1 Back, and QB power. The trick for us is to be able to install the base concept for our Power Pass in such a way that no matter what the formation we run it out of, our guys always know what the base concept looks like and can adjust accordingly from there.
Base Power Pass
Like most teams running power pass, our base concept is based off of a “Flood” Concept: achieving 3 distinct levels outside of the numbers. We do this with a number of route combinations, but our base concept involves a vertical, corner route, and a flat route (Insert Diagram #1). This base concept teaches our QBs how to read High to Low and also have the automatic hot route built in.
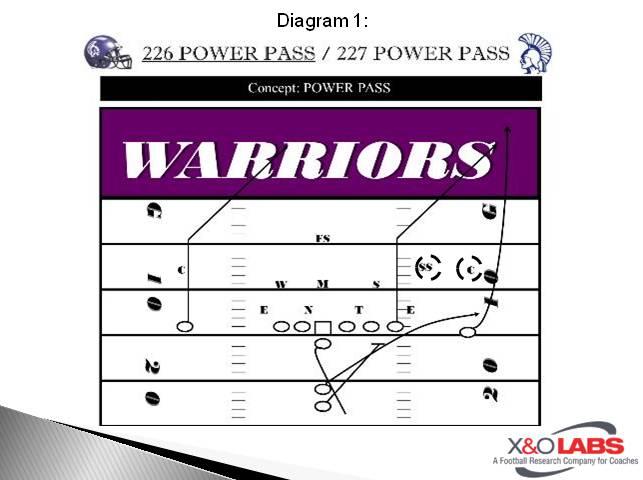
In the red-zone, specifically, we don’t run this exact route very much due to spacing issues with the vertical but I like to show this base install for teaching purposes so people can see what we are trying to accomplish from the beginning with the teaching of our QB’s read progression. Specifically for our QBs, they read the CB first to determine if we can take a shot with the vertical. If the CB bails and stays over the top, their eyes travel to the alley player the read the Corner/Flat route combination. Where a lot of young QBs make their mistake, in my opinion, involves the initial read on the CB. I teach all of my QBs if the CB is looking at you and trying to play both the vertical and corner route, take the shot. If he turns his back and runs, find the alley player. If the alley player sinks, throw the flat route to the FB. If the alley player jumps the Flat route, throw the Corner route. We have 2 main teaching points with all of our Corner Routes:
- Always run the route skinny, aiming at the front pylon until we get inside the 30…at that point the aiming point changes to the back pylon. This give the QB leeway to flatten out the route if the safety sits over the top. This is the main reason I say to throw the corner route if the alley player jumps the flat route.
- If we get a safety that has outside leverage on our corner route, we will convert the corner to a skinny post. This adjustment will be shown in one of the video clips.
The one thing I want to point out with this read involves how a lot of people talk about the FB route in the flat in terms of “You can’t go broke taking a profit”. I’m not sure this has ever been talked about in my QB room because last I checked, you can throw a TD on 3rd and 3 even if the FB is always open! For us, the defense always dictates where we throw the ball regardless of the down and distance.
Protections
One of the questions I get asked the most when it comes to our Power Pass revolves around our different use of protections based on the type of play action we are running. With three different types of Power Pass comes 3 different types of protection as well. Our base protection gets installed out of our 2 back Power Pass and is taught based on the Turn back protection concept. With this protection, we will pull the back side guard to emulate Power and he is ultimately responsible for the first defender to show in the C Gap. With our FB being out in the route, we keep the IB in to be responsible for the second defender to show in the C gap or outside. Where I think we do a really nice job is at our play side tackle. We teach our QBs to make sure and alert our offensive line anytime we see a threat of pressure to the call side. With this alert, our play side tackle, who’s main responsibility is the B gap, will be slower to turn back to the B gap, anticipating the 5 technique to cross his face. We call this a “Hump” technique. I’ve seen teams turn the tackle to quickly and a good defensive end will play off of the tackle’s outside hip leaving the protection a hat short. Our play side Guard and Center will block back as well leaving the backside tackle to funnel hinge and take the most dangerous threat: either the defensive end or the WILL LB if he blitzes. If we choose to run this away from the TE, keeping him in for protection, we water fall the back side with the Tackle and TE.