Proven Protocols In Defensive Game Planning

By Mike Kuchar

Lead Research Manager

X&O Labs


Introduction

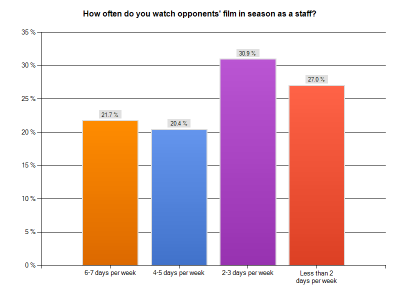
In August, right before the season began, XandOLabs.com conducted research on what high school staffs are doing to prepare their players on a weekly basis.  This particular report focuses on defensive staffs and what they look for when breaking down offenses.  Sure, many of our reports are centered around scheme, but we wanted to provide readily available research to coaches in-season on some ideas they can implement today to gain more efficiency in game planning.   We broke down our research into the following categories:

  • Sequencing in Breaking Down Film
  • Delegating film work to coaches
  • What to include in scouting reports
  • What information needs to be presented to players
  • Gaining an advantage on your opponent
  • Opponent’s Top Formations- 69 percent of coaches choose to include this in their scouting report.
  • Opponent’s Key Players-  60 percent of coaches choose to include this in their scouting reports.  This information includes the player’s height and weight, their years as a starter and their individual strengths and weaknesses.  The majority of coaches will include only 3-4 of the top offensive players on their opponent each week.   There are even some coaches like Ron Anzevino, the defensive coordinator at Hampton High School who will include a two-deep depth chart as well for his weekly opponents.
  • Opponents Top Plays- Without question, this was included in nearly all of coaches’ responses.  But how many plays are addressed becomes the question.  We found that the majority of coaches will select between 3-5 of the opponent’s top run/pass concepts and include them in the scouting report.  Anything more than that is too much information. 
  • Goal Line/Short Yardage Offense- 19 percent of coaches are including these short yardage concepts on their scouting reports.
  • Red Zone Offense- 16 percent of coaches is including what an offense does in the red zone as part of its scouting report.
  • Weekly Theme- 16 percent of coaches are using a “theme of the week” as part of their scouting report.  This could be manifested in the form of quote, anecdote or story that players will read and reflect on.
  • Screens and Draws- 15 percent of coaches are including opponents screen and draw package as part of their scouting report.
  • Pressure Checks and Automatics- 15 percent of coaches include the various “checked” pressures they will be using against certain formations as part of their scouting report.
  • 3rd Down Offense- 14 percent of coaches include what an opponent does on 3rd down as part of their scouting report.
  • Pass Protection Schemes- 14 percent of coaches present a protection analysis in their scouting report for at least one type of protection.
  • Gadgets and Trick Plays- 14 percent of coaches will include their opponent’s most popular trick plays as part of their scouting report.
  • Two-Point Plays- 12 percent of coaches include opponents two-point plays as part of their scouting report. 


Editor’s Note:  It’s important to note that based on our research, 88.7 percent of coaches are using HUDL for scouting breakdowns.  All of the information below is based off using that program or something similar.

Read More

3 Tactics to Defend the Screen Game

By John Kelling
Defensive Coordinator/Linebacker Coach
Frostburg State University (MD)
Twitter: @JohnKelling37


RPO, RPO, RPO. That is all us defensive coaches hear today. Oh, how I miss the days when you either had to defend the run or the pass, but not both on the same play. While that is a nice dream for us defensive coaches, the reality is that these plays are here to stay and it will only get worse. One of the major pass concepts offenses’ use off these RPOs is the screen game. This report is about the different tactics we utilize to defend the screen part of all these RPOs. Obviously, teams have the capabilities to run screens without RPOs and these schemes can be used to stop them as well, but RPOs are predominately what we see. 

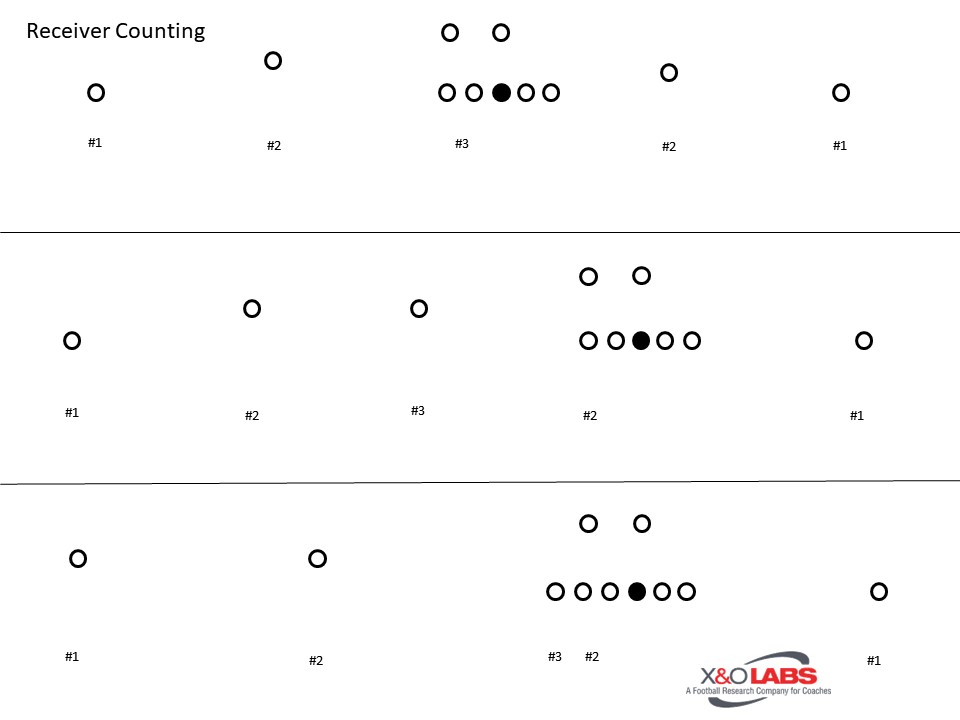
One important step we need to do is define the different types of screens we will be talking about and create a common language in which to discuss these screens. The very first thing is how we label eligible receivers on the offense. We start counting from the outside to the inside on both sides. Therefore we have a #1 receiver on both sides, a #2 receiver on both sides, and then the #3 receiver. (Technically it is the number with either a strong or weak tag based off how we call our defenses strength. Example we make the strength call to trips then we count #1 strong, #2 strong, #3, #2 weak is the RB, and then finally #1 weak is the single receiver.) It is this counting system that allows our players to know what rules, key reads, or players that affect their techniques.

Diagram 1


The next step to insure proper communication is describing the types of screens we see, and more importantly, the one’s we will be talking about in this report. The first screen is a bubble screen. This is a screen where the eligible receiver works his way to the sidelines while everyone outside of him blocks. This typically occurs in a balanced set (equal number of eligible receivers on each side) to the #2 receiver or to the #3 receiver in Trips sets. This can even occur to #2 weak in a trips set if the RB flairs to the sideline on the side of trips. However, regardless of who catches the screen it is going towards the sideline.

The next screen is the tunnel screen. This is a screen where the receiver is coming back towards the ball and his teammates are blocking the defenders out. This is also a screen where the offense may release offensive linemen downfield to block defenders. This can typically be done to any receiver except for a running back in the backfield.

The next type of screens is a combination of the bubble and the tunnel screen call a dual screen. This means that one side is running a tunnel screen and the other side is running a bubble screen. In the same realm is the Now screen. The Now screen is where the receiver catching the ball stops where he is or works straight back a bit and catches the ball. This now screen can either be a tunnel or a bubble screen, it just depends on how they choose to block it. The other popular way to run the Now screen is from a stack formation. The stack formation is where one receiver lines up right behind the other receiver. This can occur from #1 and #2 or #2 and #3.

Most teams we face use many different combinations of these screens from multiple formations. It is imperative that as we defend these screens that we have answers that are simple for our players and multiple for any offense. Here is how we start defending the screen game from our opponents.

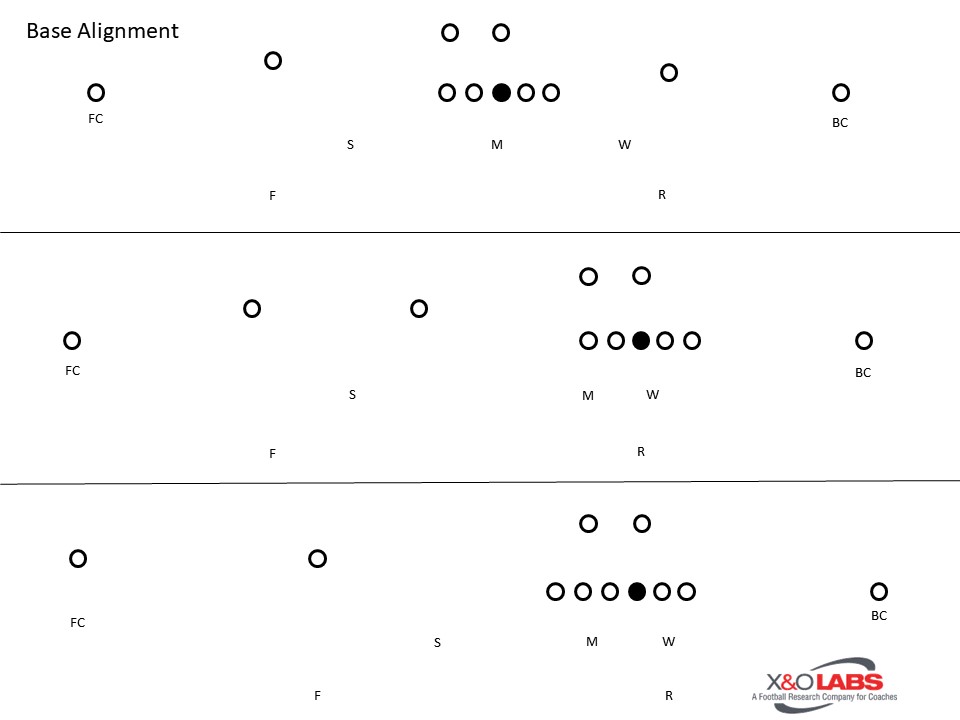
The first thing we do to try and limit the number of screens is pressing the corners. Our base starting point for the corners is head up on the #1 receiver. This alignment will be adjusted based off the coverage called and / or the formation the offense aligns in. We do this so our players can be aggressive and change angles of the blockers. Putting them in a position to be aggressive and play with confidence is a cornerstone of the entire defense. First reason why this effects the screen game is the release of #1. If he is the person receiving the screen, he must get a good release to create some distance between himself and the corner. If the receiver fails to create that separation, it allows the corner to stay right with him and be very aggressive on any ball thrown to him since there is no pass interference behind the line of scrimmage. Another reason for allowing him to be aggressive is if #1 is blocking the corner, contact happens right away and that receiver must hold onto that block for a while. It gives us a better chance to defeat the block when we get our hands on him quickly and it eliminates the possibility of cut blocks. The last reason we like the press alignment in defeating the screen game is because it makes it the trap technique must easier to execute. (Will be explained more in the trap section.)

Diagram 2


Quarter, Quarter, Half Coverage

The first tactical scheme we use to combat the screen game is our quarter, quarter, half coverage. In this scheme, we can roll the ½’s side to whatever one we want to. Most of the time we roll it to the side we have scouted the screens to come from so we can have an aggressive corner to that side. The safeties are in charge of communicating to the corners which side we are rolling to and which side is away by using a “Roll Right” or “Roll Left” call. Here is each positions alignments, assignments, and techniques.

Read More

Explosive PAP’s to Manipulate Two-High Safety Coverages

By Joel Przygodski
Offensive Coordinator/Wide Receiver Coach
Ann Arbor Pioneer High School (MI)
Twitter: @joel12p


At Pioneer, we are a Pro-style offense that relies heavily on gap run schemes to control the clock and possess the ball. The foundation of our run game is power/counter and we became efficient with pin-and-pull concepts towards the end of the season. We use multiple personnel packages, formations, shifts, motions, and different tempos to attack the defense with our base run plays. We also protect our run schemes with play action concepts to punish a defense that is over-playing the run.


Pass Protection

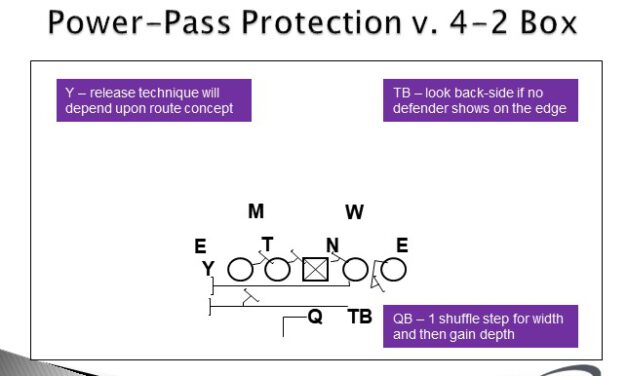
The majority of the time, we will execute our Power-Pass or Stretch-Pass protections when calling for a play to attack downfield. They are the protections that our players are the most comfortable and confident with. We want our linemen to fire-out low and aggressive to sell the run action before progressing to their protection rules.


Power-Pass Assignments

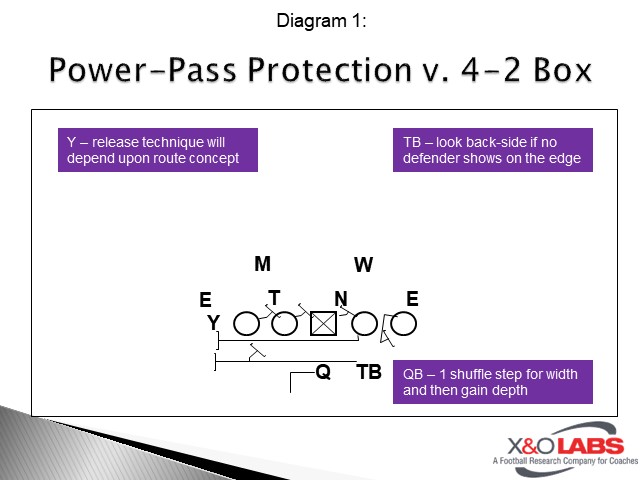
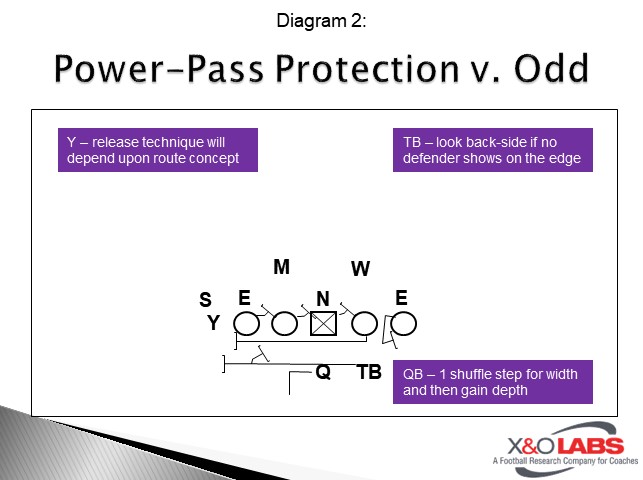
PST – fire out and block the play-side B Gap

PSG – fire out and block the play-side A Gap

C – fire out and block the back-side A Gap

BSG – flat pull for the play-side C Gap and look to kick the defender out

BST – seal-hinge the back-side B Gap (just like Power)

TB – look to seal the edge after the play-fake. If no-one shows, look back-side


Diagram 1

Diagram 2


We call our Stretch-Pass Protection a little different than most coaches I have spoken with. It is a full-slide protection where our linemen are responsible for protecting their back-side gap and the Back is responsible for the C Gap defender. We run enough opposite reads (back-field running stretch right while the OL blocks stretch left and the QB will read the end to give on the sweep or keep and run QB stretch), so this protection is a great answer for safeties who are getting anxious to get involved in the run game.


Stretch-Pass Assignments

PST – hard zone block the play-side B Gap

PSG – hard zone block the play-side A Gap

C – hard zone block the back-side A Gap

BSG – hard zone block the back-side B Gap

BST – hard zone block the back-side C Gap

TB – mesh with the QB and block the C Gap Defender

Read More

3 Ways to Grade Offensive Linemen

By Justin Iske – @justiniske

Offensive Line Coach

Fort Hays State University


Editor’s Notes: Justin Iske begins his fourth season on the coaching staff at Fort Hays State in 2014. Iske coaches the FHSU offensive line and serves as the team’s strength coach. In Iske’s first three seasons at FHSU, he has coached seven All-MIAA selections on the offensive line, led by two-time second team selection Hawk Rouse in 2011 and 2012 and second-team selection Mario Abundez in 2013. The Tiger offensive line helped produce an average of over 2,000 rushing and 2,000 passing yards per year in Iske’s three seasons. Iske came to FHSU after two seasons at Northwestern Oklahoma State University where he was the offensive coordinator, special teams coordinator and offensive line coach. His 2010 team won the conference championship and led the conference in rushing offense, sacks allowed and kickoff returns.


Introduction


In working on a number of different staffs and under several different head coaches, we have been exposed to numerous ways to grade game and/or practice film. The purpose of this article is to explain three different ways that we have used, and to focus on the one that we feel is the most effective at improving your players’ performance.

PLUS / MINUS

A lot of what we can accomplish as coaches is determined by our schedule. If you are a team that watches film the day after a game, there is not a whole lot of time to dissect your game film before you meet with your players the next day. When in a time crunch, the plus/minus system of grading is effective. The coach simply watches each play and assigns a plus (you did your job) or a minus (you didn’t do your job). At the end of the game, you take the number of plusses divided by the number of plays and that is the player’s grade.

Example: 55 Plusses / 70 Plays = 78.5%

This advantage of this system is that the coach can get their film graded very quickly. The drawback is that it is hard for the player to know what to do in order to improve based on his grade.

Read More

In-Season Weekly Practice Planning

By Chad Stadem
Head Coach & Offensive Coordinator
Washington High School (SD)
Twitter: @Mr_Stadem & @SFW_Football


This year will be my 6th year at Sioux Falls Washington, 16th year as a head coach, and 18th year total of coaching football.  Every year I am looking to make our practices more efficient and effective.  We as a staff work together to develop our practice plans, and I encourage our staff to come up with creative ways to teach the game of football in practices.  Our vision is to play fast and practice fast.  We do not believe in staying onto something too long.  We keep moving.  We believe that our practices should not take more than 2 hours and generally as we get late into the season our practices last under an hour and a half.  We try and film each practice especially when we are in group or team periods.  Filming those periods allows us to keep moving.  We do not want to stop practice to walk over what just went wrong.  We will coach on the fly and use the film the next day before practice to instruct or correct the issue.


A little about Washington

Sioux Falls Washington is a large school of around 2000 students.  We have a freshman, junior varsity, and varsity teams.  Our junior varsity practices with the varsity team and has their games on Monday’s.  We are a two-platoon system and generally have no one playing both ways in our base offensive and defensive packages.  We do have some personal packages on both the offense and defense.  We do need to have periods when those players might need to work a group on the other side of the ball.  We have a clock running on a board with periods listed and a horn will blow at the end of each period.  Each period is 5 minutes in length and we try to stay at or below 24 periods for each practice.  We believe that over two hours of practice is asking a lot from everyone on the team.  If we do things right, we will even cut a period short and move forward.  Almost every day we do not use the full 24 periods of practice time.  The players see that as a reward for doing things right and encourages them to run with a sense of urgency the whole practice.


Period Simulation – Teach the game

Since we are a two-platoon team, we have the luxury of more time to teach the game.  Most of my assistants formerly coached at the collegiate level and have experience with working with a two-platoon system.  We always try to find ways to create a game simulation in our practice plans.  We want to teach the game.  We like to come up with different scenarios to help the team understand the importance of being successful in the game of football.  We believe that game simulation periods break up the regular practice routine, and it helps generate game like intensity.  At the beginning of the period, I will gather the teams together, discuss the scenario we are about to enter and ask the units what their focus should be in this scenario to be successful.  Once the period is over, we meet as a team or our units and quickly discuss what we did right and what we need to do better at in that scenario.  Then we move onto the next period on the practice plan.

We love the situational period for not only teaching the game, but it creates competitive intensity in our practices.  Our offensive and defensive units take pride in winning these periods.  These periods break up practice and allow the kids to play the game they love in a controlled environment.


Practice A and Practice B – Game Organization during a sudden change

We picked up this wrinkle to help generate accountability for our players.  Practice A is a normal practice and we will follow the plan to the minute.  Practice B alerts the team that I am about to create a game like a sudden change in practice.  We got this idea from Jed Stugart while he was the head coach at the University of Sioux Falls.  The focus is generally on special teams for us, but we will also use this on package groupings that require members from both the offensive and defensive units.  As we practice I will blow a whistle and yell out a call for a unit to perform their task.  That unit will sprint to the location I am at to complete the task.  Everyone else will continue with the regular practice. 

An example would be if I called for the PAT/FG team.  I will blow a whistle, yell “Field Goal Team HOT!” and have a ball placed on the ground for the field goal attempt.  “Hot” means the clock is running and they have 20 seconds with no mistakes to complete the field goal.  Our special team’s coaches will run over with them counting down the seconds.  This can be tough on our guys as we practice on 3 game sized practice fields and a large open area for our bigs.  They need to know the unit they are on, their responsibility, and no mistakes allowed.  Once this task is completed they will sprint back to what they were doing before the call for their unit.

I do this on my own and no one knows what group I will call for or when I will call for them during practice.  It is like throwing a pop quiz onto the guys.  It holds them accountable.  I always tell the team that we should never have to call a timeout because someone doesn’t know what unit he or she are on.  If we do, then you will lose out on an opportunity to remain on that unit.  You will be replaced.  We require the players to know the depth chart as well.  There are many times I will call for a unit and add that a certain member is out with a cramp or injury. The backup needs to know whom they are backing up and fill in if that person is out.  Our expectations remain the same and we expect the task to be completed with no mistakes.

Read More

6 Tips to Effective Scout Team Organization

By Jim Dawson
Senior Consultant, Secondary
Trinity University (TX)

Introduction:

We all know that we need a “good look” on our practice fields from players running the opponent’s scheme. The task of asking lower level players on a depth chart to perform and execute at a high level is a daunting task. For me, managing good scout teams has always been one of my passions. I am speaking primarily from the defensive side of the ball. That said, I’m sure these principles will apply to all scout teams. Perhaps these tips may help the situation and provide the best “show” in our weekly preparation against opponent schemes.

Tip #1 – Use Your Best Available Players

Over the years, I have found that nothing can beat reps against talent. For this reason, we go “good on good” in 7v7 and inside run. The team portion of the practices is then manned by our scouts. Everywhere I’ve been, we have subscribed to the adage that if you are not in the 2 deep you are servicing on scout team. These guys are our resource so try to make the best of the talent available. This means that position coaches need to know that they cannot be hoarding talent. They must be bought into the understanding that all players that are not in the 2 deep should be available.

Putting the best huddle on the field can be a challenge. Finding offensive linemen and getting them to give a good look is the first challenge. Many times injuries and banged up guys deplete this group. There are times we’ve used a TE as a tackle, a large back as a TE or even one of our own defensive line or LB to create an OL to service. Skill spots seem to run a little deeper but there are times we use a DB to simulate a receiver, a running back or an option QB.

Tip #2 – Use the Classroom

Preparing the unit begins in the classroom by showing video of the opponent scheme and teaching them the look. This provides a foundation that we can build off of in our pre-practice walk through. It is important to note that we sometimes will not teach our scout groups the more difficult concepts like an option attack or a timed wing T, (fly motion), that requires reading skills and timing. Instead, we will teach it in our group drills or walk through the play and check the fits. We try to match talent in the spots that best imitate the opponent.

Tip #3 – Full Time Assistants Draw Cards

The “playbook” or scout cards are drawn by full time assistants with attention to the detail the staff wants to see. If a play can be called in our terminology we will label it as such. Our part-time, GA, or student coaches assemble the book the day before the intended practice. This avoids the last minute scurry to get things done and increases accuracy. The book is then organized according to the script. We always double check to be sure pages are in order to ensure that there are no issues during the period.

Here are some of the items we ensure are on every card:

Read More

In-Season EDD’s in Man Protections

By Ken Ingram
Offensive Line Coach
George Fox University (OR)


Pass protection is all about the development of hands and feet, but it’s the eye discipline to play with the right leverage that often gets overlooked. Regardless of the time of rush an offensive lineman is combating, it becomes essential to be in the right position to get between the quarterback and the defender to ensure the ball gets released on time. These are the 12 drills we will work during the season to develop the skill sets of our offensive linemen in pass protection.


Drill 1: Kick Slide Drill

This is one of the first drills we do for pass protection. We want to concentrate on these skills.

  • Balanced stance
  • Push off the front foot, kick with the back foot
  • Always coaching: hips down, head up, chest back, hands six inches in front of chest
  • Looking for a base with the feet, both side to side and forward backwards.
  • Once they have kicked four times, hold the position to see if they are in the proper position.


Diagram 1


To study film of this drill, click on the video below:

Read More

Situational Punting in the Rugby Scheme

By Garic B.D. Warner
Special Teams Coordinator
Marietta High School (OH)
Twitter: @mumford421


The main concept behind the rugby punt is giving your coverage players additional time to get downfield before the kick. Not every high school team is blessed with a punter with great hang time. The rugby punt allows you to get those precious seconds during the snap to kick interval. The punter must have a consistent launch point, as protection is vital for every punt.


Formation

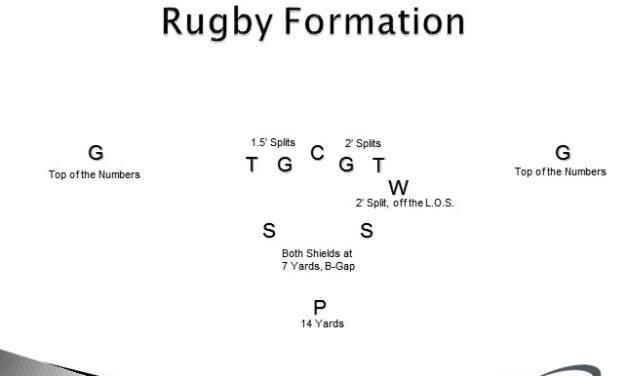
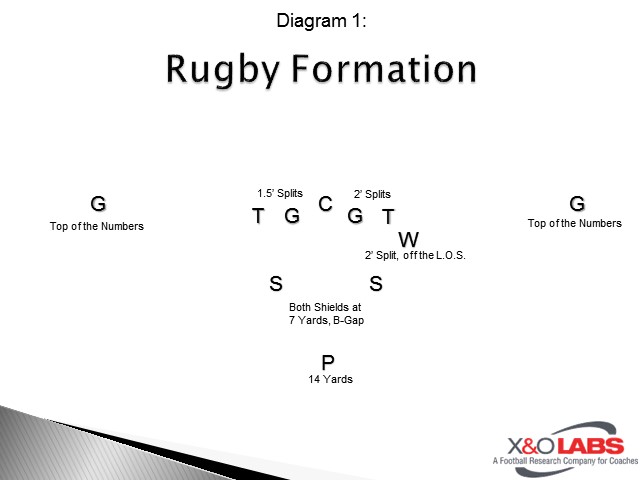
The rugby punt formation possibilities are endless. Here at Marietta High School, we believe in winning special teams play with better fundamentals and effort. The only formation variant we teach is the shield punt. We simply move our wing back to the shield and the gunners to tight end. While the coverage rules don’t change, the protection scheme is a bit different and more in line with traditional shield punt concepts. Below is our rugby and shield punt formations.

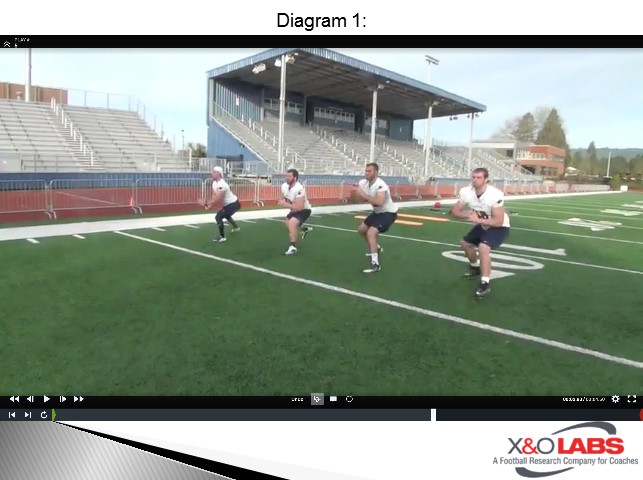
Diagram 1


Here’s a good look at our rugby punt formation. By this point in our season, our punter had improved his accuracy, so we moved our left gunner in closer to the formation.

Read More

6 Tips for Improving Defensive Practice Efficiency

Cody Fagan
Defensive Coordinator
Midlothian High School (TX)
Twitter: @Coach_Fagan30

Introduction

As most defensive coaches would tell you it’s hard to find time to build a game plan and stay focused on fundamentals during the grind of a football season. At Midlothian High School, we get 50 minutes per day on Monday and Tuesday, and 30 minutes on Wednesday to guarantee our defense is ready to stop our opponents’ normally fast paced offense. That’s just over 2 hours of on field practice time a week to practice fundamentals, implement a new game plan, and ensure the kids are confident they know what they will see from our opponent and are ready to stop them. I have been blessed to work for some great defensive coordinators and elite head coaches in my 10 years in this wonderful profession. Like many of you, I have “stolen” some great ideas along the way to help maximize defensive practice time.

Tip #1: Practice with a “Conditioning Pace”

In order to get the most out of our 2 hours and 10 minutes of on field defensive practice a week, we have trained our coaches and kids to practice like every second counts. I know this is not a new or revolutionary idea, but sometimes I think we have to remind ourselves and the kids that the game is won Monday – Thursday in the film room and on field preparation. Normally, the better prepared team comes out on top. We try to alternate segments of practice from “slower paced” (although nothing we do on the field is very slow) to “Full speed” (get as many reps as possible in that 5-15 minute segment). By doing this, we guarantee they are well rested during the times we have to slow down and teach. 

Tip #2: Circuits for Maximizing Reps

Like countless other defensive coaches we take advantage of a few circuits during our practices to make sure we never get to far away from the basics during our preparation. Vince Lombardi once said “some people try to find things in this game that don’t exist but football is only two things; blocking and tackling.” With that in mind, we make sure we are always practicing tackling and getting off blocks. Below is a description and diagram of our 2 most commonly used circuits during the season.  

Panther Tackle Circuit

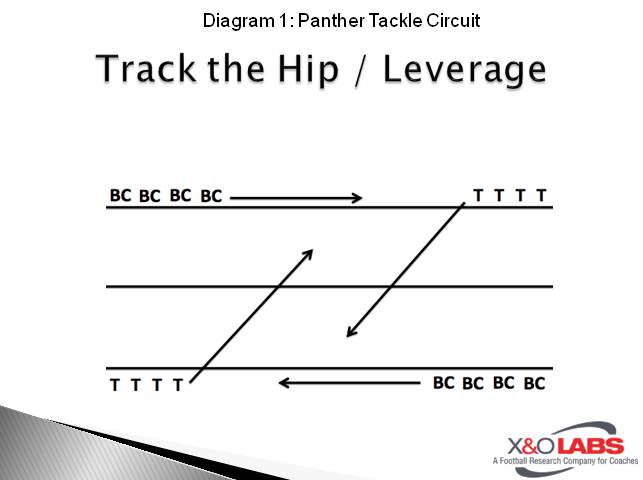
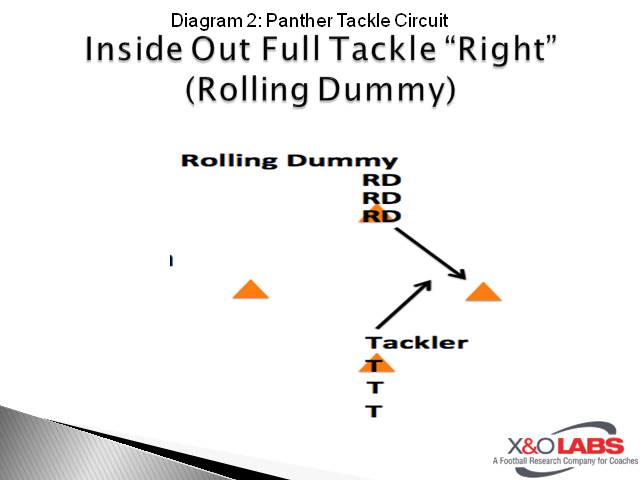
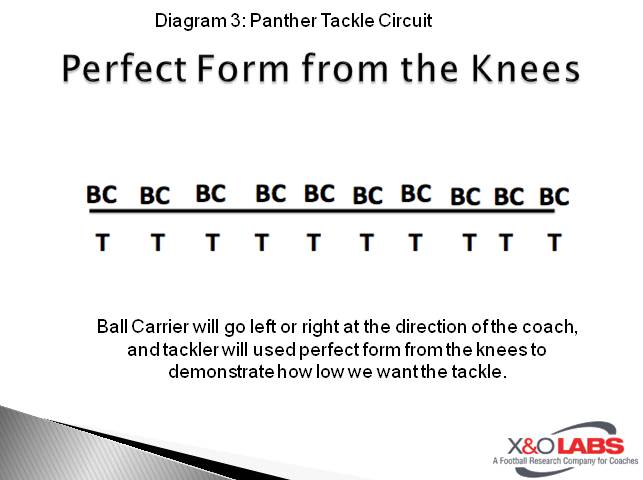
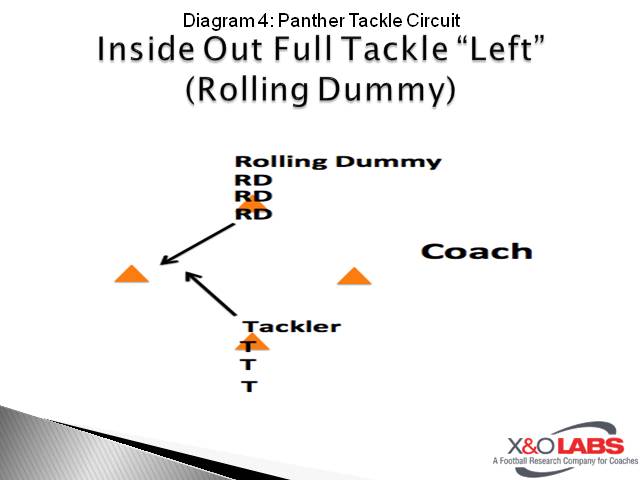
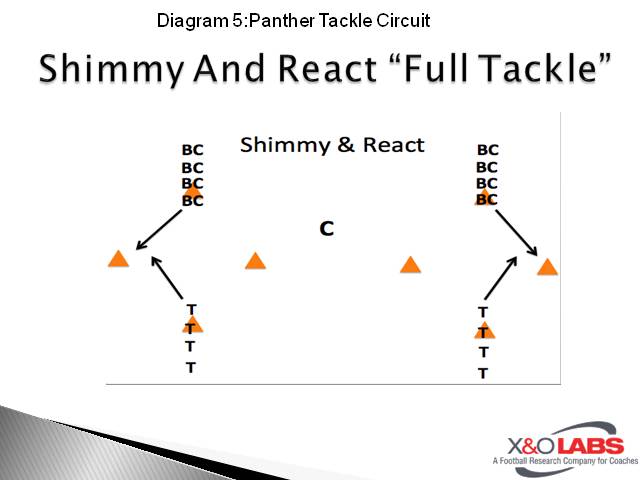
Our tackle circuit consists of five varsity defensive coaches stationed around the field each doing a different tackling drill. We will divide kids into five groups of 10 players and each group will spend 2 minutes at each station. Our circuit is as fast as possible with coaches coaching every rep. We will adjust our stations periodically to practice what we need based on recent success and failures in our tackling. For the most part these, are the five tackling drills we do day in and day out:

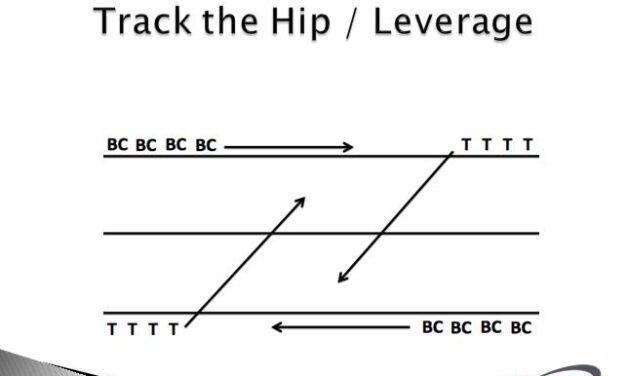
  1. Track the hip / leverage
  2. Inside out full tackle “right” (rolling dummy)
  3. Perfect form (from the knees)
  4. Inside out full tackle “left” (rolling dummy)
  5. Shimmy and react (full tackle)

Slide1Slide1Slide1Slide1Slide1

Panther Defensive Circuit

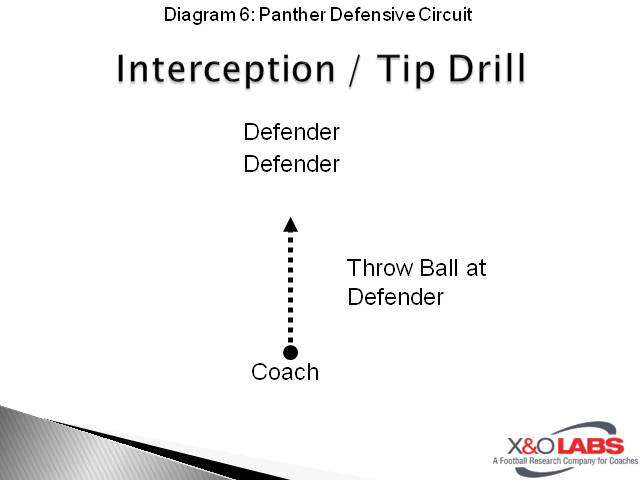
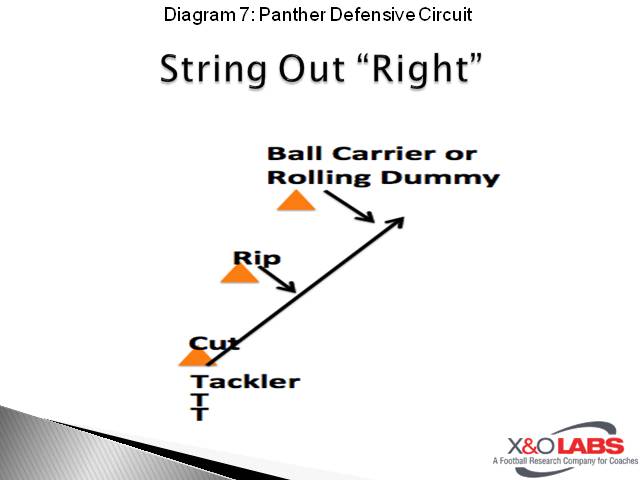
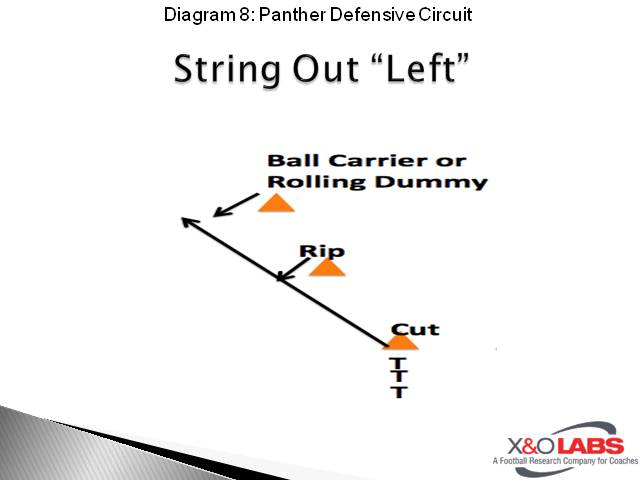
Our defensive circuit consists of 5 Varsity Defensive Coaches stationed around the field in the same locations as the tackle circuit each doing a different type of defensive drill. We will break kids into 5 groups of close to 10 players and each group will spend 2 minutes at each station. Our circuit is as fast as possible with coaches coaching every rep.  We will adjust our stations periodically to practice what we need based on recent success and failures in our defensive productivity.  But for the most part these are the 5 basic defensive drills we do day in and day out:

  1. Interception/ tip drill, ball on the perimeter for d-line
  2. String out: Cage and defeat a block, rip of a block, tackle rolling dummy (right)
  3. String out: Cage and defeat a block, rip of a block, tackle rolling dummy (left)
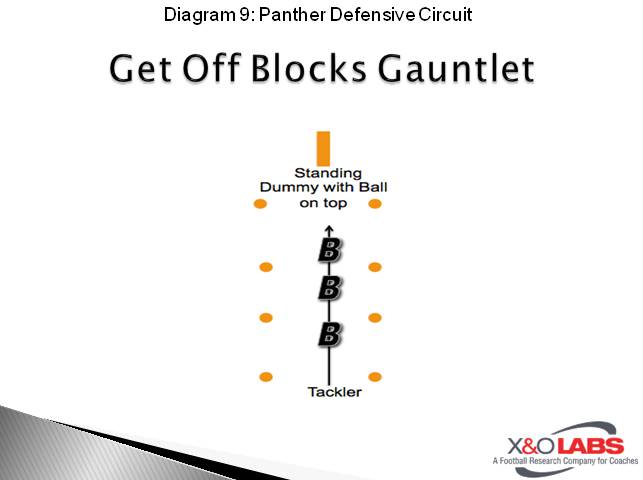
  4. Get off block gauntlet: 3 vs. 1 defeat 3 blocks and get to dummy then recover in a crowd
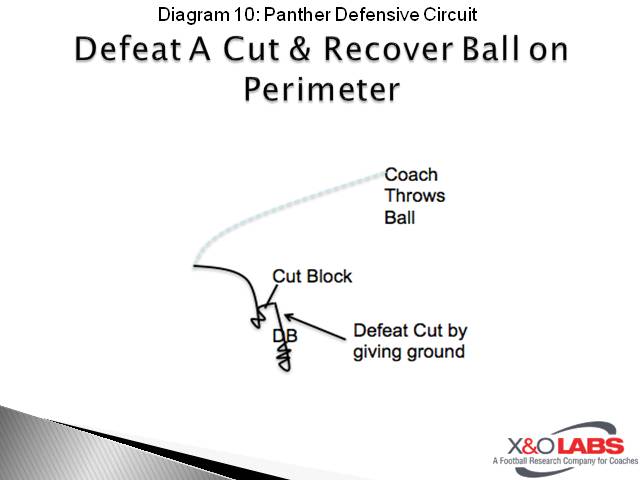
  5. Defeat a cut and recover ball on the perimeter

Slide6Slide6Slide6Slide6Slide6

Tip #3: Play Sheets

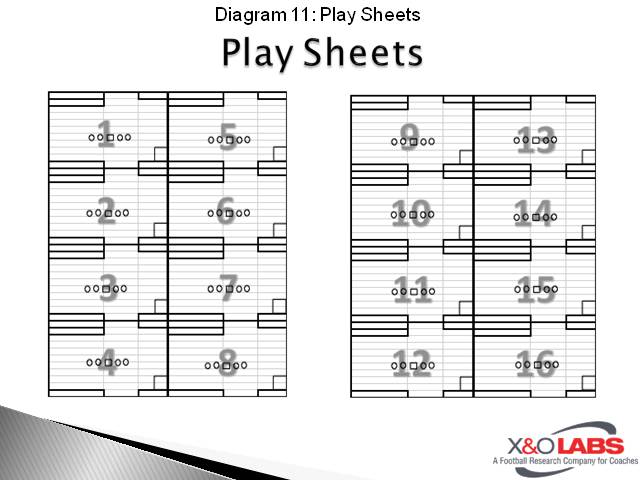
We got tired of slowing down the pace of practice to huddle up the scout team and show them the play, so we have bought in on using the play sheet format shown below (Diagram 11).

Slide11

We use these sheets for all group settings; inside, 7 on 7, and team segments. Each sheet is numbered in a different color to safeguard against kids having the wrong sheet during the wrong segment of practice. Each player will have a sheet and know what their position is. For example, the X receiver looks to see wher

Read More

8 Mesh Mechanics for Option: Gun/Pistol Alignments

By Mike Kuchar
Senior Research Manager
X&O Labs
Twitter: @MikekKuchar

The following excerpt is from X&O Labs special report on the Veer and Midline Option concepts. Get more on this special report, go here


Pistol Techniques and Fundamentals (Midline Option)

#1: Jump Step Technique

Rouse-BioRalph Isernia, Head Coach, Rensselaer Polytechnic Institute: “From the shotgun, the QB will ‘jump’ the snap and step with his back side foot opposite of the read. He will clear the midline by stepping up and over, away from the read. The step is 2 feet toward the LOS and 2 feet off the midline. Basically, his toes will be on the center’s back side foot. After the first ‘Clear’ step, he will come to balance with his back side foot. With his eyes on the read, he will get his shoulders back and extend the ball back to the FB. The FB will take a drop step with his BS foot for timing and run the midline course 100 mph. With inside arm up, he will soft fold over the ball and feel for ‘push-pressure’ from the QB give. His eyes are on his action key (the block in A gap) so he can read the block.”
#2: Drop Step Technique

Matt Sims Colby High School (KS): “To teach the mesh in the Midline scheme. We tell the Pistol back that he owns the line from him to the center. It is the QB’s job to get out of the way. If we are running Midline to the right side, the QB in the Pistol formation will take a 1-yard step toward the line of scrimmage with his left foot at 10 o’clock. This allows him to get out of the way of the Pistol back that owns the line. The QB will then get depth with the ball as he watches his read man. Most times the decision is made before the mesh happens. The QB needs to show the ball keep bent arms and make his read. As the Pistol back runs straight down hill toward the center.”

Joe Whipple, Schalmont High School (NY): “We run our Midline, Veer and Zone mesh everyday for 5 minutes. I paint a line from a cone where the center would be back 8 yards behind the QB and RB. The RB aligns in 2 different positions in all three plays. We first have them run all three through Pistol (RB aligned behind QB in gun) then align him to the side of the QB, as he would run Zone. He is able to run all three plays from both positions and they all look the same. The painted line gives the QB and RB aiming points to where they have to go. The QB is taught to get off the midline. Ideally his heels are in the back side A gap. The RB runs right up the line, which is the crotch of the center. So if he is aligned in Pistol its pretty much straight downhill. If he is aligned next to QB he gets to the line and works up field. The QB does not ride the RB to the LOS, I think it is tough and it makes the defender play both RB and QB. He rides him until he makes the decision to keep or give. We always tell him when in doubt, give.” 

#3: Two-Step Technique

Marcus Miller, Englewood High School (FL): “Our midline step rule is for the QB to take his play side foot and put the toe of his play side foot 3 inches perpendicular to his back side foot. His back side foot will naturally progress to towards the LOS, this makes his weight shift forward, but we want his backfoot in the ground as soon as possible because midline is a pull 85% of the time and he will drive off his back foot. After the ride, we push off the (play side) back foot and take two steps and then cut vertically. His mesh point is fast and gains ground to make the DT play it just like he does under center.”
Tim Kilgore, Mansfield Legacy High school (TX): “We run it out of the Pistol. The QB steps back with two quick steps and allows the RB to aim at the crack of center. QB extends ball with thumbs on top and spread fingers on bottom. Teaching their grip during QB school in February, I walk by the QB and try to slap the ball out of their hands. The running back runs his belly over the ball. QB rides from thigh pad to thigh pad and transfer his weight to front foot. This weight shift allows him to take his first step with his back foot without a false step. The QB will take 3 steps parallel to the line of scrimmage before cutting up field. He can cut up quickly if we are cutting up inside of a 5-technique. The RB follows the Zone direction of the center unless he sees daylight in the back side A gap.”

Read More

“40” Personnel Package for Red Zone Offense

By Chris Cutcliffe
Head Coach
Oxford High School (MS)
Twitter: @chriscutcliffe

With Noah Riley
X&O Labs Contributing Writer


Offensive red zone production is absolutely crucial in determining wins and losses, particularly in close games. We all know that as the field condenses, it becomes more and more difficult to move the football against a great defense; therefore, great preparation and practice in this area of the field is essential for setting up your team to have the best chance for success. At Oxford, we believe that in crunch time you have to be able to run the football in the red zone. We are typically 60-65% run in that area of the field. However, we spend a great deal of time preparing and practicing our red zone passing game. We are looking for high efficiency in our passing game and the ability to produce some big plays. In this article, I will break down some of our game planning thoughts in the red zone, how our offense practices for the red zone, and look at several examples from last season where this preparation and practice lead directly to touchdowns on Friday night.


Game Planning and Practicing the Red Zone Run Game

The first thing we try to do when creating our red zone plan is looking at what we think of as a defense’s red zone personality.  Some coaches stay conservative in the red zone, but many will dial up pressures and play a lot of man coverage.  The next thing we identify is at what point does the defense switch from a red zone defense to a goal line defense.  For many teams, this happens inside the 5-yard line.  For others, it is more determined by offensive personnel than it is by yard line.  Once we have these patterns identified, we are able to begin working on our red zone run game plan and our goal line run game plan.  We work this game plan into our practice schedule on Wednesday.  Our offensive players have coined the term “Red Zone Wednesday.”  We will work our goal line and short yardage run game plan during our inside drill on Wednesday and work our red zone run game plan during a red zone team period.


Personnel Variations

We use a lot of 10, 11 and 12 personnel groupings in our base offense and we’ll do the same in the red zone. Some weeks we will have special personnel groupings like some of our heavy stuff and empty stuff.  It’s one of those things that builds. Early on we may just carry our base personnel stuff and maybe one special, then late in the season, we may have 3-4 special personnel groupings. An example of this is our cannon-ball package (detailed below) which we started in week 6, and carried it the rest of the year. There are also some personnel groupings that we took into a certain week, and didn’t run them the rest of the year, we just liked it for that one game. No matter what formation/ personnel grouping we’re in, we try to keep the teaching all the same, especially for the offensive linemen.


Tempo Variations

When we’re in the red zone, we’ll use a little more check with my stuff, just because there’s less film to scout in the red zone compared to the open field. You’re not always sure what you’re going to get. Despite the fact that we are a no-huddle team, when we run our cannonball package we huddled just because it made it easier on our inexperienced wildcat quarterback. We also probably use a little more one-word calls because those prevent teams from subbing in goal-line personnel. Also, you naturally use more one-word calls because you usually are in the red zone because you made a big play, and one-word calls are used to catch teams off guard after a big play.


Protect Both Edges

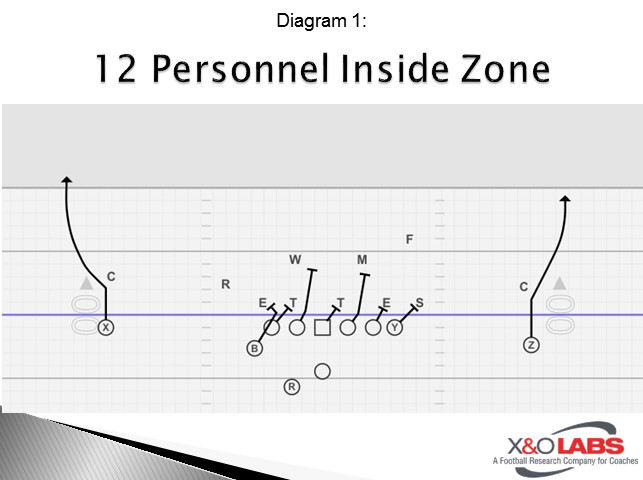
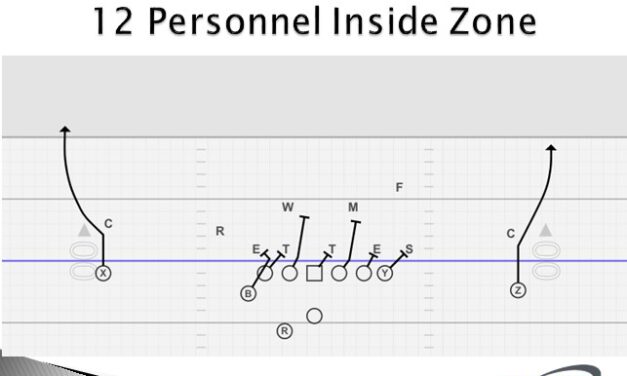
We believe it is absolutely critical in the red zone to avoid negative yardage plays, so that plays a significant role in our game planning.  For example, many teams love to bring edge pressure in the red zone.  You often see an edge rusher catch a running back off of the short side for a loss in these situations.  We love to utilize 12 personnel formations where we have both of our edges protected to run the football.  This is also a great time to tag an RPO to take advantage of a 1 on 1 matchup on the outside because with both edges protected, there should not be a free hitter on the QB.  The example below is inside zone with both edges protected.

Diagram 1


The clip below is an example of this concept:

Read More

Drilling the Guard to Near Back Read Progression for ILBs

By Spencer Leno
Inside Linebackers Coach
Massillon Washington High School (OH)
Twitter: @SpencerLeno


There are three main points of emphasis that are communicated to our inside linebackers at the beginning of the year. They include:

  • Know Alignment/Assignment
  • Read and React
  • Be Great Tacklers


While block destruction, tackling, footwork, and pass defense are all important aspects of playing ILB, our players really take pride in reading their keys and then reacting to the football. If we get good at reading our keys, we can always make up for a lack of talent or speed. Stopping the run is our first team defensive goal, so we really emphasize the importance of being disciplined with our eyes and reading keys. For us, we believe the easiest and most efficient way to read effectively is by reading “guard to near back.” Out of our three or four individual periods each day at practice, our ILBs will spend at least one period or more each day practicing our reads, whether it’s in the form of a drill or a walk through.

From an overall defensive perspective, we are a multi-front, 3-4 defense. We will start off in an under front with a stand up 5 technique in the boundary and then branch off from there. Most of the time, our two inside linebackers will align in 30 techniques (outside shade of the OG). We believe in being gap sound in the run game, but understand that gaps can move based upon whether an offense is running gap scheme or zone. Although we are a base under front defense, these reads, rules, and terminology can be applied to all ILBs in any defense in some form or another.

This article will focus on the progression of how to teach inside linebackers to read “guard to near back” effectively. When teaching players how to read their keys, it is important that we work part-to-whole, utilizing specific and simple terminology that all players can reiterate without hesitation. Our linebackers will hear the terminology being used constantly throughout drill work, film study, and chalk talk. The part-to-whole teaching and drill work progression includes the following:

  1. Walk Through of Drills and Reads
  2. Chalk Talk/Film
  3. Half-line Read Drill
  4. Flow Drill (Near Back Flow)
  5. Whole Line “Fast” Read Drill
  6. Inside Run
  7. Team Run


Guard to Near Back Key Principles

As opposed to reading primarily guard or primarily the running back, we read guard first to the near back second. Once we get our initial read from the guard, we eye our near back to read his shoulders to determine whether he’s running inside, off tackle, or outside. Their eyes should always be on the guard first because of the potential misdirection of the RB on run plays such as counter and QB counter. This is one reason why we do not just read the RB. It is worth noting that before we teach the primary reads, we review our read step and basic footwork. When the ball is snapped, we teach our ILBs to take a read step mirroring their primary key (guard) taking short six-inch steps until our key tells us to react and attack. When reading guard to near back, we initially focus on three primary reads to start off. They include:

  • Open Window
  • Closed Window
  • Pull Read


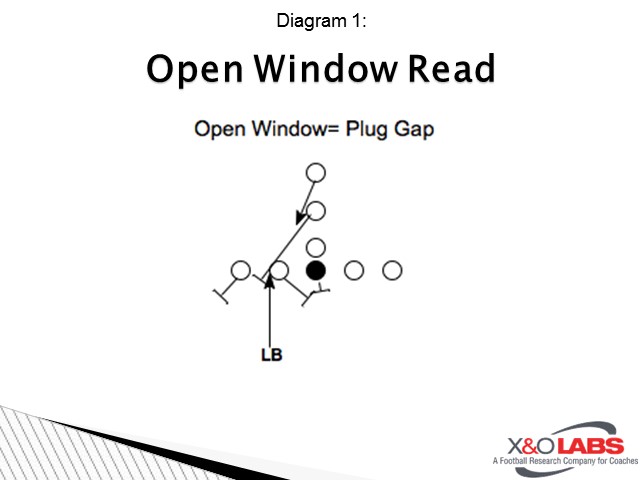
An open window read can be identified as a clear open read in our gap with full RB flow towards the gap. When we read this we will “plug” the gap, either making the play or taking on a fullback’s, H-back’s, or pulling guard’s block.

Diagram 1


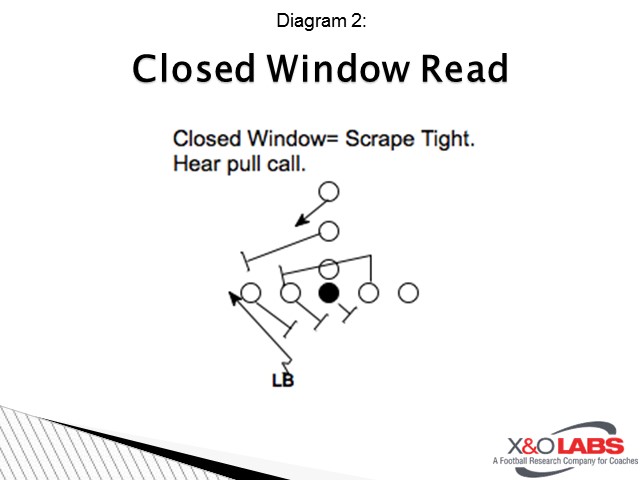
A closed window read can be defined as down blocks by the OG and OT. When we read this, our ILB may take his six-inch read steps mirroring the down blocks, but should redirect and scrape “cloudy to clear” tight to the wrong arm. The running backs shoulders will most likely be square to us still. Whether or not we are getting a “pull” call from the opposite ILB will help with this read as well.This read will occur when teams run gap scheme based plays.

Diagram 2


A pull read can be defined when the OG or OT pulls behind the center. When we get this read, we teach our guys to communicate “pull-pull” and then to “press play side A,” working “cloudy to clear.” We teach our guys that when pressing the play side A, if it’s “clear” we “press” it, if it’s “cloudy,” we work over top the down block from the play side. Since we read guard to near back, it is important to note that a pull by the OG trumps any directional flow of the RB (counter plays). The pull call tells the opposite ILB, who is getting a closed window read, to redirect to scrape. In the “Half-line Read Drill” clips below, you will see a rep where the ILB follows his guard as opposed to the misdirection of the near back.

Read More

7 Drills to Teach Proper Pursuit Angles

By Mike Kuchar
Senior Research Manager
X&O Labs
Twitter: @MikekKuchar


Introduction

1775-thumbAll great defensive coaches teach effort. But how to teach effort continually needs to be addressed. Maxims like “run to the ball,” or “get there quicker” are being quickly replaced with refined coaching points on how to take the correct angles in running to the ball carrier. These are several of the more efficient drills that we pulled from our drill film library that teach defenders the proper pursuit angles when closing in on a ball carrier.
1 on 1 Concept Drill

Jason Sedlak, Defensive Coordinator, St. Thomas Academy (MN)

Slide1

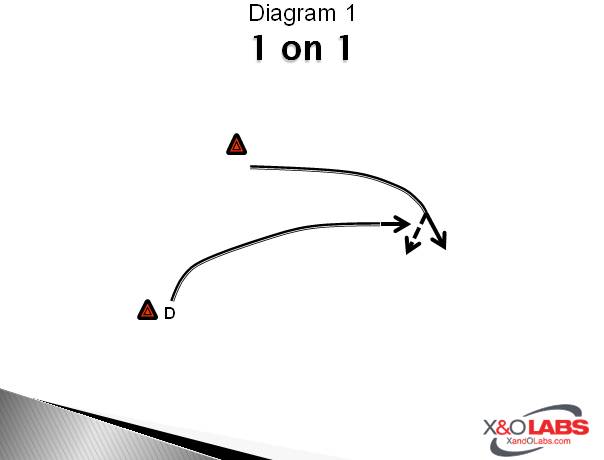
We use this drill in summer practice and the first day or so of two-a-days to introduce and solidify the back hip concept. The ball carrier is to take an outside path and at some point in time try to cutback across the face of the defender. The defender should pursue to the back hip and know that the ball carrier will cut back into his pursuit path. We conduct this drill at ½ to ¾ speed to really solidify the concept and focus on the following coaching points:

  • Initial steps should be directly at back hip and bend as the ball carrier turns upfield.
  • Do not get out in front of the ball carrier and run to a point in space where he might go.
  • Close the distance with the ball carrier as fast as possible.
  • Shimmy/breakdown under control as the ball carrier cuts back.
  • Never let the ball carrier cross your face.

To see video of this drill, click on the video below:

Read More

Game Planning the Red Zone

By Lazarus Morgan
Defensive Coordinator
Alfred University (NY)

With Adam Hovorka
X&O Labs Managing Editor


If you do not let the other team score, it is hard to lose the game. Sounds simple enough, right? Our defense wants to be the absolute best at not allowing points. Yards tell lies, so at Alfred University, we strive to be the best scoring defense in our conference every year.

In 2016, we had a great season: a 12-1 record, a run to the elite 8, and we finished number 1 in several defensive categories in the Empire 8 Conference. But, we were awful in the Red Zone. We gave up a TD approximately 70% of the time an offense would get into the red zone against us. Going into the 2017 season, I knew we had to get better in that area.

In 2017, we gave up a TD roughly 43% of the time an offense would get in the red zone; an improvement of nearly 30%. How did we do this? First, we changed the culture in the program regarding how we viewed the red zone. Then schematically, we simplified things so our athletes could play fast when the size of the field had become much smaller.

In changing the culture, the mentality of the defense now became that it did not matter what happened that allowed the offense to get to the Red Zone. We taught our players and trained them to block that out. Now it is all about holding the offense to a field goal attempt, or better yet, getting the ball back.

When an offense had a short field, in the past we would see some kids have that “here we go again mentality” that carried a very negative vibe and led to finger pointing. We changed that mentality, encouraging our players to be very excited because it was now an opportunity to show how great we are as a defense.  And they loved embracing that challenge.

This past season during a typical game preparation week, we practiced red zone defense three times a week. In this report, I will focus on how we play defense in the red zone from the 20 to 10 and the 10 to goal line, since for us those are two different defensive areas.

In the red zone, we do three things: we play a two-high coverage, a one-high coverage, and have a pressure package.


Two-High Coverage

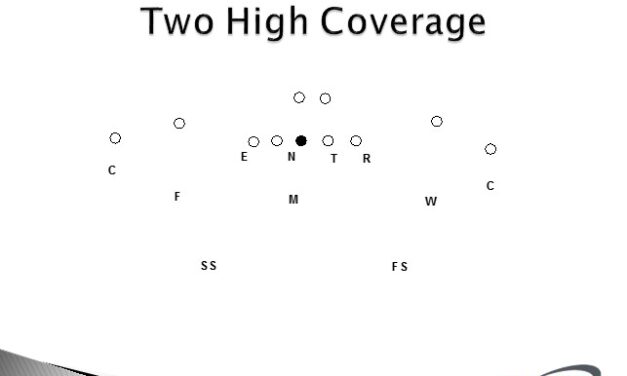
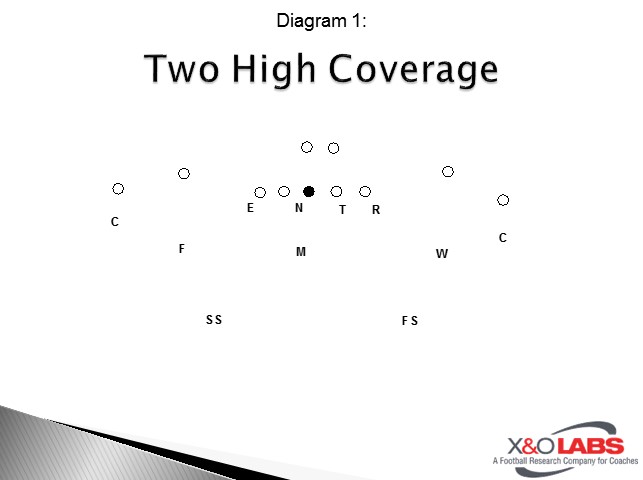
Everything we do for the most part as a defense in terms of coverage is from a two-high shell. Our two-high coverage is good for any type of 2×2 formation, or a pro or twins set. It allows us to commit nine players to the run game and gives us four defenders to play four verticals by the offense. Let’s start with the run first. Our coverages and our run fits are married together. In our defense, if you are the widest defender, you are a “force/fold” player, while all other players that are a part of the box are “fast” players. 

Diagram 1


In the diagram above, the force/fold players would be our Frank and our Will LBs. Their alignments will be predicated on the split of the WR in relation to the hash, the Frank LB will never get wider than the hash and the Will LB will never end up wider than the number 2 receiver if the ball is on hash. In our defense, “Force” simply means the ball coming to you, make the tackle. If you do not make the tackle, you must turn the ball back inside. We are a big leverage tackling team, so that tackle should be made with the players inside foot and inside shoulder forward. If the ball goes away, we want those players to take two shuffles with their shoulders square looking for the cutback. If the ball is not cutting back after they have taken their second shuffle, they pursue to the football.

Our fast players in the diagram are our Mike LB and our Safeties. Fast players in our defense take an inside out path to the football. We want those players to be on the inside hip of the ball carrier. The Mike can be aligned anywhere between a strong side 30 to a weak side 10 based on the tendencies of the team we are playing that week. The safeties align approximately 12 yards deep, 1-2 yards inside the number 2 receiver. If the number 2 receiver is a TE, then that safety will tighten to about 10 yards. Both safeties are keying the #2 receiver to their sides for a run pass/read. If they read pass, based on the defensive call, they could be covering the number 2 receiver man-to-man on any vertical climbing route or they could be playing a true quarters coverage. Our corners start in a press alignment. They will utilize a press-bail technique if we are playing true quarters coverage. When they press-bail, on the snap they will flip their hips open allowing them to read the QB as they drop straight back to their deep outside quarter. If they are pressing and playing man, they will not bail, as they have that number 1 receiver man-to-man, protecting the inside and forcing an outside release.

Read More

North Dakota University Competitive Tackling Scenarios

By Mike Kuchar
Senior Research Manager
X&O Labs
Twitter: @MikekKuchar


Introduction

The following research was conducted as part of X&O Labs special report on “Designing Tackling Systems” which can be accessed below:


Situational Tackling Scenarios:

One of the drill components that Coach Schmidt will use to teach tackling is what he calls “competitive tackling.” Done mainly in fall camp and in the spring, these types of drills pit best on best positionally to create competition. According to Coach Schmidt, it’s his best drill to teach leverage and it teaches them to make the different types of tackles. “One can be near shoulder, near leg while one can be a knife tackle,” he told us. “You can get a swipe tackle when one defender gets beat and the other one has to make a swipe tackle. This has been great for us because it’s competitive and you don’t get eleven on eleven where there is carnage everywhere. We post the wins and losses on the board in the meeting room so guys can see it. It’s a great way to evaluate who your best players in tackle.”

Read More