The 2018 RPO Evolution – Case 3: Pistol Formation RPO’s

By Mike Kuchar 
Senior Research Manager 
X&O Labs 
Twitter: @MikekKuchar 


Special Reporting by Adam Hovorka, X&O Labs Contributing Writer 

Introduction  

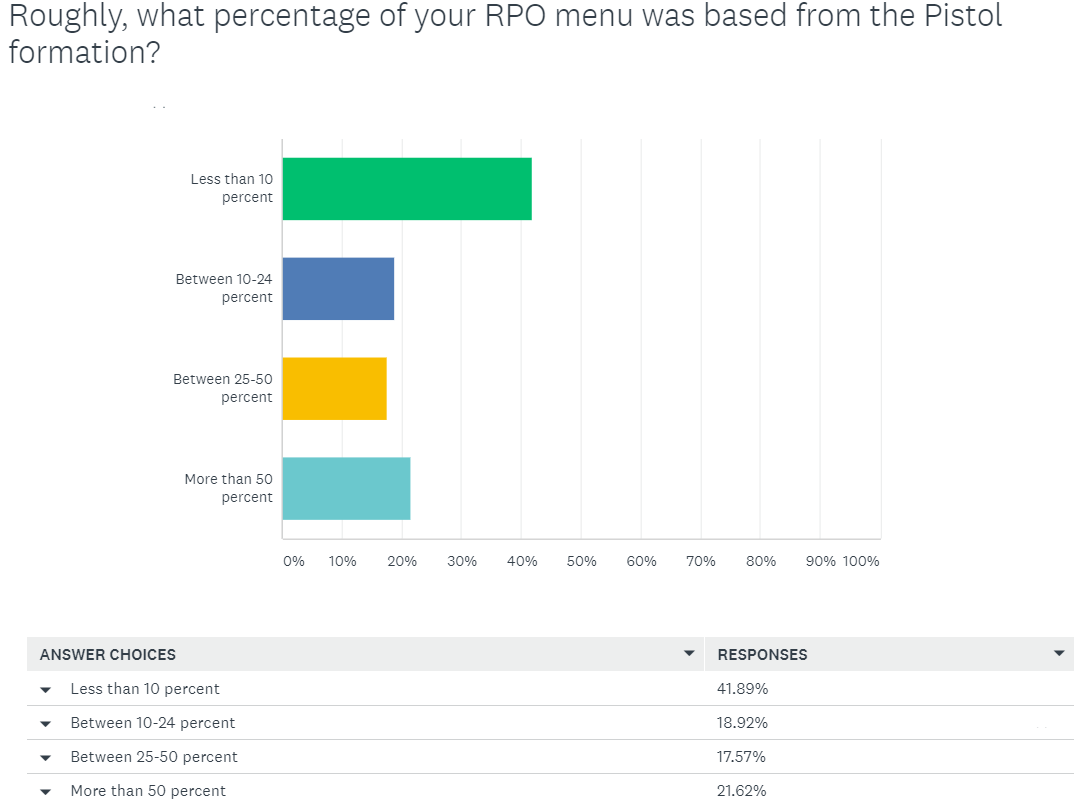
One of the more telling cues in preparing for an RPO offense is where it places its offset back in shotgun formations. In most cases, the placement of the back will predicate the side of the run/pass option concept. So, in turn defenses are finding ways to use combination coverages or man coverages to eliminate any potential conflict defenders to the side of the back. This is why it’s important now for offensive coordinators to design their RPO’s out of Pistol formations so defenses cannot get a tell on which side the RPO is being activated. One would assume that because of this tendency most if not all OC’s would be transitioning into using the Pistol for all of its RPO’s. Yet, according to our research, of the 61 percent of coaches utilize RPO’s from Pistol formations only 21 percent of coaches use the Pistol on more than 50 percent of snaps. 

d15

The coaches that contributed to our study cited the following advantages for utilizing their RPO’s from the Pistol formation.  

Benefits of Using RPO’s from Pistol Formations 

  • It creates balance issues for the defense- without a pre-determined strength of formation; they were left to guess for shades and stunts. If the ball were in the middle of the field, it would cause automatic field defense strength.  
  • It forces defenses to balance up and play head up defensive linemen, which is something they are not used to doing.  
  • The depth of the running back often froze linebackers from making the correct run fits.  
  • It helped disguise the side of read in the RPO game.  
  • It allows offensive coordinators to vary the side of the read in the RPO game. 
  • It provides cleaner reads on the second level with more downhill flow from linebackers. 
  • It allowed the QB to keep his eyes on his secondary read while having his shoulders/feet pointed in the direction that he was going to throw. 
  • It allows the QB to choose the side he’d like to open up to and read pre-snap, which could be based off the tightest apex defender. This could actually be done by having the QB hold his hands behind his back and signal to the RB which way he was going to open for the mesh.  

Productivity 

It’s difficult to argue with the productivity that the coaches we sourced are having with the Pistol RPO game. Consider the following numbers:  

Eric Struck, offensive coordinator, Sioux Falls High School (SD) 

Pistol Free Access Throws: 

7/8=87.5% for 41 yds. and 4 TD’s; 0 interceptions 

Pistol Bubble Constraints: 

6/7= 85.7% 83 yards and 1 TD; 0 Interceptions 

Pistol Inside Zone/1 Back Power: 

67 carries for 519 yds. 7.74 yards per carry. 6 TD’s 

Matt Mishler, offensive coordinator, Rolling Meadows High School (IL) 

Read More

Teaching Landmarks and Vision Principles to Zone Defenders vs. Hot Throws

By Mark Theophel
Defensive Coordinator 
Hartwick College (NY)

Introduction

Every year our defense utilizes a mixture of both man and zone coverage concepts. While both serve their purpose, zone coverage has consistently been most effective for us when it comes to making big plays on defense, particularly in the pass game. Plays where we are in zone coverage (namely 3-Deep and 2-Deep) account for about two-thirds of our interceptions and sacks in the last three seasons. A big reason for this is the way our teaching in zone coverage contrasts with man coverage.

Our zone defenders will cover an area of the field, rather than locking on to one receiver, and we apply landmarks to help our players get to their drops quickly while reading the QB. This is especially helpful when defending “hot” throws, which is a major point of emphasis for our defense, particularly because we are often playing zone coverage behind some form of pressure. A smart QB can neutralize the effectiveness of a stunt/blitz by throwing “hot” to an exposed zone, so defensively we spend a lot of practice time trying to counter this by coaching our players to anticipate those throws and break on the throw from the QB, creating opportunities for takeaways. In addition, denying these hot throws can create held balls and gives us more time to get to the QB with the pass rush.

Defining the Zones

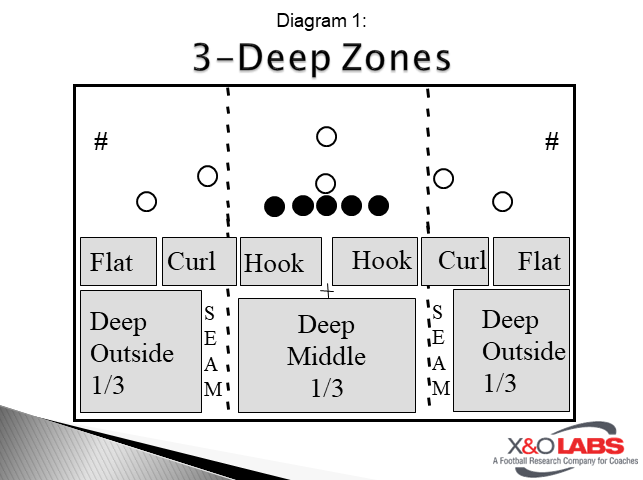
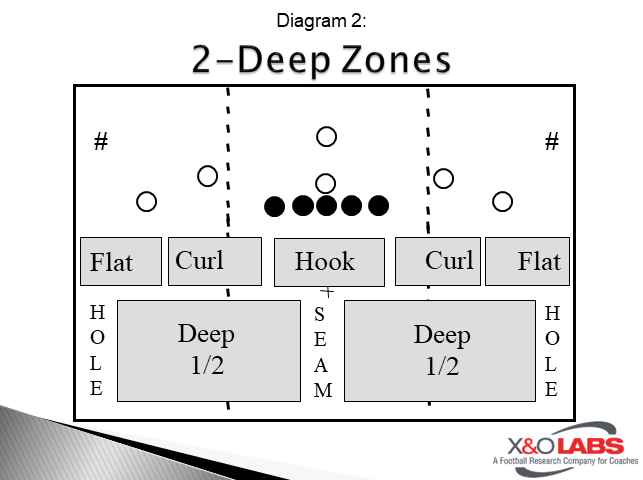
It is important that our players first understand the different zones of the field in our 3-Deep and 2-Deep coverages. This will help them understand their landmarks better. Additionally, they must understand how to relate to WRs in their zone after the pattern distribution is finished. We will diagram these zones for both 3-Deep and 2-Deep coverages, separately, and term our drops for the underneath coverage defenders to fit those areas of the field.

Slide1

3-Deep Zone Drops:

  • SCF (Seam-Curl-Flat)
    • Re-Route #2 in the seam, expand and play #1 curl-to-flat
    • Landmark is 2 yards outside the hash
  • Hook-to-Curl
    • Relate to #3 in the hook, #2 in the curl
    • Landmark is 2 yards inside the hash
  • Final 3 (used in zone pressures)
    • Defend the hook inside the #3 WR after all exchanges
    • Landmark is the goalpost

Slide1

2-Deep Zone Drops:

  • Flat
    • Relate to #1 at the numbers
  • Seam/Curl
    • Re-route #2 in the seam, expand and play #1 in the curl
    • Landmark is the Hash+2 (2 yards inside or outside, depending on QB/routes)

Drilling the Technique

We must dedicate practice time to teaching our pass drop technique, including taking a good initial angle and being able to break on the throw by the QB. Here are a few drills that we use with our linebackers to improve their drops in underneath coverage.

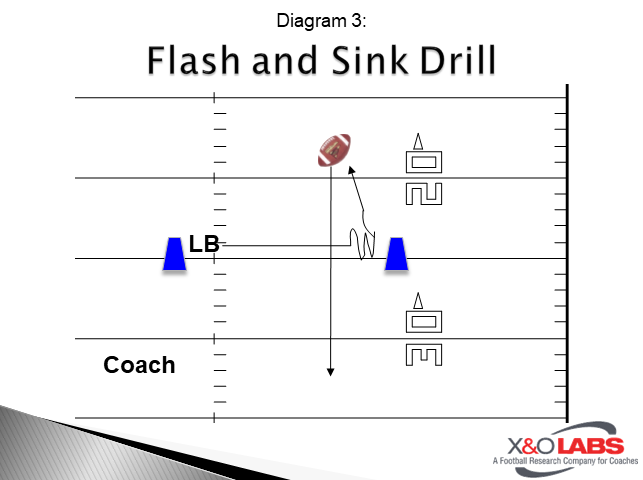
We use the “Flash + Sink” drill to practice dropping flat to a zone and undercutting hot throws.

Slide3

Flash + Sink Coaching Points:

  • LB push flat to the cone, eyes on the QB (Coach). If the QB throws hot to the first cone, undercut the throw and intercept.
  • Buzz feet at the cone and flip hips inside (zone turn). The QB/Coach will point front shoulder up-field.
  • Sink and read the QB, break on the throw and intercept

This drill best compliments the technique of a final 3 dropper in our 3-Deep/3-Under coverage behind zone pressures. This defender is responsible for defending the hot throw in the middle of the field and defending inside the #3 WR. Here are a couple of good examples of the Flash + Sink drill applied in a game situation.

Read More

Building Pre-Snap Option Route Tags Based on Leverage

By Stan Zweifel
Head Football Coach
University of Dubuque (IA)
Twitter: @StanZweifel


Editors’ Note: In our preseason research, we had a large number of coaches reach out to us to ask about running option routes. The more we dug into this topic, the more we ran into people who told us that the best place to learn these concepts is at the University of Dubuque from HFC Stan Zweifel. This report covers how he teaches this technical concept.


Introduction

The concept of our option pass play is for the quarterback to read a receiver as opposed to reading a coverage. Over the years, we have noticed an improved completion percentage by our QB’s when they are sure of who to throw the ball to.

Base Concept

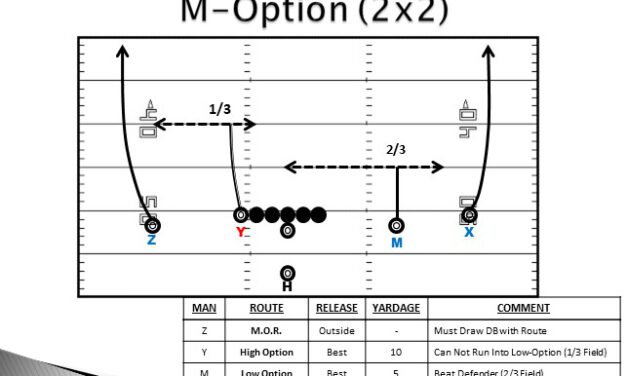
We identify our receivers in our Mustang Personnel Grouping (11 Personnel) as X – SE, M – Slot, Y – TE, and Z – Flanker. When we tag one of those receivers, we are identifying who is running the “low option.” The low option is a route run at a depth of 5 yard and the main coaching point is to simply GET OPEN. We coach the quarterback reads the receiver, not the defense and give receiver limited routes against any coverage.

Terms Defined
MOR – Mandatory Outside Release. This is used by outside wide receivers to get outside of a rolled up defender. This creates horizontal stretch from the low option.

Low Option – 5 yard get open route. If you are aligned as an inside receiver, here are your choices:

  • Attack leverage – Break Inside
  • Attack leverage – Break Outside
  • Attack outside – Wrap behind defender, into a void in zone and sit.
  • You have 2/3 of the field to work

High Option – 10 yard get open route. If you are an outside receiver, never break away from the ball!

Read More

5 Motion Sequences to Create New #1s

By Steve Monninger
Head Football Coach
Norfolk Academy (VA)


Introduction

When I used to be a defensive coordinator, I had a difficult time getting my corners, safeties and overhang defenders to adjust to motions that created a new #1 receiver. What seemed easy to handle in scout team reps and walkthrough sessions proved more challenging on game day. When I became the head football coach at Norfolk Academy six years ago, my mindset switched over to the offensive side of the ball, but I always remembered what gave me fits as a DC.

When installing a no huddle offense at Norfolk Academy, I knew that I wanted to feature offensive motions that were simple for us, but difficult for defenders. It had to be simple with the ability to be executed out of any personal grouping. This report will explain our reasoning behind creating new #1s with motion and will cover specific examples of how the motions are put into practice for specific plays at Norfolk Academy. Let’s start with the top five reasons we like to create a new #1:

Reason #1: Adding new width to the formation affects the defenders:

  • Corners cannot effectively use press or jam technique.
  • Safeties must adjust over-the-top alignments.
  • Overhang defenders must adjust their apex alignments.

Reason #2: Match Ups

  • We can easily get our bigger TE against a smaller corner.
  • We can easily get our fastest slot WR against a slower corner.

Reason #3: Enhance Inside and Outside Run Game

  • These motions can pull defenders out of the box, creating a numbers advantage for our inside run game.
  • These motions tend to soften the flank for our middle zone (pin and pull) run game.

Reason #4: Improve RPOs

  • These motions tend to “clean up” the C Gap, helping our QB make good reads for our Run Pass Options and perimeter passes.

Reason #5: Route Assignments

  • Since all our pass pattern concepts follow a #1, #2, #3 principle, we can use motions to target a better receiver running a specific route.

Implementing Our Formations and Motions

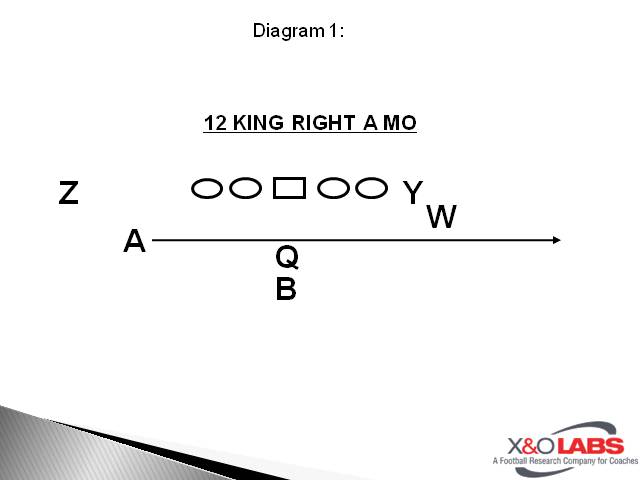
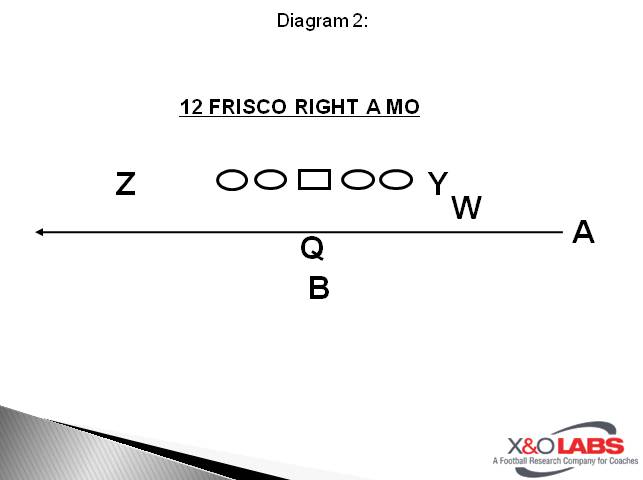
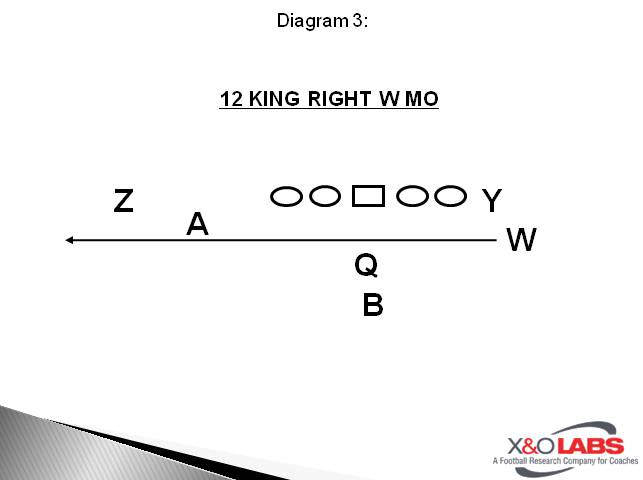
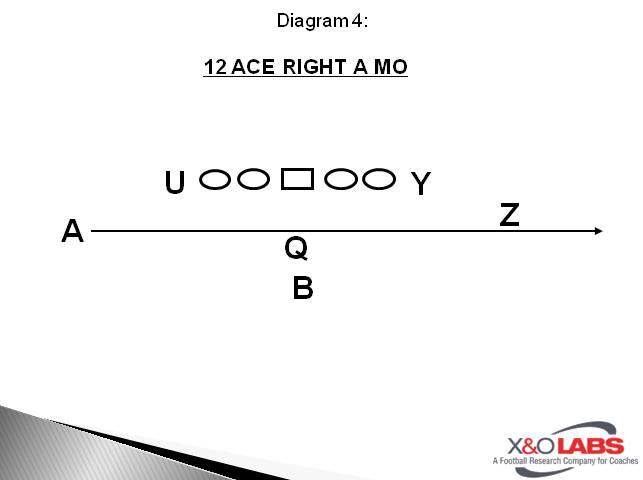
To get our offensive players in the appropriate places, we simply signal a formation, a specific player and a motion from the sideline. The formation will tell all the players where to line up. The player identified (A, Y, Z, W, etc.) knows that he will be going in motion and the type of motion will tell the player where he needs to end up. During the cadence, the QB will simply point to that player to send him in motion. For the sake of this report, we will look at two motions that create a new #1. These motions are “Mo” and “Out.

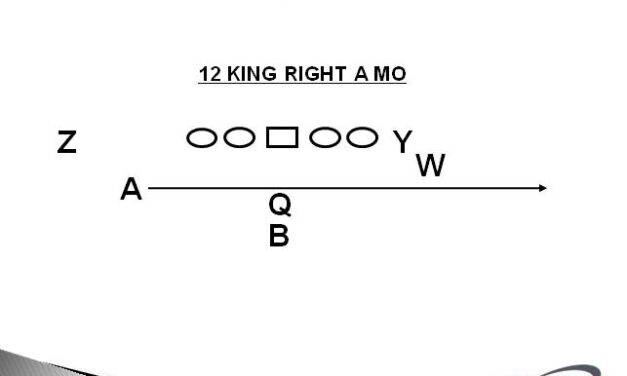
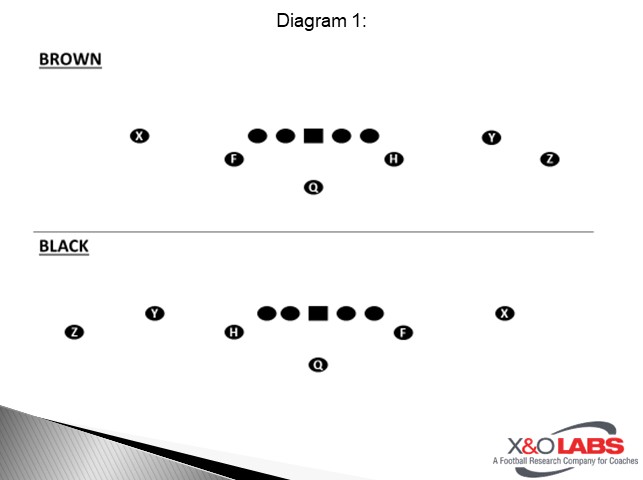
“Mo” is a motion that sends a player across the formation to create a new #1. This motion will typically change the formation from trips to doubles or doubles to trips. Examples include the following; A Mo, Y Mo, Z Mo, W Mo (Diagrams 1-4). 

Slide1Slide1Slide1Slide1

Read More

Double TE Empty Run/Pass Package

Ed Honabarger 
Head Football Coach 
Danville High School (OH) 
Twitter: @DanvilleFootbal 

Introduction 

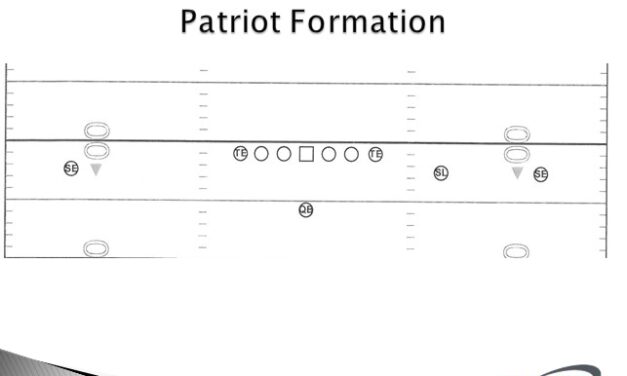
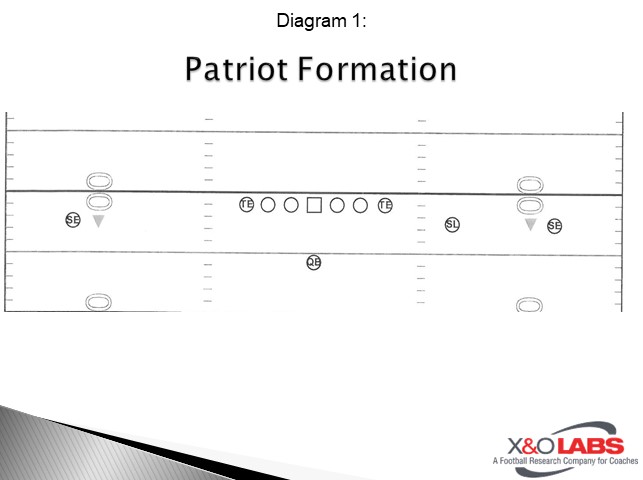
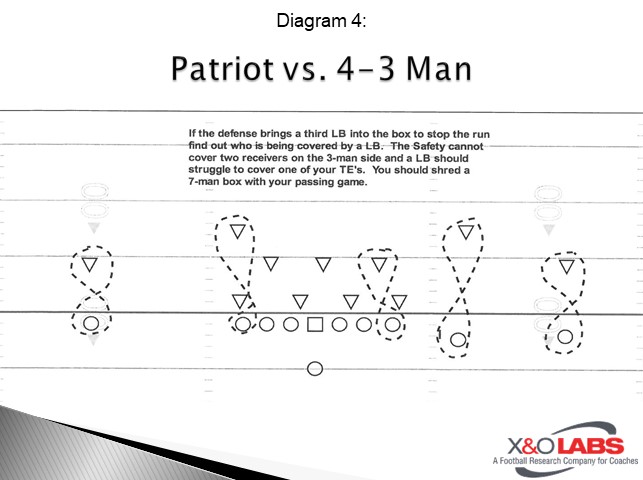
Several seasons ago, we wanted to incorporate some TE sets into our 5-wide attack. Depending on the player types we have year to year, we have created different personnel packages to bring more true TE body types into the game. We felt this caused problems for the defense while giving us angles and advantages across the front. We implemented three different TW 5-wide looks that each had their own strengths and we have used them heavily since that time. The formation that we liked the best is our double TE look. It is called Patriot after New England because of the success they were having with two TE’s and utilizing empty variations. 

Slide1

For us this is a simple change. We moved our slot on the 2-man side and our #2 receiver on the 3-man side into the TE positions because we wanted to leave the same skilled players on the field that we had in our 5-wide package. This formation specifically helps us create a numbers advantage in the box or over the field. We felt if teams were going to load the box up to stop our running attack, we would be able to pass at will on them. If the defense was more concerned about the pass, then we would be more than happy to attack them with QB runs. The defense really needs to pick their poison on what they want to give up and then we must be disciplined to attack their scheme.  

The greatest thing about the Patriot formation is we are able to run the same plays we run in our zero TE 5-wide package. In practice, we may not cover all of the plays we could possibly run out of Patriot, but the players receive the play reps out of one of our other formations and can easily make the small adjustment to run the play during a game if need be out of this set.   

Alignment 

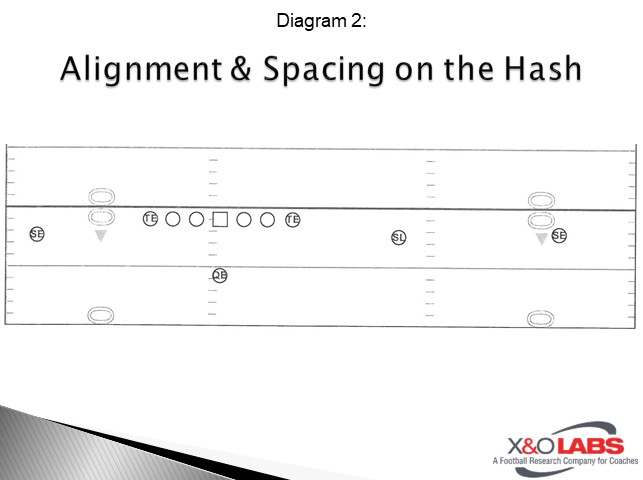
The box will look like a traditional two TE set. Our OGs, OTs and TEs will all maintain three-foot splits. Depending on where the ball is set for play, we adjust our three split receivers. The 2-receiver side will always go to the boundary, and the 3-receiver side will always go to the wide side of the field. Occasionally, we will do the opposite if we see that we can exploit the defense. 

We like to create space with our receivers, so we like the split ends to align outside the numbers. The slot receiver will then split the difference between the tight end and split end on the 3-man side. When the ball is on the hash, we have the split end on the 2-man side as close to the sideline as the referee will allow while still keeping the split end on the 3-man side outside the numbers and the slot splitting the difference. This helps create a lot of space for our receivers to run their routes, catch the ball, and let their athleticism take over. You could move the slot closer to the tight end or the split end to create different looks and route combinations.  

Slide1

The Box 

One of the best parts of this formation is that the defense will often times will not line up soundly.  DBs struggle with whom to cover and at what depth they should align. Defensive fronts are really in trouble now with the two TE look. We see a lot of 6-man boxes. If you are playing a 6-man defensive front that has a traditional alignment (ex. 4-2 or 3-3), how are they going to align and be gap sound? The short answer is that they cannot do it. To account for the extra hat, they have to change their box and this usually pushes someone into the wrong position.  

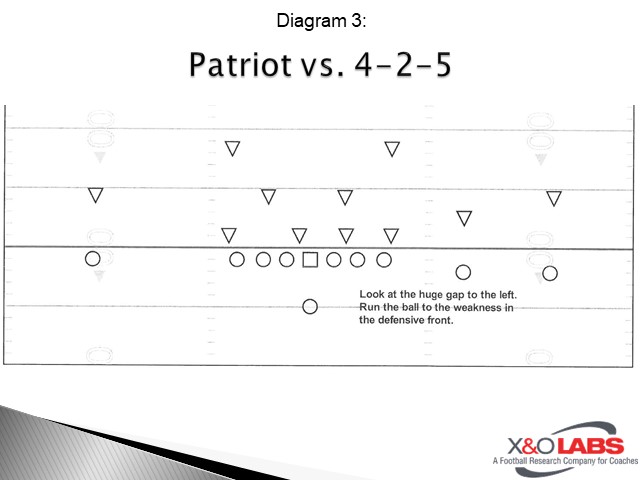
Diagram 3 (below) shows a 4-2-5 look that we see frequently.  You can see why we are excited against this look as only six defenders in the box and the defense is giving up the run.   

Slide3Slide3

Read More

Robber Coverage from Two High Looks

By Matt Sutjak
Defensive Coordinator
Millersville University (PA)
Twitter: @coach_sutjak


Introduction

During the offseason leading up to the 2017 season, our main focus as a defense was to find a way to add numbers into our run fit defense. We needed to do this without sacrificing our ability to match vertical routes and allow an offense to find uncontested throws. We decided to install a two high robber defense to give us the ability to accomplish this.

To run this coverage, you must have two safeties that do not shy away from inserting themselves into the run game when their read takes them there. They must also have enough speed and acceleration to run with slot receivers when an offense tries to challenge the deep middle of the field. Your corners need to have patience and trust their underneath coverage. They must also have the ability to win on deep passes against the top receivers in the league.

Our success is built on the discipline of our defenders to keep their eyes on their read progression and trust what their keys are telling them. We work constantly to master the small techniques within the scheme that put our guys in position to make big plays.

Passing Strength – Alignment, Keys and Reasonability

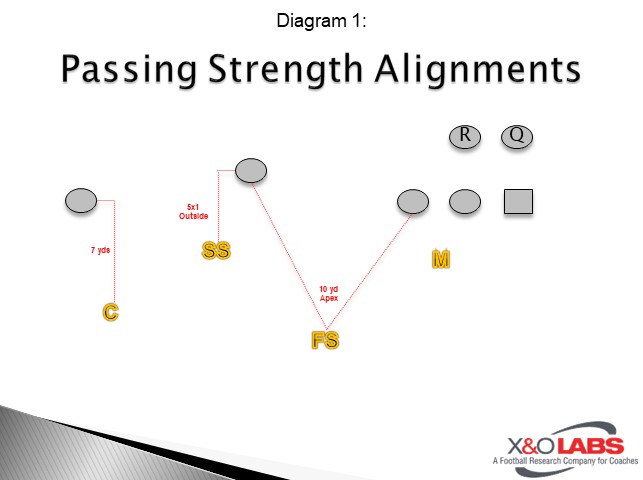
When teaching this coverage to our student athletes, we begin by teaching it versus a Twins formation to our passing strength. Our free safety alignment is a 10 yard apex between the #2 receiver and the tackle. Our strong safety is aligned 5 by 1 outside leverage of the #2 receiver. The strong side corner is aligned 7 by 1 with inside leverage on the #1 receiver. The middle linebacker’s alignment will vary based on front calls and the running strength.

Slide1

Once aligned, the free safety will survey the formation for tendency keys. He will then focus his eyes on the near tackle and read through the backfield. We term the free safety’s responsibility in this coverage as “CV” (Curl/Vertical). His pass responsibility is to “rob” the Curl to Vertical route of the #2 receiver. His run responsibility is “alley support”. Against downhill runs (Inside Zone), the free safety will take outside/in leverage to the football. Against perimeter run (Fly Sweep), the free safety will take inside/out leverage on the ball carrier. With run away, his responsibility is cutback replace behind the middle linebacker.

The strong safety will begin with his eyes focused on the end man on the line of scrimmage, through the backfield. He must also keep the #2 receiver in his peripheral vision to see immediate bubble routes. The strong safety’s responsibility versus the pass is the “flat” zone. Once he gets a pass read, his eyes go from the #2 receiver to the #1 receiver. If #2 pushed inside or vertical, he will work underneath #1. Against the run, the strong safety is our force player with perimeter run to him. With run inside or away, he is ultimate cutback player and he should never over pursue the football.

The strong side corner will begin with his eyes on the same keys as the strong safety and free safety. Like the strong safety, he has pass first responsibility. Once he gets a pass read, he becomes a half field corner. He reads from the #2 receiver to the #1 receiver and must be deeper than all routes. In the run game, the corner is a secondary force player with run to and the “touchdown saver” with run away by always taking a high angle.

The middle linebacker will begin with his eyes on the surface of the offensive line. Once he gets a pass read, he will drop to the strong side “hook.” We call this responsibility a “hole technique.” His eyes push from the #3 receiver to the #2 receiver. He will wall #3 until another route enters his zone. With a run read, the middle linebacker’s run fit will change based on the front call.

Weak Side – Alignment, Keys and Reasonability

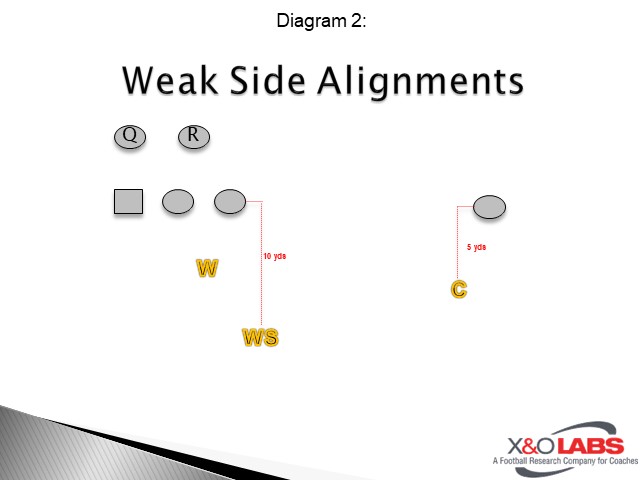
To teach the weak side of our robber coverage, we begin by explaining it versus a one receiver detached formation. We will adapt the rules versus different formations and build a system of checks if there are formations we do not like the coverage against. The weak safety is responsible for making the adjustment call to the weak side linebacker and corner. The weak safety will align 10 by 1 yards outside of the tackle and the weak side corner will align 5 by 1 yards inside of the #1 receiver.

Slide1

Read More

The 21 Personnel Slot Formation Package

Chris Andreadis
Offensive Coordinator
Red Mountain High School (AZ)


Introduction

RPOs. No-Huddle. Up-Tempo. Spread offense is all the rage. Try making it through a coaching clinic without hearing those words. Everyone has 4 WRs every snap. No one has an in line TE or a fullback. With all of this happening in mass, I have found that our offensive system has become more rare. 

I started my coaching career as an offensive line coach. I learned very quickly that a commitment to the run game has many positive effects:

  • It’s a low-risk / high reward offense (only ball carrier fumbles can cost you). The worst thing that can happen is that you run three plays and punt.
  • It moves the chains and controls the ball and game tempo.
  • It wears down the opposing defensive front – and keeps your defense fresh (and a little ornery if you keep them standing around too long).

Overall, I am a big proponent of a balanced attack. I don’t think that necessarily means 50/50 run/pass. To me, balance means the defense is not exactly sure if a run or pass is coming on any specific down, distance or field position out of that specific formation.

While you can certainly spread to run the ball, I believe that using four WRs every snap never forces the defense to play an extra gap (or two) like an In-Line TE and fullback does. In our quest to stay multiple, we found that the 21 personnel “slot” formation gave us everything we wanted. It allowed us to be in our 2-back set (I and off-set), We kept our in-line TE and we had a 2 WR side to throw various passing concepts. Formationally, it put our run strength and pass strength on opposite sides.  This forced Defenses to make a decision as to how they would line up. It was the perfect formation for us.

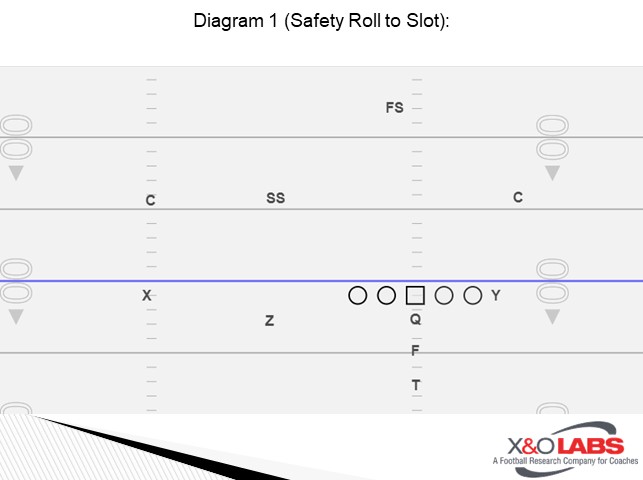
We basically focused on 2 Coverage keys during the game: 1) Where they rolled their safety in a 1-high look, and 2) where they played their Outside LBs. *NOTE: We never saw a defense go “corners over”, but if they did – we would use motion and shifts to get the matchup we wanted.

Slide1

If a team rolled coverage to the slot side (see above), that meant the only “non-box” player left to the TE side was the CB. In our experience, most corners want nothing to do with setting the edge or getting in the box – so that dictated we attack the TE side with off-tackle and perimeter runs ; as well as play-action passes.

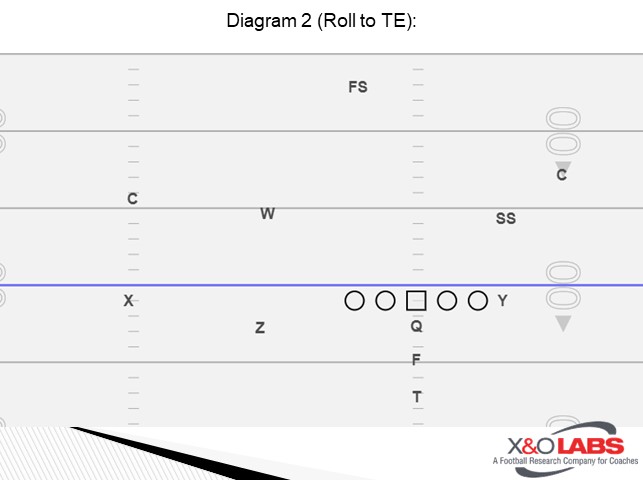
Diagram 2 (Roll to TE)

If the defense rolled their safety (see above)  to the TE side (for run support), that meant we had our slot WR matched with an OLB. We would attack that side with passes  (both drop-back and play-action). 

Slide1

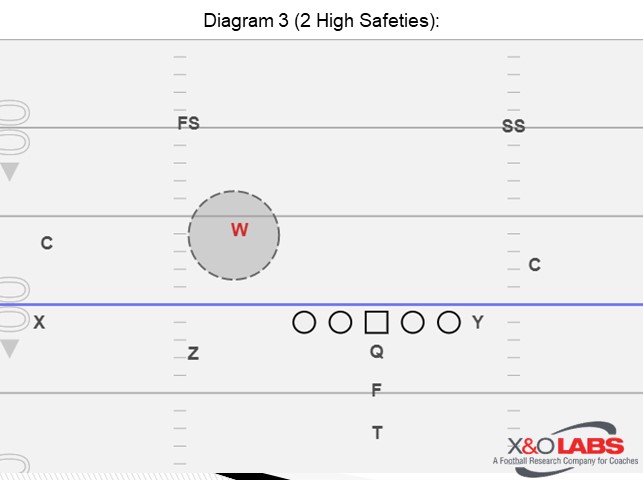
If they stayed in 2-high, and apexed their WOLB, we ran the ball. If they stayed in 2-high and kept a 7-man box, we threw a quick pass to our uncovered slot.

If teams played zero, we had built-in checks. We had a few very talented WRs that were matchup problems for most teams – we picked the matchup we liked, max-protected and took a shot.

Some front considerations:

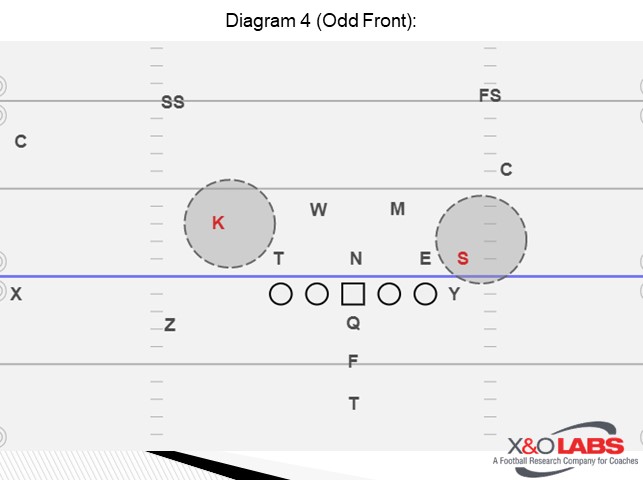
So, if we were facing an odd-front – did they walk Sam up on the TE?, Did they remove their Kat (weakside OLB) to the slot WR? Did they Eagle down and cover our guard?

Versus an even front – did they bump LBs or just add safety in? 

Slide3Slide3Slide3

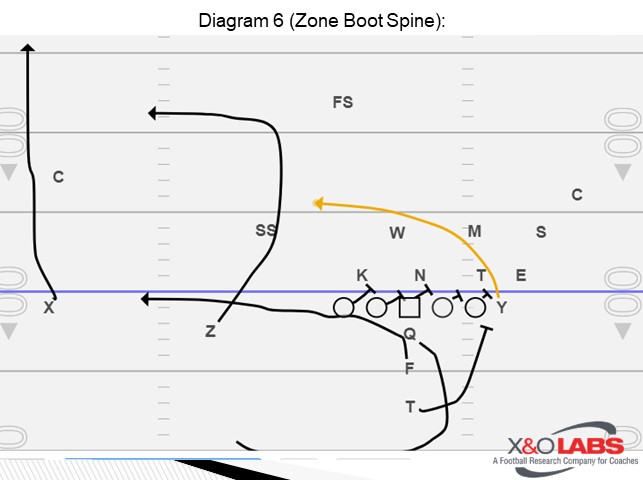
We were also able to run all aspects of our offense, both run and pass. Our best play-action was our “Boot Spine” which was a flood concept with our FB leaking out to the flat. Any two WR pass concept was fair game. 

Slide6Slide6

To study game film of this concept, click on the video below:

Read More

Designing Pre-Snap Movement Verbiage in Tempo Offenses

By Mike Kuchar
Senior Research Manager
X&O Labs
Twitter: @MikekKuchar


Introduction

It’s clear why more offensive coordinators are implementing pre-snap shifts and motions this season. Pre-snap movement not only puts a defensive unit on its heels, but also distorts its eye discipline, producing the anxiety needed to slow them down by the time the ball is snapped. But, offensively, the challenge lies in keeping verbiage concise to not confuse players and correlating with what player is moving. We were curious to see how coaches were packaging their movements and concepts into one-word calls. So, to explore how coaches were designing their pre-snap movement verbiage for this coming fall, we reached out to seven offensive coaches- many of them no-huddle advocates- to ask them the following questions:

  1. What is the signal or verbiage you use for perimeter (receivers and tight ends) motions in your system? Give an example of how is it tied into a play call.
  2. What is the signal or verbiage your use for perimeter (receiver and tight ends) shifts in your system? Give an example of how is it tied into a play call.
  3. What is the signal or verbiage your use for backfield motions in your system? Give an example of how is it tied into a play call.

Although their responses are posted anonymously, the contributor list is below:


Contributors (In Alphabetical Order):

  • Andrew Coverdale, offensive coordinator, Trinity High School (KY)
  • Eric Davis, head football coach, Mankato East High School (MN)
  • Dan Ellis, head football coach, Great Valley High School (PA)
  • Gabe Fertitta, offensive coordinator, Catholic High School (LA)
  • Matt Kerstetter, offensive coordinator, Westfield High School (TX)
  • Jeff Russell, offensive coordinator, Wethersfield High School (CT)
  • Steve Steele, head football coach, T.F. Riggs High School (SD)

What is the signal or verbiage you use for perimeter (receivers and tight ends) motions in your system? Give an example of how is it tied into a play call.

Source 1:

“We are a no-Huddle Team and most of our motions are verbal. I do not care if the defense knows that motion is coming. We use what we call ‘In’, ‘Across’, and ‘Orbit’ motion. The positions that can in motion are our Slot Receiver (H), our Tight End (Y), or our Tailback (T).

H:  Hip, Hack, Hop

Y:  Yin, Yankee, Yo

B:  Bing, Bang, Bomb

T:  Tick, Tack, Toe

For example, if we wanted to motion our Y across into a 2 x 2 set (Race) and run Power Right into the Boundary, we would call / signal ‘Yankee Race Power Right’.  We can motion into or out of formations.”

Source 2:

“For speed sweep motions, we tag a 5 or 6 and the receiver that is coming in speed sweep already knows who he is based on the call. For example, 26 is our power play to the right. 526 is power to the right with a speed sweep underneath as a diversion. 5 means the motion comes from the left to the right. 6 means the motion come from the right to the left. 7 and 8 are used for speed sweeps when we will actually mesh or hand off to the speed sweeper. For instance, 28 is our buck sweep play. If we want to hand it off to a WR on speed sweep, we will call 728. Other motions are just tagged as ‘y move’ ‘x move’ and the WR knows the kind of motion that is required.”

Source 3:

“We use the following pre-snap movements on the perimeter:

Read More

Implementing Clemson’s QB Designed Runs and RPO Package: Case 1 – Clemson’s Designed QB Gap Runs

By Jeff Smith
Special Assignment Researcher (X&O Labs)
Offensive Coordinator
Warrenton Central High School (MO) 


Introduction 

Utilizing the quarterback as a runner can be a detriment to any defense and it purely comes down to a simple numbers advantage. In the run game of conventional offenses, the quarterback is used to turn and hand the ball off taking him out of the numbers equation. It’s 10 (offensive players) vs. 11 (defensive players) football, meaning at least one defender will be unblocked to make the tackle. And that’s not including the potential of one getting off a block to make the stop. The quarterback run game forces defenses to account for him, often resorting to 8-9 man boxes with man coverage behind it (you will see plenty of those defensive structures in this report). And nobody does it better than Clemson as it pertains to designing formation and alerting their blocking schemes to make sure their top athlete (the quarterback) gets plenty of touches.  

Once the defense starts to do load boxes and play man coverages, that’s when the big plays come in the pass game. We will detail those in case three. In case one we are going to focus specifically on the gap run menu for the quarterback.  

What is a Gap Run? 

Most offensive coordinators classify their run schemes into three genres: zone runs, gap runs, and man runs. This all depends on the blocking scheme up front. The crux of a gap-blocking scheme is double teams at the point of attack. These are two on one blocks where two offensive linemen are working against a down defender (such as a defensive lineman) and a second level defender such as linebacker. The benefit of doubles teams, aside from the numbers advantage, is that it creates instant movement on the line of scrimmage. This, in turn, creates opening up entry points for the ball carrier to run the ball. Modeled after the old Woody Hays power play at Ohio State, Clemson uses its gap runs out of open formations, with no attached tight end.  

Why gap runs are effective in this system? 

Clemson isn’t known for having the most stout offensive linemen up front, but they know how to move. The gap system cultivates this type of offensive lineman who are technically sound. As one of our researchers told us, “The offensive line doesn’t maul people, but they are sound. They stay on combo blocks until they absolutely have to come off.” This is evidenced in our research below.  

The second reason why Clemson is effective in its gap schemes is their use of open formations. Their use of four and five wide receivers sets spreads the defenses out. That formation advantage, coupled with double teams at the point of attack, usually equates to big gains in the quarterback gap run game. They also use open sets, shifts and motions more than most teams to spread the defense out and to make them think and adjust on the fly.  

Gap Runs Used by Clemson: 

  • QB Counter Concept 
  • Counter Read Concept 
  • Power Read Concept 
  • Power Toss Concept 

QB Counter Concept

One of the more prominent gap runs in Clemson’s offensive menu is the QB counter concept. This is a scheme that they use with a variety of pre-snap shifts and motions. They also use a number of different read keys and the mix a sixth hat into their blocking scheme. Due to this scheme’s versatility, it allows Clemson to run it from multiple formations and personnel groupings. This keeps things simple and consistent for the offensive linemen, yet creates a lot of window dressing for defenses to worry about. 

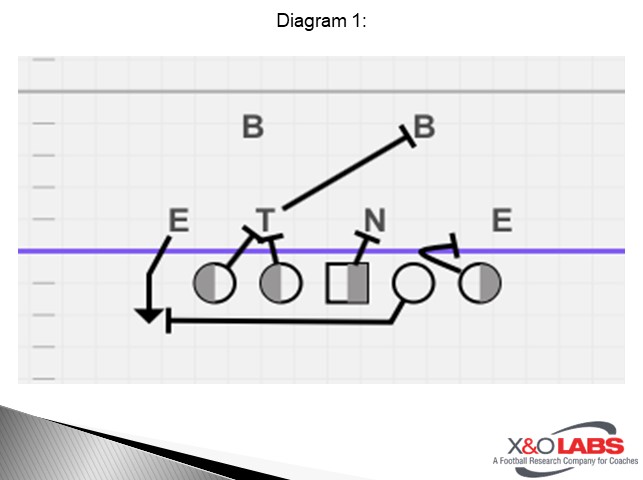
We start by looking at the Counter scheme for the offensive linemen.  This scheme is exactly like a power blocking scheme, except instead of the puller climbing up to the 2nd level, they are looking to kick out the (EMLOS) end man on the line of scrimmage.  To execute this type of scheme with success, there must have gap rules.  Every team has specific terminology to accomplish this, which can be very complex. But in order to keep it simple these are the rules for front five.  

Line Scheme and Front Rules 

Play side Tackle and Guard 

  1. Protect your backside gap.  
  2. If it isn’t threatened, work a double team to the backside inside linebacker.

Center vs. Four Man Fronts 

  1. Work down the line of scrimmage.
  2. If you can’t execute the down block because the defensive lineman is too wide, then make a “switch” alerting the pulling Guard that the Center will pull. 

Backside Guard 

  1. Flat pull and kick out EMOL
  2. If Center calls for a “switch”, protect A Gap and wheel back.

Backside Tackle 

  1. Protect B Gap and wheel back.

By working through these techniques, an offensive line is “building the wall” on the play side, which makes it hard for backside defenders to get through or over it. This combined with kicking out and logging the play side defenders. The diagrams below illustrate how to block the counter scheme against the two more common defensive fronts.  

Counter vs 42 Over 
Slide1

Counter vs 34 

Slide1

Blocking Variations 

Those are the counter basics, but adjustments need to be made in order to run the play effectively against disciplined defenses and there are plenty of those in the ACC. So, in order to protect the base concept of the play, Clemson has to make alterations in its blocking scheme to take advantage of potential personnel mismatches.  

Log Block  

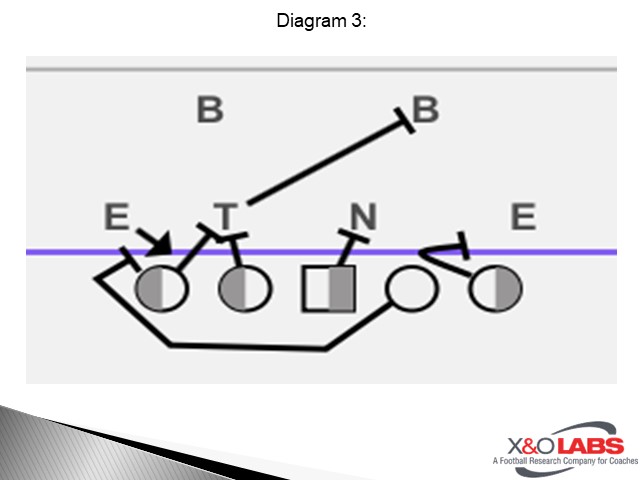
Again, the goal of this scheme is to kick out the EMOL and work inside of this block through B Gap. The quickest way to gash a defense is straight ahead. That being said, many defenses are taught to “spill” the ball, by making sure the defensive lineman that is getting kicked out, forces the ball outside on the perimeter where there are better athletes available to make a tackle on the quarterback. When this situation happens, the puller at Clemson is taught to read it and instead of trying to kick them out (which would be basically impossible) they will “log” them inside.  This basically means they will work their head and hips to the outside of the EMOL and will look to seal them inside.  This forces the play to bounce outside to C or D Gap.  This means that the ball carrier needs to look to bounce instead of cutting back. See the illustration below:  

Counter vs 42 Over- Log Block 
Slide3

Center Pull 

Four defensive linemen defenses, like the ones being used at the University of Miami at Virginia Tech in the ACC, usually possess a dynamic player at the 3-technique position. This block can be extremely difficult for a Center to execute a back block on. He may be too fast and get too much penetration into the backfield. In these circumstances, Clemson will pull its Center and keep its backside Guard on that dominant defender. The illustration below details this changeup.   

Counter vs 42 Under- Wide 3 Tech, Center “Switch” Call 
Slide3

Insert Blocking 
Read More

Implementing Clemson’s QB Designed Runs and RPO Package: Case 2 – Clemson’s Designed QB Zone Runs

By Pete DeWeese
Special Assignment Researcher (X&O Labs)
Offensive Coordinator
Sprayberry High School (GA) 


Introduction 

The zone read has been a cornerstone in spread offenses for over twenty years, and Clemson’s system uses it as well. The difference lies in how Clemson runs its zone run game. Every zone run in Clemson’s offensive menu has built in components- whether it’s a blocking adjustment or an RPO. The zone read is option football at it’s core which means an offensive coordinator will design the concept with whom he wants to carry the ball in mind. For Clemson’s athletes, both the quarterback and running back can pose significant threats to the defense. While carriers by both these ball carriers can alter from season to season, one thing is clear: the threat of a dual quarterback in this system makes a defense have to account for him.  

What is a Zone Run? 

The difference in a zone run as compared to a gap run relies on the intended horizontal displacement of defenders. The zone scheme can be a wider scheme than a gap scheme and has the potential to stretch defenders, opening up entry points for the back in the run box. When it’s coupled with the quarterback read element (where he is reading a particular defender to either give or keep the ball) the zone run game forces defenses to tie at least one defender in playing the quarterback pull element. It’s the perfect complement to gap schemes because it presents a completely different feel for the defense and can cause them to misfit the scheme.  

Why zone runs are effective in this system? 

Clemson is effective in these schemes for various reasons. The inside zone variations are a major part of their tempo game because it’s easy to execute when moving fast. Since there are no pull involved along the line of scrimmage, blocking assignments are easier to communicate along the front. There are less moving parts to these run concepts than there are in gap schemes. Another way in which Clemson is effective in these schemes it the wide path that the quarterback takes on almost all of his pull reads. Many coaches tell the quarterack to pull and replace (the read key), but Clemson’s quarterbacks work wider. Another reason for the success of these concepts is the discipline of Clemson’s running backs who do a great job of “bouncing” their fake when the QB pulls the ball, often blocking (or gettign tackled by) an extra defender. 

Types of Zone Runs Clemson Utilizes 

  • Zone Read 
  • QB Draw 

Zone Read Concept  

Formation Variations 

In most scenarios, the zone read concept can be thwarted by a gap exchange with a linebacker, allowing the defensive end to chase the dive back while the second level linebacker can come over the top to play the quarterback. While this is a standard way of playing the zone read option, Clemson relies on building different formation structures to force defenses to be out leveraged when defending the zone read game. Most of these formation structures fit into two main categories: 

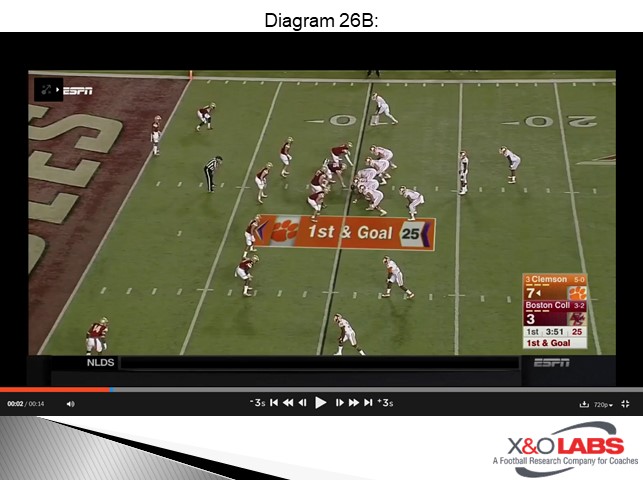
  • Trips Formation Structures- three receivers are placed to one side of the formation (Diagram 26B). 
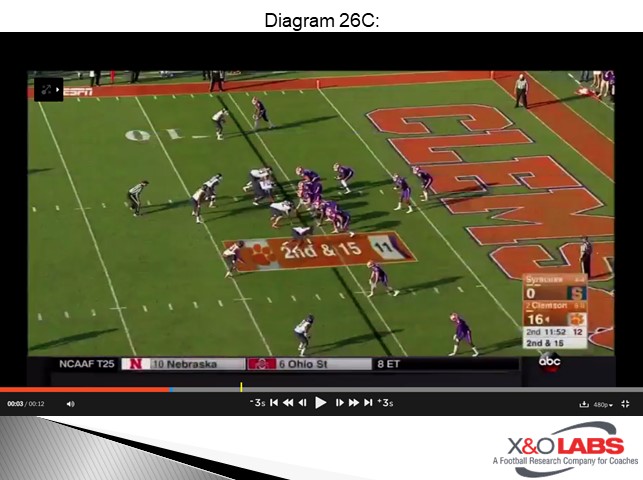
  • Doubles Formation Structures- two receivers are placed to both sides of the formation (Diagram 26C). 

Slide27Slide27

How Clemson produces these formations relies on the use of an off the line tight end or H-back. Because he is off the line of scrimmage, he can insert anywhere along the LOS or on the perimeter. The ability of the tight end to be also an effective slot receiver reduces the need to substitute and allows the Tigers to go up tempo. It was a formation initially made popular in the coaching profession by Gus Malzahn and his staff at Auburn. Now it’s nearly impossible to watch a college football game without seeing at least one team utilizing this formation.  How Clemson uses that H in its zone read game is at the crux of the success of its run game.  

3×1 Formation Structures 

King Weak Formation 

Placing the back away from the trips formation, allows Clemson to attack the weak-side of the defense. If a team wants to play a 2-high safety coverage, this alignment can really help attack the space voided by a deep safety to the single wide receiver side.  The same is true for a defense that rotates the strong safety down over the two receivers but does not walk a defender outside of the weak B-gap to fil the “apex” of the formation.  

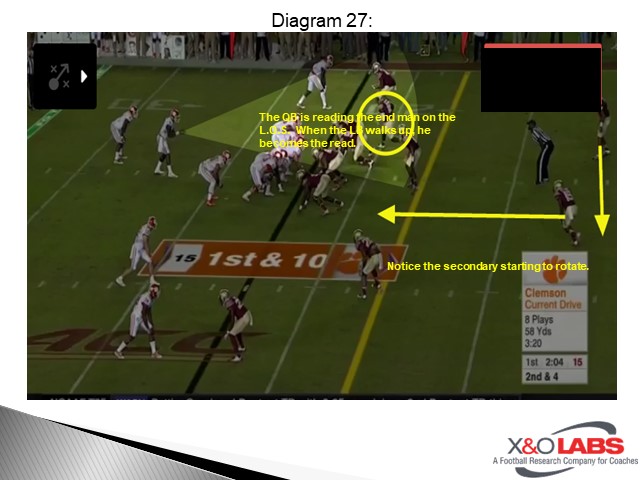
In the illustration below, Clemson uses this formation for their zone run game.  With the ball on the left hash, Clemson puts two wide receivers to the field and aligns the H-back off the ball and on the outer half of the offensive tackle to the same side. Florida State tries to add a seventh player to the box by locking up on the outside and spinning the field safety down into the box to take the H-back one-on-one or become an extra fitter in the box.  They marry this coverage with a boundary pressure with the Will LB coming off of the edge (Diagram 27). 

Slide29

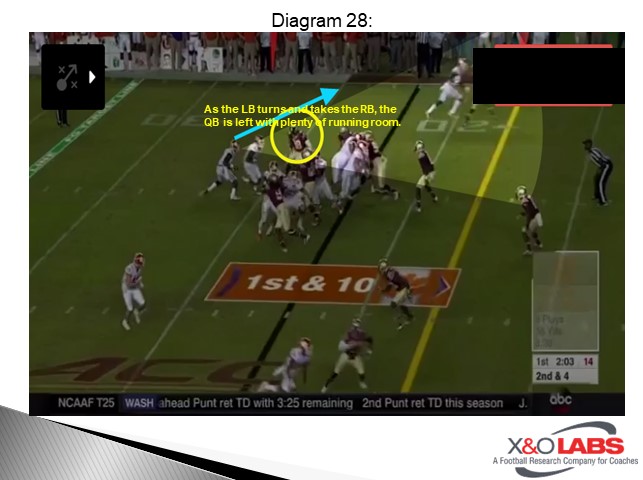
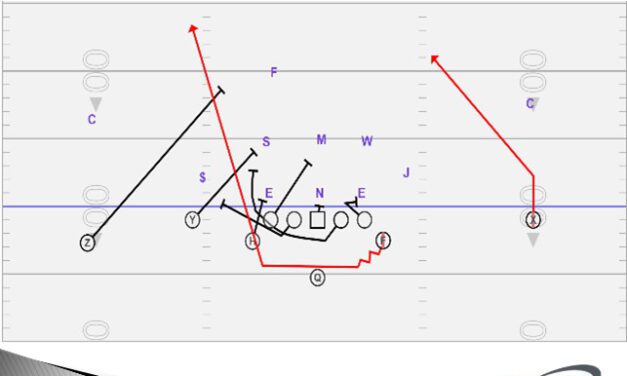
But as the left tackle works his zone track, the boundary defensive end (who is likely supposed to be slanting inside to B Gap) gets stuck outside. As a result, Florida State ends up with two defenders in C gap.  As the blitz happens, the quarterback reads the outside linebacker that has become the new end man on the line of scrimmage. Since the boundary safety has rotated towards the middle of the field to execute his Cover 1 assignment, and the corner is matched up in man-to-man, the quarterback  is able to attain a numbers advantage turn this into a big gain (Diagram 28).  

Slide29

King Strong Formation 

Clemson will also put its A back to the side of the trips, which can be more ideal for attacking single high safety structures. Placing the running back to the passing strength (along with the H) puts four players to a side.  If the defense rotates a safety down over the slot, Clemson can still account for the outside linebacker when running zone read that direction.  This makes it easier to match hats. 

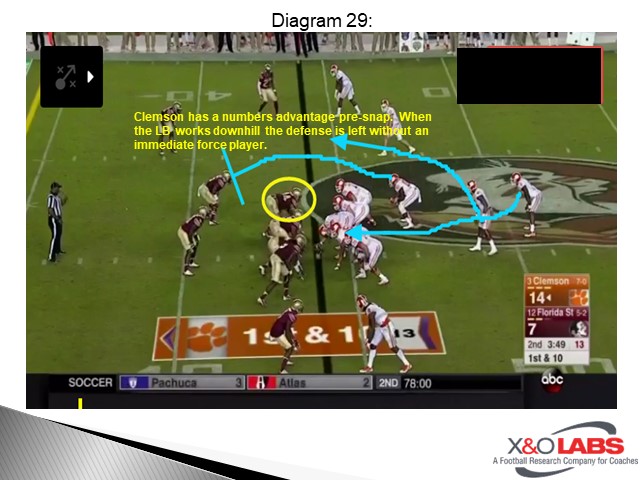
In the clip below, Clemson goes back to this familiar formation. In this game Florida State seems to bounce back and forth from some Even fronts to some Odd front defenses.  On this play FSU is essentially playing a Bear front, with five defenders at the line of scrimmage. To the strength of the formation they have a head up 4-technique that spikes inside to take B gap on the snap of the ball.  The head up nose appears to be two-gapping the center while the backside end is aligned in a loose 3-Technique and attacks the guard on the snap of the ball.  To the weak side, FSU has a stand-up backer playing C gap. Clemson has an immediate numbers advantage (Diagram 29).  

Slide31

Read More

Implementing Clemson’s QB Designed Runs and RPO Package: Case 3 – Clemson’s RPO (Run/Pass Option) Package

By Devin Gates 
Special Assignment Researcher (X&O Labs) 
Former Offensive Coordinator 
Fitchburg State University (MA) 

Introduction 

We would be remiss presenting a report on Clemson’s offensive system, without appropriately detailing the various RPO’s that it uses in its offensive menu. Without getting too engrossed in the intricacies of the RPO system (X&O Labs has already published three special reports on this topic alone) the simplest definition of an RPO is a pre-snap or post-snap read by the quarterback where he makes a decision on whether to give the ball to running back, keep the ball himself or throw it to a potential receiver. It’s the new option football, and few teams run them as effectively as Clemson.  

Before getting into the types of RPO’s that Clemson uses, it’s important to note that they will use two different types of RPO’s. Pre-Snap RPO’s and post-snap RPO’s. The definitions of each are below: 

Pre-Snap RPO’s– These are run/pass options that are determined pre-snap by the quarterback. The decision is based on pre-snap leverage of defenders. Some of these routes include screens such as now screens, flair screens and bubble screens. Quite simply, if the quarterback in this system feels he has a numbers advantage or if his receivers have a leverage advantage, he will throw the ball out on the perimeter. 

Post-Snap RPO’s- These are run/pass options that are determined post-snap by the quarterback. In these situations, the quarterback is reading a particular defender (dependent on the coverage) to assess if he will play the run or pass component of the scheme. Whatever component of the scheme that defender plays, the quarterback executes the other option. In other words, whatever he does is wrong.  

Second vs. Third Level RPO’s 

There is a substantial difference between RPO’s that manipulate second level or third level defenders. Second level defenders are classified as cornerbacks and linebackers while third level defenders are classified as safeties. Clemson has RPO’s to manipulate both of these levels, which is why we segmented our research based off these two distinctions.   

The Simplicity of Clemson RPO’s 

The RPO offense can be overwhelming for younger quarterbacks who are asked to make real time decisions based on an action of a defender. Because of this, sometimes less is more when designing these concepts. Clemson has had success with multiple quarterbacks running their system because they are simple in their approach with RPO’s. They are not flashy. They aren’t using RPOs to attack the middle of the field or push vertical, but really just to put horizontal stress on the second level conflict defender. They mostly used wide receiver bubble screens to achieve this, as well as a couple of quick game concepts. The success of Clemson’s RPO game isn’t the scheme or structure; it’s when and where they utilize the RPOs to increase the chances of a positive play at crucial times.  First, in establishing rhythm when starting a drive in their own territory, and by gaining positive yardage in point scoring territory to increase their chances of scoring. 

Second Level RPO’s 

Bubble Screen RPO 

The majority of the Clemson’s zone/bubble RPO’s are utilzed out of 11 personnel (one back and one tight end) formations either with an attached wing or the tight end on the line.  Because they will run out of both 3×1 and 2×2 formations it makes the linebacker to the two wide receiver side the conflict defender. This gives the quarterback the clear give/throw read.  If the defense plays a zone coverage and that conflict defender leans towards the box with the mesh, it gives the offense a two on one with the wide receivers vs either the cornerback or safety, depending on who the deep player is.  Because of its dual threat quarterback, Clemson has the ability to combat man coverage or seven in the box by making this play a triple option look and having the quarterback be a dynamic run threat.      

Clemson’s Variations of the Bubble RPO 

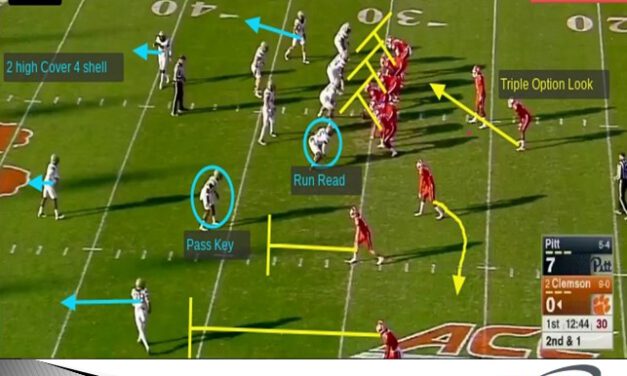
In this illustration, the RPO concept here is a six-man zone read blocking concept with a bubble to protect it.  This is a triple option read for quarterback. The first look is to the single receiver. In the illustration below, the safety to that side is aligned almost on the hash. There is an over hang level two player to the single receiver so that cancels the throw and moves the QB to the next phase of the triple option, which is the run action. Here, the defensive end for Pitt gives the quarterback a pull read by crashing down the line of scrimmage. The quarterback then attacks and reads alley defender for his second read.  The alley defender leans into the alley, giving blocking leverage to wide receiver.  The quarterback sees this, throws bubble.  The wide receiver is now one on one with safety (Diagram 54). 

Read More

Transitioning Between Even and Odd Fronts to Defend RPO’s

By Mike Kuchar 
Co-Founder/Senior Research Manager 
X&O Labs 
Twitter: @MikekKuchar 


Introduction 

Rose-Hulman Institute defensive coordinator Nick Davis believes in playing man coverage. It’s his philosophy. Even with some of the more intelligent student-athletes in the country (Rose-Hulman is an engineering school) Coach Davis believes in the simplicity of lining up man for man and playing ball, particularly against RPO offenses. Although Coach Davis’ players have the ingenuity to paly both man and zone coverages, he just chooses not to. 

“Our kids have trouble playing zone because they play with man eyes because they are so used to it,” he told us. “We’ll see our overhangs that will run with crossers. It’s really been a detriment for us to do something else. Our kids are smart but are lesser athletes that whom we play. So we tell them to stay on the hip of their receiver. And if we tell them to do one thing our kids are going to focus on doing it.” 

Clearly, they have done what’s asked of them. The Fighting Engineers defense produced the following numbers this past season (all national ranks): 

  • #1 Player in the Nation with Sacks (17 sacks) 
  • #2 Team Sacks  
  • #9 TFL 
  • #11 Yards per Carry 
  • #16 Rush Defense 
  • #19 Pass Completion Percentage 
  • #24 3rd?Down Defense 
  • #30 Red Zone Defense 

From a base standpoint, each player in the Fighting Engineers defense has a gap or a man. Some defenders will have a man and a gap if there is a tight end involved. According to Coach Davis, he’s seen less and less RPO’s than two-high quarters teams because of there is no leverage placed on overhang players. “ We create match-ups and it doesn’t matter where they are,” he told us. “We get lined up quickly and we just play with the proper leverage- inside or outside. Since we are a box team (and not a spill team) we can change our leverage to cheat inside if we are getting hurt in the slant game. We teach all our defensive backs press man coverage and off man coverage from both the outside and slot positions so we can get the best match-ups.”         

Personnel 

The novelty of the Rose-Hulman defense is that Coach Davis plays a 3-3-5 structure based off four down personnel. He is able to cross train defenders so that he can adjust the front structure depending on the offensive personnel or formation. “We like to be more even fronts against heavy personnel and more odd fronts vs. spread personnel,” said Coach Davis. “We will do both even and odd fronts vs. both personnel types to keep people honest.” For the most part, Coach Davis plays a field/boundary defense. He’ll play with two true defensive ends (one of which that can be a hybrid interior technique), one Nose, one hybrid linebacker (that can play on the line of scrimmage in four down fronts) and two traditional linebackers who will be in the box. “We like this personnel because we do not need to sub personnel to match the offense and we can present multiple looks,” he told us.     

This is the following personnel descriptions that Rose-Hulman uses in its backend: 

Dime: Best cover slot player. Most athlete safety or third best corner  

Rover: Needs to be able to cover second best slot player and match physical Tight Ends. 

Mike: Most physical defender. Does not need to play much.  

Bob:?Best athlete of the linebackers. Needs to be able to play on the line of scrimmage. A player that may be able to both rush and cover.  

Will: Mixture of the Mike and Bob linebacker. Needs to be able to cover but also be a physical guy. He plays man on the tailback quite a bit.   

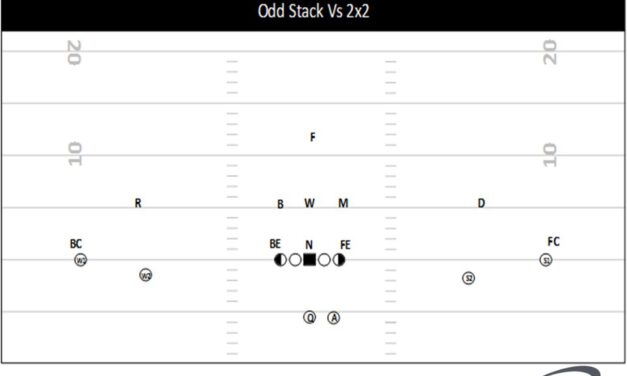
As referenced above, Rose-Hulman will vary its three-down vs. four-down looks depending on the formation structure presented. In one-back looks, the Fighting Engineers will align in odd stack looks. Against two-back structures, they will choose to be in more four-down fronts adjusting with the B linebacker up on the line of scrimmage. “We treat 10 personnel and 00 personnel the same and would like to be in an odd front of some sort,” he said. “We treat 11, 12, 20, 21 personnel the same and would like to be in an even front of some sort. ?Our base coverage adjusts to any personnel or formation.?We can add cover safeties or corners if we want against 10 personnel and physical safeties or stack linebackers against heavy personnel. Our system allows us to interchange position and not lose a beat.” 

Read More

Empty Buck Sweep Package

Chris Parker
Head Football Coach
Pickens High School (GA)
Twitter: @PickensFootball 


Introduction 

As a team, we run a lot of empty formations. We have made a commitment to do this for the following reasons: 

  • Simplifies the defense 
  • Forces adjustments 
  • Get 5 receivers out quickly. This forces the defense to be aware of 5 vertical threats and 5 horizontal threats on each play.  
  • The defense likely has limited experience against empty. 
  • We can run all the same running plays as we can in 10 pp if the QB can run. 
  • It is easier to recognize coverage. 
  • It creates spacing and easier recognized matchups for lineman and receivers. 

Every plan has some weaknesses. The biggest detriment to any Empty schemes is the inability to run the ball physically and conventionally. Jet Sweeps and QB runs have been good plays for us, but we needed more. We decided to lean on our Wing T roots and to marry some of our old Wing-T concepts into our empty package. We started by taking our base empty formation and moving the inside receiver positions to a “wing” alignment on some formations. At that point, the empty Buck Sweep became a staple of our offense. 

Our Base Empty Wing Formations 

These formations allow us to still have 5 receivers in the formation but also use the Wings as blockers or runners in a more physical, “Wing-T” look.  

Slide1

Diagram 1 is our basic formation. This is just like our traditional empty formation but the inside receivers are aligned as wings. This gives us the ability to use them as blockers, runners, or receivers.   

Slide1

Diagram 2 is our basic formation with a TE. This allows us to have tight side and split side plays and forces the defense to defend and cover the TE.  

Empty Buck Sweep 

While we have many plays and concepts we use in this formation, one of our best plays is the Buck Sweep. This play has been very successful for us in the past few years. We are able to run the buck to either side since there are wings on both sides. We are able to read the backside and throw the pop concept.  

Slide3Slide3

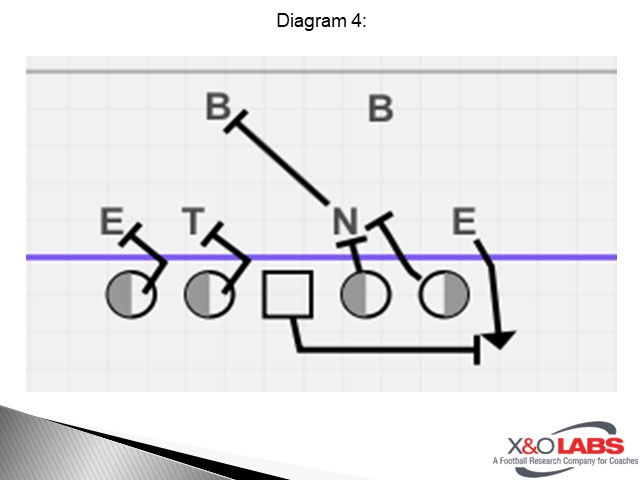
In diagram 3, we are running toward the strength of the formation and the isolated X receiver has the pop. In diagram 4, we are running Buck weak with the double pop read away.  

Quarterback 

  • The QB will handoff on Buck or throw the pop. 
  • The Buck handoff happens by catching the snap and placing the ball directly in front of himself. The RB will receive the ball running parallel to the line of scrimmage.   
  • The read is the backside ILB and/or the grass for the pop. If the backside ILB is chasing the play, pull the ball and find the voided area for the pop. If there are multiple receivers on the pop side, they will all be running the slant and QB can read inside/out. 
  • If the QB is unsure, he needs to handoff on Buck run.   

Wingbacks 

The wingbacks will block down if they are on the called side and be the ball carrier if they are on the backside on the play call.  

The blocking wing will block down on the DE. This can be a tough block. The key is to have a great get-off. The back should put his weight on his outside leg and push off that leg and throw himself into the defender. Once engaged the defender, he must run his feet the entire play. If the DE disappears, he should elevate to the 2nd level and find a linebacker to wall off.   

The ball carrier can get the ball with or without motion. It depends on how quick the ball carrier can get the ball after the snap. He should run flat in front of the quarterback receiving the ball like a jet sweep runner. After he gets the ball, he should read the play side guard’s block. The play side guard is attempting to kick the flank defender. If he kicks, the back should stick his foot in the ground and push vertical to catch the backside guard that will be wrapping in the hole. If the play side guard has to log the flank defender, then the back should bounce the play wid

Read More

Variations of the Double Screen Concept

By Zach Schneider
Offensive Coordinator
Battle Ground Academy (TN)
Twitter: @MrSchneiderBGA


Introduction

Screen passes have been an integral part of our offense at Battle Ground Academy. We view our screen game as an extension of our run game, as well as way to protect our pass game. I feel we are unique in that we try to scheme our screen game. Not only do we look to throw screens versus defensive pressure, we will also game plan screens versus defensive alignment to formations. We also see screens as a great answer in the red zone.

BGA Double Screen

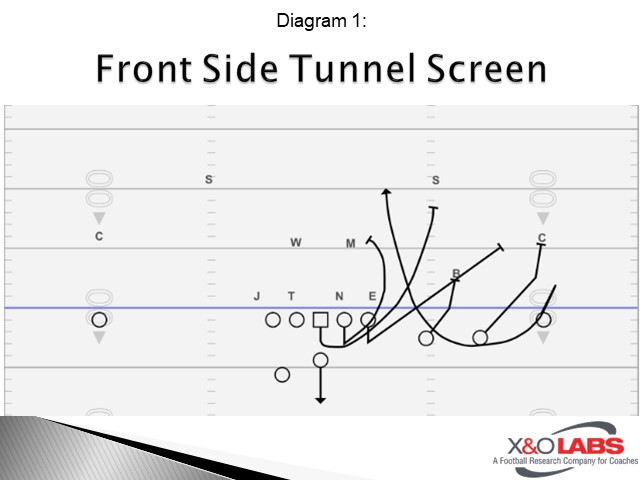
Offensively, we are based in 10 personnel and run various 2×2, 3×1, 3×2, 4×1, and 2 back formations. Our ultimate goal in our screen package is to be able to get the ball to any skill position on the field in various spots. The first year running this screen we had two separate screens in our offense. A tunnel screen to our front side and a quick (now or swing) screen to our backside. In the past couple years, we have meshed those screens together.

We spend a considerable amount of time during our spring practice and pre-season camp drilling our base screens. Most of this time is geared towards teaching our linemen the proper timing, technique, and assignment. We view our linemen to be the most important aspect of our screen game and once they have their timing, technique and assignments mastered, our options are limitless!

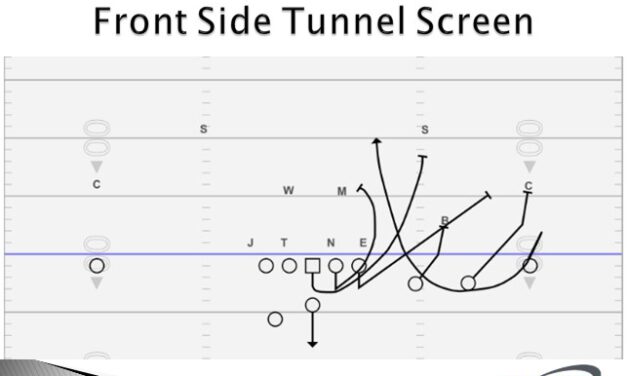
Tunnel Screen Blocking Scheme – Front Side
Slide1

Our play side timing for our linemen is pass set for roughly 2.5 seconds and release to your assignment. One of the “teaching techniques” we use with our linemen in the spring and preseason camp is we have them sing “Mary had a little lamb” then release. This has done wonders for us and our timing, plus the kids get a kick out of it!

From a blocking assignment perspective, we use the acronym FCA for our blocking scheme on the play side. This stands for force, contain, alley.
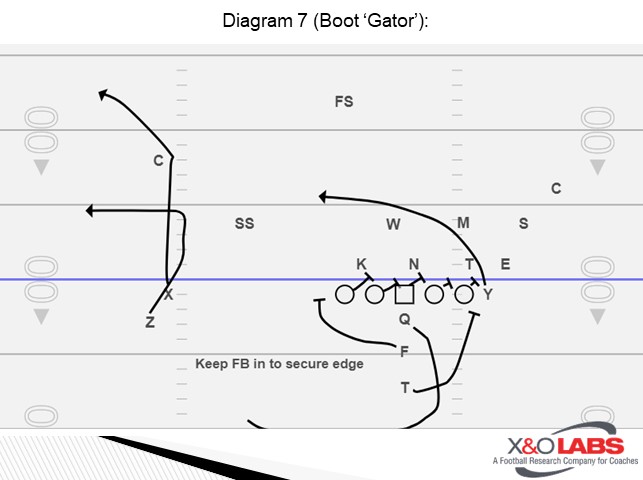
Play Side Offensive Tackle – Our play side tackle is our “force” player. In a perfect world, his responsibility is the force defender. To simplify this assignment, we instruct him to aim for the “chains” or an imaginary point 10 yards down the field on the sideline.

Play Side Offensive Guard – Our play side guard is our “contain” player. In a perfect world his responsibility is to meet the play side ILB or MIKE. We give him an aiming point of 6 yards downfield 2 yards outside the PST.

Offensive Center – Our center is our “alley” player. His responsibility is to run the “alley” created by the “force” player and the “contain” player. The center will act as the “lead” block for the player catching the tunnel screen.

Read More

Training the Feet and Eyes in Press Coverage

By Grant Caserta
Defensive Coordinator
Husson University
Twitter: @GCaserta1


Introduction

Press coverage is a tool that has many great benefits for the defense. From taking away easy throws, to challenging receivers, to altering route releases, press coverage can make things hard on the offense. With a few basic coaching points, corners can be equipped with the techniques and confidence to be successful at the line of scrimmage.
Stance and Key

There are two main items we focus on to help us achieve a proper stance: feet and eyes.

Feet

When teaching corners a stance for press coverage we always start with the feet. The first thing we look for is balanced weight distribution in the feet. We want equal weight on each foot, and equal weight on the ball and heel of the foot. This posture allows us to move quickly in reaction to the receiver in any direction.

We want the corner’s feet to be around shoulder width apart, or slightly wider than shoulder width. Each individual body type may be comfortable in a slightly different stance. Longer legged corners may feel more comfortable with a wider stance, while shorter corners may feel better with a narrower stance. I am a strong believer in the idea that an uncomfortable player will likely be a non-efficient player, movement-wise. The only requirement we have for a corner’s stance is that he must be balanced and stable after taking his first step. We want the corner’s first step to put him in an athletic position that allows him to respond to the receiver quickly. We do not want the first step to overextend the corner’s base so he cannot react to a counter move by the receiver. We also do not want the first step to be too short, where the receiver cannot be cut off on his initial release.

Eyes

Just like defending a ball handler in basketball, we want to focus our eyes on the midsection of the receiver. It is very easy to be fooled by head/shoulder fakes and arm movement. By keying the midsection, we give the corner the best chance of responding correctly to the true release of the receiver. It is the onus of the receiver to get around the corner; therefore, the more patience the corner can show initially, the better shot he has of forcing the receiver to declare where he is going. This can be best accomplished by keeping the eyes keyed on the midsection of the receiver – ignoring head fakes and other superficial attempts to get the corner’s hips opened up too early.

Two keys to winning at the Line of Scrimmage

We teach two key elements to the start of press coverage technique.

  1. Working on 45-degree angles to cut off the receiver and
  2. Protecting the “cylinder” by striking the receiver. These help us to disrupt timing of routes, prevent free releases and stay in the proper position to defend.

45 Degree Angles

Read More