306")


By Mark Theophel
Defensive Coordinator
Hartwick College (NY)
Introduction
Every year our defense utilizes a mixture of both man and zone coverage concepts. While both serve their purpose, zone coverage has consistently been most effective for us when it comes to making big plays on defense, particularly in the pass game. Plays where we are in zone coverage (namely 3-Deep and 2-Deep) account for about two-thirds of our interceptions and sacks in the last three seasons. A big reason for this is the way our teaching in zone coverage contrasts with man coverage.
Our zone defenders will cover an area of the field, rather than locking on to one receiver, and we apply landmarks to help our players get to their drops quickly while reading the QB. This is especially helpful when defending “hot” throws, which is a major point of emphasis for our defense, particularly because we are often playing zone coverage behind some form of pressure. A smart QB can neutralize the effectiveness of a stunt/blitz by throwing “hot” to an exposed zone, so defensively we spend a lot of practice time trying to counter this by coaching our players to anticipate those throws and break on the throw from the QB, creating opportunities for takeaways. In addition, denying these hot throws can create held balls and gives us more time to get to the QB with the pass rush.
Defining the Zones
It is important that our players first understand the different zones of the field in our 3-Deep and 2-Deep coverages. This will help them understand their landmarks better. Additionally, they must understand how to relate to WRs in their zone after the pattern distribution is finished. We will diagram these zones for both 3-Deep and 2-Deep coverages, separately, and term our drops for the underneath coverage defenders to fit those areas of the field.
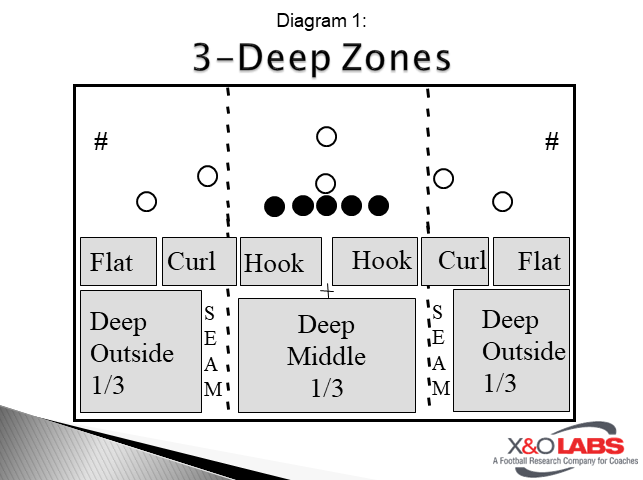
3-Deep Zone Drops:
- SCF (Seam-Curl-Flat)
- Re-Route #2 in the seam, expand and play #1 curl-to-flat
- Landmark is 2 yards outside the hash
- Hook-to-Curl
- Relate to #3 in the hook, #2 in the curl
- Landmark is 2 yards inside the hash
- Final 3 (used in zone pressures)
- Defend the hook inside the #3 WR after all exchanges
- Landmark is the goalpost
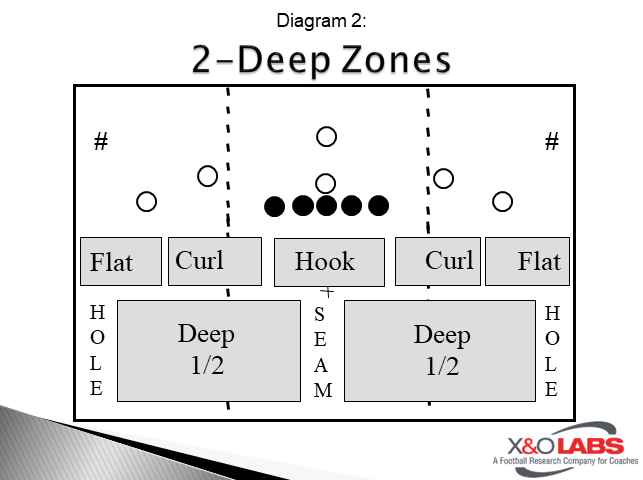
2-Deep Zone Drops:
- Flat
- Relate to #1 at the numbers
- Seam/Curl
- Re-route #2 in the seam, expand and play #1 in the curl
- Landmark is the Hash+2 (2 yards inside or outside, depending on QB/routes)
Drilling the Technique
We must dedicate practice time to teaching our pass drop technique, including taking a good initial angle and being able to break on the throw by the QB. Here are a few drills that we use with our linebackers to improve their drops in underneath coverage.
We use the “Flash + Sink” drill to practice dropping flat to a zone and undercutting hot throws.
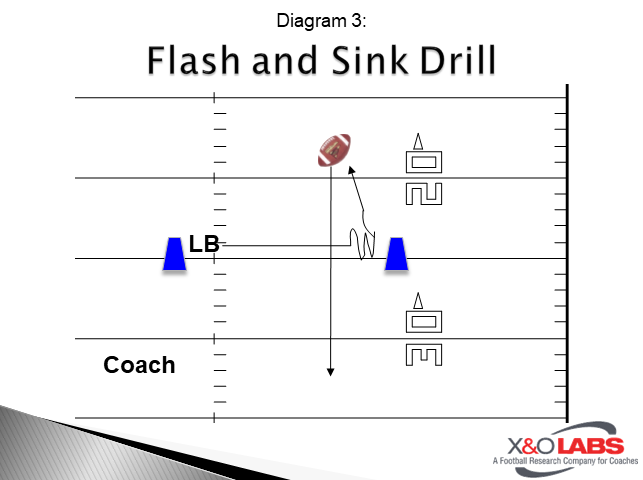
Flash + Sink Coaching Points:
- LB push flat to the cone, eyes on the QB (Coach). If the QB throws hot to the first cone, undercut the throw and intercept.
- Buzz feet at the cone and flip hips inside (zone turn). The QB/Coach will point front shoulder up-field.
- Sink and read the QB, break on the throw and intercept
This drill best compliments the technique of a final 3 dropper in our 3-Deep/3-Under coverage behind zone pressures. This defender is responsible for defending the hot throw in the middle of the field and defending inside the #3 WR. Here are a couple of good examples of the Flash + Sink drill applied in a game situation.