



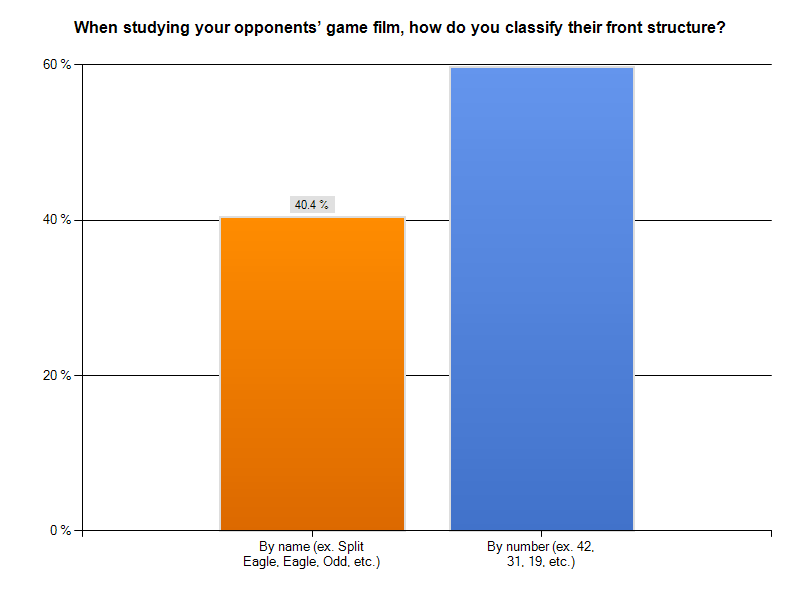
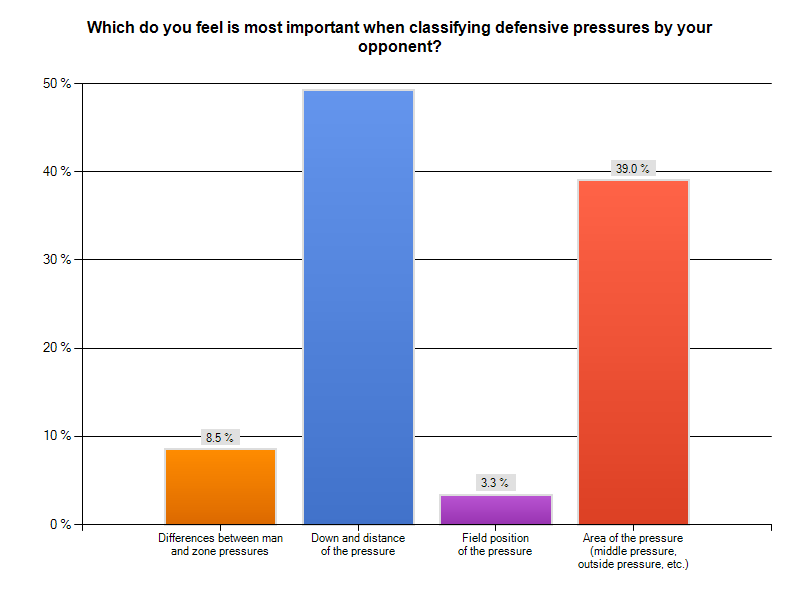
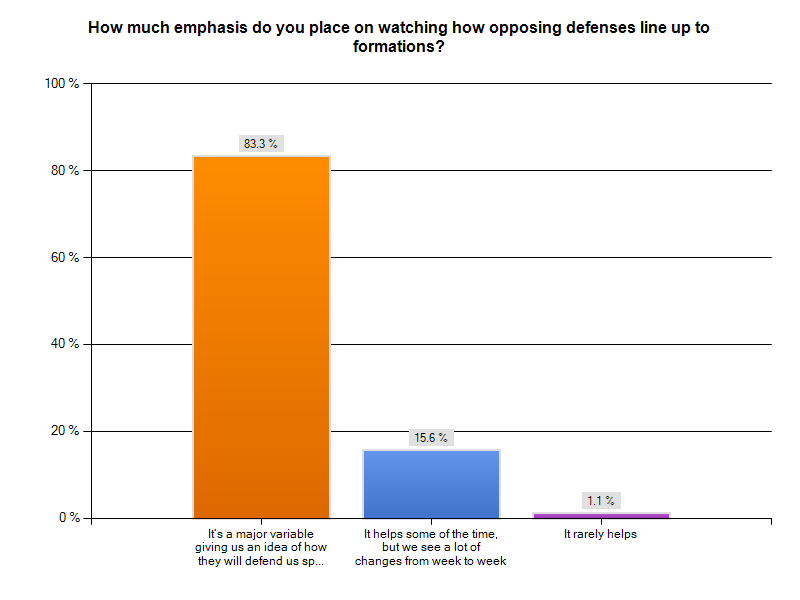
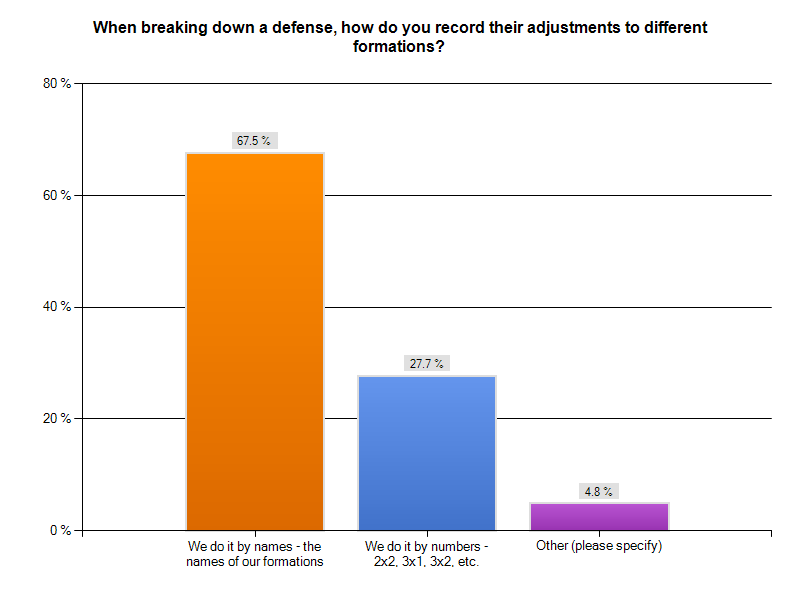
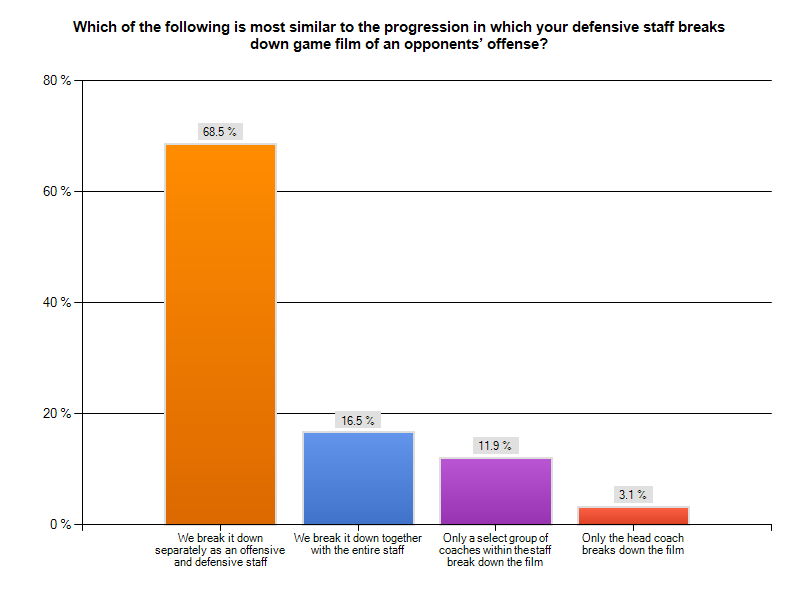
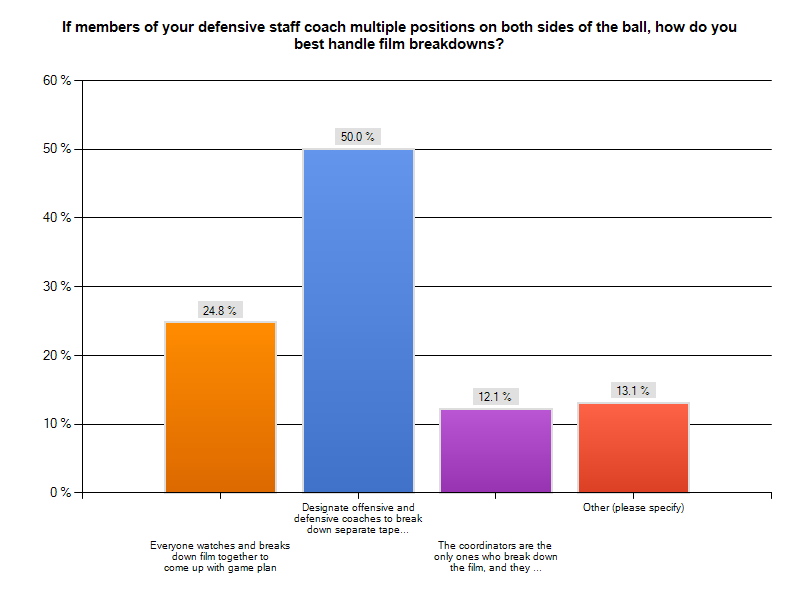
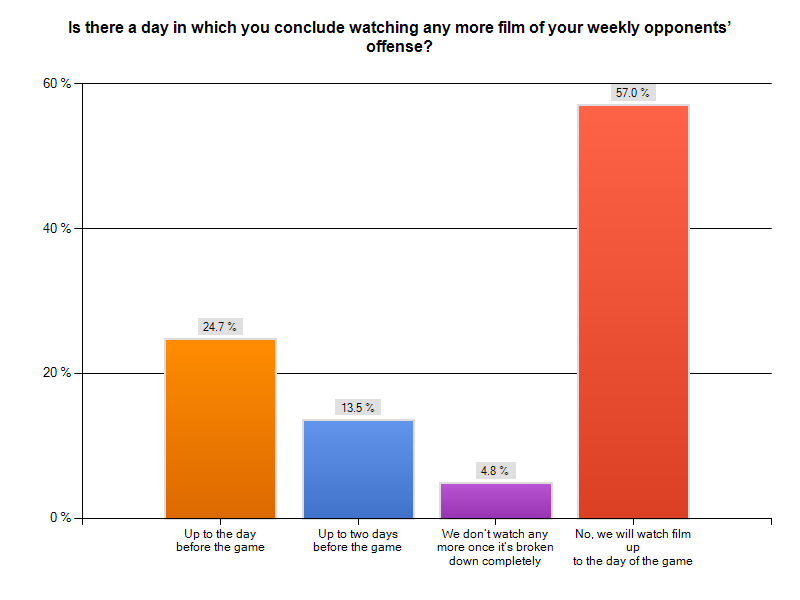
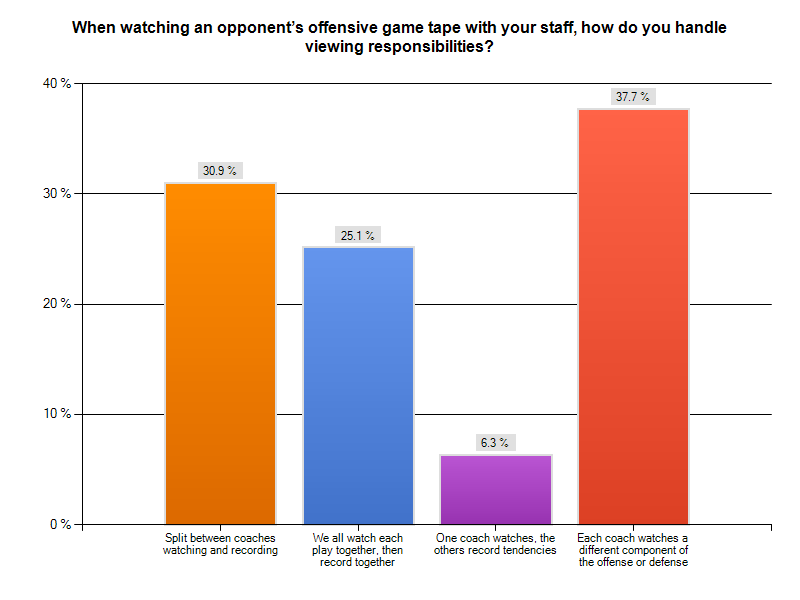
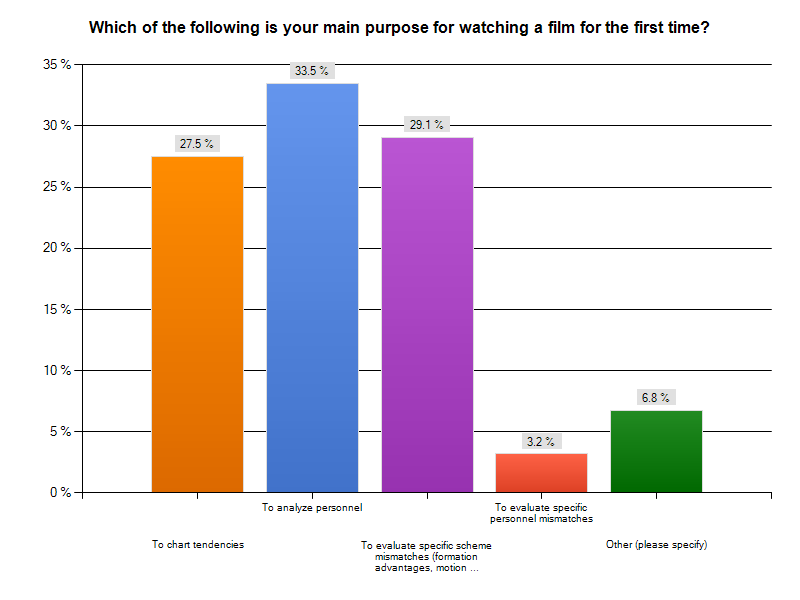
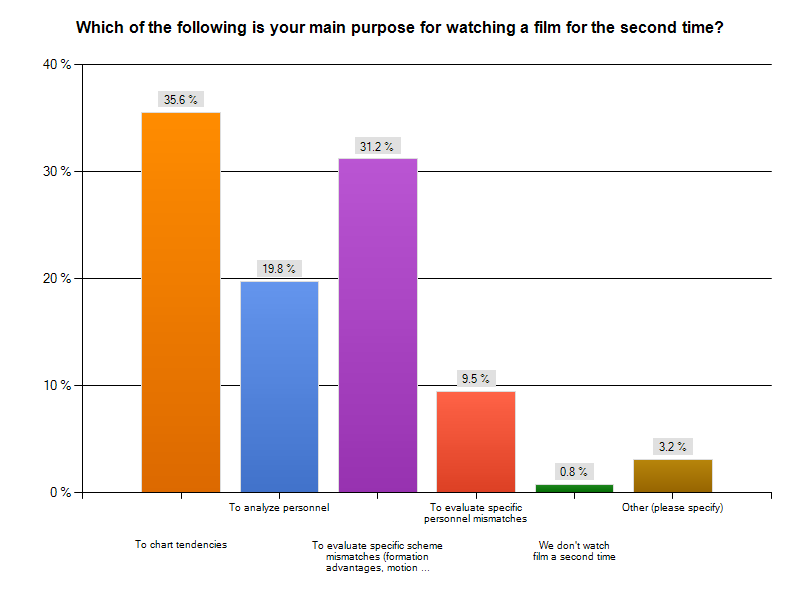
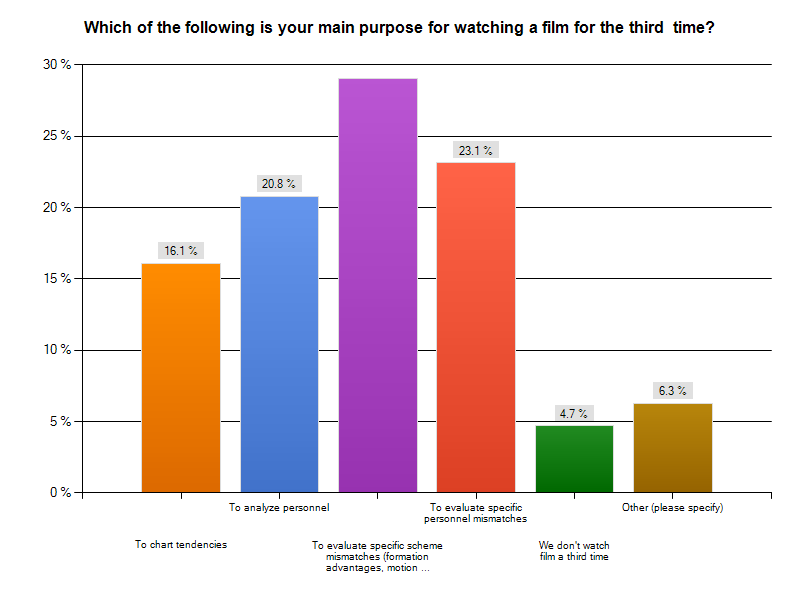
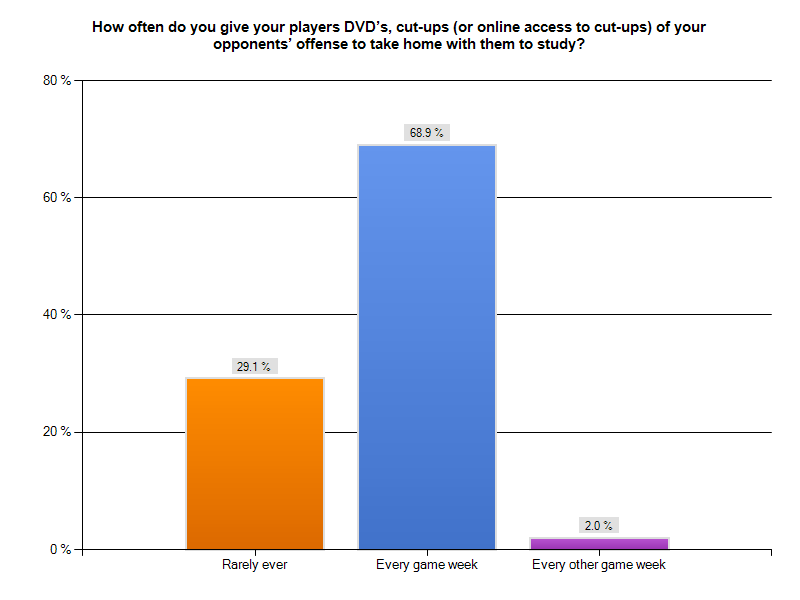

Defending Pre-Snap Movements: Statistical Analysis
The following Statistical Analysis Report is from the Research Report: Defending Pre-Snap Movements.
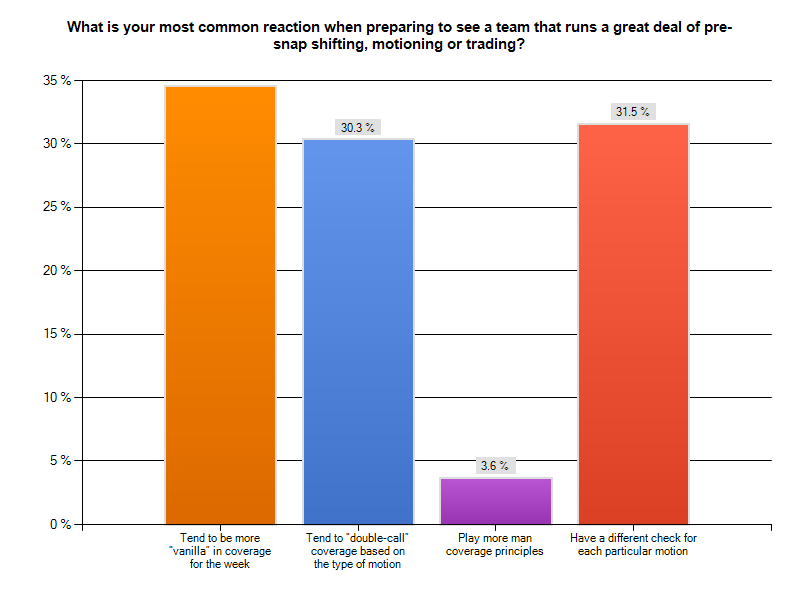
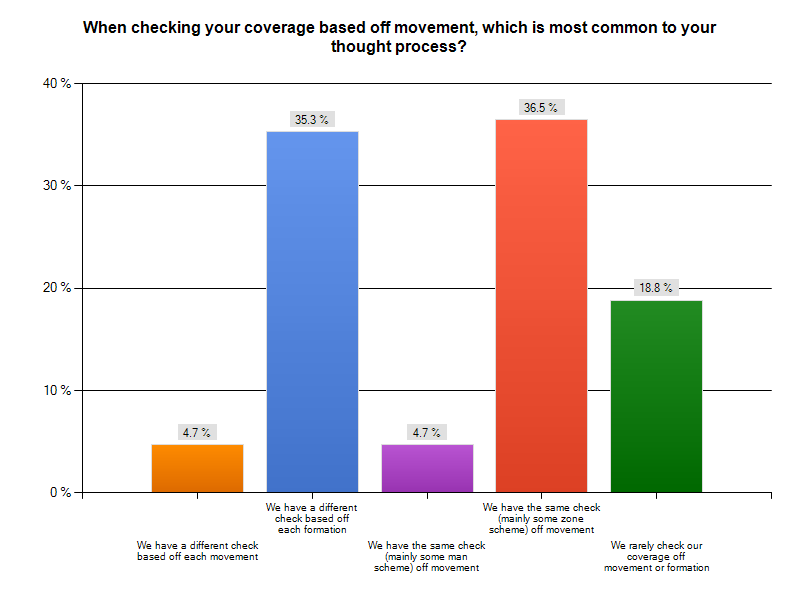
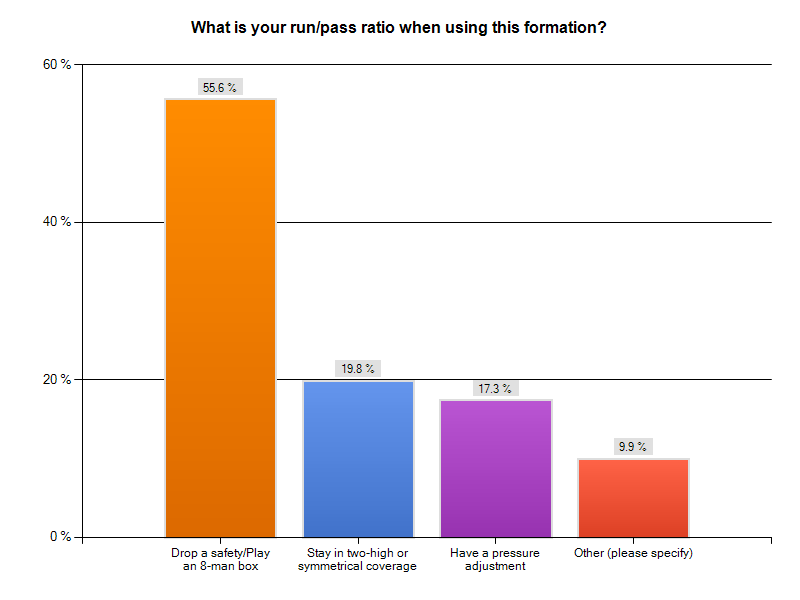
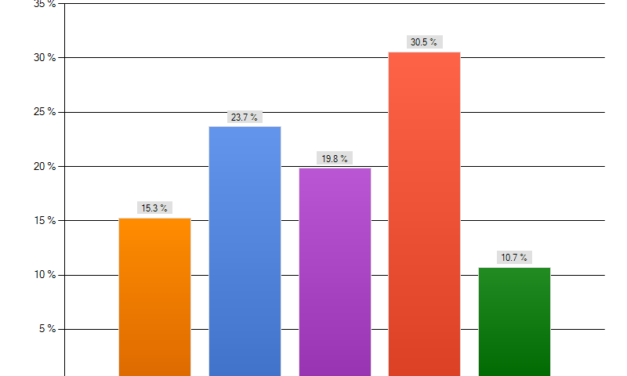
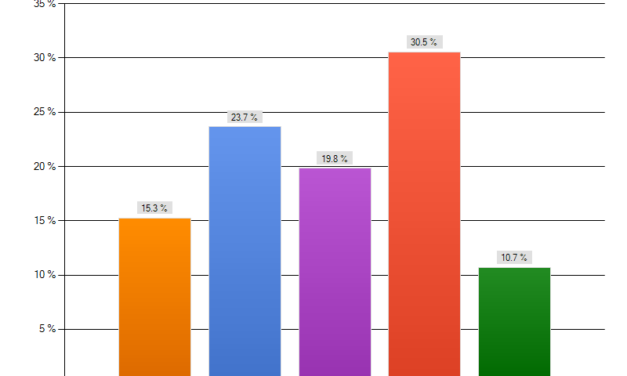
Attacking the Alley Against Odd Fronts: Statistical Analysis
The following Statistical Analysis Report is from the Research Report: Attacking the Alley Against Odd Fronts.
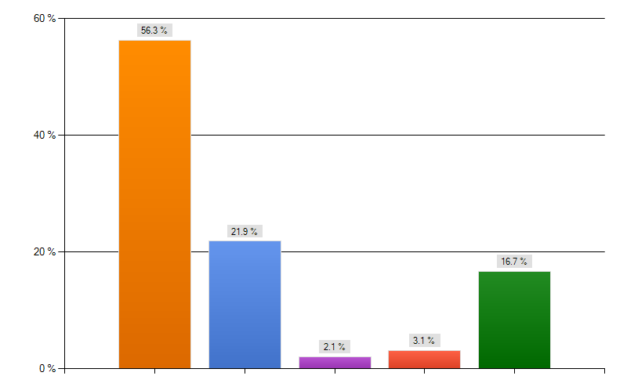
Coaching Contracts: Statistical Analysis
The following Statistical Analysis Report is from the following Research Reports (click on the report name to access that specific report):
- 17 Mistakes College Assistant Coaches Make With Their Contracts, Part 1
- 17 Mistakes College Assistant Coaches Make With Their Contracts, Part 2
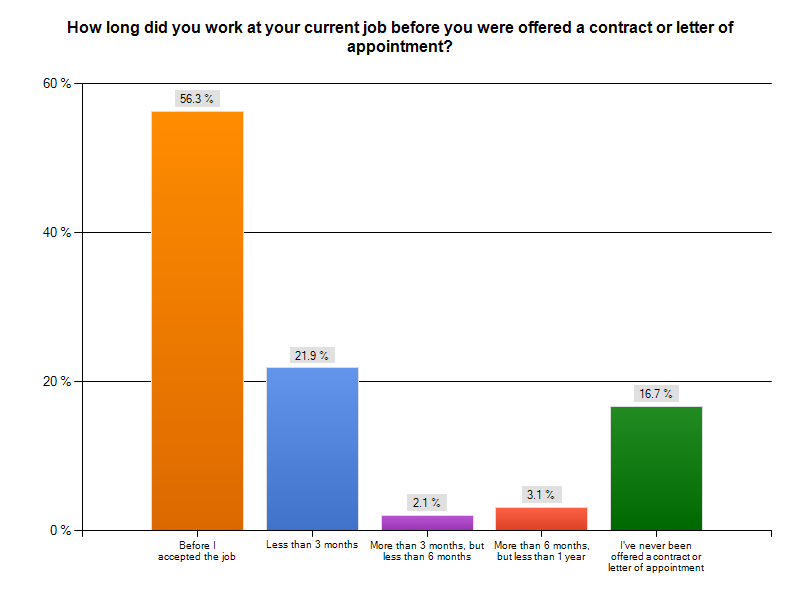
The 9-Technique: Statistical Analysis Report
The following Statistical Analysis Report is from the following Research Reports (click on the report name to access that specific report):
- 9-Technique Play vs. Run Schemes
- Training the 9-Technique vs. Pass

Spring Football: 10 Schools in 8 Days
X&O Labs’ Senior Research Manager Mike Kuchar is hitting the road this spring, covering 10 colleges in just eight days in the
 X&O Lab’ Mike Kuchar will meet with the staffs of 10 colleges in just 8 days this spring. Keep reading www.XandOLabs.com for all t
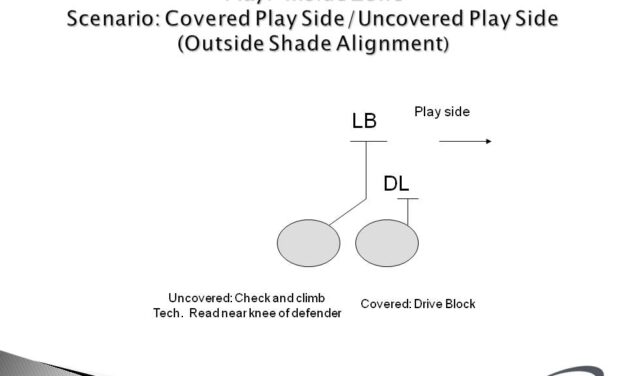
“Pod Teaching” the Inside and Outside Zone Schemes
By George Penree,
Offensive Line Coach
Utica College (NY)
Editor’s Note: The following clinic report was written by Utica College (NY) offensive line coach George Penree, a post he has held since 2007. In 2010 Utica broke more school-records including points in a single game (78), pass completions (231), passing a receiving yards (2,742), passing yards per game (274.2), total offensive yards (4,007), total yards of offense per game (400.7), and all purpose yards (5,049). Coach Penree will be happy to answer any comments or questions by leaving them below.
I would like to thank X&O Labs and all the great coaches who have influenced me over the years. I would like to discuss how we at Utica College teach the inside and outside zone using three-person groups, which is something we do once a week for a ten-minute individual period (five minutes for inside zone and five minutes for outside zone).
Before getting into the actual drills, a few things must be understood. The inside and outside zone blocking concepts are based on the teaching that in any inside or outside zone play there are “covered” and “uncovered” linemen.
- Covered linemen are those that have a defender in an alignment directly across from them.
- Uncovered linemen are exactly that, they do not have a defender aligned across from them.
I talk to my players about the different covered alignments a defender can have. The defender can either align to the play side (the side the ball is being run to), or backside (the side the ball is being run away from.) The covered lineman will first diagnose if he is covered play side, or covered backside. The uncovered linemen’s universal rule is to work with the next covered linemen to the play side. They have to diagnose what alignment the defender is in on the covered linemen they are working with. The covered lineman will make the call. If the uncovered lineman will look to the play side to identify the player and technique he is using. Once our guys understand these alignments, they then perform the technique best suited to block defenders in the different alignments.
I use these tables to organize all the techniques I have to teach in meetings and practice. It also gives our guys the ability to quickly recall the technique best used to block the defenders aligned across from them.
The table below explains the four situations we encounter on inside zone.
| Covered / Uncovered | Play side / Backside | Technique Used |
| Covered | Play side | Drive Block |
| Covered | Backside | Stab and Demeanor |
| Uncovered | Play side | Check and Climb |
| Uncovered | Backside | Lateral Drive |
The table below explains the four situations we encounter on outside zone.
| Covered / Uncovered | Playside / Backside | Technique Used |
| Covered | Play side | Reach |
| Covered | Backside | Reach, Stab, Climb |
| Uncovered | Play side | Reach, Check, Climb |
| Uncovered | Backside | Reach, Run, Takeover |
Blocking Technique Coaching Points:
Drive Block
- Get helmet on play side number of defender.
- First step is the lead step, so set distance – landmark outside number.
- Second step is the power step. The backside leg should get back underneath shoulder pads (regain leverage).
- Engage with defensive lineman with inside hand placement.
- Gradually climb the block. Start low and finish high.
Stab and Demeanor Block:
- Step with play side foot, pick it up and put it down.
- Second step is a “crotch step.” Drive back side foot through midline of defender (splitting his crotch).
- Inside arm should engage somewhere near play side number. Keep elbow tight and tucked to your body.
- Have good demeanor, knees inside ankle, ankle inside feet; duck walk defender back by keeping outside arm free in case of widening linebacker.
Get X&O Labs’ Research Reports, Clinic Reports and Video Reports Sent to Your Email Every Tuesday. Just Enter Your Name and Email in the Sign Up Box in the Right Hand Margin of This Page >>>>>>>>>> Above our Facebook Fan Box. It’s FREE!
Check and Climb Block:
- Take lateral step with play side foot, but shoulder should be squared.
- Get back side foot to shoulder pad (regain leverage).
- Get eyes go to near gap.
- If no first level defender in gap, duck walk to second level.
- First level defender: drive block through back side number of defender.
Lateral Drive Block:
- Take lateral step to close gap by keeping shoulders square.
- Second step comes back underneath shoulder pads (regain leverage).
- Use two hand drive through backside number of defender.
- Climb the block.
Reach Block:
- Aiming point is play side shoulder
- First step – depth and width step. Loose ground, but gain width.
- Second step – predicated on how hard DL fights towards ball
- If DL is even with OL – (stack the feet) take backside leg, don’t crossover, point toe at end zone, bench press with outside arm and torque him back inside.
- If DL widens – crossover and run, so head to get to play side shoulder
Reach, Stab and Climb Block:
- “Hold defender up” so uncovered player can reach him.
- First step – get depth and width on play side foot and put inside arm on near shoulder pad; shock (stab) defensive lineman with inside hand and work to second level defender.
- If second level defender is head up, our lineman will block him; otherwise look backside. Don’t chase second level players over the top.
Reach, Check and Climb Block:
- Same footwork, but no stab.
- Uncovered lineman is reading the near knee of defender.
- If near knee comes at us – work reach block.
- If near knee goes away – climb to second level.
Reach, Run and Takeover Block:
- Uncovered lineman will run laterally to get his head on the play side shoulder of defender.
- Once head is on play side number, execute reach block technique.
Determining Covered/Uncovered
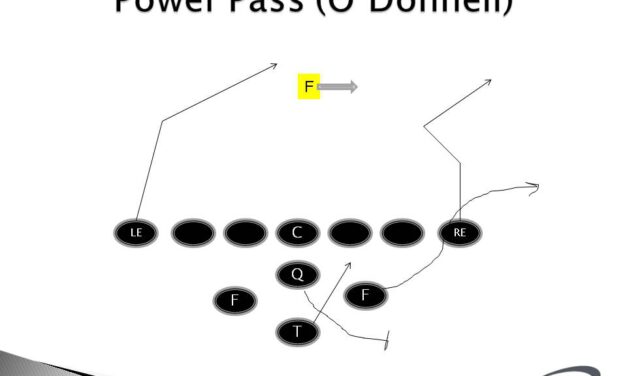
Play-Action Pass Game Out of Diamond Formation
By Mike Kuchar
Research Manager
X&O Labs
Two weeks ago, X&O Labs released its report on the Diamond formation run game. While we realized its balanced, three-back structure can produce a myriad of problems for defenses to defend the run, all of which we detailed in the prior report, we had no idea how many coaches were gashing coverages by putting the ball in the air. Although the Diamond formation may provide some generous one-on-one matchups on the perimeter (a key ingredient for the quick game) we’ve found that the majority of coaches will employ some play-action concepts in the formation.
Since the Diamond is still a relatively novel idea (although the T-formation old timers may tell you differently) the following report does not contain a ton of statistics and figures. It’s more of a collection of examples from coaches that reached out to us and wanted to pass their ideas along to you. It’s verbatim, straight from our surveys. As if that is not generous enough, they’ve even offered to answer any questions you may have. So when you’re done reading, feel free to ask questions or make comments below and these coaches will respond. By the same token, you’re always welcome to share what you’re doing at any time by contacting us (I can be reached at [email protected]).
We’ve broken down the Diamond formation play-action game into the following categories:
- Power Pass: Since we found the gap scheme was the most used run scheme out of the Diamond formation, we figured we’d start there. The intent is to put pressure on the perimeter of the defense.
- Iso Pass: This is based off the isolation run scheme with the intent to get behind the interior of the second level defenders.
- Boots/Nakeds: For those that have more athletic QBs running the system, this scheme provides a duel threat run/pass option on the perimeter.
- Specials: Some changeups that can provide big play opportunity.
Case 1: Power Pass
Play Concept (Power Pass)
Contributor: Mike O’Donnell, Rush City High School, Rush City (MN)
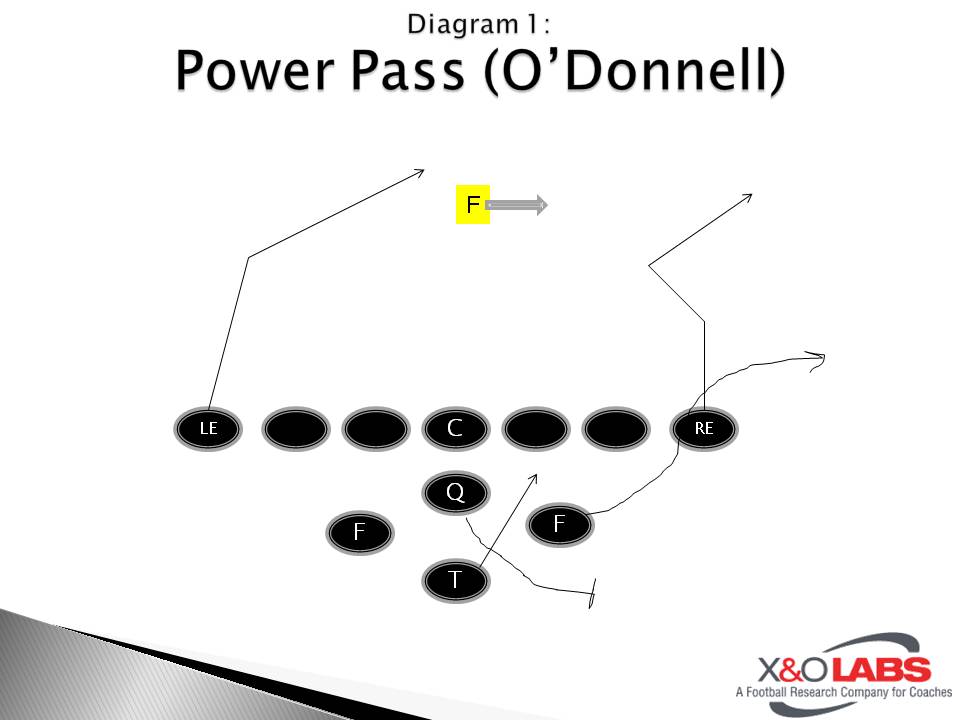
The most production pass action we have employed from the Diamond set has been to fake our power/lead play. We’ll look for the play side end who runs a post-corner route. At the same time, our near back who would be a kick out blocker on the defensive end in our lead play, would slide out into the flat after faking a block on the defensive end. This power/lead action tends to freeze the defense and keeps them committed to stopping the off-tackle action. By forcing the defense to check for the run first, we then get a two-on-one look with our play side end deep to the corner and our near back in the flat. At the same time, our backside end runs a post and looks for a deep opening in the middle of the football field. If the free safety moves out to help cover the post-corner route by the play side end, the post is wide open to the backside end. Diagram 1.
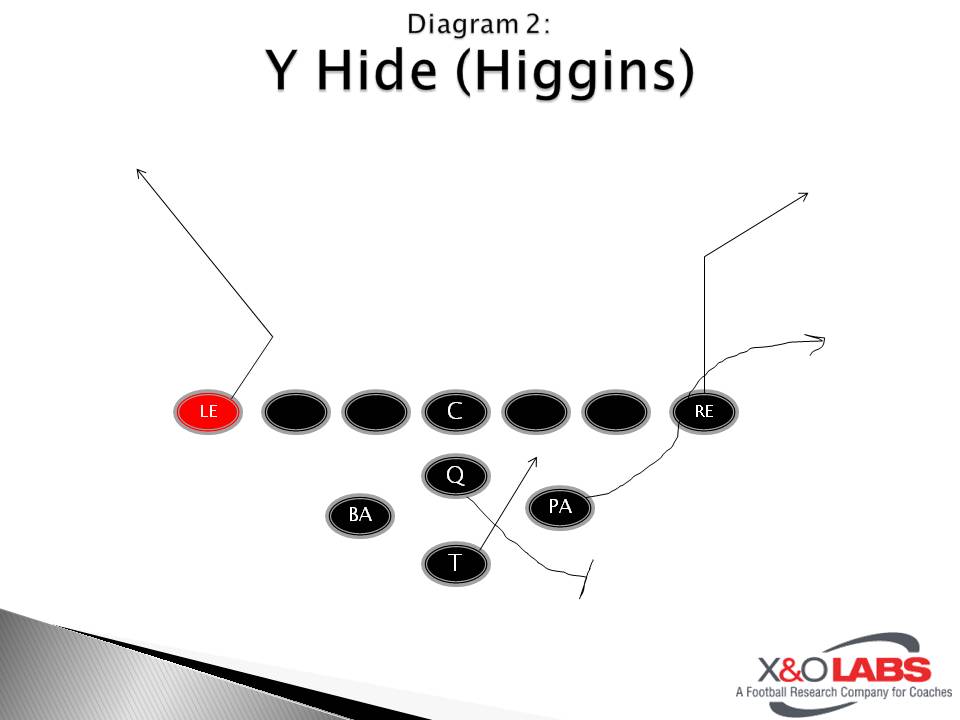
Play Concept (Y Hide)
Contributor: Dan Higgins, Cocoa Beach High School, Cocoa Beach (FL)
- QB: Play action the tailback to the play side TE side.
- TB: Fake the dive and block the DE to the outside.
- PA: Run track to the outside of the DE and run an arrow route to the goal line cone.
- Play Side TE: Release to the inside and get cone in the corner of the end zone.
- Backside TE: Release inside and hide for a 3 count and then get to the backside cone (flag route).
QB Check Downs: (diagram 2)
- Look and pump play side
- Get depth and throw to the backside TE
Diamond Formation: Misdirection and Option Concepts
By Mike Kuchar
Senior Research Manager
X&O Labs
Researchers’ Note: You can access the raw data – in the form of graphs – from our research on the Diamond Formation: Click here to read the Statistical Analysis Report.
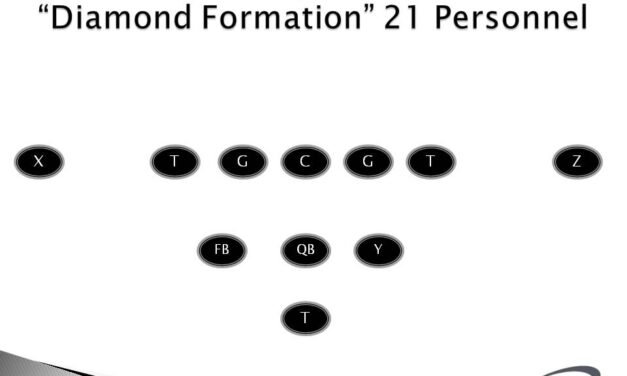
You’ve seen both the Pittsburgh Steelers and Green Bay Packers showcase it in front of millions of people in last year’s Super Bowl. Then you saw Bob Stoops at Oklahomatoy with it in Norman. Finally you saw former Oklahoma State offensive coordinator Dana Holgorsen bring it to a whole other level and dice defenses in Stillwater. It was “score at will” time for the Cowboys, propelling Holgorsen to his first head coaching job – now he’s doing it at West Virginia. So, chances are by now, you are familiar with at least the structure of the diamond formation (Diagram 1), but have you had the gaul to use it? If you’re like most of the coaches we spoke with, you’re still hesitating on dipping both feet in.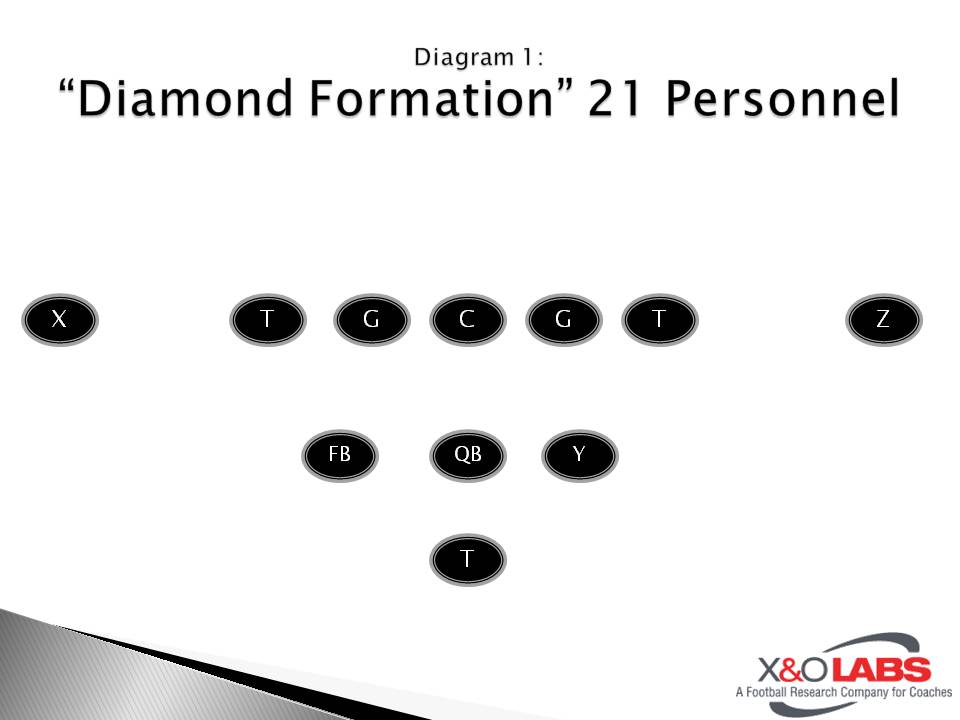
In fact, when we distributed our survey on the diamond formation to over 10,000 coaches we asked that only those that use the diamond formation respond…356 hit us back. Now we realize that it is clinic season, but that number should be a good indicator of how many coaches still have not incorporated the diamond formation into their offense. What’s more is that of those 356 coaches, 57.3 percent of them use it in less than 10 percent of their offensive schemes. Probably the most telling facet of our research was that of all of the coaches that use the formation said they will use more of it next season. If that’s not a testament to its value, we don’t know what is. But again, we’ll try to be unbiased in producing the following research – even if our coaches can’t.
When asked why they’ve decided to utilize the diamond formation, we got a laundry list of benefits. These are in no particular order.
Benefits of Using the Diamond Formation:
- Mismatches on the Perimeter: With nine players in the backfield (five offensive lineman and four backs) defenses are sure to load the box by playing 8-man fronts or locking down the perimeter. Once the defense loads the box, you get one-on-one coverage with the outside receivers. The pass game is a report all to itself, one that we will follow up with in the next couple of weeks.
- Extra Hats = Extra Gaps: Whether you specialize in man, zone or gap run schemes, the extra blocker coming from the backfield is a big bonus. You can run inside zone and still have a lead blocker (by having the backside back cut off the C gap). You can run Power and have the backside back pull and lead through or you can simply run your isolation schemes and send both backs through the point of attack (as Urban Meyer did with Tebow a few years back). It’s a terrific equalizer to teams that will try to put eight or nine defenders in the box – you have eight to block them.
- Three-Back Offensive Sets: This is why even the old-school Wing T guys love this set. You get the opportunity to have three of your better athletes on the field at one time and really develop your run game concepts by distributing the football.
- Balances Up the Defense: You force defenses to declare their strength pre-snap by setting their front and their coverage. Once they tip their hand, you can run Power or Isolation either way (with the QB checking which side). A balanced offense makes it difficult for an even front defense to set its strength and it allows teams to audible and run at the 1-tech or 3-technique. You can run the same plays both directions without shifts/motions.
- Instant Misdirection: We all know how difficult it is for defenses (particularly at the high school level) to diagnose misdirection schemes efficiently. The three-back set up in the diamond formation provides you with misdirection on any run scheme, because chances are you need only two backs at the point of attack – you can send the other one away. Gap schemes tend to work best because you don’t need to pull an offensive lineman. Many of the coaches we spoke with also believe that it eliminates defender’s ability to cross read vs. schemes like the inside zone and allows offenses to effectively run the inverted veer with the QB play side.
- Pre-Snap Motions and Shifts: Once you start in the diamond formation and defenses declare, it’s similar to empty where you can move and motion to get the numbers advantage you want. They can’t overload the box because now they’re forced to expand a defender out of the core. We devote and entire case study below on some of the most common pre-snap movements our coaches have used.
Get Our Upcoming Research Report Revealing Pass Game Strategies in the Diamond Formation. Enter Your Email Address in the Email Sign Up Box in the Right Hand Margin of This Page >>>>>> Above Our Facebook Fan Box. It’s FREE!
Case 1: Alignments and Personnel
We’ve found that when using the Diamond Formation, 49.4 percent of coaches will mainly run out of this set 75 percent of the time. While there are several opportunities to throw the ball, there is no question it is a run-first formation with lethal play-action possibilities off corresponding run actions. In the survey, we inquired about personnel and which is more suitable for running this formation. We’ve seen both: we’ve seen the Oklahoma State’s of the world run it out of 10 or spread personnel while professional teams like the Carolina Panthers used more 21 personnel with the addition of an H-Back. When our survey concluded, we noticed that 42.5 percent use 21 personnel while 37.3 percent use 10 personnel – these were the two personnel groupings of choice based on our coaches.
Tom McPherson, the head coach at Ridgeview High School (FL) uses both 30 and 10 personnel groupings in his diamond formation. When he’s in 30 personnel, he’ll have three viable backs (two sniffers and one tailback) to run his power and kick run game as well as his isolation run game. He’ll cheat his sniffers up to two yards from the line of scrimmage so they can get to the point of attack quicker. “We’re a no tight end team, so we have a hard time handling seven in the box,” said McPherson. “Now we can kick and wrap our sniffers and have seven blockers in the box. Our traditional diamond set is the only three back set where I use 10 personnel. I think in terms of bigger backs or smaller backs. Changing personnel helps with practice planning because I’m not going to do any jet sweep meshes with the big backs, only with the smaller skill kids in 10 personnel. I won’t ask a big back to be the jet sweep guy. He will only be the power guy.”

17 Mistakes College Assistant Coaches Make With Their Contracts, Part 2
By Mike Kuchar
Senior Research Manager
X&O Labs
Last week, X&O Labs published part one of a two-part installment on the 17 biggest mistakes college assistant coaches make with their contracts. We’ve sifted through the fine print, and examined the details of hundreds of contracts. Although the process may have been tedious, the results were rewarding. To us, there is no better satisfaction than helping you, our readers, discover new coaching trends and information that help you better your program and career.
We’ve surveyed college level assistant football coaches and interviewed coaching agents, attorneys and employment experts – including lengthy research with the founder of a prominent coaches representation company, Dennis Cordell of Coaches, Inc. We’ve found what we consider to be The 17 Biggest Mistakes College Assistant Coaches Make with Their Contracts. These mistakes are in no particular order.
Before we advance, if you have not read part one of this two-part research report featuring mistakes and solutions #1 through #9 – please click here to read part one – you can come back here and read mistakes and solutions #10 through #17. Also, you can review the raw data – in the form of graphs – from our research of assistant coaches’ contracts: Click here for the Statistical Analysis Report.
Mistake #10: Not Securing Performance-Based Bonuses
The Problem:
This, of course, was only a problem when coaches weren’t pushing for it. NFL players often get bonuses for playoff appearances and personal productivityso why can’t coaches? Previously, what may have been a case of “don’t ask, don’t tell,” has now been brought to the forefront of negotiating.
The Solution:
The FCS (football championship subdivision, formerly D-1AA) teams have limited salary pools, but we’ve found establishing individual performance based bonuses beforehand are easier for Athletic Directors to sell to people across campus. “One of the problems in FCS is participating schools don’t generate playoff revenues as FBS schools do with bowl games.” says Cordell. “Although bowl bonuses are the norm in FBS, standard playoff bonuses for assistants are minimal to non-existent at the FCS level. If it was my client, I would ask for bonuses for common measurable achievements for his position group; such as rushing yards and RB all-conference honors for a RB Coach. You can also get creative, like having a bonus for losing less than three fumbles per year or averaging more than 5 yards per carry. This type of bonus money is easier for the school to swallow because it’s validated with numbers and does not apply to every assistant on staff.” Might as well ask, what do you have to lose?