Drilling Zone/Bubble Concepts


By John Sexton
Offensive Coordinator/QBs Coach
Central Catholic High School (MA)
Twitter: @JohnSexton20

Introduction:

As a Hurry-Up, Spread offense the inside zone run is our bread and butter. We feel we can run IZ into any front or any call that the opposing defense gives us and have a successful play. Our entire inside run game catalog and the majority of our perimeter screen game are predicated on our ability to run some variation of inside zone.

That said, we understand that it does not make sense to continue to try to run the ball into a loaded box. We must have a way to counteract defenses who have loaded the box with personnel to take away our inside run game. The perimeter screen game forces a defense to widen and remove players from the box. Once they remove defenders to play the bubble (or Hitch/Stay/Smoke), we go back to running the ball between the tackles. It’s a never ending cat and mouse game.

We made the decision 4 seasons ago to tag the bubble screen onto all inside zone runs and it has transformed us as an offense. Our inside zone now is truly a triple option football play:

  1. QB hands the ball to the tailback and he runs the ball
  2. QB pulls ball and runs it himself
  3. QB pulls ball and then throws the bubble screen out to the perimeter.

None of this is earth-shattering or revolutionary but it is effective if done properly. We just needed to find an efficient and effective way to practice these things. That is what this article is about.

Drilling the Bubble

They say necessity is the mother of invention and in this case it certainly rings true. As an offensive staff, we loved the idea of tagging the bubble onto these runs full time but at first we were having a hard time executing the whole play, particularly the bubble portion. It just wasn’t timing up well and we had to come up with a way to work on it and fix it. What we came up with is a drill that we have done 1-2 times a week for the last 4 seasons (more than that during preseason camp) and it has been an enormous part of our offensive success. Here is how the drill works:

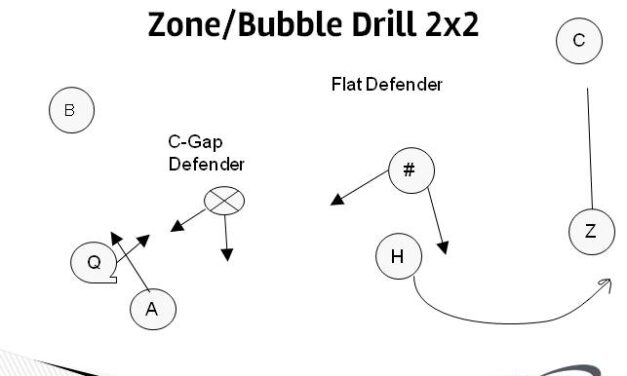
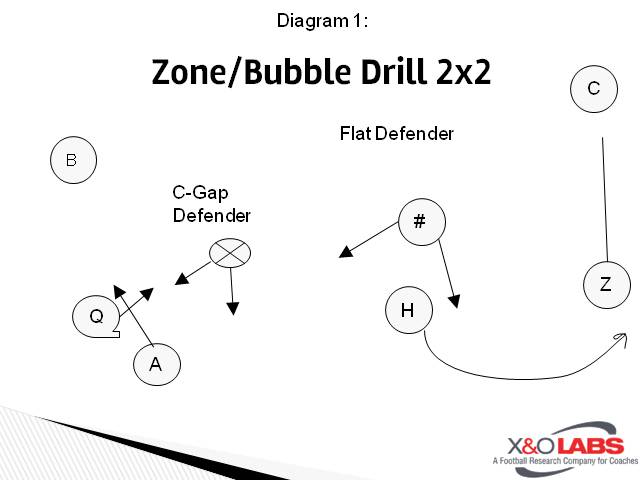
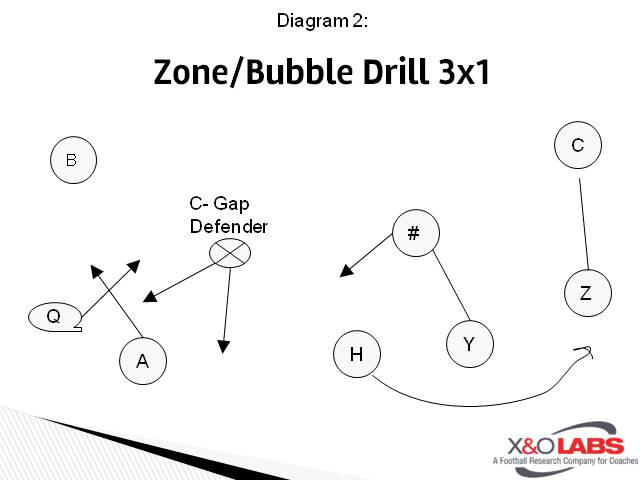
We set up a center with a football in each A gap. We run the drill to both sides, alternating back and forth. You’ll need 4 scout team guys on each side to play the role of defenders: a C gap defender, a Flat defender, a cornerback and an Inside Backer who holds a bag that the TB can make a cut off of when he is handed the ball.
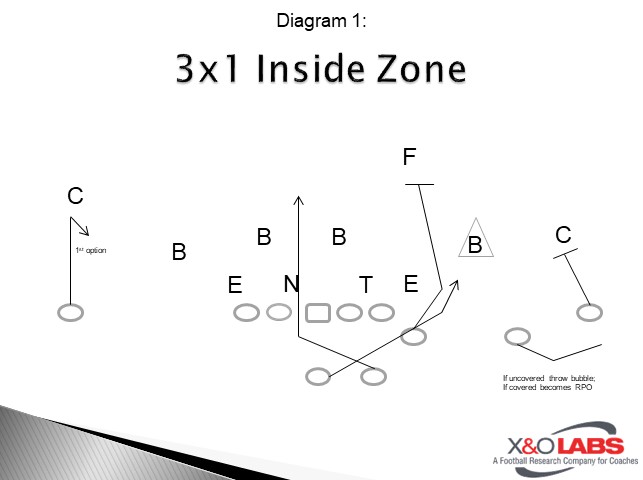
Slide1Slide2

I stand behind the offense and give the C gap defender and then the flat defender hand signals. Basically, it’s either a crash or stay signal for the C gap defender and a crash or cover signal for the Flat defender. If I give the C gap player a Stay signal, he either stands still or comes up the field which tells the QB to hand the ball to the tailback. The QB carries out his run fake, the slot carries out his bubble and the X/Z blocks the corner. If I give the C gap defender a crash signal, the QB pulls the ball. The tailback still explodes into the LOS to hold the interior defenders.

Read More

QB Run Game From Empty Sets

By Coach Matt Burleson
Head Football Coach
Telfair County HS (GA)

Introduction:

At Telfair County High School we are a shotgun, no-huddle offense. We will run a good amount of inside zone and jet sweep with the various passes off of each concept. Our personal philosophy about being in the shotgun is our quarterbacks have to be able to run the ball. They don’t have to be game breakers, but they do need to make the defense account for them in the run game.  This past season our quarterback, who runs in the high 4.7s, rushed for nearly 700 yards and 12 touchdowns.

One of our favorite ways to get our quarterback the ball is in our Empty formations. We have several different ways to get to an empty formation, but we feel this is a great way to thin out the middle of the defense. We can do this with our without our jet action, but we have two main variations that we use to run the quarterback up the middle to keep the linebackers honest and keep those chains moving: the dive and the trap. As you will see it is essentially the same play for our quarterback and it doesn’t cost us anything extra with our lineman as we already run these variations with our running back.  This approach is simple, but effective.

When we arrived here four years ago we were a Hybrid Double Wing offense primarily under center. Everything was built around the Jet and Rocket Sweep. Just as in every offense, you have complimentary run and pass plays off your bread and butter; ours at the time were play action pass, fullback dive and trap. As we have moved more towards exclusive shotgun formations we felt our complimentary run plays needed to change a bit for our jet sweep. In turn, we added the quarterback dive and trap. Year two, our quarterback was more of a pocket passer, but we would run him 3-5 times a game off of our jet sweep just to keep the defense honest. The young man was actually fairly successful when his number was called (averaging 6.8 yards a carry) and it made our jet sweep more effective. Years 3 and 4, we have been fortunate to have more athletic quarterbacks so we have been able to be more frequent with the QB Dive and Trap and with much success. In fact, our two quarterbacks combined for nearly 1000 yards this year off these two plays. In our playoff game, we rushed for over 300 yards with 200 coming from our quarterbacks.

QB Dive

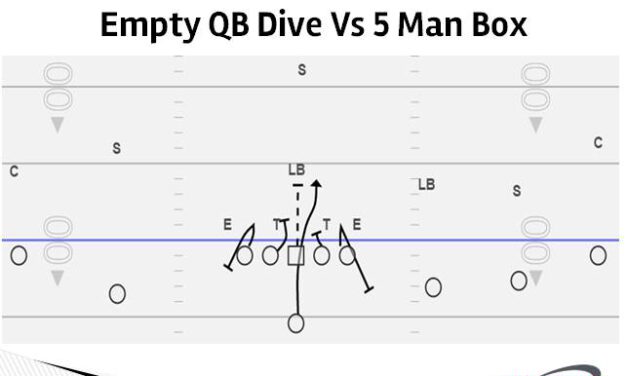
The first variation of our QB inside run game is our bread and butter QB run play out of Empty.  We will use this play in any area of the field and in nearly every down and distance situation that we encounter throughout a game.   If we come out in empty and the defense is giving us some form of a 5 man box we typically will not even use motion as we have the numbers we like to run the QB Dive (Diagram 1). If we are encountering a fast flow defense we will run this play as a complimentary off our Jet Sweep action to widen the play side LB and DE, this makes for an easier block for our play side OT up to the LB. We will not block the DE to the motion side. We will allow the threat of the jet sweep take care of him. Now we are back to a 5 on 5 situation (Diagram 2).

Read More

Best Practices: Defending the Wing T Buck Sweep

By Mike Kuchar
Senior Research Manager
X&O Labs
Twitter: @MikekKuchar


Editor’s Note: The following research was conducted as part of XandOLabs.com special report on “Defending Unconventional Offenses.”


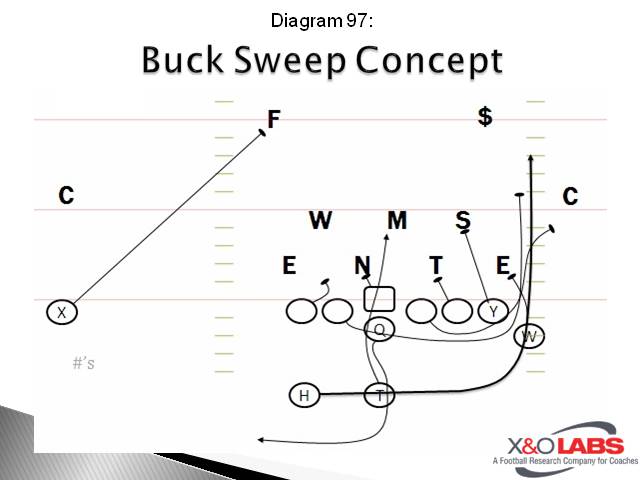
Defending Buck Sweep:

Slide97

Reader Responses:

“We will start with a twist with the 7-technique and the strong side linebacker in our four-down front. The defensive end is to rip through the outside shoulder of the tight end with a quick, short step of his outside foot and then he steps through with his inside leg and inside arm to the outside shoulder of the TE (a rock technique). We normally run this tech with DTs to the left or right from a 2- or 2i-tech on the guard, but it can also be run with a 7-technique to his outside at the outside shoulder of the tight end. We stress to them to not avoid contact with the tight end. In fact, we would rather he make contact with the tight end’s outside shoulder with his inside shoulder. With a 3-technique to that same side, who usually draws a down block by the offensive tackle, it can open the C gap for the outside linebacker. The outside linebacker will fire hard to C gap from his alignment over the wing. We usually play Cover 2 to that side, so the corner will have pitch, toss, etc. The strong safety aligns over the tight end at eight yards depth and has deep half on pass and alley fill on run to his side.”

“Attack the inside shoulder of the wing with outside linebacker. If not blocked by the wing, squeeze and burst into the inside leg of the pulling guard to make the runner bounce deep and wide.”

“The main concept we have worked is the outside linebacker on the wing must get his hands on the wing to prevent a clean release onto the MLB. Then the outside linebacker must be prepared to take on the pulling guard on the line of scrimmage keeping outside leverage and force the ball carrier back inside.”

“We have had success defending Buck Sweep by attacking the pulling guard with the strong safety. When he reads the Wing blocking down inside, the strong safety will attack the inside shoulder of the pulling guard forcing the ball even deeper. The aggressive play of the 6-technique defensive end should have already forced the play deeper than intended.”

Read More

3 Necessities in Defending RPOs from 4-2-5 Structures

By Marty Albert
Defensive Coordinator                                                                       
Laguna Hills High School (CA)

Introduction

RPOs have been a the most recent challenge for defenses across the country. To address this, we worked to adjust our base 4-2-5 defense with split-field coverage to not allow the offense to manipulate our defensive reaction. The key was to create a simple game plan that would protect the defender that the RPO is trying to put into conflict. To succeed against RPOs, we need to take our talent and do two vital things to succeed; play fast and play with confidence.

Making The QB’s Read Difficult

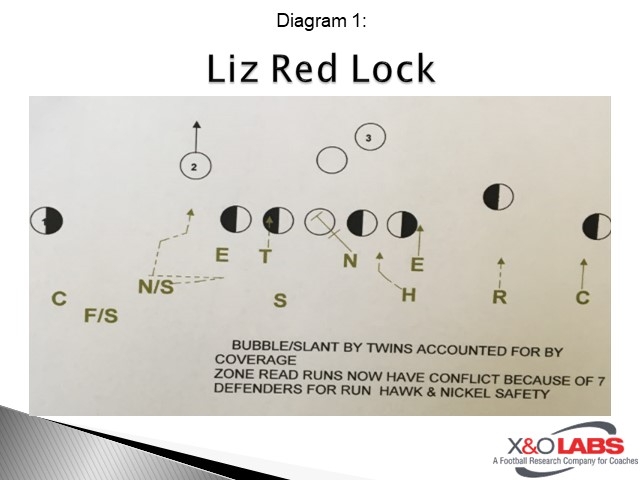
Through extensive RPO study, we have determined that the side where the running back is set is the read side for QB. Our game plan concepts were to set the front away from the running back and Split-field coverage away from running back. To disguise that, the outside backer to read side could play B gap quicker because of our coverage call of Red Lock (Man to Man) to # 1 & # 2. Which means the QB is throwing into man coverage and outside backer has no pass conflict.

Slide1

In diagram 1, the running back set on right side call is Liz to front. Side of running back coverage is Red Lock. The Hawk is considered the conflict for QB, but because of Man coverage he has no conflict in run or pass.

Alignment:  Corners start in man press alignment and slowly shuffle to 6 Yds. The FS calls Red to the two detached receivers. We will pattern read #2. The Rover safety calls Lock (man to man) coverage to the two detached receivers. This doesn’t allow them throw Bubble/Screen/ Slant patterns to #1 or #2.

Read More

Implementing Man Blocking Fundamentals in Gap Runs

By Alex Roy
Offensive Line Coach
Don Lugo High School (CA)
Twitter: @CoachARoy76


Introduction

In our first meeting as a new staff, the first thing the head coach said was “If you want to win it all, you got to run the ball.” We bought into that philosophy at Don Lugo and it has brought us tremendous success. We nearly doubled our production on the ground in rushing yards, yards per game, carries and touchdowns. With our change to a man blocking scheme, it ignited our run game that took us from six wins to ten wins and a CIF semi-final appearance.

The man blocking scheme allowed our players to just fire out and play, without all the clutter and adjustments. I gave our lineman four pre-snap principles to remember:

  1. Know the play
  2. Identify your blocking rule
  3. Identify your defender
  4. Fire out and play!

With these four things, it made our blocking schemes simple, to allow our players to play fast and block the defender as fast as you can. We want to step on their toes before they can make a read. We do not want our players to think too much.

We have four main blocking rules with variables attached to each, but the principles and scheme is the same. These four rules apply to all of our run plays, most especially our bread and butter plays (the blast, power g and reverse).

  1. Drive
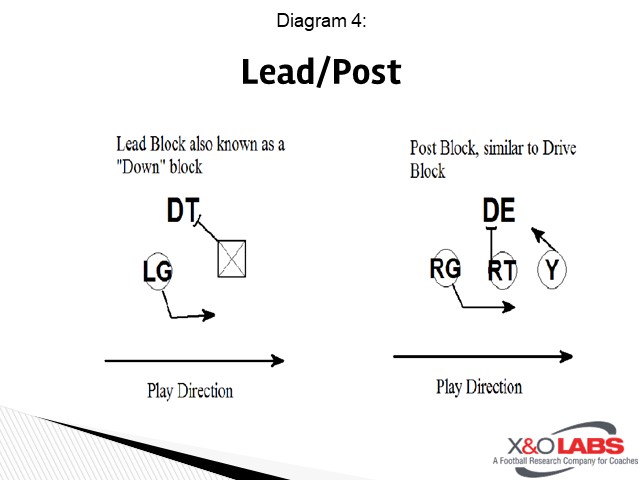
  2. Lead/Post
  3. Angle
  4. Pull

Drive

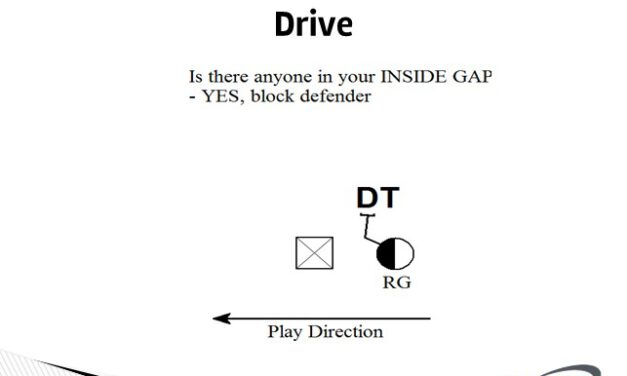
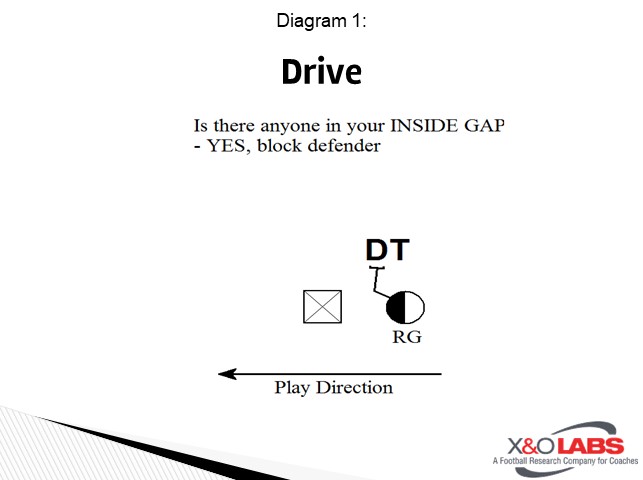
Our Drive rule is “G-O-L.” This stands for is “Gap-On-Linebacker.” The lineman go through this three-step process when they are about to execute their “Drive” block.

  1. Is there anyone in their INSIDE GAP? 
    1. Yes? Block the man
    2. No? Question 2
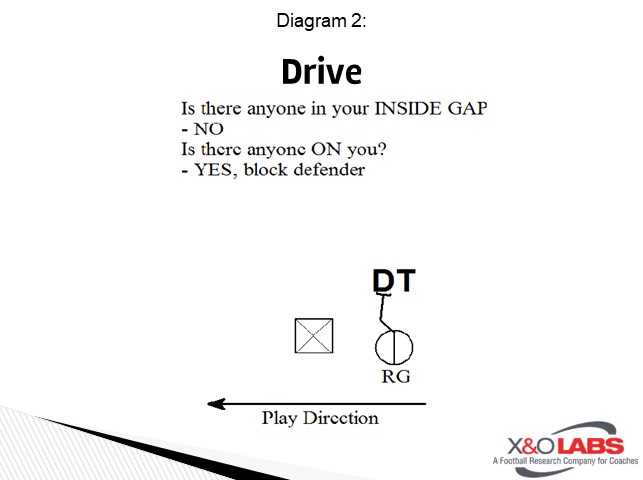
  2. Is there anyone ON you, as in a head up defensive lineman?
    1. Yes? Block the man
    2. No? Then…
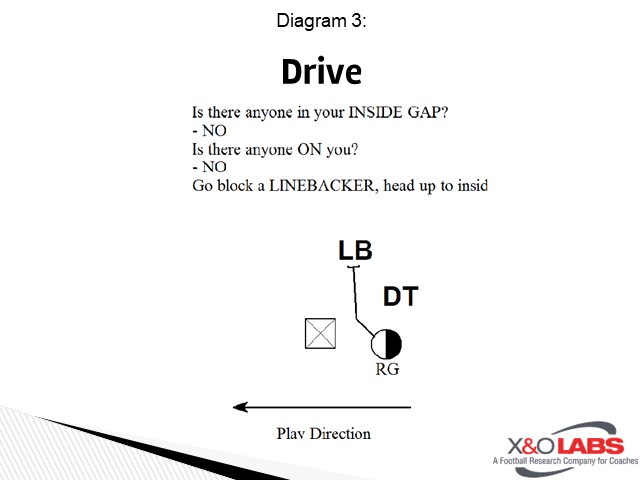
  3. Block the LINEBACKER (
    1. First Linebacker HEAD UP to INSIDE of you.

Slide1Slide1Slide1

There are a few adjustments to the Drive rule, and those include “Drive Out” and “Drive Away.” This enables our players to adjust to a specific run play. For instance, on “Drive Away” our center will apply the same “G-O-L” rules to the gap away from the play. Another example is our play side tackle will follow the “G-O-L” rules for “Drive Out” to the outside as opposed to the inside.

Our focus for executing the Drive block is aggressiveness like a board drill. We want them to take a play side drive step out and up 6 to 8 inches. From there, we want movement up the field and no lateral movement. Their hips are still parallel to the line of scrimmage and their helmets to the play/hole side. If the play is going right, we want their heads on the right side and vice versa. This type of block should look like a sled drill if executed properly.

Lead/Post

Slide4

Our Lead/Post is essentially a down block, but the rule is that he will Lead onto a defensive lineman only, not a linebacker. Post is where he will block the defender that is head up on him. This sounds similar to the Drive blocking rule, but this helps our players to differentiate between the going to the Linebacker and only blocking the defensive lineman. I use the word Post to help describe a possible situation in our run game, where the play side tackle will Post up his defender, only to be set up for the lead block coming in from the tight end. Like in basketball, when you post up a defender, you are taking them 1 on 1 and setting them up for a variety of things such as a post play or a post move for the score.

Read More

20 Personnel Gap Schemes from Slant/Stack Formations

By Mike Kuchar
Senior Research Manager
X&O Labs
Twitter: @MikekKuchar


Introduction:

The following research was conducted as part of XandOLabs.com special report on “Spread Gap Schemes,” which can be accessed in full by clicking here.

20 Personnel Groupings

Stack Formation:

We found one of the more prevalent formations used to run the single pull Power concept has been what most coaches are referring to as the Stack formation (Diagram 21). It’s a 3×1 formation with the sniffer (or H back) aligned in the B gap to the trips side. The name “Stack” is derivative of Auburn University head coach Gus Malzahn, who ran the same formation while he was at Shiloh Christian High School (AR) in the late 1990s. Jeff Conaway, a Malzahn disciple who is now the head coach at Shiloh Christian is still using it to run Power with a great deal of success. In Coach Conaway’s system, the Stack is a 20 personnel grouping that puts the H, slot and A back to the right side. The H in “rip” alignment, which he calls in B gap and in easy arms reach of the offensive tackle while the back is aligned in what Coach Conaway calls a 1.5 alignment, which is six yards deep straddling the inside leg of the guard.

Read More

Backside Tags and RPOs to Protect the Stick

By Jacquez Green
Offensive Coordinator
Godby High School (FL)
Twitter: @JacquezGreen


Introduction

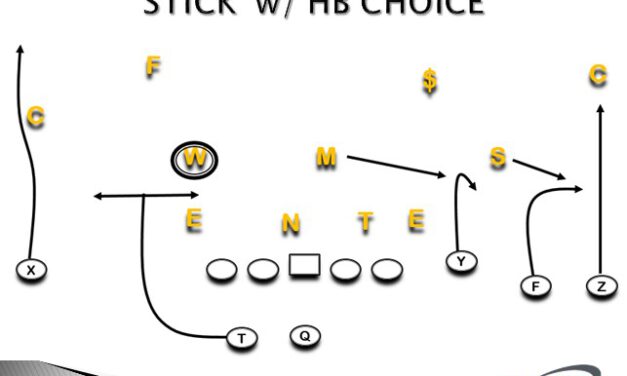
The stick concept is a versatile and effective concept as it can be run out of many formations (2×2, 3×1, 2×1 and Empty Formations) and a variety of offenses from pro-style to the spread offenses and even the Wing T. It works because it places a horizontal stretch on your underneath defenders and it’s a short distance throw. We also use this concept because it’s a high percentage throw for the quarterback, slows down an aggressive pass rush, a great play versus the zone blitz. In addition, this concept also gives us a chance to create personnel mismatches with our athletic receivers on linebackers.

As with any concept that you run a lot, you must find ways to protect it. There are various ways to protect it, choose one that goes along with your personal philosophy on offense.

There are several ways to protect the stick concept:

Backside Tags

  • Empty –Double Slants, Slant w/ Flat, Quick Out w/Go)
  • 3×1-Hitch, Slant, Slows Screen
  • 3×1-HB Choice (RB on an option route vs the Will LB)
  • 3×1 & 2×1-Spot (Snag with wide route)
  • 3×1 & 2×1-Spill (Snag with wheel route)

RPO

  • Draw
  • Tunnel Screen
  • Slow Screen
  • Lock Stick

HB Choice

Read More

Defending 3rd Down with Efficiency

By Jordan Langs
Defensive Coordinator
Wheaton College (IL)
Twitter: @Coach_Langs

Introduction

Getting off the field on third down is critical to winning football games. Here at Wheaton, we have had very good success on third down over the past few years. Last year, we finished 6th in the country in that category while also finishing 5th in scoring defense and red zone defense. We attribute this success to our approach on third downs. Here is a look at the keys to getting off the field.

Don’t Forget 1st and 2nd Down

For our defense, the emphasis on 1st and 2nd down has become about executing our fundamental schemes, fronts, and coverages. We believe that early downs are when offenses have the most flexibility and variety. It is when we feel like we have the least amount of control of the scenario because the offense’s options are all at their disposal. Because of this, we end up at our most fundamental and conservative on 1st and 2nd downs. If we start getting into a guessing game and try to match their variety, we think that puts us at a disadvantage.

So in these early downs, we focus on what we can control, which is our discipline, technique and effort. From an install and teaching standpoint, we are a 4-man front and want to be very gap sound in the run game. In the pass, we are most comfortable in match quarters type of schemes with a ton of focus and teaching placed on being great pattern-read pass droppers. So this is what we want to focus on in those early downs. If we decide to deviate from that and exert a little more risk with pressure or line games, our kids must have a cerebral understanding of where and how we are increasing that risk.

The factors that go into the decision to take some risk, obviously depends on things like field position, opponent and game plan. The players understanding weakness and objectives of certain calls are important on every down, but especially important on 1st and 2nd. By them understanding what we are trying to accomplish in each front and coverage, it enables them to have a grasp on how best to get the offense in 3rd and medium to long situations. 

Get In the Driver’s Seat

Getting in the driver’s seat as a defense in this age of football is not an easy task, as outlined above. We see 3rd and medium to long as one of the lone times that we get a chance to drive the bus and dictate some things to the offense. If and when we get in these scenarios, we do not want show up without a plan.

A large part of that plan is trying to make both the Quarterback and the Offensive Coordinator unsure of what they are looking at. As we all know, the up-tempo style of a lot of offenses allows them the opportunity to change plays multiple times before the ball is snapped; with a lot of the changes being dictated from what the Offensive Coordinator sees from the press box. We know that we are not just trying to keep the QB guessing but also his play caller.

One approach to try and handle those late play changes is to go ahead and try to change your own defensive call in order to counteract what the offense is trying to do. We will do that occasionally, but it is not how we prefer to counter the play change. Largely, we would prefer to counter 3rd down (for the sake of this topic) offenses by having multiple options and facets that allow us to feel like we can stay in the call we want and execute it regardless of the offense.

Read More

GMC’s 3-Deep Coverage Structures to Defend Perimeter RPO Concepts

By Mike Kuchar
Senior Research Manager
X&O Labs
Twitter: @MikekKuchar


Introduction

The following research was conducted as part of XandOLabs.com special report on “Defending RPO and Triple Option Concepts.”

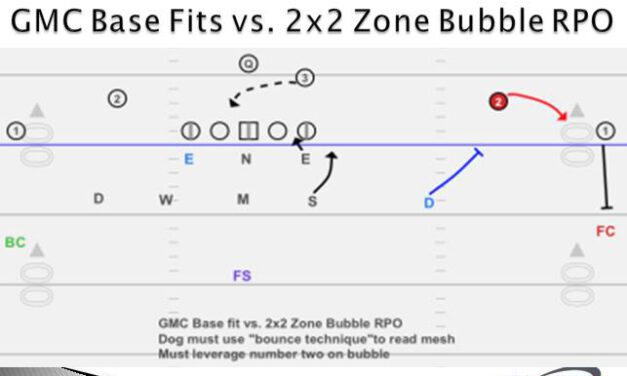
Much of what Coach Manchester does is out of a three-deep shell. “We want those outside linebackers to bounce, bounce and get a run/pass key on the end man on the line of scrimmage,” said Coach Manchester. “He won’t shuffle inside because teams will throw the bubble right away and it’s a pitch and catch. When we play three deep zone the Dog will be over number two five yards from the line of scrimmage and six yards from the receiver. They will bounce, bounce to get their run/pass key and then if it’s pass their eyes go straight to number two to reroute him. We read pass routes.”

Read More

Multiple One-Word Play Calls for Tempo Offense

By Heath Feldman
Wide Receiver Coach
Springboro High School (OH)

Introduction

One of the biggest negatives to running a tempo offense is the potential for running or throwing into a bad look. The concept of being able to call multiple plays while using a single code word allows for protection against this. We have incorporated 3 of our base runs with a base quick game pass and included an RPO / Relief into one-word calls that include the formation, play direction, and snap count.

In our system, the one-word calls are communicated to the players through signals and large posters. Each run concept is paired with a specific formation and the one word call also determines whether the formation strength is to the right or left as well as determines which direction the play is to be run. For example, all our one-word calls may consist of NFL cities for plays run left and NFL nicknames for plays run right. With the one word, we always let the linemen know which direction the run play is to be run and we then rely on the skilled players to know which side to set the formation. For our 3×1 Inside Zone we may call it Cleveland or Browns. If the call comes in Cleveland the “L” tells the line we are running inside zone left and the receivers know that the corresponding formation to this play is Trips Right. The call is then echoed by the players to insure they line up as quickly as possible and are ready to execute the play at the ready-for-play whistle. It is then the QB’s responsibility to run and execute the correct phase of the one word play that is called.

In regard to usage, one of the best things we found out about the one-word calls is that they are effective in most situations. There were times when we felt our team needed a little boost of energy so we came right off the sidelines using them to start drives. We also used them frequently after a big chunk play when we felt we had the defense on their heels. Most often, however, we used them when we wanted to play as fast as possible at a time when we felt the defense was tired or vulnerable.

The other aspect of these calls that we really liked was we could call the same play multiple downs in a row and not worry about the defense hearing the same call. In addition, playing at break neck speed forced defenses into base calls and limited what they could do in regards to their blitz packages and coverages.

3×1 Inside Zone

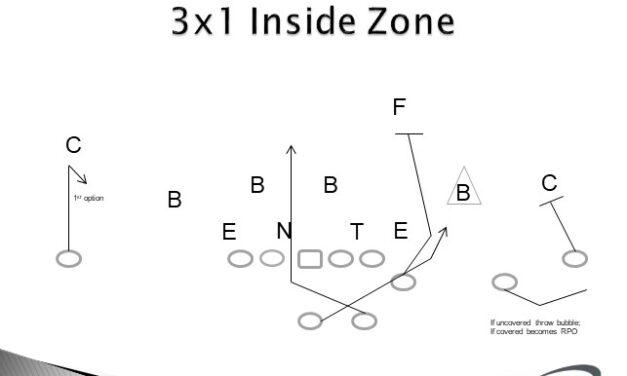
Our base run is inside zone, which we like to run weak out of a 3×1 set with a tight wing. We have married our inside zone weak with a quick hitch to the single receiver. Any time the quarterback has a free line of sight to the hitch we want him to take it. If he does not like the hitch look he quickly checks our #2 receiver for an uncovered bubble look. If #2 is covered he executes our inside zone read. The RPO happens if the QB pulls the ball on zone read. He will then attack and read the flat defender thinking run until the defender commits to him at which time he will throw the ball to our #2 who has slow played his bubble technique.

Slide1

Coaching Points

OL: Run inside zone weak

RB: Run inside zone weak. The QB will alert if he is going to throw free release hitch to know to stay out of his way.

Single Receiver (X): Run hitch route

Outside Receiver (Z): Stalk block

Inside Receiver (W): If uncovered run full speed bubble; if covered crawl to bubble (make sure to always stay behind QB in “pitch relation”)

Read More

2-Back Snag Vs. Two-High/One-High Coverage Structures

By Mike Kuchar
Senior Research Manager
X&O Labs
Twitter: @MikeKKuchar

Introduction

The following research was conducted as part of XandOLabs.com special report on “Spread Passing Study: Snap Concept.”

Run-Action Variations

Snag off Two-Back Isolation and Power

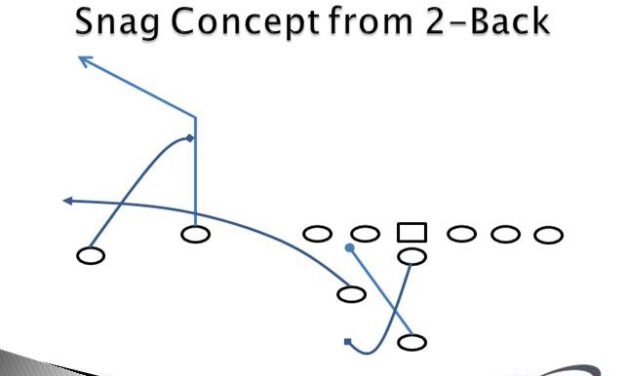
When the yardage shrinks inside the red zone, so does the probability of man coverage, which is why man coaches are employing some form of run-action to their snag concept in the red zone. Kyle Lowman at Bandys High School (NC) chooses to package his Snag concept out of two-back formations with various run actions including isolation and power. He will tighten his receiver splits and slide the fullback into the flat as the arrow component to the concept.

Lowman details this two-back Snag play-actions below against various coverages:

We wanted to combine the efficiency and potential of the snag concept with what we were best at – the I-formation and offset I-formation running game, namely the Isolation and Power plays. It also allowed us to make more use of the fullback in the flats, combined with a Smash concept in one play. Our bread n’ butter play has always been the Isolation, so we played on the needs of the defense to stop that to create open opportunities for receiving targets.

Coaching Points by Route:

  • Snag Route
    • Align no more than 6 to 8 yards outside Corner route.
    • If aligned on the LOS, squat for one count to let Corner route clear.
    • Run at 7 yd deep mark into the path of the Corner route.
    • If you pass a defender, sit down in window just inside him.
    • If next LB is buzzing hard and low, step around him to inside. If he is coming above you, pivot and work back out.
  • Corner Route
    • Hard and fast vertical release through OLB’s outside shoulder.
    • If he buzzes out hard, cut under him and get back on path upfield.
    • At 8 to 10 yards deep, stick inside foot, & accelerate away.
    • Take deep angle to sideline, looking over outside shoulder.
  • Flat Route
    • #1 goal is to WIN WIDE! Gain width fast, looking over low shoulder after clearing the traffic.
    • Be ready for quick throw if there is pressure or QB sees you with running room.

Coaching the Receivers

Read More

Affecting Run-Pass Options from the Odd Stack

By Nick West
Linebacker Coach
Parkview Baptist (LA)
Twitter: @nickawest1


Introduction:

The innovation of RPOs has become a nightmare for defenses over the past few years. This is due to the gap discipline needed for zone runs and high percentage routes that are basically glorified runs on the perimeter. It is really a true spread option that makes defenses cover so much of the field. Which leads to the fundamental question that DC’s are being forced to ask:

What coverage to play behind the front and how to fit and read the run?

Both split safeties and single safety looks have strengths and weaknesses in what the shell structure defends. The core 5 or 6 in the box of the defense has to have discipline and gap integrity to stop these zone run schemes. Think about the 6 Gaps in 10 personnel and 7 gaps in 20 personnel plus the extra hat that the running QB has to be taken into account. In my opinion, 2 back offenses can require 3 deep zone for the 8th hat closer to the line of scrimmage (LOS). The key is figuring out whom the read keys are and if the numbers in the core or perimeter defense will affect play calling.

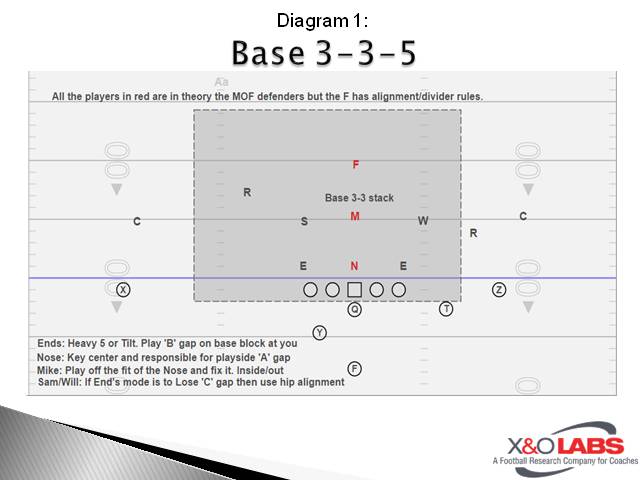
The 3-3-5 can manipulate into a variety of fronts by either slanting, blitzing or alignment to confuse offenses and traditional blocking schemes while still maintaining the simplicity of 4-2-5 reads. The defense can be more calculated than a 4 man front by choosing where the 4th rusher comes from to affect a heavy tendency or down and distance. In addition, it is advantageous to have 5 defensive backs to defend RPO concepts.

In high school football, the majority of the game is played on the hashes which can give space advantages to the defense. In addition, we figure that high school QB’s are average to below average at throwing the forward pass. This limited space into the boundary makes throwing a boundary speed out much easier than throwing to the #1 receiver into the field which could end up being a 40 yard throw. Try and catch a tendency to see if this theory holds true. RB alignment can be a great run/pass tell and allow a defense to set great fronts or get into great coverages. Also another alignment tendency can come from an H-back alignments and wide out splits in relation to formation and MOF.  Talking to offensive guys from flex-bone to air raid, a common theme is highlighting the playmakers on their offense. So defend the comfort zones and what the offense wants to prioritize.

Component 1: Defensive Line Play for Hybrid Players

Defensive line play is going to be a huge key in stopping runs by either playing technique (LOS Control) or moving/slanting. Slanting a 0 technique nose away from the RB for heavy inside zone run teams can dictate what gap the ball is pressed. The nose can work up field after slanting into the play side A gap and having a back side A gap player which would be our Mike backer in base stack. So when the back presses and cuts back, a hat is in the back side ‘A’ gap ready to make a tackle.

Slide1

A tilt technique from the defensive end gives a better first step to squeeze on down blocks or zone away. Taking a 5 technique that’s square pre snap and angling him 45 degrees can allow a wide hip technique from the outside backers to make them hybrid core/perimeter defenders. This allows them to align with some width to get closer to slot while still be able to fit in the box. If you tilt a 5 technique, assume that he is a ‘B’ gap player because any base or reach at him is difficult because he is not square to the line of scrimmage (LOS) and first step is down LOS which makes it almost impossible to stay in c gap. Teaching three to four blocks to the defensive line can simplify the reaction and thought process a player needs to comprehend both mentally and physically. Not just about the initial read but the post snap read progression.

In the video link below, the End in boundary gets a reach block and fits in “B” gap and outside backer in boundary is  in Hip alignment. Also note that the 5 tech to the field is doing a great job of squeezing the block and spilling the football.      

Read More

WR Eye Discipline and Catch Mechanics Drill Work

By Adam Griggs
Wide Receivers Coach
Massachusetts Institute of Technology (MIT)
Twitter: @TheCoachGriggs


Introduction

There are countless clinics, diagrams, texts, and even videos out there on everything from releases, footwork, stemming a route, ball security, agility and explosive running with the ball. But often we forget that YAC (yards after catch) can not occur without the catch. Here is a basic progression of drills that can been used by wide receivers at all levels to gain a constant focus of “eye discipline” and proper catching mechanics.

Body Clock Drill

As our offensive coordinator, Keith Levan (former University of New Hampshire wide receiver) says that the key to developing as a wide receiver is to catch as many “bad balls” as possible. This drill is key to creating muscle memory of proper catch mechanics in 8 positions around the body as well as full extension above the head and just slightly “over the top.” We call this drill “Body Clock.” This is an excellent partner warm-up during pre-practice or during the offseason (in particular on a leg day).

Players start no more than 5-7 yards away or a distance that they can each accurately hit the spots “around the clock.” They throw the ball to the following locations in order:

  1. Eyes
  2. Left Shoulder
  3. Left Ribs
  4. Left hip
  5. Knees
  6. Right Hip
  7. Right Ribs
  8. Right Shoulder
  9. Eyes

They will throw the ball farther away from the body for additional challenge. Both players are working together, beginning from a loose position, and can have a slow relaxed foot fire, hands relaxed in the center of the body until the ball is thrown. When the ball is thrown, make sure the hands are loose and open, not clenched and snapping at the ball.

Coaching Points

We stress that the backside hand is quickly and efficiently crossing the body to the catch position. We also make sure the receiver is dropping his hips and eyes to the catch position. We will “freeze” the ball in place as we catch it, with eyes to the tip of the ball. Have players judge themselves by asking, “Am I catching the front end of the ball? Middle? Or back end of the ball?”  

Freeze and Catch and Lock Drills

Turning your head up the field early, or peeking for contact can lead to incompletions. But these only occur when a player does not see the ball into the fingertips of his hand and/or fails to follow the ball into a secure position. This process is called “Catch and Lock” and must become automatic for any great receiver.

Read More

In-Phase & Out of-Phase Technique Progressions for DBs

By Eliot Fields
Assistant Defensive Coordinator & Safeties Coach
Carroll University (WI)
Twitter: @CoachFields_CU

Introduction

We define being in-phase as the defender being in good position on a receiver. This means our defender is in a slight trail technique in which they are close enough to get their hand to the receiver’s hip while still maintaining a slight bend in the elbow. When we are in-phase, we are in good position to play the ball if thrown in our direction. We will utilize our wedge progression to teach our in-phase technique.

On the other hand, we will define being out-of-phase as the defender not being in position to make a play on the ball. This means the defender will need to play the receiver’s hands instead. When we are out-of-phase, we will utilize our disadvantage progression.

While some of the drills you will see here may be familiar, I firmly believe that the progressions we use to teach the techniques help our players fully understand the technique, as well as the “why” behind how we do things. Teaching a technique is one thing, but without teaching the student-athlete the “why,” we are not truly helping that individual become a better player. By utilizing these progressions, we are able to introduce the different aspects of our in-phase and out-of-phase techniques, identify when each will be used and ultimately tie everything back together.

Wedge Progression

As I stated above, when teaching our wedge progression we are saying that our defender is in-phase with the receiver and can make a play on the ball. We begin by teaching the wedge, as it is our best-case scenario. When we are teaching technique, we always want to teach the proper technique before moving on to contingencies.

The primary focus of our wedge progression is getting into, or maintaining, proper body position on a vertical route by the receiver. This progression is broken into 4 phases:

  1. Jogging Wedge (w/o ball)
  2. Start In-Phase
  3. Mirror Breaks
  4. Full Wedge

Jogging Wedge

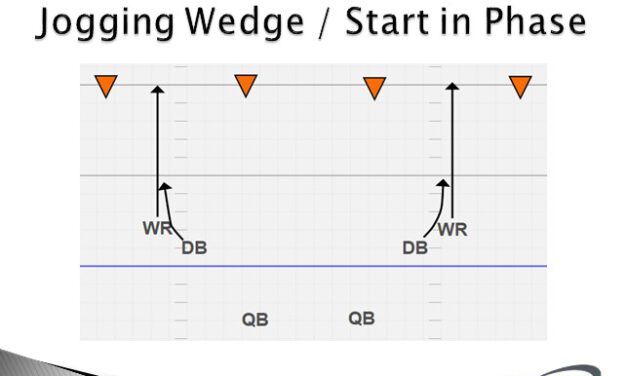
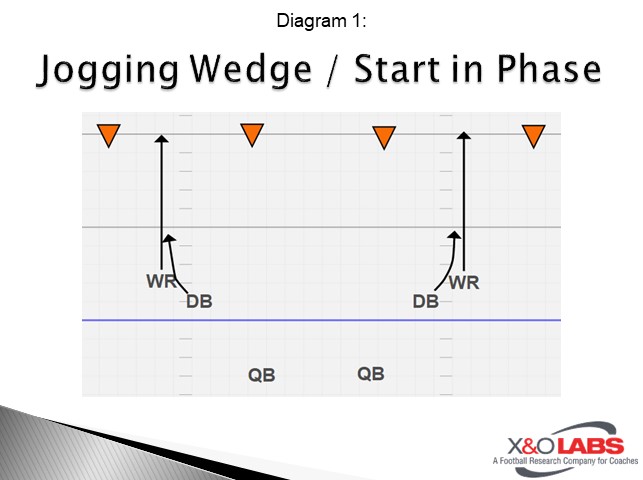
We start our progression by teaching the correct body position and posture. We want this drill to simulate perfect positioning against a receiver downfield. For this drill, we will slow down the tempo of the receiver and the defender, and eliminate the ball. The defender will start in-phase with the receiver, meaning that he has:

  1. Inside positioning on the receiver
  2. A slight trail technique (between ¼ and ½ man) on the receiver
  3. A slight bend in the elbow with the bottom 6 inches of his Ulna (DB’s outside arm) making contact with the inside hip of the receiver

On the whistle, both players will jog at 60-75% speed, with the defender looking to maintain this position on the receiver through the rep. The focus of this drill is 100% on body positioning and posture. The defender should be playing within their frame and under control throughout the entire rep.

Slide1

To study film of this drill, click on the video below:

Read More

Devising Sufficient Mid-Season Tackling Time (What’s too much, what’s not enough)

By Mike Kuchar
Senior Research Manager
X&O Labs
Twitter: @MikekKuchar


Introduction

The following research was conducted as part of XandOLabs.com special report on “Designing Tackling Systems.”

Practice Time in Tackling 

Once these issues are identified a decision has to be made on how much time needs to be devoted in-season in correcting these issues. Coaches are asked to balance the necessary time constraints made at every level of football with the priority that proper tackling warrants. We asked our contributors the following question:

What is your training method in teaching tackling? Do you do more of Circuit training? Grid training? Done on position groupings only? How much is done in-season?”


Contributor Key (in Alphabetical Order):

Joey Didier (JD): Defensive Coordinator, University of St. Francis (IN)

Vincent DiGaetano (VD): Defensive Analyst, Wagner University (NY)

Matt Entz (ME): Defensive Coordinator, North Dakota State University

Chris Kappas (CK): Defensive Coordinator, Mount Union University (OH)

Jamie Marshall (JM): Defensive Line Coach, Lindenwood University (MO)

Matt McLagan (MM): Defensive Coordinator, Northern State University (SD)

Jay Niemann (JN): Defensive Coordinator, Rutgers University

Mike Siravo (MS): Defensive Coordinator, Temple University

Eric Schmidt (ES): Defensive Coordinator, North Dakota University


Editor’s Note: All of the drill work mentioned below will be detailed with drill video in the later cases of this report.

JD: “We train our tackling in every practice through circuit training. One of our three coaches is the ‘expert’ on our staff in regards to one of our three tackling phases: track the near hip, shoulders roll through thighs, run or roll. That coach leads a drill in a ten-minute circuit daily either in full or no pads. We keep our players in their position groups as they rotate through the tackle circuit. In season, we spend about thirty minutes a week on defense with a ten-minute circuit on Tuesday, Wednesday and Thursday. We also spend 10-15 minutes a week on special teams tackling.”

VD: “We have a combination of training methods between circuit and position. We have developed within our circuit more position specific drills based on angles and frequency of types of tackles our position players are making. We also work on them playing off of blocks. In season, less time is spent on the circuit training and more time is spent working on tackling in individual drills. Realistically, a 5-10 minute segment is used each practice day with a tackling focus.”

ME: “We do a lot of circuit stuff early in spring and in camp. We make up a circuit that is a carry over for all groups, but then as we progress into fall camp we will do more position specific. It’s hard to mimic defensive line tackling. There are a lot of one-arm tackles going on up front. A defensive lineman only does those things with half his body. What we do three weeks before the national championship game, we will go back and treat it like fall camp. We go back to day one stuff where we are going circuit stuff again. If we are not going to have a circuit, we will try to find a way to get a tackling finisher in INDI for your first five minutes. For circuits, we will do a five-minute circuit in-season for five minutes total because we use 24 periods and exactly two hours full pads. We are always in a thud mode when we practice. We are getting ample tackling examples in practice. Emphasis is not taking him to the ground. Tackle high, keep eyes up and let go once we feel the thud. We let backs and receivers finish.”

CK: “It’s all circuits, but in some of the stuff we will do individual instruction. We don’t say we’ll work ten minutes of tackling, but each coach will find a way to work it in his drills at least once a week. We will do a circuit or drill every single day.” 

JM: “We will use one or two days during the season at five minutes per day. They are position specific and where we are going to be in space making tackles. If they are a 22 personnel team, then we need to work more in the phone booth or will be spread out in space. It’s specific to game planning that week.”

MM: “Our tackling teaching is primarily done in circuit training and defensive group drills. The process starts with multiple days of circuit progression and leads to defensive group drills. At that point, we will recycle the drills for repetition or evolution. Position groups will also integrate position specific tackling within their individual time. We will not reach this point until we feel we have a sufficient foundation to our tackling system. Our tackling system progression will take us through five practices (progression: static drills, on-feet drills, on-feet tracking drills, finish drills, full defensive group drill). At this point, we will recycle drills for repetition or evolution. Position groups will integrate position specific tackling within their individual time. After our initial progression, we will practice a tackling area of need/choice in approximately two-thirds of a week’s practice.”

JN: “Our individual drills are centered on the problems we’ve had in the previous day’s practice sessions. Defensive linemen may not need the same work as defensive backs do such as open field progressions. It’s a combination of circuit and individual tackling. We would like ten minutes of the circuit in fall camp and then five minutes of the

Read More