Training RBs to Use Their Off-Arm as a Weapon

By Mario Price
Running Backs/Special Teams Coordinator
Davidson College (NC)
Twitter: @CoachMarioPrice


Introduction:

Running backs in most offenses, regardless of the scheme, must truly be the “X” factor because they are an integral part of every segment of the offensive attack. A complete back must be able to function at a high level in multiple areas:

  • Zone Scheme Run Game
  • Gap Scheme Run Game
  • Perimeter Run Game
  • Pass Protections
  • Receiver In The Pass Game
  • Special Plays (Screens, Reverses, etc.)
  • Special Teams Contributor

There is much skill development that goes into grooming a “complete” back due to the multiple skill requirements with the position. It is vital that pre-practice, post-practice, and individual time are utilized efficiently to develop these skills.

As you organize and plan drills for your running back group it is important that you keep a few things in mind:

  • DO NOT practice drills that do not directly correlate to what the back will be asked to do on the field, even if it is a really good drill.
  • Frequency of the drills should correspond directly to their relevance in the offense.
  • Drills should be designed in a format that will enable your RBs to work several fundamentals during the course of a drill.
  • Commands for all drills should correspond with the offensive cadence and should be stopped by the whistle.
  • If a player is injured during drill, then it may not be a good drill.

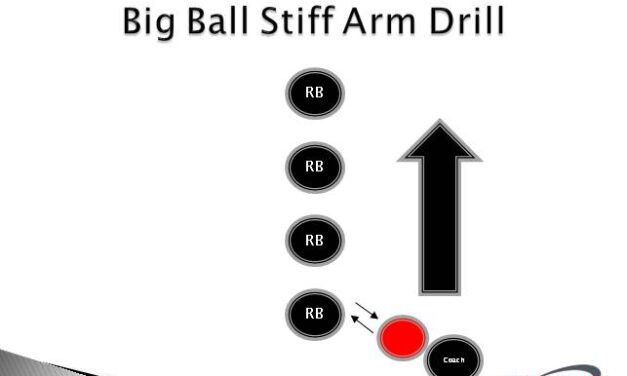
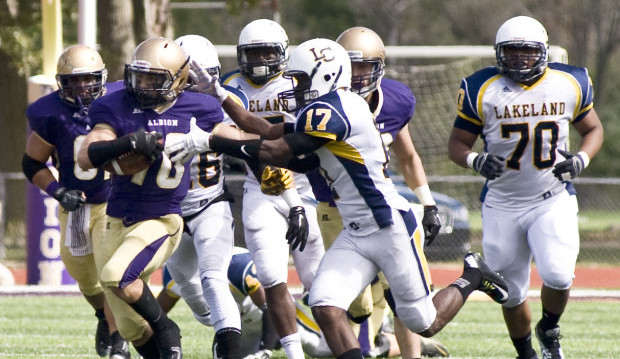
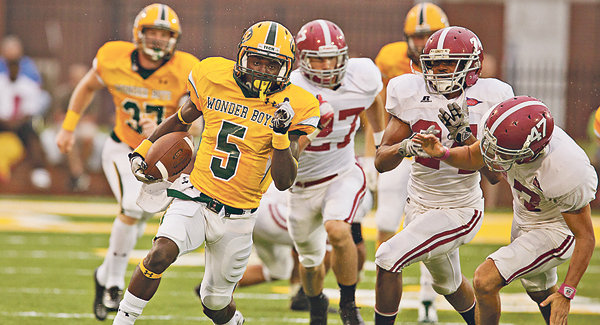
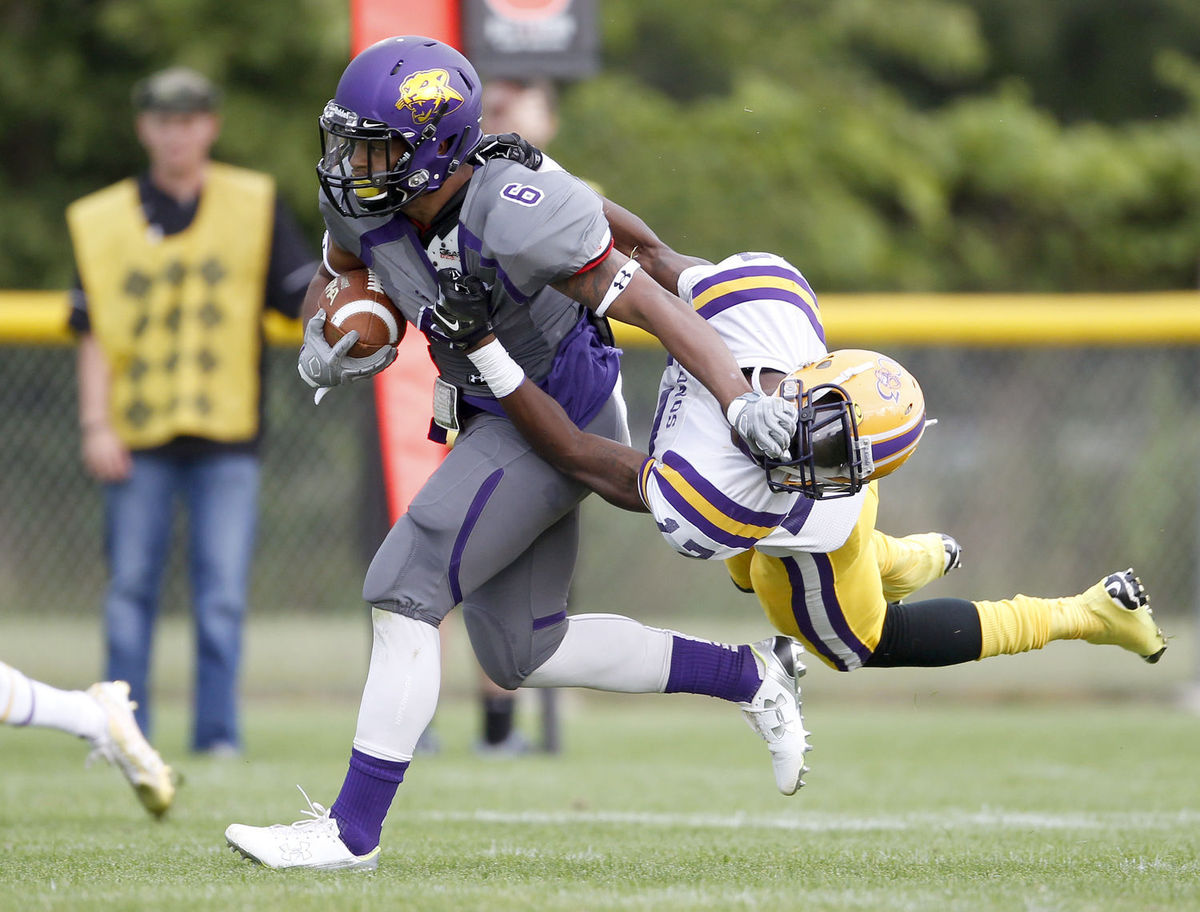
As we train our backs to be consistently productive and have the ability to create explosive plays for the offense, one important skill set that is important to develop is “Yards After Contact” (YAC). Today’s athletes are bigger, strong, and faster than ever and many backs are able to naturally create YAC with their physical toughness, but the ability to use the off-arm as a weapon (stiff arm, ripping, etc.) is becoming a lost art.

Stiff Arm

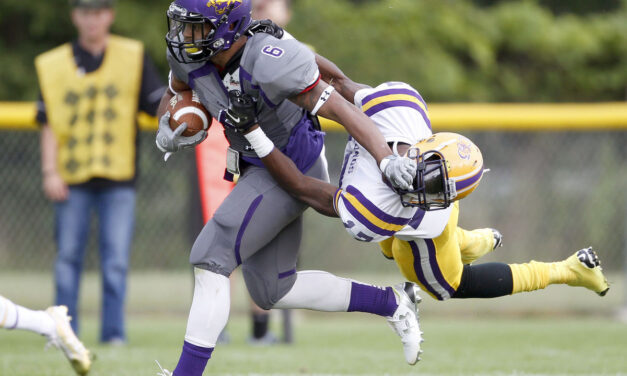
A great stiff arm can ward off a defender and limit a defensive player’s ability to wrap up the back for an effective tackle allowing for more yards after contact.

Technique: Extend the arm into a slightly bent, rigid position (don’t lock arm, to eliminate hyperextension).  Aiming at the defenders helmet, shoulder pad, or extended arms.

Read More

Marshall University 4-2-5 F.I.B. (Formation Into Boundary) Run Fits

By Mike Kuchar
Senior Research Manager
X&O Labs
Twitter: @MikekKuchar


Introduction

marshall1The following research was conducted as part of XandOLabs.com special report on “4-2-5 LB Play.”

Read More

Punt Block Unit and Scheme Development

By Jamison Bisch
Former Defensive Coordinator
New Mexico Military Institute Junior College, Roswell, NM
Twitter: @coachbisch

Introduction:

Since 2012, we have blocked/disrupted 31 punts with 3 TDs and multiple safeties. This success is not an accident. We believe that these results are directly connected to the detailed skill development approach that we use here at New Mexico Military Junior College.This clinic report will cover a few fundamental techniques used by players in our punt block unit. Those techniques include the Rush Technique, Catching Technique, Hold-Up Technique, and Blocking Technique(s). We will also examine our Base, Overload, and Hold Up schemes. 

Punt Block Mission Statement

It is important to note that we work hard to combine multiplicity and simplicity to find an optimal balance for our freshman and sophomores to be able to execute at the highest level. Over time, we feel we have found a good balance in that regard and that should be obvious through this report.Here is the mission statement that we base this concept on:

“We will force mistakes and turnovers on this unit. It’s a race to the block point, don’t be last! We want our opponent to fear that if they don’t have a perfect snap, great protection, and a quick kick by the punter, then the result will be a blocked punt. Since 2012 we have blocked/disrupted 31 punts with 3 TD’s and multiple safeties.”

Unit Objectives

  1. Disrupt 1 kick per game
    1. Block a punt
    2. Force a poor punt
    3. Force a timeout
    4. Explosive return (>20 yards)
    5. We will place the best players who can block punts on this unit.
    6. We must have the Attitude, Desire, and Effort to get it done.
  2. Obtain and keep the football (100% possession)
    1. Field all catchable punts
    2. “Peter” calls from the returner to the rest of the unit when necessary.
      1. Obnoxiously Loud
      2. Visual Signals
  3. No Penalties
  4. Allow No Successful Fakes
  5. Average 10 yards per return

Unit Techniques

Rush Technique

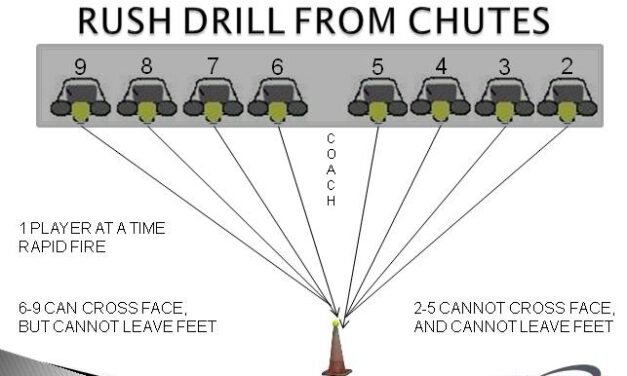
While there are certain situations where I have players align in a 2-point stance, the majority of the time everyone except our CBs align in 3-point rush stances. We give our players a number of coaching points for rushing the punter and much of this is covered during the first week of fall camp. During this time, I do not even install any type of schemes. Instead, I focus on teaching the technique and finding out who can rush. Coaching points for rush technique include:

  1. Concentrate on the ball with near hand down, near foot back (heal to toe), get off on the snap.
  2. Run over the leg of the blocker staying low. Pick up your feet.
  3. Take proper angles to the block point.
    1. Outside rushers must clear the blocker and drop the inside shoulder (dip/rip), and take the proper aiming point. Aiming points will vary depending on how deep the punter is aligned and how long his steps are. We must practice proper angles.
    2. Inside rushers must control momentum and beware of angles. Each week, we give our players a scouting report on the opponent’s punt unit and this report has a block point on it each week. We then build our practice around that block point. Things that go into the block point scouting report include:
      1. Depth from line of scrimmage (typically around block point is 10-11 yards).
      2. Horizontal location. In other words, if the punter ends up behind a guard, tackle, etc.
      3. Whether the punter is right or left footed.
  4. Never leave your lane. In other words we should not cross each other.
  5. The technique for blocking a punt involves putting your hands together in the shape of a diamond with index finger touching index finger and thumb touching thumb. Players are coached to look through the diamond to the ball and to keep their eyes open and hands together. It amazes me how many times guys get to the block point, form the diamond, and close their eyes!

Read More

Formationing the Stick Draw Concept

By Jhett Norman
Offensive Coordinator/Quarterback Coach
Levelland High School (TX)
Twitter: @jhethronorm

Introduction:

Stick Draw has become a staple for most everyone who runs an RPO offense these days. Here at Levelland, it has become a staple of our system as well. We look to throw the ball on every single play, and the quick hitch route has become our go to in short yardage situations. It is important to mention that we take the RPO concept and flip the letters into PRO as we always look to pass first and run second. With the defense keying on our hitch receivers, we have had to add in a few wrinkles to keep the stick/draw concept working efficiently.

Formations:

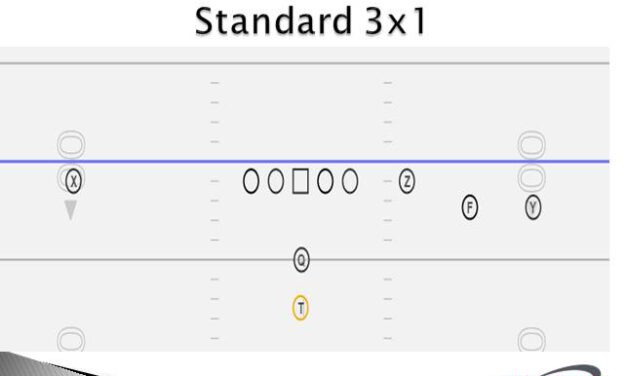
We primarily base our offense out of trips, but we have the ability to run the play out of doubles. The play is called differently depending on the formation. We also can change the linemen blocking rules, as well as, who the ball carrier for the run option. All of these things help us find a way to keep running the same basic scheme over and over throughout a game and a season.

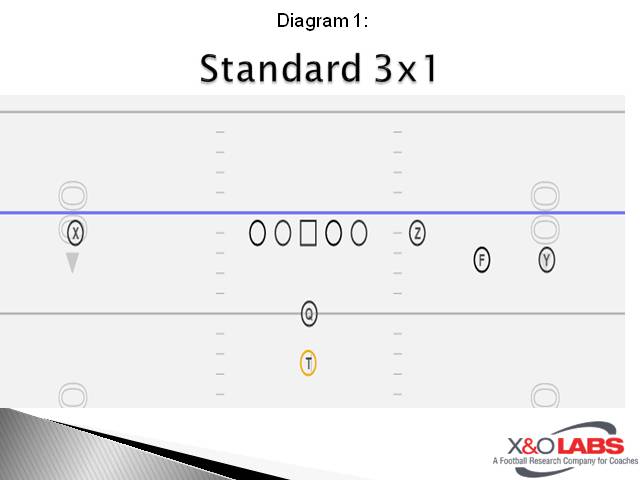
3×1 Formation

Slide1

To study game film of the stick draw in this formation, click on the video below:

Read More

Odd Front DCs: Scenarios for Two-Gap Technique

By Mike Kuchar
Senior Research Manager
X&O Labs
Twitter: @MikekKuchar

Introduction

The following research was conducted as part of XandOLabs.com special report on “Odd Front vs. the Run Game,” continue reading for more information on this report.

Instances to Two-Gap the Nose

Mark Segina, Unadilla Valley High School (NY): “I use two gap techniques for mainly three reasons: if I have a kid who can two-gap, if a team is mostly running read option/outside zone stuff and to keep the center off my inside linebacker.”

Dino Kaklis, Defensive Coordinator, University of Virginia-Wise: “We two-gap unless we have some sort of movement going on. We are flexible due to who is playing the position for us.”

Brandon Staley, Defensive Coordinator, John Carroll University (OH): “We believe in playing two gap because the whole idea of run defense is to slow the run fit down and create as many one-on-ones as possible. That’s what you get when you use two-gap techniques. The whole concept of offensive football, whether it’s zone or power, is to get double teams at the point of attack. Our big goal is getting movement off the line of scrimmage will get you beat on double teams. The whole purpose of playing two gaps is to create one-on-ones at the point of attack. We want to be in a three-down front because you are defending two-back football. It’s easier to do in three down than in four down because you don’t give the offense angles. Every body wants to block an over front. The edges are firmer for the read game and the counter game because you have overhangs.”

Tom Bainter, Bothell High School (WA): “For us, it depends on the player. The better the player, the more freedom we give him to play two gaps. The inside linebacker will fix the open gap. We’ve had some great NT’s so we play two gap nose most of the time.”

Jason Faulk, Cecilia High School (LA): “We mainly two-gap our nose against double tight end formations. We often have trouble with our outside linebackers being physical enough to play on the line of scrimmage. We are fortunate enough this year to have a big enough nose to play a two-gap technique however, if the center is crossing us and pinning us we will check to a Diamond Front where the nose shades strong and an inside linebacker will get in a four point stance and shade weak.”

Dale Sprague, Defensive Line Coach, Southern Virginia University: “In our base fronts, we have the nose two-gapping whenever he is in a zero technique and we are not stunting or zone blitzing.”

Jeff Larson, Defensive Coordinator, Chadron State College (NE): “We rarely two gap the nose, but when we do it is usually vs. open sets. The main reason we did two-gap our nose vs. open sets was because the lack of the extra gap created by a tight end, so we felt our backside linebacker could make the nose right and not have to worry about leaving an extra gap open.”

Alvin Smith, Defensive Line Coach, Wagner College (NY): “We have bigger body than an attack 4-3 defense that have some athleticism. 3-4 defensive ends and 3-4 nose’s are starting to be bigger than offensive lineman. You don’t want to give up more than 10 pounds to your opponent.”

Douglas Godwin, Gulf Breeze High School (FL): “We two-gap our nose in our eagle look to help defend against heavy run teams. We want to take away any type of inside run that teams will give us. We will also do this in short yardage situations.”

Read More

Southeastern Louisiana University’s One-Step Variants in Zone Blocking

By Mike Kuchar
Senior Research Manager
X&O Labs
Twitter: @MikekKuchar


Editor’s Note: The following research was part of X&O Labs’ larger study on the Middle Zone and Outside Zone Concept, which can be accessed in its entirety by clicking here


Near Hip Progression for Uncovered Linemen

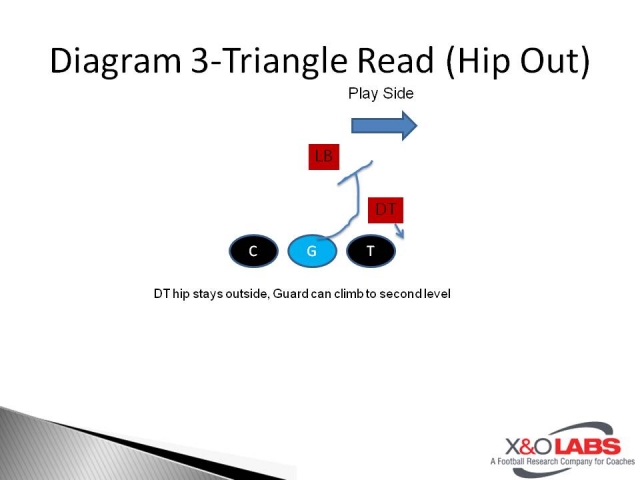
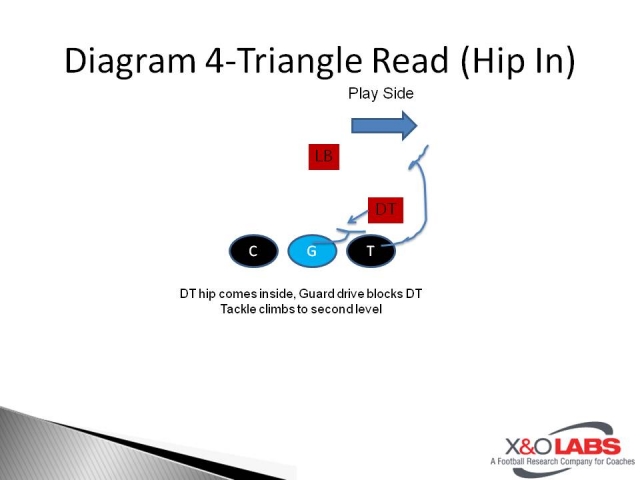
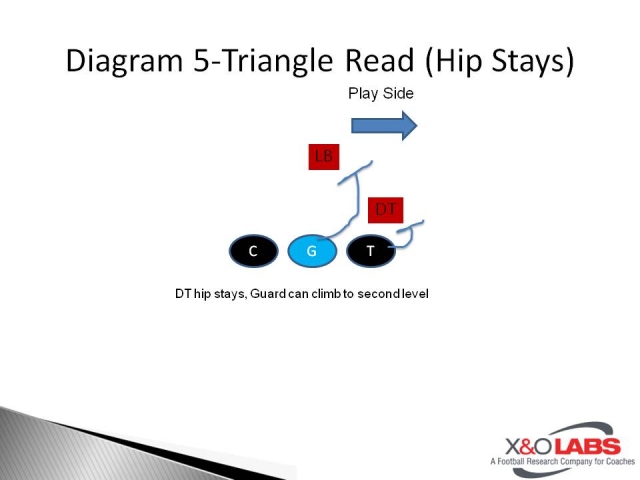
selaTravis Mikel, the offensive line coach at Southeastern Louisiana University, teaches a hip Aiming Point and what he calls a “Triangle Read” to his offensive linemen. The triangle read is to keep their eyes on the following (down lineman hip, play side linebacker, then back to their track).

According to Mikel, once the uncovered lineman diagnoses their read, he makes the following adjustments:

  • Hip Out- Climb to second level (Diagram 3)
  • Hip In (to him)- Drive block defender (Diagram 4)
  • Hip Stays- Drive to linebacker (Diagram 5)

Slide3Slide4Slide5

Read More

4 Phase Teaching to Cover 2 Corners

By Will Davis and Brad Garrett
Defensive Backs Coaches
Clewiston High School (FL)

Introduction

The hardest part to teaching Cover 2 is training the eyes of the corner. A lot of DBs will align correctly and look inside on the snap of the football and when that ball is snapped. We are physical with the receiver to their side, but a lot of the important key details seem to fall out of place after that. Corners think that cover 2 is just a defense where they have to be more physical and not let anyone outside of them, but they’re not grasping how much more goes into the coverage itself.

We keep the concept of our coverage as basic as we can for our 2 corners. The drills we use do have a lot of different parts that we try to put together. This is done to help the corners understand  how dominant Cover 2 can be if they can understand the importance of leverage, play quick and aggressive with their hands, and most importantly, play just as fast with their eyes. 

We try to break down the defense into 4 phases. Each phase gives the DB an opportunity to see how important training your eyes can become to a well trained Cover 2 corner. Depending on the number of receivers and down and distance, that will determine how we play the technique of cover 2.

Alignment

We like to align our DB with his inside leg just inside the outside leg of the #1 receiver, especially if they come out in any 21 personnel with 1 receiver to each side. We play more of a press technique by being really handsy and punishing. This is to disrupt the quick passing game.

If the offense tries to spread us out in a 2×2 set or 3×1, we will loosen up to about 5 yards with our alignment on the receiver being the same. The DB’s eyes always remain inside. If they have a #2 receiver to the side they are playing, that receiver will be the first key and he will keep his eyes to see through that receiver to the QB. Note that we are not reading the end man on the line of scrimmage in this drill because this is built to help with the passing game aspect of Cover 2. That way our DBs can keep their hands on, eyes wired, and feet hot, so that they can be ready and alert if they anything comes at them. We really try to focus on the importance of the QB and how he will tell us where and when the ball is coming our way.

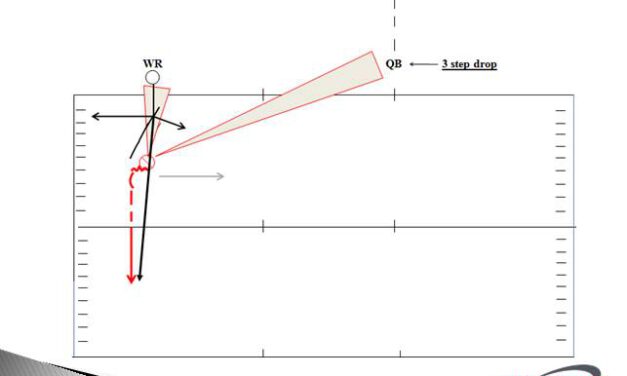
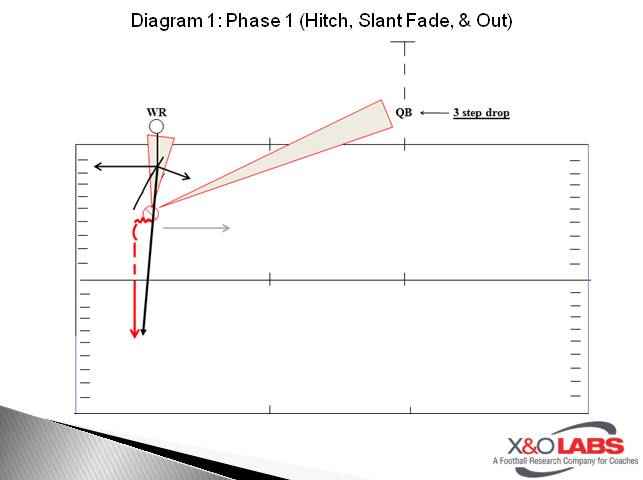
Phase 1: This phase is the first step in the progression. We like to run in the spring and the early parts of fall camp to give our guys an idea of how important reading the QB is. A lot of the time, they get so caught up in focusing on the receiver in front of them that they cannot keep the control they need to be both aggressive and relaxed enough to break on any pass plays that comes to their side. Phase 1 combats that by concentrating on the simple, short game concepts such as Hitches, Slants, Quick Outs, Q-screens and of course, the fade route. 

We will use a coach as the QB in the beginning stages along with a cone and a normal 1 receiver to each side alignment. We have each DB focus on their eye placement of the QB the entire time, and nothing else. There is not a receiver in front of them, so they shouldn’t take their eyes back.  We teach the DBs to read the front shoulder level of the QB, so that they know in which direction he wants to throw the football. For example, if the front shoulder is up, flat and relaxed to determine the depth of the pass. They also pay attention to the attitude of the QB in order to see when he wants to throw it. This is from the non-throwing hand coming off the ball to deal it. We also teach the DB to read the drop and placement of the non-throwing hand as well in this drill. 

This may seem complicated, but we walk through everything before the drill so that they can get a visual understanding of what we are talking about. Reading the drop is the tough part as the DBs want to be aggressive and that tends to stop their feet. We say that “when our feet and eyes die, we die.” When the QB is under center, we show the DB the difference of the drop. A quick pass from the QB under center will be a quick 3 step drop, this tells our corners that something quick is coming at them so they better keep their feet hot and be ready to break and drive at any second. If the QB is in shotgun, then the type of pass and play is easy to read because the QB will just catch the snap and then be ready to deal immediately. The first step of the DB on the snap of the ball will be with his foot closet to the outside. This takes away any extra leverage the receiver may have to be able to get outside. Next, the DB will begin to buz his feet; this allows the DB to keep his feet moving so he doesn’t allow himself to be dead in the water. 

The DB will keep his eyes on the QB and then break and drive depending on the position of the QB’s front shoulder. The level of the shoulder, if it’s up in the sky, relaxed and level. Then, finally, they will read the attitude of the QB to see when he wants to get rid of the ball. When the off-hand begins to come off the football, they begin to break and drive on the direction in which the shoulder is pointed. The DB will break on the QB, and then catch the ball and finish through a cone 10 yards behind the drill. This helps the DB understand the QB can tell them all about a pass play without even knowing where the receiver is. Coaches can use the routes that they want to run or mix and implement them any way they want.

Slide1

Drill Focus:

  • On the QB cadence, the DB will key the first three steps of his drop to determine the depth of the routes.
    • Under center- 3 step drop
    • Shotgun- Catch, Flip, Throw
  • After the DB determines the 3 step drop of the QB, his eyes will stay on the QB to become familiar of the QB’s body language(“Attitude”) before throwing the ball and his off hand released from ready throw position.
  • He will read the shoulders of the QB to help him break on the direction of the route as well as the trajectory.
  • Do not chase routes. The QB tells him where to go.

Coaching Points:

Read More

Tunnel Screen Off Run Actions

By Brett Dudley
Assistant Head Coach/Offensive Coordinator
Antioch High School (CA)
Twitter: @Coachbdud

Introduction

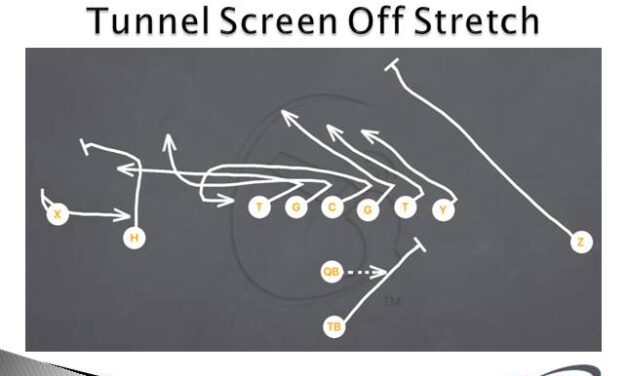
In our offense, the tunnel screen is a WR screen that we throw opposite of a run fake. We primarily ran this off of our stretch action (to get the most flow from the defense), but also experimented it off of power, to use the pulling guard to influence LBs. We would fully fake one direction and throw the screen back to the other side.

As a general rule for the offensive line, we will block the run called for the first 3 steps then work to release flat down the line of scrimmage. Their rules are as follows:

  • The first lineman to release looks out to kick out the first person out of the box.
  • The 2nd OL to release works to lead up through the alley.
  • The 3rd OL to release looks back in for anyone chasing the screen down from inside (often called a “rat killer”).

This general eye progression of “out-up-in” progression is used in all of our screen game, so the line has a set of rules (Out, Up, In) they can follow as they release down the line of scrimmage (LOS) in any of our screens.

Coaching the Receivers

The receiver getting the football will work 3 steps vertically trying to sell a vertical route. The goal is to get the corner backpedaling. If the corner is pressed up on him, the receiver must be physical and push off to create separation. Since the pass is caught behind the line of scrimmage, there is no pass interference, so he must get the corner off of him by any means necessary. Once the 3rd step is planted, he will pivot and retrace his route stem, working back through where he lined up, and retracing back to the QB just inside of the LOS. Once he catches the ball, we try to get them to turn up inside of the tackle or “first man out’s” block, usually this is where the “tunnel” begins to be formed.

Read More

Why Choate Prep (CT) Teaches Its H to Skip Pull on One-Back Counter

By Mike Kuchar
Senior Research Manager
X&O Labs
Twitter: @MikekKuchar

Introduction

The following research was conducted as part of X&O Labs’ study on “Spread Gap Schemes,” which can be accessed in full on the Insiders website.

LJ Spinnato, the head coach at Choate Rosemary Hall, the number one prep program in Connecticut, spends his spring visiting with Coach Malzahn at Auburn. He also uses the Slant formation to run is Counter scheme. The rules for the scheme are below:

PST (play side tackle): B Gap or backside inside linebacker; sift if odd front.

PSG (play side guard): Block A Gap or backside inside linebacker.

C: Away A gap to 3-technique; sift if odd.

BSG (back side guard): Trap pull technique to C gap player, pick up play side foot and put it down toes pointed downhill through play side guard and tackle. Adjust downfield to up field shoulder of kick player. Get ready to log and spill player as physical up field as possible.

BST (back side tackle): Gap Hinge. If odd, sift punch, hinge to outside linebacker after stunning 4-technique before center overtakes him. Same concept on 3-technique away.

H Back: Always run from sniffer position otherwise true Counter Trey. Skip pull just like a pulling guard on our Power play. Keeps his shoulders up field and it times up the best for us. Lead up on play side inside linebacker.

Skip Pull Fundamental:

Once that sniffer is in position to execute his block on the Counter, and he knows who to block, he must be taught the specifics on how to block that second level defender. We’ve found that most coaches are teaching a typical square pull technique where the H turns his shoulder perpendicular to the line of scrimmage to hug the double team.

LJ Spinnato, the coach at Choate Rosemary Hall (CT), was teaching the same technique, but found that often times his H was overrunning the C gap and not squaring up on the play side linebacker. So, week one of this season Coach Spinnato decided that he would teach that sniffer to use a skip pull technique just like the backside guard. He found the timing worked better and it gave the ball carrier a two-way go in the C gap.

To study game film on how Choate Rosemary Hall (CT) runs its Counter concept, click on the video below:

Read More

Designing RPO Systems: Case 1 – RPO Run Design/Pre and Post-Snap Protocols

By Mike Kuchar
Senior Research Manager
X&O Labs
Twitter: @MikekKuchar

Introduction

case1leadpicQuick question to all those RPO coaches: Are you designing these run/pass options in order to run the ball more effectively or just to throw it around the lot?

The answer seems obvious, right: to outnumber the defense in order to run the football.

Well, we thought so too until we started conducting our research on this study. The philosophy that began as a way to control a plus-one defender by tagging a pass element to your run game, may have shifted to the priority of getting your best receiver the ball in space though the air. Of course, there is nothing wrong with that philosophy. In fact, many of the coaches we spoke with are successful perhaps because they’ve figured out alone just how to do that.

We did provide over a dozen contributors to this study from all levels of football, including several who used a post-snap read on over 75 percent of their offensive snaps this season.  While a contingent of these coaches use their RPO concept to take advantage of defenders who are tied into the run game, there are others like Fordham University head coach Andrew Breiner who thinks the opposite. As Coach Breiner told us, “People are thinking how can I call a run and throw the football. That’s not our intention. Our intention is to call the run to run the ball, but now allow defenses to add the extra defender in the box.”

In this case, we wanted to provide coaches with the necessary means to design these RPO concepts. In doing so, we are going to take the following philosophy in mind, we will report on how coaches are constructing these schemes by placing defenders in conflict in order to run the ball more effectively.

Many of our sources were among the top rushing programs in the country this past season, Albion College (MI) rushed for 283 yards per game and Arkansas Tech University rushed for 269 just to name a few. We dug into how these coaches, and others, we using the RPO system to put defenders in pre-snap conflict and manipulate their assignment post-snap. The run games they were using to do so were based on three components:

  • Front Structure
  • Box Count
  • Field and Boundary Fitters

The bottom line is to find out who a defenses extra run fitter is and manipulate that defender using various means.

Designing Runs off Front Structure

Some runs work particularly well against different fronts. We all know this as coaches. But there are some coaches who put a premium on which run concept they are calling based off the front that they are seeing. We’ve found that in general terms, coordinators who plan against even front structures are more susceptible to call gap scheme run concepts, particularly against play side 3-techniques in order to get movement at the point of attack. These are also the same coaches who will choose to run zone concepts at the bubble (or shade/5-technique) side so their front side guard can climb to the next level. Alternatively, coaches that are designing their RPOs against predominantly even front teams have chosen to use some double pull concepts, mainly in the form of buck sweep and other pin and pull variations, because of the probability of getting two linemen out at the point of attack.

Eric Davis at Mankato East High School (MN) told us his power and counter gap schemes were less efficient vs. 3-4 teams, partially due to our inability to block the outside linebacker when our kick out player blocked the 4-techhnique or 5-technique.  “We also had some struggles getting to the backside linebacker with our backside guard on inside zone vs. 3-4 teams.  So we’re hoping that an expansion of our RPO package will fix that problem. We did run our buck sweep very effectively against those teams as well as power out of tackle over. While inside zone was not great against the 3-4, it was extremely effective against the 3-3 Stack, probably due to the fact the gaps the defenders were responsible for were more clearly defined immediately post-snap.”

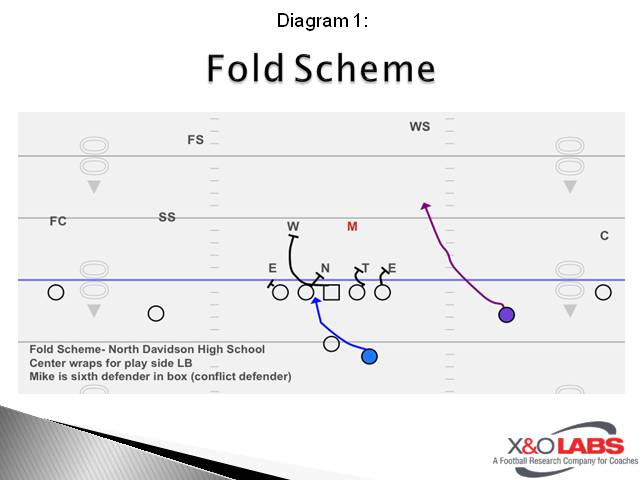
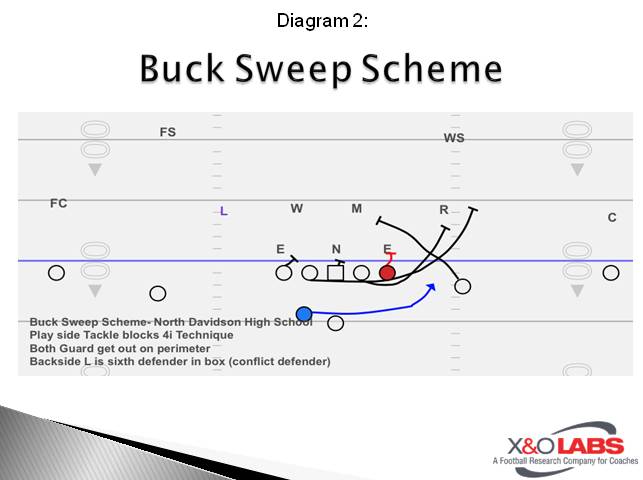
Mark Holcomb at North Davidson High School (NC) will break the run concepts from his RPO package into attacking front structure as well. Against four man fronts, Coach Holcomb will use his fold scheme, where he will block down on the nose and wrap the center or the uncovered lineman for the play side linebacker (Diagram 1). It’s a way for him to block the sixth man in the box. Against three-down looks, the gap blocking structure of the buck sweep helps even against 4i-techniques because he will use his tackle on that player in order to have two puller with the guards (Diagram 2).

Slide1Slide2 

Joe Osovet, the former head coach at Nassau Community College (NY), will check the portions of his RPOs to the shade techniques in four-down fronts. Although his run portions are not married to his RPOs at all, he told us he will run the best run concept that we will think is best against the front we are going to face. Then he tags his RPO concepts to what we think the back end of coverage is going to look like. “If we had our druthers, we want to gap things,” said Coach Osovet. “We want to run our inside zone to the low shade, our G/T counter to the high and our dart scheme is predicated on where the bubble is or the second level linebacker alignment is.”

Read More

Designing RPO Systems: Case 2 – RPO Formation Design to Manipulate Conflict Defenders

By Mike Kuchar
Senior Research Manager
X&O Labs
Twitter: @MikekKuchar

Introduction

case2leadpicOnce the pre-snap thought process has been ingrained in your quarterback, now it becomes necessary to start designing your RPOs based off the personnel groupings and formations you already have in your system. As an underlining rule, we’ve found that most coaches take the run concepts they use with the most success and protect them formationally by using structures where they can get a hat on a hat. Then, once the extra hat falls in defensively, the run/pass option is added. 

This case will focus entirely on how to identify who that extra defender (or conflict player) is based off the formation you present offensively. The RPO game is all about protecting your top runs. So we wanted to dig deeper and help coaches figure out how they can protect their runs based on the defensive structure they are seeing each week. Our sources divulge how they are able to do that using various formations. Since the majority of coaches we spoke are pure tempo coaches, the main personnel groupings we research are 20, 10 and 11 personnel groupings.

Lee Sadler at Marshall High School (AR) gives definition to the conflict defender

as someone who is responsible for playing both the run and the pass. “If we have one or two receivers to a side, the second defender from the outside-in is the conflict player,” said Coach Sadler. “We don’t count safeties or players over seven yards deep. If we have a three-receiver side, then the third player from the outside-in is the conflict player.” Following those rules, every time the quarterback gets lined up he will do the following:

  1. Look at the box for possible pressure.
  2. Look to the conflict defender on the left.
  3. Look to the conflict defender on the right.
  4. Look back to the box one more time and start the cadence.

The quarterback learns that on interior runs, he will have RPO options on both sides. On perimeter runs, he will only be concerned with the conflict defender on the backside.”

For Dustin Beurer, the offensive coordinator at Albion College (MI) any time he can block five for five up front (or four for four) he we will throw more vertical passing game with the quick game or pop on the backside. Any time he can leave the backside defensive end on a six-man box, he will run his quick game stuff (all of which are detailed later in this report). He classifies his box count priorities below:

  • 4-1 box read: Run the ball or vertical pass
  • 4-2 box read: pick on backside linebacker
  • 3-4 box read: nickel or outside safety

Editor’s Note: All of the concepts that are referenced in this case will be detailed, complete with video, in case three.

10 Personnel Designs

2×2 Open Formations

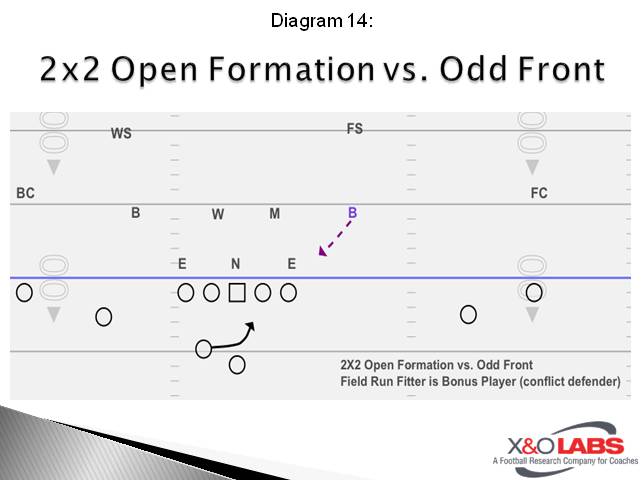
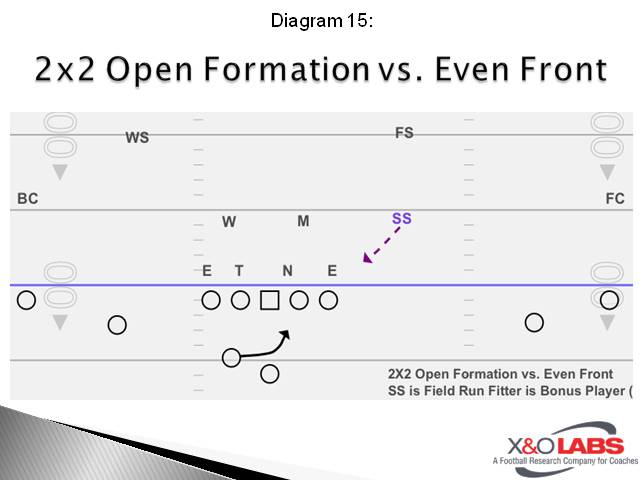
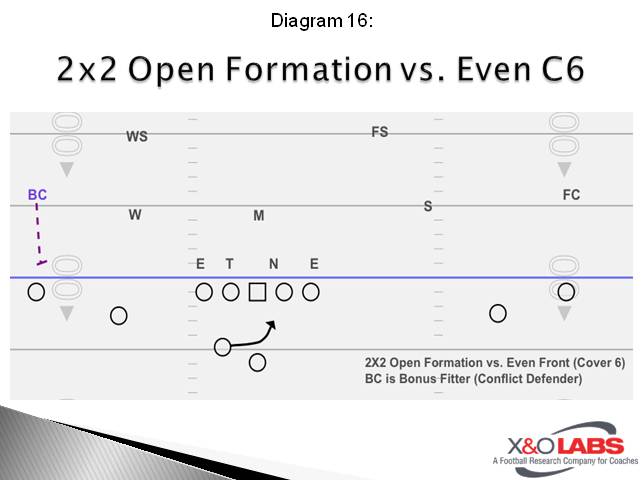
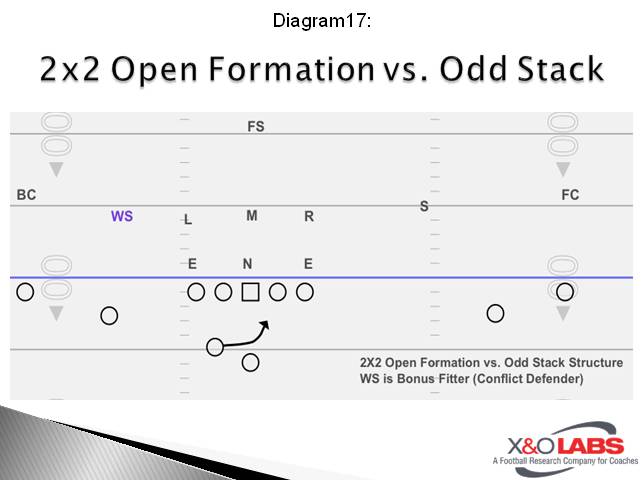
When designing RPOs from 10 personnel groupings, a clarification needs to be made the difference between 2×2 open or 3×1 open formations. Most defenses will align in two-high safety structures against these formations, so the extra run fitter can come from the following locations:

Field Second Level Run Fitter: Odd structure (Diagram 14) and Even structure (Diagram 15)

 Slide14Slide15

Boundary Second Level Run Fitter such as a Corner (Some 4-3 structures) (Diagram 16)

Slide16 

Boundary Second Level Run Fitter such as a Linebacker (Odd Stack structures) (Diagram 17)

Slide17

Read More

Designing RPO Systems: Case 3 – RPO Route Designation to Manipulate Coverage Structure

By Mike Kuchar
Senior Research Manager
X&O Labs
Twitter: @MikekKuchar


Introduction

case3leadpicIn this case, we detail which pass concepts coaches are using to stress conflict defenders. But before we start reporting on which run concepts are married with the pass game, there is one important denomination we came across in our research: Interior runs such as zone, power and counter are tied more to horizontal pass concepts while exterior runs such as pin and pull and outside zone are tied more to vertical pass concepts.

The reasoning is simple: The interior runs tighten second and third level defenders (opening up the perimeter alleys), while the perimeter runs widen them (opening up seams in the defense).

These are all new submissions with most coming in the form of post-snap third level reads. In the prior case, we presented research on how to target conflict defenders based off formation. In this case, we will present which concepts are used to attack these defenders. We categorized them into specific support patterns.

Third Level Manipulations

Safety Manipulations

Please Note: The RPOs detailed below can be used with various run actions, so the illustrations do not include the specifics on run blocking.


Manipulating Backside Safety in Run Support

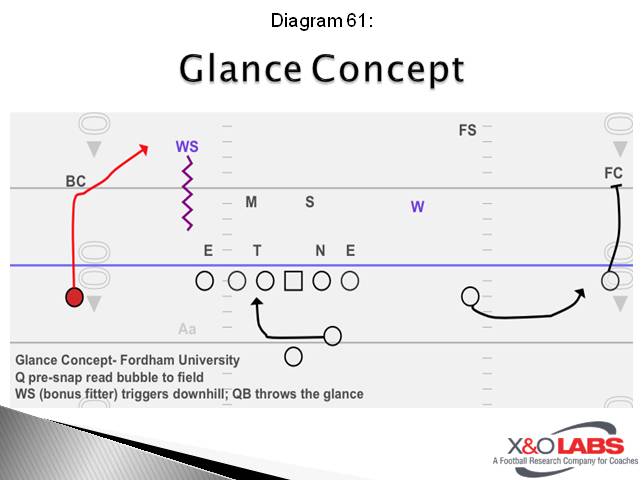
Glance RPO: Fordham University (NY) (Diagram 61)

Slide61

Read: Away from run action

Run Action: Inside Zone, outside zone, power or dart

Conflict Defender: Boundary safety in quarters coverage

Description: Glance is a concept generally to the X receiver out of 11 personnel groupings who will take a five-step route on a post angle. The quarterback will first check to see if he has leverage to the field to throw the bubble. If there is no threat of a perimeter blitz from the overhang, the quarterback will read the boundary safety for the glance route. “If the boundary safety rotates to the post, or makes any type of definitive movement to the line of scrimmage, we will throw the glance,” said head coach and offensive coordinator Andrew Breiner. The key is to allow the boundary safety post-snap to come screaming downhill when he sees run action.

To study game cutups of the Glance concept, click on the video below:

Read More

Designing RPO Systems: Case 4 – RPO Route Designation to Combat Man Coverage

By Mike Kuchar
Senior Research Manager
Special Reporting by Adam Hovorka and James Woods
X&O Labs
Twitter: @MikekKuchar


Introduction

case4leadpicThe talk around the clinic circuit this off-season was that man coverage provides a viable answer in defending these RPO schemes. We have the research to back it up. We found that 46 percent of defensive coordinators either use pure man coverage or a version of split field coverage (which essentially turns to man post snap) to defend run/pass option concepts. So this case serves as the pure counterpoint to the topic, how offensive coaches are attacking man coverage in their RPO game.

We’ve segmented our research into the following perspectives of opinion:

  • Coaches who rely on quick game methodologies
  • Coaches who use stacked and compressed formations.
  • Coaches who rely more on the run game component of RPOs

Quick Game Methodologies

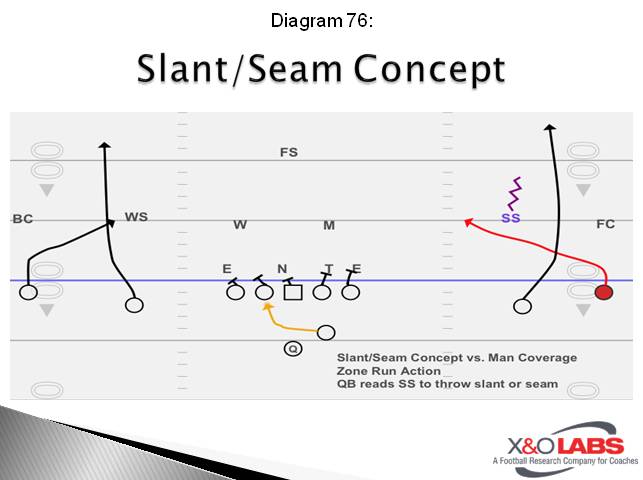
Lynn Shackelford at Cashion High School (OK) started to see an abundance of man coverage later on in the season due to the success rate of his RPO game. When he was presented with man coverage, he relied on quick game routes such as slants, arrows, posts, outs, seams and fades. He would use a built-in man beater to attack the side of man coverage. “For example, if we called a man side and a zone side, the quarterback would pre-snap to see coverage and what side he is working,” said Coach Shackelford. “If he likes the man leverage, he catches and throws the man side. If he doesn’t, he hands the zone run play.” Coach Shackelford will often have a slant/seam built into the man side as a man beater, which is paired with his zone run game. The quarterback is double reading here post snap from the inside linebacker to the strong safety. “If backer run fits, he reads the strong safety. If strong safety is peddling, he is throwing the slant.”

Zone Slant RPO: Cashion High School (OK) (Diagram 76)

Slide76

To study game cutups on this concept, click on the video below:

Read More

Designing RPO Systems: Bonus Case – Installation Methodologies and the Next Wave of RPO’s

By Mike Kuchar
Senior Research Manager
Special Reporting by Adam Hovorka and James Woods
X&O Labs
Twitter: @MikekKuchar


Introduction

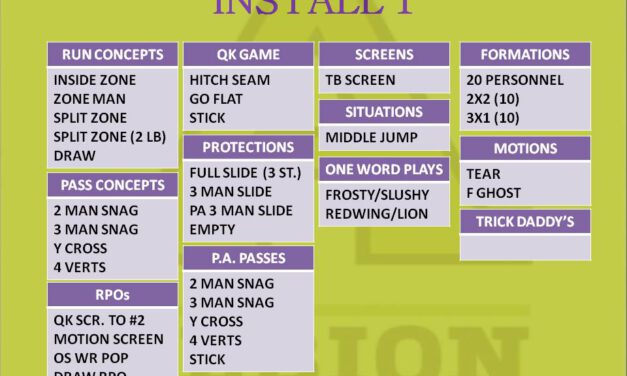
The difficultly in implementing RPO concepts seems to be the selection process. Once coaches understand how to design them, creativity can take over resulting in an endless amount of concepts. Case three in this report had over two dozen alone. So the following question arises: How much does one need in an offensive system? We were curious to see if there was a specific number tagged to installation. We found that number ranged from 5 to 15 total pass tags off various run actions.  While we realize that is a broad base to work with, we did research how coaches were devising their installation both in the spring and fall to get to the end goal giving their offense the confidence to be able to run these efficiently. We segmented our research into the following methodologies:

  • Whole/Part/Whole
  • Three Day Installations
  • Segmented Teaching

Whole/Part/Whole Methodologies

One of the most thorough responses on the whole/part/whole teaching methodology came from Jake Olsen, the offensive coordinator at Loras College (IA).

He describes his process in details below:

“When installing these concepts, or any RPO for that matter, we use whole-part-whole installation. In the meeting room, we introduce the play with all components as a whole. It’s imperative our coaches outline the reasons why we are pairing particular runs with specific quick screens or passes. Based upon what we expect to see from our opponent, we devise the specific run(s) that we believe will work against the opponent’s front and pair up exterior schemes that can get our athletes the ball quickly in space.

Once we have put the RPO play together, we begin to discuss with the quarterback the objective. We’ll diagram up the base defensive look against the play and then begin to go over the ways the run portion could be stopped. We will then discuss how the ‘conflict defender’ relates to the third level and its coverage, thus providing our quarterback base knowledge about the run portion of the RPO. Finally, we will converse which match-ups in relation to our formation, will give us the best chance to have success.

Once we are on the practice field, we will work specific parts of the RPO during early individual periods. For example, we work two different five minute run mesh portions each day. One takes place before our team stretch to work particularly on the motion mesh or ‘jet’ mesh on our outside runs. Our centers, quarterbacks, slot receivers, and running backs are involved during this period.

The second five-minute period is a traditional run mesh between the RB and the quarterback. We work all the variations and mesh angles of our game plan at this time. In both five-minute periods we train the quarterbacks eyes by placing a coach in the area of where we believe the ‘conflict defender’ would be and flash numbers using our fingers during the mesh. This is similar to what we’ll do with quick game reads or other pass concept reads where we’re forcing the QB to focus on a defender. As he becomes comfortable with the mesh, we’ll begin to move the coach ‘conflict’ defender around on the snap, which simulates a bit more of a real look.

Regarding the exterior pass parts of the RPO, we use several individual or group periods to work out timing and routes. We split our receivers and quarterbacks into two different sides and work different quick game/quick screen concepts. Once again, we’ll place a coach as the ‘conflict defender’ requiring the quarterback to train his eyes toward the second level on the snap or mesh.

The final portion of teaching the RPO is putting it back together as a whole. There are several ways we believe this can be done. Our favorite is to bring all the offensive components back together, excluding the offensive line. We line up the entire formation and place one coach on the field as a defender. He will represent the ‘read’ defender for our quarterback to play against. As the season progresses, and our Quarterbacks become more comfortable, we add defensive backs into the equation. We have corners present press technique/soft technique on the outside receivers or safeties roll from 2-High down to 1-High in conjunction with the ‘conflict defender’. We’ll play this 6-on-1/6-on-3 drill for a number of reps with all our game plan RPOs. We feel this has been a great drill to gain the necessary reps we need to become smooth without creating long, drawn out team periods in order to get all the scenarios.

We’ve found the best way to get the quarterback to play fast and confident is to break the RPO down into is basic parts. We rep them individually on air, put them back together, and approach is much like a 3-on-1 fast break in basketball. Our quarterback is the point guard with the ball and he is looking to distribute quickly. In most of our drill work with our quarterback throughout practice, we place some sort of body in the area where his eyes should be and flash numbers or move creating a subconscious trigger which relates to what he should do on game day.”

Jesse Montalto, the head coach at Ellsworth Community College believes in teaching the entire concept together, but admits the biggest challenge is getting the quarterback to know who he is responsible for. So he teaches this in the most simplistic way possible: Equating it to numbers. “If it’s a five man box, the line has the four down and Mike or the three down and the two inside backer, which means the quarterback has number six,” Coach Montalto told us. “In a six man box, the quarterback knows he is responsible for the defensive end and be ready to triple off him. It’s installed in everything we do from the beginning; whatever the run game is in the RPO is in. If zone is day one, then all the run pass options with it are in with it. If power or counter is in, any RPOs off these run action are automatically in. We do it all the time.

Read More

Pre-Season Drill Series for Offensive Linemen

By Brian White
Offensive Coordinator
Rose-Hulman Institute of Technology
Twitter: @CoachWhite_RHIT

Introduction:

In conjunction with our Strength & Conditioning staff, our program has developed a series of drills our offensive linemen will perform during the off-season and during our spring practice. Our offense is an up-tempo offense that prides itself on our pace. We want to ensure that we practice such a manner that will prepare our offensive line to operate at a fast pace while improving their skills.

Additionally, we sought to develop a series of off-season drills that would not only simulate the accountability each offensive linemen have to each other on gameday, but improve the comradery of the unit as well.  This report will detail the core of the program we put together.

Tires/Ladders

The Tire and Ladder Drills are two drills preformed simultaneously to maximize efficiency and develop accountability in the unit. Our offensive line is split into two groups, one performing the Ladder Drills and one performing the Tire Drills. The amount of reps performed by the Tire Drill group is dependent on how quickly the Ladder Drill group finishes their set.

Ladder Drills are a great way to develop foot quickness, which is an important skill for offensive linemen.  Additionally, we wanted to extend the benefit of the Ladder Drills from the feet to the hands. offensive linemen need to have quick hands to be effective blockers and strong shoulders to maintain their health and strength throughout the season. Many offensive linemen suffer injuries to the labrum and/or AC joint. Performing the Ladder Drills with hands is designed to help prevent these injuries. The Ladder Group will perform their specific footwork pattern on their way down the ladder and then repeat the pattern on their hands on the way back.

Tire Punch & 1 in

The first set of drills is Tire Punches and 1 in on the Ladder. On the Tire Punches, we stress the offensive linemen to maintain a great pass pro demeanor.  We look for the whole foot on the ground with the weight on the insteps. The feet should be active throughout the entire drill, meaning that the offensive lineman will pound his insteps into the ground while never raising the feet too high. The ankles, knees and hips should be bent to produce proper power angles. We pay particular attention to how the lineman carries his torso and his hands. The spine should be sucked in and the chest should be puffed out. The elbows should be touching the ribs and the thumbs placed together. 

The Tire Punch is especially effective in developing punch timing. The offensive linemen are paired up on opposite sides of the tire and punch the tire one at a time. This creates movement from the tire that forces the offensive line to strike at the appropriate time. The punch should be delivered when the tire enters the “Strike Zone.” This is the area where the punch can deliver an appropriate amount of force to stop the defender’s charge and create separation. We define this area as the “Watch Area,” or the point where the defender is in the area where the offensive lineman’s wristwatch would be if his arms were extended out in front of his body.

The Ladder Group will face straight ahead and place 1 foot in each grid on the ladder on the way down.  On the way back, they will place 1 hand in each grid. We stress hand quickness and a firm punch into the ground. Just as we want to hear the feet of the offensive line pounding the ground, we want to hear the same from the hands. Once the Ladder Group has finished their set, then the Tire group will be able to move on to their next exercise.

Tire Flip & 2 In

In the next set of drills, the Tire group will again be paired up and flip the tire back and forth. We stress great hip flexibility in this drill. To pick up the tire, the offensive lineman must push his hips backwards to sink down and grip underneath the tire. The force to lift the tire should come from the feet pushing against the ground and driving the hips up. Tire Flips are an effective method to overtrain our run blocking technique. On a run block, we want to lift the defender out of the ground and climb underneath the defender to get our hips onto his hips. We illustrate this point the first time we teach the drill by first asking each offensive linemen to push, pull then lift the tire. Then we ask them to lift the tire with their hands far apart followed by lifting with their hands close together. We use these two teaching exercises to demonstrate why we want each offensive lineman to block with tight hands and lift the defender.

On the Ladder, the next exercise is 2 in each grid. The setup is similar to the 1-in drill, but now 2 feet will be placed in each grid on the way down and two hands on the way back. Emphasis is placed on the speed of the double tap in each grid.

Tire Front Squat & 1 In Carioca / 2 In Shuffle

On the third and fourth sets of Tire exercises, the Ladder group will perform two consecutive series of drills. The Tire Group will Front Squat the tire. Based on the weight of the tires used, adjustments to the number of men working on each tire may need to be made. The weight of our tires requires three men to work on each tire. The Front Squat is particular effective in developing communication and accountability. All three offensive linemen on the tire must be coordinated in the timing, depth and tempo of their squat on movement up and down. Usually, one leader will step forward on each tire to set the pace of the drill.

Read More