Practice Methodologies in Defending RPO/Triple Option

By Mike Kuchar
Senior Research Manager
X&O Labs
Twitter: @MikekKuchar

Editor’s Note: The following research was conducted as part of XandOLabs.com special report on “Defending RPO and Triple Option Concepts.”

Introduction:

It’s impossible to defend these schemes during the course of a game week, which is why most coaches don’t. We’ve found that the majority of coaches, 57 percent choose to start preparing for triple option offenses in the spring or summer leading up to the season (See Graph Below). So, we reached out to those coaches who have won at least half their games against these schemes to tell us exactly how they prep for these offenses.
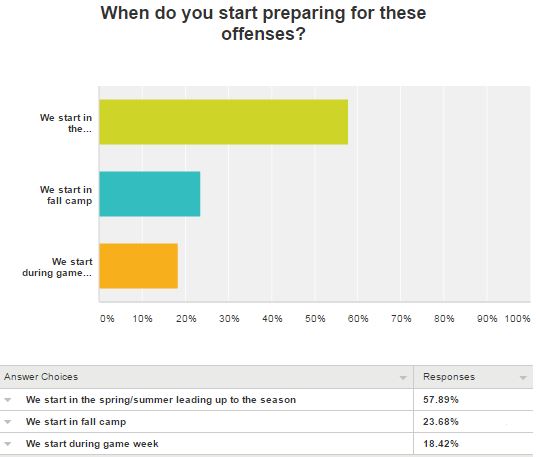
chart9

Practice Planning Flexbone Option:

Shawn Quinn, the defensive coordinators at Western Carolina University, adopted the following practice philosophies when defending triple option concepts:

  • Teach half/part/whole
  • Start half line than progress to full line.
  • Start with defensive line and back seven split up.
  • Start in the spring devoting time to defending the option every day.
  • Do a technique circuit which includes arc, load and cut work.
  • During the season, set aside time every day to practice basic option fits. We use ten minutes every Monday practice.
  • Work option fits during bye weeks.
  • Do as many drills without a ball to have defenders go to their responsibilities.
  • Rep every call verses one play. For example, use dive option weak vs. every defensive call you have.
  • Rep every play vs. one defensive call.
  • Use a perimeter blocking drill with cut blocking.

Half-Line Methodologies:

Jay Brophy, Buchtel High School (OH): “Set up half line group work on assignment football. Two half lines set up going left and right, rotating defense so they get looks going both ways on option.”

Jared Ocker, Sioux City East High School (IA): “We do half line fits all week against the various phases of the options. We use scout team cards and do not use a football. We will work on getting hands on and blocking down step down. This is also the time where we will script in our line stunts and blitzes.”

Jim Dawson, Trinity University (TX): “Split drills…a-b gap reads and games, c-d gap reads and play all before coming together in a team option drill or script.”

Team Defense Methodologies:

Gary Phillips, Conestoga High School (PA): “We practice a whole defense drill that works all phases of the option (dive/keep/pitch). We work on this for 10 minutes every practice in preparation.”

James Cook, Smithfield High School (RI): “Pursuit drills. Making sure our defense is running through the dive to QB then to the pitch.”

Read More

9 or Hitch Option (Bruise) Concept

By Jerald Pierucci
Head Football Coach/Offensive Coordinator
Shafter High School (CA)

Introduction

The hitch/9, 9/hitch and Hitch/Hitch concepts are staples for nearly all passing offenses.  We have recently combined these two concepts into one play call giving your offense the capability to hit the homerun ball and take the five-yard hitch without a check at the lines or coaches checks from the sideline. This is a concept that can be installed in one practice period, and ran at any time on the field. 

Necessity for Flexibility

Being a tempo/no huddle team. The ability to be flexible in play design (not complicated) is critical for us to play fast and have success on offense. With defenses becoming more flexible in coverages, we found ourselves relying more on “check with me” calls. While we are not against using “check with me’s,” the slow down allows defenses to change coverage while you are trying to change your offensive call.

A concept we use a lot is the Hitch/9, 9/hitch and all hitches. Each one is good against certain coverages, but can be taken away against others. As a play caller, I found myself calling an all hitches and a defense would align in 4 across all sitting at 5 yards, or other times calling 9/hitch and the defense aligned in Coverage 3.  Over time, I felt that it was more about getting lucky on having the right call at the right time.  

For that reason, we started using check with me and sideline checks to get into the right play. This was successful at first and we were able adjust to what the defense was aligned too. We continued this until we came against a team that stemmed alignment every time we checked.   

This last set back, made us really look at the play and decide to make it a pre-snap option that would put the decision the hands of the defense. We let their alignment dictate the route that will be ran. This is ultimately what allows this play to be successful. No matter what alignment or coverage the defense is in, we had an answer.

Necessity for Simplicity

When I started toying with the idea of putting a hitch/9 option route concept together, I started looking at the post snap option routes that were out there. After messing around with it at practice, it was obvious to me that at the high school level the post snap option was not a good option for our program. It was too complicated, and the time commitment to it was too great and the payout was too small.   

Read More

Differentiating Cut Block Technique Off Play Concept

By Ryan Schleusner
Offensive Line Coach
Fairmont State


Introduction

The cut block can be a highly effective weapon in almost any offense when used properly. A well timed and executed cut block can level the playing field at a position where you are usually athletically outmatched by the guy across the ball from you. The effects of these blocks include:

  1. It immediately takes the defender you are tasked with blocking out of the equation on the play.
  2. It can put a great deal of doubt in a defender’s head about how hard and fast he wants to play when he knows there is a good chance he will wind up on the turf if he goes full speed.

We teach cut blocks throughout our offensive structure. They can be used in any of the following concepts (each of which I will detail later in the report).

  1. Quick game pass protection
  2. Backside of outside zone
  3. In space on screens
  4. Reverses
  5. Draws
  6. Trick plays
  7. Backside punch/hinge on gap plays
  8. Down blocks in any pin/pull type of schemes

Cutting in Quick Game Pass Protection

The main goal of a cut block in quick game pass protection is to get a defender’s hands down so that the pass does not get tipped and intercepted. Even if the block fails to get the defender all the way to the ground, a properly time cut and where the player accelerates his body into the defender should succeed in forcing him to put his hands down. Thus, his hands will be unavailable to swat down a quick pass. The biggest coaching point in cutting while in quick game pass protection is to make sure you get into your pass set quickly (high hat). This will tip the defender off that it is a pass play and get him to fire off the ball quickly. 

As with anything in pass protection, it is important to set to a landmark. When pass setting to set up a cut block, it is important to be aggressive while maintaining a half-man relationship. We teach them to aim for the inside number of the defender and to get there quickly. The lineman must avoid being too far away from the defender when the timing is right.  

As a base quick game rule, we talk about getting at two or three kicks before throwing a cut block (depending on the speed of the kick and athleticism). As the defender comes towards them, it is important to wait until he is an arm’s reach away then he should drop his shoulder and drive off his far foot. He is aiming to get across his body on the cut. As he drops his shoulder and accelerates his body, we talk about throwing an uppercut aimed at the inside groin of the far leg. This will help accelerate your body and provide enough torque to finish the block cleanly.

It is important for the players to remember to communicate when they are cut blocking. The players next to them need to know of these intentions so that you can work together do not get called for an illegal chop block.

Film Notes: In this first clip, you will see the left guard take a good set, accelerate his body efficiently and finish the cut block by taking the defender to the ground. Both the right tackle and right guard in this clip have near misses for separate reasons. The right tackle attempts the cut too early which results in him missing his aiming point and make contact more towards the shin area than the groin. Because he executes the block quickly and with a good amount of force, he still makes a good impact on the defender.  The right guard’s block is unsuccessful because he does not accelerate his body fast enough and does not finish with an uppercut. This makes the contact weak and results in the defender not reaching the ground. The left tackle opted for a quick set, which can be a good option if you don’t feel confident the defender will be coming off the ball hard enough to get a good cut.

Read More

Splatter, Leverage and Rip Thru Block Destruction Drills for LBs

By Freddie Aughtry-Lindsay
Defensive Run Game Coordinator / Linebackers Coach / Pro Liaison
Campbell University (NC)
Twitter: @31_CoachFAL

Introduction

Here at Campbell University, our linebacker unit uses a number of block destruction techniques as tools to give us the best chance of being productive and effective at our position. At the linebacker position, you must be able to meet and defeat blocks with great technique and effort. The job of defensive players is to get to the ball carrier as quickly as possible while also being physical at the point of attack. The four block destruction techniques that are taught and discussed daily on our team / within the linebacker core are as follows:

  1. Spill & Leverage
  2. Splatter
  3. Rip-Thru.

Throughout this clinic report, these four block destruction techniques will be discussed in detail.

That said, no matter what technique is being used the most important components of block destruction are to always have active eyes, feet and hands. When using any of the techniques listed above, we want to always attack half a man when approaching a blocker. Ultimately, this allows us the best opportunity to get off a block and pursue the ball carrier. Attacking half a man also allows us to keep our off hand free, which increases our ability to make a play. We never want to be head up on the blocker because this blocks our vision and gives the blocker the ability to engage. Lastly, it is imperative that we know where our support is at all times within the defense so we can fit on the correct side of the blocker.

Techniques #1 & #2: Spill / Leverage Technique

The first techniques taught at Campbell University are the “spill” and “leverage” techniques. These techniques are used when taking on a blocker and we want to send the ball either towards the sideline (spill), or towards the middle of the field (leverage). The first thing we want to do is see the blocker and approach him with bent knees, attacking only half a man. The defender’s feet must be shoulder width apart with our foot nearest to the blocker slightly in front of the other. We do this because we want to attack the blocker with the same arm and same leg (ex: right arm/right leg). This gives us the most power to effectively destruct the blocker. The player must now shrink his elbow into his rib cage and ball his hand to make a fist. In doing this, we are using our fist, forearm, core, and shoulder to create a “shield” to alleviate impact from the shoulder. This ultimately protects our shoulders from injury.

Read More

Rule/Route Conversions for RPO Concepts

By Brent Eckley
Head Football Coach
Jackson High School (MO)
Twitter: @jacksonfbnation

Introduction:

At Jackson High School, we’ve sound some success in using RPOs to help us read different defensive players, as opposed to the more traditional concept of reading the backside defensive end on run plays.  We also make use of these types of plays, but we’ve found some ‘easier’ yards with changing up who we are reading play to play.

The two RPOs that will be covered in this clinic report are our most successful over the past two seasons.  The first is an RPO off of our outside zone or stretch play with the QB reading the backside inside linebacker. The quarterback has the option of giving the ball the running back or passing the ball to one of our backside receivers. The second RPO is based off of our quarterback outside zone or stretch play. The quarterback is now reading the front side force player. He will either run the ball or throw to one of our front side receivers. For the sake of this report, we will show the run plays and the corresponding RPOs out of 3×1 sets out of 10 personnel.

RB Stretch RPO

This concept is based in our outside zone concept. Our offensive line will take a minimum of two foot width alignment and we try to align deep, at the center’s hip.

Our rules for blocking the stretch play is based on covered or uncovered rules much like many teams that run outside zone. Covered linemen are taught to drop step and reach. We coach to run the feet and try not to close our hips too soon on the reach. If we close too soon, the uncovered lineman won’t be able to push us off to get to the linebacker. We teach our uncovered linemen to three step climb. His eyes are on the nearest defensive lineman to the play side. The uncovered lineman will drop step, crossover and run, trying to overtake the reach block of the covered lineman. If he can’t get there in 3 steps, he will then climb for the linebacker. If he can get there, he will push off the covered lineman to the linebacker and overtake the reach block, trying to close his hips as soon as possible to maintain the reach block.

Slide1

To make this play an RPO, we have matched up our most versatile quick pass concept with our stretch play. The following slides will list coaching points for this pass concept for our receivers and quarterback.

Slide2Slide3Slide4

Read More

11 Personnel Jet Sweep Concepts from Compressed and FIB Structures

By Bill Turner
Offensive Coordinator / QB coach
Buckeye High School (OH)
Twitter: @BillTurner6684

Introduction

Our version of the popular jet sweep concept is slightly different than most because we do ours from tight or compressed formations. We like running it to the field, but have had great success to the boundary as well. It has become important for us to have the ability to run it both ways based on how the defense is playing us. We will run it no huddle at a fast pace and also have the ability to check it to the best direction at the line of scrimmage. The jet also sets up our favorite run concept, the counter trey or QB counter trey.

Our goal of the jet sweep is to stretch the field horizontally by getting the ball to our best athletes moving as fast as possible trying to get it outside. We want to seal the edge with our last down lineman and our receivers. Our fullback will take on the outside force defender while working to hook him to the inside. If the FB is forced to kick him out, our ball carrier will adjust and take the ball into the alley. Later, we will cover several different ways to block this play depending on the defense’s alignment as well as using unbalanced formations to keep defense off balance.

Base Look

Our base formation for the jet is out of 11 personnel. We label our positions a little differently than most schools. F is fullback who is our best blocking back. X is our tight end. Y is our flanker also is our best jet runner. H is our adjuster and is our second-best jet runner. Z is physical blocker and deep threat.

Slide1

Base Blocking Rules for The Jet

In the diagram below, we are in our base tight formation against an even defense. We are running the ball to the field away from the tight end. Our linemen are taking quick steps to the play side (known as gang steps is our terminology). We are stepping to the outside gap to hook that defender. Those to the left of the center are gang stepping as well but are looking to get downfield. If our tackle fails to hook the last lineman, he must continue to stay on him and run him up field or to the sideline.

Our H is coming down to the first man inside of him, which is often a linebacker. The Z will look for the most dangerous defender inside of him. If the Z is not threatened inside, he will go up field to the near safety. The H and Z will communicate with each other and may switch up their assignment based on the defenses alignment. Occasionally, we will have the Z take on the force man if he feels he can hook him or drive him to the sideline.

The F will take on the outside force man (usually a corner) aiming at his outside shoulder. If the corner stays wide, it turns into a kick out block.

The QB will bring the jet runner in motion with a hand signal. He is responsible for setting the ball in the jet runner’s belly and then carries out his Q counter trey fake.

Read More

Mixing Zone and Man Concepts to Defend 2×2 RPOs

Joe Ginn
Defensive Front Coordinator/LBs
Choctaw High School (OK)
Twitter:
@CoachGinn


Introduction:

Well, offensive coaches have done it. They’ve found a new way to bring back the Triple option and incorporated wishbone concepts of the veer into the Spread Offense with Zone Read/Bubble Schemes. I want to talk today about a very simple scheme that I believe we can all apply regardless of defensive scheme to attempt to defend it. The example I’m showing and accompanying video will show an Odd Stack, and a Base 4-3 Scheme. The key to incorporating this scheme is having the 2 safeties in the game and matchups you believe in. 

Scheme

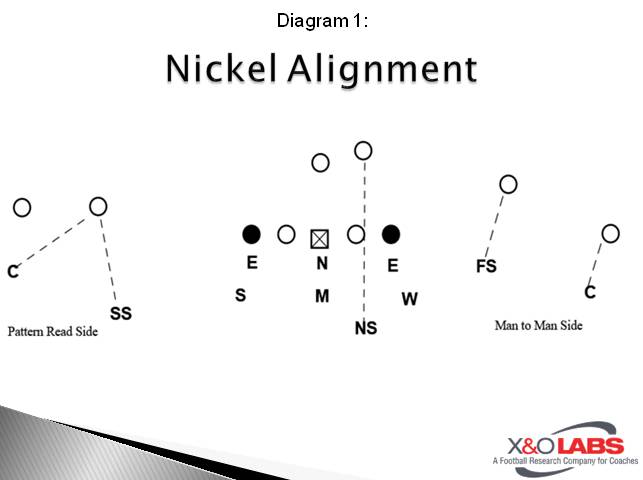
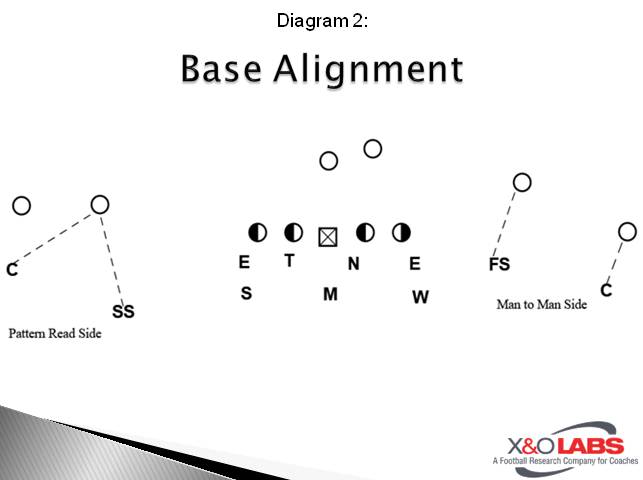
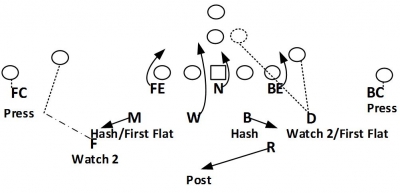
The concept we tried to use to limit this particular offense was playing man to man to the side we knew the Bubble/RPO was going to take place. We kept our normal Cover 2 Pattern Read Concepts in place on the other side. This particular team always offset their back, so we knew which side the bubble would be to, because we knew the QB would read the End to the side of the back and that slot receiver would be the one running the bubble. I’m going to focus this talk on their 2×2 set because it got a little bit more complicated to trips, and that’s a different topic here. We wanted #1 to be able to keep our LBs in the box and present to the Offense as much as possible a 6 or 7 man box to be able to stop the run, their run was much more scary than their pass (plus they were a spread to run team).

Our Scheme was to play Man to Man on the side of the back with our Safety and Corner because we knew this was the side the bubble or a slant would come from. While on the other side, we simply maintained our normal Pattern Read of #2 rules. Our Corner would squat on any out breaking route by #2 therefore, we could keep our LB on that side closer to the box because all he had to do was get to the curl area to defend any curl/slant, or be able to help collision the vertical of #2, but again we wanted his primary focus to be defending the run game.  You’ll see this concept diagrammed in Diagram 1 & 2, Diagram 1 is our 3-3-5 Nickel Concept, Diagram 2 is our Base 4-3.

Slide1Slide2

Defending the Run

As far as our concepts vs. the run we wanted them to be fairly simple.  We always play “Big” gaps vs. the Zone.  What I mean is the LB’s are assigned a gap based on alignment or movement of the D-Line so they are to fit their “Big” gap vs. Zone Concepts by the offense.  In the Nickel we wanted to force the QB’s hand a bit, so we slanted the front away from the back. We simply called “Away” with our playcall to alert the D-Line we were slanting away from the back. We played head up 4’s with our DE’s and the Nose played a head up 0. Our Linebackers were responsible for fitting big gaps vs. Zone, this put Sam in B gap strong, Mike was responsible for the Weakside A-gap, to take away the cutback if the Back read the Nose, and Will was our Gap exchange guy for the Cutback or a QB Pull.  e was told to fit tight to the Hip of the DE’s starting alignment of a 4 and tackle the 1st threat to show.  e also tried to steal the Nickel Safety in the run game by lining him up at about 8 yards depth and put him over the back.  e was responsible for the back.  e told him you’re the guy the Offense can’t block so if it’s run go tackle the running back. I’m not sure how many tackles he had, but this is the part I’d work to fix if I used this scheme again.  Honestly I don’t know if we had an aggressive enough kid playing here. 

Read More

Designing Tackling Systems – Case 1: Developing Your Tackling System

By Mike Kuchar
Senior Research Manager
X&O Labs
Twitter: @MikekKuchar


Introduction

In recent years, tackling has shifted more into a science than a fundamental. As evidenced by various methodologies (the Seattle Seahawk Tackling progression and Heads Up Football) have strived to take the head out of tackling, coaches are continuously trying to find methods to both help their players become more efficient tacklers and protect them from injury.

When conducting our initial research on this topic, we struggled with our focus. We wanted to provide our coaches with answers (mainly in the form of drill work) to correct the most problematic issues their players were having in tackling, such as keeping the head up, driving through the tackle, keeping proper leverage, etc. However, as we started the interview process with our contributors, we found that there was a pocket of coaches who have developed their own “tackling system” to fit the needs of their players and the circumstances in which these tackles are made. So rather than rollout a drill catalog of 100+ random tackling drills (many of which can be considered to be outdated), we wanted to provide coaches with a framework of a system that helps them create and develop the drill work which reinforces the proper tackling techniques and helps their defenders fix the most common errors in tackling. We’ve found that your system can be established in the following ways:

  • Studying each opponents’ offensive system to assess which types of tackling situations your defenders may be involved in. This has a lot to do with the personnel of your opponent. For example, are they based in spread sets where open field tackling may be more inherent or are they more heavily grounded in 12, 22 personnel based as an inside the box run team?
  • Studying opponents’ offensive personnel to assess which kinds of tackling situations you believe your defenders will encounter during the season. This can be done by reviewing prior game film from other opponents.
  • Studying your own personnel to evaluate which types of tackles (either based on scenarios or fundamentals) they are missing and take corrective actions to fix these problems.

In case one, we present a series of questions that we geared to our contributors which focus specifically on which elements they use to develop their system, how they identify either scenario based of fundamental based tackling errors and how much in-season practice time is devoted to correcting these tackling issues. Below is a key of the coaches that contributed to this study:

Contributor Key (in Alphabetical Order):

Joey Didier (JD): Defensive Coordinator, University of St. Francis (IN)

Vincent DiGaetano (VD): Defensive Analyst, Wagner University (NY)

Matt Entz (ME): Defensive Coordinator, North Dakota State University

Chris Kappas (CK): Defensive Coordinator, Mount Union University (OH)

Jamie Marshall (JM): Defensive Line Coach, Lindenwood University (MO)

Matt McLagan (MM): Defensive Coordinator, Northern State University (SD)

Jay Niemann (JN): Defensive Coordinator, Rutgers University

Mike Siravo (MS): Defensive Coordinator, Temple University

Eric Schmidt (ES): Defensive Coordinator, North Dakota University


Why is it important to have a “tackling system,” rather than a series of drills in teaching tackling to your players?

JD: “Tackling is the cornerstone of defensive football. There is no schematic answer to your players not being able to bring down an opponent’s ball carrier. Having a tackling system is important for three reasons: 

1: It creates teaching consistency among your defensive staff. 

2: It carries over to all positions and can be applied to all situations.   

3: It creates focus and buy-in with your players as to why tackling will help them be successful, and most importantly keep them safe.”

VG: “Three reasons I believe:

1: Develops common language among players and coaches.

2: It allows for drill work to focus on different segments of tackling consistent with system.

Read More

Designing Tackling Systems – Case 2: Reinforcing Proper Body Placement in Open Field Tackling

By Mike Kuchar
Senior Research Manager
X&O Labs
Twitter: @MikekKuchar


Introduction

We’ll start with perhaps the most common error in any open-field tackling situations: incorrect body placement. It seems to be the number one issue during the approach of a ball carrier.  So whether you’re teaching the shimmy technique, the break down technique or the long stride/short stride technique, it’s imperative to address how you want to make sure your defenders essentially come in at ball level.

It was Rutgers University head coach Chris Ash that told us he studied film on how tackles were made, not missed, before developing his system. Below is a tutorial from North Dakota University on tackles made with proper body placement.

Read More

Designing Tackling Systems – Case 3: Reinforcing Tracking Issues in One-on-One Tackling Situations

By Mike Kuchar
Senior Research Manager
X&O Labs
Twitter: @MikekKuchar


Introduction

Once the proper body positioning is taught in the open field, it becomes necessary for defenders to use the proper leverage points to make a tackle. Commonly referred to as “tracking” the ball carrier, we’ve found that leverage seems to be the most referred to word in teaching tackling and various coaches teach leverage are examined in this case. Leverage can pertain to both the area of the field (sideline, force or cutback) and it can also pertain to the leverage the defender has on the ball carrier (inside out, head up or outside in).

It was Rutgers University head coach Chris Ash that told us he studied film on how tackles were made, not missed, before developing his system. Below is a tutorial from Northern State University on both force tackle situations and cutback tackle situations.

Below is a tutorial on force tackle situations from Northern State University:

Read More

Designing Tackling Systems – Case 4: Reinforcing Multiple Defender Leverage Points on Ball Carrier

By Mike Kuchar
Senior Research Manager
X&O Labs
Twitter: @MikekKuchar


Explanation

Most commonly referred to as “losing the cup” losing multiple defender leverage points on a ball carrier are another common issue in tackling. What should usually result in an immediate tackling situation can turn into a substantial gain if one or more of those defenders lose leverage. While this all may depend on coverage structure, it’s essential that defenders know and understand which responsibility they have in each run situation.

It was Rutgers University head coach Chris Ash that told us he studied film on how tackles were made, not missed, before developing his system. Below is a tutorial from Northern State University on what it calls “Vice” tackle, where three defenders converge on a ball carrier.

Read More

Designing Tackling Systems – Case 5: Reinforcing Proper Strike Points on Contact

By Mike Kuchar
Senior Research Manager
X&O Labs
Twitter: @MikekKuchar


Explanation

Once the approach mastered and the proper leverage is attained, the defender needs to “finish” on the ball carrier by bringing him down to the ground. How coaches implement this fundamental in their system varies. Some use mats, some use agile bags and some use bodies. Below are the specific drills that teach this phase of tackling.

What we found most common is coaches teaching a “near leg, near shoulder” contact point on the tackle. It has become imperative for defenders to get that lead foot in the ground before making contact. For example, if a defender is making contact with his left shoulder, his left foot should be in the ground and vice versa.

It was Rutgers University head coach Chris Ash that told us he studied film on how tackles were made, not missed, before developing his system. Below is a tutorial from North Dakota University on tackles were made with the near leg, near shoulder contact points.

Read More

Designing Tackling Systems – Case 6: Implementing the Rugby Style Tackling System

By Mike Kuchar
Senior Research Manager
X&O Labs
Twitter: @MikekKuchar


Introduction

Back in 2014 the Seattle Seahawk Rugby tackling video went viral sending hundreds of coaches to reconsider how they were teaching tackling. One of these coaches was Chris Ash, the former Ohio State University co-defensive coordinator who is now the head coach at Rutgers University. According to Coach Ash, when he first viewed the Seahawk tackling video, he simply took he drills he viewed (along with googling ‘rugby tacking’ on the internet) and directly implemented these drills. It was all he knew how to do.

But now two years later, Atavus (http://www.atavus.com)- the Seattle based company that was behind that Seahawk drill tape- has put together a system on how you can design and implement the rugby tackling system in your program. XandOLabs.com spent a weekend in Philadelphia with the Atavus crew as they clinicked us on how they are developing their system to suit the needs of football coaches. Below is a sneak peek on some of the newer progressions they are designing this off-season as it pertains to transitioning rugby style tackling to the game of football.

Two-Step Process

In Atavus’ teaching progression, tackling takes a form of a two-step process: a tracking zone and a tackling zone. The definition of these two are below:

Tracking Zone- Pre-contact phase used to maximize potential contact. It’s defined as a controlled movement phase.

Tackling Zone- Contact phase where the goal is to maximize power and control over the ball carrier.

According to Rex Norris, head of football development at Atavus, when these two measures are combined it creates a positive tackling situation.

Tracking Phase

In the tracking zone, the goal is to close space on the ball carrier and limit his options. “This is about identifying the target and starting the correct pursuit angles by being continuously under control,” said Coach Norris. According to Coach Norris, there are three phases to the pre-contact zone:

Read More

Designing Tackling Systems – Bonus Case: The Buzzword Catalog of Tackling

By Mike Kuchar
Senior Research Manager
X&O Labs
Twitter: @MikekKuchar


Introduction

Football is a game of short bursts and shorter words, so in this case we wanted to provide coaches with the specific verbiage our contributors are using to teach tackling. While some of these words may be familiar, there are different ways to say the same thing to your players and a coach never knows which words will stick. We asked our coaches the following question:

Which common buzzwords do you use to teach tackling with your players?

Mount Union University Buzzword Catalog (Chris Kappas, Defensive Coordinator)

Full Speed as Long as Possible: “We talk about going full speed as long as you can to close out the space (between you and the ball carrier). You can’t give defenders a landmark because it’s a feel thing. It’s not three yards, etc. The goal is to get that near foot shimmy to step on that ball carrier’s toes. You have to break down close enough where he can make moves but you need to be far enough where he can’t run straight through you if you miss the arm tackle.”


Lindenwood University Buzzword Catalog (Jamie Marshall, Defensive Line Coach)- Rugby Style Emphasis

Tracking the Near Thigh: “We talk about tracking the near thigh (instead of the near hip) because as you track the ball carrier the near thigh always tells you where the receiver or the ball carrier is going. Your eyes can get lost if it’s up on the hip because that can lead to the belly button. We went to the near thigh. Wherever your eyes are looking your body is going to take you. We talk eyes to the thigh, wrap and squeeze. You can’t look at the hip if you’re asked to contact the thigh.”

Shoulders Through Thighs: This pertains to the finish component of the roll tackle where a defender’s shoulders makes contact with the ball carriers thighs.

Run or Roll: This pertains to the decision that the defender makes post contact on whether or not to run through the tackle or roll through the tackle.


North Dakota State University Buzzword Catalog (Matt Entz, Defensive Coordinator)

Hit Up Position: “We don’t use the phrase coming to balance because I think it brings out some different thought processes for kids. If I just said ‘be careful to keep your balance,’ the general player will widen his feet and drop his center of gravity where his footwork is outside of his frame. Now if that ball carrier changes direction I’m going to have to step underneath myself to recover. What we talk a lot about is getting to a hit up position where my feet are under my armpits.”

Read More

Protecting Your Base RPOs with Quick Game Variations

By David Buchanan & Harrison Ingels
Head Football Coach & Offensive Coordinator
Quabbin Regional High School (MA)
Twitter: @QRHSfballcoach

Introduction

At Quabbin Regional High School, we are a spread offense that relies heavily on our RPO scheme to protect our run game. We are 10 personnel base and we usually see a 6-man box every snap. Our RPOs are designed to attack edge defenders. This is not that different from what many others do. What we have added is the ability to attack the defender that is being assigned to make that tackle against the pass in the event of an RPO (usually safeties or corners).

In the past few years, we have seen that when we run our spot or bubble RPO those are the defenders who usually are the second players in. Our goal is to put them in conflict when we run our RPO protection concepts. When we are looking at when to call RPO run, we treat it like play action pass, when are the safeties/corners flying up to make the tackle on bubble, spot, or slant. If they’re flying up field too fast, we throw a vertical route to take advantage of the space they created.

In the 2016 season, we were able to leverage these concepts to protect our base RPOs and run game. This allowed us to be the highest scoring offense in our region’s history (43.2 PPG) and our receivers and QB set multiple school and regional records. We also were able to win our first league championship and qualified for playoffs for the second time in history.

Bubble-Go

Slide1

This is an RPO variation concept designed to protect an RPO bread and butter for most offenses. We will run a lot of bubble concept, especially against odd coverage teams with a weak coverage linebacker or an alignment for that linebacker that really gives us a lot of space. Our traditional bubble comes with us blocking hard on the corner with our wide receiver while the slot or a running back running the bubble behind that block. When teams adjust their corners to jam the receiver or the corner starts coming downhill when he reads bubble, we call our “bubble-go” concept. When reading this concept, your QB should be reading the corner. If the corner gets flat footed or comes down hill, it’s an easy shot down the field to your outside receiver. If the corner bails, the bubble is wide open. It’s a simple post snap read that can produce big plays.

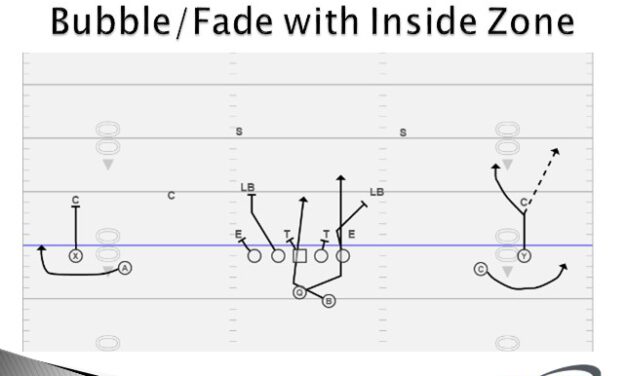
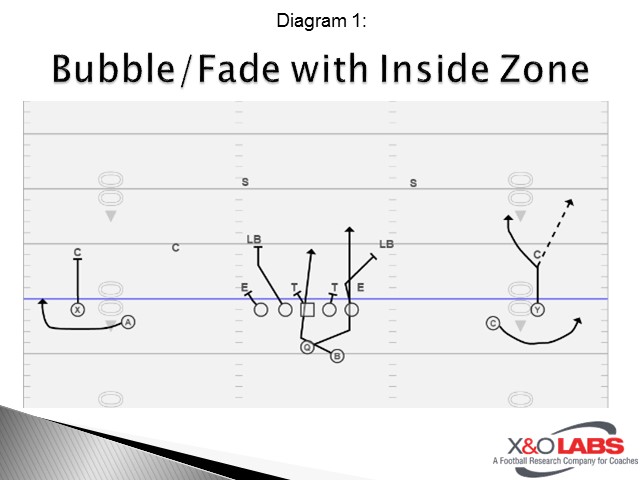
For us, bubble-go is the actual play call. We would call it “inside zone right bubble-go.” Everyone is running inside zone, with our RPO tag being a bubble and a go route. We show some variations on film with TEs that made us more variable and gave defenses more to prepare for when it came to our formations, most created big plays for us (20< yards).

You’ll see a couple of different variations on this concept on this video. There’s our traditional bubble fade out of 2×2, a variation out of double tight with arc motion and a tight end running a vertical, and a variation out of a single tight set with the tight end running the “bubble” as a speed out and the flanker going vertical. This is another play we run to counter the teams that fly to our RPO scheme and break their keys, usually for huge gainers. You wind up with four options (run, QB run, bubble, and fade) every play, although depending on the experience and skill level of the QB you may want to tell him it is an “always throw” play. We’ve had to coach it both ways depending on the QB.

To study game film of this concept, click on the video below:

Read More