306")


By Mike Kuchar
Senior Researcher/Co-Founder
X&O Labs
Twitter: @MikekKuchar
Now that we are all in-season, X&O Labs wanted to provide you with some quick answers to protect the top runs in your offensive menu. So, for the entire month of August we are rolling out our series on troubleshooting the run game. This week’s focus is on tight zone run schemes where we will present research on how offensive line coaches are solving the most common problems that impede tight zone runs including: blocking play side 2i or “heads” techniques, handling the backside B-gap combination block and building in alternatives to cut the C gap in split zone runs.
Problem 1: Blocking Play Side 2i Techniques
Solution: Changing Targets from Inside V to Outside Armpit Aiming Points
Source: Sanders Davis, offensive line coach, Rice University (TX)
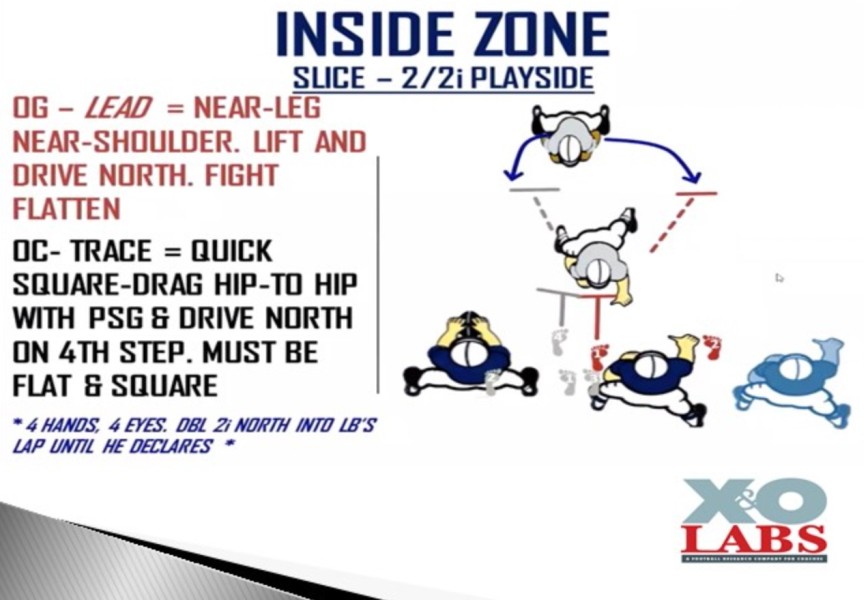
Like most conferences, the defenses in Conference USA have gone to using 2i technique defenders to hang on doubles at the point of attack. Running the scheme to the 2i has become a preferred choice for the staff at Rice because if you get that defender moved, you’re going to get as much guaranteed yardage as possible. The ball carrier just presses the combination and cuts it behind it. “We try to dent anything we can on the front side,” he told me. “It’s a vertical mindset. That happens vs. a 2i.”
One of the things that has helped Coach Davis teach those Centers is to teach him to “cross the T” of the play side shade, which means work to get to his outside armpit. It’s a different aiming point than the inside “V” taught for everyone else. The reason is, it helps the play side Guard to rock back on him and get the play dented. “We can’t inside target it because we get no stretch on him,” Coach Davis told me. “If you get your hat across, threatening his leverage and get him going sideways so now we deliver the down lineman to the rock back. Often times it’s a nasty hit.”
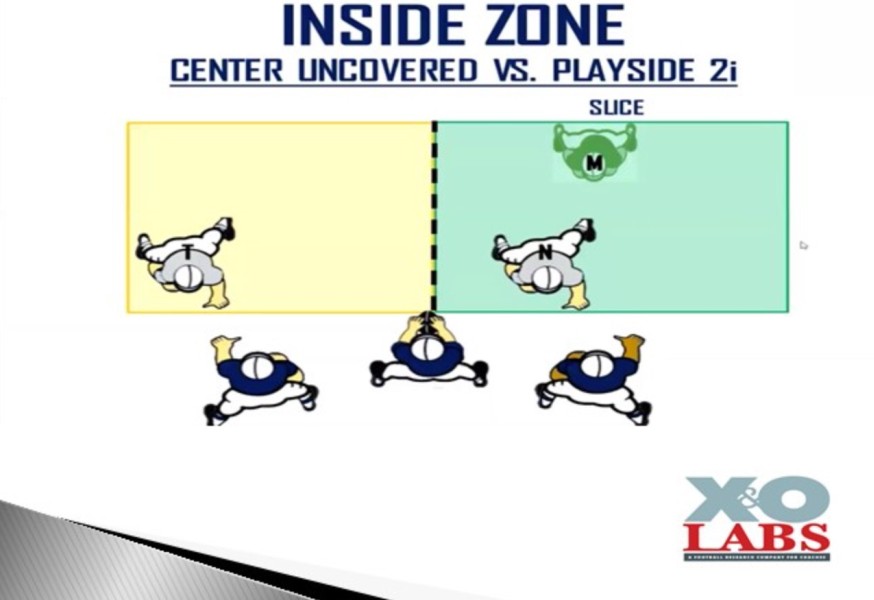
The Center is in a “trace” scenario working to execute a quick square drag technique to get hip to hip with play side Guard. It’s a vertical double until the second-level defender declares. The Guard is in a lead scenario with near leg and near shoulder contact. Against any lag technique by the 2i, he’ll get knocked back into the Center.
Problem 2: No Movement on Backside B Gap Combinations
Solution: Building in B-Gap Divides (Wham) Concepts
Source: Brian Gabriel, offensive line coach, Monmouth University (NJ)
But the increasing popularity of the Bear front has placed a great deal of pressure on the backside B gap combination block in tight zone runs. Often times, the backside Guard cannot find his way to backside linebacker because of a heavy 3-technique that can squeeze the combination block.
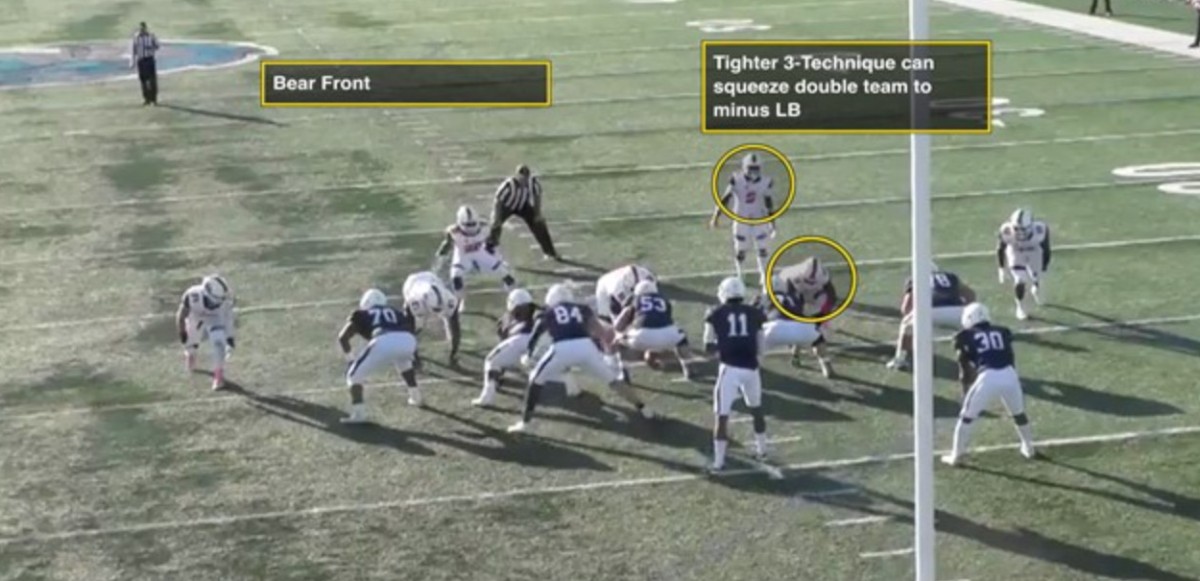
And the Bear front is a prevalent early down defense for good reasons- it draws double teams off zone and gap concepts in the run game and becomes nearly impossible to create movement along the run box. So, in order for offenses to get traction in the run game it becomes vital to split the front at the seams. And perhaps the best way to do so is by using some form of A gap divide principle, or better known as the “Wham” concept. While Monmouth University calls it “Able,” it has been a productive add for the Hawks this season, tallying a 7.6 yards per play efficiency.
The concept is built off tight zone by dividing the backside B gap or A-gap defender, rather than the C-gap defender most common in divide zone schemes. “We feel like we needed another way to divide the defense, rather than having the backside Tackle/Guard cut off the B gap,” said run game coordinator Brian Gabriel. “So, we divide at the 3-technique rather than the 5-technique. Some of the A gap divide worked us as well. We wanted to change the divide point from split flow zone and change who we’re cutting off, particularly against blocks we’re having trouble with.”
Concept Installation
Like most inside zone teams, Monmouth University uses three different concepts in its base A gap zone installation and has the ability to insert the tight end on the front side or on the backside of the concept based on the tag. Often times, it becomes a check at the line of scrimmage.
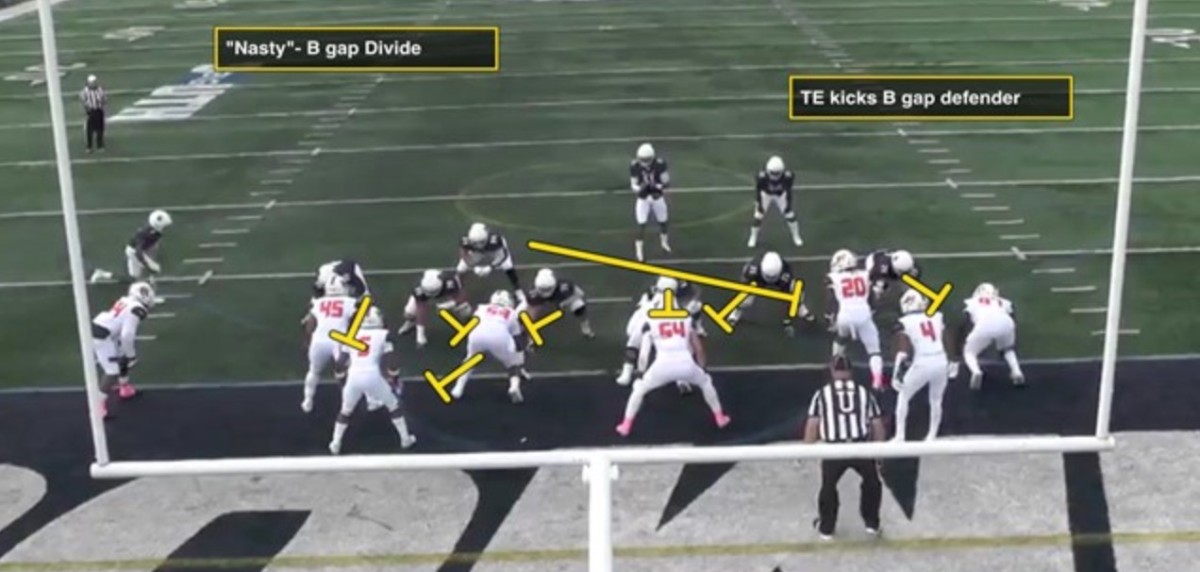
Below are three tags Monmouth uses off its tight zone scheme. In each of these concepts, the backside is locking or “fanning” away.
“Easy”: This is a C gap divide concept. Tight end would come across the ball and kick out C gap defender. This is the most common form of divide zone.
“Nasty”: This is a B gap divide concept where the Guard takes his best release to the minus linebacker and the tight end will block the 3-technique defender. “This became a bear check for us,” said Coach Gabriel. “We prefer it to the 3-technique because that is the best release for the Guard. Good against Bear and Under fronts with 4i techniques”
“Able”: This is an A gap divide concept where the tight end will block the A gap defender weak, which can be the Nose in Odd fronts. According to Coach Gabriel, it’s a solid fix if you can get a tell against Odd outfits that move the Nose post-snap, but may be more of a challenge against the two-gap technique Nose. “One of our opponents this season were crossing the Nose so the Center was disciplined enough to keep going play side and the tight end would block the Nose,” he said. Many defenses are not true Odd teams with movement so you can live with it. We tell the Center to block him like he’s coming to your gap. If he disappears go and the tight end will insert.”

Problem 3: H/Y Not Physical Enough to Kick C Gap on Split Zone
Solution: Building in Horizontal Reads off Tight Zone Action
Source: Braden Layer, offensive coordinator, Bowdoin College
When I got to Allegheny College as the offensive coordinator in 2017, our slot receiver was one of the most-feared athletes in the conference. A true burner, he possessed the ability to score any time he touched the football. Thus, his “influence” on a jet sweep was incredibly powerful. We found that by devoting a handful of plays each game to the jet action with the original goal of challenging the perimeter, we were in turn able to dramatically influence the box, specifically in the zone read game.
This became a great fit when we didn’t necessarily have a dominant H-back that could consistently handle DEs on zone/split zone, and our QB was limited in his keep ability on zone read. We needed a way to encourage a handoff while still feeling solid about our numbers and angles, and matching zone read with jet motion allowed us to do just that. We married two different components of our offense without installing any new techniques or major learning, keeping it simple.
Zone Read With Jet Motion
On this play, our quarterback oversees putting the slot in motion. He aims to snap the football when the S receiver hits the outside leg of the tackle for our jet motion. Because we want to encourage our receiver to reach the mesh as close to full speed as possible, he tracks the motion in more of a banana path. Flat to the outside leg of the tackle, then bellies to directly in front of the quarterback.
On the snap, the quarterback turns and reads the defensive end towards the side the S will finish his motion. There is no dummy fake or show to the motion-man. Again, with the threat of the S receiver getting outside and finding a perimeter running lane, we are hoping to influence the read key to widen on the snap. Should the defensive end crash, our S now becomes an extra alley blocker for the QB on any keep read (can handle a hard squeeze/scrape).
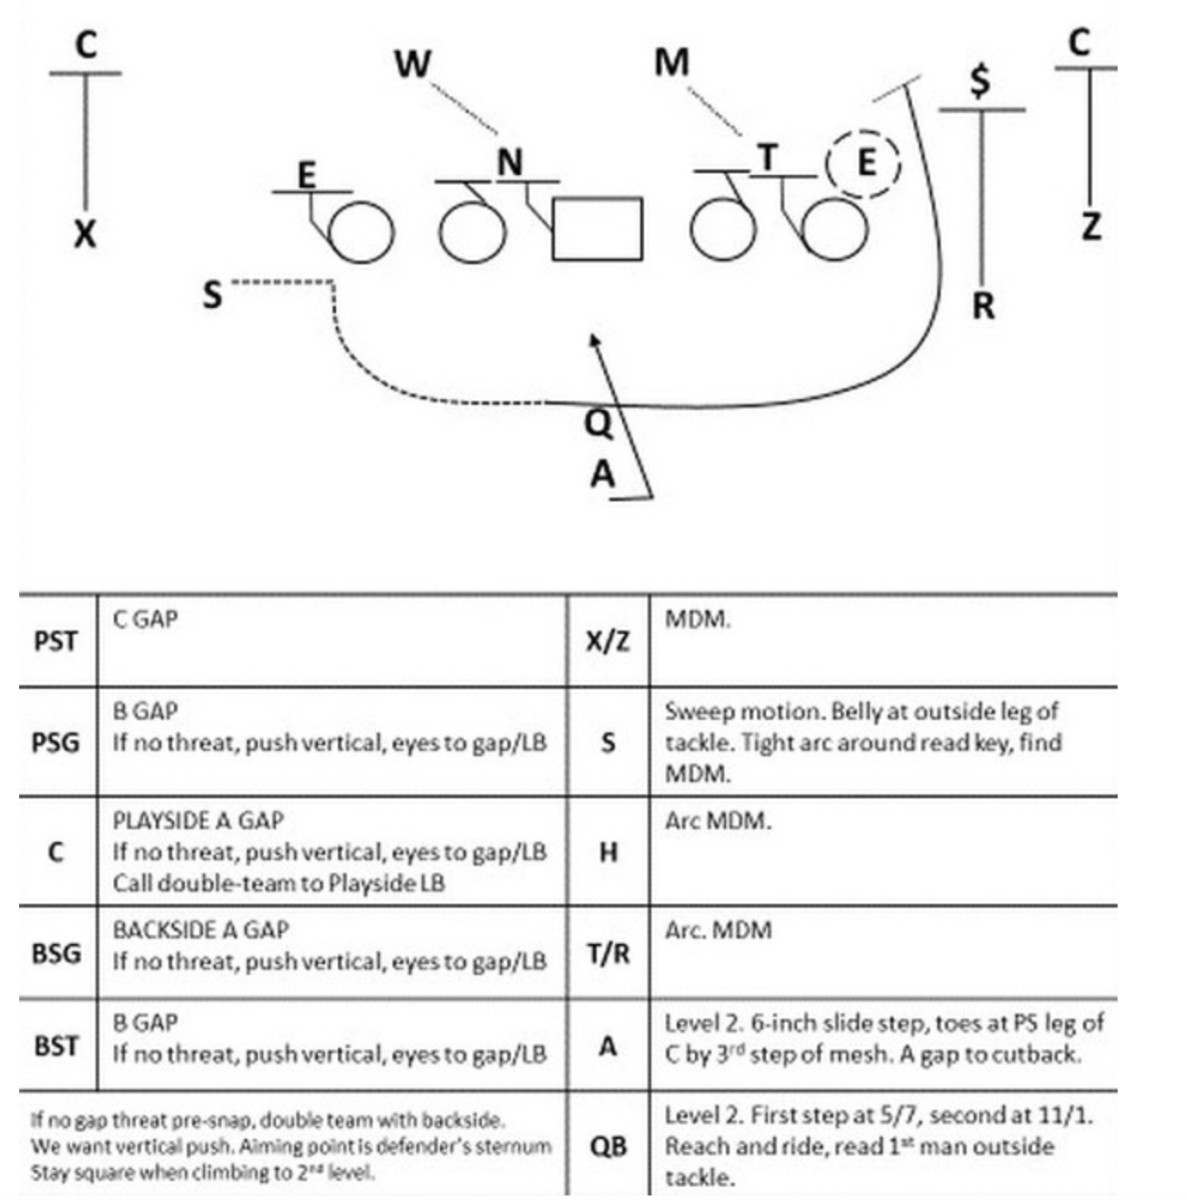
At Allegheny and now as the OC at Bowdoin, we have clear visual keys for what is a keep read for our QB. Another reason we love this zone variation is that is allows us to encourage the give read if we are not the most dynamic runners at the QB position. Unless the defensive end turns his shoulders to chase and reaches a landmark of the BSG on his crash, we aimed to give. Obviously, depending on the ability of your QB, this read changes for your offense.
The jet sweep threat allowed our tailback to feel VERY comfortable with his backside cutback. Our aiming point on the zone play is the playside leg of the center, and our tailback is taught to press the heels of the center, reading the A gap. If we have a solid double team and get vertical displacement, our tailback is free to bang the playside open gap. If he sees a muddy A gap and no vertical push, we teach a one-cut rule on his cutback. He is free to jump-cut and find the open gap all the way back to the C-gap defender.
With the jet motion, we are hopefully encouraging a much clearer C-gap for our tailback. If he doesn’t find playside A-gap to be open, he is naturally thinking “hit backside C.”
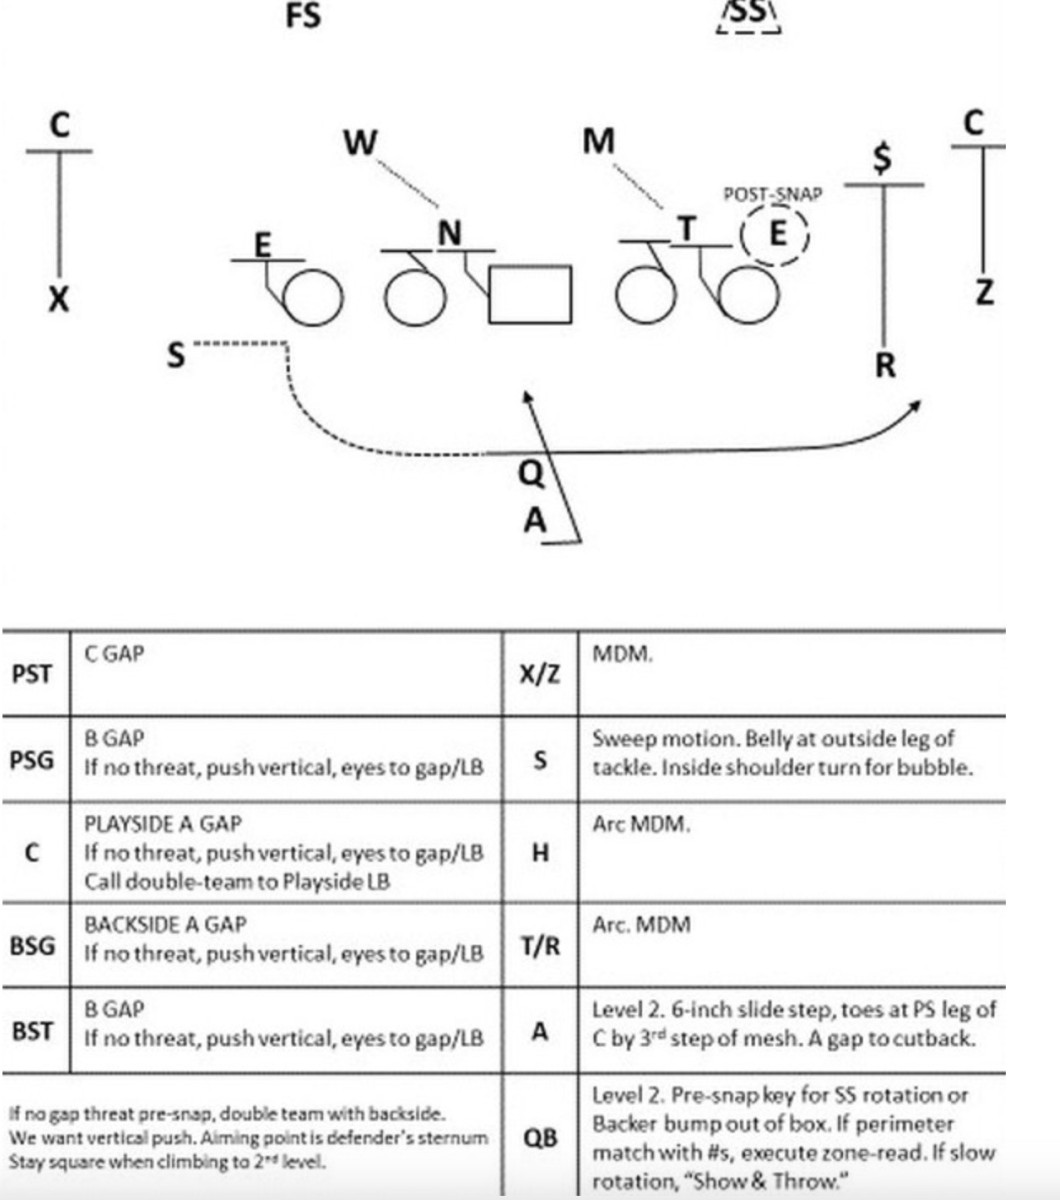
Adding Bubble
Changing the technique of the S on this zone-read variation post-snap has given us the option of now throwing bubble on the perimeter.
We added this for a few reasons. First, if the slot is our best player, we need to continue to find ways to get him the football, especially in space. Second, if teams are reluctant to rotate safeties down to get a perimeter match as they are continuing to load the box for the run component, it allows us to win with numbers. Last, it gives another potential option for our QB to be effective without having to RUN the ball.
The S is nothing but window dressing, as he is taught post-snap to bend tightly around the read key and look to pick up the most dangerous alley defender. In this bubble variation, the S will now continue right down the line on a horizontal path following the snap, looking over his inside shoulder. For our QB, instead of teaching a true triple-option progression, we teach it in line with our RPO calls. He has a pre-snap indicator, and a post-snap read.
Conclusion:
Want more? Access into The Labs, gets you full access to the following reports as well as raw and narrated game film on the same concepts: