306")


By Matt Kimmes (with Kyle Borland)
Offensive Coordinator/Quarterbacks Coach
DeForest High School (WI)
Twitter: @norskicoachk (@kblu54)
We utilize the Trap concept in our offense because of its quick-hitting nature and its flexibility regarding personnel. We are primarily a gap scheme/skip-pull team, so Trap gives the illusion of that while being a "rule-breaker" for us in terms of how we block it. There are also many ways to "dress it up" with motions, RPOs, triple-option looks, and by using the QB as the primary ball carrier. Double-wing, Wing T, and similar-based teams have been using Trap effectively for years, but we've adapted the same concept to our shotgun-based approach. First, let’s start with the basics of our shotgun Trap:
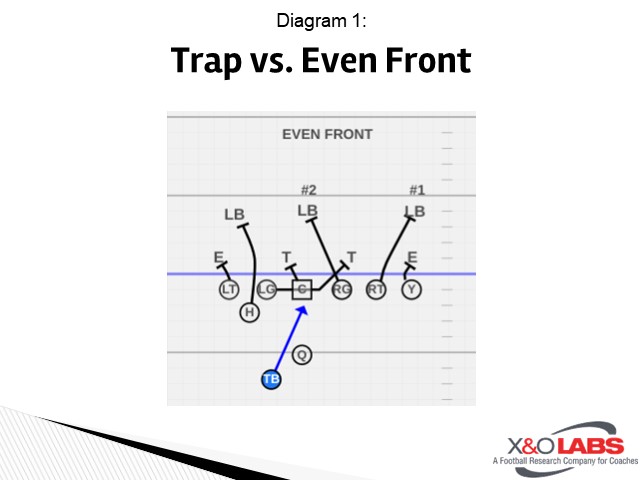
The main crux of the blocking scheme comes from the middle 3 linemen: both guards and the center. Essentially, they block each other’s first threat to give the appearance of a gap scheme but also leaving no reaction time for the defense. This first diagram is drawn up against an Even/4-down front with a 1-tech to the side of the TB and a 3-tech aligned away. This is the traditional “favorite” defense for Trap because it allows enough spacing for the blockers to hit their marks as well as keeping the TB on a normal track.
Starting with the center, he should down block to the backside DL which in this case would be the 1-tech. The play side guard should release up to the #2 linebacker, which is usually the Mike LB. These two blocks should create a crease in the play side A-gap and influence the unblocked 3-tech. The backside guard then takes a direct angle to perform the Trap block onto the play side DL and opens the A-gap for the TB. The TB should secure the handoff and aim directly upfield; it will look messy for a split second before a significant opening. Ideally, the TB should not take any lateral movement.
Since the crux of the blocking scheme is in the middle, that allows a lot of variation for the rest of the scheme as well as flexibility for personnel and tags. In the first diagram above, the play side tackle releases up to the #1 linebacker and the tight end (Y) base blocks on the edge defender. On the backside, our fullback (H) will release up to the #3 linebacker and the backside tackle will base block the edge defender. It can simply be explained as a “first threat” scheme for the periphery blockers. In some offenses, Trap requires both tackles to immediately release to their nearest linebacker, as the next diagram shows:
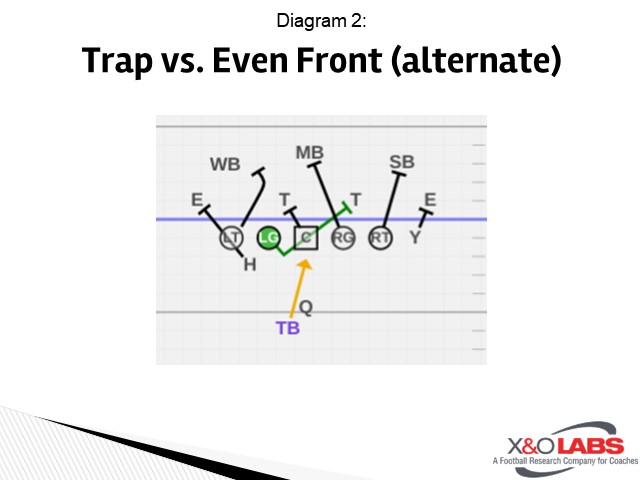
Here, the backside tackle releases up to the #3 linebacker, mirroring his tackle counterpart. This then allows the H to perform a more natural block on the backside edge. This might be an easier variation to teach as both tackles are now doing the same thing, as well as opening Read variations in different personnel sets. For example, you can put a "Read" tag on the play, out of 11 personnel and leave the backside edge to determine to give/keep for the QB:
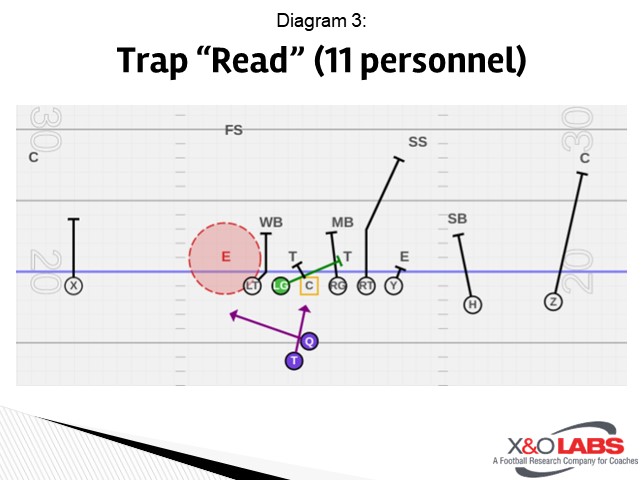
If the middle 3 linemen perform their blocks and the ball carrier remains on a tight inside track, you can break off a big play before the defense can properly react or run fit.