306")

By Mike Kuchar
Senior Researcher/Co-Founder
X&O Labs
Twitter: @MikekKuchar
Now that we are all in-season, X&O Labs wanted to provide you with some quick answers to protect the top runs in your offensive menu. So, for the entire month of August we are rolling out our series on troubleshooting the run game. This week’s focus is on gap run schemes (such as power and G/Y counter) where we will present research on how offensive line coaches are solving the most common problems that impede gap runs including backside guard’s being too wide on entry points, Center’s struggling with the back block on penetrating Nose Guards, Fullbacks being too soft on kick out blocks, defenses triggering off Y movement in off-line counter schemes and first level defenders presenting edge pressure from the backside and running down the mesh.
Problem 1: Second-Level Defenders Triggering off the Y in G/Y Counter
Solution: Grounded Tight End Pulls
Source: Keegan Kennedy, offensive line coach, Harvard University
Like many offenses, Harvard relied on using more detached (Y-Off) roles for its tight on gap schemes. But during his off-season study this winter, offensive line coach Keegan Kennedy realized how much defenses were relying on keying that Y-off to rock back and fit split zone and counter schemes. So, he spent the majority of spring ball teaching the Y to pull from a grounded or attached position and found that defenses were rarely keyed in to him when he was on the line of scrimmage. “We find it to be a great advantage,” coach Kennedy told me. “ We wound up loving to pull the tight end from an on the ball alignment. Our tight ends are super athletic but they have to be good enough to run things in the box.”
Grounded Puller Coaching Points:
Coach Kennedy teaches the Y when he’s on the ball to open at 90 degrees and get in phase with the first puller. Because he’s a grounded tight end, he’s already in the ideal alignment of being 1×1 off backside Tackle so he doesn’t need to get any depth.

Coach Kennedy teaches the grounded tight end to key the inside hip of the Guard. If the end of line of scrimmage defender boxes the play, the tight end fits inside of him.
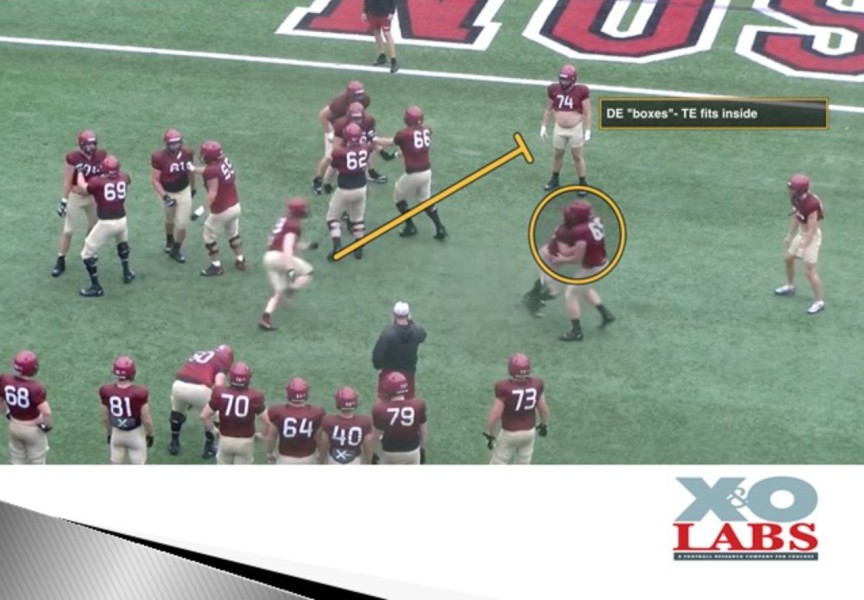
If the defender spills it, the tight end needs to get around it. Coach Kennedy talks about that hip being vertical, which alerts him to get around.
Problem 2: First-Level Defenders Running Down Mesh
Solution: Pistol Backside Mesh
Source: Ryan Olson, offensive line coach, South Dakota State University
Pistol Backside Mesh:
There are some alignment nuances that the Jackrabbits use to gain maximum efficiency on the concept. One of those variants is teaching a backside mesh from Pistol alignments. According to Coach Olson, the purpose is to provide a control mechanism any defenders able to run the play down from the backside.
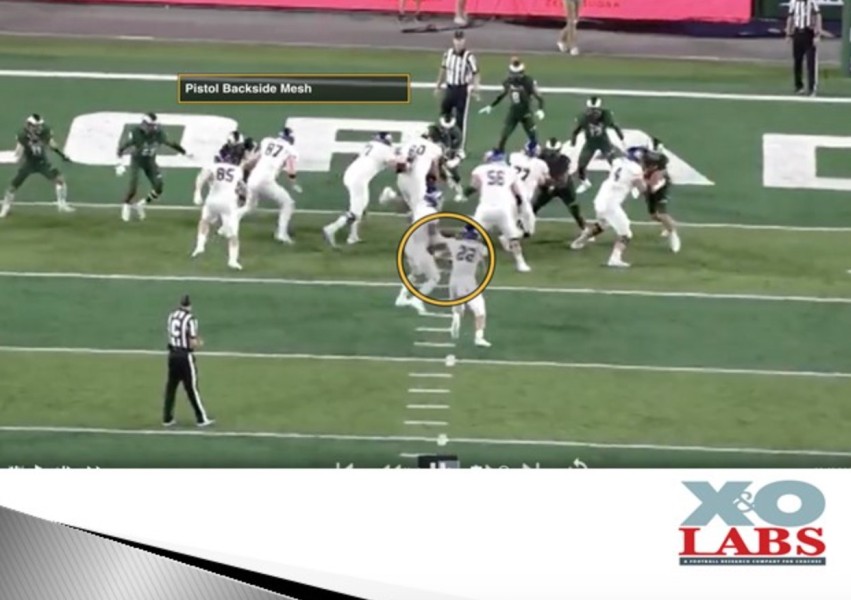
The QB is taught to get off the midline and he’s responsible for clearing the way for the back. The running back is responsible for the mesh, while the quarterback’s eyes go to the backside C area. Wherever the QB sticks the ball it’s him to makes the adjustment. The quarterback is responsible for the D gap defender, so he is given the option of pulling the ball if there is smoke off the edge or the backside Tackle doesn’t do a good job on the hinge.
According to Coach Olson, the change in mesh has been really good in handling any backside issues. “When you have weak side linebacker’s walk up backside he’s usually accounted for in the count so you need a hat for him,” said Coach Olson. “In the past we would just pull it if he came off the edge. But the defense can have numbers if there is a safety over there. Or, you can put a tight end on the backside but you need to change the formation and be in different personnel groups. This is easiest and affects the least amount of people.”
RB Aiming Point:
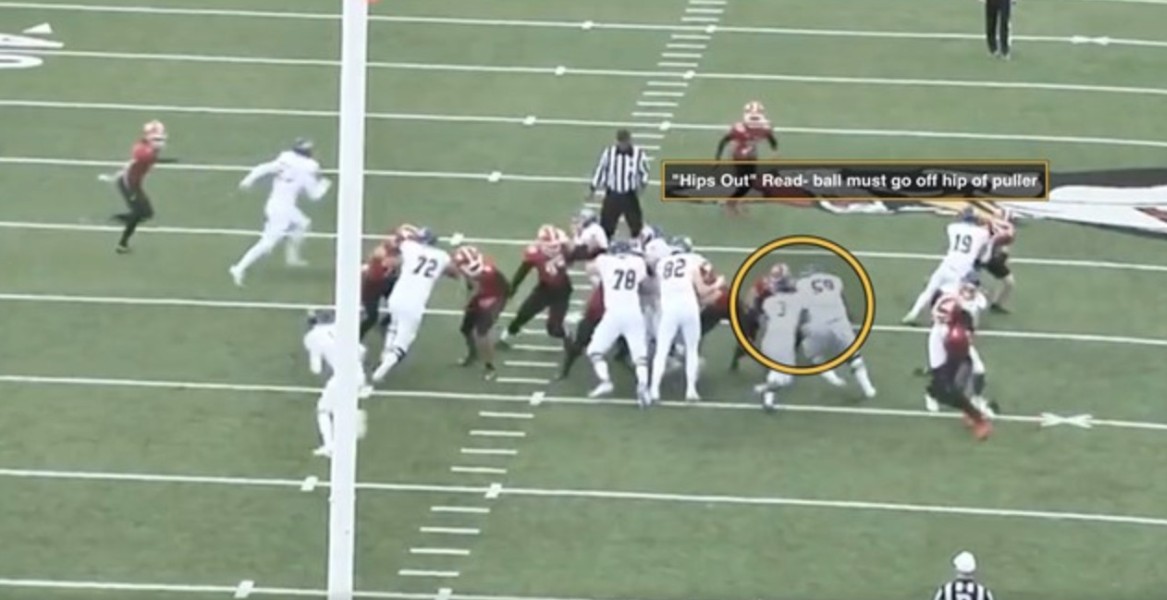
The ball carrier is taught to be 1×1 off the inside hip of the puller (backside guard). Coach Olson teaches a “hips in” or “hips out” progression reading the block of the puller.
“Hips Out”- Puller’s ass is in the hole ball should stay inside the puller.
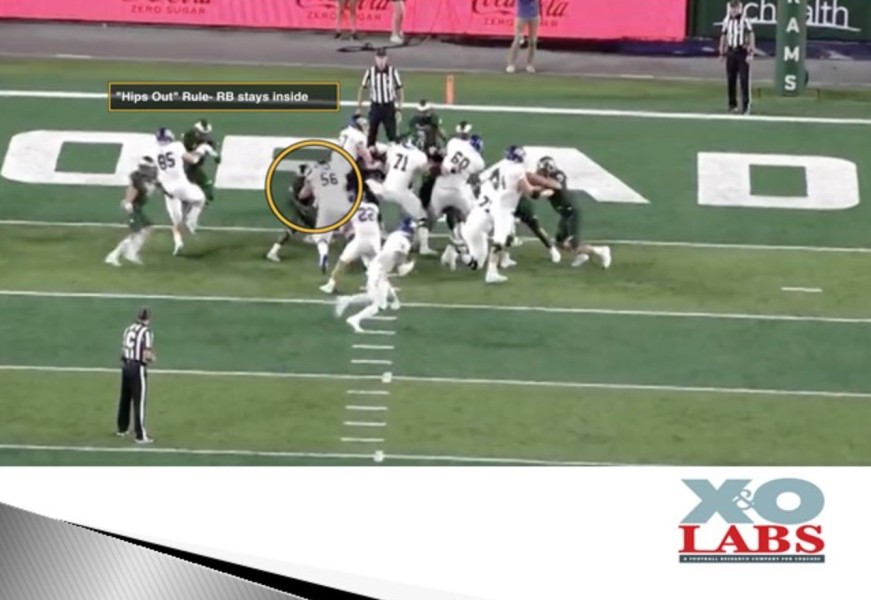
“Hips In”- If the puller skates it or he has to log it the running back has to go tight off the ass of the puller.
So, while the power concept is taught as an A gap concept, the ball carrier will often bounce the ball based on the read of the block. “We’ve never seen the ball hit in the A gap, particularly against an Over front if we’re getting the right movement on the combination,” said Coach Olson. “There is too much static in there so it becomes more of a B gap out insert point. It may look like it’s in the A gap because we are getting vertical movement. We’ve never talked about feeling flow of the backer. So many defenses come over the top of down blocks. So, now we tell them to check the backside A gap. If that Nose pops over the Center, we may want to hit them against fast flow teams.”
Problem 3: Center Backblock on Penetrating 3 Technique
Solution: Shuffle Technique by Center
Source: Arthur Ray, Jr., offensive line coach, Northwood University (MI)
Center Down Block Technique:
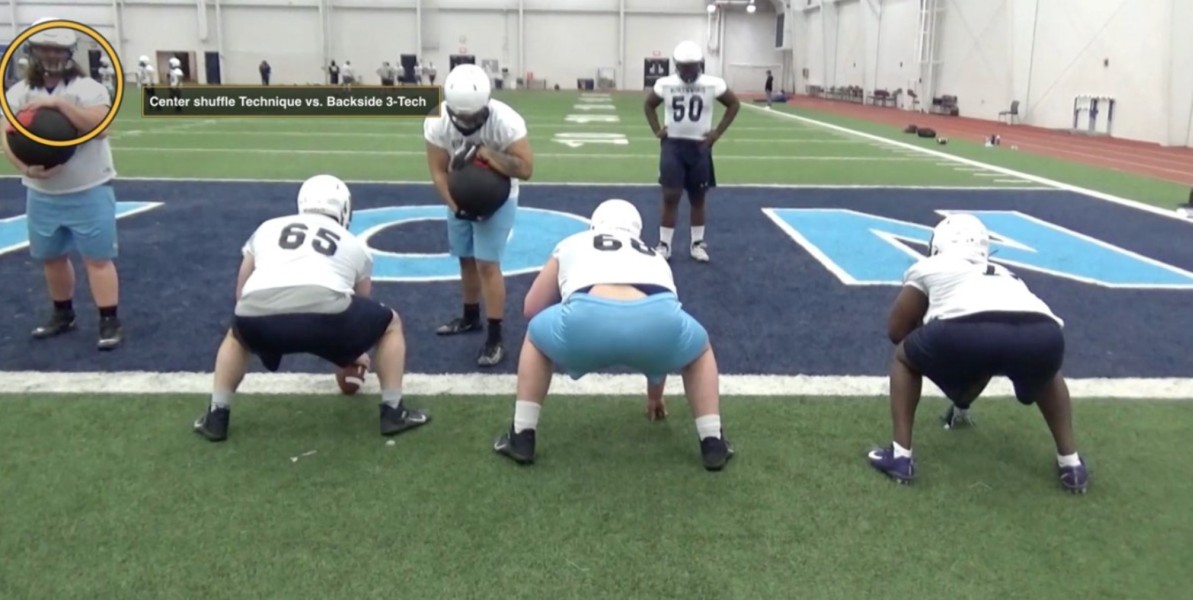
When we have a shade Nose he gains ground with the first step aiming point is V of the Neck. I want an inside hand on the defender’s frontside number and a backside hand on the defender’s side/back to prevent the defender from crossing his face.
Shuffle Technique with backside 3-tech remain flat do not gain ground in case of 3-tech hard charges upfield. The Backside Tackle should prevent penetration, so you are on track to take over!
Problem 4: Fullbacks Lunging and Whiffing on Kickout Blocks
Solution: Using the Gallop Technique for Fullbacks
Source: Danny Schaechter, offensive coordinator, Gonzaga College High School (DC)
Like many other coaches, when it came to fullback, we had coaching points: contact near foot, near shoulder, and explode low to high. We’d been giving those fundamental points to our fullbacks for years, and it had been fairly successful, but there were still issues with fullbacks on our kick-out blocks lunging and whiffing, being driven back into the play, and/or playing too high. This is because coaching points are not the same as technique. After asking a lot of college coaches, including Power 5 coaches who were known for physical fullback play, this was the common answer: we just find someone who can do it. Many high school coaches don’t have that option. Through the search for an actual technique to a kick-out block, our staff had an idea that stole from the biggest fullbacks on the team, the offensive line. For us, this was the birth of the fullback gallop technique for kick-out blocks.
The Gallop
Once again, this technique is borrowed from the offensive line’s gallop technique used by the drive man on double teams.
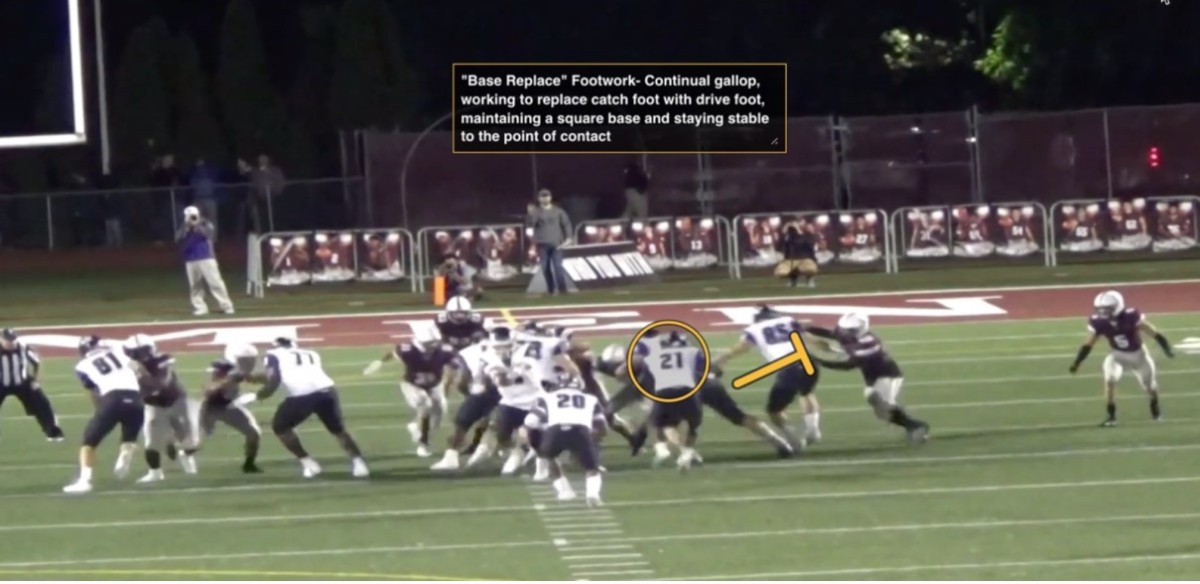
The technique is truly not complicated, and our fullbacks picked it up quickly. The fullback will drive from his opposite foot of the kick-out block. This means if the kick-out is to the right, the fullback will be driving from his left foot. If it were to the left, he’d be driving from his right foot. We refer to the gallop with his feet as “base replace.” This means the fullback is continually galloping, working to replace his catch foot, the foot nearest the defender he is kicking out, with his drive foot, allowing him to maintain a base and stay stable to the point of contact. Also, this delivers the first coaching point we give on the kick-out: near foot/near shoulder. Furthermore, the fullback will keep three-joint flexion in his ankles, knees, and hips while staying square to the line of scrimmage. This accomplishes the coaching point of exploding low to high when contact is made. More so, this helps us tremendously against teams who spill/wrong arm kick-out blocks. For the upper body, we teach our fullbacks to contact with the near shoulder and use a flipper. The inside arm can be used after contact, but we tell them that it’s insurance to maintain contact and strain. When the inside arm is used, we are trying to contact the defender’s inside hip, which gives the fullback the chance to control the defender’s body.
We taught our fullbacks to step with the backside leg when in the I formation on a kick-out block (note: this is what we taught before the gallop technique since our fullbacks would open instead of staying square, but we don’t think it will be necessary moving forward with the gallop technique). Then, he steps with his next foot which gets him in a good base. After the fullback gets into his initial base, he takes one gallop, driving from his left foot, which the endzone shot shows a great example of this “base replace” footwork.
Problem 5: Backside Guard Too Fast on Skip Pull
Solution: BSG Shuffle Pull Technique
Source: Bill O’Boyle, offensive line coach, University of Colorado
Shuffle “Slow” Pull Technique:
Coach O’Boyle credits learning the slow pull from former offensive line coach Reese Morgan from Iowa. It started with the concept of pullers keeping shoulders squared on second level blocks. While he started teaching the skip pull, he quickly released that the skip pull takes up too much depth and provides hesitation. At Kent State, the slow pull is taught universally to the following players in run schemes:
- Backside Guard in Power
- Backside Tackle in G/T Counter
- Backside Y (or big slot in Kent State’s scheme in G/Y Counter
- Backside or Playside Y (or big slot in Kent State’s scheme in Insert Zone
As these slow pullers are working into the line of scrimmage, they are searching out the linebacker right now and determining who is going to be in A gap. “We don’t chase linebackers,” Coach O’Boyle told me. “If my backer triggers, I need to block that immediately and the A gap will be pried open. We insert faster through the A gap with the shuffle pull. Here the pullers shoulders are square, his base is right when he makes contact because he’s not crossing over or coming in sideways where the linebacker can spill him.”
The coaching points for the shuffle pull are divided into three fundamentals:
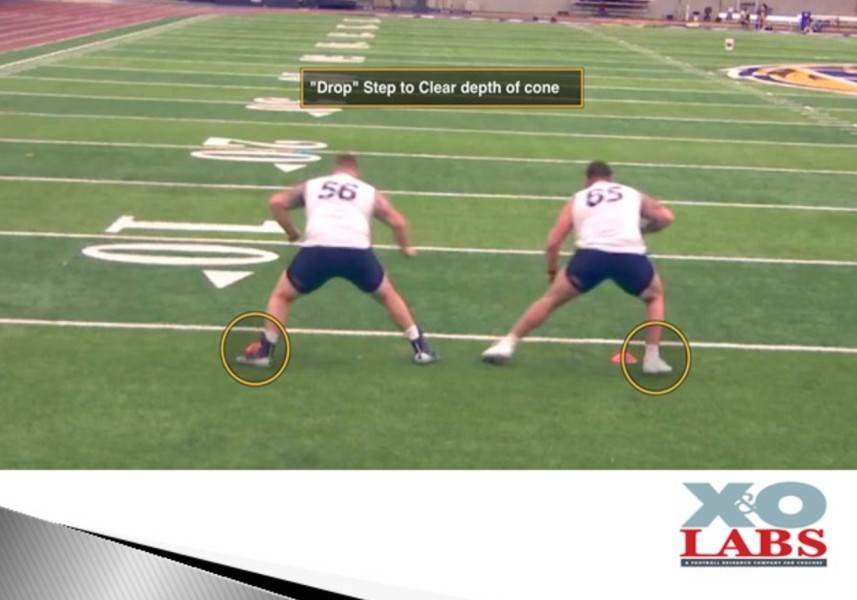
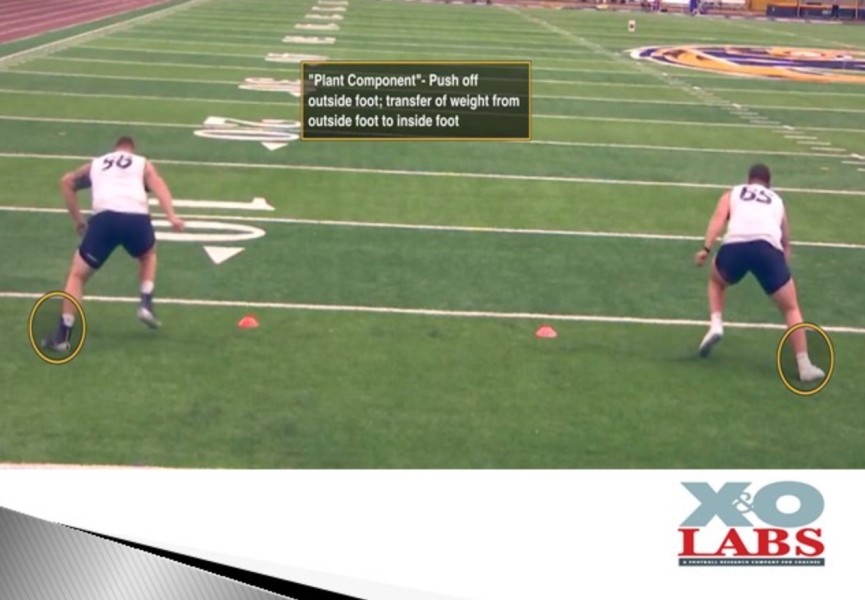
- Shuffle– The first step must be a drop step to clear the down block or back block of Center. It’s essentially a kick step to lose ground. Coach O’Boyle teaches this component of the technique by using a cone to teach depth.
- Plant– Here the puller works to transfer his weight from his outside foot to his inside foot before inserting into the line of scrimmage. This helps to get power underneath them in preparation for the Gorilla touch strike point below.
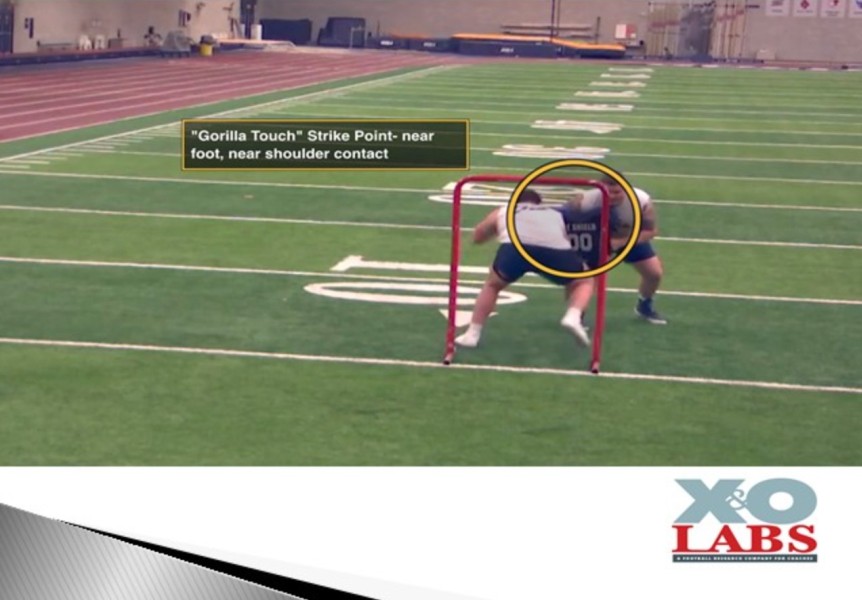
- Insert– When the puller inserts into the line of scrimmage, he’s taught to execute what Coach O’Boyle calls a “Gorilla touch” which emphasizes a low to high, near foot/near shoulder strike point. “Our coaching point is to touch the ground,” said Coach O’Boyle.
Conclusion:
Want more? Access into The Labs, gets you full access to the following reports as well as raw and narrated game film on the same concepts: