306")


By Casey Miller
Offensive Coordinator
Herriman High School (UT)
Twitter: @cqmiller4
Introduction:
In any run-oriented offense, defenses will load the box with an 8th defender to help stop the run game. There are a few offensive strategies you can utilize to combat this defensive tactic and still be able to stick to your offensive philosophy of being a physical running team. There are five ways we try to do this, and we always build them into the gameplan at Herriman High School. Depending on what the defensive coordinator does to adjust to our base run game, we can move to any of them at any point in the game to counter-adjust.
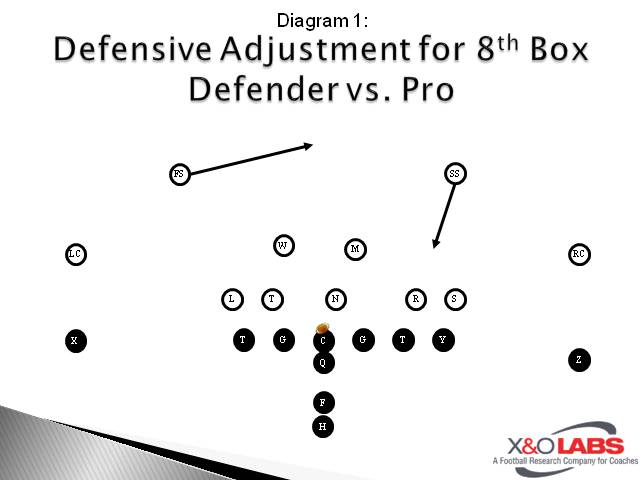
Loaded Box Solution #1: Remove the 8th Defender from the Box
Most teams who face a run-heavy team will drop a safety down into the box to get an 8th defender in the box. For any stack-defenses (3-3-5, 3-5-3, 4-2-5, 4-4), it usually means the overhangs come up and play really tight, or they come all the way up on the line of scrimmage and come off the edge. For traditional 4-3 and 3-4 teams, this is usually dropping the “strong safety” down into the box on the multiple receiver side. By using formations with both WRs on the same side, most teams will put the strong safety on the side with both WRs, and he will have to leave the box to account for the slot receiver. In the box, this keeps the offense with the same run formation they always have, but it removes the 8th defender from the box because he has to widen out to the 2-WR side to continue to play zone coverage. You have now turned the 8 man box into a 7 man box, or at the very least, you are now running the ball at a corner that now has to be the primary run support on the TE side.

To study game film on how Coach Miller removes the 8th defender from the box, click on the video below:
Editor’s Note: Coach Miller provides the following coaching points for each of the following clips below:
Vid #01 – Remove Defender
- 1st Play = This is a 3-4 team that rolled their strong safety (#41) down into the box if the offense lined up in a pro formation. If the offense lines up in a slot formation, the SS moves to the weakside and must APEX out of the box leaving a 7-man box to defend the run. We wanted to run power to the TE side this week, so we were able to remove the extra box defender by lining up in a slot formation.
- 2nd Play = This is against the same opponent as the previous play. We run Iso on this one, but it gives an example of how we give our running back a 2-way-go with our backside blocking. The weakside guard and tackle both block out and the double-team on the nose will stay on the nose if the backside LB goes over the top. If the RB sees the FB is going to get the outside shoulder of the Iso-LB, he stays to the playside and the backside LB can’t get to him because of the FB block. If the Iso-LB keeps his outside-arm-free, the RB will cut into the A-gap not occupied by the backside LB. If the LB gets to the playside, the RB will cut off the backside of the double team, but if the LB stays backside, the RB will just hit the playside A-gap and get to the 3rd level of the defense. On this particular play, the FB gets the outside shoulder so the back stays on the playside and picks up about 10 yards.
- 3rd Play = This is a 4-3 team that would get their quarters safeties close to the LOS vs. a pro formation, but in a slot formation with the threat of 2 vertical routes to the same side, they would back the safety to that side off the ball. This gave us an opportunity to run the ball to the weakside away from their run defenders on the TE side.
- 4th Play = This is the same opponent as the previous play. We caught their LBs filling inside very quickly so we removed the safety from the box and ran stretch back to the slot side.
- 5th Play = This is our rival school that plays a 3-4 and has coverage-rules based on the offensive formation. Slot formation will again move their strong safety over to the slot side, which allows us to run back to the TE side without a force player to help the box-defenders until the FS. The corner and FS end up combining to bring down the RB, but it is 10 yards downfield. Just as the Iso play earlier, the back knows the FB will get the playside shoulder of the LB so he stays to the playside and hits the hole.
- 6th Play = Same concept and same play as the clip before. We ran this play from this formation over 20 times in the 2nd half in this game. Turned a 3-point deficit at half into a large margin of victory by the end of the game
- 7th Play = Same team, same concept, but this time the back sees the FB isn’t going to seal the Iso-LB, so he cuts back to the backside and slips thru the gap opened up backside.
- 8th Play = Same team, same concept, but this time we ran it to the TE side because the defense had adjusted their defense to prevent us from running the weakside Iso play. Back knows the seal will happen, so he just stays playside and he has no force until he hits 3rd level
- 9th Play = We get caught running this play to the side the defense has their extra defender to the playside, but the RB recognizes presnap that there is no backside LB, so he is going to cut backside the entire way. The force filling outside-in never has a chance to get there so we end up with a big gain.
- 10th Play = In our 2nd round playoff game, we faced a 4-4 team that had 8 in the box