306")

By Steve Erxleben
Defensive Coordinator
South River High School (MD)
Introduction:
The ability to utilize Fire Zone Blitz concepts on any down and distance allows a defense to be multiple and defend numerous formations and blocking schemes without checking out of most calls. In our league, each of our opponents present diverse formations, motions, run schemes, pass protections, and pass combinations out of a variety of personnel packages and tempos. As a defensive staff, we feel being a heavy zone pressure team gives us an opportunity to dictate the game and concern ourselves more with what we are running versus having to have a litany of checks per formation, motion, personnel, etc.
As a 76% blitz team, we primarily use a 3 under 3 deep coverage scheme behind our zone blitzes. We feel it is the most important part of our blitz scheme in that it allows us to blitz while focusing on eliminating big plays and dictating how the ball will be leveraged from the outside-in as well as creating turnovers to get the ball back to the offense. Unfortunately, a 3 under/3 deep scheme is sometimes referred to as a “cheat” coverage because it is relatively unsound in the immediate flat areas, the deep seam, and in the middle of the field between 15 and 20 yards. We stress match up principles in our fire zones and getting our eyes eventually back to the QB to give our back 6 defenders a fighting chance if the ball is thrown. We believe that defending route combinations and not grass eliminates some of the “hot” throws that we have to rally to. It also ultimately improves the effects of our pressure schemes and eventually the success of the offense. Having a vertical line rule, like in quarters schemes, rerouting and physically delivering receivers, and the communication between the hole player, seam players, and corners are everyday skills we stress to strengthen our fire zone coverage.
Base Front/Secondary Calls
In our base defense, we will set our front either to the field or the boundary, to or away from the multiple receiver side, to or away from the TE, or to or away from the back in the shot gun. Where we are setting the front is a weekly game plan decision. Every snap we make either a “Roger” or “Louie” call which dictates where the 4th rusher is coming from and, if we are in a 3 deep situation, where safety support is spinning. Our interior linemen always slant away from the front call (Roger/Louie) as the 4th rusher (our call side OLB) becomes the C gap player/5 technique call side. The reduction side call correlates with a coverage call to establish who the force player is to the reduction side as well as who the seam player will be. All of our same-side ILB/OLB or “edge” blitzes correlate with a Roger or Louie call, which we feel makes it easier for our players to identify and gives them a chance to focus more on disguise and triggering the blitz from a proper depth and angle.
We align in a 2-high shell with our safeties leveraging #2 to their side at 10 yards and our corners aligned 2 yards deep and on the inside eye of #1 every down. Before or after every snap, depending on the alignment of #2 and the game plan for the week, we will roll our secondary and bail our corners to create a 1 high MOF when we get into our odd or MOF-closed coverages.
We feel that pre-snap movement is key to effecting the calls and execution of the protection. It also has an effect on the decision making of the QB if he is in a situation of having to find some sort of hot read in a limited amount of time. We like the spinning and bailing of our Secondary in a no-huddle or tempo situation because it could eventually effect a check from the sideline and a possible delay of game, unwanted timeout, or lack of execution by the 11 players on offense. Additionally, all of our pre-snap movement helps our players play faster due to they are not sitting “static” and are ready to trigger as soon as the play develops.
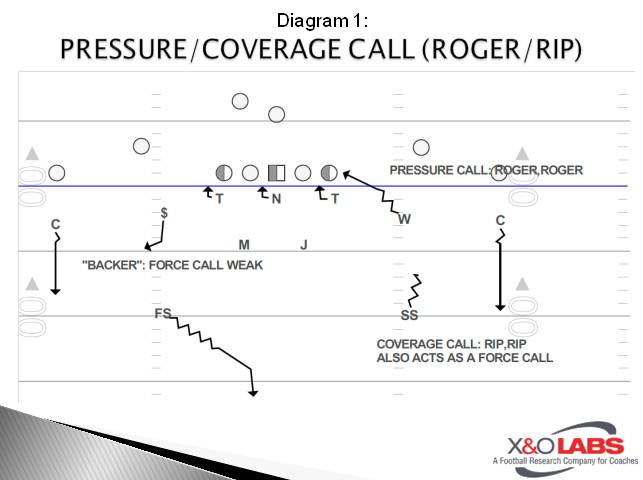
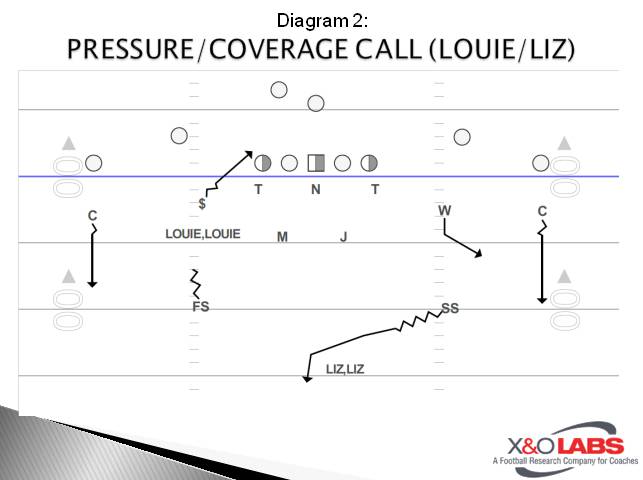
If we roll our coverage and set the reduction and down safety right we will echo the “Roger” call from the front with a “Rip” call (Diagram 1). This tells the front that the safety aligned to the right will be rolling or “spinning” to the right and is now the force player and Seam Player to that side. If the front is setting the reduction the left, we echo the “Louie” call with a “Liz” call to set the force player/seam player to the left (Diagram 2). We feel like making 2 calls gets everybody talking and communicating so that we have gap integrity and the 3 underneath defenders are aware of who is playing what.
Base 3 Under/3 Deep Zone Structure
As was stated earlier in the article, a 3 under/3 deep zone structure is what is sometimes referred to as a “cheat” coverage due to the fact the 3 underneath droppers are responsible for more than 1 underneath zone. In effect, we are “cheating” players either inside or out to play more zones than we have players for. For sake of argument, we do split the field into zones however within our match up principles, we do not spot drop into these areas, which will be discussed later in the article.
We assign our 3 underneath droppers to three underneath zones (Diagrams 3-4). Our two seam droppers are assigned the curl/flat areas that stretch from just inside the hash, roughly 2 yards, all the way to the sidelines at a depth of 12-15 yards. Our hole player is assigned the immediate hook to hole area favoring the side and release of #3 at a depth of 12-15 yards. Any route under 5 yards is in what we call “no cover” which means we will leverage and only jump when the ball is thrown.