306")


By Steve Erxleben
Defensive Coordinator
South River High School (MD)
Twitter: @CoachErxleben
In today’s modern challenge of defending offenses that feature multiple formations made up of multiple personnel groupings with multiple forms of tempo, defensive schemes have to be sophisticated enough to challenge the run, pass, and protection schemes while also be simple enough to allow players to play fast. As a defensive staff here at South River High School, we decided years ago to transition from more of a base front and coverage team to a scheme rooted in zone pressure and match-carry-deliver principles on the backend.
This past season in 2019, out of 666 plays in 11 games, we zone pressured 72.8% of the time in multiple down and distance, personnel, and +/- situations out of multiple fronts, pre-snap movements, and coverages. Of those 666 plays, 172 were 10 personnel 3x1 with 121 of those plays being passes. As a defense vs 3x1, we had a 41% completion rate (50 of 121) and registered 17 of our 47 sacks as a defense.
Within our culture defensively and as a staff, we believe with the personnel we have and the style offenses within our league, hanging our hat on zone pressure allows our scheme to be balanced, have specific force and alley rules, has a reduced amount of checks, is highly adjustable, and allows us to prevent explosive plays, all allowing our players to play fast.
Over the past few seasons teams, especially in passing situations, have used 3x1 formations to out-leverage, out-formation, and establish situations where we have a conflict defender in an RPO read to attempt to get us to abort our pressure patterns and play a max coverage. To combat this, we have had to make some adjustments and checks to how we come after 3x1 formations without losing our pressure identity, especially in passing situations.
When defending a shotgun offense, the initial question most coaching staffs have is will they set the front or in some cases bring pressure to or away from the back. The same can be said for trips in that a decision has to be made in a “blitz the formation” situation, will you blitz trips or bring pressure away? Our philosophy is to major in both pressures to and away from trips without losing our ability to send 5 in the blitz pattern.
3x1 Thought Process:
Before deciding on what pressure schemes and 3x1 adjustments from a coverage aspect best fit what an opponent is running out of 3x1, it is important to consider some of the following items. Obviously, all of these are basics when scouting an opponent and there are probably others dependent upon the opponent but for the sake of argument, it does have an impact on the eventual schemes run versus any opponent:
What personnel grouping is making up 3x1 (10, 11, 12, etc.)?
For this article, we will focus on more of a traditional 3x1 made up of 10 personnel but it is warranted to address TE trips, Trips bunch, Trips Inverted (Trio) and if in some sort of 20 personnel grouping is the H back close enough in either a wing or sniffer situation to be considered truly #3
What is the alignment of the Back?
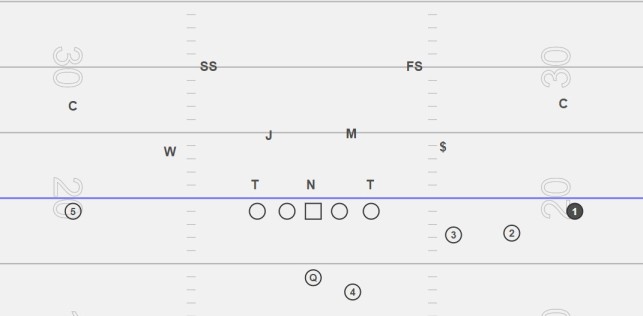
When we look at 3x1 or any formation where the RB is in the shotgun our terminology has always been if the RB is to the side of trips making him #4 strong we have coded that as a ”Near” formation, so, for example, we would label the below formations “Trips Gun Near” (DIAGRAM 1).
If the Back were to be away from trips and be #2 weak, we would refer to that formation as “Far”. (DIAGRAM 2)
Also, from a run and pass protection perspective, the depth of the back, whether even, aligned 1x1, aligned wide and in front or any other alignments can be a pre-snap tell of pocket movement, play-action, or protection aspects. In both Diagrams 3 and 4, the RB is in what we call an “UP” alignment, which usually is a pre-snap tendency for either outside zone, power read or some sort of RPO or play-action off either run action.
1) Is the Formation Open or closed on the backside and if it is open, what is the spacing of #1 weak when in the MOF?
Obviously, if #1 is attached and is the EMOL, dependent upon where the ball is either hash, MOF or if there is a Formation into the boundary situation and #1 weak is to the field, most defenses would feel comfortable playing some sort of man principle on the backside and flooding the trips side with a 5 over 3 or 4 over 3 situation. Another thing to consider is the width of #1 if he detached. We have a divider rule using the numbers in our regular Rip/Liz match concept against a 2x2 formation with regards to leverage and apply that rule to the split of #1 weak. Also, who #1 is (is he their best 1 on 1 receiver, etc.) can factor into this as well.
2) What is the split of #2 and #3 and their relationship to #1?
In 3x1 #1 strong usually, by a general tendency we have found, gets the ball the least due to the distance away from the QB so the split of #2 and #3 in terms of inside, outside, or vertical routes they may be running can have an effect on where pressure is coming from due to how long the QB is designed to hold the ball in terms of quick game, 5 step, screen, RPO, play-action, etc.
In general, after opponent film study and evaluation of defensive personnel, it can be determined, with some of the information from above, what pressures and coverages will be run when blitzing INTO trips and what pressures and coverages will be run when blitzing AWAY FROM trips.
Defensive Coordinator
South River High School (MD)
Twitter: @CoachErxleben
In today’s modern challenge of defending offenses that feature multiple formations made up of multiple personnel groupings with multiple forms of tempo, defensive schemes have to be sophisticated enough to challenge the run, pass, and protection schemes while also be simple enough to allow players to play fast. As a defensive staff here at South River High School, we decided years ago to transition from more of a base front and coverage team to a scheme rooted in zone pressure and match-carry-deliver principles on the backend.
This past season in 2019, out of 666 plays in 11 games, we zone pressured 72.8% of the time in multiple down and distance, personnel, and +/- situations out of multiple fronts, pre-snap movements, and coverages. Of those 666 plays, 172 were 10 personnel 3x1 with 121 of those plays being passes. As a defense vs 3x1, we had a 41% completion rate (50 of 121) and registered 17 of our 47 sacks as a defense.
Within our culture defensively and as a staff, we believe with the personnel we have and the style offenses within our league, hanging our hat on zone pressure allows our scheme to be balanced, have specific force and alley rules, has a reduced amount of checks, is highly adjustable, and allows us to prevent explosive plays, all allowing our players to play fast.
Over the past few seasons teams, especially in passing situations, have used 3x1 formations to out-leverage, out-formation, and establish situations where we have a conflict defender in an RPO read to attempt to get us to abort our pressure patterns and play a max coverage. To combat this, we have had to make some adjustments and checks to how we come after 3x1 formations without losing our pressure identity, especially in passing situations.
When defending a shotgun offense, the initial question most coaching staffs have is will they set the front or in some cases bring pressure to or away from the back. The same can be said for trips in that a decision has to be made in a “blitz the formation” situation, will you blitz trips or bring pressure away? Our philosophy is to major in both pressures to and away from trips without losing our ability to send 5 in the blitz pattern.
3x1 Thought Process:
Before deciding on what pressure schemes and 3x1 adjustments from a coverage aspect best fit what an opponent is running out of 3x1, it is important to consider some of the following items. Obviously, all of these are basics when scouting an opponent and there are probably others dependent upon the opponent but for the sake of argument, it does have an impact on the eventual schemes run versus any opponent:
What personnel grouping is making up 3x1 (10, 11, 12, etc.)?
For this article, we will focus on more of a traditional 3x1 made up of 10 personnel but it is warranted to address TE trips, Trips bunch, Trips Inverted (Trio) and if in some sort of 20 personnel grouping is the H back close enough in either a wing or sniffer situation to be considered truly #3
What is the alignment of the Back?
When we look at 3x1 or any formation where the RB is in the shotgun our terminology has always been if the RB is to the side of trips making him #4 strong we have coded that as a ”Near” formation, so, for example, we would label the below formations “Trips Gun Near” (DIAGRAM 1).
DIAGRAM 1
If the Back were to be away from trips and be #2 weak, we would refer to that formation as “Far”. (DIAGRAM 2)
DIAGRAM 2
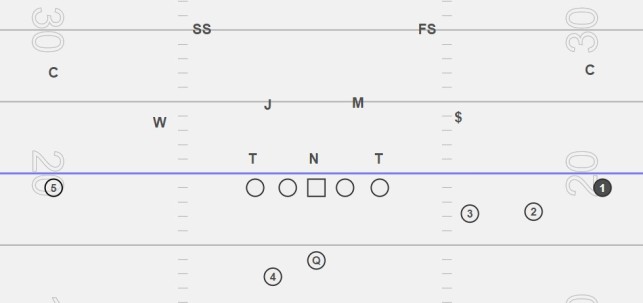
Also, from a run and pass protection perspective, the depth of the back, whether even, aligned 1x1, aligned wide and in front or any other alignments can be a pre-snap tell of pocket movement, play-action, or protection aspects. In both Diagrams 3 and 4, the RB is in what we call an “UP” alignment, which usually is a pre-snap tendency for either outside zone, power read or some sort of RPO or play-action off either run action.
DIAGRAM 3
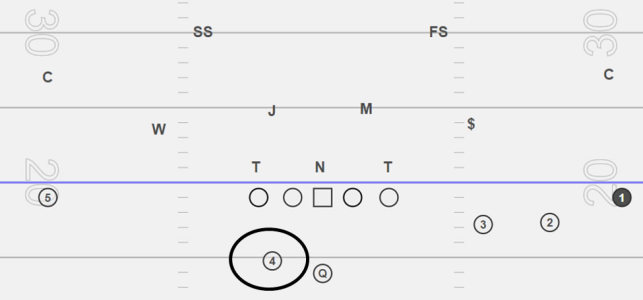
DIAGRAM 4

1) Is the Formation Open or closed on the backside and if it is open, what is the spacing of #1 weak when in the MOF?
Obviously, if #1 is attached and is the EMOL, dependent upon where the ball is either hash, MOF or if there is a Formation into the boundary situation and #1 weak is to the field, most defenses would feel comfortable playing some sort of man principle on the backside and flooding the trips side with a 5 over 3 or 4 over 3 situation. Another thing to consider is the width of #1 if he detached. We have a divider rule using the numbers in our regular Rip/Liz match concept against a 2x2 formation with regards to leverage and apply that rule to the split of #1 weak. Also, who #1 is (is he their best 1 on 1 receiver, etc.) can factor into this as well.
2) What is the split of #2 and #3 and their relationship to #1?
In 3x1 #1 strong usually, by a general tendency we have found, gets the ball the least due to the distance away from the QB so the split of #2 and #3 in terms of inside, outside, or vertical routes they may be running can have an effect on where pressure is coming from due to how long the QB is designed to hold the ball in terms of quick game, 5 step, screen, RPO, play-action, etc.
In general, after opponent film study and evaluation of defensive personnel, it can be determined, with some of the information from above, what pressures and coverages will be run when blitzing INTO trips and what pressures and coverages will be run when blitzing AWAY FROM trips.