306")


By Owen Jordan
Defensive Backs & Special Teams Coordinator
Lincoln University (MO)
Twitter: @LUCoachJordan
Whether you plan on using Cover 3 as one of multiple coverages that your defense runs or as a staple of your defense. It is important to be able to match formations, as well as put your players in the best position to be successful. I will break down the ways we use Cover 3 to match up versus multiple formations. The versatility that we get from playing multiple variations of our Cover 3 helps us to change the run fits and disguise the box count.
We can present a different post-snap picture while maintaining consistent coverage principles. Throughout the report, you will read how we can change the look of the flat defender. This may seem like an elementary variation, but the benefit of changing the flat defender is the ability to change leverage as well to change the picture that the quarterback is seeing from snap to snap. It will make the quarterback find the flat defender instead of automatically being able to find the outside linebacker or safety knowing who will play the flats. The rhythm and timing of each player are different which will change the look for the quarterback, he will not be able to develop as much rhythm and manipulate the flat defender based on previous snaps.
Terminology
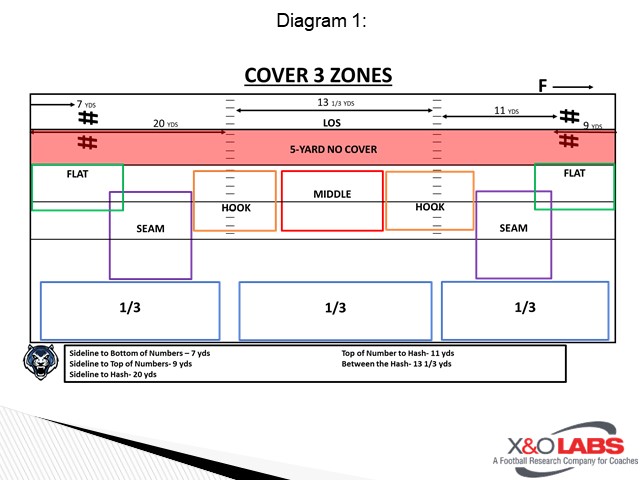
Before we get into the breakdown of how we utilize our Cover 3, it is important to understand how we label the zones and positions for each player to give you an understanding while reading the terminology used in the article. In our Cover 3, we are a spot drop defense that will carry and pass routes through our zone. Each zone from sideline to sideline is roughly 8 yards of horizontal cover with the overlap of the zones.
Zones
Seam/Flat: Often referred to as the Curl/Flat. We use the term “Seam” to emphasize a re-route of the #2 receiver. We define the “Seam” as roughly 2 yards outside the hash to 2 Yards inside of the numbers. The “Flat” is 2 yards inside the numbers to the sideline.
Strong Hook: Fieldside hash plus 4 yards on either side.
Middle: The middle of the field 3 yards inside the hash marks.
Weak Hook: Boundary side hash plus 4 yards on either side.
Positions
Sam: Field linebacker with Seam/Flat and Strong Hook responsibilities.
Mike: Middle linebacker with Strong and Weak Hook responsibilities.
Will: Boundary linebacker with Seam/Flat and Weak Hook responsibilities.
Rover: Boundary Safety with Seam/Flat, Weak Hook, and Deep Middle responsibilities.
Free Safety: Field Safety with Seam/Flat, Strong Hook and Deep Middle responsibilities.
Base Cover 3
Our base Cover 3 principles are strong and weak rotations. For teaching purposes, we will describe the zones of a Cover 3 strong rotation with the Free Safety outside the Sam in a 3x1 attached formation with the back set to the single wide receiver. In all our zone coverages we will have a 5-yard “No-Cover Zone”. We don’t want the underneath defender to drive underneath routes until the throw. We will maintain our leverage on routes while keeping our depth. Everyone on our defense must understand their landmark as well as the first threat to their zone. If we get a condensed formation, we will adjust our landmarks according to the #2 receiver. We will hold a two-high shell in our pre-snap alignment. The alignment of the safeties will be 10-12 yards deep. The boundary safety will align 1 yard inside the hash. The field safety will align 1-2 yards inside the receiver he will be rolling down to. The base alignment for the corners will be 7x2, 7 yards off and 2 yards inside the widest receiver. To a single receiver side, we want to press bail based on the alignment of the running back. If the running back is aligned to the single receiver side, we will bail with our back to the sideline so we can get our eyes to the running back out of the backfield. If the running back is away, we can man turn and play the single receiver. Our linebackers will adjust their alignment based on front and coverage responsibility. Our base alignment to 3x1, the Will is going to be in a “30” aligned in the B-gap, the Mike will be aligned in a “20” over the guard, the Sam will align 2 yards inside the #3 receiver.
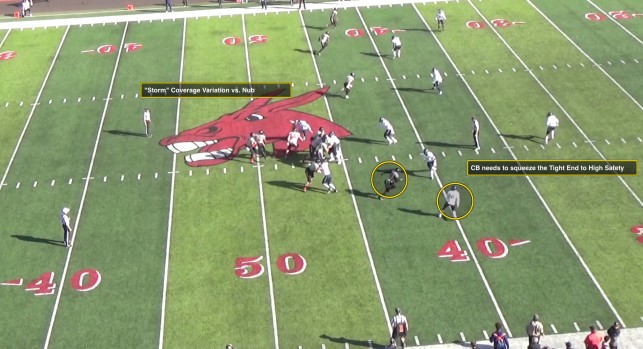
Free Safety (Seam/Flat): In a 3x1 detached formation the safeties will start showing a two-high shell with a depth of 10-12 yards. The free safety will align 2 yards inside the #2 receiver. We align based on the split of the wide receiver so that we can adjust to the formation and route alignment of the receivers. The free safety will start his rotation on the snap rolling from an inside position to the outside shoulder of the #2 receiver. We want to attack the outside shoulder for two reasons. We want to force the inside release and shorten the divide for the rover rotating to the middle third, we also don't want to get pinned by the #2 receiver who is trying to occupy the flat defender. The free safety must be patient in his rotation while reading the release of the #2 receiver. We want the free safety to hold the seam as long as he can while working to the flat. Once the free safety gets his hands on the #2 receiver, we want his eyes to go to the #1 receiver. The free safety needs to take his eyes to the #1 receiver to determine where he is going to go after rerouting the #2 receiver.
Sam (Strong Hook): The Sam will align on the inside shoulder of the #3 receiver. The Sam will be responsible for the strong hook. The Sam will push to the hash on his spot drop looking to collision the #3 receiver. If the #3 receiver takes an immediate inside shallow release the Sam will give an “Under-Under” call to alert the Mike of something coming low into his zone. Once the Sam makes the “Under-Under” call he will take his eyes to the #2 receiver looking for the next threat to his zone. Once the Sam levels off he needs to be aware of an “Under-Under” call from the Mike to indicate a route working shallow across the field or an “In-In” call from the free safety or corner to indicate a route working inside with depth. After the initial spot drop, the Sam needs to be able to work horizontally in his zone. The Sam needs to be able to push out with horizontal stretch from the
Defensive Backs & Special Teams Coordinator
Lincoln University (MO)
Twitter: @LUCoachJordan
Whether you plan on using Cover 3 as one of multiple coverages that your defense runs or as a staple of your defense. It is important to be able to match formations, as well as put your players in the best position to be successful. I will break down the ways we use Cover 3 to match up versus multiple formations. The versatility that we get from playing multiple variations of our Cover 3 helps us to change the run fits and disguise the box count.
We can present a different post-snap picture while maintaining consistent coverage principles. Throughout the report, you will read how we can change the look of the flat defender. This may seem like an elementary variation, but the benefit of changing the flat defender is the ability to change leverage as well to change the picture that the quarterback is seeing from snap to snap. It will make the quarterback find the flat defender instead of automatically being able to find the outside linebacker or safety knowing who will play the flats. The rhythm and timing of each player are different which will change the look for the quarterback, he will not be able to develop as much rhythm and manipulate the flat defender based on previous snaps.
Terminology
Before we get into the breakdown of how we utilize our Cover 3, it is important to understand how we label the zones and positions for each player to give you an understanding while reading the terminology used in the article. In our Cover 3, we are a spot drop defense that will carry and pass routes through our zone. Each zone from sideline to sideline is roughly 8 yards of horizontal cover with the overlap of the zones.
Zones
Seam/Flat: Often referred to as the Curl/Flat. We use the term “Seam” to emphasize a re-route of the #2 receiver. We define the “Seam” as roughly 2 yards outside the hash to 2 Yards inside of the numbers. The “Flat” is 2 yards inside the numbers to the sideline.
Strong Hook: Fieldside hash plus 4 yards on either side.
Middle: The middle of the field 3 yards inside the hash marks.
Weak Hook: Boundary side hash plus 4 yards on either side.
Positions
Sam: Field linebacker with Seam/Flat and Strong Hook responsibilities.
Mike: Middle linebacker with Strong and Weak Hook responsibilities.
Will: Boundary linebacker with Seam/Flat and Weak Hook responsibilities.
Rover: Boundary Safety with Seam/Flat, Weak Hook, and Deep Middle responsibilities.
Free Safety: Field Safety with Seam/Flat, Strong Hook and Deep Middle responsibilities.
Base Cover 3
Our base Cover 3 principles are strong and weak rotations. For teaching purposes, we will describe the zones of a Cover 3 strong rotation with the Free Safety outside the Sam in a 3x1 attached formation with the back set to the single wide receiver. In all our zone coverages we will have a 5-yard “No-Cover Zone”. We don’t want the underneath defender to drive underneath routes until the throw. We will maintain our leverage on routes while keeping our depth. Everyone on our defense must understand their landmark as well as the first threat to their zone. If we get a condensed formation, we will adjust our landmarks according to the #2 receiver. We will hold a two-high shell in our pre-snap alignment. The alignment of the safeties will be 10-12 yards deep. The boundary safety will align 1 yard inside the hash. The field safety will align 1-2 yards inside the receiver he will be rolling down to. The base alignment for the corners will be 7x2, 7 yards off and 2 yards inside the widest receiver. To a single receiver side, we want to press bail based on the alignment of the running back. If the running back is aligned to the single receiver side, we will bail with our back to the sideline so we can get our eyes to the running back out of the backfield. If the running back is away, we can man turn and play the single receiver. Our linebackers will adjust their alignment based on front and coverage responsibility. Our base alignment to 3x1, the Will is going to be in a “30” aligned in the B-gap, the Mike will be aligned in a “20” over the guard, the Sam will align 2 yards inside the #3 receiver.
Free Safety (Seam/Flat): In a 3x1 detached formation the safeties will start showing a two-high shell with a depth of 10-12 yards. The free safety will align 2 yards inside the #2 receiver. We align based on the split of the wide receiver so that we can adjust to the formation and route alignment of the receivers. The free safety will start his rotation on the snap rolling from an inside position to the outside shoulder of the #2 receiver. We want to attack the outside shoulder for two reasons. We want to force the inside release and shorten the divide for the rover rotating to the middle third, we also don't want to get pinned by the #2 receiver who is trying to occupy the flat defender. The free safety must be patient in his rotation while reading the release of the #2 receiver. We want the free safety to hold the seam as long as he can while working to the flat. Once the free safety gets his hands on the #2 receiver, we want his eyes to go to the #1 receiver. The free safety needs to take his eyes to the #1 receiver to determine where he is going to go after rerouting the #2 receiver.
Sam (Strong Hook): The Sam will align on the inside shoulder of the #3 receiver. The Sam will be responsible for the strong hook. The Sam will push to the hash on his spot drop looking to collision the #3 receiver. If the #3 receiver takes an immediate inside shallow release the Sam will give an “Under-Under” call to alert the Mike of something coming low into his zone. Once the Sam makes the “Under-Under” call he will take his eyes to the #2 receiver looking for the next threat to his zone. Once the Sam levels off he needs to be aware of an “Under-Under” call from the Mike to indicate a route working shallow across the field or an “In-In” call from the free safety or corner to indicate a route working inside with depth. After the initial spot drop, the Sam needs to be able to work horizontally in his zone. The Sam needs to be able to push out with horizontal stretch from the