306")
Cover Two Corner Techniques Based on Receiver Leverage
By James “Mac” McCleary Defensive Coordinator, Notre Dame High School (LA)
Editor’s Note: Coach McCleary has coached for Notre Dame High School of Acadia Parish, Louisiana for the last 14 years and has been the defensive coordinator for the past 6 years. During his time as the coordinator, Notre Dame has amassed a record of 73-9. In his six years as defensive coordinator, Notre Dame has had the opportunity to compete in 3 state championship games.
In the first article, (click here to view) I discussed how we align ourselves in Cover Two by body position to take away the holes in the field based on the receivers spacing. In this article we will discuss the reads and techniques we use to accompany these body positions to execute the coverage in a successful way. With all of our coverage variations, we teach our corners 3 ways to cover; Man Coverage, Cover 2(flat to deep), and Deep (Quarters).
When calling a coverage, the numbers tell the corner what to do. Example: C-20, Strong Corner play C-2(flats) Weak Corner play C-0(man).
When playing Cover 2 in the middle of field the Corners look at the spacing of the #1 and #2 receivers and line themselves up in one of three body positions. The corners will press, play choke technique, or play shake technique.
Average Spacing of #1 and #2
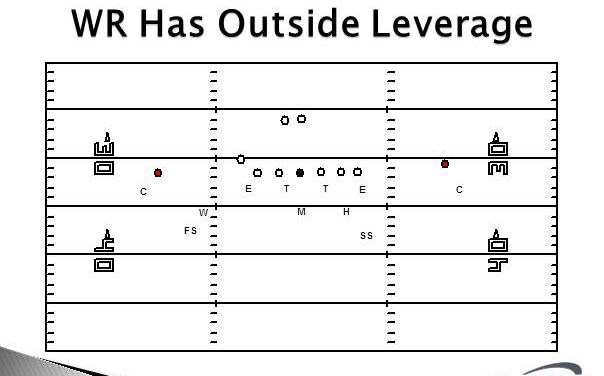
If the #1 receiver’s spacing is splitting the numbers and the hash (average spacing), then the corner will press the receiver with outside leverage.

When pressing the receiver, the corners alignment will be 1 ½ to 2 yards off the receiver with inside shoulder on the receivers outside shoulder. The corner will have a balanced stance with his feet inside his frame. Any time our corners press we teach them to focus on the hip of the receiver. Pre snap we instruct the corner to look at the feet of the receiver to see if the inside foot is back or the outside foot is back. This gives the corner a pre-snap indicator of the receiver’s first step. With outside leverage, the corner will always take a back and outside step with his outside foot to protect the outside and deny an outside release. Remember the reason for pressing the receiver is to funnel him to the safety. We stress footwork first then hands. We are reading the release of the hips as we are moving back and outside. Once the receiver’s hips commit to the inside our outside, then we proceed to drive our eyes and outside hand to our target. Our target is the outside breast plate of the receiver. We want the corner to jam the receiver with his thumb up. We tell him to make a y with his hand. If the receiver outside releases, then we flatten him out and redirect him inside. If the receiver inside releases, then we drive him in a couple of steps and split the zone back out to the flats. Once we split the zone or deny the outside release and redirect him inside, then our eyes go to the #2 receiver. When the corner’s eyes go to #2, he looks for him to come outside. If he does the corner works him flat to deep (rail) by gaining width and depth. If #2 goes inside, then the corner sits looking for crossers or the back out the backfield. If #2 goes vertical, then the corner sinks deeper protecting the corner route.

 Teaching your corners to read through the 3-step is a must, especially as the high school passing game gets better each season. I’ll start by asking this question: Do you want your corner to be able to react to the QB’s release on the 3-step drop and be able to tackle the hitch as it’s caught or even break it up? I know your answer would be “yes.” You can’t take away everything, but if you could stop it in its tracks you would be happy, right? As you work your coverages according to your game plan you know you’ll complete a hitch or a slant but if you can tackle it or maybe take it away completely, that could change your opponent’s thought process! If you teach your corners to read through the 3-step drop you will be more confident to leave your best corner alone on the backside of trips. You will also be more confident in taking away the 3-step drop when you are not in a Two-deep or in press coverage.
 Editor’s Note: Coach Cunningham currently serves as the Secondary Coach at Harrisonville High School in Missouri. This is his 4th season at Harrisonville, and prior to that he served in the same capacity at William Chrisman High School in Independece, Missouri. Coach Cunningham played his college ball at William Jewell College in Liberty, MO.