Equating Numbers with Empty Pass Protection

By Rich Alercio

X&O Labs Offensive Line Columnist

Editor’s Note: As an Insiders member, you get access to Rich Alercio’s Concept Blocking System which includes 5 reports and 2 full-length videos (shot in HD video). Click here to access the Concept Blocking System.

“Who do they think they are the New York Jets?”  You may recall that line from the Disney classic “Remember the Titans” when Ed Henry’s offense showcased an Empty formation (then a rarity) in a high school state championship game.  Five receivers gave the Titans fits in that game and it is still causing problems for defenses today.

Offensive coordinators can be on the board all day devising route combinations for five receivers but what they must first learn how to do is protect the passer.   Sure, you can only block five but you can account for many more.

While it is not the intent of this article to discuss receiver play, it is important to note that they must become involved in site adjusting or running hot routes off of second and third level blitzers.  Blitzes vs Empty formations can leave huge voids in the defense.  We will address blitz protection a bit later.  For now, let’s start with the base rules.

We will utilize a Man protection scheme with combinations to potential blitz threats.  We are Big-on-Big (BOB) in our blocking scheme.  The O-Line is responsible for all down linemen and Inside Linebackers.  In other words, they have the box.  If an offensive lineman is covered by a defensive lineman, he is responsible to block him. Any Uncovered lineman will check to block  Linebackers.  It’s as simple as that- at least to start.

Empty Pro vs 4-3

The 4-3 front is the cleanest and easiest to protect in empty.  The four covered OLs have the four defensive lineman. The one uncovered OL is responsible for the MLB (Mike LB).  He can either call a combination with the near interior lineman (Diagram 1) or set back to the “hole” to block him solo (Diagram 2).


If the Center is the uncovered OL, he has the Mike and can either set back to the hole or combo with the Guard who has the 2i.

Read More

Mid-Season WR Drill Series

By Sam Nichols

Managing Editor

X&O Labs

By the mid point of a season, most coaches know what they have to work with.  They know the strengths and weaknesses of their players and they have been able to see those qualities on the field in different situations.  The difference between most coaches and great coaches is what they do with this information.  In other words, how do they address the weaknesses of their players mid-season to help them continue to develop and grow as players.

I have found that one of the best ways to respond to the mid-season assessment is to go back to drills that specifically work on areas of weakness.  I build in drills that incorporate multiple points of emphasis and concentrate the players on the fine points of the skills.  If done well, I will see the players get over the mid-season plateau and continue to progress into the post-season when the details matter even more.

With that said, here are a few drills that I like to use on a weekly basis during the second half of the season to meet the goals stated above.  These are not earth shattering concepts, but they are crucial to success within our offense.

Drill #1:  Hitch Cut Drill

Purpose:  To rep come back routes (hitches, curls, and comebacks) through practicing cuts and catches out of the break.


Procedure: 

  1. The drill requires 6 cones set up 2 yards apart five yards down field from the starting chute (diagram 1).  Note:  It is best to have two such groups if possible to increase reps and allow you to work the same cut on both sides of the center.
  2. On “hit” the first player in line will run a hitch route and comes back to the QB through the next window to the inside.
  3. As the WR cuts, the ball should come out and the WR should continue to work to the ball until it hits his hands.  At that point, he will dip the shoulder to the side that the ball was thrown to and run straight up field through the nearest window (diagrams 2 and 3).
  4. Players run the drill cutting inward in both directions and cutting outward (comeback or stop cut) in both directions during the time allowed.

Coaching Points:

  1. Sink hips into each cut and flash your hands.
  2. Keep your feet under your body and cut off the inside of your foot.
  3. Hands and eyes should come round together.  Give the QB a target.
  4. Catch and tuck the ball in the arm closest to the QB at the time of the catch.
  5. Explode up field and do not try to dance or juke.
  6. Make sure the ball arrives right out of the cut.

Read More

Perfecting Your Pass Rush Progression

William Lund, Defensive Line Columnist, X&O Labs

By William Lund

Defensive Line Columnist

X&O Labs

Sacks, QB Knockdowns, Interceptions, forced fumbles, incomplete passes and general disruption of the quarterback are the reasons a pass rush is so critical to the overall defense. These negative plays are potential momentum shifters in a given game and are created by a relentless unyielding pass rush.

Pass rushers come in all types and abilities. I believe it is paramount that a pass rusher establish a level of physical dominance first to set up the primary of pass rush moves in one’s arsenal.  If the offensive lineman believes he is in for a physical battle established early in the game, when you need that critical move you have a greater chance to hit it at the crucial time.

I believe a great pass rush starts and ends with the Bull Rush. It’s not flashy and sounds simplistic to coaches, but rushing the QB is not about moves, it is about attitude, relentless all out attitude. Your Bull Rush establishes the physical onslaught the OL is about to endure. The natural reaction of the Offensive Tackle is to set and brace for the violent attack and punch he will receive the majority of the game.  As the game progresses your speed moves will open up and become more effective. When the offensive tackle sets his feet in preparation to absorb the punch, you can change up and speed around the corner. With this subtle change up he has to adapt to your speed and you are better able to use another violent punch back to power as he “soft sets” back.  The key is to read the offensive lineman’s pass set, you want to look for him to turn his hips and shoulders to the sideline and his chest to come up exposing himself to a violent punch dropping him right on the QB’s lap. Even if you are a speed rusher you can set up your best rush move more so by establishing a physical nature in your pass rush by utilizing a Power/Bull Rush.

Read More

3 Fire Zone Blitzes From the Under Front

By Eric Jones

Defensive Coordinator

Roy High School (UT)

Eric Jones, Defensive Coordinator, Roy High School (UT)

Editor’s Note:  Eric Jones played for Weber State University in Ogden, Utah. After college he spent 5 years as a Linebackers coach and Special Teams Coordinator at Woods Cross High and Syracuse High. Last season was his first year as a Defensive Coordinator at Roy High School in Roy, Utah.

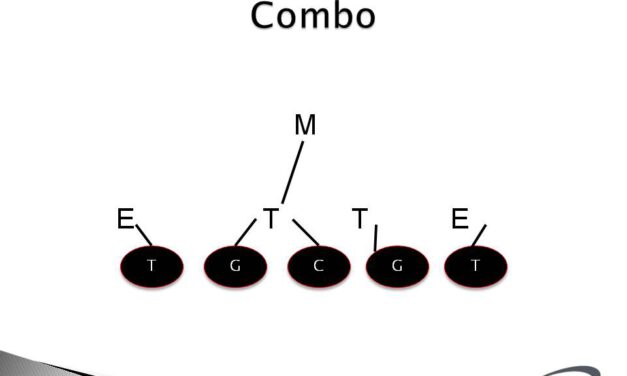
In this clinic report, I’ll be describing our approach to installing and using fire zones within our 4-3 defensive scheme. First, we base our defense primarily out of the Under front.  All of our fire zones, which I call Dogs, are used from the Under front. I prefer strongly to run my Dogs when the ball is on a hash mark. This doesn’t mean they can’t be run from the middle of the field, but I’m more comfortable when the ball is on a hash and I’ll explain why in later in the article. I’m all about simplicity so we only install three fire zones. However, using a simple tag word for each Dog, we can show up to 6 Dogs without much hassle to the original three. We run a Field Dog, Short Dog, and Pipe Dog. I’ll detail each below.

Field Dog

Field Dog (the common NCAA fire zone) is my favorite Dog in the litter. It’s simple, effective, easy to teach, and safe to run. With the ball on a hash mark, I’m always looking for situations to bring pressure. I won’t blitz much if our “base” defense is getting the job done. However, I’m not shy about blitzing if we need a momentum play or simply want to keep the offense on their toes. Some basic rules for our fire zones are as follows:


1) We always declare strength to the field.

2) The DL always slants away from where the blitz is coming from.

3) The boundary side DE is always the dropping lineman.

4) The blitzing LB’er will always blitz the gap originally covered by the DT on his side.

My huddle call would be “Under Field Dog 3.” We call it Field Dog because the pressure is coming from the wide side of the Field. Therefore, the DL will align in an Under front and slant one gap away from the Field. I know this is contrary to many fire zones out there. The current lingo with many universities involves landmarks such as Long Stick, Radical Slant, Hot, Inside Rush, and Outside Rush. That’s how I learned them in college but I’m not comfortable using those concepts with high school kids. So we simply slant one gap away from the call. That means the field side DE slants from his 5-technique to the B-gap inside of him. The Nose slants from the field side A-gap to the boundary side A-gap. The 3-technique Tackle slants through the inside hip of the boundary side OT and continues working for contain. The boundary side DE takes 1-2 read steps up field to decipher run or pass. If he reads run, then he plays run by setting the edge into the boundary. If he reads pass, then he drops into the boundary side flats. His goal is to take away the quick passing game to #1 and then react up the any swing routes by the back into the boundary.

The two blitzers that are active with Field Dog are the Sam and Mike linebackers.   The Sam is blitzing outside the EMLOS from the field side. He aims at the deepest shoulder of the deepest back and must not let the ball or QB get outside of him. The Mike backer is blitzing through the field side A-gap where the Nose is vacating. For coverage rules, both Corners are playing a press-bail technique. They align pressed initially and bail to a deep third during the cadence. We aggressively squeeze slants and posts. Anything that releases hard inside we will back off and play over top of #2. The Strong Safety becomes the Curl/Flat defender by replacing the blitzing Sam backer. In our base Cover 3 scheme and in our Dog scheme, our Curl/Flat defender uses the SCIF (Seam to Curl to Flat) technique. That means the SS will align and play off the #2 receiver to the field side. The SS will play #2 man-to-man on any vertical or outside releases. The SCIF defender can release any shallow inside route to the “Gut” defender. If he releases the hard inside route, then he’ll zone off underneath the #1 receiver. The Free Safety rotates to the middle of the field and plays the middle third. He’s a typical middle third defender and aligns over the #3 receiver in the formation.

Read More

No Huddle Communication

By Dan Ellis

X&O Labs Columnist

Dan Ellis, X&O Labs Columnist and Head Coach at West Chester East High School (PA)

Editor’s Note: Coach Dan Ellis is one of X&O Labs’ most popular monthly columnist.  His columns focus on offensive schemes that just flat out move the ball.  His previous post have been some of the most read and commented articles in X&O Labs’ history.  Ellis is the former record-setting quarterback at Virginia and currently serves as the Head Football Coach at West Chester East High School (PA).  And one of the best things about Coach Ellis is that he takes the time to answer any and all questions asked. So, if you have any questions after reading his column, just post it in the comments section below this report and Coach will respond shortly.

As a no huddle team, one of the things that I have thought about is the best way to operate and communicate in a no huddle.  We have tried two different ways to do it, using wristbands and using signals.  The key thing that we have found through experience is to make sure you have a good philosophical reason behind your no huddle and make sure your communication works with that philosophy.

Start Slow

Our original philosophy behind going to the no huddle was to make the defense adjust to us.  We felt that we could get the defense to line up in a specific way and then exploit it.  Our goal was very simple and so we used the wristband as our original means of communication.  We were moving from an offense where we used a lot of formations and motions, and using the wristband allowed us to keep some of that.  The means of communication was a player with a white board and a marker.  Some people we studied used flip numbers.  We used the white board because we thought it was easier.  On our wristband, we had it sectioned off into a run game section, quick game section, drop back section, and tricks.  It consisted of about 80 plays total.

Read More

4 Factors in Designing a Red Zone System


By Ed Zaunbrecher 

Editor’s Note: Coach Zaunbrecher (EZ) coached 34 years at the FBS level, including a three-year stint at Marshall as the Offensive Coordinator where he tutored QB Chad Pennington and Byron Leftwich and spent a five-year duration at the University of Florida in the same role while developing Rex Grossman.  He currently runs the Ed Zaunbrecher QB School (http://www.ezqbcoach.com) developing young QB’s into leaders. 

Step 1: Know the Tendencies of Your Defense Opponent

Ed Zaunbrecher, former Offensive Coordinator, University of Florida and University of Marshall


Most coaches know that in preparing a game plan for the red zone it is crucial to study the upcoming opponent to see what they do on defense in that area of the field, but even that concept is not specific enough. You must understand if they do change and where on the field those changes begin. These areas and concepts vary from team to team and are not etched in stone.

I always like to start the study at the 25 yard line. The first section of the red zone continues through the 13 yard line which we’ll call the ATTACK ZONE. This area can show the attitude of a defense if they make drastic changes. Some go from not blitzing to major blitzing to make a big play and switch momentum. Depending on the time left and score, it could be to keep you out of field goal range. Other teams stop blitzing here and try to make you earn your way on a short field. There are usually not defenses specifically for this area but rather how and when they are used.

The SCORE ZONE starts at the 12 yard line and extends to the 4 yard line or wherever the opponent likes to go to a GOAL LINE defense. If they never go to a heavy package it goes all the way to the goal line.  This also applies for two-point plays. This area of the field does have a higher chance of getting a defense special for the situation. Many teams are playing some variation of quarters coverage by playing 7 players across. The 12- yard line is the farthest out they play the coverage because the depth of the end line gets too great. Most teams will wait until the 10 yard line. You need to observe how they play the coverage if they do. Some drop to specific spots such as 2 yards deep in the end zone while others use more of a matchup zone principle.

Step 2: Determine the Essential 6 Questions

When designing your red zone offense, there are several questions you need to ask yourself when putting your game plan together.  The questions I would always ask are as follows:

  1. Do they load the box? If you spread the field, will they spread as well? If so, you may gain an advantage in the run game. If they move in tight you could get the ball wide.
  2. How much are they stunting the line? Will it be feast or famine if they take too many chances? See if they have a pattern against certain formations.
  3. Do they disguise their defense? See if a pattern emerges from your study. Some never play what they line up in and others always do.
  4. Will they take chances? Some are overly cautious and some go only for the big play with numbers of defenders and max blitzes.
  5. How do they play within their coverage schemes? Do the deep defenders play tighter or react faster to play action fakes? Do they back up at all? Do they play any man coverage and how do they play it? Do they flood the end zone with defenders?
  6. What have other teams done well against them? Which types of schemes have they stopped? Adjust your plays to fit the opponent if necessary.

Some teams change week to week so go more by what they do against teams similar to yours above the rest. What they do against a spread team might not matter if you are a wishbone team.

Step 3: Design Must-Have Offensive Concepts

Once you have completely scouted your opponent’s tendencies in the Red Zone, now it is time to develop your “menu” of must-have concepts to attack this area of the field.  Although they are certainly not limited to the selection I include below, in my experience I’ve found that utilizing these types of ideas can produce big-time results.

  1. To start with, have plays especially designed for this area of the field. This is more important in the SCORE ZONE on in to the end zone. Of course, you can vary how you get to them with motions, shifts, etc., but I would practice them weekly so your players know them inside out.
  2. Be able to attack all basic looks, not just the ones they have shown before. They are allowed to change to try and stop you. Prepare for looks that have worked well against you recently.
  3. Have a new wrinkle or two each week. It can be the same play from different formations or motions or it can be a variation off a favorite play of yours like a new misdirection. Just have a surprise ready.
  4. Don’t let your opponents relax by changing your tempo. Go on long counts but not when a penalty will kill you. Change personnel or use a different formation but run the same base plays. Practice these as you will use them in a game. Don’t try and surprise your players.  Give them some familiarity with what you’re doing.
  5. Use formations to create space. Study a defense’s reaction to different formations and pick the best plays for their normal alignments. Have a plan if it is different. Your QB has to understand the concepts.
  6. Vary your receiver splits. This causes adjustment issues for the defense in their support patterns. Get them more worried about getting lined up than reading their keys or using good technique. You can also vary the splits of bunch and stack formations that are especially good versus man coverage.
  7. Work few runs and get proficient with them. Use plays you are good at running and then the players will have great confidence in them. Have your play action passes off the same looks.
  8. Know when a defense changes concepts. Better still, make sure your players know when to expect the changes. It is not an exact science but most teams do have tendencies by yard line or down and distance. It is important everywhere but especially when points are at stake.
  9. Give the QB a chance to create a score either by run or pass. If you drill the same base concepts weekly it really helps the QB more than anyone. He makes better decisions that way.
  10. Against man coverage protect the QB and attack with your best receiver matchups. If you have trouble with releases use bunches and stacks. On stacks I prefer to offset the deep receiver about a yard outside the one on the line.
  11. Against zone coverages use levels to work in front and behind a defender so he cannot be right. You can use 3 level routes farther out and 2 level routes in close.
  12. Occupy the safeties then go over their head. This is relevant all the way from the ATTACK ZONE in. They tend to sit down since they don’t have as much depth to defend.
  13. Use play action to distort coverage. Open more space between deep coverage and underneath defenders.  Use boots and nakeds to take advantage of fast flow. Be sure to have quick throws available as well.
  14. Have at least one receiver going deep on each play. The more plays it takes to score the more there is a chance of a bad play to prevent a TD. Don’t force it but have it available.
  15. Is anyone peeking? Take advantage of a defender looking at the QB in man coverage. Beat him with a quick double move and be careful not to bring the safety over to the play too soon with your eyes.
  16. How tight is the coverage? School the QB on when to go deep or short by the cushion and matchups that are available on that play.
  17. From the 15 yard line in, the QB should be sure his throws to the front part of the end zone are down in front of the receiver. T

Read More

Read Coverage: Simple Quarters & Pattern Reading

By William Mitchell,

Head Coach,

Lewisville High School (SC)

As a grad assistant in the late 90s, I was introduced to a form of pattern reading out of a 4-4 at the IAA level. Later I was at a few places where we tried to run Quarters coverage. In both situations it never seemed to click with our players. Sure, it seemed simple to our coaching staff, but we never seemed to get the production from it in proportion to the practice time used installing it. As my career progressed, I began to embrace the 3-3 package and the Cover 3 / Man-Free concepts that fit so well with this front. But as the offenses we faced became more & more advanced and proficient in throwing the ball, I began to see the need for a change-up. What we eventually came up with is our version of READ Coverage.

Originally I wanted a way that I could turn my 2 inverts (We call them Spurs) loose to play 100 % run vs 2 RBs without telegraphing the fact that we were in Cover Zero. What we came up with is this:

The READ Technique

This technique is used by 2 defenders against 2 receivers. The way that we teach it to the players is by telling them that this is going to turn into Man coverage within the first 5 yards; we are just letting the receivers determine who has who. Once the defenders have identified their responsibility, they attack the receiver as if they are Out of Phase (using the Saban terminology). They drive at the proper angle (more on that later) and try to get in a hip to hip relationship with the WR.

The CB aligns at 7-10 yds deep over the #1 receiver. The interior defender (FS or Spur) aligns 10-12 yds deep over the #2 receiver. Both players will “Read” the #2 receiever.

We tell our players that #2 can do 3 things in the first 5 yards. He can go inside, he can go outside, or he can go vertical.

  • If # 2 goes inside or vertical, both players yell “Stay,Stay” and the FS takes #2 man to man and the CB takes #1 man to man. The FS may have to get on his horse and chase the Drag route but the LBs are looking to wall off anything coming across.
  • If #2 goes outside, both players yell “Switch, Switch” and the CB jumps the route of #2. The FS has #1 but he will take a cut-off angle to defend the go route by #1 first. (Since that can beat us the fastest).

Read More